1
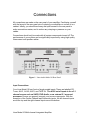
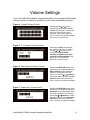
Model 10 Multi-Channel Integrated Amplifier Owner’s Manual Table of Contents Introduction........................................................................................................................ 3 Unpacking.......................................................................................................................... 4 Safety ................................................................................................................................. 4 Connections ...................................................................................................................... 5 Controls.............................................................................................................................. 7 Remote Control Functions .............................................................................................. 9 Specifications.................................................................................................................. 10 Service and Warranty .................................................................................................... 13 Linar Model 10 Multi-channel Integrated Amplifier 2 Introduction Thank you for choosing the Linar Model 10, Multi-Channel Integrated Amplifier. Linar Audio Preamplifiers and Power Amplifiers are the fruit of over 25 years of experience and research and development in the audio field. Rethought and redesigned by Victor Sima, the new Linar amplifiers will bring you into the new millennium in style. Victor’s new products are designed to provide the world-class performance at reasonable prices. The Linar 10 is designed with J-FET transistors in the input stage and the latest generation of Mosfet transistors in the output stage, with negative feedback, making the amplifier extremely stable under capacitive load. The circuitry is fully complementary from input to output. Aesthetically stunning and sonically spectacular, this amplifier is a perfect match for your high-end 5.1 or 2 channel sources, including SACD and DVD-Audio. Together they can provide you with the listening enjoyment you seek. As with many high-end audio products, your Linar amplifier will require a significant break-in period. This process can take up to 200 hours of use. Familiarize yourself with the material contained within this manual prior to using. If you have any uncertainties, contact your Linar Audio dealer. Given proper use and care, your Linar Audio amplifier should provide you with many years of exceptional music reproduction and listening pleasure. Linar Model 10 Multi-channel Integrated Amplifier 3 Unpacking Unpack your new Linar Audio Multi-Channel amplifier carefully as it is quite heavy. Keep all packaging to ensure safe transport in the future. Accessories included with your amplifier are: Remote Control AC Power Cord This Owners Manual After you have completed unpacking, perform a thorough inspection of the amplifier and report any damage to your dealer immediately. It is recommended to allow the unit to acclimatize to the temperature and humidity conditions in your home prior to operation. Safety Caution! To avoid electrical shock do not expose this product to rain or high moisture conditions. This product must be “grounded”. No “ground lifting” devices may be used and the grounding plug must be left intact. Failure to comply will void the warranty and could pose a serious risk to your health and safety. Never remove the top cover. Internal components can store electricity and could result in serious electrical shock or injury. There are no user-serviceable parts. Always provide a minimum a 10cm of clearance above the amplifier to allow for heat dissipation. Linar Model 10 Multi-channel Integrated Amplifier 4 Connections All connections are made on the rear panel of your amplifier. Familiarize yourself with the layout of the rear panel prior to placing your amplifier on a shelf or in a cabinet. Ideally, you should have easy and open access to the rear panel to make connections easier, and to reduce any crimping or pressure on your cables. Connections should only be made with all system components turned off! The performance of your system can be significantly improved by using high quality interconnect and speaker cables. Figure 1. Linar Audio Model 10 Rear Panel Input Connections Your Linar Model 10 has 6 sets of single-ended inputs. These are labelled CD, Tuner, AUX1, AUX2, AUX3, and TAPE IN. The AUX1 set of inputs is for a 5.1 channel source such as SACD, DVD-Audio, or an external 5.1 surround processor. Ensure you properly connect your source components. With the exception of the Centre Channel and Subwoofer inputs, the left channel inputs are at the top and the right channel inputs are at the bottom. Linar Model 10 Multi-channel Integrated Amplifier 5 Outputs: Line-Level Connections Your Linar Model 10 has 2 sets of single-ended. These are labelled TAPE OUT and SUB OUT. The TAPE OUT is for connection to a cassette deck or other recording device. The SUB OUT is for connection to one or two subwoofers. For Stereo inputs (i.e. CD, Tuner, etc.), the left and right channels are combined, giving a mono output from the SUB OUT. For your 5.1 channel source, the mono input signal is passed through to both the left and right SUB OUT. A single subwoofer can be connected using either the left or right SUB OUT. If you have two subwoofers, connect one subwoofer to each of the left and right SUB OUTs. Outputs: Speaker Connections Your Linar Model 10 multi-channel amplifier is supplied with 5 separate speaker connections. There are Left and Right Front Output Speaker connections, Center Output Speaker connections, and Left and Right Rear Output Speaker connections. Ensure you connect the correct speaker to the correct output for proper system performance. Follow each speaker wire from the amplifier to the appropriate speaker to make certain you have connected them properly. The + outputs are coloured red and the – outputs are coloured black. Ensure all + outputs from the amplifier match the + inputs of your speakers so you will not encounter phase problems. The speaker outputs will accept most common wire connectors, including banana plugs, spades, and bare wire. Under no circumstances should your speaker cables be allowed to short-circuit the amplifier by contacting the + and – outputs simultaneously. Power Connection Your Linar Amplifier has an “IEC” type AC power connector. Insert the supplied AC power cord into connector prior to plugging the cord into the AC wall receptacle. Linar Model 10 Multi-channel Integrated Amplifier 6 Controls All controls for your multi-channel amplifier are located on the front panel and/or the Remote Control unit. Ensure you have a direct line of sight to your amplifier for remote control use. Familiarize yourself with the volume adjustment functions on the remote control for fine-tuning of your home entertainment system. Figure 2. Linar Audio Model 10 Front Panel Display Window The front panel of your Linar Model 10 has a Lexan plastic window. Behind the window is the green backlight LCD display that shows your selected source and volume settings. The Volume, Power, and Input control buttons are embedded in the panel. Input Selector Pressing the Input selector repeatedly will scroll between the available inputs to your Linar multi-channel amplifier. These inputs include CD, TUNER, AUX1, AUX2, and AUX 3. To listen to a source, select the input to which you have connected the source. Inputs are directly accessible from the remote control. Simply press the designated button and your desired source will be selected. For Tape or other recording see “Monitor” section below. Linar Model 10 Multi-channel Integrated Amplifier 7 Power On/Off Use the Power button to turn your Linar multi-channel amplifier on or off. Press the button once to turn the power on, and press again to turn the power off. Monitor Pressing the MONITOR button will select the TAPE input of your Linar Model 10. At the same time, the signal from your selected source will be fed out via the TAPE OUT at the rear of the amplifier. The monitor function can be used to listen to a source connected to the TAPE IN, or to monitor a recording as it is occurring. The monitor function can be turned on or off with the remote control, allowing direct comparison of original and recorded media from your listening position. The Tape Loop can also be used for surround processors. Volume The Volume Up and Down buttons on the faceplate of your amplifier control the output level (Gain) of your Linar amplifier. All channels, including the subwoofer, will increase or decrease when these volume controls are operated. 2 horizontal bars in the display window indicate volume levels. Each bar has a maximum of 32 segments, representing a total of 32 individual volume settings. The slight clicking noise that can be heard when adjusting the volume is normal. Each click represents one of the 32 distinct volume levels. The clicks are due to the microprocessor that controls the volume. There are no moving parts in the volume control system, resulting in both superior sound and extended lifespan. The overall volume can be adjusted by pressing the VOL and buttons on the remote control. Refer to the Volume Settings section for complete details. Linar Model 10 Multi-channel Integrated Amplifier 8 Remote Control Functions Your Linar Model 10 is shipped with a convenient remote control unit. In addition to the previously described functions, the remote control also has the following uses: Power On/Off Press the POWER button to switch your amplifier from its standby state to its full operating mode. Press the POWER button again to return the amplifier to standby. Volume Controls The REAR VOL button allows you to switch the volume control between the main channels, the rear channels, and the subwoofer. See Volume Settings section for complete details Stereo in 4-Channel Pressing the ST IN 4 CH button will enable the Stereo in 4 Channel function. This function feeds the music signal from the front channels to both the front and rear channels. See Operating Modes section for complete details. Mute Pressing the MUTE button on your remote control will reduce the output level of your amplifier to a barely audible level. Pressing the MUTE button again will return the amplifier to its previous volume setting. Display Pressing the DISPLAY button will turn off the illumination of the front control panel of your Linar amplifier. Pressing the DISPLAY button again will turn the illumination back on. CD/TUNER/AUX1/AUX2/AUX3 Pressing these buttons will select the listening sources you have connected to the corresponding inputs of your amplifier. Figure 3. Remote Control Linar Model 10 Multi-channel Integrated Amplifier 9 Volume Settings Your Linar Audio Multi-channel Integrated Amplifier comes equipped with flexible volume controls for maximum enjoyment of your home entertainment system. Figure 4. Overall Volume Control Pressing the Vol or buttons increase and decrease the overall volume of your system. The two bars will move to the right as volume increases. After a short pause, the Linar 10 returns to its previous display. There are 32 volume levels. Figure 5. 5.1 Channel Volume Control Figure 6. Rear Channel Volume Control Figure 7. Subwoofer Volume Control Selecting the AUX1 input changes the volume mode to the 5.1 setting. The Vol or buttons will now control the Center and Rear channels in addition to the main channels and the subwoofer. See Fig 6 and Fig 7 for Rear and Subwoofer volume controls. Pressing the REAR VOL button once will allow you to temporarily adjust the Rear Channels volume separately. When you see REAR VOL in the display, use the Vol or buttons to control the relative volume of the Rear Channels. After a short pause, the Linar 10 returns to its previous display. Pressing the REAR VOL button twice will allow you to temporarily adjust the Subwoofer volume separately. When you see the SUB VOL in the display, use the Vol or buttons to control the relative volume of the Subwoofer Channels. After a short pause, the Linar 10 returns to its previous display. Linar Model 10 Multi-channel Integrated Amplifier 10 Operating Modes Your Linar Multi-Channel Integrated Amplifier gives you flexibility by working in 4 different modes. 2-Channel Stereo (plus Subwoofer) By selecting the inputs labelled CD, Tuner, AUX2,and AUX3, your amplifier will operate in the 2-channel Stereo Mode. The signal will be amplified through the front left and right channels. If you have a subwoofer connected, it will also operate. This is the most basic mode of the Linar 10. 5.1-Channel Surround By selecting the input labelled AUX1, your amplifier will operate in the 5.1 Channel Mode. The signal fed into the 5.1 AUX 1 inputs will be amplified through all channels. This is the mode in which to operate your system if you wish to listen to SACD, DVD-Audio, or other Surround sources. 4-Channel Stereo (plus Subwoofer) When listening to any source connected to the inputs labelled CD, Tuner, AUX2, and AUX3, pressing the ST IN 4 CH button will feed the source signal to both the front left and right channels as well as the rear left and right channels. This provides you with 4 channels playing the same source, great for parties or large listening spaces. Bi-Amplification The Linar Model 10 can be used to bi-amplify your main channel speakers in a 2channel only system (Speakers must have two sets of inputs and have jumpers removed prior to bi-amplifying). Bi-amplification cannot be combined with 5.1channel surround because the rear channel amplifiers are used for the high frequency drivers of your front speakers. To bi-amplify your system: 1. Connect a set of speaker cables from the front left and right speaker outputs to the low frequency inputs of your front channel speakers. 2. Connect a set of speaker cables from the rear left and right speaker outputs to the high frequency inputs of your front channel speakers. 3. Select the ST IN 4 CH button. Your speakers are now bi-amplified! You can adjust the relative volume level of your high frequency drivers by using the REAR VOL functions as described in the Volume Settings section. This will allow flexibility and fine-tuning of your system. Linar Model 10 Multi-channel Integrated Amplifier 11 Specifications Power Output: 120 Watts into 5 channels at 8 ohms 200 Watts into 5 channels at 4 ohms 300 Watts into 5 channels at 2 ohms Total Harmonic Distortion 20Hz-20kHz: Typical 0.05% (worst case 0.4%) Total Intermodulation Distortion: Typical 0.05% (Note 1) Noise: 110 db below maximum rated power. Frequency Response: 1Hz-250 kHz +0-3db Power Supply: 1500 VA (2x750) Custom Made Plitron Toroidal Transformers Input Impedance: 35 kΩ Output Impedance: 0.016 Ω Damping Factor: Better than 500 Input sensitivity: RCA inputs 0.35 Volts RMS (for max power) Gain: 90 times the input signal Channel separation: > 100db Slew rate: N/A (Note 2) Class of operation: A, AB Power consumption at idle: 30.5 watts Mass: 65 lbs with packaging (30 kg) Dimensions: 18” x 7.25” x 16” (LxHxD) Note1 - According to IHF-A202 standard, for the purpose of this standard F1 shall equal 60hz and F2 shall equal 7000hz, the low frequency sine wave having an amplitude 4 times greater than that of the high frequency sine wave. The measurements of Linar amplifiers are in respect of this standard but with any frequency combination in any ratio. Note 2 - The amplifier has no global feedback making the slew rate irrelevant. Linar Model 10 Multi-channel Integrated Amplifier 12 Service and Warranty Your Linar Audio Model 10 Multi-Channel Integrated Amplifier is covered for a period of three years against manufacturing defects. This warranty includes parts, labour, and return shipping to the original and subsequent owners. In the unlikely event you experience technical problems with your Linar Audio amplifier, please contact your dealer for troubleshooting tips. If no solution can be found, please contact Linar Audio using the contact information provided below. If there is no authorized service technician in your area, a Return Authorization may be given to you. Only after obtaining a Return Authorization should you send your amplifier to the manufacturer. Linar Audio will either repair or replace your amplifier at their discretion. This warranty will be considered void if any defect, failure, malfunction, or other damage is deemed to have been caused by mistreatment of the amplifier. Mistreatment includes, but is not limited to, abuse, tampering, servicing of the amplifier by unauthorized technicians, and failure to conform to operating instructions listed in this manual. There are no user serviceable parts in your Linar Model 10 multi-channel amplifier. Servicing should only be performed by factory-authorized technicians, or by Linar Audio. Linar Model 10 Multi-channel Integrated Amplifier 13