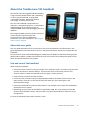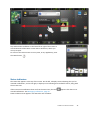
1
USER GUIDE
Trimble Juno T41 handheld
Version 1.00
Revision A
December 2012
1
Subject to the terms and conditions set forth herein, Trimble Navigation
Limited (“Trimble”) warrants that for a period of (1) year from date of
purchase this Trimble product (the “Product”) will substantially conform
to Trimble's publicly available specifications for the Product and that the
hardware and any storage media components of the Product will be
substantially free from defects in materials and workmanship.
systems, interfaces, or devices not made, supplied, or specified by
Trimble; (ii) the operation of the Product under any specification other
than, or in addition to, Trimble's standard specifications for its products;
(iii) the unauthorized installation, modification, or use of the Product; (iv)
damage caused by: accident, lightning or other electrical discharge, fresh
or salt water immersion or spray (outside of Product specifications); or
exposure to environmental conditions for which the Product is not
intended; (v) normal wear and tear on consumable parts (e.g.,
batteries); or (vi) cosmetic damage. Trimble does not warrant or
guarantee the results obtained through the use of the Product or
Software, or that software components will operate error free.
NOTICE REGARDING PRODUCTS EQUIPPED WITH TECHNOLOGY
CAPABLE OF TRACKING SATELLITE SIGNALS FROM SATELLITE BASED
AUGMENTATION SYSTEMS (SBAS) (WAAS, EGNOS, AND MSAS),
OMNISTAR, GPS, MODERNIZED GPS OR GLONASS SATELLITES, OR
FROM IALA BEACON SOURCES: TRIMBLE IS NOT RESPONSIBLE FOR
THE OPERATION OR FAILURE OF OPERATION OF ANY SATELLITE
BASED POSITIONING SYSTEM OR THE AVAILABILITY OF ANY
SATELLITE BASED POSITIONING SIGNALS.
THE FOREGOING LIMITED WARRANTY TERMS STATE TRIMBLE’S
ENTIRE LIABILITY, AND YOUR EXCLUSIVE REMEDIES, RELATING TO THE
TRIMBLE PRODUCT. EXCEPT AS OTHERWISE EXPRESSLY PROVIDED
HEREIN, THE PRODUCT, AND ACCOMPANYING DOCUMENTATION AND
MATERIALS ARE PROVIDED “AS-IS” AND WITHOUT EXPRESS OR
IMPLIED WARRANTY OF ANY KIND, BY EITHER TRIMBLE OR ANYONE
WHO HAS BEEN INVOLVED IN ITS CREATION, PRODUCTION,
INSTALLATION, OR DISTRIBUTION, INCLUDING, BUT NOT LIMITED TO,
THE IMPLIED WARRANTIES OF MERCHANTABILITY AND FITNESS FOR
A PARTICULAR PURPOSE, TITLE, AND NONINFRINGEMENT. THE
STATED EXPRESS WARRANTIES ARE IN LIEU OF ALL OBLIGATIONS OR
LIABILITIES ON THE PART OF TRIMBLE ARISING OUT OF, OR IN
CONNECTION WITH, ANY PRODUCT. BECAUSE SOME STATES AND
JURISDICTIONS DO NOT ALLOW LIMITATIONS ON DURATION OR THE
EXCLUSION OF AN IMPLIED WARRANTY, THE ABOVE LIMITATION
MAY NOT APPLY TO YOU.
Product Software
Limitation of Liability
Product software, whether built into hardware circuitry as firmware,
provided as a standalone computer software product, embedded in flash
memory, or stored on magnetic or other media, is licensed solely for use
with or as an integral part of the Product and is not sold. The terms of the
end user license agreement, as included below, govern the use of the
Product Software, including any differing limited warranty terms,
exclusions and limitations, which shall control over the terms and
conditions set forth in the limited Product warranty.
TRIMBLE'S ENTIRE LIABILITY UNDER ANY PROVISION HEREIN SHALL BE
LIMITED TO THE AMOUNT PAID BY YOU FOR THE PRODUCT. TO THE
MAXIMUM EXTENT PERMITTED BY APPLICABLE LAW, IN NO EVENT
SHALL TRIMBLE OR ITS SUPPLIERS BE LIABLE FOR ANY INDIRECT,
SPECIAL, INCIDENTAL, OR CONSEQUENTIAL DAMAGE WHATSOEVER
UNDER ANY CIRCUMSTANCE OR LEGAL THEORY RELATING IN ANYWAY
TO THE PRODUCTS, SOFTWARE AND ACCOMPANYING
DOCUMENTATION AND MATERIALS, (INCLUDING, WITHOUT
LIMITATION, DAMAGES FOR LOSS OF BUSINESS PROFITS, BUSINESS
INTERRUPTION, LOSS OF DATA, OR ANY OTHER PECUNIARY LOSS),
REGARDLESS OF WHETHER TRIMBLE HAS BEEN ADVISED OF THE
POSSIBILITY OF ANY SUCH LOSS AND REGARDLESS OF THE COURSE OF
DEALING WHICH DEVELOPS OR HAS DEVELOPED BETWEEN YOU AND
TRIMBLE. BECAUSE SOME STATES AND JURISDICTIONS DO NOT
ALLOW THE EXCLUSION OR LIMITATION OF LIABILITY FOR
CONSEQUENTIAL OR INCIDENTAL DAMAGES, THE ABOVE LIMITATION
MAY NOT APPLY TO YOU.
PLEASE NOTE: THE ABOVE TRIMBLE LIMITED WARRANTY PROVISIONS
WILL NOT APPLY TO PRODUCTS PURCHASED IN THOSE JURISDICTIONS
(E.G., MEMBER STATES OF THE EUROPEAN ECONOMIC AREA) IN
WHICH PRODUCT WARRANTIES ARE THE RESPONSIBILITY OF THE
LOCAL DEALER FROM WHOM THE PRODUCTS ARE ACQUIRED. IN SUCH
A CASE, PLEASE CONTACT YOUR TRIMBLE DEALER FOR APPLICABLE
WARRANTY INFORMATION.
Corporate Office
10355 Westmoor Drive
Suite #100
Westminster, CO 80021
USA
www.trimble.com
Legal Notices
© 2012, Trimble Navigation Limited. All rights reserved.
Trimble, the Globe & Triangle logo are trademarks of Trimble Navigation
Limited, registered in the United States and in other countries. Juno is a
trademark of Trimble Navigation Limited.
The Bluetooth word mark and logos are owned by the Bluetooth SIG,
Inc. and any use of such marks by Trimble Navigation Limited is under
license.
Android is a trademark of Google Inc.
Microsoft, Vista, Windows, and Windows Media are either registered
trademarks or trademarks of Microsoft Corporation in the United States
and/or other countries.
All other trademarks are the property of their respective owners.
Release Notice
This is the January 2013 release (Revision A) of the Trimble Juno T41
handheld documentation.
Limited Warranty Terms and Conditions
Product Limited Warranty
Warranty Remedies
If the Trimble Product fails during the warranty period for reasons
covered by this limited warranty and you notify Trimble of such failure
during the warranty period, Trimble will repair OR replace the
nonconforming Product with new, equivalent to new, or reconditioned
parts or Product, OR refund the Product purchase price paid by you, at
Trimble’s option, upon your return of the Product in accordance with
Trimble's product return procedures then in effect.
How to Obtain Warranty Service
To obtain warranty service for the Product, please contact your Trimble
dealer. Alternatively, you may contact Trimble to request warranty
service at +1-408-481-6940 (24 hours a day) or email your request to
[email protected]. Please be prepared to provide:
– your name, address, and telephone numbers;
– proof of purchase;
– a copy of this Trimble warranty
– a description of the nonconforming Product including the model
number; and
– an explanation of the problem.
The customer service representative may need additional information
from you depending on the nature of the problem.
Warranty Exclusions and Disclaimer
This Product limited warranty shall only apply in the event and to the
extent that (i) the Product is properly and correctly installed, configured,
interfaced, maintained, stored, and operated in accordance with
Trimble's applicable operator's manual and specifications, and; (ii) the
Product is not modified or misused. This Product limited warranty shall
not apply to, and Trimble shall not be responsible for, defects or
performance problems resulting from (i) the combination or utilization of
the Product with hardware or software products, information, data,
Notice to Australian Purchasers - The Australian Consumer
Law
Our goods come with guarantees that cannot be excluded under the
Australian Consumer Law. You are entitled to a replacement or refund
for a major failure and for compensation for any other reasonably
foreseeable loss or damage. You are also entitled to have the goods
repaired or replaced if the goods fail to be of acceptable quality and the
failure does not amount to a major failure.
Trimble's warranty, as set out in the user manual accompanying this
statement, or as described in the warranty card accompanying the
Product you purchased, is in addition to any mandatory rights and
remedies that you may have under the Australian Consumer Law.
Trimble Juno T41 User Guide
2
Official Language
THE OFFICIAL LANGUAGE OF THESE TERMS AND CONDITIONS IS
ENGLISH. IN THE EVENT OF A CONFLICT BETWEEN ENGLISH AND
OTHER LANGUAGE VERSIONS, THE ENGLISH LANGUAGE SHALL
CONTROL
Registration
To receive information regarding updates and new products, please
contact your local dealer or visit the Trimble website at
www.trimble.com/register. Upon registration you may select the
newsletter, upgrade, or new product information you desire.
Notices
FCC Regulations
This device complies with part 15 of the FCC Rules. Operation is subject
to the following two conditions: (1) This device may not cause harmful
interference, and (2) this device must accept any interference received,
including interference that may cause undesired operation.
This device has been tested and found to comply with the limits for a
Class B digital device, pursuant to Part 15 of the FCC Rules. These limits
are designed to provide reasonable protection against harmful
interference in a residential installation. This equipment generates, uses
and can radiate radio frequency energy and, if not installed and used in
accordance with the instructions, may cause harmful interference to
radio communications. However, there is no guarantee that interference
will not occur in a particular installation if this equipment does cause
harmful interference to radio or television reception, which can be
determined by turning the equipment off and on. The user is
encouraged to try to correct the interference by one or more of the
following measures:
- Reorient or relocate the receiving antenna.
- Increase the separation between the equipment and receiver.
- Connect the equipment into an outlet on a circuit different from that to
which the receiver is connected.
- Consult the dealer or an experienced radio/TV technician for help.
Changes and modifications not expressly approved by the manufacturer
or registrant of this equipment can void your authority to operate this
equipment under Federal Communications Commission rules.
The radios in this device have been designed and manufactured to not
exceed stipulated emission limits for exposure to radio frequency (RF)
energy as required by the Federal Communications Commission of the
U.S. Government 47 C.F.R. § 2.1091 and 2.1093. The external antenna
connector provided in this device is for GNSS antennas only.
IC
Operation is subject to the following two conditions: (1) this device may
not cause interference, and (2) this device must accept any interference,
including interference that may cause undesired operation of the device.
This Class B digital apparatus complies with Canadian ICES-003.
Cet appareil numérique de la classe B est conforme à la norme NMB-003
du Canada.
This Category II radio communication device complies with Industry
Canada Standard RSS-310.
Ce dispositif de radiocommunication de catégorie II respecte la norme
CNR-310 d’Industrie Canada.
IMPORTANT NOTE:
IC Radiation Exposure Statement
This EUT is compliant with SAR for general population/uncontrolled
exposure limits in IC RSS-102 and had been tested in accordance with
the measurement methods and procedures specified in IEEE 1528. This
equipment should be installed and operated with minimum distance 0.5
cm between the radiator & your body.
This device and its antenna(s) must not be co-located or operating in
conjunction with any other antenna or transmitter. The County Code
Selection feature is disabled for products marketed in the US/Canada.
CE
a. Caution:
• Risk of explosion if battery replaced by an incorrect type.
• Dispose of used batteries according to the instructions.
b. Make sure the temperature for adapter will not be higher than 40 ˚C.
CE SAR Compliance
This device meets the EU requirements (1999/519/EC) on the limitation
of exposure of the general public to electromagnetic fields by way of
health protection.
The limits are part of extensive recommendations for the protection of
the general public. These recommendations have been developed and
checked by independent scientific organizations through regular and
thorough evaluations of scientific studies. The unit of measurement for
the European Council's recommended limit for mobile devices is the
"Specific Absorption Rate" (SAR), and the SAR limit is 2.0 W/ kg
averaged over 10 gram of body tissue. It meets the requirements of the
International Commission on Non-Ionizing Radiation Protection (ICNIRP).
For body worn operation, this device has been tested and meets the
ICNIRP exposure guidelines and the European Standard EN 62311 and
EN 62209-2, for use with dedicated accessories. Use of other accessories
which contain metals may not ensure compliance with ICNIRP exposure
guidelines.
Canada
This digital apparatus does not exceed the Class B limits for radio noise
emissions from digital apparatus as set out in the radio interference
regulations of the Canadian Department of Communications.
Le présent appareil numérique n'émet pas de bruits radioélectriques
dépassant les limites applicables aux appareils numériques de Classe B
prescrites dans le règlement sur le brouillage radioélectrique édicté par
le Ministère des Communications du Canada.
Antenna Statement
Under Industry Canada regulations, this radio transmitter may only
operate using an antenna of a type and maximum (or lesser) gain
approved for the transmitter by Industry Canada. To reduce potential
radio interference to other users, the antenna type and its gain should be
so chosen that the equivalent isotropically radiated power (e.i.r.p.) is not
more than that necessary for successful communication. Conformément
à la réglementation d'Industrie Canada, le présent émetteur radio peut
fonctionner avec une antenne d'un type et d'un gain maximal (ou
inférieur) approuvé pour l'émetteur par Industrie Canada. Dans le but de
réduire les risques de brouillage radioélectrique à l'intention des autres
utilisateurs, il faut choisir le type d'antenne et son gain de sorte que la
puissance isotrope rayonnée équivalente (p.i.r.e.) ne dépasse pas
l'intensité nécessaire à l'établissement d'une communication
satisfaisante.
Licence exempt
This device complies with Industry Canada licence-exempt RSS standard
(s). Operation is subject to the following two conditions:
(1) this device may not cause interference, and
(2) this device must accept any interference, including interference that
may cause undesired operation of the device.
Le présent appareil est conforme aux CNR d'Industrie Canada applicables
aux appareils radio exempts de licence. L'exploitation est autorisée aux
deux conditions suivantes :
(1) l'appareil ne doit pas produire de brouillage, et
(2) l'utilisateur de l'appareil doit accepter tout brouillage radioélectrique
subi, même si le brouillage est susceptible d'en compromettre le
fonctionnement.
Europe / EU Conformance
The following CE compliance
information is applicable to this device
that carry the following CE mark:
This product has been tested and found to comply with all requirements
for CE Marking and sale within the European Economic Area (EEA).
The Trimble Juno T41 has Bluetooth wireless technology approval in
most EU countries and satisfies the requirements for Radio and
Telecommunication Terminal Equipment specified by European Council
Directive 1999/5/EC. These requirements provide reasonable protection
against harmful interference when the equipment is operated
appropriately in a residential or commercial environment.
Juno T41 handhelds equipped with wireless cellular modem radios are
intended for connection to European Networks operating with GSM 900,
or GSM 1800. A copy of the CE Declaration of Conformity for the Juno
T41 handheld can be accessed from
http://www.trimble.com/support.shtml.
Australia and New Zealand
This product conforms with the regulatory requirements of
the Australian Communications Authority (ACA) EMC and
Radiocommunications framework, thus satisfying the
requirements for C-Tick Marking and sale within Australia and New
Zealand.
Additionally, Juno T41 3.5G products that incorporate a
modem also comply with the requirements for A-Tick
Marking and sale in Australia.
Trimble Juno T41 User Guide
3
Taiwan – Battery Recycling Requirements
The product contains a removable Lithium-ion polymer battery.
Taiwanese regulations require that waste batteries are
recycled.
廢電池請回收
European Union Customers: (WEEE)
For product recycling instructions and more information, please go to
www.trimble.com/ev.shtml.
Recycling in Europe: To recycle Trimble WEEE (Waste Electrical and
Electronic Equipment, products that run on electrical power.), Call +31
497 53 24 30, and ask for the "WEEE Associate". Or, mail a request for
recycling instructions to:
Trimble Europe BV
c/o Menlo Worldwide Logistics
Meerheide 45
5521 DZ Eersel, NL
Trimble Juno T41 User Guide
4
Contents
Safety Information
Radio use
RF Exposure Information (SAR)
AC Adaptor safety
Electrostatic discharge
Battery safety
Storage card use
About the Trimble Juno T41 handheld
About this user guide
Use and care of the handheld
Technical assistance
Parts of the Juno T41 handheld
Powering the handheld
Resetting the handheld to factory defaults
Storing data
Deleting data
Inserting and removing the SIM card
Using the Android operating system
Using the Home screen
Viewing other parts of the Home screen
Status indicators
Interacting with the handheld
Entering information
Personalizing the Home screen
Set the time and date
Using the clock
Setting alarms
Display settings
Sounds
Locking the screen
Locking the phone
Using the phone
Messaging
Connecting to an office computer
Using the integrated radios to connect to other devices
Turning on and turning off the integrated radios
Connecting to a cellular network from the modem
Connecting to a Wi-Fi access point
Connecting to a Bluetooth-enabled device
Accessing a corporate network
Using the GNSS receiver
Using an external GNSS antenna
Using the camera
Starting the camera application
Displaying the camera controls
Using the camera in Still mode
Using the camera in Video mode
Camera setting options
6
6
6
7
8
8
9
10
10
10
11
11
12
14
14
15
16
17
17
17
18
20
21
23
24
25
25
25
26
26
26
27
28
29
30
30
30
31
33
34
36
36
36
36
36
37
37
37
Safety Information
Radio use
Depending on the model, the Trimble® Juno® T41 handheld contains a Bluetooth® radio, a Wi-Fi
radio, and a cellular modem radio. In some situations, you may be required to turn off the radios.
For example, aviation authority regulations restrict the use of wireless transmission devices on
board aircraft.
To prevent the handheld from emitting radio signals, do one of the following:
l
l
l
To turn off the handheld, press and hold the Power button for 3 seconds to display the Phone
options menu, then tap Power off.
To put the handheld in airplane mode, press and hold the Power button for 3 seconds to
display the Phone options menu, then tap Airplane mode. This mode turns off all wireless
connections.
To turn off the Bluetooth, Wi-Fi, and wireless cellular modem radios only:
a. On the Homescreen, tap Settings, then tap Wireless & networks.
b. If any radios are on, tap them to turn them off.
Note – You may need to deactivate the Wi-Fi and/or Bluetooth radio in the handheld if the country
in which you are working does not approve the use of Wi-Fi and/or Bluetooth wireless technology.
If you are unsure about whether the Juno T41 handheld’s radios are approved for use in your
country, check with your Trimble reseller.
RF Exposure Information (SAR)
This device meets the government’s requirements for exposure to radio waves. This device is
designed and manufactured not to exceed the emission limits for exposure to radio frequency (RF)
energy set by the Federal Communications Commission of the U.S. Government. The exposure
standard for wireless devices employs a unit of measurement known as the Specific Absorption
Rate, or SAR. The SAR limit set by the FCC is 1.6W/kg. Tests for SAR are conducted using standard
operating positions accepted by the FCC with the device transmitting at its highest certified power
level in all tested frequency bands. Although the SAR is determined at the highest certified power
level, the actual SAR level of the device while operating can be well below the maximum value. This is
because the device is designed to operate at multiple power levels so as to use only the poser
required to reach the network. In general, the closer you are to a wireless base station antenna, the
lower the power output.
The highest SAR value for the device as reported to the FCC when worn on the body, as described in
the user guide, is no more than 0.39 W/kg for GSM850 / 1.23 W/kg for PCS1900 (Body-worn
measurements differ among device models, depending upon available accessories and FCC
requirements.) While there may be differences between the SAR levels of various devices and at
various positions, they all meet the government requirement. The FCC has granted an Equipment
Authorization for this device with all reported SAR levels evaluated as in compliance with the FCC RF
exposure guidelines.
This device is compliant with SAR for general population /uncontrolled exposure limits in ANSI/IEEE
C95.1-1999 and had been tested in accordance with the measurement methods and procedures
specified in OET Bulletin 65 Supplement C. For body worn operation, this device has been tested
Trimble Juno T41 User Guide
5
and meets the FCC RF exposure guidelines for use with an accessory that contains no metal and the
positions the handset a minimum of 0.5 cm from the body. Use of other accessories may not ensure
compliance with FCC RF exposure guidelines. If you do not use a body-worn accessory and are not
holding the device at the ear, position the handset a minimum of 0.5 cm from your body when the
device is switched on.
Exposure to radio frequency radiation from Bluetooth and Wi-Fi transmitters
This device is approved as a portable device with respect to Radio Frequency (RF) exposure
compliance. The radiated output power of the internal wireless radio transmitters is less than 100
milliwatt, which results in exposure levels far below the FCC radio frequency exposure limits, even
when operated in close proximity to the body. The internal wireless radios operate within guidelines
found in international radio frequency safety standards and recommendations, which reflect the
consensus of the international scientific community. Trimble therefore believes the internal wireless
radios are safe for use by users. The level of electromagnetic energy emitted is hundreds of times
lower than the electromagnetic energy emitted by wireless devices such as mobile phones.
However, the use of wireless radios may be restricted in some situations or environments, such as
on aircraft. If you are unsure of restrictions, you are encouraged to ask for authorization before
turning on the wireless radios.
Exposure to radio frequency radiation from cellular wireless transmitters
Juno T41 handhelds equipped with wireless cellular modem radios have been designed and
manufactured to meet safety requirements for limiting exposure to radio waves. When used in
accordance with the instructions set forth in this manual, the equipment has been independently
verified to not exceed the emission limits for safe exposure to radio frequency (RF) energy as
specified by the Federal Communications Commission of the U.S. Government in 47 CFR §2.1093.
These limits are part of comprehensive guidelines and establish permitted levels of RF energy for the
general population. The guidelines are based on standards that were developed by independent
scientific organization through periodic and thorough evaluation of scientific studies. The standards
include a substantial safety margin designed to assure the safety of all persons, regardless of age
and health.
AC Adaptor safety
To charge the handheld’s battery, use the USB / power cable and adaptor kit provided with the
handheld (see Powering the handheld, page 12).
WARNING -To use AC adaptors safely
– Use only the AC adaptor intended for the handheld. Using any other AC adaptor can damage the handheld and
may void your warranty. Do not use the AC adaptor with any other product.
– Make certain that the input voltage on the adaptor matches the voltage and frequency in your location.
– Make certain that the adaptor has prongs compatible with your outlets.
– Do not use the AC adaptor in wet outdoor areas; it is designed for indoor use only.
– Unplug the AC adaptor from power when not in use.
Trimble Juno T41 User Guide
6
Electrostatic discharge
WARNING - Static electricity can harm electronic components inside your handheld. To prevent static damage:
- Discharge static electricity from your body before you touch any of the electronic components inside your device,
such as a memory module. You can do so by touching an unpainted metal surface.
The handheld is designed for outdoor conditions; however under conditions of low humidity
extremely high voltage discharge events are possible. Users are advised that the risk of causing
discharge to sensitive electronics can be minimized by avoiding finger contact to the recessed
connectors on the unit.
Battery safety
The rechargeable Lithium-ion polymer battery is supplied partially charged. Charge the battery
completely before using it for the first time (see Powering the handheld, page 12). If the battery has
been stored for longer than six months, charge it before use.
WARNING - Use only the battery intended for the product. Using any other battery can damage the handheld and
may void your warranty. If the battery becomes damaged or stops charging fully, replace it with a new battery.
WARNING - Do not damage the rechargeable Lithium-ion polymer battery. A damaged battery can cause an
explosion or fire, and can result in personal injury and/or property damage.
To prevent injury or damage:
– Do not use or charge the battery if it appears to be damaged. Signs of damage include, but are not limited to,
discoloration, warping, and leaking battery fluid.
– Do not store or leave your device near a heat source such as near a fireplace or other heat-generating
appliance, or otherwise expose it to temperatures in excess of 70 °C (158 °F) such as on a vehicle dashboard.
When heated to excessive temperatures, battery cells could explode or vent, posing a risk of fire.
– Do not immerse the battery in water.
– Do not use or store the battery inside a vehicle during hot weather.
– Do not drop or puncture the battery.
– Do not open the battery or short-circuit its contacts.
WARNING -Avoid contact with the rechargeable Lithium-ion polymer battery if it appears to be leaking. Battery
fluid is corrosive, and contact with it can result in personal injury and/or property damage.
To prevent injury or damage:
– If the battery leaks, avoid contact with the battery fluid.
– If battery fluid gets into your eyes, immediately rinse your eyes with clean water and seek medical attention.
Do not rub your eyes!
– If battery fluid gets onto your skin or clothing, immediately use clean water to wash off the battery fluid.
WARNING -Charge and use the rechargeable Lithium-ion polymer battery only in strict accordance with the
instructions. Charging or using the battery in unauthorized equipment can cause an explosion or fire, and can
result in personal injury and/or equipment damage.
To prevent injury or damage:
– Do not charge or use the battery if it appears to be damaged or leaking.
– Charge the Lithium-ion polymer battery only in a Trimble product that is specified to charge it. Be sure to follow
Trimble Juno T41 User Guide
7
all instructions that are provided with the battery charger.
– Discontinue charging a battery that gives off extreme heat or a burning odor.
– Use the battery only in Trimble equipment that is specified to use it.
– Use the battery only for its intended use and according to the instructions in the product documentation.
Storage card use
The handheld provides a storage card slot, providing an alternative storage location to the storage
memory in the handheld.
WARNING - Static electricity can harm electronic components inside your handheld. To prevent static damage:
- Discharge static electricity from your body before you touch any of the electronic components inside your device,
such as a memory module. You can do so by touching an unpainted metal surface.
WARNING- The presence of any dust or moisture in the memory card slot may adversely affect the device and
void your Trimble warranty. To prevent dust or moisture entering the memory card slot:
– Make certain that the storage card slot door is attached correctly when you are using the handheld outdoors.
– When inserting or removing a memory card, place the handheld on a dust-free indoor surface.
Trimble Juno T41 User Guide
8
About the Trimble Juno T41 handheld
The Trimble Juno T41 rugged handheld combines
a high sensitivity GNSS receiver with, depending
on the model of handheld, an integrated
3.75G cellular modem, Bluetooth® wireless
technology, and Wi-Fi connectivity.
The Juno T41 handheld is powered by the
Android™ 2.3.4 operating system, is rated IP65 or
IP68 depending on the model, and has an
integrated 8MP camera with geotagging and dual
LED flash.
The integrated GNSS receiver provides accurate 24 meter positioning information with
postprocessed or real-time differential
corrections. For more information, see Using the
GNSS receiver, page 36.
About this user guide
This user guide describes how to set up and use the Juno T41 handheld. The information in this
guide supplements the information in the Juno T41 Quick Start Guide, which you received with the
handheld.
Even if you have used other Global Navigation Satellite System (GNSS) or Global Positioning System
(GPS) products before, Trimble recommends that you spend some time reading this guide to learn
about the special features of the product.
Use and care of the handheld
When using the handheld:
l
l
l
l
l
Protect the touch screen by using your finger or the capacitive stylus, and avoid using excessive
pressure and sharp or abrasive objects. To protect the touch screen from pressure and
abrasive objects, Trimble recommends that you apply a screen protector.
Keep the outer surface free of dirt and dust.
Ensure that the protective covers are appropriately fitted to the external antenna port, and
SIM / memory card slot, so that they are kept free from dirt, dust, fluid ingress, and
electrostatic discharge.
Protect the handheld from extreme temperatures. For example, do not leave the handheld on
the dashboard of a vehicle.
Depending on the model, the handheld is rated IP65 or IP68, but is not waterproof. Do not
immerse the handheld in water, and be careful not to drop the handheld or subject it to any
strong impact.
To clean the handheld, wipe it with a clean dry cloth.
Trimble Juno T41 User Guide
9
Technical assistance
Go to the Juno T41 handheld webpage on the Trimble website www.trimble.com/Outdoor-RuggedComputers/junot41.aspx for the latest support information, including:
l
support notes detailing support issues
l
documentation
l
the latest files available for download
Additional help
If you still cannot find the information that you need, contact your Trimble reseller.
Parts of the Juno T41 handheld
This section describes the main features of the Juno T41 handheld, and provides the information
you need to get up and running with the handheld.
❶ Power button
❼ Charge / Notification LED
❷ Headset connector
❽ Microphone
❸ Volume / Action buttons
❾ Camera and flash
❹ MicroSD and SIM card slot
❿ Speaker
❺ Touch screen
⓫ I/O / Power connector
❻ GNSS antenna port
⓬ Buttons: Home, Menu, Back, Search
Trimble Juno T41 User Guide
10
Powering the handheld
The Juno T41 handheld contains a rechargeable Lithium-ion polymer battery.
Note – Charge the battery completely before using the handheld for the first time. If the battery
has been stored for longer than six months, charge it before use. Trimble recommends charging
the battery for four hours to recharge it fully.
Note – Cold temperatures, or using Bluetooth wireless technology, Wi-Fi, or the cellular modem
consume additional battery power and so shortens battery life between charges.
Battery safety
WARNING - Use only the battery intended for the product. Using any other battery can damage the handheld and
may void your warranty. If the battery becomes damaged or stops charging fully, replace it with a new battery.
WARNING - Do not damage the rechargeable Lithium-ion polymer battery. A damaged battery can cause an
explosion or fire, and can result in personal injury and/or property damage.
To prevent injury or damage:
– Do not use or charge the battery if it appears to be damaged. Signs of damage include, but are not limited to,
discoloration, warping, and leaking battery fluid.
– Do not store or leave your device near a heat source such as near a fireplace or other heat-generating
appliance, or otherwise expose it to temperatures in excess of 70 °C (158 °F) such as on a vehicle dashboard.
When heated to excessive temperatures, battery cells could explode or vent, posing a risk of fire.
– Do not immerse the battery in water.
– Do not use or store the battery inside a vehicle during hot weather.
– Do not drop or puncture the battery.
– Do not open the battery or short-circuit its contacts.
WARNING -Avoid contact with the rechargeable Lithium-ion polymer battery if it appears to be leaking. Battery
fluid is corrosive, and contact with it can result in personal injury and/or property damage.
To prevent injury or damage:
– If the battery leaks, avoid contact with the battery fluid.
– If battery fluid gets into your eyes, immediately rinse your eyes with clean water and seek medical attention.
Do not rub your eyes!
– If battery fluid gets onto your skin or clothing, immediately use clean water to wash off the battery fluid.
WARNING -Charge and use the rechargeable Lithium-ion polymer battery only in strict accordance with the
instructions. Charging or using the battery in unauthorized equipment can cause an explosion or fire, and can
result in personal injury and/or equipment damage.
To prevent injury or damage:
– Do not charge or use the battery if it appears to be damaged or leaking.
– Charge the Lithium-ion polymer battery only in a Trimble product that is specified to charge it. Be sure to follow
all instructions that are provided with the battery charger.
– Discontinue charging a battery that gives off extreme heat or a burning odor.
– Use the battery only in Trimble equipment that is specified to use it.
– Use the battery only for its intended use and according to the instructions in the product documentation.
Trimble Juno T41 User Guide
11
Charging the battery
1. Connect the AC power adaptor to the Power socket on the handheld and then connect the
adaptor to main power. An international adaptor kit is provided with the handheld.
2. Check that the Charge / Notification LED on the handheld is solid orange, indicating that the
handheld is properly connected to the power source and the battery is charging.
Fully charging the battery from empty takes approximately four hours.
The Charge / Notification LED on the handheld indicates the battery power or charging status, and
operating system notifications, as shown below:
LED State
Handheld / battery state
Solid orange
Battery is charging.
Flashing orange
Battery is charging, operating system notification; or, operating system
notification, battery is not charging.
Solid red
Low battery charge.
Flashing red
Low battery charge, operating system notification.
Solid green
Battery fully charged.
Flashing green
Battery fully charged, operating system notification.
Avoid keeping the battery at full charge at high temperatures. For more information, see Use and
care of the handheld, page 10.
Note – The life of the battery can be significantly shortened if power is constantly supplied to the
handheld. To avoid this issue, connect the handheld to an external power source only when the
battery requires charging. Once fully charged, disconnect the external power source and allow the
battery to discharge through normal use.
Turning on and turning off the handheld
To turn on the handheld, press the Power button until the screen lights up.
To completely shut down the handheld, press and hold the Power button until the Phone options
menu appears, and then tap Power off. All running applications are shut down, and the handheld is
completely turned off.
You can also use the Phone options menu to put the handheld into silent mode or airplane mode.
Checking the level of battery power
To check the level of battery power remaining at any time while the handheld is on:
1. On the Home screen, tap the Launcher icon
.
2. In the Launcher, tap Settings/ About phone.
3. Tap Status.
The Status screen shows the battery status and battery level.
Trimble Juno T41 User Guide
12
Conserving power
Trimble recommends that you do the following to reduce power consumption:
l
l
l
Set the handheld to automatically turn off when idle. For more information, see Display
settings, page 25.
Reduce the brightness setting for the backlight. For more information, see Display settings,
page 25.
Turn off the integrated Bluetooth and Wi-Fi radios, and the handheld's cellular modem,
whenever you are not using them. For more information, see Turning on and turning off the
integrated radios, page 30.
Note – Do not disconnect from GNSS if you will be reconnecting within about five minutes. A GNSS
application can take up to 30 seconds to reactivate the integrated GNSS receiver, so disconnecting
to save power can cost time.
Resetting the handheld to factory defaults
You can factory-reset the Juno T41 handheld if you forget the password that you use to lock the
device, or to delete all of your personal data from the handheld's internal storage, system and
application settings, and any downloaded applications.
Performing a factory data reset does not delete any system software updates.
1. On the Home screen, tap Settings, then tap Privacy/ Factory data reset.
2. If required, select the checkbox to delete data on the SD card.
3. Tap Reset phone.
Storing data
The handheld has several types of memory available:
l
l
l
l
Program memory is similar to the RAM in a computer, and is used for running apps. You
cannot use it to save data.
Internal storage is used for storing applications and private app data.
Internal SD card is similar to the hard disk in a computer and is used for storing data and/or
apps.
Removable SD card refers to micro SD cards inserted into the handheld's removable SD card
slot.
The Juno T41 handheld's internal storage is where most applications and private data for those
applications are stored. The operating system manages and carefully guards internal storage,
because it can contain your private information; you cannot view its contents when you connect
the handheld to a computer with a USB cable.
The handheld's internal SD card (sometimes just called "SD card") is the primary non-removable
storage for data files. Some applications are also designed to be stored on this card, rather than in
internal storage, by default or as an option. This storage medium is actually an internal eMMC
component. It is referred to as an SD card and mounted as /sdcard in order to maintain Android
Trimble Juno T41 User Guide
13
compatibility. When the Juno T41 handheld is connected to a computer (see Connecting to an office
computer, page 29), you can copy files to and from the internal SD card.
The handheld also has a slot for a removable SD card. When a removable card is inserted, it is
mounted as /removablesdcard. Like the internal SD card, this storage device is accessible when the
Juno T41 handheld is connected to a computer.
To check the memory capacity on the handheld, in the Launcher, tap Settings/ Storage.
Trimble recommends that you regularly copy important data to an office computer. For more
information, see Connecting to an office computer, page 29.
Deleting data
To quickly delete all data on the SD card, in the Launcher, tap Settings, and then tap Storage / Erase
internal SD card.
To quickly delete all the data on the handheld:
1. In the Launcher, tap Settings, and then tap Privacy/ Factory data reset.
2. If you want to delete all the data on the SD card, select the Erase internal SD card option.
Otherwise, leave this option unselected.
3. Tap Reset phone.
Memory cards
As an alternative to storage memory, you can save data to a memory card. Use a MicroSD memory
card to securely transfer data to and from another device that supports MicroSD memory cards.
WARNING- The presence of any dust or moisture in the memory card slot may adversely affect the device and
void your Trimble warranty. To prevent dust or moisture entering the memory card slot:
– Make certain that the storage card slot door is attached correctly when you are using the handheld outdoors.
– When inserting or removing a memory card, place the handheld on a dust-free indoor surface.
WARNING - Static electricity can harm electronic components inside the handheld. To prevent static damage,
discharge static electricity from your body before you touch any of the electronic components inside your device,
such as a memory module. You can do so by touching an unpainted metal surface.
To insert a memory card:
1. Turn off the handheld. See Turning on and turning off the handheld, page 13
2. In a dust-free indoor environment, remove the two small screws to remove the memory card
slot cover (on the left side of the handheld).
3. Insert the memory card into the card slot with the gold contacts facing up.
4. Replace the cover, tightening the two small screws.
5. When you select the Save As option in an application, the memory card appears in the list of
available storage locations as /removablesdcard.
Trimble Juno T41 User Guide
14
Note – Do not store required data or applications to a memory card if the card will be removed.
Data saved to a memory card is available only when the card is inserted in the handheld.
Inserting and removing the SIM card
CAUTION - The SIM card and its contents can be easily damaged by scratches or bending. Use caution when
inserting or removing the card.
CAUTION - The presence of any dust or moisture in the SIM card slot may adversely affect the device and void
your Trimble warranty. To prevent dust or moisture entering the SIM card slot:
– When inserting or removing a SIM card, place the handheld on a dust-free indoor surface.
WARNING - Static electricity can harm electronic components inside the handheld. To prevent static damage,
discharge static electricity from your body before you touch any of the electronic components inside your device,
such as a memory module. You can do so by touching an unpainted metal surface.
To insert or remove a SIM card:
1. Turn off the handheld (see Turning on and turning off the handheld, page 13).
2. In a dust-free indoor environment, remove the two small screws to remove the SIM card slot
cover (on the left side of the handheld).
3. Insert or remove the SIM card, with the gold contacts face down.
4. Replace the SIM card slot cover, tightening the two small screws.
Trimble Juno T41 User Guide
15
Using the Android operating system
The Juno T41 handheld is powered by the Android operating system. When you start the handheld,
the Home screen appears. From here you can access all the features on the handheld.
Using the Home screen
The Home screen has the following elements:
l
l
l
l
The Status bar at the top of the screen shows the time, signal
strength, battery status, and other information. It also displays
notification icons. See Managing notifications, page 23
Widgets, for example the Google search field, are applications
that you can use directly on the Home screen.
To open any item anywhere on the Home screen, tap it. To add a
shortcut to an application, or a widget, tap and hold an empty
space on the Home screen, then select the required item from
the menus that appear.
To open the Launcher and view all your applications, tap the
Launcher icon
.
You can customize the application icons, widgets, shortcuts, and other features that appear on the
Home screen. See Personalizing the Home screen, page 23.
You can set the screen timeout so that if you don’t use the handheld for a while, the screen
automatically turns off to conserve battery power. In the Launcher, tap Settings, then tap Display /
Screen timeout, then select the required timeout.
To wake up the handheld when the screen has turned off, press the Power button. If you have set
security on the handheld, you will need to unlock it (see Locking the screen, page 26), then drag the
lock icon to the right.
Viewing other parts of the Home screen
Extensions to the Home screen provide more space for widgets, shortcuts, and other items. Slide
your finger left or right across the Home screen.
Small dots at the lower left and right indicate which screen you’re viewing.
Trimble Juno T41 User Guide
16
Tap and hold the small dots on the lower left or right of the screen to
view thumbnails of the Home screen and its extensions, which you
can tap to open.
To return to the Home screen at at any time, in any application, press
the Home button
.
Status indicators
The Status bar appears at the top of the screen. On the left, it displays icons indicating that you’ve
received notifications, and on the right, it displays icons indicating the handheld’s status, along with
the current time.
If there are more notifications than can fit in the status bar, the icon
view all notifications. See Managing notifications, page 23.
appears. Click the icon to
Status indicators that appear in the Status bar are as follows:
Trimble Juno T41 User Guide
17
Icon
Description
Icon
Description
Connected to GPRS mobile network
Bluetooth is on
GPRS in use
Connected to a Bluetooth device
Connected to EDGE mobile network
Alarm is set
EDGE in use
Speakerphone is on
Connected to 3G mobile network
Vibrate mode
3G in use
Ringer is silenced
Mobile network signal strength
Phone microphone is mute
Connected to a Wi-Fi network
No SIM card installed
Roaming
Battery is very low
No signal
Battery is low
Airplane mode
Battery is partially charged
GPS is on
Battery is full
Receiving location data from GPS
Battery is charging
The following icons indicate that you’ve received a notification. See Managing notifications, page 23
for information about responding to these notifications. In addition to these icons, applications you
install on the handheld may use their own notification icons.
Icon
Description
Icon
Description
New text or multimedia message
Call in progress
Problem with text or multimedia message
delivery
Call in progress using a Bluetooth headset
New voicemail
Missed call
Upcoming event
Call on hold
Data is syncing
Call forwarding is on
Problem with sign-in or sync
Song is playing
SD card or USB storage is full
Uploading data
An open Wi-Fi network is available
Downloading data
Handheld is connected via USB cable
Connected to or disconnected from
Trimble Juno T41 User Guide
18
Icon
Description
Icon
Description
virtual private network (VPN)
More notifications
Application update available
Carrier data use threshold approaching or
exceeded
Interacting with the handheld
To interact with the handheld using the touchscreen, use a capacitive stylus or your finger to tap
items on the touch screen, to scroll up or down, and to enter information.
Action
Definition
Tap
Touch the screen once to open items and select options.
Use the keyboard input panel to enter typed text by tapping keys on the on-screen
keyboard.
Tap and hold
Tap and hold the stylus or your finger on an item to see a list of actions available for that
item. On the pop-up menu that appears, tap the action you want to perform.
Drag
Hold the stylus or your finger on an item for a moment and then, without lifting your
finger, move your finger on the screen until you reach the target position. Drag items on
the Home screen to reposition them.
Swipe or slide
Quickly move your finger across the surface of the screen, without pausing when you
first touch it, to scroll a page or a list up or down. In some Calendar views, swipe quickly
across the screen to change the range of time visible.
Double tap
Tap quickly twice on a webpage, map, or other screen to zoom. Double-tapping after
pinching to zoom in some applications, such as Browser, reflows a column of text to fit
the width of the screen.
Pinch
In some applications (such as Browser and Gallery), place two fingers on the screen at
once and pinch them together to zoom out or spread them apart to zoom in.
Rotate the
screen
On most screens, the orientation of the screen rotates with the phone as you turn it from
upright to its side and back again. You can turn this feature on and off, see Display
settings, page 25.
The handheld has the following buttons:
Button
Press
Press and hold
Home
Opens the Home screen. If you’re viewing the left or right extended Opens the most
Home screen, opens the central Home screen.
recently used
applications
screen.
Menu
Opens a menu with items relevant to the current screen or
application.
Back
Opens the previous screen you were working in. If the onscreen
keyboard is open, the keyboard closes.
Trimble Juno T41 User Guide
19
Search
Power
On the Home screen, opens Google search for searching your
handheld and the Internet. In some applications, it opens a search
box for searching within the application.
Turns off the screen.
Opens a menu
with options for
Airplane mode,
for Silent mode,
and for powering
off the phone.
Volume Up / Down When a call is in progress, it increases or decreases the call volume.
When the phone is ringing, it silences the ringer. On the Home
screen when no call is in progress, it increases or decreases the
ringtone volume, or sets the phone to be silent or to vibrate instead
of ringing. In other applications, it controls the volume of music,
spoken directions, and other audio.
Quickly increases
the ringtone
volume to
maximum or
minimum.
Entering information
Depending on the program or application you are using, you can enter information in several ways,
as described below:
Input method
Description
Synchronizing
Connect the handheld to an office computer to exchange information between
the handheld and the office computer.
For more information, see Connecting to an office computer, page 29.
Writing
Use your finger or a stylus like a pen to write directly on the screen.
Typing
Use the keyboard input panel to enter typed text by tapping keys on the onscreen keyboard.
Recording
Create a recording.
Using the menus
The Android mobile technology platform has two kinds of menus:
l
Options menus contain tools that apply to the activities of the current screen or application,
not to any specific item on the screen. To open options menus, press the Menu button
.
Not all screens have options menus; if you press Menu on a screen that has no options menu,
nothing happens. Some screens have more options menu items than can fit in the main menu;
tap More to open a menu of additional items. Options menus contain items that apply to the
current screen or to the application as a whole.
l
Context menus contain tools that apply to a specific item on the screen. To open a context
menu, tap and hold an item on the screen. Not all items have context menus. If you tap and
hold an item that has no context menu, nothing happens.
Trimble Juno T41 User Guide
20
Using the on-screen keyboard
In some applications, the keyboard appears automatically. In others, it appears when you tap in a
text entry field.
l
l
l
l
If you tap in a text field which already contains text, the cursor is inserted at the point where
you tapped and the insertion point tab appears. To move the insertion point, drag the
insertion point by its tab.
Select a word, or several words at a time, to copy, cut,and paste text. See Editing text below.
Tap the required keys on the screen to enter text. What you type appears in the text field and
in the strip above the keyboard. When the keyboard has a suggestion for what you might be
typing, the word you are typing is underlined in the text field and the suggestions appear in
orange in the strip above the keyboard. The boldfaced suggestion at the left of the strip is the
keyboard’s best suggestion. You can drag the strip to the left to bring any additional
suggestions into view.
Tap space or a punctuation mark to enter the boldfaced suggested word. If you tap the space
key, the suggestion strip offers a series of punctuation marks you can tap, to replace the space
with. Or tap another suggested word to enter it. If you tap a word that is not in the system or
user dictionary, it is entered and you are prompted to tap the word again if you want to add it
to the user dictionary.
l
Tap the Delete key
l
To enter numbers, tap the ?123 key. To return to letters, tap ABC.
l
l
l
l
to delete characters to the left of the cursor.
To enter symbols and other characters, tap and hold one of the top-row keys and then slide
you finger up to the list of options that appears. To select an option, lift your finger when you
reach it, to enter the number indicated in black on that key. For example, tap and hold a vowel
or the C, N, or S key to open a small window where you can drag onto the accented vowel or
other alternate letter you want to use.
To view additional symbols, tap the Alt key on the numeric keyboard. Tap it again to switch
back.
Tap and hold the Period key ( . ), or tap and hold a number or symbol key to select other
common symbols.
To close the keyboard, tap the Back
button.
Editing text
To edit text in text fields:
1. Tap the text field containing the text you want to edit. The cursor is inserted where you tapped,
and has an orange tab you can use to drag it if you need to move it.
2. To select text, tap and hold the text or word, and then tap Select word or Select all. The selected
text is highlighted in orange, with a tab at each end of the selection. You can drag either
selection tab to expand or reduce the range of selected text. To deselect the text, tap any
unselected text in the same or in another text field, or press the Back
button.
Trimble Juno T41 User Guide
21
3. Tap the selected text to open a menu which gives you options to cut or copy your selection, or,
if you have previously cut or copied text, paste. You can also enter text by typing over the
selected text, or tap Delete to delete the selected text.
4. Press the Back
button to close the keyboard.
Managing notifications
Notification icons appear you when you have new messages, calendar events, and alarms, as well as
ongoing events, such as when call forwarding is on or the current call status. Depending on your
settings you may also hear a notification sound, the phone may vibrate, and LEDs may flash. For
information on these settings, see Sounds, page 26.
When you receive a notification, its icon appears in the Status bar, along with a summary that
appears briefly. For a description of notification icons, see Status indicators, page 18.
To open the Notifications panel to view a list of all your notifications, do one of the following:
l
l
drag the Status bar down from the top of the screen.
in the Launcher or on the Home screen, press the Menu
Notifications.
button and then tap
Tap a notification to open it in its application.
To clear all notifications, open the Notifications panel and then tap Clear at the top right of the
panel. All event-based notifications are cleared; ongoing notifications remain in the list.
To close the Notifications panel, drag the tab at the bottom of the Notifications panel to the top of
the screen, or press the Back
respond to it.
button. The panel also closes when you touch a notification to
Personalizing the Home screen
You can add application icons, shortcuts, widgets, and other items to any part of any Home screen
where there is free space. You can also change the wallpaper.
To add an item to the Home screen:
1. On the Home screen, press the Menu
button and tap Add, or tap and hold an empty
location on the Home screen. If there is no space on the Home screen, Add is disabled; you
must delete or move an item before you can add another item, or switch to another Home
screen pane.
2. On the menu that opens, tap the type of item you want to add. You can add the following
types of items to the Home screen:
l
l
Shortcuts. Add shortcuts to applications, for example a bookmarked webpage, or a
favorite contact. The shortcuts available depend on the applications you have installed.
Widgets. Add any of a variety of miniature applications (widgets) to your Home screen, for
example a clock, a music player, a picture frame, the Google search bar, a power manager,
or a calendar that shows upcoming appointments.
Trimble Juno T41 User Guide
22
l
Folders. Add a folder where you can organize Home screen items, or, forexample, a folder
that contain all your contacts. Your folders’ contents are kept up-to-date automatically.
To move an item on the Home screen: 1. Tap and hold the item you want to move, until it vibrates. Don’t lift your finger.
2. Drag the item to a new location on the screen. To drag the item onto another Home screen
pane, pause at the edge of the screen.
3. When the item is where you want it, lift your finger.
To remove an item from the Home screen:
1. Tap and hold the item you want to move, until it vibrates. Don’t lift your finger. The Launcher
icon changes to a Trash Can icon.
2. Drag the item to the Trash Can icon.
3. When the icon turns red, lift your finger.
To change the Home screen wallpaper:
1. Press the Menu
button and tap Wallpapers, or tap and hold an empty area of the Home
screen and in the menu that opens, tap Wallpapers.
2. Tap Gallery to use a picture that you have captured using the camera or copied to your phone.
Tap Wallpapers to open a screen where you can sample the wallpaper images that come with
the handheld.
3. Tap Save or Set wallpaper.
To rename a folder:
1. Tap the folder to open it.
2. Tap and hold the folder window’s title bar.
3. Enter a new name in the dialog that appears.
4. Tap OK.
Set the time and date
1. In the Launcher, tap Settings/ Date & time.
2. Do one of the following:
l
l
Tap Automatic to use network time and date settings.
Manually set the time and date. Make sure Automatic is not selected, then tap the other
options on the screen to set the date, time zone, time, time format, and date format.
3. Tap the Back
button to exit the screen.
Trimble Juno T41 User Guide
23
Using the clock
In addition to displaying the date and time, the Clock application can be used as an alarm clock. To
open the Clock application, in the Launcher, tap Clock. The clock opens with the date and time
displayed on the Home screen. With the Clock application running, you can:
l
l
Tap the Dimmer icon
normal brightness.
to dim the screen brighteness. Tap the Dimmer icon again to restore
Set alarms. Tap the Alarm icon
to open the Alarms screen.
Setting alarms
On the Alarms screen:
l
Tap the Alarm icon
in green.
next to an alarm to turn it on or off. Alarms that are set are underlined
l
Tap an existing alarm to change its time and other attributes.
l
Tap Add alarm to add a new alarm. You can also add a new alarm on the main Clock screen;
press the Menu
button and then tap Add alarm.
Display settings
The backlight makes the screen easier to read in low light, but uses extra power. Use the Brightness
control to configure power-saving settings for the backlight. Use the brightness sliders to adjust the
display brightness.
To open the Display settings:
1. In the Launcher, tap Settings, then tap Display.
2. To set the screen brightness, tap Brightness, then select Automatic brightness, or deselect
Automatic brightness and use the slider to set the brightness level.
3. Select or deselect Auto-rotate screen to turn on or off automatic screen rotation when the
handheld is turned.
4. Tap Animation to set screen animations as required.
5. Tap Screen timeout and then select the required screen idle timeout duration.
Note – If the screen timeout is set to Never, the handheld will only turn off if you press the Power
button. Use this option with caution. Leaving the handheld on for long periods of time will shorten
battery life.
Trimble Juno T41 User Guide
24
Sounds
Use the Sounds settings to set preferences for the speaker volume and system sounds such as the
phone ringtone, vibrations, alerts, notifications, and alarms. To open the Sounds settings screen, in
the Launcher, tap Settings, then tap Sound. You can set:
l
l
l
l
l
l
l
l
l
Silent mode, to turn off all sound notifications (including call and notification ringtones) except
the audio from music, videos, and other media and alarms.
Vibrate. Set to always, never, only when the handheld is in Silent mode, or only when the
handheld is not in Silent mode.
Volume. Set the volume of ringtones when you receive a phone call or notification, media
(music, videos), and alarms. You can select to use the same volume for calls and notifications,
or you can set the notification ringtone volume independently.
Phone ringtone. Select the ringtone to sound when you receive a phone call. Tap a ringtone to
listen to it.
Notification ringtone. Select the ringtone to sound when you receive a notification. Tap a
ringtone to listen to it.
Audible touch tones. Select to turn on tones when you use the phone to dial a number.
Audible selection. Select to play a sound when you tap buttons, icons, and other onscreen
items.
Screen lock sounds. Select to play a sound when the screen is locked or unlocked.
Haptic feedback. Select to make the handheld vibrate briefly when you tap soft buttons and
perform other actions.
Locking the screen
You can set the screen on the handheld to lock to prevent others from using it.
1. In the Launcher, tap Settings / Location & security.
2. If you have not set screen lock settings before, or you have reset them to None, tap Set up
screen lock. If you have already set a screen lock tap Change screen lock .
3. Tap Pattern, PIN, or Password. Follow the instructions that appear on the screens.
The next time you turn on the handheld or wake up the screen, you must enter your PIN or
password, or draw your unlock pattern to unlock it.
Locking the phone
You can set the SIM card to lock to prevent others from using the phone.
1. In the Launcher, tap Settings / Location & security.
2. Tap Set up SIM card lock.
3. Tap Lock SIM card, and enter a PIN.
To change the SIM card PIN, tap Change SIM PIN.
To remove the SIM card lock, tap Lock SIM card again to deselect it.
Trimble Juno T41 User Guide
25
Using the phone
Use the Juno T41 handheld to make and receive phone calls. You can enter a number to dial using
the keypad (see below), or select a number from your Contacts list (see Dialing a number from the
Contacts list).
To make a phone call:
1. Make sure that a SIM card is installed. See Inserting and removing the SIM card, page 16.
2. Make sure that the phone is turned on. See Turning on and turning off the integrated radios,
page 30.
3. Do one of the following:
l
Tap the Phone icon
at the bottom of the Home screen.
l
Tap the Phone application icon
l
From Contacts or the Call log, tap the Phone tab.
in the Launcher.
4. Tap the numeric keys on the Phone tab to enter the phone number. To dial an international
number, tap and hold the 0 key to enter the plus ( + ) symbol. Then enter the international
prefix for the country, followed by the full phone number.
5. Tap
to dial the number that you entered.
6. If required, press the Volume Up / Down button on the left side of the handheld to adjust the
call volume.
To end a phone call, tap
.
When you receive a phone call, the Incoming Call screen opens with the caller ID and any additional
information about the caller if they are saved in Contacts. All incoming calls are recorded in the Call
log. To answer a call, drag the green phone icon to the right. If you were already on a call, the first
call is placed on hold while you answer the new call.
To silence the ringer before answering the call, press the Volume Down button.
To decline a call, drag the red phone button to the left.
Using the Call log
The Call log contains all the calls you have made, received, or missed. You can use it to redial a
number or return a call.
1. In the Phone application or Contacts, tap the Call log tab.
2. To dial a number listed in the Call log, tap
next to the required number.
You can also add an entry’s number to your Contacts:
1. Tap and hold the entry.
2. Tap Add to contacts.
3. Tap Create new contact, or scroll to an existing contact to add the number to.
Trimble Juno T41 User Guide
26
To clear the Call log, press Menu
and then tap Clear call log.
Dialing a number from the Contacts list
To make a phone call using the Contacts list:
1. In the Launcher, tap Contacts, or tap the Phone icon
Contacts tab.
on the Home screen and then tap the
2. Tap the required contact to call.
Messaging
Use Messaging to send and receive text messages (SMS) and multimedia message (MMS).
Sending a text or a multimedia message
1. Make sure that a SIM card is installed. See Inserting and removing the SIM card, page 16.
2. Make sure that the phone is turned on. See Turning on and turning off the integrated radios,
page 30.
3. Tap the Messaging icon
in the Launcher. The Messaging window opens, where you can
create a new message or open an ongoing message thread.
4. Tap New message to start a new text or multimedia message (or tap an existing message
thread to open it).
5. For a new message, do one of the following:
l
l
enter a phone number in the To field. As you enter the number, matching contacts
appear. You can tap a contact to select it or continue to enter the number.
start to type the name of a contact in the To field. As you type, matching contacts appear.
Tap a contact to select it.
6. Tap the composition text box, and enter your message using the on-screen keyboard.
7. For a multimedia message, press Menu
attach to the message.
and then tap Attach to select the media file to
8. Tap Send or Send MMS.
Deleting a message thread
Tap and hold the message thread, then tap Delete thread in the menu that opens; or, press Menu
and then tap Delete threads to delete all message threads from the window.
Replying to messages
If you are working in a message window, messages that you receive are displayed in it. Otherwise,
you receive a new message notification and a new message icon appears in the Status bar. See
Trimble Juno T41 User Guide
27
Managing notifications, page 23
When you tap the new message notification, the Message window opens, where you can reply to
the message. If Auto-retrieve is not selected (see Changing Messaging settings, below), tap
Download to view the message.
If the message contains a media file, tap Play to view, watch, or listen to it. Tap and hold the media
file to open a menu with an option for saving messages to your internal SD card.
Tap and hold a message to open a menu with a number of options for working with the message
and its sender’s information.
Changing Messaging settings
1. Tap the Messaging icon
2. Press the Menu
in the Launcher.
button, and then tap Settings.
You can specify the following settings:
l
Delete old messages. When selected, older messages in a thread are deleted when a set limit is
reached. Set limits using:
l
l
l
l
Text message limit. Set the number of messages to save per thread of text messages.
Multimedia message limit. Set the number of messages to save per thread of multimedia
messages.
Auto-retrieve. When not selected, only the heading of multimedia messages is downloaded,
which you can then tap to open a menu to download the whole message. This is useful for
controlling how much data you download, for example, when connected to a slow data
network.
Roaming auto-retrieve. When not selected, only the header of multimedia messages is
downloaded when connected to other carrier’s data networks. This is useful for avoiding
unexpected charges, if your contract has limits on data roaming.
Connecting to an office computer
Connect the handheld to an office computer to transfer information, settings, and files from one
device to the other, or to install software onto the handheld.
Connect the handheld to a computer using a USB cable.
To protect your data, Trimble recommends that you regularly copy important data to an office
computer. When you connect the handheld a computer, make sure you follow the computer’s
instructions for connecting and disconnecting USB devices, to avoid damaging or corrupting files.
Note – The Juno T41 handheld uses the Media Transfer Protocol (MTP) for transferring data
between the handheld and a computer. For the Microsoft® Windows® XP operating system,
Windows Media® Player 10 or later must be installed on the computer to provide access to MTP
devices such as the Juno T41 handheld. For the Windows Vista® and later operating systems, the
MTP drivers are already provided by Microsoft and should be found automatically.
Trimble Juno T41 User Guide
28
1. Connect the handheld to the computer using the USB cable that you received with the
handheld.
2. The AutoPlay window opens on the computer. Select Open device to view files. The Juno T41 is
listed as a portable device connected to the computer.
3. Copy or move files as required between the handheld and the computer.
Using the integrated radios to connect to other devices
Some models of the Juno T41 handheld include an integrated Bluetooth radio and Wi-Fi radio, and
provide a number of options for connecting to networks and other devices. Some models also
include an integrated cellular modem for sending and receiving data, and support voice calls and
text messaging.
To use the Wi-Fi or Bluetooth radio or the cellular modem, you need to turn it on (see Turning on
and turning off the integrated radios below).
Using a data connection from your local cellular provider, the Juno T41 handheld’s integrated
cellular modem can be used to connect to the Internet, send and receive messages (including email,
SMS, or instant messages), or to send and receive files and other data to and from the office directly
in the field.
You can use the handheld’s integrated Wi-Fi radio to connect to the Internet or a corporate network
using a connection to a Wi-Fi access point (“hotspot”).
You can use Bluetooth wireless technology to connect directly to other Bluetooth-enabled devices
such as a headset, laser rangefinder, or a barcode scanner, that are within range (typically within 5
m to 10 m of the handheld).
This section describes how to enable the radios, and the main connectivity options available. Use
the table below to identify the wireless connection type you want to make and then follow the steps
provided.
Connection method
To...
See...
Cellular modem
Connect to a cellular network
page 30
Wi-Fi
Connect to a Wi-Fi access point
page 31
Bluetooth wireless technology
Connect to another Bluetooth-enabled device
page 33
Wi-Fi, or cellular modem
Access a corporate network (Virtual Private Network)
page 34
Turning on and turning off the integrated radios
1. In the Launcher, tap Settings/ Wireless & networks.
2. Tap WiFi, Bluetooth, and /or Phone to turn on the required radios.
Connecting to a cellular network from the modem
Use the integrated cellular modem to connect to a cellular network and access the Internet or a
company network. Use this type of connection to access a background map server, or for Internet
and email access.
Trimble Juno T41 User Guide
29
Before you begin the steps below, Trimble recommends that you:
l
l
l
make sure that a SIM card is inserted in the handheld. See Inserting and removing the SIM
card, page 16.
confirm that the modem can access the Internet directly. If necessary, contact your service
provicer and confirm whether you must enter a user name, password, and domain details
when connecting.
make sure that you have the correct APN (Access Point Name) from your cellular provider.
The Juno T41 handheld attempts to automatically set the appropriate Access Point Name (APN) for
your data connection based on your cellular provider’s identity. This process can take several
minutes.
To configure cellular network settings:
1. In the Launcher, tap Settings/ Wireless & networks.
2. Make sure the Phone is turned on. If it is not, tap Phone to turn it on.
3. Tap Mobile networks.
4. If you need to create a new APN:
a. Tap Access Point Names.
b. Tap an existing APN to edit it, or press Menu/ New APN to create a new APN. Enter the
APN settings that you obtained from your wireless service provider.
c. Press Menu / Save.
d. To use the new or edited APN, select it in the APN screen.
5. To enable data transfer over the cellular network, select Data enabled.
6. To enable data transfer when roaming, select Data roaming.
7. To limit limiting data connections to 2G networks (GPRS or EDGE), select Only use 2G networks.
This will extend the battery charge. When connected to a 2G network, Trimble recommends
that you do not transmit a lot of data, such as sending, uploading, or downloading pictures or
video, until you are connected to a faster mobile or other wireless network.
Connecting to a Wi-Fi access point
To use Wi-Fi on the Juno T41 handheld, you must access a wireless access point, or “hotspot.” Some
hotspots are open and you can easily connect to them. Others are hidden or implement other
security features, so you must configure the handheld so it can connect to them.
The Status bar displays icons that indicate Wi-Fi status.
When you connect to a Wi-Fi network, the handheld obtains a network address and other
information it needs from the network. If required, you can configure the handheld with advanced
settings; see Advanced Wi-Fi settings below.
To turn on the Wi-Fi radio and connect to a Wi-Fi network:
1. In the Launcher, tap Settings/ Wireless & networks.
2. Make sure Wi-Fi is turned on. If it is not, tap Wi-Fi to turn it on.
Trimble Juno T41 User Guide
30
3. Tap Wi-Fi Settings. The handheld lists the Wi-Fi networks available. Secured networks are
indicated with a Lock icon.
4. If the handheld finds a network that you connected to previously, it connects to it. Otherwise,
tap the network that you want to connect to.
l
l
If the network is open, you are prompted to confirm that you want to connect to the
network. Tap Connect.
If the network is secured, you’re prompted to enter a password or other details.
To view details about the speed, security, address, and related settings of the network you are
connected to, in the Wi-Fi settings screen, tap the network name.
By default, when the Wi-Fi radio is on, notifications appear in the Status bar when the handheld
detects an open Wi-Fi network. To receive notifications when open networks are in range, in the WiFi settings screen, select Network notification.
Adding a Wi-Fi network
You can add a Wi-Fi network so the handheld remembers it, along with any security details. You can
then connect to it automatically when it is in range. You must also add a Wi-Fi network to connect
to it if the network does not broadcast its name (SSID), or to add a Wi-Fi network when you are out
of its range.
To join a secured network, you must obtain the security details from the network’s administrator.
1. In the Launcher, tap Settings/ Wireless & networks.
2. Make sure Wi-Fi is turned on. If it is not, tap Wi-Fi to turn it on.
3. In the Wi-Fi settings screen, tap Add WiFi network.
4. Enter the network SSID.
5. If the network is secured, tap Open under Security and select the type of security for the
network. Enter the password and other security details for the network.
6. Tap Save.
The handheld connects to the wireless network automatically when you are within range.
Forgetting a Wi-Fi network
You can make the handheld forget about the details of a Wi-Fi network that you added—for
example, if you do not want the handheld to connect to it automatically or if it is a network that you
no longer use.
1. In the Launcher, tap Settings/ Wireless & networks.
2. Make sure Wi-Fi is turned on. If it is not, tap Wi-Fi to turn it on.
3. In the Wi-Fi settings screen, tap and hold the network you want the handheld to forget.
4. Tap Forget network.
Trimble Juno T41 User Guide
31
Advanced Wi-Fi settings
To access advanced Wi-Fi settings, in the Wi-Fi settings screen, press Menu and then tap Advanced.
You can set:
l
l
l
l
The Wi-Fi sleep policy, to specify when the Wi-Fi radio disconnects. If this is set to Never, the
Wi-Fi radio uses more battery power.
The MAC (Media Access Control) address of the handheld when connecting to Wi-Fi networks.
The IP address assigned to the handheld by the Wi-Fi network you are connected to (unless
you use the IP settings to assign it a static IP address; see below).
IP settings. If you select Use static IP, you can use the IP settings to enter an IP address and
other network settings for the handheld manually, rather than using the DHCP protocol to
obtain network settings from the Wi-Fi network itself.
Connecting to a Bluetooth-enabled device
The Juno T41 handheld has an integrated Bluetooth radio that you can use to establish a wireless
connection to other Bluetooth devices that are within range.
Using a Bluetooth connection, you can communicate with devices such as cellular phones, office
computers, other handhelds, and Bluetooth-enabled laser rangefinders and barcode scanners. You
can also communicate with peripheral devices that use Bluetooth adaptors instead of serial or USB
connections.
To connect to a Bluetooth device, you must turn on the handheld's Bluetooth radio, and set up a
paired Bluetooth connection between the two devices. See Working with paired Bluetooth-enabled
devices, page 33.
Turn off the Bluetooth radio when it is not in use, to extend the charge of the handheld battery. You
may also be required to turn Bluetooth off in some locations. See Turning on and turning off the
integrated radios, page 30.
To turn on the Bluetooth radio:
1. In the Launcher, tap Settings/ Wireless & networks.
2. Make sure the Bluetooth radio is turned on. If it is not, tap Bluetooth to turn it on.
3. The Juno T41 handheld has a generic name by default, which is visible to other devices when
you connect to them. You can change the name so that it is more recognizable. Tap Bluetooth
settings, then tap Device name and enter a sensible name for the handheld. Tap Ok.
Status bar icons indicate Bluetooth status.
Working with paired Bluetooth-enabled devices
Pairing the handheld with another Bluetooth-enabled device creates a permanent security bond
between the devices, which helps to exchange information securely between the devices. The paired
relationship is established when two devices create and exchange a link key. Once the relationship is
established, the handheld and the other Bluetooth device only need to have their Bluetooth radios
turned on to exchange information; they do not need to be visible to other devices.
You must pair the handheld with a device before you can connect to it. Once you pair the handheld
with a device, they stay paired unless you unpair them.
Trimble Juno T41 User Guide
32
To pair with a Bluetooth device:
1. In the Launcher, tap Settings/ Wireless & networks.
2. Make sure the Bluetooth radio is turned on. If it is not, tap Bluetooth to turn it on.
3. Tap Bluetooth settings. The handheld lists the Bluetooth devices it can detect. (If the device
you want to connect to is not listed, make sure it is discoverable; refer to the documentation
for the device).
4. To manually scan for discoverable devices, tap Scan for devices.
5. To set up a paired connection to a device, tap it in the list of Bluetooth devices. If you are
prompted to, enter a password. You will need to obtain this from the other device.
If the pairing is successful, the handheld connects to the device. The device shows as connected in
the list.
You can easliy connect to the paired device in the future by tapping it in the list of Bluetooth
devices.
Disconnecting from a Bluetooth device
Tap the connected device in the list of Bluetooth devices on the Bluetooth settings screen, then tap
OK to confirm that you want to disconnect.
Unpairing a Bluetooth device
You can unpair a Bluetooth device to delete all pairing information about it. Tap and hold the device
in the list of Bluetooth devices on the Bluetooth settings screen, then tap Unpair or Disconnect &
unpair.
Making the handheld visible (discoverable) to other Bluetooth devices
To allow other Bluetooth-enabled devices to connect to the handheld, or if the handheld will not
connect to or pair with another device you are attempting to connect to, you must make the
handheld visible (this is sometimes referred to as “discoverable”).
To make the handheld visible to other devices:
1. In the Launcher, tap Settings/ Wireless & networks.
2. Make sure the Bluetooth radio is turned on. If it is not, tap Bluetooth to turn it on.
3. Tap Bluetooth settings.
4. Tap Discoverable.
The handheld will be discoverable to other Bluetooth devices within range, for 120 seconds.
Accessing a corporate network
Use a Virtual Private Network (VPN) connection to access a corporate network or Intranet. VPNs
enable you to connect to the resources inside a secured local network, from outside that network.
Before you begin, obtain the following information from your network administrator:
Trimble Juno T41 User Guide
33
l
username and password
l
domain name
l
host name or IP address of the VPN server
To add a VPN:
1. In the Launcher, tap Settings/ Wireless & networks / VPN settings.
2. Tap Add VPN, then tap the type of VPN to add.
3. In the screen that opens, follow the instructions from your network administrator to configure
each component of the VPN settings.
4. Tap the Menu
button, then tap Save.
The VPN is added to the list on the VPN settings screen.
To connect to a VPN:
1. In the Launcher, tap Settings/ Wireless & networks / VPN settings.
2. The VPNs configured in the handheld are listed on the VPN settings screen. Tap the VPN that
you want to connect to.
3. Enter any requested security details and then tap Connect.
When you are connected to a VPN, an ongoing notification appears in the Status bar. If you are
disconnected, you receive a notification that you can use to return to the VPN settings screen so
that you can reconnect to it. See Managing notifications, page 23
To disconnect from a VPN, open the Notifications panel and tap the ongoing notification for the VPN
connection.
To edit a VPN:
1. In the Launcher, tap Settings/ Wireless & networks / VPN settings.
2. The VPNs configured in the handheld are listed on the VPN settings screen. Tap the VPN that
you want to edit.
3. Tap Edit network, then make the required changes.
4. Tap the Menu
button, then tap Save.
To delete a VPN:
1. In the Launcher, tap Settings/ Wireless & networks / VPN settings.
2. The VPNs configured in the handheld are listed on the VPN settings screen. Tap the VPN that
you want to delete.
3. Tap Delete network, then tap OK.
Trimble Juno T41 User Guide
34
Using the GNSS receiver
The Juno T41 handheld includes an integrated GNSS receiver that enables you to use GPS satellites.
GPS (Global Positioning System) is a Global Navigation Satellite System (GNSS), consisting of a
constellation of satellites that orbit the earth. GNSS provides worldwide, all-weather, 24-hour time
and position information.
To receive signals from GPS satellites, the handheld must have a clear view of the sky. GPS positions
may not always be available, particularly in or near buildings, in vehicles, or under tree canopy.
To use GPS satellites:
1. In the Launcher, tap Settings/ Locations & security.
2. Tap Use GPS satellites to select it.
Using GPS enables the handheld to determine your location (within 2 to 4 meter accuracy), and geotagging of photos you take using the handheld's integrated camera.
Using an external GNSS antenna
The Juno T41 handheld provides an external GNSS antenna port, which is suitable for use in most
conditions. This port is suitable for GPS antennas only.
CAUTION - The presence of any dust or moisture in the external antenna port may cause the external antenna to
not work. To prevent dust or moisture entering the external antenna slot, take care when using the handheld with
an external antenna in wet or dusty conditions.
To use an external antenna, you must configure antenna settings in the GNSS field software, once
you have connected the external antenna to the handheld. Refer to the relevant software
documentation for details.
Using the camera
Some models of the Juno T41 handheld contain an integrated 8 megapixel digital camera, with
geotagging and dual LED flash, which you can use to capture photos or video.
Starting the camera application
1. In the Launcher, tap Camera.
2. Make sure that the protective lens cover is clean; wipe it with a microfiber cloth before taking
pictures.
Displaying the camera controls
The camera controls are displayed on the right side of the screen. See Camera setting options, page
37.
Trimble Juno T41 User Guide
35
Using the camera in Still mode
To take a photo:
1. Start the camera, and make sure the slider is in Still mode
.
2. Use the view finder to frame the photo you want to capture, and adjust any other settings if
required (see Camera setting options, page 37). The preview image changes as you change the
settings.
3. To capture the photo, tap the Shutter icon
on the screen, or tap and hold the Shutter icon
to focus; when the photo is in focus, the focus indicators in each corner turn green. The camera
takes the photo when you lift your finger off the Shutter icon.
The photo you just took is displayed for a moment, and then is displayed as a thumbnail, which you
can tap to open in the Gallery. Photos are stored as .jpg files.
To cancel taking the photo, slide your finger off the Shutter icon and then lift your finger off the
screen.
To view photos in the Gallery, tap a thumbnail in the camera application to open the Gallery, or in
the Launcher, tap Gallery.
Using the camera in Video mode
1. Start the camera, and make sure the slider is in Video mode
.
2. Adjust any other settings if required (see Camera setting options, page 37
3. Point the lens to frame where you want to start recording, then tap the Start Video icon
on the screen. The video starts recording and the timer starts counting up to indicate the
length of the video.
4. To stop recording, tap
.
The video you recorded is displayed as a thumbnail, which you can tap to open in the Gallery.
Videos are stored as .3GPP files.
To close the camera application, press the Back
or the Home
button.
To view videos in the Gallery, tap a thumbnail in the camera application to open the Gallery, or in
the Launcher, tap Gallery.
Camera setting options
To access the camera setting options, start the camera application. The camera setting options are
displayed on the screen, and indicate the current settings. To edit the settings, tap the required
option.
In Still mode, the settings are:
Trimble Juno T41 User Guide
36
Control
Settings
Available settings
Use to set:
l
Focus mode. Autofocus (Auto), to more quickly take pictures focused at
infinity (Infinity), or close-ups (Macro).
l
Exposure. -2 to +2
l
Picture size
l
Picture quality
l
Color effect
l
Restore to defaults
Store location
GPS location stored with photo
GPS Location not stored with photo
White balance
Set the camera to adjust the white balance automatically, or specify how the
camera adjusts colors in different kinds of light:
Automatic
Incandescent
Daylight
Fluorescent
Cloudy
Flash mode
Automatic
On
Off
Zoom
x1 to x4
In Video mode, the settings are:
Control
Settings
White balance
Description
Use to set:
l
Color effect
l
Restore to defaults
Set the camera to adjust the white balance automatically, or specify how the
camera adjusts colors in different kinds of light:
Automatic
Incandescent
Daylight
Fluorescent
Trimble Juno T41 User Guide
37
Control
Description
Cloudy
Flash mode
On
Off
Video quality
Set the appropriate video quality and maximum length combination: High
(30m), Low (30m).
Trimble Juno T41 User Guide
38