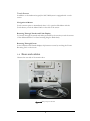
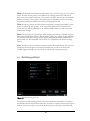
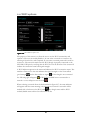
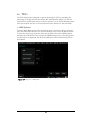
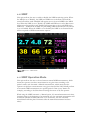
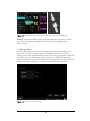
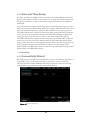
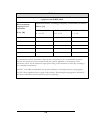
1
® Cheetah NICOM Reliant -User Guide R-IFU-01 /Revision 21 CHEETAH NICOM SYSTEM User Guide In the US: Cheetah Medical, Inc. 600 SE Maritime Ave Suite 220 Vancouver, WA 98661 USA Toll free: (+1) 866-751-9097 Telephone: (+1) 360-828-8685 Fax: (+1) 360-718-8154 In Europe and Asia Cheetah Medical (UK) Limited 1, Irmar House 59, Cookham Road Maidenhead Berkshire SL6 7EP United Kingdom Telephone: (+44) 1628 636806 Fax: (+44) 1628 788802 E-mail: [email protected] Web Site: www.cheetah-medical.com Cheetah Medical 2012 Table of Contents CHAPTER 1: INTRODUCTION.........................................................................5 Introduction..........................................................................................................................................................................5 GeneralDescription.......................................................................................................................................................6 Front andButtons...........................................................................................................................................................6 Rear and cables................................................................................................................................................................7 Specifications......................................................................................................................................................................9 NIBP....................................................................................................................................................................................10 BedsideCare...................................................................................................................................................................16 Label.....................................................................................................................................................................................16 BatteryMode..................................................................................................................................................................17 Warnings andPrecautions....................................................................................................................................17 CleaningandDisinfectingtheNICOMDevice.........................................................................................................18 SpecialPatientPopulations.....................................................................................................................................19 IndicationsForUse......................................................................................................................................................20 LimitationsOfUse......................................................................................................................................................21 SpO2....................................................................................................................................................................................21 WeightUnits...................................................................................................................................................................66 ElectricGrid......................................................................................................................................................................66 AudibleAlarm...............................................................................................................................................................66 DateFormat.....................................................................................................................................................................66 TimeFormat...................................................................................................................................................................66 TestType...........................................................................................................................................................................67 SampleInterval..............................................................................................................................................................67 TFCd...................................................................................................................................................................................68 NIBP....................................................................................................................................................................................69 NIBPOperationMode...........................................................................................................................................69 NIBPTimeInterval....................................................................................................................................................70 NIBPInitialInflationPressure...............................................................................................................................70 Date and Time Setup..............................................................................................................................................72 ConnectivityWizard..................................................................................................................................................72 NetworkingWizard...................................................................................................................................................73 HgbPostingPeriod.....................................................................................................................................................73 SpO2OperationMode...........................................................................................................................................74 CHAPTER 5: CHAPTER2: NICOMEMR................................................................................75 SCREENS OVERVIEW......................................................28 ChangePassword.......................................................................................................................................................77 RetrieveData...................................................................................................................................................................78 Management..................................................................................................................................................................79 PatientRecord.................................................................................................................................................................80 StartupScreen................................................................................................................................................................28 MenuScreen..................................................................................................................................................................29 NewPatientScreen.....................................................................................................................................................30 ExistingPatientScreen..............................................................................................................................................31 RunScreen.......................................................................................................................................................................32 TrendDisplayScreen................................................................................................................................................39 TabularDisplayScreen............................................................................................................................................39 ProtocolTabularDisplayScreen.......................................................................................................................40 HemodynamicDashboardScreen................................................................................................................41 SettingsScreen................................................................................................................................................................42 SetOption..........................................................................................................................................................................44 GENERAL OPTIONS............................................................45 TestOptions.....................................................................................................................................................................46 NIBPOptions................................................................................................................................................................47 SpO2Options................................................................................................................................................................48 ConnectivityOptions.................................................................................................................................................49 NetworkConfigurationOptions........................................................................................................................50 DateandTime...............................................................................................................................................................50 DeviceMode.................................................................................................................................................................51 HostModeScreen......................................................................................................................................................53 ServiceModeScreen................................................................................................................................................54 DemoScreen.................................................................................................................................................................54 ShutDownScreen.....................................................................................................................................................55 CHAPTER3: BASICFUNCTIONS...............................................................57 SavingaNewPatient................................................................................................................................................57 Performing a Test.......................................................................................................................................................58 ViewingTestResults.................................................................................................................................................60 EnteringEvents..............................................................................................................................................................62 Calibrating the TouchScreen..............................................................................................................................64 CHAPTER4: SETTING& ADVANCEDFUNCTIONS......................65 HeightUnits.....................................................................................................................................................................66 CHAPTER 6: MEASUREMENTS SHORT DESCRIPTION...........83 CO.........................................................................................................................................................................................83 CI.............................................................................................................................................................................................83 HR.........................................................................................................................................................................................83 VET......................................................................................................................................................................................83 dX/dt.....................................................................................................................................................................................83 SV..........................................................................................................................................................................................83 SVI.........................................................................................................................................................................................84 SVV.....................................................................................................................................................................................84 TFC.......................................................................................................................................................................................84 TFCd...................................................................................................................................................................................84 TFCd0...............................................................................................................................................................................84 NIBP....................................................................................................................................................................................84 MAP....................................................................................................................................................................................84 TPR.......................................................................................................................................................................................85 TPRI.....................................................................................................................................................................................85 CP...........................................................................................................................................................................................85 CPI.........................................................................................................................................................................................85 Z0............................................................................................................................................................................................85 DO2I....................................................................................................................................................................................85 SpO2....................................................................................................................................................................................85 Hgb........................................................................................................................................................................................85 CHAPTER7: TROUBLESHOOTING..........................................................86 ErrorMessage................................................................................................................................................................86 WarningMessages....................................................................................................................................................90 OtherProblems.............................................................................................................................................................90 CHAPTER8: SERVICEAND MAINTENANCE.....................................93 GeneralCare....................................................................................................................................................................93 Cleaning.............................................................................................................................................................................93 FuseReplacement.......................................................................................................................................................94 ChargeableBatteries...................................................................................................................................................94 EMCManufacturerDeclaration_____________________________________95 CHAPTER9: PARTS' INFORMATION....................................................101 OrderingInformation.............................................................................................................................................101 EquipmentandAccessoriesInventory......................................................................................................102 ReturningPartsunderWarranty.....................................................................................................................102 ShippingParts.............................................................................................................................................................103 CHAPTER10: REGULATORYREPRESENTATIVE.......................104 Conventions used in this manual WARNING Indicates conditions or practices that could lead to patient injury, illness, or death CAUTION Indicates conditions or practices that could damage the equipment or other property. Note Provides additional important information. On product, means "consult accompanying documentation" On product, means "see instructions for use" Patient Information Bar - Appears on all Run screens. This bar holds all of the patient's info as it was inserted into the system, such as: ID, Name, Gender, Age, Weight, Height and BSA. The Patient Information Bar also holds the Test Type Icon ('R' for rest testing or 'S' for stress testing). Run Bar - Appears on all Run screens. This bar holds the Study Refresh Clock, Alarm status icon, Test status icons (play, pause or stop) and the Message Display area. Menu Bar – Appears on all of the NICOM's screens. This bar holds the Screen Name, Operation Help line, Date, Time and Battery status. Note In order to reach the sub menu – first enter the screen's pop-up menu by clicking the NICOM's Back button. Then, either click the NICOM's OK button or use its Right arrow key to enter the sub menu.*All icons described according to order of appearance - from left to right Chapter 1 1.0 Introduction 1.1 Introduction The Cheetah NICOM® Reliant System is a portable, non-invasive cardiac output (CO) monitoring device based on BIOREACTANCE® technology. It also measures Heart Rate (HR), Stroke Volume (SV), Stroke Volume Variation (SVV), Ventricular Ejection Time (VET), Mean Arterial Pressure (MAP), Systolic Blood Pressure (SBP), Diastolic Blood Pressure (DBP), Blood Oxygenation (SpO2) and Thoracic Fluid Content (TFC). In addition the system calculates clinical parameters such as Cardiac Index (CI), Stroke Volume Index (SVI), Total Peripheral Resistance (TPR), Total Peripheral Resistance Index (TPRI), Cardiac Power (CP), Cardiac Power Index (CPI), Oxygen Delivery Index (DO2I), Thoracic Fluid Content delta (TFCd) and Thoracic Fluid Content delta from baseline(TFCd0) based on the above measured parameters or based on a manually entered parameters such as manually entered Hemoglobin (Hgb), manually entered blood oxygenation (SpO2) or manually entered Mean Arterial Pressure (MAP). The NIBP functionality measures and displays systolic, diastolic, and mean arterial pressures. The SpO2 functionality measures and displays SpO2. The Cheetah NICOM® Operator’s Manual contains instructions and information for the operation and maintenance of the Cheetah NICOM System. A thorough understanding of the system controls and connections is vital for instrument operation. It is therefore essential to read this manual carefully before attempting to use the Cheetah NICOM System, in order to ensure optimal performance and trouble free service life. This manual should be retained for future reference. 5 1.2 General Description The Cheetah NICOM System dimensions are: Height: 22 cm Width: 26 cm Depth: 20 cm Total Weight: 4.5 Kg 1.3 Front and Buttons On the front there is an 8" LCD screen and eight buttons. The green button is the Power button. In order to turn the unit on, press continuously for a few seconds until the Cheetah Logo is prompted; in order to turn the unit off, use the Shut Down command on the main menu (section 2.22). Alternatively, pressing the green power button continuously for several seconds will also turn the unit off, however this shut down method is discouraged because some test information may not be saved. Use the NICOM's Up ▲ and Down ▼ buttons in order to choose commands from the menu, to change measurements' display during a test and to browse and look up values within fields. The NICOM's OK button is used to set selection of commands from the menu, values in fields and to start and pause tests. Use the NICOM's Left ◄ and Right ► buttons to move the cursor between fields and to browse test segments when reviewing patient test results. The NICOM's Back button serves to operate the pop-up menu and to return the cursor to previous placement. The NICOM's Print button is intended for future use and is currently not operational. Figure 1.1 NICOM System Front Panel 6 Touch Screen: In addition to the hardware keypad, the NICOM System is equipped with a touch screen. Navigation in Menus Touch a menu option to immediately select it. To open the Side Menu with the Touch Screen, touch the Menu Name on the side of the screen. Browsing Through Trends and Table Display To browse through the trends and tables presented by the monitor, touch the arrows of the dedicated slider. For faster browsing drag the Slider body. Browsing Through Events In the Numerical and Trends displays skip between events by touching the Events Browsing Tool on the screen 1.4 Rear and cables Observe the rear side of the monitor box: Figure 1.2 Back panel of the NICOM 7 In the rear of the device there are five cable sockets: 1. NICOM Patient Cable connector – the wide socket is intended for the NICOM Patient Cable. The other end of the patient cable should be connected to the NICOM Sensors which are applied to the patient’s body as described in the section 'Performing a Test' (section number 3.2). Note The NICOM Patient Cable is connected to the NICOM using a D type connector with screws. Make sure to tighten the screws when connecting the cable to the device in order to prevent disconnection that would lead to loss of monitoring function. WARNING It is advised to clean the NICOM Patient Cable between patients in order to prevent the transfer of infectious diseases (see in Section 8.2. Service and Maintenance, Cleaning) 2. Power socket – standard electric power socket. The device can also function on its internal chargeable batteries. Connecting this cable to an electric source will supply the monitor from the main grid and charge the batteries. 3. USB port – connecting a standard USB cable allows the user to download results of previous tests stored in the NICOM to the NICOM EMR PC application. In order to perform these actions it is necessary to install the NICOM EMR PC software to a PC. The software CD comes with every new monitor and can also be accessed by contacting a Cheetah Medical Service representative. The USB port also enables various technical operations such as uploading of software upgrades. 4. NIBP cuff connector – Connect the NIBP cuff to the monitor using the NIBP connector (please refer to figure 1.2). 5. SpO2 connector – Connect the SpO2 Sensor to the monitor using the SpO2 connector (please refer to figure 1.2). 8 1.5 Specifications Skin Voltage Tolerance: Frequency Response: Time Constant: CMRR: Filter: Safety Requirements: Rated Voltage/Current: Rated frequency Fuses: A/D Sample rate Features ±300 mV 8Hz 0.125 Sec 70db 75KHz According to IEC/EN 60601-1 standard. Class I Equipment BF type applied part. Power switch supply 100V to 240V 50/60 Hz. 2 X T2AL250V converter at 12 bit (2.5 mV LSB). 500 per sec. Hemodynamic display options Height/Weight units Dedicated NICOM Electronic Medical Records interface (XlS PDF & XML file formats, Password Protection) Hemodynamic status report with visit-to-visit data Clinical Protocol Wizards Event Management Touch Screen control Serial and Ethernet connections Ambient Temperature and Humidity: Operation condition: Atmospheric pressure: Storage condition: Delivery condition: 10-40°C/ 50-104°F, 50-75% RH 700hPa to 1060hPa 0-50°C/ 32-122°F, 50-75% RH 0-50°C/ 32-122°F, 50-75% RH Technical Characteristics of Acquisition Module Isolated preamplifier in accordance with IEC 601-1 standard. Note The Cheetah NICOM is not defibrillator proof. 9 1.6 NIBP Terminology: Oscillometry The oscillometric method of blood pressure measurement is a non-invasive method that monitors the amplitude of cuff pressure changes during cuff deflation to determine arterial blood pressure. The cuff pressure is first elevated above the patient systolic blood pressure level and the cuff begins to deflate at a certain rate. The initial rise in amplitude of these pressure fluctuations during cuff deflation corresponds closely to the systolic blood pressure. As the cuff is further deflated, these pressure fluctuations increase in amplitude until a peak is reached which is usually referred to as the mean arterial pressure (MAP). As cuff deflation continues, the diastolic pressure can be determined based upon the rapidly diminishing amplitude of the pressure fluctuations. Thus systolic, MAP and diastolic blood pressures can be accurately obtained by supervising the pressure fluctuations while controlling the cuff deflation rate. mmHg Millimeters of Mercury, which is the most common unit of measure for pressure in non-invasive blood pressure. bpm Beats per minute, which is the most common unit of measure for pulse rate. Introduction: The NIBP module of the NICOM device is an oscillometric blood pressure system. The module is designed to take blood pressure measurements on demand. After each blood pressure measurement, the Module will discard the previous blood pressure results. All Module operating parameters will reset to default values at power-up. All Module blood pressure values are discarded when the Module is reset Populations that may use the NIBP function: For adult patients, blood pressure measurements made with the Advantage OEM BP Module Series are equivalent to those obtained by trained observers using the cuff/stethoscope auscultatory method within the limits prescribed by ANSI/AAMI SP10: 1992 & 2002 (mean error difference of ± 5 mmHg or less, standard deviation of 8 mmHg or less). Blood pressure measurements determined with this device are equivalent to those obtained by a trained observer using the cuff / stethoscope auscultation method, within the limits prescribed by the American National Standard, Electronic or automated sphygmomanometers. The NIBP Module performance with common arrhythmias, such as atrial or ventricular premature beats or atrial fibrillation, has been verified by use of a patient simulator. 10 Warnings & Precautions This device should not be used when oscillometric pulses may be altered by other devices or techniques such as External Counterpulsation (ECP) or Intra Aortic Balloon Pump Counterpulsation. DO NOT use the NIBP module for any purpose other than specified in this manual without written consent and approval from Cheetah Medical. DO NOT use the device in the presence of flammable gaseous anesthesia agents. DO NOT attach the cuff to a limb being used for IV infusions as the cuff inflation can block the infusion, potentially causing harm to the patient. CAUTION Substitution of a component different from that supplied may result in measurement error. Repairs should be undertaken only by personnel trained or authorized by Cheetah Medical. CAUTION Accuracy of any blood pressure measurement may be affected by the position of the subject, his or her physical condition and use outside of the operating instructions detailed in this manual. Interpretation of blood pressure measurements should be made only by a physician or trained medical staff. CAUTION All air hoses and cuffs used to connect the patient to the module must be approved by Cheetah Medical. Hoses of a certain material and/or durometer may cause the module to perform in an improper fashion. Also, cuffs that are extremely small or large in volume may cause errors to occur depending on the BP mode selection. Air hoses as well as cuffs are offered as accessories from Cheetah Medical. CAUTION If the blood pressure cuff is on the same limb as a pulse oximeter probe, the oxygen saturation results will be altered when the cuff occludes the brachial artery. CAUTION To obtain accurate blood pressure readings, the cuff must be the correct size, and also be correctly fitted to the patient. Incorrect size or incorrect fitting may result in incorrect readings. CAUTION When a cuff is used on a patient for an extended length of time, be sure to occasionally check the limb for proper circulation. CAUTION Intra-arm differences vary between people. Do not assume that measurements from both arms are same. CAUTION The module may not operate correctly if used or stored outside the relevant temperature or humidity ranges described in the Performance specifications. Adverse Reactions Allergic exanthema (symptomatic eruption) in the area of the cuff may result, including the formation of urticaria (allergic reaction including raised edematous 11 patches of skin or mucous membranes and intense itching) caused by the fabric material of the cuff. Petechia (a minute reddish or purplish spot containing blood that appears on the skin surface) formation or Rumple-Leede phenomenon (multiple petechia) on the forearm following the application of the cuff, which may lead to Idiopathic thrombocytopenia (spontaneous persistent decrease in the number of platelets associated with hemorrhagic conditions) or phlebitis (inflammation of a vein) may be observed. Cuff Selection & Placement It is important to select the cuff size that is appropriate to the diameter of the patient's upper arm. Use the Range Lines on the inside of the cuff to determine the correct size cuff to use. Wrap the cuff around the arm making sure that the Artery Marker is aligned over the brachial artery (as shown in Figure 1.3). If possible, do not wrap the cuff over the patient's clothing. The cuff should fit snug to the patient's arm for maximum oscillometric signal quality. An appropriate sized cuff should be placed on the nondominate arm where the lower edge of the cuff is located 2cm above the antecubital fossa (interior bend of the elbow). Figure 1.3 NIBP Cuff Placement Ensure that the air hose from the monitor to the cuff is not compressed, crimped or damaged. The midpoint of the subject's upper arm should be supported at heart level for proper measurement accuracy. When the cuff is below heart level, measurement results may be higher and when the cuff is above heart level, measurement results may be lower than comparative results obtained at heart level. Please remember that using a cuff that is the wrong size may give false and misleading results. 12 Note All cuffs and hoses sold with the NICOM system containing an NIBP module must be approved for use by Cheetah Medical. Note The initial inflation pressure will be selected via the "Initial Inflation" option that is located on the NIBP Settings' screen. Cuff sizes available for use with the Cheetah NICOM: Part # 98-0080-04 98-0080-05 98-0080-06 98-0080-07 98-0080-08 98-0080-09 98-0080-10 Description/Size All-Purp, Small Adult All-Purp, Small Adult Long All-Purp, Adult All-Purp, Adult Long All-Purp, Large Adult All-Purp, Large Adult Long All-Purp, Thigh Range (cm) 17-25 17-25 23-33 23-33 31-40 31-40 38-50 Bladder (cm) 9.8x20.3 9.8x20.4 13x27.5 13x27.6 16.3x33 16.3x33 20x40 Error Code List & Definitions Artifact / Erratic Oscillometric Signal Corrective Action: • The patient may have been moving too much. • Check that the cuff is in the correct positions. • Check that the correct size cuff is being applied. NOTE If an NIBP error occurs, measurement values can still be reported. In all cases and applications, these values should be disregarded when concurrent with an NIBP error. Exceeded retry count Corrective Action: • The patient may have been moving too much. • Check that the cuff is properly tightened. • Check that the cuff is in the correct position. • Check that the correct size cuff is being applied. • Check that there is no excessive clothing between the arm and the cuff. 13 Exceeded measurement time limit Corrective Action: • The patient may have been moving too much. • Check that the cuff is properly tightened. • Check that the cuff is in the correct position. • Check that the correct size cuff is being applied. • Check that there is no excessive clothing between the arm and the cuff. Pneumatic Blockage Corrective Action: • Check that the hose has no sharp bends or is pinched. • Check that the patient is not lying on the cuff. • Check that the cuff is in the correct position. Inflate Timeout, Air Leak or Loose Cuff Corrective Action: • Check that the hose is connected to the system and the cuff. • Check that the cuff is properly tightened. • Check that the cuff is in the correct position. • Check that the correct size cuff is being applied. • Check that the cuff is not leaking air. • Check that the hose connections are not damaged or loose. Safety Timeout Corrective Action: • Check the patient. • Check that the cuff is in the correct position. • The patient may have been moving too much. • Take another BP reading. Cuff Overpressure Corrective Action: • Check that the correct size cuff is being applied. • Check that the hose has no sharp bends or is pinched. • Check that the cuff is in the correct position. • Check that the patient is not lying on the cuff. Power supply out of range or other hardware problem Corrective Action: Service may be required. Call a Cheetah Medical representative. 14 Permission problem Corrective Action: Service may be required. Call a Cheetah Medical representative. Transducer out of range Corrective Action: If possible, perform calibration. Service may be required. Call a Cheetah Medical representative. ADC out of range Corrective Action: Service may be required. Call a Cheetah Medical representative. EEPROM calibration data failure Corrective Action: If possible, perform calibration. Service may be required. Call a Cheetah Medical representative Error Measuring NIBP – Critical NIBP module error. Corrective Action: Service may be required. Call a Cheetah Medical representative Device Busy – NIBP device is not responding as it is in the middle of an activity. Corrective Action: • Retry to obtain an NIBP reading. • If this error persists, restart the unit and try again to obtain an NIBP reading. If you still encounter the error message after restarting the unit, service may be required. Call a Cheetah Medical representative 15 1.7 Bedside Care To ensure that the NICOM signals will be recorded to an adequate standard, it is important to follow the following guidelines: NICOM Sensor Placement 1) Shave body hair and wipe the patient’s skin with alcohol (75%) if necessary. If alcohol is used to prep the skin, it is advised to let the skin dry prior to placement of the NICOM sensors in order to preserve optimal gel performance. Finally, use the skin-prep “sand paper” provided in the sensor set to roughen the skin. Place the NICOM Sensors on the patient’s skin as seen bellow (Figure 1.4) Figure 1.4 NICOM Prewired Sensor Placement Note When the sensors are misplaced or become detached the screen will display a warning that will notify the user that there is loss of signal or poor signal quality. CAUTION Do not use NICOM sensors after the expiration date. CAUTION In the unlikely event that the patient has an allergic reaction to the NICOM sensors, detach the sensors immediately from the patient and avoid any further placement of NICOM sensors on this patient. 1.8 Label The following label is attached to the Cheetah NICOM device: 16 1.9 Battery Mode The NICOM monitor can function without external power connection. In this mode of operation, when fully charged, the batteries can provide up to 90 minutes of power. To fully charge the battery when it is depleted, it is necessary to connect the device to the external power supply for approximately 6 hours. When the monitor is disconnected from the external power supply the batteries automatically power the unit so that the user should not experience any interruption in the test. The battery charge indicator reflects that the system currently operates in battery mode and is dependent on battery capacity. When connected to the external power source the battery charge indicator will indicate that the battery is being charged and the amount of battery charge remaining in a graphic way. If the battery level falls to 10% or lower, a warning message will appear. To protect the monitor and the monitor data, the system will shutdown automatically without user prompt if the charge level falls under 5%. CAUTION In order to prevent loss of data or study interruption, working in battery mode is only recommended for short periods of time, for example during transport and not for routine testing. 1.10 Warnings and Precautions Warnings WARNING US Federal Law restricts the sale of this instrument to, or on the order of a physician. WARNING When the USB connection is not used, the socket should be covered with the USB cap at all times. Precautions CAUTION Strictly follow the warning instructions in this manual. 17 CAUTION The instrument is fragile; to prevent damage please handle with care and avoid dropping it. Be careful while unpacking. For system repacking instructions please refer to page 75 on this guide. CAUTION Ensure that the system is only used by a trained person familiar with all system operating procedures. Hospital personnel should complete a training program prior to operating the Cheetah NICOM. CAUTION To avoid damage to the instrument or sensors, be careful of liquid spillage while cleaning. CAUTION Do not expose the instrument or sensors to sprays, liquids or any other type of solvent. CAUTION To avoid damage to the surface of the instrument or sensors: • Avoid excessive pressure when cleaning the lettering. • Do not use solvents or detergents for cleaning. • Do not clean the sensors with an abrasive. Note Scratches on the surface of the sensors will cause inaccurate data recording. CAUTION To avoid damage to the LCD screen - do not expose the instrument to direct sunlight for long periods of time. CAUTION User is prohibited from changing, adding, removing or disassembling any system parts. Warranty shall not apply to any defects, failure or damage caused by improper use and/or improper or inadequate maintenance and care. CAUTION The unit is classified as Class IIb, continuously operated, ordinary equipment with applied part and with signal input output parts. The device is not intended for use in the presence of flammable mixtures. Note The contents of this manual are subject to change without prior notice for improvement of analysis precision. Note Used sensors should not be placed with common household waste products. Contact local authorities for the location of a chemical waste collection program nearest you. 1.11 Cleaning and Disinfecting the NICOM Device CAUTION The NICOM system is classified as non-waterproof. To avoid damage to the NICOM monitor and its accessories (including the NICOM patient cable, the NIBP hose and cuff), avoid entrance of liquids during use and cleaning. 18 CAUTION Be sure to turn the power off and disconnect the AC power cord from the power source before performing cleaning procedures. CAUTION To avoid damage to the surface of the instrument: • • Avoid excessive pressure when cleaning the printed labeling on the monitor frame in the front and rear panel, as well as the adhesive labels on the rear panel Take care not to scratch the front display while cleaning CAUTION NICOM sensors are single-use disposable products and should never be reused, cleaned or exposed to liquids. If necessary, replace the sensors if they become wet or soiled. To clean or disinfect the monitor perform the following: • • • This instrument requires routine cleaning, which includes removal of any soil or dirt from the external surfaces. A soft cloth dampened lightly with water may be used. To disinfect external monitor surfaces, and reusable accessories such as the NICOM patient cable, clean with 75% medical grade alcohol using a dampened soft towel or wipe. Do not expose the instrument, patient cable or sensors to sprays, or any other type of solvents. For NICOM accessories labeled as manufactured by third-party suppliers, follow the respective manufacturer’s instructions for recommended care and maintenance. 1.12 Special Patient Populations There are populations of specific interest in which this monitor has not been tested, including. • Patients with congenital heart disease associated with complex intra-cardiac shunts. • Patients with Continuous Flow LVADs: The NICOM technology works by detecting pulsatile changes in aortic blood volume. With a continuous flow LVAD, by definition, there are little if any pulsations unless the heart itself ejects. Therefore, use of the NICOM device in these patients could be useful in detecting the contribution of the native heart to the cardiac output, but would not detect the contribution of the LVAD. The results, therefore, should be interpreted with this in mind. 19 1.13 Indications for Use The Cheetah Reliant with NIBP and SpO2 functionalities is a portable, hemodynamic monitoring non-invasive Cardiac Output monitoring device that monitors and displays a patient’s Cardiac Output (CO) in Ltr/Min with a Non Invasive Blood Pressure (NIBP) function that non-invasively measures and displays blood pressure (diastolic, systolic and mean arterial pressure) and heart rate and with a SpO2 function that non-invasively measures and displays blood oxygen saturation (SpO2). The device displays associated heamodynamic parameters based on measurements or calculations of measurements already incorporated into the Cheetah Reliant. These parameters are: • Cardiac Index (CI), • Stroke Volume (SV), • Stroke Volume Index (SVI), • Stroke Volume Variation (SVV), • Heart Rate (HR), • Ventricular Ejection Time (VET), • Total Peripheral Resistance (TPR), • Total Peripheral Resistance Index (TPRI), • Cardiac Power (CP), • Cardiac Power Index (CPI), • Blood Oxygenation (SPO2) • Oxygen Delivery Index (DO2I), • Electrical impedance of the chest cavity (Z0), • Thoracic Fluid Content (TFC), • Thoracic Fluid Content change from preset time period (TFCd) and • Thoracic Fluid Content from baseline (TFCd0). • Changes in SV, CO and other hemodynamic parameters which are derived by Bioreactance® as a result of posture 20 The Cheetah Reliant with NIBP and SpO2 functionalities is intended for use within hospitals and other healthcare facilities (e.g., outpatient clinics) that provide patient care. 1.14 Limitations of Use Clinical Situations Potentially Affecting NICOM Algorithm Accuracy or Performance Note Most of the clinical situations and patient conditions listed below may impact absolute values, but should not affect device responsiveness and sensitivity/specificity to assess directional hemodynamic changes. The exception is in circumstances of severe external pacemaker interference. Examples of conditions that can influence reported CO, influence monitor accuracy, or result in suboptimal signal quality. 1. Severe aortic insufficiency The regurgitation fraction associated with severe cases of aortic insufficiency may result in overestimation of the net forward CO. That is because NICOM measures the ejection but does not subtract the backward regurgitation that takes place during diastole. 2. Severe anatomic abnormalities of the thoracic aorta Severe anatomic abnormalities of the thoracic aorta, such as a large synthetic aortic graft, large aortic aneurysm or large aortic dissection can impact the accuracy or performance of hemodynamic parameters. The abnormality has to be large in order to have a meaningful impact on monitor accuracy. 3. External pacemakers and internal pacemakers with unipolar electrodes Use caution in monitoring patients with external pacemakers, and patients with relatively older models of internal pacemakers which utilize unipolar electrodes. Some external pacemakers and unipolar internal pacemakers can add electrical artifact to the NICOM BIOREACTANCE signal. Note It is possible to completely mitigate or significantly alleviate the problem by placing the NICOM sensor 2.5 inches (approximately 6 cm) or more away from the external pacemaker percutaneous lead. Unipolar internal pacemakers are rarely used nowadays. 1.15 SpO2 Introduction: 21 Pulse oximetry is a non-invasive method allowing the monitoring of the oxygen content of a patient's hemoglobin. A sensor is placed on a thin part of the patient's body, usually a fingertip or earlobe, or in the case of an infant, across a foot. Light with red wavelengths and light with infrared wavelengths is sequentially passed from one side to a photo detector on the other side. Changing absorbance of each of the two wavelengths is measured, allowing determination of the absorbances due to the pulsing arterial blood alone, excluding venous blood, skin, bone, muscle, fat, and (in most cases) fingernail polish. Based upon the ratio of changing absorbance of the red and infrared light caused by the difference in color between oxygen-bound (bright red) and oxygen-unbound (dark red or blue, in severe cases) blood hemoglobin, a measure of oxygenation (SpO2 - the percent of hemoglobin molecules bound with oxygen molecules) can be made. The SpO2 functionality of the NICOM device can be operated by either the NELL-1 OEM SpO2 module manufactured by Covidien Plc or the XPOD SpO2 device manufactured by NONIN Inc. Both the NELL-1 and XPOD are indicated for the continuous non-invasive monitoring of functional oxygen saturation of arterial hemoglobin (SpO2). The operation of the SpO2 functionality is controlled by the Reliant monitor as described in following sections. The SpO2 module is incorporated inside the Reliant monitor when using the NELL-1 OEM SpO2 module. The XPOD is an auxiliary SpO2 device which is connected to a dedicated XPOD connector on the Reliant monitor. Populations that may use the SpO2 function: The NICOM SpO2 module is intended for use with neonatal, pediatric, and adult patients during both no motion and motion conditions and for patients who are either well or poorly perfused, dependent on the SpO2 sensor used. SpO2 Sensors for the NELL-1 SpO2 Module: The NELLCOR DS100 SPO2 sensor comes supplied with the NICOM with the SpO2 functionality. In addition, the Cheetah Reliant with NIBP and SpO2 functionality is also compatible with any of the following NELLCOR SpO2 sensors that have the following accuracy specifications (*Arms): Sensor REUSABLE: D-YS (Infant to Adult) D-YS with D-YSE Ear Clip D-YS with D-YSPD SpotClip DS-100A OXI-A/N 22 Adults/Pediatrics Accuracy Neonates Accuracy ± 3 digits ± 3.5 digits ± 4 digits N/A ± 3.5 digits N/A ± 3 digits ± 3 digits N/A ± 4 digits DISPOSABLE: OXI-P/I OxiCliq A: OxiCliq P: OxiCliq N (adult): OxiCliq I: ± 3 digits ± 2.5 digits ± 2.5 digits ± 2.5 digits ± 2.5 digits N/A N/A N/A ± 3.5digits N/A *Arms: All accuracies are expressed as ± “X” digits. Pulse oximeter equipment measurements are statistically distributed; about two thirds of pulse oximeter measurements can be expected to fall in this accuracy (ARMS) range. "Neonatal Accuracy: When sensors are used on neonatal subjects as recommended, the specified accuracy range is increased by + 1 digit, as compared to adult usage, to account for the theoretical effect on oximeter measurements of fetal hemoglobin in neonatal blood. For example, OxiCliqN accuracy on neonates is + 3.5 digits, rather than + 2.5." Cleaning and maintenance instruction for the SpO2 sensor are described in the specific SpO2 sensor user manual which is supplied with the sensor. The SpO2 sensor is connected to the monitor via the dedicated SpO2 cable that connects to the dedicated connection on the back of the monitor (See Figure 1.2). Place the sensor on a thin part of the patients body (e.g., fingertip or earlobe, or in the case of an infant, across a foot). To start SpO2 monitoring while running a test, select Start SpO2 from the main menu if SpO2 automatic mode is not the default mode. When this is done SpO2 monitoring shall commence automatically. NELL-1 SpO2 Module Specifications: The following are the SpO2 module specifications: • • • • • • • • • • • • Patient Range Neonate through adult Operating Temperature 0 °C to +60 °C Relative Humidity 15% to 95% non-condensing Altitude 1,000 feet below sea level to 10,000 feet above sea level Operating Mechanical Shock Per IEC 600068-2-27, 100G, 6 ms half sine Operating Sinusoidal Vibration Per IEC 600068-2-6, 10 Hz to 500 Hz, 1 G peak, 10 sweeps/axis Operating Random Vibration Per IEC 600068-2-34, 20 Hz to 500 Hz, 0.02 g2/Hz Storage Temperature -40 °C to +70 °C Relative Humidity 15% to 95% non-condensing Storage Altitude 1,000 feet below sea level to 20,000 feet above sea level Vibration Per NSTA Project 1A Drop Per NSTA Project 1A 23 • Saturation 1% to 100% SpO2 SpO2 Sensors for the XPOD SpO2 Device: The NICOM with the SpO2 functionality is supplied with the NONIN 8000AA SPO2 sensor. In addition, the Cheetah Reliant with NIBP and SpO2 functionality is compatible with any of the following NONIN SpO2 sensors that have the following accuracy specifications: Adults/Pediatrics Neonates No Motion REUSABLE: DISPOSABLE: Finger Clip: Flex: Soft Sensor: 8000R: 8000Q: 6000 Series: 7000 Series: ± 2 digits: ± 3 digits ± 2 digits ± 3 digits ± 4 digits ± 2 digits ± 3 digits ± 3 digits ± 3 digits N/A N/A N/A ± 3 digits ± 4 digits Finger Clip: Flex: Soft Sensor: All Sensors: ± 2 digits ± 3 digits ± 3 digits : ± 2 digits ± 3 digits ± 4 digits ± 4 digits 3 digits Motion REUSABLE: Low Perfusion Notes: Reusable Group: Finger Clip Sensors: 8000AA-1, 8000AA-3, 8000AP-1, 8000AP-3 Flex Sensors: 8000J-1, 8000J-3, 8008J, 8001J Soft Sensors: 8000SS, 8000SM, 8000SL Disposable Group: Flexi-Form® II (7000 Series) Sensors: 7000A, 7000P, 7000I, 7000N 6000 Series Sensors: 6000A, 6000P, 6000I, 6000N Instruction for cleaning and maintenance of the SpO2 sensor are described in the specific SpO2 sensor user manual which is supplied with the sensor. The SpO2 sensor is connected to the monitor via the dedicated SpO2 cable that connects to the dedicated connection on the back of the monitor (See Figure 1.2). Place the sensor on a thin part of the patient’s body (e.g., fingertip or earlobe, or in the case of an infant, across a foot). To start SpO2 monitoring while running a test, select Start SpO2 from the main menu if SpO2 automatic mode is not the default mode. When this is done, the SpO2 monitoring shall commence automatically. 24 XPOD SpO2 Module Specifications: The following are the SpO2 module specifications: • • • • • • • • • • • • • • • • • • • • • • Patient Range Neonate through adult Oxygen Saturation Range (SpO2): 0 to 100% Displayed Pulse Rate Range: 18 to 321 beats per minute (BPM) Measurement Wavelengths and Output Power Red: 660 nanometers @ 0.8 mW maximum average Infrared (using NONIN PureLight® Sensor): 910 nanometers @ 1.2 mW maximum average SpO2 Accuracy (Arms*) 70-100% (* ±1 Arms represents approximately 68% of measurements) Temperature (Operating) 0oC to +50oC (32oF – 122oF) o Specified operating temperature is for the module. o Operating temperature of Sensor is not to exceed 40oC (104oF) Temperature (Storage/Transportation) -20oC to +50oC (-4oF - +122oF) Humidity (Operating) 10 to 90% non-condensing Humidity (Storage/Transportation) 10 to 95% non-condensing Power Draw 60 mW typical operation Voltage Input 2 to 6 VDC, w/100 mV max. ripple I/O Signals 0 to +5.0 VDC (nominal) Patient Isolation Meets IEC 60601-1 Dielectric withstand Leakage Current Not applicable Fluid Spill Resistance None Ruggedness (Shock) IEC 60068-2-27 Ruggedness (Vibration) Sinusoidal – IEC 60068-2-6 Random – IEC 60068-2-64 Sensors Designed to use NONIN®-branded PureLight® sensors only Shielding An RF shield is included (placed over the analog components) Warnings & Precautions DO NOT use the SpO2 module for any purpose other than specified in this manual without written consent and approval from Cheetah Medical. CAUTION Substitution of a component different from that supplied may result in measurement error. Repairs should be undertaken only by personnel trained or authorized by Cheetah Medical. CAUTION All SpO2 sensors used to connect the patient to the NICOM SpO2 module must be approved by Cheetah Medical. Unauthorized SpO2 sensors may cause the module to perform in an improper fashion. Authorized SpO2 sensors are offered as accessories from Cheetah Medical. 25 CAUTION Do not use NIBP or constricting instruments on the same appendage as the sensor. CAUTION The SpO2 module may not operate correctly if used or stored outside the relevant temperature or humidity ranges described in the Performance specifications. WARNING Intravascular dyes (such as indocyanine green, methylene blue, etc.) and darkly pigmented skin can adversely affect SpO2 readings. WARNING Significant amounts of dysfunctional hemoglobins (such as carboxyhemoglobin, methemoglobin, etc.) may adversely affect oximetry performance. WARNING Oximetry performance may be impaired when patient perfusion is low or signal attenuation is high. WARNING Long cables (such as the sensor or extension cable) may cause patient strangulation if routed incorrectly. WARNING Electromagnetic interference which includes devices such as defibrillators, MRIs, or electro-surgical units may adversely affect SpO2 readings. CAUTION Do not immerse sensors. SpO2 Error Code List & Definitions 26 SpO2 System is being Reset Corrective Action: Wait until the SpO2 measurements are initiated. If after 3 minutes the SpO2 measurements are not updated, service may be required. Contact Cheetah-Medical Representative. SpO2 Low signal, Please check sensor Adjustment Corrective Action: Readjust the SpO2 sensor. If problem persist, replace the SpO2 sensor. If problem persist, call Cheetah-Medical representative. SpO2 sensor malfunction, Please replace SpO2 Sensor Corrective Action: Stop the SpO2 module. Replace the SpO2 sensor. Start the SpO2 module. SpO2 Module Error, please contact Cheetah-Medical Corrective Action: Service is required. Call a Cheetah Medical representative 27 Chapter 2 2.0 Screens Overview Note All NICOM screens are now touch-sensitive. All on screen actions can be performed by touching the on screen buttons while the hardware buttons' operation hasn't changed and still works as described below. 2.1 Start up Screen The first activation of the device opens the “Start Up” screen, which is the gateway to the program. 28 Figure 2.1 NICOM Start up screen 2.2 Menu Screen The purpose of the Menu Screen is to allow the user easy navigation through the system's main workflows and functionalities. In addition to the touch screen, the NICOM's Up/Down buttons move the cursor among the menu items. The NICOM's OK button opens the appropriate screen. Figure 2.2 NICOM Main Menu screen In order to perform a measurement it is required to insert the patient's details; this action can be performed in the New Patient screen for patients who have not been tested before. For returning patients, select the Existing Patient screen by placing the arrow on Existing Patient and pressing the NICOM's OK button. To select an existing patient, choose the required patient from the list to the right by using the arrow keys to highlight the patient’s name and then press the NICOM's OK button. Use the Settings screen in order to set the system's time and date, measure units etc. For more details about the settings' screen please see 2.7. Choose the Shut Down screen in order to safely turn off the device. 29 2.3 New Patient Screen The purpose of the New Patient Wizard Screen is to add a new patient to the unit. Figure 2.3 NICOM New patient screen The wizard screen opens with the ID field. In order to navigate between the numbers and letters of the keyboard press the NICOM's Left/Right and Up/Down arrow keys and in order to select a specific letter or number, press the OK button while the required digit is highlighted. In fields that have multiple options to choose from (such as Gender), move the cursor to the selected field; when the selected option is highlighted press the NICOM's OK button in order to lock the selection. In order to move to the next field press 'Next' and fill in the required data. The ID, age, weight, height and gender fields are mandatory. All other fields that follow are optional. When reaching the final mandatory field, the on screen Finish button will be enabled, indicating that from this point on, the wizard can be completed at any stage, and the remaining patient information is discretionary and not mandatory. When entering the patient’s age, note that it is possible to enter months as well as years. For instance, refer to the following examples: For 1 months enter “0.1” For 10 months enter “0.10” For 20.6 years enter “20.6” 30 Note The new patient information will be kept in the system as long as it is not shut down. In order for the patient to be added to the existing patients' list and stored there even after system shut down, a test must be run first, with at least one recorded result. Conversely, if the system is shut down prior to obtaining at least one reading, the patient information will be lost from the existing patients’ list. Note In order to prevent confusion between patients, a unique patient ID for each patient is entered by the operator. If the exact same patient ID is entered into the system the user will be prompted to use a different ID number in order to prevent confusion in storage. Note The new patient's information will be displayed on the top of all Run screens. The posted information includes: ID, full name, gender, age, weight, height and BSA. The measure units (lb/ft or kg/cm) will appear alongside the relevant parameters to prevent mix ups. The measured units may be set or modified in the device Settings screen. Note In order to prevent confusion between units and measurements, if the system recognizes that the weight or the height entered by the user does not match the normal weight and height per a given age, it will prompt a warning message. 2.4 Existing patient Figure 2.4 NICOM Existing patient screen The purpose of the Existing patient screen is to upload the information of a patient that already exists in the monitor's data base. In order to navigate between the screen's options use the arrow keys or touch the desired selection, then press the NICOM's 31 OK button in order to lock your selection. To present the results of a patient's previous tests select the Display Results option and then select the required test from the list presented in a pop-up window. The Run option will open the Run screen, to allow a new monitoring session to be performed on the patient. The Update Details option opens the Patient Form screen to allow the update of any patient detail that requires modification or update. The Close option navigates back to the main menu screen. In order to use the screen's pop-up menu choose the desired menu button and choose an option. The Change Patient option opens a pop-up window that shows the list of existing patients, as shown in the Main Menu screen. In order to change patient highlight the patient’s ID, then press the NICOM's OK button. The selected patient's details will be loaded onto the Existing Patient screen. In order to dismiss the pop-up window without changing the patient, press BACK on the NICOM. Choose Exit in order to navigate back to the Main Menu screen. In order to dismiss the pop-up menu without choosing any option press the BACK button again. 2.5 Run Screen The purpose of the Run screen is to run a new test, save it and display its results during the test. Figure 2.5 NICOM Run screen The Run Screen is accessed by selecting the Run option in the New Patient or Existing Patient screens. After accessing the Run Screen, press the NICOM's OK button to run a test. The Stop icon that appears on the top left hand side of the Run Bar, will be replaced by the Play icon; in order to pause the test press the NICOM's OK button again (the play icon will now be replaced by the pause icon). In order to browse between the different types of display screens, select the Switch Display 32 option from the Run screen's pop-up menu, then use the UP and Down buttons to select the display screen of interest. In order to access the Run pop-up menu press the BACK button, then use the arrow keys to navigate between the options. To view the quality of the data generated during the test the raw data and dNICOM average morphology are displayed in real-time. In addition to the technical data dxdt, VET and Z0 are also displayed. The pop-up menus accesses from the various Run screens (Run, Dashboard, Trends and Numerical Display) enable the following options: NIBP NIBP Time Interval - this option allows the user to change the time interval settings during an ongoing test. Once selected, a small "V" sign will appear to the left of this option. The change is relevant for that specific test only. The NIBP time interval for the following test will be set according to the pre-defined default as appears on the Settings screen. This option is available through all Run screens' pop-up menus. Manual NIBP - this option allows the user to start a manual NIBP measurement. The NIBP will initiate the measurement immediately after selection. Following the manual reading the system will continue to periodically obtain an NIBP measurement according to the default time interval chosen in the Settings screen. End NIBP - this option allows the user to quit all NIBP measurements immediately, which also deflates the cuff. The change is relevant for that specific test only. The NIBP measurements for the following test will be set according to the pre-defined default as appears on the settings screen. This option is available through all Run screens' pop-up menus. Resume NIBP – this option replaces the End NIBP option on the sub menu. It only becomes available after the End NIBP option was selected and is meant to reenable NIBP measurements during a running test. View Y Axis Auto Scaling - this option activates an automatic focus on the dynamic area of interest vs. the whole spectrum of potential results. Thus, this option provides more insight on trends. Index Display – by selecting this option, the CO, SV, CP and TPR parameters will be replaced by their indexed parameters on the display. Indexed parameters are corrected to the patient’s BSA. Once selected, a small 'V' sign will appear on the left hand side of the 'Index Display' option on the pop-up menu Time Scale - this option enables the user to create wider or narrower timescale view, for example in order to focus on a short period of interest or to visualize many hours 33 of monitoring and observe a longer-term trend. The user has a choice of six different time-scale options: 5 min, 20 min, 30 min, 1 hour, 4 hours and 10 hours. Test Controls Initiate Calibration - This option enables the user to run a new patient calibration process on the system while a test is ongoing, at any given time. Start – by choosing this option the user will begin running a new test. Another way to do so is by clicking the OK button while on the main Run screen as long as a Test is not already running at the time. Pause – this option allows the user to halt a running test for an unlimited period of time, without terminating it. The test can be resumed at any time by pressing the NICOM's OK button or by choosing the Continue option on the Test Controls' sub menu. When pause is operated, “pause” indicator will appear in the alerts bar. Stop - this option prompts a pop-up screen asking the user to decide whether or not to quit a running test. Silence Alarm - this option allows the user to silence the alarm for two minutes during a test. Protocols The Protocol Wizards guide the user in step-by-step fashion through NICOM supported protocols. The Protocol Wizard is designed to simplify administration and data management related to hemodynamic tests such as the Passive Leg Raise, an Orthostatic Bioreactance maneuver or Bolus injection. Once chosen, the tests perform automatically without interruption of monitoring and will only request user involvement and confirmation where required. The wizard will track the relevant clinical parameters and will also calculate additional clinical information to provide the user with the end point of the protocol. A protocol can be initiated at any stage during a test, except for the calibration phase. Simply press the Back button on the NICOM to access the screen's pop-up menu. In addition, the user can start the PLR and the Bolus Protocols directly from the Challenge stage. If this is selected, the system will automatically analyze the last 3 minutes of readings to establish whether or not there is a valid Baseline stage. The system will not allow for a direct challenge stage if the last 3 minutes readings contain poor signals or excessive movements. When selecting the 'Protocols' option a sub menu opens with a choice of the following protocols: Orthostatic Bioreactance , PLR test, and Bolus. Once selected, the protocol wizard will appear on screen and state the steps that are to be taken. The Protocol results can later be viewed on the designated 'Protocol Tabular Display' screen (see section 2.8 for more details).The NICOM's Protocol Wizards consists of: 34 Orthostatic Bioreactance Screening- Figure 2.6 NICOM Orthostatic Bioreactance Protocol This option allows the user to determine the hemodynamic response to an orthostatic maneuver. This protocol persists of two main steps: Baseline and Challenge. During the baseline stage, the patient is monitored for three minutes while in a sitting position. The Challenge step is based on monitoring the patient for three more minutes while lying in supine position. As the Challenge step ends, the NICOM will produce an Orthostatic Bioreactance protocol outcome report. 35 Passive Leg Raise (PLR) Test – Figure 2.7 NICOM PLR Protocol This option allows the user to determine the hemodynamic response to a passive leg raise maneuver. This protocol persists of two main steps: Baseline and Challenge. During the baseline step, the patient is to be lying in a semi-recumbent position where the head and shoulders are elevated by 30-45%, as when resting on a high pillow, while being monitored for three minutes. The Challenge step is based on monitoring the patient for three more minutes while lying in supine position with legs elevated to 45 degrees. As the Challenge step ends, the NICOM will produce a NICOM PLR report. 36 Bolus injection Protocol Figure 2.8 NICOM Bolus Protocol This option allows the user to determine the homonymic response to a Bolus injection. It is persist of two main steps: Baseline and Challenge. During the baseline step, the patient is to be still with minimal movement or clinical intervention, while being monitored for three minutes. The challenge step consists of monitoring the patient while bolus is being injected to him. You can determine when the bolus protocol ends as per the injection completion by selection the stop bolus protocol option. As the Challenge step ends, the NICOM will produce a NICOM Bolus report. Manual Data Entry Enter MAP - this option allows the user to insert the patient's MAP value into the system, as retrieved from another BP monitor such as arterial line or a manual BP test. The inserted MAP reading will be presented on the screen no later than 10 seconds after the manual entry and will also serve to derive the MAP-related parameters, namely TPR, TPRI, CP and CPI. Enter SpO2 and Hgb - From the Side Menu the user can manually enter the Hgb and SPO2 through the dial box window. Following the entry of these two parameters the system will update DO2I. 37 Switch Display - this option allows the user to toggle through the different run screens in order to view all changes in real time. Use the Switch Display option to navigate between the Run screen, the Dashboard, the Numerical Display the Trend Display and Protocol display screens (see figure 2.6 below). Note The Protocol Display screen will only be enabled in case a protocol was run successfully during a test. Exit - this option navigates back to the Main Menu screen. In order to begin monitoring a patient, open the Run screen by entering the new patient information or by selecting an existing patient of the list that appears on the NICOM's Main Menu screen, then press the NICOM's OK button (as indicated on the screen's menu bar's help line - see figure 2.5). In order to pause the test press OK again. In order to completely stop the test choose the Stop option on the Run screen's pop-up menu. A window will then emerge, state that a test is being run and ask the user to confirm whether or not to end it. If a choice is made to stop the test - the stop icon will replace the play icon on the run bar at the top left side of the screen. Note All tests can be started and paused using the pop-up menu options. On the lower section of the screen 3 oscillograms run during a measurement: two ECG/time-marker channels and one NICOM channel. Eleven empty numeric display boxes appear on the top and side of the screen. During measurement the system will display results of CO/CI, HR, SV/SVI, SVV, NIBP, CP/CPI, MAP, TPR/TPRI, dxdt, VET and Z0. Note A refresh clock appears on the Run bar on all Run screens that counts the number of cycles remaining until the results refresh and appear on the screen. SpO2 Start/Stop SpO2 - this option allows the user to start the SpO2 module to measure automatically SpO2 measurements. In this working mode the spO2 module will continuously display SpO2 results. If Hemoglobin was entered, the Do2I shall be calculated continuously as well at the same rate the CI is updated. Note When the SpO2 in not in automatic mode or was disabled automatically by the system, the SpO2 title on screen shall be displayed with an annotation (man) which means the SpO2 is enabled for manual entry. Note When the SpO2 is on automatic mode, the option to enter manually SpO2 readings is disabled. The SpO2 title in this working mode will not be annotated with the annotation (man). 38 2.6 Trend Display Screen The purpose of the Trend Display screen is to display graphic results of all saved or ongoing measurements: CO, CI, HR, NIBP (SBP, DBP and MAP), TPRI, TPR, SV, SVI, SVV, TFCd0, SpO2, DO2I Figure 2.9 NICOM Trend display screens To reach this screen, press the Display Results button in the Existing Patient screen (Figure 2.4). The results are shown graphically in the time scale defined for the screen. Use Right and Left buttons to browse and see previous results. When viewing the results of a saved test, the pop-up menu contains several viewing options such as: Y Axis Auto Scaling, Time Scale, Switch Display and Patient Info. Select the Switch Display option or use the Up/Down arrow keys on the device in order to navigate between the Numerical Display and Trend Display screens. The Time Scale option opens a sub menu that allows the user to choose different time scales. The Patient Info option opens the Existing Patient screen. The CI and the CO are separated in two different trends to present a better resolution for each. The index parameter trend is presented in broken line and the clinical parameter trend is presented in full solid line. The SpO2 and DO2I trends are displayed as well. 2.7 Tabular Display Screen The purpose of the Tabular Display screen is to display the numeric results of saved or ongoing measurements. The Numeric Display contains the key clinical information in a tabular format. In addition, the last column of the Numerical contains the number of events per Study were applicable. By clicking on the annotated row, the system displays the Event list of the specified Study. In order to view the Tabular display, select the Switch Display option or use the Up/Down arrow keys on the device. 39 Figure 2.10 NICOM Tabular display screen 2.8 Protocol Tabular Display screen Figure 2.11 NICOM Protocol Tabular display screen The Protocol Display contains the same clinical parameters as the Numerical display but in addition the last row displays the delta between the baseline and challenge stages of the protocol. It also displays the date, time and protocol type. 40 The protocols' results are displayed 13 line items at a time in case the Study is set to 30 seconds, or 7 line items at a time, per protocol, in case the Study is set to 1 min. In order to view the protocol's Tabular display select the Switch Display option or use the Up/Down arrow keys on the device. The Bolus protocol results which can have up to 60 lines (in case of 230 sec samples) are displayed in three lines only – average baseline, maximum challenge and the delta in percentage. 2.9 Hemodynamic Dashboard Screen The Hemodynamic Dashboard screen is the main monitoring screen. It allows the clinician to maximize the information that is viewed without having to skip between screens. The waveforms are not shown and the extra space is used to further highlight the measured parameters themselves. The Hemodynamic Dashboard screen is accessed by using the arrow keys or by selecting the switch display option on the popup menu and then choosing the Dashboard option on the sub menu. Figure 2.12 NICOM Hemodynamic Dashboard screen The results are shown for CI, CO, HR, SV, SVV, SVI, TPR,TPRI, NIBP, CP/CPI, MAP, TFCd0, TFC, TFCd, SpO2, DO2I, along with the Dashboard Grid. With the Dashboard Grid the clinician can view in the Dashboard screen the trends of two selected clinical parameters from a list that includes all the clinical parameters the NICOM is measuring. Note that the trends in the Dashboard are controlled independently from the trends in the Trend Display, i.e. changing the Dashboard 41 trend time scale or Y-Axis does not influence the settings of the trends in the Trend Display and changing the time scale and Y-axis in the Trend display does not influence the Dashboard trend. 2.10 Settings Screen The Settings screen is accessed via the Main Menu screen. The purpose of this screen is to allow the user to control various device features such as: Date and Time settings, NIBP settings, SpO2 settings, Connectivity settings, Network Configuration Settings, Wi-Fi settings, Test settings and General device settings. Figure 2.13 NICOM Settings screen Select a field in the Settings screen and the options related to the field are automatically displayed. After choosing the desired option select Apply in order to accept changes and stay in the Settings screen; select the on-screen OK button in order to accept changes and go back to the Main Menu screen; select Cancel in order to discard changes and go back to the Main Menu screen. Note On all settings screens - select Apply in order to approve changes and remain in the Settings screen or select the on-screen OK button to approve changes and go directly back to Main Menu. All other actions will result in changes not being saved. The Pop-up menu on this screen offers the following options: The Demo option will prompt a window with all of the Run screen's features. Selection of Demo allows a Demo test to be performed on a simulated patient. This option is intended for new users to better understand how to run a test on a patient. 42 Live Demo option will prompt a window where a desired file can be opened. When selected, the Run screen’s window will be prompted having all of its features. Selecting the Live Demo allows a recorded test to be performed. This option is intended for new users to better understand how to run a test on a patient and how to perform protocols. The About option will prompt a window with technical information that can facilitate the quality of service and support when needed. The Calibration option allows a technical support person or otherwise authorized user to calibrate the system whenever needed. Note Should not be attempted by user The Device Mode option allows the user to choose between four operating modes: Monitoring Mode , PC Mode, Host Mode and Service Mode The Set option - allows the user to toggle through the following options: General, Test, NIBP, SpO2, Connectivity, Network configuration, Wi-Fi options and Date and Time. Each option opens a screen where different parameters can be changed. From the Settings Screen, select Apply to approve changes and remain in the Settings screen or select the on-screen OK to approve changes and go directly back to Main Menu. Select Cancel to disregard the changes and go directly back to the Main Menu. The Exit option - will navigate back to the Main Menu screen. 43 2.11 Set Option The purpose of the Settings screen's Set option is to allow the user to change the device's settings. The settings are divided into the following groups: General options, Test options, NIBP options, SpO2 options, Connectivity, Network Configuration, Wi-Fi options and Date and Time. Figure 2.14 NICOM Settings screen When selecting the Settings option on the Main Menu screen, the General Options screen, which is the default screen for this section is presented. In order to toggle through the different Set options, press the Back button to activate the screen's pop-up menu. Select the Set option using the up and down keys, then select the desired Set screen and press the NICOM's OK button. In order to operate the fields of the selected Set screen, highlight the desired option, select OK on the NICOM to operate the field, and then use the Left/Right buttons to move between the options; the flickering red highlight marks the chosen option. Select the NICOM's OK button again in order to lock your selection. Use the arrow keys in order to move to the next field. In order to save the new settings select the onscreen OK button. Select Cancel in order to discard the changes and go back to Main Menu. Select Apply in order to accept all changes, and remain in the Settings screen. 44 2.12 General Options Figure 2.15 NICOM Settings Screen's General Options In the General Options' screen the user can choose to change the settings of the device's Height Units, Weight Units, Electric Grid, Audible Alarm, Date Format and Time Format. 45 2.13 Test Options Figure 2.16 NICOM Settings screen's Test options In the Test Options' screen the user can choose to change the settings for the device's Test Type, Sample Interval and TFCd measuring time. 46 2.14 NIBP Options Figure 2.17 NICOM Settings screen's NIBP options In the NIBP Options' screen the user can choose to change the settings for the NIBP module: Operation Mode, Time Interval, Initial Inflation pressure or choose to enable or disable the NIBP option. 47 2.15 SpO2 Options Figure 2.18 NICOM Settings screen's SpO2 options In the SpO2 Options' screen the user can choose to change the settings for the SpO2 functionality: Hgb Posting Period and SpO2 Operation Mode. 48 2.16 Connectivity Figure 2.19 NICOM Settings screen's Connectivity options In the Connectivity screen the user can choose to change the NICOM connectivity method to an external system for continuous data flow. 49 2.17 Network Configuration Figure 2.20 NICOM Settings screen's Network Configuration options In the Network configuration screen the user can choose to change the configuration connection to the hospital network. 2.18 Date and Time Figure 2.21 NICOM Settings screen's Date and Time options 50 Use the Date and Time screen to set the time and date of the device's clock. This clock controls the date and time that are saved for every record and displayed on the Trend Display and Tabular Display screens. Press the NICOM's OK button to operate the field. Use the arrow keys to set the desired date/ time. Press the NICOM's OK button again and use the arrow keys in order to move to the next field. In order to save the new settings and remain in the settings screen select the Apply button; in order to save the new settings and go back to the Main Menu screen press the on screen OK button. Select Cancel in order to discard the changes and go back to the Main Menu screen. 2.19 Device Mode Figure 2.22 NICOM Settings screen's Device mode options Note The Device Mode option is located in the Settings' pop-up menu. Press the Back button to access the pop-up menu options. There are four Device Mode options: Monitoring Mode, Host Mode, PC Mode and Service Mode and. Apart from Monitoring Mode, the other three are intended for unique features outside routine use of the monitor: 1. Monitoring Mode - on start up and during patient testing the unit works in a standard mode where the information is presented on the NICOM screen. This is the NICOM's work-mode. 2. Host Mode - enables the NICOM EMR application for download and management of testing information. 51 3. PC Mode - transfers control of the unit to a PC via the NICOM PC software application. PC Mode is not intended for commercial users. Note It is necessary for the user to enter the Service Mode option and insert the required password in order for the PC Mode option to become enabled. Note This functionality is currently reserved for highly select research applications. In order to discuss access to NICOM PC Mode and to obtain the required NICOM PC software application please contact an authorized Cheetah Medical agent. Use of this feature also requires connection of the PC to a special isolation transformer because most PCs are not safe for use when connected to a person and thus require isolation to prevent electric shock hazard. 4. Service Mode – this working mode enables technicians to retrieve data directly from the system's analog board without opening the unit. This mode is intended exclusively for the use of Cheetah Medical technicians and engineers. Thus, it is password protected. 5. Check up Mode - Once the Simulator is connected to a NICOM monitor, the Check up Mode Wizard shall test the NICOM monitor and shall verify that it works according to specs and within the factory calibration thresholds. At the end of the test, the Check up Wizard shall report the user if the system is working according to specs and is calibrated or not. Warning If the Check up fails, please do not use the NICOM monitor and contact a Cheetah-Medical representative. 52 WARNING The NICOM's USB connector has a cap which is not to be removed when the device is used for monitoring. Should the operator work in PC Mode while the unit is connected to a patient regardless of the above warning, the connection of the PC Main through a NICOM Isolation Transformer is required. In the event that the user wishes to use the device in PC Mode while running a test or while otherwise connecting NICOM to a patient, please contact Cheetah Medical in order to purchase a NICOM Isolation Transformer first. 2.20 Host Mode Screen Figure 2.23 NICOM Host Mode screen The Host Mode screen has two purposes. The primary purpose is to enable the NICOM EMR application which allows the user to download and manage testing information (see more in Chapter 5). The other purpose of this screen is to manage the technical aspects and functionalities of the NICOM unit, such as software updates, extracting performance logs and the like and is intended for qualified NICOM technicians only. 53 2.21 Service Mode Screen Figure 2.24 NICOM Password Entry (left) and Service Mode Screens (right) Note The Service Mode screen is password protected. For service, please contact the Cheetah Medical technical support team. The Service Mode screen is intended to better support special requirements that are relevant only for service purposes. When entering the Service Mode, the words 'Service Mode' will be displayed on both ends of the Menu Bar on all of the NICOM's screens. The Hemodynamic Dashboard screen will now display four technical parameters that are intended for Cheetah Medical technicians only, alongside all other system monitoring parameters. 2.22 Live Demo and Demo Screens Figure 2.25 NICOM Demo screen 54 The Demo Screen is intended to show the various monitoring screens and to demonstrate how the information is presented during a test, without the need to connect the monitor to a patient and run a real test. This screen was developed for training purposes. It simulates the procedure of running a test on a patient using the system only (no disposables are needed for this action). Press the OK button to start a study; scroll between the various screens using the Up/Down arrow keys in order to visualize a demonstration test. 2.23 Shut down Screen The purpose of the Shut Down screen is to safely turn the device off. The Shut Down screen is accessed by selecting the Shut Down option on the device's Main Menu screen. Figure 2.26 NICOM Shut Down screen To turn the device off, select the on screen 'Yes' option by using the NICOM's arrow keys and press the NICOM's OK button. In order to cancel the Shut Down screen and return to the Main Menu screen, choose the on screen 'No' option. 55 2.24 WI-FI options Figure 2.27 NICOM Wi-Fi options screen The purpose of this screen is to allow the user to set the Wi-Fi connectivity and operate it. The user can enable/disable it, he can select a network to connect to by selecting it from the list, and if required, he can enter a network password in order to connect to. The user must make sure the Wi-Fi dongle is properly connected to the NICOM’s USB port by verifying that the Wi-Fi Icon in the bottom of the screen will indicate the connection status and signal strength. A Wi-Fi indicator appears in the menu and indicates the Wi-Fi connection status. The number of bars next to the stick indicates the signal strength so that 3 bars reflect good strength and no bars refelct no signal the following sigh will appear . If the dongel is not connected . If Wi-Fi is in enabled but not connected to a network a cross will apear over the icon . When selecting a network from the list described in figure 2.27, the same indicator will appear with the same meaning, only that when a network is secured it will be marked with a lock next to the Wi-Fi stick , the dongel status and the Wi-Fi enabele/disable status will not be reflected in the list. 56 Chapter 3 3.0 Basic Functions 3.1 Saving a New Patient The following instructions go through the process of saving new patient details. 1. Choose the New Patient option on the Main Menu screen and press the OK button on the NICOM. 2. Insert the patient's personal details to the on-screen wizard: Use the arrow keys to choose the requested digit. Press the NICOM's OK button for the digit to be inserted to the field. Select the on-screen Next button in order to be directed to the following wizard screen; select the on-screen Cancel button in order to discard of the form and move back to the Main Menu screen; select the on-screen Back in order to move back one step at the wizard; select the on-screen Finish button in order to save the inserted data and move on to the Patient Information screen and to monitor the patient. Note The Finish button will only be enabled when all mandatory fields have been filled in with the patient's information. Note The new patient information will be kept in the system as long as it is not shut down. In order for the patient to be added to the existing patients' list and stored there even after system shut down, a test must be run first, with at least one recorded result. Conversely, if the system is shut down prior to obtaining at least one reading, the patient information will be lost. 3. On multiple choice fields – such as Gender – use arrow keys in order to move between the options. The red highlighted option is recognized as the chosen option. Press OK in order to set your selection. 4. The age, weight, height and gender fields affect some of the calculations and results. Therefore, if it is not possible to enter true values, the user should attempt to estimate them; these are also mandatory fields on the system. 5. Select the on screen Finish button in order to save the inserted data. You will then be forwarded to the Patient Information screen where you can glance at the information entered and proceed to monitor the patient or review more options. 57 3.2 Performing a Test The following instructions summarize the basic actions that should be complied with in order to perform a measurement and save the results. 1. Turn on the NICOM monitor by holding the power switch down for 3 seconds. 2. Prior to monitoring the patient make sure that the Settings are appropriate for the test, including test type, NIBP options, SpO2 options, sample interval and the like. 3. Choose an existing patient from the Existing Patient list on the main menu screen, or insert a new patient through the New Patient screen (section 2.3 and section 3.1 respectively). Measurement cannot be performed without being associated with a specific patient. 4. Attach the NICOM Sensors to the patient in locations as shown below (instructions are also provided on the sensors' bag), on clean, prepped and preferably hairless skin. Figure 3.1 NICOM Sensors Instructions 5. Special Note The NICOM double sensors are designed for single use only. If the NICOM Sensors become detached, or are removed from the patient’s body for any reason, they should be replaced with a new set before continuing with the test. The NICOM Sensors' shelf life is indicated on the sensors' pack and depends on the batch. Both batch and shelf life information will always appear on the outer side of the sensors bag. 6. Open the Run screen (section 2.5), make sure that all the sensors are connected and if possible, that the patient is moving as least as possible during the calibration phase 58 (see immediately below). Press the OK button on the NICOM to start the measurement. First result shall appear after approximately 70 seconds. Special Note During the first 130 seconds of operation the system performs an automatic calibration function and a corresponding message is posted on the screen. At this time, for optimal results, the patient should lie or sit as quietly as possible, preferably without speaking or making sudden movements. Once the initial calibration is completed the message is taken off the screen, signaling that standard monitoring can resume. In the event of excessive patient movement or talking during this period, the system will filter away interferences however this may prolong the initial calibration period beyond 130 seconds. 7. During the measurement, the screen display can be changed and the measurement can be paused as explained in section 2.5. 8. In order to take an NIBP measurement, connect the air hose by pushing it in and turning it clockwise. Make sure that the NIBP is set to 'Enable' on the NIBP Options settings screen. When the NICOM is set, place the cuff around the patient's arm, over bare skin above the elbow. Lift the patient's arm to the level of the heart. In case that the NICOM is set to Manual + Automatic NIBP operation, the NICOM will inflate the cuff at a given time according to the settings that were selected for NIBP prior to beginning the test (see chapter 4) and will display the pressure on the screen. A manual measurement can be taken at any given time. Note The arm is to be passively raised to the level of the heart; this should not be done by the patient. Moreover, the patient should be as relaxed as possible throughout the NIBP measurement. 9. At the end of the measurement, in order to completely end the test, select the Stop option from the screen's pop-up menu or by clicking the OK button on the NICOM. Then select the Back button on the NICOM in order to return to the Menu screen. 59 3.3 Viewing Test Results Follow the instructions below to view results of prior tests. Graphic results: 1. Choose the Existing Patient option on the Main Menu screen by using the arrow keys and pressing the NICOM's OK button. Select the required patient and press OK on the NICOM. 2. Select the Display Results button by using the arrow keys and pressing the NICOM's OK button. In case that the patient has had several tests run at different times, a window that presents all of the individual patient’s different tests will pop-up. Select the required test off of the list, according to the date and time it was taken, by using the arrow keys and pressing the NICOM's OK button or use the UP and DOWN buttons (without entering the pop-up menu first) until reaching the desired display screen. The Time Scale option, which appears on the NICOM's Run screens' pop-up menu, determines the different clinical parameters results' appearance as trend graphs on the Trend Display screens (See chapter 4 for more details about these measurements). If a disconnection incident or another type of signal quality disturbance took place during the measurement, no results will be shown for the affected time intervals. In other words, there will be a gap in the trend graph, skipping the areas of questionable or suboptimal signal. 3. Press the Back button on the NICOM to view the pop-up menu options. Choose the Switch Display option then select Trend 2 in order to view more clinical parameters results trend graphs on the same page. (See chapter 4 for more details about these measurements.) 4. Press the NICOM's Left arrow to display the earlier results' page, or press the Right arrow for later results page. Note in order to display another patient's results, press the BACK button on the NICOM to enter the screen's pop-up menu, then choose the Patient Info option and click the NICOM's OK button in order to be redirected to the Existing Patient screen. Press BACK to enter the pop-up menu options of this screen. Select the Change Patient option; a window that states all of the existing patients' details will pop-up. Select the desired patient off of the list by using the arrow keys and pressing the NICOM's OK button. Now follow steps 2-4. 5. Press the NICOM's Back button and select the Patient Info option in order to finish and go back to the Existing Patient screen. From the Existing Patient screen, select BACK again to enter the pop-up menu then select the Exit option in order to return to the main menu. 60 Numeric results: 1. Choose the Existing Patient option on the Menu screen, select the required patient and press the NICOM's OK button. 2. Select the Display Results button by using the arrow keys and pressing the NICOM's OK button. In case the patient has had several tests run at different times, a window that displays all of the individual patient’s different tests will pop-up. Select the desired test off of the list, according to the date and time it was taken, by using the arrow keys and pressing the NICOM's OK button. You will be transferred to the Trend Display screen. 3. Press the Back button to view the pop-up menu options for the Trend Display screen. Choose the Switch Display option then select the Numeric option or use the UP and DOWN buttons (without entering the pop-up menu first) until reaching the desired display screen. Each page of the Numeric Results screen contains 18 lines of results. To browse through the results use the NICOM's Left and Right arrow keys. Each row contains the Data and Time when the measurements were acquired and the monitored measurements (See chapter 4 for more details about these measurements). Rows with red texts and no reported results represent time intervals of suboptimal signal quality or lead or sensor disconnect. 4. Press the Left arrow key on the NICOM to display earlier results, or press the NICOM's Right arrow key for later results. Note in order to display another patient’s results, press the BACK button on the NICOM to enter the screen's pop-up menu, then choose the Patient Info option and click the NICOM's OK button in order to be redirected to the Existing Patient screen. Press BACK to enter the pop-up menu options of this screen. Select the Change Patient option; a window that displays all of the existing patients' details would pop-up. Select the desired patient off of the list by using the arrow keys and pressing the NICOM's OK button. Now follow steps 2-4. 5. Press the NICOM's Back button and select the Patient Info option in order to finish and go back to the Existing Patient screen. From the Existing Patient screen, select BACK again to enter the pop-up menu then select the Exit option in order to return to the main menu. 61 3.4 Entering Events This application allows the user to enter free text events either in real time during monitoring or when browsing through the results after the end of the test. The events are displayed in the Trend Display screen and in the Numerical Display screen. In addition, the NICOM automatically adds events when the protocols are activated. Adding events: To add an event while monitoring: 1. From the Side Menu choose Menu EventsAdd Event. The Add Event window opens. 2. Enter the event description (Up to 30 characters) and choose to add it. The event is automatically time stamped according to when the Event window was opened. The user can also choose not to enter an event description. In that case the first event without an event description will be called Time Stamp 1 the second Time Stamp 2 etc… Note that only one event can be added per cycle (approximately every 10 seconds). To add an event retrospectively 1. Browse to the desired result 2. From the Side Menu choose Menu EventsAdd Event. The Add Event window opens. 3. Enter the event description (Up to 30 characters). 4. Enter the date and time Viewing events: Events display in the Trend Display Screen In the Trend Display screen the events are displayed graphically as markers within the Trend. When selecting an Event Marker, the system displays the Events in the Event bar with the date and time of its entry. Figure 3.3 Events displayed in the Trend Display screen 62 Events display in the Numerical Display Screen In the Numerical displays the system specifies the number of events in a row that contain events. When selecting the row, an event display window is prompted with the list of events that were entered during the time frame of the row (there can be an event every 10 sec, thus, six events every minute). Figure 3.4 Events displayed in the Numerical Display screen 63 3.5 Calibrating the Touch Screen Perform this calibration procedure if the Touch Screen becomes less responsive. 1. From the Side Menu choose Touch Screen Calibration. The Touch Screen Calibration tools opens Figure 3.3 Touch Calibration Screen Tool 2. Follow the onscreen instructions 64 Chapter 4 4.0 Settings & Advanced Functions The purpose of the Settings screen is to allow the user to control some options related to the device's behavior. The Settings screen's pop-up menu Set option is divided into the following Settings options: General Options, Test Options, NIBP Options, SpO2 Options, Connectivity, Network Configuration, Wi-Fi options and Date & Time. General Options: From the Main Menu screen select the Settings option, using the NICOM's arrow keys. Once this option is selected, press the NICOM's OK button. The General Options screen will then be presented. The General Options screen allows modification of the measurements that are listed below. Figure 4.1– General Options screen with Settings pop-up menu 65 4.1 Height Units This option allows user to set the device to work according to the Metric or USA system. Moving from one system to another changes all measurable units from cm units to inch units, and vice versa. 4.2 Weight Units This option allows user to set the device to work according to the Metric or USA system. Moving from one system to another changes all measurable units from kg units to lb and vice versa. 4.3 Electric Grid The NICOM filters away interferences caused by the electric grid. The electric grid emits signals with frequency of 60 Hz in the US and 50 Hz in Europe and most of the rest of the world. To customize the filter to your geographic location select 60 Hz if you are located in the USA and 50 Hz if located elsewhere. If you are not sure about the local grid system parameters please contact your IT personnel or electricity provider. CAUTION Choosing an incorrect grid system might result in signal interference problems which can lead to suboptimal performance. 4.4 Audible Alarm Change this field to Off to avoid low battery audible alerts. The buzzer status icon will appear on the top left side of the run bar of the display screen (Run, Dashboard, Trend and Numeric display). 4.5 Date Format This option allows the user to set the date display format in the device to show either Day/Month/Year or Month/Day/Year. 4.6 Time Format This option allows the user to set the time format in the device to 24 hrs or 12 hrs (AM/PM) formats. Note The Set Date and Time option is located in the Settings screen's pop-up menu. Press BACK then select the Set option. In the small window that opens to the right of the pop-up menu select the Date and Time option to access the Date and Time settings' screen (as explained in point 4.15 below). 66 Test Options: From the Main Menu screen select the Settings option using the NICOM's arrow keys. Once this option is selected, press the NICOM's OK button to enter the Settings screen. Press an option to enter the screen's pop-up menu. Select the Set option then select Test Options and press the NICOM's OK button. Once entering the Test Settings screen all setting options for this section are displayed. The measurements listed below can be modified: Figure 4.2 Settings screen – general options 4.7 Test Type The Test Type icon will appear on the top right side of the patient information bar of the display screens (Run, Dashboard, Trend and Numeric display). Change this field from Rest to Stress before attempting to perform any measurement that includes very significant motion. 4.8 Sample Interval Tests results which are calculated and displayed on the monitor represent information averaged through certain periods of time. The corresponding time period can be changed using the field options. The user may choose to receive 30-seconds averages or 1-minute averages. Use the NICOM's Right and Left buttons to choose the desired averaged period of time. 67 4.9 TFCd The TFCd parameter is designed to capture the change in TFC by calculating the percentage of change between the current TFC measurement and the one that was measured at a specific prior time as set by the operator (i.e. the TFCd Measuring time) This option allows the user to choose between 15min, 30min, 1hr, 4hrs and 10hrs. NIBP Options: From the Main Menu screen select the Settings option. Once this option is selected, press the NICOM's OK button to enter the Settings screen. Press the BACK button to enter the screen's pop-up menu. Select the Set option then select NIBP Options and press the OK button. Once entering the NIBP Settings screen, all setting options for this section are displayed, that allows modification of the measurements that are listed below. Figure 4.3 Settings screen – NIBP options 68 4.10 NIBP This option allows the user to enable or disable the NIBP monitoring option. When the NIBP is set to 'Disable', the NIBP and TPR boxes on the Run screen will be turned off and the word: 'Disabled' will appear next to the word NIBP in the NIBP box. When the NIBP is set to 'Enable', the NIBP and TPR boxes on the Run screen will be turned on and the word: 'Enabled' will appear next to the word NIBP in the NIBP box. NIBP will be available for performing NIBP measurements only when it is set to Enabled. When the NIBP is set to disabled, the NIBP is not functional and will not respond to NIBP measurements requests. Figure 4.4 Run screen – NIBP disabled 4.11 NIBP Operation Mode This option allows the user to choose between manual NIBP measurements, which means the operator can take a measurement at any given time according to his patient's needs, and Automatic +Manual measurements, which means that the operator can perform a measurement at any given time and the NICOM will perform an automatic NIBP measurement at a specific period of time (every 30mins for example), according to the Time Interval settings that were set by the operator. While using the NIBP Automatic + Manual option, if a manual measurement is taken 2 minutes prior to the beginning of an automatic one, the automatic measurement will be delayed. (Should the time interval be set to 30 minutes, the next automatic measurement will take place 32 minutes after the manual measurement has been taken). 69 Note While actively measuring blood pressure, the NIBP activity timer will appear on the NIBP box to state that the NIBP module is being used. Special Note The NIBP, MAP, CP, CPI, TPR, TPRI and DO2I are not as frequently refreshed as the rest of the NICOM's parameters. Once a parameter has not been refreshed for a period of ten minutes, its color will begin to fade out by a gradual color fade-out process that takes another ten minutes to complete. The parameter will regain its full display color only when a new measurement is taken. 4.12 NIBP Time Interval This option allows the user to set the NIBP time interval for the Automatic + Manual option, so that an automatic NIBP measurement will take place at a pre-set period of time according to his patient's needs. The options to choose from for time presets are: 1min, 3min, 5min, 10min, 15min, 30min 60min and 90min. Note The time interval icon appears on the NIBP box to state the time left before the next automatic measurement. 4.13 NIBP Initial Inflation Pressure The initial inflation pressure system default is set to 160 mmHg. This option allows the user to set the NIBP initial inflation pressure to a different threshold level from the system's default, according to the patient's systolic blood pressure. The options to choose from are (in mmHg): 120, 140, 160, 180 and 200. Setting the correct initial inflation pressure reduces the incidence of both overinflation and under-inflation of the blood pressure cuff which also affects the rate at which the blood pressure measurement is taken while increasing patient comfort. Note In any case of over inflation of the blood pressure cuff the NIBP measurement can be stopped immediately by using one of two methods (see figure 4.5 below): 1. While in the Run Screen, press the NICOM's BACK button to view the popup menu options; then choose the End NIBP option which stops the NIBP operation and deflates the cuff immediately. 2. The cuff connectors which are located on the back and in the middle of the air tube are designed to allow for be rapid disconnection by the user which results in immediate deflation of the cuff (a disconnection of just one of the cuff connectors will result in immediate cuff deflation). 70 Figure 4.5 NIBP disconnection options (Software option – upper figure, hardware option – bottom figure) Note In case that the NIBP cuff is not correctly adjusted to the patient, or when there is an air leakage in the NIBP cuff connection the system will prompt a failure message. Date and Time: From the Main Menu screen select the Settings option using the NICOM's arrow keys. Once this option is selected, press the NICOM's OK button to enter the Settings screen. Press the BACK button to enter the screen's pop-up menu. Select the Set option then select Date & Time Option and press the NICOM's OK button. Once entering the Date & Time Settings screen, all setting options for this section are displayed, that allow modification of the measurements that are listed below. Figure 4.6 Settings screen – Date and Time screen 71 4.14 Date and Time Setup The Date and Time are displayed for every result in the Tabular Display screen and appear on the right lower side of every screen. Clock setup is necessary the first time the device is turned on as well as after battery-charge if the battery was completely discharged. Press the Back button while in the Settings screen which will open the pop-up menu. Select Set and then the Date & Time option, by using the NICOM's arrow keys, then press the NICOM's OK button. Once the Date and Time screen opens, press the NICOM's OK button to operate the Date setup field; use the NICOM's Up/Down arrow keys to set the correct date and press the NICOM's OK button. When done setting the date use the arrow keys to move to the Time setting field. Click the NICOM's OK button to operate the time setup field; use the NICOM's Up/Down arrow keys to set the correct time and then click the NICOM's OK button. When setup is done, select the on screen Apply button in order to save the settings and stay in the settings screen; press the OK button in order to save the settings and be directed back to the Main Menu screen or select Cancel to discard the changes and be directed back to the Main Menu screen. Connectivity 4.15 Connectivity Wizard NICOM can be connected to the hospital's IT system via the Ethernet, Serial port or external Wi-Fi port on the back of the unit by using the Connectivity Wizard. The IT department and the EMR provider will be required to make the necessary customization to read and present the NICOM information Figure 4.7 Connectivity Wizard 72 Networking 4.16 Networking Wizard NICOM may be connected to the hospital network by using the Networking Wizard. The Wizard should be used by a network administrator from the hospital's IT department. Figure 4.8 Networking Wizard After defining the connectivity, the NICOM can be connected the to hospitals Wi-Fi network by using the Wi-Fi setting options as described in chapter 2.24. SpO2 From the Main Menu screen select the Settings option. Once this option is selected, press the NICOM's OK button to enter the Settings screen. Press the BACK button to enter the screen's pop-up menu. Select the Set option then select SpO2 Options and press the OK button. Once entering the SpO2 Settings screen, all setting options for this section are displayed, that allows modification of the measurements that are listed below. 4.17 Hgb Posting Period This option allows the user to adjust the Hemoglobin posting period. This posting period controls when the manual entered Hgb value is not updated and shall color the value in fading gray. The options are 1hr, 4hr, 8hr, 12hr, 24hr. 73 4.18 SpO2 Operation Mode This option allows the user to select which SpO2 working mode shall be the default mode. The user can decide between Manual mode and Automatic Mode. When the SpO2 default mode in Manual, the SpO2 is disabled and shall not prompt automatically SpO2 measurements when monitoring a patient. In this mode the user will be required to start the SpO2 to enable it to Automatic Mode but every new test the SpO2 shall return to Manual mode as it is set as the default working mode. When the spO2 is in Automatic default mode, it will automatically activate the SpO2 module and shall display the SpO2 measurements on screen when monitoring a patient. If the user shall require using the manual SpO2 mode, he/she will be required to stop the SpO2 module when monitoring a patient. 74 Chapter 5 5.0 NICOM EMR (Electronic Medical Records) WARNING NICOM EMR does not require the patient to be connected to the NICOM. Moreover, NICOM EMR should not be used while the unit is connected to a patient unless the PC is connected to a NICOM Isolation Transformer, which is not routinely provided with the Cheetah NICOM. The NICOM EMR application, which stands for NICOM Electronic Medical Records, allows the user to download to a PC, store, print or recall for future reference test information that was previously recorded on the NICOM system. This application is a library function which enables users to save patient records, compare sequential test results, print test reports and so forth. The NICOM EMR application is in “read only” format. Data retrieved from the NICOM system cannot be altered. Note all screens described in this section are shown on the PC. System Requirements Windows XP Professional/Windows XP Home Edition/Windows Vista • NICOM EMR is best viewed on a screen resolution of 1024 x 768 pixels. • In order to use the application, install the NICOM EMR Software to your PC by loading the software installation CD and following the on screen setup wizard's instructions. • If installing from file or after loading the EMR installation CD the installation wizard would need to be accessed via double clicking the SETUP.EXE file. Note In order to maintain existing NICOM EMR data, do not uninstall previous EMR versions Note As of EMR 1.3, all EMR versions are backward compatible with previous EMR versions; therefore it supports all of the NICOM's versions. When retrieving 75 data from the NICOM it will automatically detect the NICOM's version and proceed with the data retrieval without user involvement. Click on the EMR application's icon, which is located on your desktop, and allow the application to open. Figure 5.1 Example of a NICOM EMR Splash screen A password will be required at start up in order to enter the application. The initial password is: 123456 Note The NICOM EMR password protects your patient information. It is highly recommended that after first installation the password should be changed in order to prevent unauthorized personnel from accessing confidential clinical data. 76 5.1 Change Password After entering the initial password, the user is led to the Management screen. It is recommended that the initial password be changed before entering new data; in order to do so, select the Change Password button that appears on the bottom left side of the screen. A small pop-up "Change Password" screen will appear. Figure 5.2 NICOM EMR Change Password screen In this screen you will be asked to enter your current password to the first field. You will then be asked to enter a new password of your choice to the following field, then enter it again in order to verify it. Select the OK button on the screen to accept changes or choose Cancel to discard password change. 77 5.2 Retrieve Data Figure 5.3 NICOM EMR Retrieve data wizard In order to allow data to be transferred from your NICOM device to your PC, select the Retrieve Data option (at the bottom left side of the screen). A data wizard will be prompted. Follow the on screen instructions to connect the NICOM device to your PC and start retrieving data. When instructed, use a USB cable (supplied) to connect the two devices. When data import from the NICOM to the PC is completed, the NICOM EMR Management screen will be displayed (see Figure 5.4 below) where the new information will be prompted and ready to be accessed immediately. 78 5.3 Management Figure 5.4 NICOM EMR Management screen The Management screen is divided to two sections: 1. Search for a patient Insert patient details (1 or more) into the table to find a specific patient from the local patient data base. Select Search to find the specific patient; select Clear to discard any entered data. Note To access all patients, clear all the fields and choose Search. 2. Patient List All the results that were retrieved from the search will be listed in the patient list table. Select the required patient or test from the list by clicking on it once with the mouse and then clicking on the Open button below. To delete a required row from the list – select it first and then click the Delete button. Note A unique patient ID is entered to the NICOM for each patient by the operator which prevents patient mix ups. The NICOM EMR is a read only library application and so no data can be altered on it. Furthermore, the software attributes the data by the unique ID only during the data retrieval from the NICOM. 79 5.4 Patient Record Figure 5.5 NICOM EMR Patient Record – trend display screens The screen is divided to three sections: 1. Patient and Test information A constant table that displays the selected patient's personal information (ID, , Gender, etc.) and test information such as: Test Date, Test type and patient biometric details that were obtained at the time of the test such as weight, height, age and more. 2. Test list A list is available of all the tests that were saved for the specific patient's data base. When selecting a test, by clicking on the required test from the list, the test information will be loaded on to the screen. 3. Trend and Numerical Display Tabs Trend Display Shows the trend graphs of the selected test as specified in the NICOM. Use the Up/Down buttons on the screen in order to switch the display from CO, CI, HR, NIBP (SBP and DBP), MAP, TPRI and TPR to SV, SVI, SVV, SpO2, DO2I and TFCd0. Use the scroller at the bottom of the screen in order to browse through the study. Use 'Set X Axis To' buttons (at the bottom of the screen) in order to view the display in the desired time scale (every 5 min, every 20 min, Etc.) The Y Axis amplitude can be adjusted manually by clicking the up/down arrows that are located to the right of each parameter's display. The Y Axis amplitude can 80 be set automatically by clicking the check box at the bottom of the screen. (Click again to cancel auto Y axis settings). Numerical Display This tab contains the Tabular Display of numerical information as presented on the NICOM. Figure 5.6 NICOM EMR Patient record – Numerical display screen The menu buttons in this section: 1. Report by Test will produce a report for an individual patient's specific test; the data is presented minute by minute as presented on the NICOM device on real time. The screen offers two report options to choose from: Full Report the report includes: Trends, Table of results, and Average beat morphologies that are representative for a certain time segment during the test. Executive Report the report includes: Trends and Table of results. Both the Full Report and the Executive Report are automatically saved in 'My Documents'. After being saved, the report will be opened on the screen. 81 2. Report by Patient will produce a report for each and every one of the tests that were conducted on the current patient. Again, there are two report options, the Full Report and the Executive Report. If the Report by Patient option is chosen, the operator will be asked to choose the folder in which the report is to be saved, out of a list of options folders. 3. Export by Test: The operator will be asked to choose the format to save the report in from two options: Excel and XML. Excel will automatically be saved in 'My documents'. After being saved, the report will be opened on the computer screen. XML: The operator will be asked to 'save as' – the automatic file name will be consistent with the patient's ID. 4. Export by Patient This feature enables the user to export ALL the tests for an individual patient at once. The operator will be asked to choose the file format with which to export the data, Excel or XML. Excel: The operator will be asked to choose the folder to save the report in, out of a list of folders. XML: The operator will be asked to 'save as' – the automatic file name will be consistent with the patient's ID. 82 Chapter 6 6.0 Measurements Short Description In this chapter you can find a short description of the primary measurements that are calculated and displayed by the Cheetah NICOM device. 6.1 CO Cardiac Output is the volume of blood being pumped by the heart in one minute. It is equal to the heart rate multiplied by the average stroke volume. The unit of measurement is liters per minute. CO=HR × SV. 6.2 CI Cardiac Index is a parameter that relates the cardiac output (CO) to body surface area (BSA), thus relating heart performance to the size of the individual. The unit of measurement is liters per minute per square meter (l/min/m^2). 6.3 HR Heart Rate is the number of contractions (heart beats) of the heart in one minute. The HR units are BPM (Beats per Minute). 6.4 VET Ventricular Ejection Time is the time of ejection of blood from the ventricle beginning with aortic valve opening and ending with aortic valve closure. The unit of measurement is millisecond.. 6.5 dX/dt Instantaneous thoracic BIOREACTANCE. The input and output of blood through the thorax at each systole causes modifications of the electric properties of the thorax, which can be measured by calculating the electrical bio-reactance. The electrical bio- reactance of the thorax cyclically drops with each pulsatile volume of blood ejected from the heart. 6.6 SV Stroke volume is the amount of blood (cc) pumped by the ventricle of the heart in one contraction. 83 6.7 SVI Stroke volume index relates the stroke volume (SV) to body surface area (BSA), thus relating heart performance to the size of the individual (SV/BSA). The unit of measurement is cc per minute per square meter (cc/min/m^2). 6.8 SVV Stroke volume variation is the calculated variation around the stroke volumes which occur at a window of time (for example during 30 seconds). SVV reflects the patient’s preload responsiveness. SVV is meaningful only in positive-pressure mechanically ventilated patients, during stable periods (for example no movement or unstable respiration). SVV is not accurate during cardiac arrhythmia. During other periods SVV may reflect non-respiratory influences on the stroke volume and be less predictive of actual preload responsiveness. The user should take the SVV results in this context and look for appropriate periods in using this parameter. More insight is available in medical publications about SVV and preload responsiveness. Literature on this topic as on hemodynamics and cardiac output monitoring may be referenced by the company upon request. 6.9 TFC Thoracic Fluid Content is the simple the inverse of Zo (see 6.13 below) (or 1/Zo). Because it is the inverse of the impedance, it reflects the electrical conductivity of the chest cavity which is also a corollary to the content of fluid in the thorax. 6.10 TFCd The TFCd parameter indicates the dynamic change in TFC over time. It calculates this by measuring the percentage change between the average of the last 10 TFC measurements and the average of 10 consecutive TFC readings measured at a specific time as set by the operator. For example, if the user chooses to view TFCd in increments of 1 hour, the average of the last 10 studies is 60 and the average of 10 consecutive TFC readings occurring one hour before is 50, then the TFCd is 20%. 6.11 TFCd0 The TFCd0 parameter indicates the change in percentage terms from the average TFC acquired in the first five studies. To illustrate, if average TFC during the first 5 studies was 40 and the current TFC is 44, this represents a 10% elevation in the TFC relative to the TFC baseline average absolute value. Thus the TFCd0 that will be displayed will be +10%. 6.12 NIBP Non Invasive Blood Pressure is the pressure exerted by the blood against the walls of the blood vessels. 6.13 MAP Mean Arterial Pressure is the mean blood pressure. It depends on the flow of blood from the heart (cardiac output) and the resistance to flow in the small arteries and microscopic resistance vessels (arterioles). 84 6.14 TPR Total Peripheral Resistance is the resistance to flow that must be overcome in order to push blood through the circulatory system, or the net resistance to blood flow in all the small arteries and microscopic arterioles. TPR= MAP/CO 6.15 TPRI Total Peripheral Resistance Index is the indexed version of the TPR. TPRI= MAP/CI 6.16 CP Cardiac Power represents the work product generated by the heart and is measured in units of Watts. It is derived from CO and MAP by the following formula: CP = CO * MAP/451 (see reference for this formula below) Reference: Mendoza DD, Cooper HA, Panza JA. Cardiac power output predicts mortality across a broad spectrum of patients with acute cardiac disease. American Heart Journal 2007, Volume 153 (3); 366-370 6.17 CPI Cardiac Power Index is the indexed version of the CP. It is measured in units of Watts/M2 and is calculated by dividing CP by the BSA. CPI = CP/BSA 6.18 Z0 Z0 is the electrical impedance of the chest cavity. 6.19 DO2I DO2I is the oxygen delivery index. It is calculated according to the following formula: DO2I = 1.39 x Hgb x (SpO2/100) x CI x 10. 6.20 SpO2 SpO2 stands for the arterial blood oxygenation. 6.21 Hgb Hgb stands for the Hemoglobin concentration in the blood. 85 Chapter 7 7.0 Troubleshooting This chapter is intended to enable the user to troubleshoot problems that may occur during the operation of the system. Problems that are not covered in this manual should be referred to a Cheetah Medical service engineer. 7.1 Error Messages The following error messages may be encountered in the course of normal system operation. The following instructions are intended to assist the user in dealing with them. 1. Message: This message appears with an additional message: Reason – disconnection between the NICOM device and the patient's body. This results in a low amplitude ECG signal. Cause: The NICOM cable or one or more of the NICOM Sensors are not connected properly to the NICOM device or to the patient. Solution: Check that the NICOM Sensors are well attached to the patient's body and are connected properly to the NICOM cable. Check the connection of the NICOM cable to its socket in the rear panel on the back side of the NICOM device. Sometimes earlier sensor replacement is necessary, especially if the sensors are wet or if the underlying skin is hairy. If the problem persists, try to replace the sensors that seem less ideally attached and to stop the test and start a new one. 2. Message: 86 or These messages appear with an additional message: Reason – disconnection between the NICOM device and the patient's body. This results in a suboptimal NICOM signal. Cause: Patient's cable or one or more of the NICOM Sensors are not connected properly to the NICOM device or to the patient. Solution: Check that the NICOM right or left (according to the message) sensors are well attached to the patient body and connected properly to the NICOM cable. Check the connection of the NICOM cable to its socket in the rear panel on the back side of the NICOM device. Sometimes earlier sensor replacement is warranted, especially if the sensors are wet or if the underlying skin is hairy. If the problem persists, stop the test and start a new one. 3. Message: Reason – This message will only appear at the end of a Study period for 5 seconds when the device is unable to report reliable results at the end of a Study due to long periods of excessive movements or long periods of sensor disconnections. Cause: Patient's cable or one or more of the NICOM Sensors were not connected properly to the NICOM device or to the patient or/and the device detected patient or cable movements that distorted excessively the signal. Solution: The user should discourage excessive cable or patient movements in Rest type tests or minimize as much as possible cable movements when performing a test in Stress test mode. The user should be alerted to sensor or cable disconnections and repair the problem if occurs as soon as possible. 4. Message: 87 Figure 7.1 NIBP Error at system startup Cause: The NIBP module is disconnected from the device or it stopped functioning. Solution: Please contact a Cheetah medical representative 5. Message: Phase Calibration Error. Unable to calibrate. Please check cable and sensor connections and try again Cause: The sensors are not applied appropriately or are detached from the patient body. The sensors may need to be replaced. Alternatively, the patient cable is disconnected either from the device or from the sensors. Solution: Replace sensors if you suspect suboptimal sensor application. Check that the sensors are well placed and connected to the patient cable. Check that the patient cable is securely connected to the back of the monitor. 88 6. Errors during Protocols: Figure 7.3 NICOM Protocol Error – an example Several errors may occur while running the Orthostatic Bioreactance PLR and Bolus . You may need to restart the protocol or troubleshoot according to the on screen error text. Protocol errors might persist of the following texts: Protocol Failed Unable to perform the protocol due to low signal quality. Please check sensors, patient cable connection or patient movements and then press restart. Result timeout error Unable to obtain NIBP reading. (NIBP: Inflate timeout, air leak or loose cuff). Select Next to continue without NIBP results or correct the problem and select Restart. Unable to obtain NIBP reading, NIBP timeout Unstable base line results. Select restart to start the baseline or next to continue to challenge phase. 89 7.2 Warning Messages The following warning messages may be encountered in the course of normal system operation. The following instructions are intended to assist the user in dealing with them. 1. Diagnosis: CO is extremely high and a pacemaker is active on the patient Cause: The patient has a Pacemaker which can result in interruption in the NICOM signal. Solution: Usually Pacemaker activity will not affect the NICOM signal unless it is a Unipolar Pacemaker or External Pacemaker activities which can result in distorted NICOM signal. If there is a relatively high CI reported by the system, verify that the Pacemaker lead distance from the NICOM sensor is no less than 2.5 inches. If not, replace the NICOM Sensors with new sensors and make sure the sensor is positioned more than 2.5 inches from the lead. 2. Message: Reason – The battery supply is low and is under 10% of its capacity. Cause: The device was not charged for a long period of time. Solution: Connect the device to Main power supply as soon as possible. 7.3 1. Other Problems Problem: One or more channels do not display correctly. Cause: 1. Sensors are not properly connected. 2. Patient movement during the measurement process. Solution: 90 Check the cable outlets for loose contacts at both ends. 2. Problem: The screen remains black after starting the system (does not start). Cause: Battery discharged or damaged, or the fuse is blown. Solution: Recharge the battery and re-start the system. If the problem persists, refer to Section 8 dealing with fuse replacement or contact a Cheetah Medical service person. 3. Problem: Burned out pixels on the LCD screen Cause: LCD malfunction Solution: Please contact a Cheetah medical representative for service. 4. Problem: LCD failure during monitoring Cause: DC power supply to the inverter or inverter failure Solution: Please contact a Cheetah medical representative for service. 5. Problem: Buzzer failure upon power on Cause: Buzzer turned off or buzzer malfunction Solution: In case the buzzer has been turned off: Enter the General settings screen and choose the Audible Alarm on. 91 In case of buzzer malfunction: Please contact a Cheetah medical representative. 6. Problem: Buzzer failure during monitoring Cause: Buzzer turned off or buzzer malfunction Solution: In case the buzzer has been turned off: Enter the General settings screen and choose the Audible Alarm on. In case of buzzer malfunction: Please contact a Cheetah medical representative. 92 8 Chapter 8.0 SERVICE AND MAINTENANCE Note The user or any technical personnel who are not formally authorized by Cheetah Medical should not open the NICOM box under any circumstances. Opening the NICOM box could damage the unit and will void the warranty provided by Cheetah Medical 8.1 General Care CAUTION Do not expose the instrument to direct sunlight for prolonged periods of time in order to avoid damage to the screen. 8.2 Cleaning CAUTION The system is approved for IPX0, to avoid damage to the instrument, patient cable or clips, be careful of liquid spillage while cleaning. Do not expose the instrument, Patient Cable, clips or sensors to sprays, liquids, or any other type of solvents. This instrument requires routine cleaning, which includes removal of any soil or dirt from the external surfaces. A soft cloth dampened lightly with water may be used. Be sure to turn the power off and disconnect the AC power cord from the instrument before performing cleaning procedures. When cleaning the unit or when passing a patient cable between patients, clean all Non disposable parts, such as: Patient cable and clips with 75% medical grade alcohol. CAUTION To avoid damage to the surface of the instrument: • Avoid excessive pressure when cleaning the printed symbols on the monitor frame in the front and real panel as well as the stickers on the rear panel • Scratches on the surface of the sensors will cause inaccurate recording. 93 8.3 Fuse Replacement The device uses 2 fuses to protect it against accidental short circuits. The fuses are rated at 2A SB. WARNING Before replacing a fuse, disconnect the power cord from the mains socket. Use fuses of the same type and rating only. Figure 8.1 NICOM mains socket and fuses drawer Use a finger-nail to open the little drawer placed right below the power socket. Figure 8.2 NICOM fuses drawer and fuses Replace the blown fuse with a new one. 8.4 Chargeable Batteries The NICOM device contains internal chargeable batteries. In case of malfunction please return the NICOM to the factory or to an authorized Cheetah Medical distributor in your area. 94 8.5 Electromagnetic Compatibility – Manufacturer Declaration Notes The RELIANT requires special precautions with regard to electromagnetic compatibility. • It must be installed and prepared for use as described in this User Guide. • Certain types of mobile telecommunication devices such as mobile telephones are likely to interfere with the RELIANT. • The recommended separation distances in this paragraph must therefore be complied with. • The RELIANT must not be used near or on top of another device. If this cannot be avoided, it is necessary – before clinical use – to check the equipment for correct operation under the conditions of use. • The use of accessories other than those specified or sold by CHEETAH MEDICAL Ltd. as replacement parts may have the consequence of increasing the emissions or decreasing the immunity of the unit. Electromagnetic Emissions RELIANT is intended for use in the electromagnetic environment specified in the following tables 1, 2, 4 and 6 below. • The user and/or installer of the unit must ensure that it is used in such an environment. Table 1 Guidance and manufacturer's declaration – electromagnetic emissions – RELIANT The RELIANT is intended for use in the electromagnetic environment specified below; The customer or the user of the RELIANT should assure that it is used in such an environment. Emissions test RF emissions CISPR 11 Compliance Group 1 Electromagnetic environment - guidance The RELIANT uses RF energy only for its internal function. Therefore, its RF emissions are very low and are not likely to cause any interference in nearby electronic equipment. 95 RF emissions Class A CISPR 11 Harmonic emissions IEC 61000-3-2 Voltage fluctuations/ flicker emissions Class A The RELIANT is suitable for use in all establishments, including domestic establishments and those directly connected to the public low-voltage power supply network that supplies buildings used for domestic purposes. Complies IEC 61000-3-3 Table 2 Guidance and manufacturer's declaration – electromagnetic immunity – RELIANT The RELIANT is intended for use in the electromagnetic environment specified below; The customer or the user of the RELIANT should assure that it is used in such an environment. Immunity test IEC 60601-1-2 Test level Compliance level Electromagnetic environment guidance Floors should be wood, concrete or Electrostatic discharge (ESD) IEC 61000-4-2 6 kV contact 6 kV contact Ceramic tile. If floors are covered with 8 kV air 8 kV air synthetic material, the relative humidity Should be at least 30 %. Electrical fast transient/burst IEC 61000-4-4 2 kV for power supply lines 1 kV for input/output lines 2 kV for power Mains power quality should be that of a typical public low-voltage power supply supply lines network that supplies buildings used for ot Applicable domestic purposes, commercial or hospital, clinic environment. Surge IEC 61000-4-5 1 kV differential 1 kV 96 Mains power quality should be that of a typical public low-voltage power supply mode differential mode 2 kV common mode 2 kV common mode <5 %UT <5 %UT (>95 %dip in UT) for 0,5 cycle (>95 %dip in UT) for 0,5 cycle on power supply 40 %UT 40 %UT input lines (60 %dip in UT) for 5 cycles (60 %dip in UT) for 5 cycles <5 %UT <5 %UT 70 %UT 70 %UT (30 %dip in UT) for 25 cycles (30 %dip in UT) for 25 cycles <5 %UT <5 %UT <5 %UT <5 %UT (>95 %dip in UT) for 5 s (>95 %dip in UT) for 5 s 3 A/m 3 A/m Voltage dips, short interruptions and voltage variations IEC 61000-4-11 . Power frequency (50/60 Hz) magnetic field 97 network that supplies buildings used for domestic purposes, commercial or hospital, clinic environment. Mains power quality should be that of a typical public low-voltage power supply network that supplies buildings used for domestic purposes, commercial or hospital, clinical environment. If the user of the RELIANT requires continued operation during power mains interruptions; it is recommended that RELIANT be powered from a separate power supply (UPS, etc.). Power frequency magnetic fields should be at levels characteristic of a typical public low-voltage power supply network that supplies buildings used for domestic purposes, commercial or hospital, clinic environment. IEC 61000-4-8 NOTE: UT is the a.c. mains voltage prior to application of the test level. Table 4 Guidance and manufacturer's declaration – electromagnetic immunity – RELIANT The RELIANT is intended for use in the electromagnetic environment specified below; The customer or the user of the RELIANT should assure that it is used in such an environment. Immunity test IEC 60601-1-2 Test level Compliance level Electromagnetic environment - guidance Portable and mobile RF communications equipment should be used no closer to any part of the RELIANT, including cables, than the recommended separation distance calculated from the equation applicable to the frequency of the transmitter . Conducted RF 3 Vrms IEC 61000-4-6 150 k Hz to 80 MHz 3 Vrms Recommended separation distance d = 1.17√P 3 V/m d = 1.17 √P d= 2.3 √P Radiated RF IEC 61000-4-3 80 M Hz t o 800 MHz 800 MHz t o 2,5 GHz 3 V/m 80 MHz to 2,5 GHz where P i s the maximum output power rating of the transmitter in watts (W)according to the transmitter manufacturer and d i s the recommended separation Distance in meters (m). Field strengths from fixed R F transmitters, as determined by an electromagnetic site survey ,a 98 should be less than t he compliance level in each frequency range . Interference may occur in the vicinity of equipment marked with the following symbol: NOTE 1 At 80 MHz and 800 MHz, the higher frequency range applies. NOTE 2 These guidelines may not apply in all situations .Electromagnetic propagation is affected by absorption and reflection from structures objects and people. a. Field strengths from fixed transmitters, such as base stations for radio (cellular/cordless) telephones and land mobile radios, amateur radio, AM and FM radio broadcast and TV broadcast cannot be predicted theoretically with accuracy. To assess the electromagnetic environment due to fixed RF transmitters, an electromagnetic site survey should be considered. If the measured field strength in the location in which the RELIANT is used exceeds the applicable RF compliance level above, the RELIANT should be observed to verify normal operation. If abnormal performance is observed, additional measures may be necessary, such as re-orienting or relocating the RELIANT. b. Over the frequency range 150 kHz to 80 MHz, field strengths should be less than 3 V/m. Recommended Separation Distances The RELIANT is intended for use in an electromagnetic environment in which radiated radiofrequency disturbances are controlled. The user and/or installer of the unit can help prevent electromagnetic interference by maintaining a minimum distance between portable and mobile radiofrequency communications equipment (emitters) and the RELIANT, according to the maximum output power of the equipment, as recommended in the table below. 99 Table 6 Recommended separation distances between portable and mobile RF communications equipment and the RELIANT Rated maximum output power of transmitter Separation distance according to frequency of transmitter (in meters) Meters [m] 150kHz to 80MHz 80MHz to 800MHz 800MHz to 2.5GHz d = 1.17√P d = 1.17 √P d= 2.3 √P 0.01 0.12 0.12 0.23 0.1 0.37 0.37 0.73 1 1.17 1.17 2.3 10 3.7 3.7 7.3 100 11.7 11.7 23 Watts [W] For transmitters rated at a maximum output power not listed above, the recommended separation distance d in meters (m) can be estimated using the equation applicable to the frequency of the transmitter, where P is the maximum output power rating of the transmitter in watts (W) according to the transmitter manufacturer. NOTE 1 At 80 MHz and 800 MHz, the separation distance for the higher frequency range applies. NOTE 2 These guidelines may not apply in all situations. Electromagnetic propagation is affected by absorption and reflection from structures, objects, and people. 100 9 Chapter 9.0 Parts' Information This Section outlines information for ordering and shipment of replacement parts for the Cheetah NICOM. 9.1 Ordering Information All equipment and accessories are available directly from Cheetah Medical or from an Authorized Distributor. For a list of Cheetah Medical Distributors please visit our web site at www.cheetah-medical.com. When ordering parts, specify the serial number of your unit and the part number of the item(s) you are ordering. A schedule of part numbers may be found in the Equipment and Accessory Inventory list below. Forward orders to: In the US: Cheetah Medical, Inc. 600 SE Maritime Ave Suite 220 Vancouver, WA 98661 USA Toll free: (+1) 866-751-9097 Telephone : (+1) 360-828-8685 Fax: (+1) 360-718-8154 In Europe and Asia Cheetah Medical (UK) Limited 1, Irmar House 59, Cookham Road Maidenhead Berkshire SL6 7EP United Kingdom Telephone: (+44) 1628 636806 Fax: (+44) 1628 788802 E-mail: [email protected] Web Site: www.cheetah-medical.com Note Equipment, accessories and replacement parts are generally shipped from the company within 10 business days following receipt of order. It may be recommended to stock strategic parts. The following section outlines the recommended replacement parts inventory. 101 Note It is strongly recommended that all NICOM parts be replaced with parts purchased from Cheetah Medical or an authorized distributor. Use of other parts may damage the unit and could void the unit warranty. 9.2 Equipment and Accessories Inventory The minimum recommended order of equipment and accessories is as follows: Equipment inventory: No. Description 2. Cheetah NICOM Cardiac Output Monitor USB cable A to B, 1.8 cm 3. NICOM Patient cable 1. 4. Qty. 1 Product Code CMM-RE1 Supplied* X 1 CMA-USB10 X 2 CMA-Cable10 X NICOM Sensors CME50/CME100 /CME200 5. Cheetah NICOM User Manual CD 1 6. NICOM EMR CD 1 X 1 X 8. Cheetah NICOM Quick Reference Guide NIBP Cuff 1 X 9. Cheetah NICOM Carry Bag 10. Cheetah Pole Mount Connector 11. SpO2 Sensor 7. X CMA-Bag10 CMA-PoleConn10 Table 1 * Cheetah Medical reserves the right to change the items provided free of charge with the NICOM monitor Returning Parts under Warranty When contacting the company, make sure the serial number of the system in question is in hand (as appears on the sticker at the back of the system) as well as the effective date of the warranty. All parts are included in a one-year warranty for workmanship and material. To replace parts during the warranty period, send the part prepaid to Cheetah Medical at the address listed on page 76 or to an authorized distributor from which the equipment was purchased. To qualify for credit, warranty parts should be labeled with the following information: 1. The Invoice number under which the unit/part was purchased. 102 2. 3. 4. Completed Complaint Form. This form may be obtained from Cheetah Medical or its distributor representative. Date of installation or purchase. Warranty number. Shipping Parts Note All parts should be returned in their original packages. Parts to be returned to the factory should be carefully packed. Each of the parts should be cushioned in antistatic packaging material to prevent damage from Electrostatic Discharge. Note The shipper is responsible for any shipping damage and should insure the shipment as necessary. 103 10 Chapter 10 Regulatory Representative United States Agent Information: Cheetah Medical Inc. 600 SE Maritime Ave Suite 220 Vancouver, WA 98661 USA Toll free: (+1) 866-751-9097 Telephone : (+1) 360-828-8685 Fax: (+1) 360-718-8154 [email protected] Europe Agent Information: Cheetah Medical Ltd 1 Irmar House 59 Cookham Road Maidenhead Berkshire SL6 7EP United Kingdom Telephone: (+44) 1628 636806 or (+44) 7836 725331 Fax: (+44) 1628 788802 [email protected] Manufacturer: Cheetah Medical Ltd. 38 Habarzel Str.; Tel Aviv; Israel Tel: (972)-3 644 0288 Fax: (972)-3 7254848 This guide applies to both male and female users, though using masculine gender. 104