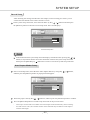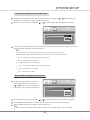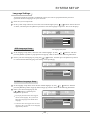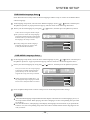
1
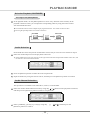
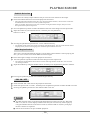
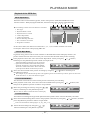
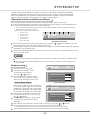
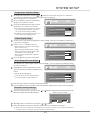
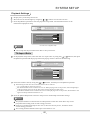
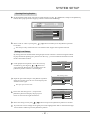
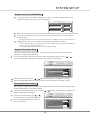
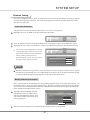
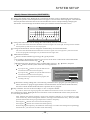
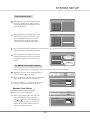
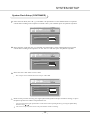
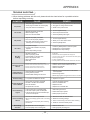
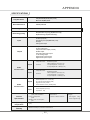
PLAYBACK MODE
Selection Playback (CONTINUED)
Track Selection
It is available to VCD, SVCD,CD and so on.
1
Select the Track Selection item on the playback control bar.
Among the numbers below the icon, the one on the left is the current track number, and the right is the total track
number of the disc.
There is not this item in the control bar when playing DVD disc.
2
Press the [SELECT] button to make this item in input mode.
NORMAL
PLAY
05/17
05/17
PBC OFF
00:00:01
STEREO
Total tracks:17 , playing now:5
3
Input the number of the desire track by using number buttons.
4
Press the [SELECT] button to start playing the track.
This function is not available in PBC ON mode.
If you do not press the [SELECT] button, the system will also start playing the selected track after a few seconds.
File Selection
FILE
AUDIO
AUDIO
For the file-style disc, we can select the file ( It's
the song for the MP3 disc) to play from the Disc
Content List window.
NORMAL
STOP
STEREO
00:03:03
Select to expand directory
FILES&DIRECTORY
1
Move the cursor into the Disc Content List window by
using the [ ]¡[ ] buttons.
2
Highlight a file by using the [ ], [ ] buttons, then
press the [SELECT] button and the system will play
the selected file.
FAVORITE/PROGRAM
Car
butterily
cat
city
fish
forien
katong
landscape1
landscape2
If the selected item in step 2 is a folder ,after pressing the [SELECT] button, the Disc Content List window
will display the files of the folder. Please refer to the section "Program Playback" for the relative detail.
Time Selection
You can select any location in the title (for DVD) or track (for VCD) freely to start playing.
1
Select the Time Selection item on the playback control bar.
Time selection playback is invalid to some discs, and in this condition the icon cannot be selected.
2
Press the [SELECT] button to make this item in input mode.
NORMAL
PLAY
05/17
PBC OFF
STEREO
--:--:-NORMAL
Search track time
3
Input the time by using number buttons and then press the [SELECT] button to confirm. If the input time
is effective, the system will start playback from the specified position
34
PLAYBACK MODE
Selection Playback (CONTINUED)
The Usage of the [GOTO] Button
1
In the playback mode, use the [GOTO] button to select every Selection item circularly in the
playback control bar. Then, you can input the corresponding values by using the remote control
with the method aforesaid.
The illustration below is the example of playing the DVD disc. It is similar to the VCD disc.
Pressing the [GOTO] button is invalid to some discs.
01/04
00:43:03
11/27
01/04
Title
Selection
Chapter11/27
Selection
Time Selection
Audio Selection
Some DVD discs have many kinds of audio data stream, and you can select one of them as output.
1
Select the Audio Output item in the playback control bar.
In the numbers below the icon, the one on the right is the total audio output mode number of this disc, and
the left one is the current mode number.
NORMAL
PLAY
05/17
01/04
11/27
01/01
01/02
01/01
01/02
OFF
00:43:03
NORMAL
Please select audio stream(1-2)
2
Press the [SELECT] button to make this item in input mode.
3
Input the number by using the remote control, and then press the [SELECT] button to confirm
Audio Channel Selection
This operation is available to non-DVD discs, such as, VCD and MP3.
1
Select the Audio Channel Selection item by using the [ ], [ ] buttons in the playback control bar,
and then press the [SELECT] button to make it in input mode.
NORMAL
PLAY
05/17
PBC OFF
STEREO
STEREO
00:13:03
Stereo audio
05/17
2
Select ¡STEREO¡, ¡R-CH¡ or ¡L-CH¡ by using the [
[SELECT] button to confirm.
35
], [
] buttons, and then press the
PLAYBACK MODE
Subtitle Selection
Some discs have many output subtitles and you can select one of them as the output.
1
Select the Subtitle Selection item in the playback control bar.
The right side of the numbers below the icon is the total subtitle number , the left is the current one.
And the default value can be set in the System Setup menu.
If the word ¡OFF¡ appears below the icon, it means closing the subtitle output, and you can set
this option in the system setup menu.
2
Press the [SELECT] button to make the Subtitle Selection item change into the input mode.
3
Input the numbers by the number buttons , and then press the [SELECT]
button to confirm.
NORMAL
PLAY
05/17
01/04
11/27
01/01
01/02
01/01
OFF
02/03
00:43:03
NORMAL
Total subtitles:3, playing now:2 (OTH)
4
Pressing the [SUBTITLE] button can switch subtitles directly.
The default option of this item can be set in the System Setup menu. You can set the default subtitle
language to be your favorite language to avoid the frequent subtitle selection.
Multi Angles Switch
The scenes viewed from different angles are recorded in some DVD discs. When playing the
disc, you can view the scenes from different camera angles.
1
2
Select the Angles Change item in the playback control bar.
Press the [SELECT] button to make the item change into the input mode.
The right side of the numbers below the icon is the total angle number of this disc ; the left is the
current angle number.
3
Input the numbers by using the number buttons, and then press the [SELECT] button to confirm.
NORMAL
PLAY
05/17
01/04
11/27
01/04
01/01
01/01
01/02
OFF
00:43:03
NORMAL
Total angles:4, playing now:1
4
Pressing the [ANGLE] button can switch the angles directly.
PBC ON / OFF
1
Select the PBC ON / OFF item in the playback control bar.
2
Select the option "ON" or "OFF", and then press the [SELECT] button to make the PBC on or off.
3
Pressing the [MENU] button also can make the PBC on or off.
NORMAL
Notes
PLAY
05/17
PBC OFF
ON
PBC
STEREO
00:00:01
Open playback control (PBC)
05/17
The PBC function refers to the menu playback function of the VCD 2.0 disc. When the
PBC is on, the TV screen displays all the tracks and you can select any track to play by
using the number buttons on the remote control; when the PBC is off, the system plays
the disc contents in sequence.
Not all the VCD discs can proceed PBC playback.
36
PLAYBACK MODE
Playback of the JPEG disc
Menu Explanation
JPEG disc refers to a kind of file type disc, used to store pictures. JPEG file and MP3 file can be
stored in one disc. When playing the JPEG file, the menu control bar is shown in the following.
1
2
3
4
5
6
The meanings of the icons in the menu are as follows:
FILE
VIDEO
1. Disc Type
2. Playback Mode Control
3. Playback Process Control
4. Control Wipe Mode
5. Control Zoom Mode
6. Pictures Rotating Selection
7. Disc Contents List window
8. Program List window
NORMAL PAUSE
Rot 0
FilScr
1 / 17
Control play progress
FAVORITE/PROGRAM
FILES&DIRECTORY
katona
landscape1
landscape2
landscape3
landscape4
model
ship
star
tibet
7
8
In the control menu, the functions of the items 1, 2, 3, 7 ,8 are similar with the ones of the
homonymic menu items when playing MP3 disc.
Control Wipe Mode
In general, many pictures will be saved in the disc as the JPEG file format. When play this disc, the
pictures will be shown on the screen one by one. You can select the mode of the picture switching.
1
In the playback control bar, select the Control Wipe Mode item by using the [
and then press the [SELECT] button to make it in input mode.
Among the numbers below the icon, the one on the
right is the total number of the mode of the picture
switching; the left one is the current mode number.
There are 17 kinds of this modes. Please refer to the
system tip for the details of the mode you select.
2
], [
] buttons,
FILE
VIDEO
NORMAL PAUSE
1 / 17
FilScr
Rot 0
From top to down
Select the desired mode of the picture switching by using the [
the [SELECT] button.
], [
] buttons and then press
For example: if you want the next picture to be appearing on the screen from top to down, please set the value
of this item to be "1", shown as the above figure.
Control Zoom Mode
This function can zoom in or zoom out the picture to facilitate your watching.
1
In the playback control bar, select the Control Zoom Mode item by using the [
then press the [SELECT] button to make it in input mode.
2
Select the percentage of zoom by using the [ ], [ ]
buttons, and then press the [SELECT] button.
The value of "FitScr" means the full screen display.
], [
] buttons, and
FILE
VIDEO
NORMAL PAUSE
1 / 17
FilScr
Rot 0
Control zoom mode
Picture Rotating
This function can change the angle of the placement of the picture on the screen to facilitate your watch.
1
Select the Picture Rotating Select item in the playback control bar by using the [
press the [SELECT] button to make it in input mode.
], [
] buttons, and then
There are four kinds of rotating angles: 0 , 90 , 180 , 270 .
2
Select the desired angle by using the [ ], [ ]
buttons and then press the [SELECT] button.
37
FILE
VIDEO
Rotate
NORMAL PAUSE
1 / 17
FilScr
Rot 0
SYSTEM SETUP
In order to satisfy different kinds of consumers and because of the outfits with different performance,
this unit is equipped with various functions. You can proceed the system setup to layout the performance
of this unit to better meet your needs and cooperate with your outfits. Certainly you may use the default
settings to satisfy your basic requirements if you want to avoid the trouble.
Operation Interface and General Steps
This section introduces the operation interface and general steps of the system setup.
1 Press the [SETUP] button to enter the system setup mode. Now the top part of the OSD displays the
system setup control bar, which is shown in the following:
If the system displays ¡ INVALID ¡ , it means the System Setup mode cannot be entered in the current
mode, so please exit this mode first.
2
4
1
5
3
6
The meanings of the icons are as follows:
1
2
3
4
5
6
2
3
4
General setup
Playback setup
Record setup
Language setup
Channel Scan
Date, Time setup
GNRL
GNRL
PLAY
PLAY
CLOCK CLOCK
LANGLANGTUNERTUNER
REC
REC
General system setup
General
Setup
System Setup Control Bar
Select the desired item to be set on the control bar by using the [ ], [ ] buttons, and then press the
[SELECT] button to enter the setup submenu of this item.
In the submenu , operate the relative controllers by using the cursor buttons and the [SELECT] button
to fulfill the corresponding setup.
Pressing the [RETURN] button to return to the previous menu, or press the [SETUP] button to exit
the system setup mode.
Notes
The steps above are general operations. Some setup may not need a certain step, or need more steps.
Please proceed the system setup in the tray out or no disc status, otherwise some setup may not
be proceeded.
General setup
1
2
3
GNRL
GNRL
Enter the system setup mode.
Select the item "GNRL" in the
system setup control bar by
using the [ ],[ ] buttons.
Press the [SELECT] button to enter
the general setup submenu ,which is
shown as the illustration on the right:
REC
REC
LANGTUNERTUNER
CLOCK CLOCK
LANG
General
Setup
Screen saver
ON
Progressive/Interlace
Interlace
Video output
RGB
Video output format
PAL
OK
Restore factory settings
Screen Saver Setup
1
PLAY
PLAY
General Setup Menu
The screen saver function is that an interesting
screen saver picture appears on the screen
PLAY
automatically, when this unit's video output
PLAY
GNRL
REC
CLOCK CLOCK
REC LANGLANGTUNERTUNER
GNRL
GNRL
signal has no change(that is the image on the
TV screen has no change) for a certain time.
General Setup
In the general setup menu, move the cursor
Screen saver
ON
Progressive/Interlace
to select the item "Screen saver" by using
Interlace
PAL
Video output
YCbCr
the [ ], [ ] buttons.
Video output format
PAL
Press the [SELECT] button , and a pop-up
OK
Restore factory settings
list will pop up, which is shown in the
following.
Move the cursor up and down to select "ON" or "OFF" by using the [ ], [ ] buttons.
Press the [SELECT] button to turn on or turn off the screen saver function.
ON
OFF
2
3
4
Pressing any button can exit the screen saver mode after the screen saver picture appears.
5
Press the [RETURN] button to return to the previous menu to proceed other settings.
38
SYSTEM SETUP
Progressive / Interlace Setup
1
2
3
4
In the general setup menu, use the [ ], [ ] buttons to select the "Progressive / Interlace"
item and press [SELECT] button, then a pop-up list will pop up.
Select "Progressive" or "Interlace"
Press the [SELECT] button to fulfill the
PLAY
PLAY
GNRL
REC
CLOCK CLOCK
REC LANGLANGTUNERTUNER
GNRL
GNRL
Progressive / Interlace switch.
Pressing the [IS/PS] button can proceed
General Setup
the Progressive / Interlace switch too.
The value of this setting must accord with
the scanning mode of the TV, otherwise
the TV screen will display nothing.
If nothing is shown on the TV screen, you
can try to press the [IS/PS] button.
Screen saver
ON
Progressive/Interlace
Video output
Interlace
Progressive
Interlace
RGB
PAL
Video output format
PAL
OK
Restore factory settings
Video Output Setup
1
2
In the general setup menu, highlight the "Video output", then press the [SELECT] button. A
pop-up list will appear.
Select "YUV" or "RGB" in the list
GNRL
GNRL
GNRL
When using the component video output,
please select "YUV".
When using the SCART output, you may
make selection according to the fact .But
you had better select the "RGB".
This setup dose not affect the composite
video output.
3
PLAY
PLAY
REC
REC
LANGTUNERTUNER
CLOCK CLOCK
LANG
General
Setup
Screen saver
ON
Progressive/Interlace
Interlace
Video output
YCbCr
YCbCr
RGB
PAL
Video output format
Press the [SELECT] button to confirm.
OK
Restore factory settings
Video Output Format Setup
This unit has two video output systems: PAL and NTSC . You can select one of them according
to your TV set specs.
1
Highlight the "Video output format" in the
general setup menu and press the [SELECT]
button.
A pop-up menu will appear.
GNRL
GNRL
GNRL
PLAY
PLAY
REC
REC
General
You can switch the TV output format by
pressing the [PAL/NTSC] button too.
3
Setup
Screen saver
ON
Progressive/Interlace
Interlace
Video output
YCbCr
Video output format
PAL
Restore factory settings
2
LANGTUNERTUNER
CLOCK CLOCK
LANG
NTSC
PAL
Select the proper option according to factual requirements.
Press the [SELECT] button, and the system will switch the output format to what you select right now.
Restore Factory Settings
1
Select the "Restore factory setting" by the [
[SELECT] button then the OSD displays:
], [
] buttons in the general setup menu, press the
Restore factory settings
System will reset all the setup items to
default value, OK to confirm, Cancel to
discard
OK
2
3
Cancel
Highlight "OK" in the menu by using the [ ], [ ] buttons.
Press the [SELECT] button to make all setup items restore the factory settings.
When your unit is in abnormal working mode, it is probably caused by your wrong setup. Please try
the "Restore Factory Settings" operation to make it work normally.
39
SYSTEM SETUP
Playback Settings
1
2
3
Display the system setup control bar.
Move the cursor left and right by using the [ ],[ ] buttons to select the "PLAY" .
Press the [SELECT] button to enter the playback setup mode. The illustration below is the
main menu of playback setup.
GNRL
GNRL
PLAY
PLAY
PLAY
REC
REC
LANGTUNERTUNER
CLOCK CLOCK
LANG
Playback Setup
TV aspect ratio
Pan Scan
Rating level
OFF
Digital audio output
RAW
Closed captions
OFF
Analog audio output
5.1CH
the main menu of playback setup
Note
This setup must be proceeded in No Disc or Tray Out status.
TV Aspect Ratio
1
In the playback setup menu, select the item "TV aspect ratio" by using the [ ], [ ] buttons, then press
the [SELECT] button and the pop-up menu will pop up, which is shown in the following.
GNRL
GNRL
PLAY
PLAY
PLAY
REC
REC
LANGTUNERTUNER
CLOCK CLOCK
LANG
Playback Setup
TV aspect ratio
Digital audio output
Pan Scan
16:9
Pan Scan
Letter Box
Closed captions
OFF
Analog audio output
5.1CH
Rating level
2
Select the suitable value by using the [
], [
] buttons, and then press the [SELECT] button.
The meaning of each value to be selected of this item is as follows:
16 : 9: Applicable to wide screen TV set.
Pan Scan: Suitable for the common size TV set. When playing wide screen pictures, left and right edges
of the original pictures are cut off. The picture will be displayed to full screen.
Letter Box: Suitable for the common size TV set. When playing wide screen pictures, black banners will
appear on the top and bottom of the TV set.
3
Press the [RETURN] button to return to the previous menu and proceed other settings.
Notes
The playback effect is related to the recorded pictures of the disc. Some discs may not be
played back according to the screen setting you select.
If a disc is recorded in the aspect ratio of 4:3, the ratio can only be 4:3, no matter which
screen setting you select.
This setting should conform to the aspect ratio of the TV set.
40
SYSTEM SETUP
Opening/Closing Caption
1
In the playback setup menu, select the "Closed captions" by the [ ], [ ] buttons, and press the [SELECT]
button, then a pop-up menu will pop up, which is shown in the following .
PLAY
PLAY
PLAY
GNRL
GNRL
REC
REC
LANGTUNERTUNER
CLOCK CLOCK
LANG
Playback Setup
TV aspect ratio
Pan Scan
Rating level
OFF
Digital audio output
RAW
Closed captions
OFF
ON
5.1CH
OFF
Analog audio output
2
Select "ON" or "OFF" by using the [
to confirm.
], [
] buttons and then press the [SELECT] button
This setup is only valid to the TV sets and discs that support the Captions function.
Rating Level Setup
By setting this unit's authorization rating and password, some discs with control grade cannot
be played without inputting the password. In this way, you can confine the children to watch
the disc unsuitable to them.
Enter Password
1
In the playback setup menu, move the cursor up
and down by pressing the [ ] , [ ] buttons to
select the item "Rating level", and then press the
[SELECT] button. The TV screen displays:
OK
Cancel
Set Rating Level
2
Input the password and press the [SELECT] button.
If the password is right, the TV screen displays the
window on the right.
Set rating level
New password
New
OFF
OK
The super password is 3308.
Set Rating Level
3
Select the "Set rating level" , and press the
[SELECT] button to display the pop-up list
which is shown as the right illustration:
Set rating level
OFF
OFF
8:Adult
New password
New
OK
4
Select the rating level by the [
5
If you do not want to change the original password, highlight the "OK" in the menu through
cursor buttons and then press the [SELECT] button.
], [
] buttons and press the [SELECT] button to confirm.
41
SYSTEM SETUP
Rating Level Setup (CONTINUED)
6
To change the password, please highlight the "New" in the above figure and press the
[SELECT] button. Now the TV screen will display:
New Password
New password
OK
Confirm password
Cancel
7
Select the "New password" by the cursor buttons and input the new password by number buttons.
8
Select the "Confirm password" by the cursor buttons and input this password again by
number buttons.
The input password in the "New password " must accord with that in the "Confirm password".
9
Highlight the "OK" by cursor buttons and then press the [SELECT] button.
After setting the rating level, when playing the disc with the rating level higher than what you
have set, you must input the password.
If you forget the password, you may input the super password.
Digital Audio Output Setup
1
This unit has digital audio output jacks. So you can enjoy the higher quality audio with an
amplifier with digital audio decoders.
Access the playback setup menu. Select the item "Digital audio output" by the [ ], [ ]
buttons, and then press the [SELECT] button. A pop-up menu will pop up:
GNRL
GNRL
PLAY
PLAY
PLAY
REC
REC
LANGTUNERTUNER
CLOCK CLOCK
LANG
Playback Setup
2
3
TV aspect ratio
Pan Scan
Rating level
OFF
Digital audio output
RAW
Closed captions
RAW
OFF
LPCM
Analog audio output
5.1CH
Select the proper value by the [ ], [ ] buttons and then press the [SELECT] button.
Press the [RETURN] button to return to the previous menu and proceed other settings.
Analog Audio Output Setup
This setting is used to select an analog audio output format between the 2CH analog mix audio
output and the Dolby 5.1 CH analog output.
1
Select the "Analog audio output" item by the [
], [
] buttons, and then press the [SELECT]
button. A pop-up list will appear:
2
Select the desired value by the [
], [
]
GNRL
GNRL
PLAY
PLAY
PLAY
REC
REC
LANGTUNERTUNER
CLOCK CLOCK
LANG
buttons then press the [SELECT] button.
3
Press the [RETURN] button to return to
Playback Setup
the previous menu.
TV aspect ratio
Pan Scan
Rating level
OFF
Digital audio output
RAW
Closed captions
OFF
Analog audio output
5.1CH
2CH
5.1CH
42
SYSTEM SETUP
Record Setup
After finishing the settings introduced in this chapter, when recording, the values you set
will become the default values of the correlative items.
1
In the system setup control bar, select the item "REC' by the [ ], [ ] buttons and then press
the [SELECT] button to enter the record setup menu. The screen displays:
PLAY
PLAY
GNRL
GNRL
REC
REC
REC
LANGTUNERTUNER
CLOCK CLOCK
LANG
Auto add chapter marker during recording.
Record Setup
Auto chapter marker
OFF
Default source
F-A/V
Default quality
SP
the record setup menu
Note
If the left bottom of the system setup control bar displays "INVALID" when pressing the [ ],[ ]
buttons, it may indicate that the current activated menu will not be the system setup control bar.
Please press the [RETURN] or [ ] button once or more to activate the system setup control bar.
Auto Chapter Marker Setup
1
In the record setup menu, select the item "Auto chapter marker" by using the [
and then press the [SELECT] button. A pop-up menu will appear:
GNRL
GNRL
PLAY
PLAY
REC
REC
REC
], [
] buttons,
LANGTUNERTUNER
CLOCK CLOCK
LANG
Auto add chapter marker during recording
Record Setup
Auto chapter marker
OFF
ON
OFF
SP
Default source
Default quality
2
Select the proper value by the [
3
Press the [RETURN] button to end this setup and return to the previous menu.
], [
] buttons, and then press the [SELECT] button to confirm.
This setup is used to make sure whether insert the chapter marker automatically when recording.
If set this item to "ON", the recorded contents will be automatically divided into some chapters
with the same length.
43
SYSTEM SETUP
Default Input Signal Sources Selection
1
In the record setup menu, select the "Default source" by using the [
], [
] buttons and press
the [SELECT] button, then a pop-up menu will appear:
2
Select the desired value by using the [
], [
] buttons and then press the [SELECT] button.
PLAY
PLAY
GNRL
GNRL
REC
REC
REC
LANGTUNERTUNER
CLOCK CLOCK
LANG
Front A/V
Record Setup
Auto chapter marker
OFF
F-A/V
Default source
F-A/V
F-SV
R-A/V
Default quality
3
Press the [RETURN] button to return to the previous menu and proceed other settings or press the
[SETUP] button to end this setup and then exit.
Ëã
There are several kinds of input signal sources as the follows. Please refer to the
"Basic Information¡Illustration of the Front/Rear Panel " for their position on the unit.
R-A / V Rear panel composite audio and video input.
R-SV Rear panel S-video input
TUNER Rear panel TV turner input
F-A/ V Front panel composite audio and video input.
F-SV Front panel S-video input
DV
Front panel DV input
Default Recording Quality Selection
1
In the record setup menu, select the
item "Default quality" by using the
[ ], [ ] buttons, press the [SELECT]
button, then a pop-up menu will pop up.
GNRL
GNRL
PLAY
PLAY
REC
REC
REC
LANGTUNERTUNER
CLOCK CLOCK
LANG
Standard play, around 120 minutes in a blank disc
Record Setup
Auto chapter marker
OFF
Default source
F-A/V
Default quality
SP
SLP
EP
SP
HQ
2
Select the desired value by using the [
], [
] buttons, and then press the [SELECT] button.
3
Press the [RETURN] button to return to the previous menu to proceed other settings.
4
Press the [SETUP] button to end the setup, and then exit.
Ëã
Please refer to the "TERMS" for the difference of the four recording qualities: SP, SLP, EP, HQ.
44
SYSTEM SETUP
Language Settings
To meet the needs of consumers in different regions, this unit is equiped with many kinds of
operation interface languages for your selection.
1
Enter the system setup mode.
2
In the system setup control bar, move the cursor left and right by the [ ], [ ] buttons. Select the item
"LANG", and then press the [SELECT] button to enter the language setup menu. The screen displays:
GNRL
GNRL
PLAY
PLAY
REC
REC
LANGTUNERTUNER
CLOCK CLOCK
LANG
LANG
Language Setup
OSD language
English
Menu language
English
Subtitle language
OFF
Audio language
English
OSD Language Setup
the language setup menu
1
In the language setup menu, select the item "OSD language" by the [ ], [ ] buttons, and then
press the [SELECT] button. A pop-up menu will pop up, which is shown as the following illustration:
2
Select your desired language by using the [ ], [ ] buttons, and then press the [SELECT] button
to confirm and the OSD language will change correspondingly.
GNRL
GNRL
PLAY
PLAY
REC
REC
LANGTUNERTUNER
CLOCK CLOCK
LANG
LANG
Language Setup
English
OSD language
English
Spanish
French
German
Menu language
Subtitle language
Audio language
DVD Menu Language Setup
1
In the language setup menu, select the item "Menu language" by the [
], [
] buttons, and then
press the [SELECT] button. A pop-up menu will pop up, which is shown as the following illustration.
2
Select your desired language by the
[ ], [ ] buttons, and then press
the [SELECT] button.
GNRL
GNRL
If you play the DVD discs that support
the selected language, the system will
adopt this language as the DVD menu
language.
PLAY
PLAY
REC
REC
LANGTUNERTUNER
CLOCK CLOCK
LANG
LANG
Language Setup
If the disc does not support the selected
language, the system will use the language
supported by the disc.
45
OSD language
English
Menu language
Norwegian
Subtitle language
Norwegian
Finnic
Audio language
Original
SYSTEM SETUP
DVD Subtitle Language Setup
Some DVD discs have many kinds of subtitle languages and this setup is used to set the default DVD
subtitle language.
1
In the language setup menu, select the item "Subtitle language" by the [ ], [ ] buttons, and then press
the [SELECT] button. A pop-up menu will pop up, which is shown as the following illustration:
2
Select your desired language by using the [
], [
] buttons, and then press the [SELECT] button.
"OFF" means closing the subtitle output.
The system will select this setup language
as the DVD subtitle language preferentially.
If the DVD discs you select do not support
this language, this setup is invalid.
GNRL
GNRL
PLAY
PLAY
REC
REC
LANGTUNERTUNER
CLOCK CLOCK
LANG
LANG
Language Setup
You may change the subtitle language
at random when playing. Please refer
to "Playback mode" for details.
OSD language
English
Menu language
Norwegian
Subtitle language
OFF
Audio language
OFF
English
Chinese
DVD AUDIO Language Setup
1
In the language setup menu, select the item "Audio language" by the [ ], [ ] buttons, and then press
the [SELECT] button . A pop-up menu will pop up, which is shown as the following illustration.
2
Select your desired language by using the [
The system will use the setup language
as the DVD AUDIO output language
preferentially. If the disc dose not
support this setup, the setup is invalid.
], [
GNRL
GNRL
] buttons, and then press the [SELECT] button.
PLAY
PLAY
REC
REC
LANGTUNERTUNER
CLOCK CLOCK
LANG
LANG
Language Setup
When playing DVD AUDIO discs, you
may change the output language at random.
Please refer to "Playback Mode" for details.
3
OSD language
English
Menu language
Norwegian
Subtitle language
OFF
Audio language
English
English
Chinese
Damish
Press the [RETURN] button to return to the previous menu and proceed other settings.
Notes
About the DVD language setup introduced in this chapter, some discs have not the language you set, so
the setup will be invalid. When playing, the relative languages are the corresponding ones provided
by the discs.
For some DVD discs, when playing,it will display the language selection menu. If you perform the
selection in it, the corresponding setup of this unit will be invalid, and the relative languages are the
ones you select.
46
SYSTEM SETUP
Channel Tuning
This unit is equipped with a TV tuner, by which you can receive TV signals. Before receiving TV signals,
you must proceed tuning operation . The result of the operation will be saved and will not be lost after
this unit is switched off.
Auto Scan Channels
1
This operation can tune this unit automatically to receive the TV programs.
Highlight the item "TUNER" in the System Setup Control Bar.
GNRL
GNRL
PLAY
PLAY
REC
REC
LANG
TUNERTUNER
CLOCK CLOCK
LANG
TUNER
2
Press the [SELECT] button, then the TUNER menu will pop up, as shown in the following figure.
3
Highlight the item "Auto scan channels", and press the [SELECT] button to start channel scanning.
You can press the [STOP] button to stop the
scanning during the operation. If do so, the
channel information having been obtained
during scanning can also be saved.
GNRL
GNRL
PLAY
PLAY
REC
REC
LANG
TUNERTUNER
CLOCK CLOCK
LANG
TUNER
Start auto scan channel.
TUNER
When scanning a channel, the TV will show
the image of this channel's program.
Auto scan channels:
SCAN
Modify channel information
EDIT
Sort channel order
SORT
Note
Before the channel scan operation, you must connect the system properly to ensure the TV signals
can enter the system through the "TV TUNER input" jack. Please refer to "System connection-System
Connection of Recording External Signals" for the connection illustration.
Modify Channel Information
Here, you can name the channel after the corresponding program's name or any other name you like, sort
the channel order to access the special channel easily, fine tune the channel and manual scan the channel.
You can more easily management the channels, and make this unit receive the TV signal more better by
these operations introduced in this section.
SELECT to modify, CH+/CH- to shift channel,0~9 to jump channel
1
Highlight the item "Modify channel
information" in the "TUNER" menu,
and press the [SELECT] button, then
the "Channel Edit" menu will pop up
as the right figure:
Channel Edit
Channel No. & name
P089/CH089
Frequency
46.25MHz
Video mode
PAL
Sound mode
B/G
Skip
Yes
Fine tune
OK
2
Select the desired channel to be modified by pressing the [CH+] / [CH-] button.
47
SYSTEM SETUP
Modify Channel Information(CONTINUED)
3
Change the channel name: Highlight the "Channel NO. & name" in the "Channel Edit" menu, and press
the [SELECT] button, then a keyboard menu will appear, as shown in the following figure . This function
of the keyboard is almost the same as the one introduced in section "Chapter Editing-Changing the
Title Index". You can change the channel name by the methods introduced in that section.
Channel Edit
A
B
C
D
E
F
G
H
I
J
K
0
1
2
L
M
N
O
P
Q
R
S
T
U
V
3
4
5
W X
Y
Z
(
)
-
:
,
.
6
7
8
9
Space
4
Caps
BkSp
Delete
Clear
Exit
OK
Change the video mode: You can change the video mode by the item "Video mode".
The value of the video mode must match the received TV signal. If it is not right, the image will be unstable
and maybe the system can not receive the program.
5
Change the Sound mode: You can change the sound mode by the item"Sound mode".
The value of the Sound mode must match the received TV signal. If it is not right, the system will can not
receive the program's sound signal. So you should select the right value.
6
Manual Scan Channels:
a Select a channel number by pressing [CH+],[CH-] buttons.
b According to the demands of the local TV system, set the items "Video mode" and "Sound mode"
by the methods described in steps
4
and
5
.
c Highlight the item "Frequency" in the "Channel Edit" menu by [
[ ]/[
],[ ] buttons, and press
] button, then the system shall start scanning channels.
LEFT/RIGHT to manual scan, CH+/CH- to change channel
If you press the [
] button, the system shall forward
scan channels from the current frequency.
If you press the [ ] button, the system shall backward
scan channels from the current frequency.
When encountering a channel with TV program, the
Channel Edit
Channel NO. & name
P089/CH089
Frequency
46.25MHz
Video mode
PAL
Sound mode
B/G
Skip
Yes
Fine tune
scanning will stop.
OK
d When the scanning ending, that is encountering a channel with TV program, press the [SELECT]
7
button, then the TV program signal shall be correlated with the current channel number & name,
that is the current channel number & name represents this TV program.
Skip a channel: You can set the item "Skip" to "Yes" to skip the channel.
If you do so, when receiving TV programs, this channel will cannot be received, as if it does not exist.
8
Channel Fine Tuning: Highlight the item "Fine Tune" in the "Channel Edit" menu. Then you can start
fine tuning the channel.
After finishing the channel scanning, maybe some channels' frequency is not be adjusted to right
value. In this way, when watching these channels, the image and sound will be misty. Then you should
perform channel fine tuning to right adjust these channels' frequency.
Pressing the [ ] button once can increase the frequency.
Pressing the [ ] button once can decrease the frequency.
When changing the frequency, the definition of the image or sound will be changed correspondingly,
then from this, you can know the effect of the fine tuning.
48
SYSTEM SETUP
Sort Channel Order
RIGHT key to select channel, Return to confirm.
1
Channel Sort
Highlight the item "Sort channel order",
and press the [SELECT] button, then a
corresponding menu will appear shown
as the right figure.
CH001
CH002
CH003
CH004
CH005
CH006
CH007
CH008
CH009
CH010
CH001
CH002
CH003
CH004
CH005
CH006
CH007
CH008
CH009
CH010
Skiped
Skiped
Skiped
Skiped
Skiped
Skiped
Skiped
Skiped
Skiped
Skiped
UP/DOWN to select position, LEFT key to insert Return to confirm.
2
3
Highlight the desired channel in the left
list window by the cursor buttons, and
press the [SELECT] button, then the
channel name will appear in the right
list window, shown as the right figure.
Channel Sort
CH001
CH002
CH003
CH004
CH005
CH006
CH007
CH008
CH009
CH010
CH001
CH002
CH003
CH004
CH005
CH006
CH007
CH008
CH009
CH010
Skiped
Skiped
Skiped
Skiped
Skiped
Skiped
Skiped
Skiped
Skiped
Skiped
CH006
CH006
Skiped
Move the channel name up and down by pressing the [ ]/[ ] button to select the right position
which you want to insert this channel to.
UP/DOWN to select position, LEFT key to insert Return to confirm.
Channel Sort
4
Press the [SELECT] button to insert the
channel name to the selected position in
the left list window, shown as the right
figure.
CH010
Ch011
CH012
CH013
CH014
CH006
CH015
CH016
CH017
CH018
CH010
CH011
CH012
CH013
CH014
CH006
CH015
CH016
CH017
CH018
Skiped
Skiped
Skiped
Skiped
Skiped
Skiped
Skiped
Skiped
Skiped
Skiped
After pressing the
[SELECT] button, this channel
name is moved to this position.
CH006
CH006
Skiped
Before pressing the
[SELECT] button, the
channel name is in here.
To Switch Tuner Audio Channel
Some TV programs have two dubbings. You can select one of them to fit your favorite.
1
2
Highlight the item "Tuner audio channel" in
Tuner menu by [ ], [ ] buttons.
PLAY
PLAY
GNRL
GNRL
Press the [SELECT] button, then a submenu list
will pop up as shown in the right figure.
REC
LANG
TUNER
TUNER
TUNER
Auto scan channels:
3
Select "Channel A" or "Channel B" in the list,
then press [SELECT] button to confirm.
CLOCK
Start auto scan channel.
SCAN
Modify channel information
EDIT
Sort channel order
SORT
Tuner audio channel
Channel A
Channel A
Channel B
System Clock Setup
1
Enter the system setup mode.
2
In the system setup control bar, move the
GNRL
GNRL
PLAY
PLAY
cursor to select the item "CLOCK" by
the [
], [
REC
REC
LANGTUNERTUNER
CLOCK CLOCK
LANG
Date & Time Setup
] buttons, and then press the
[SELECT] button, so the TV screen will
display the time setup window, which is
shown as the right illustration.
49
Date(mm/dd/yy)
01/01/01
Time(hh:mm:ss)
12:00:00
AM/PM
PM
SYSTEM SETUP
System Clock Setup (CONTINUED)
3
Select the item "Date (mm / dd / yy)" and make it in input mode. Use the number buttons to input the
current date according to the sequence of "month / date / year" and then press the [SELECT] button.
PLAY
PLAY
GNRL
GNRL
REC
REC
LANGTUNERTUNER
CLOCK
LANG
CLOCK CLOCK
Date & Time Setup
4
Date(mm/dd/yy)
--/--/--
Time(hh:mm:ss)
12:00:00
AM/PM
PM
Select the item "Time (hh: mm: ss)" and make it in input mode. Use the number buttons to input the
current date according to the sequence of "hh : mm : ss" and then press the [SELECT] button.
PLAY
PLAY
GNRL
GNRL
REC
REC
LANGTUNERTUNER
CLOCK
CLOCK CLOCK
LANG
Date & Time Setup
5
Date(mm/dd/yy)
01/01/01
Time(hh:mm:ss)
--:--:--
AM/PM
PM
Select the item "AM / PM" to set its value.
This setup is used to indicate the time of step 4: AM or PM.
GNRL
GNRL
PLAY
PLAY
REC
REC
LANGTUNERTUNER
CLOCK
LANG
CLOCK CLOCK
Date & Time Setup
Date(mm/dd/yy)
01/01/01
Time(hh:mm:ss)
12:00:00
PM
AM/PM
AM
PM
6
Return to the previous menu by pressing the [RETURN] button and proceed other settings, or press
the [SETUP] button to end the setup and then exit.
You can cancel the illegal inputted date or time and exit the inputting mode by pressing the [RETURN]
button in steps 1 - 4 .
The correct setup of system clock is the precondition of time recording.
50
OTHER OPERATION
Standby
1
When this unit is working normally, press the [STANDBY / ON] button on the remote
control. This unit enters the standby mode.
In the standby mode, the VFD shows the current system time that can be used as a clock.
Please refer to "System Setup-System Clock Settings" for time setup.
The standby indicator on the front panel lights up in red.
When this unit is writing or erasing a disc, this function is invalid in order to avoid any
damage to the disc.
2
Press the [STANDBY / ON] button on the remote control again, this unit will restore normal work.
When this unit is working normally, the standby indicator is off.
51
APPENDIX
TROUBLE SHOOTING
When having problems with this unit, please check the chart below for a possible solution
before requesting servicing.
SYMPTOM
No power
No sound
No picture
No color
No disc
reading
Remote control
failure
Instantaneous
function failure
Picture rolling
External signals
record failure
No monitoring
signal
Time recording
failure
Recording
abortion
CAUSE
REMEDY
1. The power plug not connected
1. Connect the power plug into the wall outlet securely
2. Power plug and socket not contact tightly
2. Plug again or change another socket
3. The power socket not switched on
3. Switch on the power socket
1. Signals not properly connected
1. Connect signals securely
2. Discs wrapped or dirty
2. Clean and process the discs.
3. The unit in the mute status
3. Press the [MUTE] button again
1. Signals not properly connected
2. The TV set not properly adjusted
1. Connect signals securely
3. This video output system of this unit not
matching the TV scanning manner
3. Press the [IS/PS] button
2. Reset your TV set's AV/TV status
1. TV system not right
2. TV set's color saturation not properly
adjusted
3. Video output setting not right
1. Press the [IS/PS] button to reset the system
1. No disc in the drive
2. Disc not properly placed
3. Condensation on the laser head
4. Not in the playback mode
5. Wrong disc format
6. Disc dirty
1. Load a disc
1. Remote control not pointing to the sensor window
1. Hold the remote control in proper position
2. Use the remote control nearer to the TV set
3. Replace the batteries
4. Remove obstacles
2. Readjust the TV set's saturation
3. Readjust video output settings
2. Reload the disc with the playback side facing down
3. Turn on the power for about 1 hour without a disc before playing
4. Press the [PLAY] button
5. Load the compatible discs
6. Carefully clean the disc with soft cloth outwards from the center
2. Remote control more than 8 meters away from the TV set
3. Remote control butteries' voltage become low
4. Obstacles between remote control and the unit
1. Disc information not well stored
2. Wrong buttons pressed
3. External static leakage into the cover
1. Wait for 5-10 seconds and this unit will restore
normal playback.
2. Press the right button
3. Restart playing after turning off this unit for 1-2 minutes
1. T V system not suitable for the disc
1. Adjust the TV system
1. The system not properly connected
1. Connect the system properly
2. No disc or the disc not recordable
2. Place a recordable disc
3. The disc finalized
3. Replace the disc
4. No space left in the disc
4. Replace the recordable disc
1. The input source is not prepared well
2. The video output system not adequate
3. The actual input source and selected input
source not correspond
1. Reset the signal source
1. The disc not meet the requirements
1. Reload new DVD+R, DVD+RW discs
2. Wrong time settings (system clock or recording
time)
3. The source not work properly when recording
4. Powered off
2. Reset time recording settings
1. No space left in the recording disc
1. Reload a blank disc
2. Too bad quality of the recording disc
2. Use high quality recording disc
52
2. Switch video output system
3. Select proper input source
3. Ensure normal working of the source when recording
4. Switch the unit to the standby mode
APPENDIX
SPECIFICATIONS
DVD¡DVD+R/RW¡SVCD¡VCD¡CD-DA¡
Playable discs
Mixed CD-DA¡MP3¡JPEG
Recordable discs
DVD+R¡DVD+RW
Recording formats
DVD £MPEG II£
SLP(Standard Long Play)¡SP(Standard Play)
Recording quality
EP(Extend Play)¡HQ(Perfect Quality) .
Composite video input
S-video input(Y/C)
DV camera jack input(IEEE1394¡i-Link)
RF input
Analog audio input
Input
Composite video output
S-video output(Y/C)
Component video output (Y Cb Cr)
SCART output
2CH analog mix audio output
5.1 CH analog output
Digital audio coaxial output
Digital audio optical output
Output
Composite video:
Output
S-video£
NTSC/PAL system
Video amplitude 1.0¡0.2Vp-p,75¦
Y output amplitude 1.0Vp-p,75¦
C output amplitude 0.286Vp-p,75¦
Video
characteristics
Composite video:
Input
S-video£
Output
Audio
characteristics
Input
Audio amplitude 2.0+0.2
-1.0 Vrms,10k¦
AF response 20Hz¡20KHz(¡1dB)
Signal/noise ratio ¡ 85dB
Audio distortion+noise ¡-65dB(1KHZ)
Audio amplitude ¡6.0Vp-p
Impedance 10K¦
General
Specification
Power supply£
¡100V-¡240V £50/60Hz
Power consumption£
¡ 30W
Standby power consumption:
¡ 3W
Operating
temperature
5¡¡35¡
Operation
humidity
NTSC/PAL system
Video amplitude 1.0¡0.2Vp-p,75¦
Y input amplitude 1.0Vp-p,75¦
C input amplitude 0.286Vp-p,75¦
Dimension£
430mm x 295mm x 65mm
Relative humidity 15¡75%£No condensation£
53
Weight£
Net weight£ 3.8 kg
Gross weight£5.0 kg
APPENDIX
CREDITS
"DTS" and "DTS Digital Out" are the trademarks of Digital Theater
Systems, Inc.
Manufactured under license from Dolby Laboratories. "Dolby" and
the double D symbol are trademarks of Dolby Laboratories. Confidential
unpublished works. 1992-1997 Dolby Laboratories, Inc. All rights reserved.
This product incorporates copyright protection technology that is protected
by method claims of certain U.S. patents and other intellectual property rights
owned by Macrovision Corporation and other rights owners . Use of this
copyright protection technology must be authorized by Macrovision Corporation,
and is intended for home and other limited viewing uses only unless otherwise
authorized by Macrovision Corporation. Reverse engineering or disassembly
is prohibited.
54