1
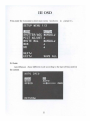
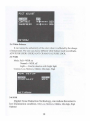
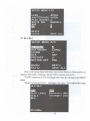
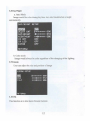
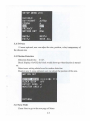
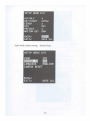
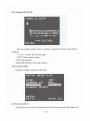
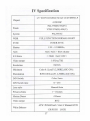
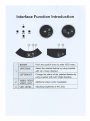
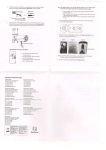
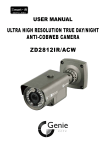
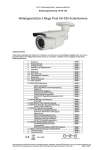
New Generation Hi-Resolution Camera
(Built-jn OSD)
USER'S
MANUAL
Thank you for purchasing our products. Pleas
read the manual carefully before operating
Version: YX-ZX412912V01
30#
Notes
"'
Do not make the products under great impact or stay away
from strong electromagnetic interference and vibration.
"'
There are some sophisticated parts inside the camera,
therefore, during transpottation and installation, please avoid the
damage cause by stress or severe vibration. For the sake of safety,
please do not switch on power before accomplishing all
installation.
> Please comply with all electrical safety standards during
operation, camera or signal transmission cable should maintain a
sufficient distance (50 meters) with high-voltage equipment 'or
cables, if necessary, lighting and thunder protective measures must
be taken.
> Please install the camera in well-ventilated environment.
> Please do not make the camera face sunshine or other strong
light directly in case of any damage to the lens and the sensor.
> The temperature and humidity range for cameras work are
-1 0 ~50 oc, less than 90% separately, please do not start cameras
beyond this range.
> To avoid lightning strikes, please make sure the installation
of power supply ground line in a good condition.
> To prevent the equipment from damage by shower or splash
of water, please do not place the device substances such as liquid.
Contents
I Features ....................................................................... 6
II IN'TERFACE .............................................................7
2.1 Interface ..............................................................7
III Menus ....................................................................... 8
3. 1Lens .................................................................... 8
3.2Shutter/AGC ....................................................... 9
3.3Pic adjustment ............................................ ... ..... 9
3.4 White Balance .................................................. 10
3.5-wDR .......................... ...................................... ! 0
3.6DNR ......... ........... ............................................. l0
3.7 HLC/B LC ........................................................ 11
3.8D/N' Switch ....................................................... l3
3.9 Ezoom ............................................................. 12
3.10Dis ..................................................................... l5
3 .11 Privacy Mask .................................................. 13
3.12Motion Detection............................................ 13
3.13Sync .................................................. .............. 13
3.14Camera lD ........................................................ 15
3.15Language ................................................... ..... 15
3.16Reset ............................................................... l5
3.1 7Retun1 ............................................................. 16
-3.18Exit/Save ........................................................ 16
•
IV Specification........................................................... 17
VFAQ .. .. ..................................................................... l9
Safety Precaution
Warning
Don~ dismantle without authority,
becareful thunder striking.
A
,.lA.
Note: To avoid thunder-strking, please donl open the backcover,
the maintenance must be made by our authorized serviceman.
This symbol means that there might exist uninsulated
dangerous voltage inside the case, be careful of electric shock.
A
This symbol reminds you to pay attention to important
operation and maintenance instructions in the accompanied
· information.
Warning
~
In order to prevent damage caused by fire or elechic shock, please do
not put cameras exposed in the moist environment or rainwater.
~
Please make sure the adapter is consistent with product
specifications, othenvise it might cause fire, electric shock or damage
~
Pay attention to polarity of the adapter, it might cause some
accidents like fires .
~
Please don't connect multiple cameras with the same adapter at the
same time; overloading of adapter capacity may cause fires.
);>
Power supply must be firmly fixed so as not to loose to cause fires .
);>
If the device gets" abnormal smell or smoke", please stop it
immediately and contact with our customer service center.
);>
If the camera <:loesn't work as usual, please do not dismantle it by
yourself. Please contact our local distributor or our maintenance office
authorized by our company, otherwise we won't promise wananty.
~
Please do not splash water on the product components when
cleaning
I. Features
1.
New Generation SONY CCD and DSP
Adopting the latest CCD and DSP, the camera can receive clear and lucid
images even at circumstances with very low illumination.
2.
Wide Dynamic Range ( WDR)
WDR Camera adopts cutting-edge and effective technology. With this
funct ion it can see all the view both inside the house and outside of the window
with different lighting.
3.
High Resolution
4.
700TVL.
DIN Switch
•
Day & Night cameras can switch automatically into color or
B!W according to optical changes.
5.
3DDNR
Digital Noise Reduction Technology enhances the ability to handle with
signal noise ratio, this technology makes camera can receive more clear and
vivid images even under low-light conditions.
6.
Motion Detect
Motion detection function can trigger alann or recording when sensing
moving objects, users can set the sensitivity and multiple detection zones
7.
•
Privacy Mask
The Privacy Mask can block out sensitive areas from view, covering the areas
with a solid block of color, you can adjust the mask position and size
OSD
8.
On Screen Display Menu
6
II Interface
2.1 Interface
•
UP
•
• • •
•
\
•
LEFT
9/TER
RIGHT
OO'a'N
ENTER
Enter and Exit the menu
UP/DOWN
LEFT/RIGHT
Moving up and down
Modify the parameters
•
•
7
III OSD
Press enter for 2 seconds to enter main menu ( as shown
in
picture 1 ) ,
SETUP MENU 1/3
-SHUTTER/AGC ~
MANUAL~
PICT ADJUST .,t
WHITE BAL
MANUAL.,!
WDR
~
NR
~
NEXT~
EXIT~
SAVE ALL
3.1 Lens
Auto/N1anual, chose different mode according to the type of lens used on
the camera
8
3.2 Shutter/AGC
•
Auto/Manual
a. Auto Setup
Mode: with auto iris lens, chose Auto Iris
with Fixed iris lens, chose Auto lris+Shutter
Brightness: 0-255
•
b. Manual Setup
user can adjust the Shutter Mode Shutter Speed and AGC
•
•
3.3 Picture Adjustment
Mirror: O:ff/V-FLIP/H-FLIP/HV-FLIP
Contrast: 0-63
Sharpness:0-15
9
3.4 White Balance
It can restore the authenticity of the color when it is affected by the change
of temperature. The user can choose different white balance mode accordingly,
ATW/PUSH/USER1/USER2/Al\!Tl CRIMANUALIPUSH LOCK.
3.5 \\IDR
Mode: Full---\VDR on
Normal----WDR off
Light---- Used in situation with bright light
Contras: Low, Mid-low, Middle, Mid-high, High
3.6 DNR
Digital Noise Reduction Technology, can reduce the noise in
low illumination condition. Off, Low, Mid-low, Middle, Mid-high, High
Optional
10
SETUP MENU 1/3
LENS
AUTO+i
SHUTTER/AGC AUTO+i
PICT ADJUST ...
WHITE BAL
MANUAL+i
WDR
...
Iii
I
NEXT+i
EXIT+i
SAVE ALL
3.7HLC/BLC
SETUP MENU 2/3
~
DAY/NIGHT
EZOOM
DIS
PRIVACY
MOTION DET
BACK~
EXIT+i
•
I
AUTO+i
tl
OFF
...
ON+i
NEXT+'
SAVE ALL
HLC is for strong light inhibition, tum on this function when used in roa
monitor. The traffic violating vehicles will be clearly monitored.
"CLIP" is between 0-255, the bigger the value, the stronger light inhibit
effect
"Scale" is between"0-15", the bigger the value, tbe brighter the image
11
3.8 Day/Night
a. Auto Mode
Image would be color during daytime, turn into black& white at night
automatically.
DAY/ NIGHT SETUP
~
~
DELAY CNT
ll ll lll ll lll ll ll ()()()
DAY~NIGHT
l.llllllllllllll ()
NIGHT~DAY
llllfllllllllll
IR OPT
IR LED
EXTON
OFF
OFF
16
080
..
OFF
RETURN~
b. Color mode
lmage would always be color regardless of the changing of the lighting.
3.9 Ezoom
User can adjust the size and position of image
•
•
3.10 Dis
This function is to shut down Ezoom fucntion
12
SETUP MENU 2/3
HLC/BLC
DAY/NIGHT
EZOOM
-
.
'
~
~
AUTO~
~
g
PRIVACY
MOTION DET
~
BACK~
NEXT~
EXIT~
SAVE ALL
ON~
3.11 Privacy
15 areas optional, user can adjust the size, position, color, transparency of
the chosen area
3.12 Motion Detection
Detection Sensitivity: 0-127.
Block Display: On/Off, the block would show up when function is turned
on.
Detect area: setting related area for motion detection
Monitor area: 4 areas optional, user can adjust the position of the area.
-'
•
3.13 Sync Mode
Chose Next to go to the new page of Menu
13
Sync Mode: default setting Internal Sync
14
3.14 Camera 1D Set UP
You can set the camera code as munbers, uppercase letters, and related
symbols..
"~H~" Cursor for left and right
"CLR" Clear camera name
"POS" for position.
"RETURN"retum to the upper menu.
3.15 LANGUAGE
Chinese, English, Japanese Optional
3.16 Camera Reset
This function is to clear all parameters that has been saved, and return tall
15
parameters to default setting. This process should be double confirmed by the
user before resetting.
3.17 Return to front page
3.18 EXIT I SAVE ALL
16
IV Specification
l/3" SONY DOUBLE SCAN CCD+EFFIO-P
Chipset
4129 DSP
PAL:976(H)x582(V)
Pixels
NTSC:976(H)x494(V)
System
PAL/NTSC
WDR
FULL FUNCTION/NORMAL/LIGHT
SYNC
INNER SYNC
1/53~1/IOOOOOs ;
Shutter
AGC
S/N Ratio
AGC/ AGC + Slow shutter
>50ciB CAGC OFF)
. 1.0Vp-p,75Q
Video output
.
.
700TVL
Resolution
Minimum
Color 0.1Lux(Fl.2,50IRE,AGC ON),
illumination
B/W:O.OOlLux(F 1.2,50lRE,AGC ON)
DIN Switch
Color /Auto
o ~2ss
DIN Switch time
ManuaVAuto
Lens style
Ptivacy Zones
1~1 szones
Motion Detect
4 Zones
BNC
Video output
ATW /PUSH/Userl/User 2/ Manual/ANTI
'White Balance
CRIPUSH LOCK
17
VerticaVHorizontal I Vertical +
Mirror
Horizontal /Off
Can be set
Title
Title Position
I
Any position on the screen
High/Medium to high/Medium/Low to
DNR
medium!Low/Off
English/Chinese/Japanese
OSD
Pic contrast
0-63
Pic sharpness
0-15
•
DC12V±l 0%
Power
2.0W
Wattage
Operating
-lo·c.-...so·c
Temperature
Operating Humidity
<90%
Storage Temperature
-40°C~+60°C
20.-...95%
Storage Humidity
•
•
18
VFAQ
1. Q: No image after installation?
A: a. Check to connect the power supply correctly, whether the indicating led is always on
or not;
b. Check the video cable, make sure it is workable.
c. Check if the monitor has been open.
2 . Q: Image interference after installation
A: a. Check the power quality, if the adapter can't work, please replace another one.
b. Check if electromagnetic interference exists in the stnTottndings, please use some
anti-interference devices.
3 . Q: RS485 can't control menu?
A: a. Please check the controller issued code is correct;
b. Please checkif the control circuit is smooth;
c. Please verify the commtmication address, baud rate well-matched;
d. Please check if the connection interface is loose.
4. Q: Camera image can't switch into B/W at night?
A: Please open the camera menu to see if "Day/Night Switch" is set as AUTO, if not, please
change into AUTO.
5. Q: Noise is very obvious at night with low illumination.
A: please make sure AGC ON.
6. Q: The image color is abnonnal.
A: a. please make sure if the white balance is correctly set as Auto White Balance.
b. Please enter the menu to restore factory settings.
7. Q: Image appears to be whiter than usual after installation?
A: a. Please check whether the lens aperture was adjusted too large, so that the image
appears whiter.
b. Please verify the camera rear panel, if ·the regulator potentiometer is adjusted too
l~rge.
c. Check if the brightness of the monitor is too large.
8. Q: When installation, image is not clear or exist dark corners?
A: a. Please adjust focus and zoom of the lens. Make sure the focus should be adjusted in a
proper way.
b. Please check if U1e lens is c lean.
19
Interface Function Introduction
UP
.·. ....
.
-.
,
••
'·
-.
LEFT
... .
. ,.
•·.••••••.
1
'' .
"
'
RIGHT
OOER
··000!1···'·~
,.,..ENTER
--·,., ... .
Push the joystick down to enter OSD menu.
. .....
Select the desired feature by using Joystick
with Up I Down direction.
.
..UP/DOWN
'
. -· ..
1
. . . .. .
..
Change the status of the selected feature by
using Joystick with Left I Right direction.
·. LEFT/RIGHT
"
.
••••
.
' :· vu)ed tesn
2 .
Additional video out for installation.
. . . VIDEO OUT
"' ... -: .;.
'LED
LEVEL . Adjusting brightness of IR LEOs.
3
.
.
.
.
.
.
••
•
"
.
•
.
.