1
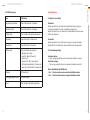
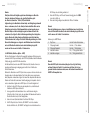
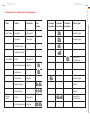
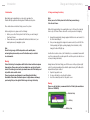
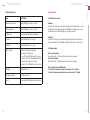
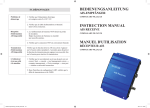
Probiker KX4 Z-Link
Bedienungsanleitung/User manual
Inhalt
Contents
Seite
Einleitung
4
1.
Introduction
24
2.
Aufladen und Wechseln des Akkus
5
2.
Charge and change the battery
25
3.
Eigenschaften und Funktionen
3.1. Produkteigenschaften
3.2. Hauptfunktionen
3.
6
6
Features and functions
3.1. Product features
3.2. Main functions
26
26
Produktbeschreibung
4.1. Erläuterung der Bedieneinheit
4.2. LED – Statusanzeige
7
8
Product description
4.1. Explanation of the operating unit
4.2. LED status display
27
28
Basisfunktionen
5.1. Gerät einschalten/ausschalten
5.2. Lautstärkenregulierung
9
9
Basic functions
5.1. Switch device on/off
5.2. Volume control
29
29
Use Bluetooth enabled mobile phones,
navigation systems or MP3 (A2DP) players
6.1. Mobile phone
6.2. Navigation system
6.3. MP3 music (wireless option – A2DP)
30
31
32
7.
Intercom operation
34
8.
Extended functions of the Z-Link in combination with
a mobile phone, navigation system or intercom
8.1. MP3 mode
8.2. Intercom mode
8.3. Navigation system mode
35
36
36
Reset (restoring the factory settings)
37
4.
5.
6.
4.
5.
Verwenden von Bluetooth fähigen Handys,
Navigationsgeräten oder MP3-(A2DP) Playern
6.1. Handy
6.2. Navigationsgerät
6.3. MP3-Musik (Drahtlose Option – A2DP)
10
11
12
7.
Interkombetrieb (Gegensprechanlage)
14
8.
Erweiterte Funktionen des Z-Link in Verbindung mit Handy,
Navigationsgerät oder Interkom
8.1. MP3-Modus
8.2. Interkom-Modus
8.3. Navigationsgeräte-Modus
15
16
16
Reset (Wiederherstellung der Werkseinstellung)
17
9.
10. Erläuterung der Ton-und Blinkzeichen der Bedieneinheit
18
11. Kundendienst
22
10. Explanation of the sound- and flashing signals
of the operating unit
12. Hinweise
22
9.
2
Page
1.
6.
38
11. Customer service
42
12. Information
42
3
Aufladen und Wechseln des Akkus
1. Einleitung
2. Aufladen und Wechseln des Akkus
Herzlichen Glückwunsch und vielen Dank, dass Sie sich für den Probiker KX4
Klapphelm mit integriertem Z-Link Bluetooth System entschieden haben.
Hinweis:
Das Z-Link System muss vor der ersten Inbetriebnahme mindestens
4 Stunden geladen werden.
deutsch
Einleitung
Diese Anleitung soll Ihnen bei der Benutzung des Systems behilflich sein.
Vor Inbetriebnahme ist folgendes zu beachten:
> Das Z-Link System muss vor der ersten Inbetriebnahme mindestens
4 Stunden geladen werden.
> Machen Sie sich bitte mit den Bluetooth Funktionen Ihres Handys und/oder
Navigationsgerätes vertraut.
Hinweis:
Aufgrund der großen Bandbreite an verschiedenen Anbietern auf
dem Handy- und Navigationsgerätemarkt kann es bei einigen Modellen zu
Funktionseinschränkungen kommen.
Warnung:
Schützen Sie den Akku und die im Helm eingebauten Kopfhörer sowie das
Mikrofon vor Nässe. Bitte achten Sie darauf, dass ihr Helm von innen nicht
nass wird. Wenn der Helm innen nass wird, sollten Sie den Z-Link Akku
entnehmen und das Gerät und den Innenraum trocknen.
Bitte nehmen Sie keine Bluetooth-Einstellungen während der Fahrt vor.
Achten Sie auf die Lautstärke. Eine zu hohe Lautstärke kann auf Dauer Ihr
Hörvermögen schädigen.
Nutzen Sie zum Aufladen des Akkus nur das original Z-Link Ladegerät.
Die Betriebszeit mit voll aufgeladenem Akku beträgt bis zu 12 Stunden,
die Stand-by Zeit beträgt bis zu 300 Stunden. Bitte beachten Sie die korrekte
Vorgehensweise beim Aufladen:
1. Nehmen Sie das im Lieferumfang enthaltene Akku-Netzladegerät aus der
Verpackung und schließen Sie es an den Z-Link-Mini-USB Eingang an.
2. Nachdem Sie den Netzstecker des Ladegerätes in die Steckdose gesteckt
haben, leuchtet während des Ladevorgangs die rote LED des Z-Link Bedienmoduls. Wenn der Akku komplett geladen ist, leuchtet die blaue LED.
Ähnlich wie bei anderen elektronischen Geräten ist der Akku des Z-Link ein Verbrauchsgegenstand. Der Akku muss nach gewisser Zeit erneuert werden. In den
nächsten drei Schritten wird beschrieben, wie man den Akku korrekt wechselt:
Wenn Sie das Innenfutter des Helmes herausgenommen haben, finden Sie dicht
neben der außen angebrachten Bedienungseinheit eine Aussparung im Styroporkern,
indem sich das Kunststoffgehäuse für den Bluetooth Chip und den Akku befindet.
1. Öffnen Sie die obere Kunststoff-Abdeckung.
2. Ziehen Sie am Akku-Band, um den Akku korrekt zu entnehmen.
3. Legen Sie den neuen Akku ein und schließen Sie die Kunststoff-Abdeckung.
Warnung:
Bitte verwenden Sie nur den vom Hersteller für das Z-Link empfohlenen
Akku (Best.Nr.: 10004699).
Bluetooth Chip
Akku
Akku-Band
4
5
Produktbeschreibung
3. Eigenschaften und Funktionen
4. Produktbeschreibung
3.1. Produkteigenschaften
Das Gerät unterstützt Bluetooth 2.1, A2DP, AVCRP und EDR Standard.
Die Reichweite beträgt bis zu 10m.
4.1. Erläuterung der Bedieneinheit
deutsch
Eigenschaften und Funktionen
3.2.Hauptfunktionen
Mobiltelefon
> Telefonanrufe vom Mobiltelefon entgegennehmen
> Spracherkennung
(diese Funktion muss vom jeweiligen Handy unterstützt werden)
> Wahlwiederholung der letzten Telefonnummer
> Anrufe unterdrücken oder abbrechen
Interkom
> Sprachverbindung zu einem weiteren Z-Link System
Navigationsgerät
> Sprachanweisungen des Navigationsgerätes empfangen.
Dafür muss das jeweilige Navigationsgerät das Bluetooth „Handsfree“
Protokoll (HFP) unterstützen.
MP3-Player (Bluetooth)
> Musik von MP3-Playern und Handys, die das Bluetooth-A2DP Profil
unterstützen, empfangen.
> Unterstützt AVRCP - zur Fernbedienung verschiedener Audiofunktionen
(Wiedergabe, Pause, Titel-Vorlauf und –Rücklauf) über die Bedieneinheit
in Kombination mit AVRCP-kompatiblen MP3-Playern oder Handys.
1.
2.
3.
4.
5.
6.
6
Telefon-Taste
„+“ Taste Lautstärkenerhöhung durch langes Drücken/
Titel vorwärts durch kurzes Drücken
„-“ Taste Lautstärkenverringerung durch langes Drücken/
Titel zurück durch kurzes Drücken
LED Statusleuchten
Anschluss für Mini USB Akku- Netzladegerät
Gummiabdeckung zum Schutz vor Spritzwasser
7
4.2. LED-Statusanzeige
8
Basisfunktionen
5. Basisfunktionen
Status
LED Anzeige
5.1.Gerät ein-/ausschalten
1. Stand-by & Ruhezustand
Blaue LED leuchtet alle 3 Sekunden
2. Verbunden Status
Blaue LED leuchtet alle 5 Sekunden
3. Pairing Status
Rote und Blaue LED leuchten abwechselnd
Einschalten
Drücken und halten Sie die Telefon-Taste ungefähr fünf Sekunden lang, um
das Gerät einzuschalten. Es ertönt ein akustisches Signal und die
blaue LED leuchtet für ca. eine Sekunde. Im Stand-by Modus leuchtet die blaue
LED alle drei Sekunden.
4. Einschalten
Blaue LED leuchtet 1 Sekunde auf
5. Ausschalten
Rote LED leuchtet 1 Sekunde auf
6. Batteriestatus
Zeigt den Batteriestatus nach dem
einschalten des Systems:
· über 50 %, blaue LED leuchtet 1
Sekunde auf
· zwischen 10 %-50 %, rote und blaue
LED leuchten gleichzeitig für 1 Sekunde auf
· unter 10 %, rote LED leuchtet 1 Sekunde auf
7. Aufladen
LED leuchtet rot
8. Ladevorgang abgeschlossen
LED leuchtet blau
9. Reset
Rote und blaue LED leuchten gleichzeitig
deutsch
Produktbeschreibung
Ausschalten
Drücken und halten Sie die Telefon-Taste so lange, bis ein langes akustisches
Signal ertönt. Die rote LED leuchtet kurz auf und das Gerät ist ausgeschaltet.
5.2. Lautstärkenregulierung
Lautstärke erhöhen:
„+“ Taste so lange gedrückt halten, bis die erwünschte Lautstärke erreicht ist.
Lautstärke verringern:
„-“ Taste so lange gedrückt halten, bis die erwünschte Lautstärke erreicht ist.
Hinweis (Zweitfunktion im A2DP-Modus):
> Die „+ “ Taste kurz drücken um den nächsten Musiktitel zu wählen.
> Die „-“ Taste kurz drücken um den vorherigen Musiktitel zu wählen.
9
6. Verwenden von bluetooth-fähigen Handys, Navigationsgeräten
oder MP3 (A2DP) Playern
6.1. Handy
Bevor Sie die Verbindung zu einem Handy herstellen, lesen Sie bitte ausführlich die
Bedienungsanleitung Ihres bluetooth-fähigen Handys und überprüfen, ob dieses ein
HSP (Haedset Profile) oder HFP (Handsfree Profile) Bluetooth Profil unterstützt.
1. Aktivieren Sie zuerst den Pairing-Modus bei Ihrem Z-Link Bluetooth-System:
Drücken Sie im ausgeschalteten Zustand für ca. acht Sekunden die TelefonTaste, bis die rote und blaue LED an der Z-Link Bedieneinheit abwechselnd leuchten. Das Gerät befindet sich jetzt im Pairing-Modus.
2. Aktivieren Sie nun die Bluetooth-Funktion Ihres Handys.
3. Wenn Ihr Handy das Gerät findet, erscheint in der Geräteauswahlliste des
Handys das Z-Link als „BT HELMET“. Bitte wählen Sie „BT HELMET“ aus, geben
Sie bei Aufforderung den Pin/das Passwort 0000 (vier mal die Null) ein und
schließen Sie so das Pairing ab.
4. Wenn das Pairing erfolgreich verlief, leuchtet die LED des Z-Link blau.
Hinweis:
Nach erfolgreichem Pairing zwischen Handy und Z-Link müssen Sie diesen
Ablauf nicht noch einmal wiederholen. Das Pairing bleibt bestehen.
Wenn Sie das Z-Link erneut einschalten, stellt es automatisch eine Verbindung
zu Ihrem Bluetooth-Handy her. Wenn der Verbindungsprozess länger als zwei
Minuten dauert und die blaue und rote LED weiterhin leuchten, konnte keine
Verbindung hergestellt werden und Sie müssen die Schritte 1-3 wiederholen.
Bedienung des Handys
1. Telefonanruf annehmen/Telefonanruf beenden
Bei einem eingehenden Anruf werden Sie per Signalton durch Ihr Z-Link benachrichtigt. Um ein Gespräch entgegenzunehmen oder zu beenden, drücken
Sie jeweils kurz die Telefon-Taste.
Hinweis:
Wenn Sie vor einem Telefonanruf Musik gehört haben und den Anruf beenden,
schaltet das Z-Link System automatisch auf den letzten Musiktitel um.
10
Verwendung
2.
3.
4.
Eingehenden Telefonanruf verweigern
Wenn Sie einen eingehenden Telefonanruf verweigern möchten, drücken sie
für ca. zwei Sekunden die Telefon-Taste, bis Sie ein akustisches Signal
vernehmen. Das System verweigert automatisch den eingehenden Anruf.
Wahlwiederholung
Wenn Sie die letzte Telefonnummer erneut wählen möchten, drücken Sie die
Telefon-Taste zweimal kurz hintereinander.
Spracherkennung
Drücken Sie die Telefon-Taste dreimal kurz hintereinander, um die Spracherkennungs-Funktion zu aktivieren. Nach der Aktivierung der Spracherkennung
hören Sie ein akustisches Signal.
deutsch
Verwendung
Hinweis:
Natürlich muss Ihr Bluetooth-Handy diese Spracherkennungs-Funktion
unterstützen.
6.2. Navigationsgerät
Um ein Bluetooth- Navigationsgerät in Verbindung mit Z-Link zu benutzen, müssen
Sie beide Geräte miteinander pairen. Nach erfolgreichem Pairing können Sie die
Navigationsanweisungen und die ggfs. auf dem Navigationsgerät gespeicherten
Musikdateien (MP3-Format) empfangen.
1. Schalten Sie ihr Navigationsgerät ein.
2. Im ausgeschalteten Zustand drücken Sie ca. acht Sekunden lang die
Telefon-Taste Ihres Z-Link, bis die rote und blaue LED abwechselnd leuchten.
Das Gerät befindet sich jetzt im Pairing Modus.
3. Suchen Sie auf Ihrem Navigationsgerät nach Bluetooth-Headsets.
4. Das Navigationsgerät wird das Z-Link als „BT HELMET“ in der Liste erkannter
Geräte aufführen. Wählen Sie „BT HELMET“ und folgen Sie den Instruktionen
Ihres Navigationsgerätes, bis das Pairing abgeschlossen ist.
5. Wenn Ihr Navigationsgerät ein PIN oder Passwort verlangt, geben Sie 0000
(vier mal die Null) ein.
6. War das Pairing erfolgreich, blinkt die LED des Z-Link langsam blau.
11
Hinweis:
Nicht jedes Bluetooth-Navigationsgerät kann Verbindungen zu BluetoothHeadsets aufnehmen. Dafür muss das jeweilige Navigationsgerät
das Bluetooth „Handsfree“ Profile (HFP) unterstützen.
Aufgrund der großen Bandbreite auf dem Handy- und Navigationsgerätemarkt
kann es vorkommen, dass Sie das Handy auf unterschiedliche Weise an das
Navigationsgerät und das Z-Link Kommunikationssystem koppeln müssen.
Wenn Ihr Handy erst mit dem Navigationsgerät und dann mit dem Z-Link
verbunden ist, befolgen Sie bitte die Bedienungsanleitung Ihres Navigationsgerätes. Wenn beide Geräte, Handy und Navigationsgerät, direkt mit dem
Z-Link verbunden sind, befolgen Sie bitte die Bedienungsanleitung des Z-Link.
Wenn der Verbindungsprozess länger als zwei Minuten dauert und die blaue
und rote LED weiterhin leuchten, konnte keine Verbindung hergestellt
werden und Sie müssen die Schritte 1-5 wiederholen.
6.3. MP3-Musik (Drahtlose Option – A2DP)
Mit dem Z-Link können Sie Musik in Stereoqualität empfangen. Dafür müssen die
verwendeten MP3-Player und Handys das A2DP Profil (Advanced Audio Distribution
Profile) und ggfs. das AVRCP Profil unterstützen.
Ein Bluetooth-Gerät, welches das AVRCP Profil unterstützt, erlaubt es Ihnen, die
grundlegende Bedienung der Ausgangsquelle mittels Ihrer Z-Link Bedieneinheit vorzunehmen.
Während Sie Musik über eine A2DP Quelle hören, verpassen Sie keine Anrufe oder
Gespräche über die Interkom-Funktion. Das Z-Link gibt bei einem eingehenden
Anruf/Gespräch ein akustisches Signal. Sie können das Gespräch dann über das
Drücken der Telefon-Taste annehmen. Nach Beendigung des Gesprächs ertönt erneut ein akustisches Signal und der MP3-Player setzt seine Wiedergabe fort.
1. Schalten Sie Ihren MP3-Player ein und überprüfen Sie, ob die BluetoothFunktion des MP3-Players aktiviert ist.
2. Im ausgeschalteten Zustand drücken Sie ca. acht Sekunden lang die
Telefon-Taste Ihres Z-Link, bis die rote und blaue LED abwechselnd leuchten.
Das Gerät befindet sich jetzt im Pairing Modus.
3. Suchen Sie nach „Bluetooth-Geräten“ auf Ihrem MP3-Player.
4. Ihr MP3-Player listet das Z-Link als „BT HELMET“ in der Liste erkannter
Geräte auf. Wählen Sie „BT HELMET“ und folgen Sie den Instruktionen Ihres
12
Verwendung
5.
6.
MP3-Players, bis das Pairing vollendet ist.
Wenn Ihr MP3-Player ein PIN oder Passwort verlangt, geben Sie 0000
(vier mal die Null) ein.
Wenn das Pairing erfolgreich war, blinkt die LED des Z-Link blau.
deutsch
Verwendung
Hinweis:
Wenn der Verbindungsprozess länger als zwei Minuten dauert und die blaue
und rote LED weiterhin leuchten, konnte keine Verbindung hergestellt werden
und Sie müssen die Schritte 1-5 wiederholen.
Bedienung des AVRCP Modus
1. Play/Pause
2. Titelsprung Vorwärts
3. Titelsprung Rückwärts
4. Lautstärke erhöhen
5. Lautstärke verringern
Kurz die Telefon-Taste drücken
Kurz die „+“ Taste drücken
Kurz die „-“ Taste drücken
Die „+“ Taste gedrückt halten
Die „-“ Taste gedrückt halten
Hinweis:
Wenn die A2DP Quelle in Ihrem Handy integriert ist, erfolgt das Pairing
mit dem Z-Link wie in Punkt 6.1. beschrieben wird. Wenn Sie die oben
genannte Funktion benutzen möchten, muss Ihr Gerät mit einem Bluetooth
AVRCP Profil kompatibel sein.
13
7. Interkombetrieb (Gegensprechanlage)
Nach dem Pairing von zwei Z-Link Geräten kann die Kommunikation zwischen
Fahrer und Sozius stattfinden.
1. Schalten Sie beide Z-Link Bluetooth-Systeme ein, indem Sie auf beiden
Bedieneinheiten für ca. fünf Sekunden die Telefon-Taste drücken.
Dann ertönt ein akustisches Signal und die blaue LED leuchtet.
2. Drücken Sie anschließend die „+“ und die „-“ Taste gleichzeitig für ca. fünf
Sekunden an beiden Z-Link Bedieneinheiten, bis die rote und blaue LED abwechselnd leuchten. Die Geräte befinden sich jetzt im Pairing-Modus.
3. Jetzt drücken Sie kurz die Telefon-Taste auf einem der beiden Z-Link Geräte
(Dieser ist dann automatisch der Master). Sie hören ein akustisches Signal,
welches 2-3mal wiederholt wird. Die beiden Z-link Systeme verbinden sich
nun automatisch.
Hinweis:
Wenn der Verbindungsprozess abgeschlossen ist, leuchtet die LED des Z-Link
blau. Wenn der Verbindungsprozess länger als zwei Minuten dauert und die blaue
und rote LED weiterhin leuchten, konnte keine Verbindung hergestellt werden und
Sie müssen die Schritte 1-3 wiederholen. Nach erfolgreichem Pairing müssen Sie
diesen Vorgang nicht erneut wiederholen. Die beiden Z-Link Geräte erkennen sich
jetzt immer wieder automatisch nach dem Einschalten.
Bedienung im Interkom-Modus
1. Beenden der Interkom-Funktion
Drücken Sie kurz die Telefon-Taste, währenddessen hören Sie ein akustisches
Signal auf beiden miteinander gekoppelten Z-Link Geräten.
2. Starten der Interkom-Funktion
Drücken Sie für ca. zwei Sekunden die Telefon-Taste und Sie hören ein
akustisches Signal auf dem Master Z-Link und zwei Signaltöne auf dem Slave
Z-Link Gerät. Die Gegensprechanlage startet automatisch.
Hinweis:
Master/Slave – sind allgemeine Namen/Begriffe für BluetoothSysteme. Der Master steuert die Kommunikation und der Slave ist einfacher
Teilnehmer an der Kommunikation.
14
Erweiterte Funktionen
8. Erweiterte Funktionen des Z-Link in Verbindung mit Handy,
Navigationsgerät oder Interkom
8.1. MP3-Modus
Während Sie Musik hören, können Sie einen Telefonanruf oder einen InterkomAnruf entgegen nehmen. Während eines Gespräches ist das Abspielen
von Musik nicht möglich. Wenn das Gespräch beendet ist, setzt die Musik automatisch dort wieder ein, wo sie gestoppt wurde.
deutsch
Interkombetrieb
1. Telefonanruf entgegennehmen
Die Musik stoppt automatisch und Sie hören ein akustisches Signal, welches Sie
auf einen eingehenden Telefonanruf aufmerksam macht. Um den Anruf anzunehmen,
drücken Sie kurz die Telefon-Taste. Wenn Sie den Anruf beenden möchten, drücken
Sie wieder kurz die Telefon-Taste und die Musik-Wiedergabe wird fortgesetzt.
Hinweis:
Wenn ein Telefonanruf während eines laufenden Gespräches eingeht,
werden Sie per akustischem Signal darüber informiert. Um den laufenden
Anruf zu beenden, drücken Sie kurz die Telefon-Taste. Danach drücken
Sie erneut die Telefon-Taste, wodurch sie den eingehenden Anruf entgegennehmen und das Gespräch starten können.
2. Wahlwiederholung der letzten Nummer
Drücken Sie zwei Mal kurz die Telefon-Taste. Die Musik-Wiedergabe stoppt automatisch, Sie hören ein akustisches Signal und die Telefon-Verbindung wird
hergestellt. Um das Gespräch zu beenden, drücken Sie kurz die Telefon-Taste oder
warten Sie, bis der Gesprächspartner auflegt. Wenn das Gespräch beendet ist,
wird die Musik-Wiedergabe automatisch fortgesetzt.
3. Interkom-Kommunikation beginnen
Drücken Sie die Telefon-Taste für ca. zwei Sekunden, die Musik stoppt automatisch,
ein akustisches Signal ertönt und die Interkom-Verbindung wird automatisch
aufgenommen. Wenn Sie das Gespräch beenden möchten, drücken Sie kurz die
Telefon-Taste oder warten Sie, bis der Gesprächspartner die Verbindung beendet.
Danach wird die Musik-Wiedergabe automatisch fortgesetzt.
15
4. Interkom-Anruf entgegennehmen
Die Musik stoppt automatisch, Sie hören ein akustisches Signal und die InterkomVerbindung wird automatisch gestartet. Wenn Sie das Gespräch beenden möchten,
drücken Sie kurz die Telefon-Taste oder warten, bis der Gesprächspartner die
Verbindung beendet. Wenn das Gespräch beendet ist, wird die Musik-Wiedergabe
automatisch fortgesetzt.
8.2. Interkom-Modus
Sollten Sie sich im Interkom-Modus befinden, können Sie problemlos einen
Telefonanruf entgegennehmen.
1. Telefonanruf im Interkom-Modus entgegennehmen
Bei einem eingehenden Telefonanruf werden Sie per akustischem Signal informiert.
Drücken Sie kurz die Telefon-Taste, um die Interkom-Funktion zu beenden. Sobald
Sie erneut kurz die Telefon-Taste drücken, nehmen Sie den Telefonanruf entgegen.
Reset
ein Gespräch beendet wurde (Musik-Wiedergabe wird nicht bei allen Geräten
automatisch fortgesetzt).
9. Reset (Wiederherstellung der Werkseinstellung)
deutsch
Erweiterte Funktionen
Stellen Sie sicher, dass das Z-Link ausgeschaltet ist. Dann drücken Sie gleichzeitig
alle drei Tasten („Telefon“, „+“ und „-“) ca. fünf Sekunden lang bis die blaue und
rote LED leuchten. Das Gerät ist nun zurückgesetzt.
Hinweis:
Wenn Sie das Gerät resettet haben, werden der komplette Speicher und alle
Verbindungen gelöscht. Wenn Sie die alten Verbindungen wiederherstellen
möchten, müssen Sie die Geräte erneut miteinander pairen.
8.3. Navigationsgeräte-Modus
1. Telefonanruf entgegennehmen
Falls Sie ein Handy mit einem kompatiblen Navigationsgerät nutzen, können
Sie Telefonanrufe entgegennehmen, indem Sie die Telefon-Taste an der Z-Link
Bedienungseinheit drücken oder den Anweisungen auf dem Display des Navigationsgerätes folgen. Bitte entnehmen Sie die Informationen zur Bedienung des
Navigationsgerätes der jeweiligen Bedienungsanleitung.
Sicherheitshinweis:
Aus Sicherheitsgründen empfehlen wir, wenn möglich, die Bedienung des
Handys über das Display des Navigationsgerätes vorzunehmen.
2. Interkom-Anruf entgegennehmen
Bei einem eingehenden Interkom-Anruf empfangen Sie ein akustisches Signal.
Drücken Sie kurz die Telefon-Taste um das Gespräch entgegenzunehmen.
Hinweis:
Bei Navigationsgeräten, die eine MP3 Player Funktion unterstützen,
kann es vorkommen, dass die Musik manuell gestartet werden muss, wenn
16
17
Erläuterung
deutsch
Erläuterung
10. Erläuterung der Ton- und Blinkzeichen des Bedienungsmoduls
Modus
Funktion
Gerätestatus
Kurz
drücken
2 Sekunden
lang drücken
5 Sekunden
lang drücken
8 Sekunden
lang drücken
Zeichen/ Signal
Basis Funktion
Einschalten
Ausgeschaltet
akustisches Signal
Ausschalten
Blaues Licht
akustisches Signal
Pairing
Ausgeschaltet
Blaue und rote
LED leuchtet auf
Anruf entgegennehmen
Klingelton
Lautstärke erhöhen
Lautstärke verringern
Telefon-Modus
Anruf beenden
Anruf abweisen
InterkomModus
18
Klingelton
akustisches Signal
Wahlwiederholung
Klingelton
Spracherkennung
Klingelton
Pairing
Eingeschaltet
Anruf entgegennehmen
Klingelton
Blaue und rote
LED leuchtet auf
19
Erläuterung
Modus
Funktion
InterkomModus
Anruf beenden
akustisches Signal
Anruf beginnen
akustisches Signal
A2DP
Pairing
Status
Ausgeschaltet
Kurz
drücken
2 Sekunden
lang drücken
5 Sekunden
lang drücken
8 Sekunden
lang drücken
Zeichen/ Signal
deutsch
Erläuterung
Blaue und rote
LED leuchtet auf
Play/Pause
Vorwärts
Rückwärts
A2DP-Modus
Anruf entgegennehmen
Klingelton
Wahlwiederholung
Interkom-Gespräch
entgegennehmen
Klingelton
akustisches Signal
Interkom-Gespräch
beginnen
Während eines
Telefongesprächs
Während eines
Interkom-Gesprächs
Reset
20
akustisches Signal
2. Telefonanruf
entgegennehmen
Klingelton
Interkom-Gespräch
entgegennehmen
akustisches Signal
Anruf entgegennehmen
Klingelton
Ausgeschaltet
Blaue und rote
LED leuchtet auf
21
11. Kundendienst
Weitere Informationen erhalten Sie auf unserer Internetseite www.louis.de
Für technische Hilfeleistung kontaktieren Sie uns bitte unter
[email protected].
12. Hinweise
CE-Mitteilung
Das Probiker KX4 Z-link entspricht im wesentlichen den Anforderungen und
Vorschriften der EG-Richtlinie 1999/5/EC (hier R&TTE-Richtlinie genannt) Artikel 3.
Das System erfüllt die Normen EN300 328 V1.7.1:2006; EN 01 489-1
V1.8.1:2008 und EN 301 489-17 V2.1.1:2009.
Konformitätserklärung
Das Probiker KX4 Z-link Headset ist im Einklang mit und entspricht den Richtlinien
der Bluetooth®?
-Spezifikation 2.1 und hat alle Tests zur Interfunktionsfähigkeit, die
in der Bluetooth®?
-Spezifikation festgelegt sind, bestanden. Die Interfunktionsfähigkeit zwischen dem Gerät und anderen Bluetooth®?
-fähigen Produkten ist jedoch
nicht gewährleistet.
Verzichtserklärung und Haftungsfreistellung
Mit der Inbetriebnahme des Probiker KX4 Z-link (nachstehend auch das „Gerät”
genannt) verzichten Sie auf wesentliche Rechte, einschließlich des Klagerechts.
Bitte lesen Sie vor Inbetriebnahme des Geräts sorgfältig den folgenden Abschnitt.
Falls Sie nicht alle Bedingungen dieser Vereinbarung akzeptieren, sollten Sie das
Produkt sofort zurückgeben. Wir werden Ihnen in solchem Falle den vollen Kaufpreis zurückerstatten. Falls Sie das Gerät jedoch in Betrieb nehmen, sind Sie an
diese Vereinbarung gebunden und verzichten u. a. auch auf jegliches Klagerecht.
Während des Fahrens auf einem Motorrad, Motorroller, Quad oder jeglichem
anderen Fahrzeug ist Ihre vollständige und ungeteilte Aufmerksamkeit erforderlich.
Wir weisen Sie hiermit ausdrücklich darauf hin, dass Sie alle erforderlichen Vorsichtsmassnahmen treffen müssen und sich während der Benutzung des Gerätes
zu jeder Zeit des Verkehrs, den Witterungsbedingungen und dem Zustand der
Strasse bewusst sein müssen. Bevor Sie einen Anruf tätigen oder annehmen,
22
Hinweise
sollten Sie Ihr Fahrzeug am Straßenrand anhalten. Alle Veröffentlichungen,
Anzeigen, Bekanntmachungen oder ähnliche Mitteilungen, die sich darauf beziehen, dass das Gerät während der Fahrt verwendet werden kann, betreffen
lediglich dessen technische Möglichkeiten und sind nicht als Aufforderung gedacht, das Gerät im direkten Straßenverkehr zu benutzen. Mit dem Kauf des Gerätes stellen Sie die Louis GmbH (nachstehend auch die „Firma“ genannt)
unwiderruflich von allen Haftungsansprüchen, Verlusten, Forderungen und anderen
Ansprüchen jeglicher Art (einschließlich der Anwaltskosten) im Zusammenhang
mit der Verwendung des Geräts frei und verpflichten sich die Firma nicht für
irgendwelche Körperverletzungen, Schäden oder Tod, sowie für Warenverluste und –
Schäden an Fahrzeugen, einschließlich Ihres eigenen Fahrzeugs, oder jeglichen
anderen Schäden an Sie oder an Dritten, ungeachtet der Umstände oder Bedingungen zu belangen und die Firma in jedem Falle schadlos zu halten.
Sie akzeptieren hiermit auch, dass die Firma keinerlei Verantwortung für körperliche Schäden irgendwelcher Art, unabhängig von Gründen, Zuständen oder Umständen, einschließlich eines Funktionsfehlers des Gerätes trägt. Alle Risiken die
mit dem Betrieb des Gerätes einhergehen, liegen ausschließlich und vollständig
beim Benutzer des Gerätes, ungeachtet dessen, ob das Gerät vom ursprünglichen
Käufer oder Dritten benutzt wird. Die Firma setzt Sie hiermit davon in Kenntnis,
dass dieses Gerät außerdem einen Verstoß gegen örtliche, Bundes-, Staats- oder
nationale Gesetze oder Vorschriften darstellen könnte und dass jegliche Benutzung
des Geräts ausschließlich auf eigenes Risiko und eigene Verantwortung erfolgt.
deutsch
Kundendienst/Hinweise
23
Charge and change the battery
1. Introduction
2. Charge and change the battery
Many thanks and congratulations on choosing to purchase the
Probiker KX4 flip-up helmet with integrated Z-Link Bluetooth system.
Note:
Before you use the Z-Link system for the first time you must charge
it for at least 4 hours.
english
Introduction
These instructions are intended to help you use the system.
Before using the device, please note the following:
> Before you use the Z-Link system for the first time, you must charge it
for at least 4 hours.
> Please make sure you are familiar with the Bluetooth functions of your
mobile phone and/or navigation system.
Note:
Due to the large range of different providers on the mobile phone
and navigation system market, some of the functions may be restricted
in certain models.
Warning:
Protect the battery, the headphones built into the helmet and the microphone
from moisture. Please make sure that your helmet does not get wet from the
inside. If the helmet gets wet inside, you should remove the Z-Link battery and
dry both the device and the inside.
Please do not make any adjustments to your Bluetooth whilst riding.
Be mindful of the volume. Continued exposure to high volumes can damage
your hearing. Only use the original Z-Link charger to charge the battery.
With a fully charged battery, the operating time is up to 12 hours; the stand-by
time is up to 300 hours. Please observe the correct procedure for charging:
1.
2.
Unpack the mains battery charger supplied with the device and connect it to
the Z-Link mini USB port.
Once you have plugged the charger into a mains socket, the red LED of the
Z-Link operating unit lights up during charging. Once the battery is fully
charged, the blue LED lights up.
As with other electronic devices, the Z-Link battery is a consumable item and will
need to be replaced after a certain period. The next three points describe the correct way to change the battery:
Having taken out the helmet lining, you will find a recess in the polystyrene right
next to the external operating unit, in which the plastic housing for the Bluetooth
chip and the battery are located.
1. Open the top plastic cover.
2. To remove the battery correctly, pull the ribbon.
3. Insert the new battery and close the plastic cover.
Warning:
Please use only the battery recommended for the Z-Link by the manufacturer
(Order no.: 10004699).
Bluetooth chip
Battery
Battery strap
24
25
Product description
3. Features and functions
4. Product description
3.1. Product features
The device supports Bluetooth 2.1, A2DP, AVCRP and EDR standard.
The range is up to 10 m.
4.1. Explanation of the operating unit
english
Features and functions
3.2. Main functions
Mobile phone
> Receive calls from a mobile phone
> Voice recognition
(this function must be supported by the mobile phone)
> Last number redial
> Suppress or cancel calls
Intercom
> Voice communication with another Z-Link system
Navigation system
> Receive voice instructions from the navigation system. The navigation system
must support the Bluetooth Handsfree Profile (HFP).
MP3 player (Bluetooth)
> Receive music from MP3 players and mobile phones which support the
Bluetooth A2DP Profile.
> Supports AVRCP – for the remote control of various audio functions (repeat,
pause, track forward and track back) via the operating unit in combination
with AVRCP-compatible MP3 players or mobile phones.
1.
2.
3.
4.
5.
6.
26
phone button
“+” button
Press and hold to increase volume/
Press and release to skip to the next track
“-” button
Press and hold to reduce volume/
Press and release to skip to the previous track
LED status lights
Connection for mini USB mains battery charger
Rubber cover for protection from water spray
27
Basic functions
4.2. LED status display
5. Basic functions
Status
LED display
5.1. Switch device on/off
1. Stand-by & idle mode
Blue LED lights up every 3 seconds
2. Connected mode
Blue LED lights up every 5 seconds
Switch on
To switch on the device, press and hold the phone button for about five seconds.
You will hear a sound signal and the blue LED lights up for approx. one second.
In stand-by mode, the blue LED lights up every three seconds.
3. Pairing mode
Red and blue LEDs light up alternately
4. Switch on
Blue LED lights up for 1 second
5. Switch off
Red LED lights up for 1 second
6. Battery status
Indicates the battery status after
the system is switched on:
· over 50%, blue LED lights up for 1 second
· between 10%-50%, red and blue LEDs light
up at the same time for 1 second
· under 10%, red LED lights up for 1 second
To increase the volume:
Press and hold the “+” button until the desired volume is reached.
To reduce the volume:
Press and hold the “-” button until the desired volume is reached.
7. Charging
LED lights up red
Note (second function in A2DP mode):
> To select the next music track, press and release the “+” button.
> To select the previous music track, press and release the “-” button.
8. Charging complete
LED lights up blue
9. Reset
Red and blue LEDs light up at the same time
english
Product description
Switch off
To switch off the device, press and hold the phone button until you will hear a
long sound signal. The red LED lights up briefly and the device is switched off.
5.2. Volume control
28
29
6. Use Bluetooth-enabled mobile phones, navigation systems or MP3 (A2DP) players
6.1. Mobile phone
Before connecting to a mobile phone, please read the operating instructions of your
Bluetooth-enabled mobile phone in detail and check whether it supports an HSP
(Headset Profile) or HFP (Handsfree Profile) Bluetooth Profile.
1. First activate the pairing mode on your Z-Link Bluetooth system:
While it is switched off, press the phone button for approx. eight seconds
until the red and blue LEDs on the Z-Link operating unit light up alternately.
The device is now in pairing mode.
2. Now activate the Bluetooth function of your mobile phone.
3. When your mobile phone finds the device, the Z-Link will appear as
“BT HELMET” in the device selection list of the mobile phone. Please select
“BT HELMET”, then insert the pin/password 0000 (four zeros) when you are
requested to do so in order to complete the pairing.
4. If the pairing has been successful, the Z-Link LED lights up blue.
Note:
Once you have paired your mobile phone and Z-Link successfully, you do not
have to repeat this process. The pairing is maintained.
Each time you switch the Z-Link on, it connects to your Bluetooth mobile
phone automatically. If connecting takes longer than two minutes and the blue
and red LEDs continue to light up, it means a connection could not be established and you will have to repeat steps 1-3.
Operating your mobile phone
1. Taking and ending a call
Your Z-Link will alert you to an incoming call with a sound signal.
To receive or end a call, press and release the phone button.
Note:
If you were listening to music before a phone call, at the end of the call the
Z-Link system will switch back to the last track automatically.
30
Use
2.
3.
4.
Declining an incoming call
If you wish to decline an incoming call, press the phone button for approx.
two seconds until you hear a sound signal. The system will decline the
incoming call automatically.
Last number redial
If you wish to redial the last number, press and release the phone button
twice consecutively.
Voice recognition
To activate the voice recognition function, press and release the phone
button three times consecutively. Once voice recognition is activated, you
will hear a sound signal.
english
Use
Note:
Obviously, your Bluetooth mobile phone must support this voice recognition
function.
6.2. Navigation system
To use a Bluetooth navigation system in combination with your Z-Link, you must
pair the two devices with one another. Once you have paired them successfully,
you will be able to receive the navigation instructions and, where applicable, the
music files (MP3 format) saved on your navigation system.
1. Switch on your navigation system.
2. While the device is switched off, press the phone button of your Z-Link
for approx. eight seconds until the red and blue LEDs light up alternately.
The device is now in pairing mode.
3. Search for Bluetooth headsets on your navigation system.
4. The sat nav will list the Z-Link as “BT HELMET” in the list of recognised
devices. Select “BT HELMET” and follow the instructions on your navigation
system until the pairing is complete.
5. If your navigation system requests a PIN or password, enter 0000 (four zeros).
6. If the pairing was successful, the blue Z-Link LED flashes slowly.
31
Note:
Not every Bluetooth navigation system can connect to Bluetooth headsets.
The navigation system must support the Bluetooth Handsfree Profile (HFP).
If you want to use a Bluetooth mobile phone to make and receive calls
through the headset, you should pair your mobile phone to your navigation
system or Z-Link. The compatibility varies between different brands and
models of mobile phones as they connect to navigation systems and Z-Link in
different way. Try to find a siutable connection way before you start to use.
If your mobile phone is connected to the navigation system and then to the
Z-Link, please follow up the instructions of your navigation system manual.
If both, your mobile phone and navigation system are connected to Z-Link
directly, please follow the instructions of your Z-Link manual.
If connecting takes longer than two minutes and the blue and red LEDs
continue to light up, it means a connection could not be established and you
will have to repeat steps 1-5.
6.3. MP3 music (wireless option – A2DP)
The Z-Link enables you to receive music in stereo quality, provided the
MP3 players and mobile phones used support the A2DP profile (advanced audio
distribution profile) and, where applicable, the AVRCP profile.
A Bluetooth device that supports the AVRCP profile will enable you to use your
Z-Link operating unit to operate the basic functions of the outgoing source.
You will not miss any calls or phone conversations via the intercom function while
listening to music via an A2DP source. The Z-Link sends a sound signal for an
incoming phone call/intercom conversation. You can then receive the call by
pressing the phone button. Once the call has ended you will hear a sound signal
and the MP3 player continues playing.
1.
2.
3.
4.
32
Use
5.
6.
devices. Select “BT HELMET” and follow the instructions on your MP3 player
until pairing is complete.
If your MP3 player requests a PIN or password, enter 0000 (four zeros).
If the pairing was successful, the blue Z-Link LED flashes.
english
Use
Note:
If connecting takes longer than two minutes and the blue and red LEDs
continue to light up, it means a connection could not be established and you
will have to repeat steps 1-5.
Operating the AVRCP mode
1. Play/Pause
2. Skip to next track
3. Skip to previous track
4. Increase volume
5. Reduce volume
Press and release the phone button
Press and release the “+” button
Press and release the “-” button
Press and hold the “+” button
Press and hold the “-” button
Note:
If the A2DP source is integrated into your mobile phone, use the Z-Link to pair
the devices, as described in point 6.1. If you wish to use the functions referred
to above, your device must be compatible with a Bluetooth AVRCP profile.
Switch your MP3 player on and check whether the Bluetooth function of the
MP3 player is activated.
While the device is switched off, press the phone button of your Z-Link for
approx. eight seconds until the red and blue LEDs light up alternately.
The device is now in pairing mode.
Search for Bluetooth headsets on your MP3 player.
The MP3 player lists the Z-Link as “BT HELMET” in the list of recognised
33
7. Intercom operation
Once two Z-Link devices have been paired, rider-to-pillion communication
can take place.
1. Switch on both Z-Link Bluetooth systems by pressing the phone button on
both operating units for approx. five seconds. You will hear a sound signal
and the blue LED lights up.
2. Then press the “+” and “-” buttons at the same time on both Z-Link operating
units for approx. five seconds until the red and blue LEDs light up alternately.
The devices are now in pairing mode.
3. Now press and release the phone button on one of the two Z-Link devices
(this automatically becomes the master). You will hear a sound signal,
which is repeated 2-3 times. The two Z-Link systems now connect with one
another automatically.
Note:
Once pairing is complete, the Z-Link LED lights up blue. If connecting takes
longer than two minutes and the blue and red LEDs continue to light up, it
means a connection could not be established and you will have to repeat steps
1-3. Once you have paired the devices successfully, you do not have to repeat
this process. The two Z-Link devices will now detect each other automatically
after switch on.
Operating in intercom mode
1. Ending the intercom function
Press and release the phone button; you will hear a sound signal from the
two Z-Link devices coupled to one another.
2. Starting the intercom function
Press the phone button for approx. two seconds; you will hear a sound
signal from the master Z-Link and two sound signals from the slave Z-Link
device. The intercom starts automatically.
Note:
Master/slave – are general names for Bluetooth systems. The master controls
the communication whereas the slave is just a participant.
34
Extended functions
8. Extended functions of the Z-Link in combination with a mobile phone,
navigation system or intercom
8.1. MP3 mode
You can receive a phone call or an intercom call whilst listening to music.
You cannot play music during a phone conversation. When you have finished
talking, the music automatically continues from where it was stopped.
english
Intercom operation
1. Receiving a phone call
The music stops automatically and you hear a sound signal alerting you to an incoming call. Press and release the phone button to take the call. When you want
to end the call, press and release the phone button again and the music continues playing.
Note:
A sound signal will inform you if a call comes in while you are talking on the
phone. Press and release the phone button to end the current call. Then press
the phone button again to receive the incoming call and start talking.
2. Last number redial
Press and release the phone button twice. The music stops playing automatically,
you hear a sound signal and the number is dialed. Press and release the phone
button to end the phone conversation or wait until your partner hangs up.
The music continues automatically once your phone conversation has ended.
3. Starting intercom communication
Press the phone button for approx. two seconds, the music stops automatically,
you will hear a sound signal and intercom communication starts immediately.
When you want to end your conversation, press and release the phone button or
wait until your partner ends the connection. The music then continues automatically.
4. Receiving an intercom call
The music stops automatically, you hear a sound signal and the intercom
connection starts automatically. When you want to end your conversation, press
and release the phone button or wait until your partner ends the connection.
35
Reset
The music continues playing automatically once your conversation has ended.
9. Reset (restoring the factory settings)
8.2. Intercom mode
You will have no problem receiving a phone call whilst you are in intercom mode.
Make sure the Z-Link is switched off. Then press all three buttons
(“phone”, “+” and “-“) at once for approx. five seconds until the blue & red LEDs
light up. The device has now been reset.
1. Receiving a phone call in intercom mode
A sound signal will alert you to an incoming phone call. Press and release the
phone button to end the intercom function. Press and release the phone button
again and you will receive the phone call immediately.
english
Extended functions
Note:
Resetting the device deletes the entire memory and all the connections.
You will have to pair devices with one another once again if you wish to restore
any previous connections.
8.3. Navigation system mode
1. Receiving a phone call
You can receive phone calls if you have a mobile phone with a compatible navigation system, by pressing the phone button on the Z-Link operating unit or following
the instructions on the navigation system display. Please refer to the information
on operating the navigation system in the respective operating instructions.
Safety instruction:
For safety reasons we recommend you use the display on the navigation
system to operate your mobile phone if possible.
2. Receiving an intercom call
You will receive a sound signal for an incoming intercom call. Press and release
the phone button to receive the call.
Note:
With navigation systems which support an MP3 player function, you may find
you have to start the music manually when you have finished talking (the
music will not continue playing automatically in all devices).
36
37
Explanations
english
Explanations
10. Explanations of the audible signals and flashing indicators
of the operating unit
Mode
Function
Device status
Press and
release
Press for
2 seconds
Press for
5 seconds
Press for
8 seconds
Indicator/signal
Basic function
Switch on
Off
Sound signal
Switch off
Blue light
Sound signal
Pairing
Off
Blue and red LEDs
light up
Receive a call
Ring tone
Increase volume
Reduce volume
Telephone
mode
End a call
Decline a call
Intercom
mode
38
Ring tone
Sound signal
Redial
Ring tone
Voice recognition
Ring tone
Pairing
On
Receive a call
Ring tone
Blue and red LEDs
light up
39
Explanations
Mode
Function
Intercom
mode
End a call
Sound signal
Start a call
Sound signal
A2DP
Pairing
Device status
Off
Press and
release
Press for
2 seconds
Press for
5 seconds
Press for
8 seconds
Indicator/signal
english
Explanations
Blue and red LEDs
light up
Play/pause
Skip forward
Skip backward
A2DP mode
Receive a call
Ring tone
Redial
Receive an
intercom call
Ring tone
Sound signal
Start an intercom call
During a
phone call
During
Intercom
Reset
40
Sound signal
Receive a second
phone call
Ring tone
Receive an
intercom call
Sound signal
Receive a call
Ring tone
Off
Blue and red LEDs
light up
41
11. Customer Service
For further information see our web page: www.louis.de
For technical support please contact us at: [email protected]
12. Information
CE declaration
The Probiker KX4 Z-link conforms essentially to the requirements and provisions
of the EC Directive 1999/5/EC (referred to here as the R&TTE Directive) Article 3.
The system meets the requirements of standards EN 300 328 V1.7.1:2006, EN
01 489-1 V1.8.1:2008 and EN 301 489-17 V2.1.1:2009.
Declaration of conformity
The Probiker KX4 Z-link headset is compliant with and conforms to the Bluetooth®
Specification 2.1 and has passed all the interoperability tests which are laid down
in the Bluetooth® Specification. However, interoperability between the device and
other Bluetooth®-enabled products is not guaranteed.
Information
directly in traffic. By purchasing the device, you release Louis GmbH (hereafter
referred to as the “Company”) irrevocably from all liability claims, losses, demands and any other types of claims (including legal fees) in connection with the
use of the device and undertake not to take legal proceedings against the
Company for any physical injuries, damage or death or for loss of goods and
damage to vehicles, including your own vehicle, or any other damage to third parties, regardless of the circumstances or conditions, and to hold the Company
harmless from any liability in each case. Furthermore, you hereby accept that the
Company is in no way responsible for physical injuries of any kind, irrespective
of the causes, conditions or circumstances, including malfunction of the device.
All the risks associated with the operation of the device lie solely and entirely with
the user of the device, regardless of whether the device is used by the original
purchaser or a third party. The Company hereby informs you that this device could
also constitute an infringement against local, regional or national laws or
provisions and that, howsoever you use the device, you do so always and only at
your own risk and your own responsibility.
english
Customer Service/Information
Disclaimer and exemption from liability
By using the Probiker KX4 Z-link (hereafter referred to as the “device”), you
renounce essential rights, including the right of action. Before using the device,
please read the following section carefully. If you do not accept all the conditions
of this agreement, you should return the product immediately. In this case, we will
refund you the full cost of your purchase. However, if you do use the product,
you are bound by the terms of this agreement and renounce rights, including the
right of action.
Riding a motorbike, scooter, quad or any other vehicle demands your complete
and undivided attention. We would like to expressly point out to you that you must
take all the necessary precautions and, whilst using the device, be aware of the
traffic, weather conditions and the state of the road at all times. Before you make
or receive a call, you should stop your vehicle by the side of the road. Any publications, advertisements, announcements or similar notifications which refer to the
fact that the device can be used while driving, apply merely to its technical possibilities and should not be understood as inducements to use the device while
42
43
Detlev Louis Motorradvertriebs GmbH · 21027 Hamburg
www.louis.de · Tel. 040-734 193 60 · order @ louis.de