1
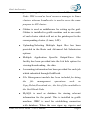
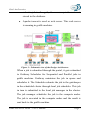
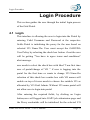
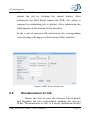
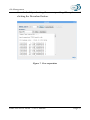
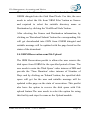
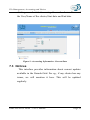
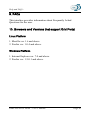
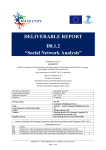
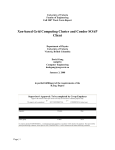
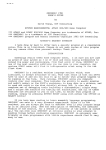
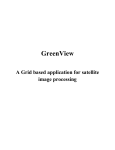
GARUDA Access Portal Version 2.1 User Manual Introduction Table of Contents 1. INTRODUCTION ........................................................................ 1 1.1 1.2 1.3 1.4 1.5 INTRODUCTION .......................................................................................... 1 PORTAL FEATURES .................................................................................... 1 USERS IN FOCUS ........................................................................................ 3 DEFINITIONS .............................................................................................. 4 STRUCTURE OF THIS MANUAL ................................................................... 4 2. GRID: AN OVERVIEW .............................................................. 5 2.1 2.2 2.3 GRID: AN OVERVIEW ................................................................................ 5 INTRODUCTION .......................................................................................... 5 FEATURES OF THE GRID ............................................................................. 5 3. INSTALLATION & STARTUP ................................................. 9 3.1 3.1.1 3.1.2 3.1.3 3.1.4 3.2 SETUP REQUIREMENTS ............................................................................... 9 Hardware Requirements: .......................................................................... 9 Database Requirements: ........................................................................... 9 Software Requirements: ............................................................................ 9 Web server Requirements: ...................................................................... 10 INVOKING GRIDPORTAL .......................................................................... 11 4. LOGIN PROCEDURE .............................................................. 13 4.1 4.2 LOGIN ...................................................................................................... 13 LOGIN ...................................................................................................... 15 5. RESOURCES ............................................................................. 16 5.1 CLASSIFICATION OF RESOURCES ............................................................. 16 6. JOB MANAGEMENT ............................................................... 18 6.1 6.2 6.3 6.4 6.5 SUBMIT JOB ............................................................................................. 18 RESUBMISSION OF JOB ............................................................................. 22 MOBILE JOB SUBMISSION AND STATUS ................................................... 23 PROGRAM COMPILATION FACILITY ......................................................... 23 JOB INFO .................................................................................................. 26 7. FILE MANAGEMENT, ACCOUNTING AND NOTICES ... 29 GARUDA Access Portal – User’s Manual Page i Introduction 7.1 FILE MANAGER ....................................................................................... 29 7.2 ACCOUNTING........................................................................................... 33 7.3 NOTICES .................................................................................................. 34 8. HELP AND FAQ’S .................................................................... 35 GARUDA Access Portal – User’s Manual Page ii Introduction Introduction 1.1 Introduction The GARUDA Access Portal is a user-friendly web portal for submitting sequential and parallel jobs to GARUDA Grid.It supports Compilation facility,Resubmission of jobs and Monitoring the job status through SMS facility using mobile phone.It also monitors the submitted jobs, provides facilities such as on-line credential management,file management, seamless integration of the Grid Meta Scheduler, accounting, and Facility for Partners to create and update their web pages. 1.2 Portal Features The following are the features included in the new version of GridPortal 2.1, 1. Job submission through Gridway by explicitly selecting the cluster This option is for users who want to submit their jobs to a specific cluster of their choice 2. Job submission through Gridway without selecting cluster This is the preferred option. Gridway will automatically select the best cluster in which the job can GARUDA Access Portal – User’s Manual Page 1 Introduction be executed based on CPU load. The local job scheduler (such as Torque) will in turn select the best nodes within that particular cluster 3. Resubmission of job Allows the user to view the selected Job Id details and Resubmit the jobs with/without updating the relevent fields. 4. Job submission with support of Wall time This option is for the users who want to run their application/job for a long time. 5. Job submission through GT4 This option is for users who want to submit jobs directly to Globus without using the scheduler. We don.t support Heterogeneous jobs here 6. Compiler Service Here user can compile their application source code in GARUDA grid environment. 7. Mobile job resubmission and job status User can re submit job and the status of job by sending sms from mobile. 8. Job monitoring: Job Status, View/Download Output files, Cancel Jobs This option is for already submitted jobs, either through Gridway or through Globus. Cancel option is available GARUDA Access Portal – User’s Manual Page 2 Introduction only for Gridway jobs 9. File Management Here users can stage files into GSRM server.GSRM is the data grid solution for the GARUDA grid.user can manage his files by file operations like renaming, copying,deleting and moving. 10. Accounting Here details regarding jobs that have already completed execution are displayed. 11. Login Service based authentication This option provides enhanced security using login service. 12. Available Resources Display option This option lists clusters in which Gridway scheduler is configured 13. Facility for Partners to create and update their web pages Currently we have provided this facility only for a few Partners 1.3 Users in focus Corporate houses having large computation/database requirements GARUDA Access Portal – User’s Manual Page 3 Introduction R&D Organizations involving in scientific research like genome, pattern matching etc Students who develop domain specific applications 1.4 Definitions 1.5 Structure of this Manual Chapter 1: Introduction of the GARUDA Access Portal and a brief description of its features Chapter 2: Provides an overview of the Grid Chapter 3: Provides instructions for installation and startup of the Grid Web Portal. Chapter 4: Provides a detailed method for signup and login into the system Chapter 5: Describes the various resources available to the user Chapter 6 Provides a description on the various job management functions, such as job submission, job status, and cancellation of job and park time. Chapter7 Provides a description on the File Browser, Accounting Information and Notices. Chapter8 Briefly describes the Help and FAQ sections GARUDA Access Portal – User’s Manual Page 4 Grid: An Overview Grid: An Overview 2 2.1 Grid: An Overview 2.2 Introduction A grid is a cluster of heterogeneous workstations located at geographically distant locations, and with the ultimate aim of sharing computing resources. The Grid web portal provides a web interface for submitting and monitoring jobs. This portal has been developed to suit the needs of Scientists/Researchers who want to run their applications, without being concerned about the details of the Grid. A grid environment will help them to run their applications in different platforms, thereby helping them to compare the performance and fine-tune their applications, or execute their compute-intensive applications at remote sites. They can also utilize the resources available in remote locations. 2.3 Features of the Grid The grid is used for sharing the resources in geographically distant locations and to utilize the idle resources available in remote locations. Gridway is used as meta scheduler for grid. This should be installed on gridfs machine, which is the GARUDA Access Portal – User’s Manual Page 5 Grid: An Overview gateway to grid environment and each Cluster Head Node. PBS is used as local resource manager in Linux clusters whereas Loadleveler is used to serve the same purpose in AIX cluster. Globus is used as middleware for setting up the grid. Globus is installed in gridfs machine and in one node of each cluster which will act as the gatekeeper for the corresponding cluster. (Linux, AIX). Uploading/Selecting Multiple Input files has been provided in the Basic and Advanced Job Submission options Multiple Application Specific Output/Error files facility has been provided into the Job Info option for viewing/downloading the data. Accounting information has been provided for each job which submitted through GridPortal. File Management module has been included for doing the file management operations such as Copy,Delete,Download etc., the list of files available in the Grid Head Node. MySQL is used as database for storing relevant information for the portal. This is installed in gridfs machine. JDBC is used for establishing connection with database. When the user signs up, sign-in and GARUDA Access Portal – User’s Manual Page 6 Grid: An Overview submits job to the grid, the necessary information is stored in the database. Apache tomcat is used as web server. This web server is running in gridfs machine. Figure 1: Schematic view of the Design Architecture When a job is submitted through the portal, it gets submitted to Gridway Scheduler for Sequential and Parallel jobs in gridfs machine. Gridway maintains the job in queue and schedules it. The Scheduler submits the job to the gatekeeper in the scheduled cluster through local job scheduler. This job in turn is submitted to the local job manager in the cluster. The job manager schedules the job to the compute nodes. The job is executed in the compute nodes and the result is sent back to the gridfs machine. GARUDA Access Portal – User’s Manual Page 7 Grid: An Overview A daemon will be running in gridfs machine which constantly updates the resource information of machines in different clusters. The output is shown to the user when he chooses the Resources option. This daemon also updates the job information of each job at regular intervals. When job is submitted to the grid, necessary information about the job is stored in the mysql database and executable, input and output data will be maintained in the directory meant for the user. The job status is monitored by the daemon mentioned above and is updated regularly. The user is provided the option for knowing the current status of his job whenever he needs. The user also has the option of viewing the output data and downloading the same whenever he wants. GARUDA Access Portal – User’s Manual Page 8 Installation & Startup Installation & Startup 3 This section guides the user through the installation procedures and helps the user in the initial startup of the Grid Portal. 3.1 Setup requirements 3.1.1 Hardware Requirements: 3.1.2 3.1.3 Linux machine 2.6.9-5.ELsmp #1 SMP Database Requirements: JDBC Driver MySQL for database Software Requirements: Globus version 4.0.7 MySQL version “mysql Ver 14.7 Distrib 4.1.20, for redhat-linux-gnu (i386) using readline 4.3” Gridway version: 5.2.3 Java and JSP are the key component of server side development for the development of GARUDA Access Portal. Job Scheduler –Torque for Linux and AIX machines GARUDA Access Portal installation scripts. GARUDA Access Portal – User’s Manual Page 9 Installation & Startup 3.1.3.1 Install the following software: The following software should be installed for using the Grid Portal. These software’s can be installed in any order, except that Java SDK should be installed before installing the Tomcat Web server, and that it is better to install Moab Scheduler after installing Globus 3.1.4 Java - j2sdk1.4.2_01 or above Globus version 4.0.7 Gridway version: 5.2.3 Web server - TOMCAT - jakarta-tomcat-6.0.14 JDBC Driver – Version 3.1.12 Mysql – Server Version 4.1.20 Torque on Computing nodes. Web server Requirements: Apache Tomcat 5.5.25 3.1.4.1 Environment variables: The user (i.e., the sysadmin) is expected to set the following environment variables in their .cshrc or .bashrc file in home directory. PORTAL_HOME: This should be set to the top-level directory of the GridPortal. E.g. export PORTAL_HOME=/home/garuda/GridPortal_test for .bashrc file TOMCAT_HOME: This should be set to the top-level directory of the tomcat web server. GARUDA Access Portal – User’s Manual Page 10 Installation & Startup E.g. export TOMCAT_HOME=/usr/local/apache-tomcat6.0.14/ for .bashrc file JAVA_HOME : This should be set to the directory where java is installed Eg. export JAVA_HOME=/usr/local/java-1.5/ for .bashrc file After setting the above environment variables in the .cshrc/.bashrc file, the following command should be given: “source .cshrc” or “source .bashrc” 3.2 Invoking GridPortal http://portal.garudaindia.in/ Invoking the Grid Portal by keying in the given URL in the web browser will display the screen as shown in Figure 2. GARUDA Access Portal – User’s Manual Page 11 Installation & Startup Figure 2: GARUDA Access Portal – Initial screen Note: the path specified above will vary as per the path set for installation of system software The main menu has the following tool icons: Paryavekshanam : directs the user to the C-DAC Grid Monitoring tool homepage Garuda Overview: directs the user to the Garuda Overview page. Contact Us: directs the user to the Contact Us Information page. Login : directs the user to Grid portal GARUDA Access Portal – User’s Manual Page 12 Login Procedure Login Procedure 4 This section guides the user through the initial login process of the Grid Portal. 4.1 Login This interface is allowing the user to login into the Portal by entering Valid Username and Password at the respective fields..Portal is initializing the proxy for the user based on selected VO Name.The User must accept the GARUDA User Policy by selecting the check box button. if not the user will be getting "You have to agree terms and conditions" alert message. user needs to select the check box with label "I am first time user of portal/change of VO " if user is logging into the portal for the first time or wants to change VO Name.On selection of this check box combo box with VO names will enable on top of it.user needs to choose the suitable VO as allocated by VO Grid Admin. Without VO name portal will not allow user to login into portal. After entering the required fields, by clicking on Login button,user will logged into GAP2 job submission page and the Proxy credentials will be initialized for the selected VO GARUDA Access Portal – User’s Manual Page 13 Login Procedure for the period of 7 days.After login user can access the grid services like job Management, Resources info, File Management, accounting.. etc List of common error messages while login into the portal 1. You are not a member of this VO.Please select VO Name you belongs to. If user provided the wrong or invalid VO Name 2. No credential for given user exist on myproxy server.Please upload your p12 certificate. If user credential is not available in myproxy server, web page will be automatically redirected to upload p12 certificate. 3. Credentail exist on the server but it has been expired.please upload your p12 certificate If user credential is available but expired in myproxy server,web page will be automatically redirect to upload new p12 certificate. 4. Please select VO name if you are first time user. If user is accessing portal for the first time without selecting check box "I am a First Time User of this page / Change of VO" . On successful uploading of p12 certificate into myproxy server, your proxy will initialize and able to login into the portal GARUDA Access Portal – User’s Manual Page 14 Login Procedure 4.2 Login Figure 3: Successful login – Welcome screen The various facilities and resources provided in the portal are described in detail in the following sections. GARUDA Access Portal – User’s Manual Page 15 Resources Resources 5 This section gives details on the various resources available to the user of the Grid. The user can view the information about the Head Node name and its various parameters such as OS, Architecture, Load Average and its Status. 5.1 Classification of Resources The resources available on the grid are classified according to the Head Node names. The classification of resources is depicted in figure 4 given below. GARUDA Access Portal – User’s Manual Page 16 Resources Figure 4: Information of Resources GARUDA Access Portal – User’s Manual Page 17 Job Management Job Management 6 This section describes the various intricacies of the job management section. Users can submit their job, monitor the status and view/download output/error files using the Job Management interfaces. There are three simple tabs in this interface. The first tab provides interface for Basic Job Submission, the second for MPICH Job Submission,Program Compilation facility,Mobile Job Submission and the third for obtaining Job Information etc., Once user logs into the GARUDA Access Portal, by default Basic Submission page will be displayed. 6.1 Submit Job There are two ways of Job Submission in the GARUDA Access Portal: Basic Job Submission and MPICH Job Submission. Basic Submission: This interface can be used to submit sequential as well as parallel jobs. The user should select the Operating System to suit their Job and the type of job they want to GARUDA Access Portal – User’s Manual Page 18 Job Management execute. Then the user has to provide the corresponding executable. User should also provide the input file if the job requires it. The executable and the input file can either be uploaded from the local machine or can be selected from the Remote File List, if it is available in the Submit Node Total number of processes required for the job, should also be provided by the user. This parameter is only for the parallel applications that requires more than one cpu.If the job requires any Command Line arguments or Environment Variables, then the user should also furnish it, before submitting. All those fields marked with * are mandatory fields and should be filled before submitting a job. The current version of GARUDA Access Portal 2.0 is having new parameters such as STDIN,User Specific Output files in this Basic Submission option. STDIN option is required when the user wants to provide any inputs to the application during the runtime. User Specific Output files option is required if the user application generates any output/error files other than GARUDA Access Portal – User’s Manual Page 19 Job Management standard output/error files and its entries should be separated by comma's or single empty space in case of multiple files. User can provide a suitable Job Name to their job in the text box provided for it. But it is optional. The user can optionally provide Execution Time. Here the Execution Time is the anticipated job completion time. After clicking the submit button the portal submits the job to GridWay Meta Scheduler, it then schedules the job for execution returning the Job Id. This Job Id is displayed in the Basic Submission interface. The jobid has to be noted for future reference to this job. In the event of unsuccessful submission, the corresponding error message is displayed. MPICH Job Submission: This interface is also provided for the user to submit Sequential and Parallel Jobs. The only difference with this submission is, it is using GT4 Web Services components for submitting jobs to the Grid instead of Gridway as scheduler. In this interface the user is provided with two modes. In the first mode, which appears by-default to the user, Portal will create the XML file for the user. In the second mode, the user can provide their-own XML file as the executable, GARUDA Access Portal – User’s Manual Page 20 Job Management provided the required files are available in the submit node. The second mode is recommended only for advanced users. However this version does not support Heterogeneous kind of job submission into the Grid. The user has to select the OS and provide corresponding executable. The executable and the input file can either be uploaded from the local machine or can be selected from the Remote File List, if it is available in the Submit Node For submitting Parallel jobs, the user needs to select the No. of Process is more than one from the combo box. The meaning of No. of Process is the total number of tasks or processes required to run the application and not in the hardware context of the cpus available in the system. Also the No. of Nodes selection helps the user to achieve the optimal performance of the application and it allows the job scheduler to divide the number of tasks across the nodes. For example if the user selects the number of node is 2 and the number of process is 4, the job scheduler spawns two process in one node and another two process in remaining node, so here the total number of tasks are 4 which will be allocated to the application. In case of any invalid selection like No. of Nodes is 8 and the No. of Process is 4, the job scheduler simply ignores the value of the No. of Nodes. GARUDA Access Portal – User’s Manual Page 21 Job Management After the all the required entries are added the user can submit the job by clicking the submit button. After submission the Grid Portal creates the XML file, which is required for submitting job to globus. After submission the jobid appears at the bottom of this interface. In the event of unsuccessful submission, the corresponding error message will appear at the bottom of this interface Figure 5: MPICH Job Submission 6.2 Resubmission of Job Allows the user to view the selected Job Id details and Resubmit the jobs with/without updating the relevent fields. "Resubmission of Job" is a newly introduced facility GARUDA Access Portal – User’s Manual Page 22 Job Management in basic job submission page, is useful for the users who want to submit the same job repeatedly with small modifications.By selecting job Id and clicking on "View job details", the details of the job id which is already submitted in respective fields are shown .User can submit the job once again by modifying or updating the i/p files,user specific output,error files and other options like wall time, environment variables, command line arguments etc.. 6.3 Mobile job Submission and Status SMS to Mobile : 09844461835 1. Re-submit job using SMS 2. SUBMIT 'GridFS username' 'GridFS password' 'jobID' Example: SUBMIT raju121 test123 20165 Checking Job status using SMS STATUS 'GridFS username' 'GridFS password' 'jobID' Example: STATUS raju121 test123 20166 Important Notes!! 1. The username and password are case sensitive. 2. The job ID shall not be alphanumeric or contain any special characters or decimal values. 3. The job ID will be purely numeric with 5 digits 6.4 Program Compilation facility Main Home Page This is the home page of compiler service.This page is having parameters such as Project Path,Operating System,Compiler Name, Compiler Option and Special libraries. GARUDA Access Portal – User’s Manual Page 23 Job Management Figure 6: Snap shots of Program compilation facility 1)Project Path: Select the project zip file that needs to be upload and compiled on the remote cluster. The project zip file should contain lib , include ,src and bin directories. All the source files should be placed inside src directory only. Directories inside src is not allowed. Download sample zip file by clicking on 'download sample zip file' button available on top right most corner for reference. 2)Operating System: This is drop down box which display the list of all available Operating Systems for the user selection in Grid GARUDA. GARUDA Access Portal – User’s Manual Page 24 Job Management 3) Compiler Name: Based on the Operating system selection, the list of available compilers will be displayed to the user through selection box 4) Compiler Option: Based on the Compiler Name selection, the compiler options will be displayed to the user through the selection box. Here user can select or deselect the compiler options using 'Add' or remove buttons 5) Special Libraries: Based on the Operating System and compiler Name selection, the special libraries available on those resources are displayed to the user. User can select or deselect the special libraries using Add or Remove button. 6) Reset Button: On clicking 'Reset' button all the entries of the will be reset. 7) Generate Makefile: Once the user clicks on 'Genarate Makefile' button, validation will be performed. If all the the entries are valid then the page will be submitted and control is redirected to the next page i.e. Display Make file page. 8) Display MakeFile: After submitting the form, make file will be generated and it will display on this page.Here user can do the modifications (if any required) in make file according to application requirement This page will have two buttons Save and submit a)Save: on Clicking 'Save' button, the changes are updated in makefile b)Submit: On clicking 'Submit' button, make file is saved and it will submit the job to Compiler Service. On GARUDA Access Portal – User’s Manual Page 25 Job Management completion(either sucess or failure) of job, the respective files are copied to portal files directory 6.5 Job Info The information about the jobs that are submitted through this portal can be obtained from this interface. Here the user could view the status of the job and the output file of the job by specifying their Job Id. The output file, error file can be downloaded by clicking the Download button. The user can also view the status of all the jobs by selecting 'All' in the Job Id combo box. The user can cancel Job by selecting the job id and clicking the Cancel Job button. After the job is canceled the acknowledgment is provided as a simple message. The user can cancel only those jobs, which are in queue. Trying to cancel a job, which has been removed from the Job queue will throw an error and this message will also be displayed to the user. After confirming the completion of a particular Job its output, error file can be viewed by selecting the corresponding file option and clicking the view button. If the output file is in the form of text then it will be displayed in the Text Area. The error file content if any will also be displayed in the Text Area. The output, error file can be GARUDA Access Portal – User’s Manual Page 26 Job Management downloaded by selecting the corresponding file option and clicking the Download button. Figure 7: View output data GARUDA Access Portal – User’s Manual Page 27 Job Management GARUDA Access Portal – User’s Manual Page 28 File Management, Accounting and Notices File Management, Accounting and Notices This section outlines the File Manager, Accounting and Notices features of the Grid Portal and describes their basic usage. 7 SADF ASDF ASF ASDf 7.1 File Manager 5.1 File Management (GRID Head Node) GHN-Grid Head Node (gridfs) This interface provides the standard file management functionalities such as 1.Copy 2.Move 3.Remove 4.Create Directory 5. Download This module allows the users to carry out the basic file management functionalities of Grid Head Node (GHN) such as Copy, Create Directory, Move and Remove which are GARUDA Access Portal – User’s Manual Page 29 File Management, Accounting and Notices listing in combo box. These functionalities are similar to UNIX file operations. By default the 'Copy' option is getting listed, when the user clicks on the FM interface, by clicking on the 'Grid Head Node' from the Source, the portal home directory of the user will get listed from the Pop up window, from this user can select any file from the portal home directory or its sub directories as a Source for copying the file. Similarly clicking on the 'Grid Head Node' from the Destination, the portal home directory will get listed and by clicking on 'OK', the destination will get selected and also having the option to create the new directory in the respective place as a destination path. After selecting the Source and Destination by clicking on 'Submit' button the file will get copied into the destination path. Similarly, the user has to follow the above steps for other functionalities Move and Create directory also. The 'Local' option allows the user to upload the file into the GHN from their local desktop i.e where the Grid Portal is launched. By selecting 'Remove' option from combo box and clicking on 'Submit' button, it will pop up a File Browser of GHN of GARUDA Access Portal – User’s Manual Page 30 File Management, Accounting and Notices the logged user. From this user can browse their entire directory structure and also by selection of check box (es) and clicking on remove the respective files will get removed from the GHN. However the removal of directory is not allowed. 5.2 GSRM File Upload This module allows the user to upload file into the GSRM data grid. For this, the user needs to select the files from 'Grid Head Node' or from the desktop using 'Local' option, as Source and required to select the suitable directory name as the Destination by Clicking the 'SRM Files' button. And there is option for the user to select the Reservation ID by clicking on the field 'Use Disk Space Reservation', this will make sure that user will be getting the Disk space as per the reservation id. The user can also obtain a details of the corresponiding Reservation ID by clicking on 'Get Status' button After selecting the Source and Destination info, by clicking on 'Upload Submit' button the corresponding file will get uploaded into GSRM datagrid and suitable message will be updated with the page based on the status of the Upload. 5.3 GSRM File Download GARUDA Access Portal – User’s Manual Page 31 File Management, Accounting and Notices This module allows the user to download the file from GSRM datagrid into the Grid Head Node. For this, the user needs to select the file from 'SRM Files' button as Source and required to select the suitable directory name as Destination by clicking the 'Grid Head Node' button. After selecting the Source and Destination information, by clicking on 'Download Submit' button the corresponding file will get downloaded into GHN from GSRM datagrid and suitable message will be updated with the page based on the status of the download. 5.4 GSRM Reservation cum File Upload The SRM Reservation portlet is allows the user reserve the disk space from GSRM for the specified period of time. The user needs to enter the 'Disk Space' value interms of MB and provide the 'Time Duration' value interms of Number of Days and by clicking on 'Submit' button, the specified disk space will get for the user and suitable message will be updated withe page on the statu of reservation. This portlet also have the option to reserve the disk space with File upload feature.The user needs to select the option for using this facility and steps for same as the Upload module. GARUDA Access Portal – User’s Manual Page 32 File Management, Accounting and Notices Figure 8: File Management 7.2 Accounting This module provides Accounting information of all the jobs that are submitted through the Grid Portal. Archive Data On clicking this Accounting Button, by default userwise radio button is enabled to view the last one month(30 days) data of the total no. of jobs and accounting info of various system parameters such as Memory usage, Virtual memory,wall time,cpu time; similarly clusterwise can be obtained by clicking on clusterwise button. The user has the various options to get the userwise and clusterwise info for the specific period in terms of days by GARUDA Access Portal – User’s Manual Page 33 File Management, Accounting and Notices clicking on submit button using the combo boxes Name of the User,Name of the cluster,Start date and End date. Figure 9: Accounting Information- Current Data 7.3 Notices This interface provides information about current updates available in the Garuda Grid. For eg., if any cluster has any issues, we will mention it here. This will be updated regularly. GARUDA Access Portal – User’s Manual Page 34 Help and FAQ’s Help and FAQ’s 8 The Help section outlines the functions of the Grid portal and other integrated tools such as Gridhra and GIDE. Clicking on the Help link in the Home page will display the screen as shown below: GARUDA Access Portal – User’s Manual Page 35 Help and FAQ’s 9. FAQs This interface provides information about Frequently Asked Questions for the user. 10. Browsers and Versions that support Grid Portal Linux Platform 1. Mozilla ver. 1.6 and above. 2. Firefox ver. 1.0.4 and above. Windows Platform 1. Internet Explorer ver. 7.0 and above. 2. Firefox ver. 1.5.0.1 and above. GARUDA Access Portal – User’s Manual Page 36