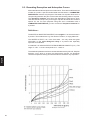
1
aw-Messgerät / aw measuring instrument / Appareil de mesure aw
& LabPartner-aw
World leading thanks INNOVATION solution and sensor technology
2518902
200040.355.04
Operating Instructions
www.novasina.ch
E
© Novasina AG, Printed at 2007 in Switzerland
Technische Änderungen vorbehalten
Technical data subject to modification
Sous réserve de modifications techniques
www.novasina.ch
INDEX
1.
Introduction ....................................................................................................................... 4
1.1. Starting Out .............................................................................................................................. 4
1.2. Important Notes ....................................................................................................................... 4
2.
General Product Description .......................................................................................... 5
2.1. System Overview ..................................................................................................................... 5
2.2. System Architecture ................................................................................................................. 6
2.3. Instrument Overview ................................................................................................................ 7
2.4. Standard Delivery .................................................................................................................... 8
2.5. Optional Accessories .............................................................................................................. 9
3.
Putting Into Operation ...................................................................................................... 10
3.1. Packaging / Installation ............................................................................................................ 10
3.2. Putting Into Operation .............................................................................................................. 10
3.3. Adding An Additional Channel (LabPARTNER-aw) ............................................................................ 11
3.4. Quick Start ............................................................................................................................... 12
3.4.1. System Start .................................................................................................................................. 12
3.4.2. Quick Measurement Start .............................................................................................................. 12
3.4.3. Changing the Reading Display ....................................................................................................... 12
3.4.4. Change Selected "Chamber Temperature" ................................................................................... 13
3.4.5. Stability Parameter Setting for Analysis .......................................................................................... 13
4.
Description, Instrument Functions ................................................................................. 14
4.1. General Description of the System User Elements ................................................................. 14
4.2. Operating the Measuring Instrument ....................................................................................... 15
4.2.1. System Startup ................................................................................................................................ 15
4.2.2. The standard „Operation Mode" ...................................................................................................... 15
4.3.1. Chamber Settings ............................................................................................................................ 16
4.3.2. Samples Database (max.10) ......................................................................................................... 18
4.3.3. Printout function for external printer .............................................................................................. 19
4.3.4. General system Settings ............................................................................................................... 22
5.
Water Activity Measurements.............................................................................. 25
5.1. Carrying Out aw-Measurements ................................................................................. 25
5.2. Important Notes About The Sensor ......................................................................................... 27
5.3. Function Principle of Stability Observation .............................................................................. 28
5.4. Setting Stability Observation Time Factors ............................................................................. 29
5.5. Recording Desorption and Adsorption Curves ........................................................................ 30
6.
Calibration ......................................................................................................................... 34
6.1. Factory Calibration, Delivery Status ........................................................................................ 34
6.2. Set A Sensor Password? ........................................................................................................ 34
6.3. Display Sensor Calibration Points .......................................................................................... 35
6.4. Calibration Procedure .............................................................................................................. 35
6.5. Clear Sensor Calibration Points .............................................................................................. 37
6.6. Interfaces RS-232 and USB ................................................................................................... 37
7.
Maintenance ...................................................................................................................... 38
7.1. Cleaning ................................................................................................................................... 38
7.2. Sensor Recalibration with Humidity Standards ....................................................................... 39
7.3. Replacing Protective Filters ..................................................................................................... 39
7.4. Replacing a CM-2 Sensor Unit ................................................................................................ 41
7.5. Replacing an Instrument Fuse ................................................................................................. 42
8.
Technical specifications ................................................................................................. 43
8.1. Equilibrium humidity values of the SAL-T humidity source ..................................................... 44
9.
Troubleshooting ............................................................................................................... 44
9.1. What is wrong, when....? ......................................................................................................... 44
9.2. Error message screens ............................................................................................................ 45
10. Short Menu overview ....................................................................................................... 46
www.novasina.ch
English
4.3. Setting the Instrument .............................................................................................................. 16
1.
Introduction
1.1. Starting Out
Thank you for having purchased an instrument of the Novasina
LabMASTER-aw system for measuring water activity. You have opted for
a highly accurate and reliable instrument representing the latest state of the
art in electronics and software design when it comes to highest precision
in aw (water activity) measuring.
To get the most out of all the possibilities of your Novasina LabMASTERaw or LabPARTNER-aw, and to guarantee safe, reliable operation, please
read these operating instructions before setting the unit into operation
carefully.
Please keep this manual in a safe place where it will be at hand whenever
you need it. If you lose the manual, please contact your Novasina
representative for immediate replacement.
1.2. Important Notes
Intended use
English
The Novasina LabMASTER-aw or LabPARTNER-aw is exclusively
intended for measuring WATER ACTIVITY under strict adherence to the
information and notes given in this manual. Any use beyond this scope is
considered to be a violation of the intended purpose and may endanger
your safety or could result in the product being damaged. Any use of this
Novasina instrument other than as intended is at the customer’s own risk
and by no means will the manufacturer or supplier be liable for any resulting
damage.
Safety instructions
4
•
The Novasina LabMASTER-aw system should be serviced, maintained
and repaired only by qualified people who are familiar with the equipment.
•
The LabMASTER-aw system must not be used in hazardous zones or
similar areas. The design was made only for the laboratory field.
•
No explosive materials and no highly inflammable substances may be
measured in the measurement chamber system.
•
Before connecting the unit to the mains, ensure that:
•
the mains voltage is within 90...260V, at 50 or 60Hz. Please check
the name plate of the system!
•
the power cable between the mains and the instrument is not
damaged.
•
The Novasina LabMASTER-aw system may be used only under the
specified operating conditions (see chapter „Specifications“).
•
Observe and strictly adhere to the local regulations regarding the
handling of mains- powered devices.
•
Use only genuine accessories and spare parts available from your
Novasina supplier or look in the internet under www.novasina.com.
•
This instrument must not be modified in any way without the written
consent of Novasina, a division of Axair Ltd.
•
Never open the instrument without removing the mains power cable first
to avoid any risk of dangerous currents.
www.novasina.ch
General Product Description
2.1. System Overview
The LabMASTER-aw system has been specially developed for
determining the fraction of free water in a test sample like food,
cosmetics or pharmaceutical probes. This fraction is also known as
"water activity" in the foodstuffs industry. Unfortunately, these days
many people still confuse water activity with the water content of a
sample. Measuring the water content of a specimen, however, is
measuring the combined fraction of both bound and free water. The
water content can be determined indirectly, yet non - destructively, using
LabMASTER-aw (see SI Sorption Isotherm)
The fundamental requisite for determining water activity quickly and with
extreme precision is an excellent moisture sensor that reaches an exact,
reproducible measurement over a very wide range (moisture from
0....100% rF). Novasina has been developing special electrolytic moisture
sensors that stand out for such unique properties for more than 40 years.
The intelligent,resistive, electrolytic sensor integrated into the
LabMASTER or PARTNER-aw is based on the latest Novasina „Novalyte
Technology“, with which one can guarantee such precision and
reproducibility. Thanks this technology an aw-meter as has never been
attained before.
The complete LabMASTER-aw system comprises various modular
components. The system can thus be optimally adapted to the customer
and his requirements.
The components of such a system are essentially as follows:
English
2.
LabPartner-aw 1 ... 9
LabMaster-aw
PC- analysis software for LabMaster/Partner-aw
www.novasina.ch
5
2.2. System Architecture
A LabMASTER-aw can be operated either alone or as controlling unit in
a network. The connection between this main unit and up to nine
LabPARTNER-aw network components is established over a special
communication circuit. The LabMASTER-aw is normally powered from a
mains socket. To avoid high inrush currents, the connected LabPARTNERaw units are fed power directly from the LabMASTER-aw.
The LabMASTER-aw can communicate with other computer systems,
such as a (Windows) PC or laptop, over a USB or RS-232 interface. The
appropriate software for analysis and data recording comes included with
the „STANDARD“ and „ADVANCED“ models.
English
A LabMASTER-aw can monitor and control up to nine additional
LabPARTNER-aw units. All settings to the LabPARTNER-aw are made
from the LabMASTER-aw, the controlling unit. A LabPARTNER-aw can
not be operated alone (without LabMaster-aw)!
Every LabPARTNER-aw has its own independent, temperature - stabilised
measuring chamber, a chamber for preconditioning, an LCD panel and two
buttons (for start / stop and internal settings options). A device number can
be allocated using the software setup to uniquely identify the unit. Attention!
No two units may be allocated the same number in a network!!
Please check that on a system of LabMASTER / PARTNER-aw it has to
be only one LabMASTER as a chief manager. It is forbidden to connect two
LabMASTER-aw via the bus line together.
For further information, please read the operating instructions for the
LabPARTNER-aw.
A LabMaster-aw system with 3 Partner and a laptop
6
www.novasina.ch
2.3. Instrument Overview
Cover with sensor unit
Probe measurement and
pre-conditioning chamber
LED light "Analyse"
LED light "Stable"
Fix-Functions keyboard
Standard keyboard
Functions buttons
LCD screen
English
Main switch
Mains outlet to the nextLabPARTNER-aw
System bus linet to the next
LabPARTNER-aw
USB output to a PC
RS-232 output to a PC
or external printer
Mains power for any
LabMASTER/PARTNER-aw
(Fuse over the plug!)
! Detailed LabPartner-aw description see operation manual !
www.novasina.ch
7
2.4. Standard Delivery
Novasina
LabMASTER-aw „BASIC“:
AW measuring instrument with precise, temperature - stabilised sample
chamber and additional preconditioning chamber, basis software without
user administration/management and without samples database system.
This instrument can only be operated as a stand-alone system. No analysis
programs for PC (Novalog MC) and no cable are included. An connection
to an external RS-232 printer is possible. It is as well possible to expand the
instrument to a higher software level with additional functions at any time
by a version code.
Standard accessories:
•
Set with 5 humidity standards: SAL-T 11, 33, 75, 90, 97%
•
50 sample cups
•
Operating instructions
Novasina LabMASTER-aw „STANDARD“: (single-channel control)
AW measuring instrument with precise, temperature-stabilised sample
chamber and additional preconditioning chamber, standard software with
user administration/management and samples database functions.
English
This instrument can only be operated as a stand-alone system. It can
communicate with a PC-based computer system (required PC-based
software included) over a USB/RS232 interface. An connection to an
external RS-232 printer is possible. It is as well possible to expand the
instrument to a higher software level with additional functions at any time.
Standard accessories:
•
Set with 5 humidity standards: SAL-T 11, 33, 75, 90, 97%
•
50 sample cups
•
Operating instructions
•
Interface RS232 - PC cable 1.8m/D-Sub 9M/9F and USB cable
•
PC software „NOVALOG MC“ for Win9X/2000/NT/XP
Novasina
LabMASTER-aw „ADVANCED“ (multi-channel control)
AW measuring instrument with precise, temperature-stabilised sample
chamber and additional preconditioning chamber, standard software with
multi-user administration/management and samples database system.
System extension via bus line to a LabPARTNER-aw possible.
The software for this instrument allows a multi-unit measurement system
with up to 9 LabPARTNER units. But can also be operated as a standalone unit. The instrument communicates with a PC-based computer
system over a USB / RS232 interface and with the LabPARTNER units with
a Field Bus system (required software is included).An connection to an
external RS-232 printer is possible.
Standard accessories:
8
•
Set with 5 humidity standards: SAL-T 11, 33, 75, 90, 97%
•
50 sample cups
•
Operating instructions
•
Interface RS232 - PC cable 1.8m/D-Sub 9M/9F and USB cable
•
PC software „NovaLog MC“ for Win9X/2000/NT/XP
www.novasina.ch
Novasina LabPartner-aw (max. 1....9 units on a network):
Modular expansion of the measuring station by one or more measuring
and preconditioning chambers can be achieved over an internal network
using LabPARTNER-aw units.
Standard accessories:
•
50 sample cups
•
Power and communication cables, both 1.8m, from MASTER to
PARTNER unit.
Please read the LabPARTNER-aw operating instructions for further
details!
2.5. Optional Accessories
•
Cell protection filters against aggressive vapours:
•
Please consult the filter specification sheet
English
For certain use of the equipment, the precision measuring cell of the
LabMASTER/PARTNER-aw must be protected against aggressive
vapours. Novasina offers various protective filter systems for this
purpose. Please consult the corresponding datasheets for Novasina
protective filter systems or contact your Novasina sales partner. Using
filter systems can prolong the service life of the measuring cell
considerably. Should you implement such filter systems, please see to
it that they are tested and changed at regular intervals. Chemical filters,
in particular, tend to become saturated and thus ineffective after they
have been in use for a certain time.
Novasina offers a special accessory for determining the sorption isotherm of a sample medium. In conjunction with the SAL-T humidity
standards, a suitable curve can thus be adopted with the greatest of
ease. As such, the LabMASTER/PARTNER-aw can also be used for
fast, precise and non-destructive water content measurement.
Operation manual
Plastic case
for sorpiton-Isotherm
with soft padding
Special pincers
Weighing glass with cover
Special measurement
Stainless steel
body for the chamber
substance basket
www.novasina.ch
9
3.
Putting Into Operation
3.1. Packaging / Installation
Novasina precision measuring instruments are supplied in sturdy, specially
lined cardboard packaging with all necessary accessories. Upon receipt,
please check first to make sure everything is present, and immediately notify
your Novasina sales partner if anything is missing or broken. Do not put
damaged or incomplete measuring instruments into operation.
The equipment must be installed in a laboratory on an even surface, avoiding
vibrations, strong heat radiation, air flow and dust.
There must be a perimeter of at least 30 cm of free space around the entire
measuring instrument, since it can momentarily give off great heat.
The temperature controller may generate excess waste heat, depending on
settings, which is dissipated through the vent holes in the housing and by the
built-in fan. The fan is thermostatically regulated. There must be unobstructed
air circulation around and especially at the back of the instrument.
3.2. Putting Into Operation
Main fuse
(+ spare fuse)
Main power plug
for PARTNER
English
Mains plug
•
Check the mains voltage. The instrument accepts 90 - 260VAC, 50/
60Hz. Also check that you have the right power cable for you instrument.
•
Insert the power cable into the instrument socket and plug it into the
mains. Switch the mains power on if necessary.
•
Switch on the LabMASTER-aw by the power switch on the front of the
instrument (lower right corner). The display will light up.
The instrument takes a little time and automatically begins to correct the
temperature in the measuring chamber if actual and set values are
different.
Backside of an LabMaster system
Note : The Novasina LabMASTER-aw consumes very little power and is
designed for continuous operation. You may therefore leave the unit
switched on even during prolonged interruptions between measurements,
so that it is ready for measurement at any time. The precision of the
instrument will be stable even after a few hours of continuous operation
(internal temperature stability of all electronic components)
After reaching the set chamber temperature, the instrument is ready
(it takes approx. 5 min. time). You can now start your first measurement by
placing a sample inside, closing the lid of the LabMASTER-aw and
pushing the Start button on the keypad. The instrument confirms the start
with an acoustic signal and the yellow LED above the LCD screen blinks.
Main switch of the LabMaster-aw
For modifying the factory settings (adding users, passwords, buzzer
duration etc.), please see chapter 3.6, „System Settings“.
For opening the chamber,
push the opener back and
press the cover
a little bit down!
10
www.novasina.ch
3.3. Adding An Additional Channel
Once you have switched on the LabMASTER-aw „ADVANCED“ for
the first time, you can connect one or more LabPARTNER-aw units
onto the modular system as needed. Please follow the procedure below
to do this:
RS-232 or UBS
90...260 VAC 50..60Hz
Serial power line
Communication
bus line
Serial power line
Communication
bus line
LabMaster-aw
Chamber 0
LabPartner-aw
Chamber 1
(LabPARTNER-aw)
LabPartner-aw
Chamber 9
•
Switch OFF the LabMASTER-aw unit.
•
Connect the power cable from the LabMASTER-aw to the
LabPARTNER-aw unit. The power cable can be max. 1.8m long!
Note: The first LabPARTNER-aw unit is powered through the
LabMASTER-aw, all subsequent LabPartners (up to 9 in total)
are powered in serial (from LabPartner to LabPartner).
-> To avoid power surges over the instrument’s power supply,
LabMASTER-aw delays the powering on of all connected LabPartner
units. An acoustic signal is given as each instrument is turned on.
•
Switch ON the LabMASTER-aw unit.
-> Select the desired channel number of the connected LabPARTNERaw (please consult the programming section of the LabPartner-aw
operation manual)
•
Switch OFF the LabMASTER-aw unit and connect the
communication cable between the LabMASTER-aw and
LabPARTNER-aw.
LabMaster-aw
Interface
•
English
Note: The connector cable, with 1.8 m cable and corresponding plugs,
comes with every LabPARTNER-aw. Make sure the cables are plugged
into the correct place on the back of the LabMASTER-aw and
LabPARTNER-aw.
Switch ON the LabMASTER-aw unit. The LabMASTER-aw and
subsequently all connected LabPARTNER-aw units are powered
on. An acoustic signal and the standard display on the LabPartner
LCD confirms when they are ready for use (if the LabMASTER-aw
fails to power on any of the LabPARTNER-aw units, the display
„Waiting for Master“ appears on the respective LabPARTNERaw). This error can arise due to missing or incorrect cabling to the
LabMASTER-aw or an incorrectly or duplicated LabPARTNER-aw
device number.
LabPartner-aw
Interface
Instrument "ID" of a
LabPartner
LabMaster-aw multi chamber screen
with 2 LabPartner
www.novasina.ch
11
ATTENTION : A LabPARTNER-aw can only be operated with one
connection to a LabMASTER-aw. All settings to the measuring chamber
etc. can only be made from the LabMASTER-aw.
Fault
OK
An additional LabPARTNER-aw instrument may be placed directly beside
the LabMASTER-aw unit or up to the distance of the cables (1.8m) around
it, wherever there is space available. Special systems with up to 9
additional channels may be distributed over different rack levels.
3.4. Quick Start
3.4.1. System Start
While the LabMASTER-aw System is starting, a greeting text appears on
the display. After about 3 seconds, the display automatically switches to
single-chamber measuring mode. Depending on the LabMASTER-aw
version, „BASIC“, „STANDARD“ or „ADVANCED“, the user may need to
identify himself (password) or may be able to commence the measurements
immediately.
3.4.2. Quick Measurement Start
Pre-conditioning
chamber
English
Measurement
chamber
Please fill a suitable test sample into a sample cup. Make sure the sample
cup is well filled, but not over the lip. Do not compact the sample medium
under any circumstances. The greater the overall surface of the sample is,
the quicker and more precise the aw measurement will be. Next, place a
product sample in the left chamber (the measurement chamber). Place a
second sample into the pre-conditioning chamber on the right side. Close
the cover and the equilibrium begins to develop. Momentary values of „aw“
and „°C“ are shown on the display.
Samples at very different temperatures from the chamber : to save time, it
is recommended to place the next sample to be measured in the preconditioning chamber in order to minimise the temperature difference.
The „stable“- and analyse function may be started with the „Start/Stop“
button. The yellow LED „ANALYSING“ flashes. When the value becomes
„stable“, the green LED lights up. The system send you as well an acustic
signal, if it will be finished by a "peep". If the cover is opened or was not
properly closed, the „STABLE“ function is interrupted and the analysing
function cannot be started!
Start / Stop
Analyzing / Stable LED
3.4.3. Changing the Reading Display
View single
"Single
chamber
mode"
View All
"Multi / summary
chamber mode"
12
Every LabMASTER-aw has two different display modes for the current
reading. These will be referred to below as „single-chamber display mode“
and „summary chamber mode“. Single-chamber mode only shows the
current reading from the selected chamber number. This can be changed
with the software button „Select chamber“. In summary chamber display,
the current readings of the entire system are shown. At the same time, it
can be checked in this display mode which LabPARTNER-aw (device No.)
a LabMASTER-aw is communicating with.
Note : When the instrument is switched on, the last set chamber No. and
the actual aw and temperature values are displayed. You can as well check
the communication status of all other LabPARTNER-aw on the system
with the "summary chamber mode"
www.novasina.ch
3.4.4. Change Selected "Chamber Temperature"
Push the function key "Settings" to switch into the system menu. There
you can adjust any chamber-, samle- and systems parameters.
Select the point "0 : Chamber settings..." on the screen and press
"ENTER". The selection can be in two way. Either by pressing „0“ on the
keyboard, or moving the highlight up or down using the „ “ or „ “ soft
keys and then press „ENTER“.
Select on the same way the menu point : „2 : Temperature" by pressing
„2“ or moving the highlight up or down using the „ “ or „ “ soft keys and
then press „ENTER“.
Set the new required chamber temperature (by keyboard) and finish
your settings by pressing the „OK“ soft key. Return to single chamber
mode by pressing „ESC“ or many time the function key "Previous
screen".
English
The internal controller system will change now the new chamber
temperature.
Maybe the rotation speed of the internal fan will be changed part time
and you can hear it a little bit. On the screen you can see, that the
temperature of the actual value will move the direction to the new set
temperature. This takes a little while. During this time, the chamber
system must be closed! A sample or a SAL-T can be inside but the
speed of changing will be slower. Please wait during the temperature
stabilisation process.
Note : If you are using a multi-channel system (LabMASTER-aw and
at least one LabPARTNER-aw), select the chamber number before
changing the settings !
3.4.5. Stability Parameter Setting for Analysis
To optimise the measuring speed of the instrument, it is possible to
optimise the stability criteria of the measurement for each sample. Two
stability parameters can be set : One for the aw value and one for the
temperature in °C. The range of the stabilty parameter will be from 1
up to 30 min. To keep within these parameters, the change in measurement reading may not be greater than 0.001 aw or 0.1°C during the
set time. If both criteria are fullfiled over the observation time the
measurement will be finished and you see the result on the lower part
of the screen. Please refer to chapter 5.4 of these operating instructions
for further information.
Stab. observation time aw
range: 1....30 min
(stable if the aw value deviation is
less than +/- 0.001 aw during this time)
Stab. observation time °C
range: 1....30 min
(stable if the chamber temperature
value deviation is less than +/- 0.1 °C during this time)
www.novasina.ch
13
4.
Description, Instrument Functions
The modular LabMASTER-aw system has a great variety of functions,
depending on software version and expansion status. These shall be
described in detail below. The table below shows which functions are
activated in which expansion status. It will be possible to update an
"BASIC" or "STANDARD" to the next possible version or directly to a
"ADVANCED" version of a LabMASTER-aw. The way is very simple and
code driven. A new code can be ordered through your local Novasina
representative.
"BASIC"
Functions
"STANDARD"
"ADVANCED"
Date and time
Measurement analysing
Probe data base
Single-user
Login / Logout
Multi-User
User management system
Password protection
RS-232 / USB communication
External printer RS-232
PC software NovaLog32
LabPartner bus line
English
Power ON / OFF (LabPartner)
Measurement chamber selection
Intelligent sensor, password
Calibration at 8 points
Unit changing aw/% RH, °C/°F, date
Optioncode alignment
4.1. General Description of the System User Elements
A LabMASTER-aw system is used primarily for precise measurement of
the water activity of a test sample at an exactly reproducible temperature.
It stands out for the following special properties:
•
High-precision, temperature-stabilised, active measuring chamber.
•
Second pre-conditioning chamber for the following sample.
•
Precise, especially developed humidity measuring cells that can be
adjusted to the proven Novasina humidity standards at any time.
•
High-precision, adjustable stability display.
•
Multi-user management system with dynamic administration.
•
Multi-chamber management system with dynamic administration.
• Samples database system for efficient lab work.
Main operating elements of the LabMASTER-aw:
14
www.novasina.ch
Status of
analising
Function keys
LCD multifunction display
Keypad unit
for data input
Fix functions
keys
status line, time, date
and actual logged USER
4.2. Operating the Measuring Instrument
4.2.1. System Startup
The system runs a comprehensive function control of all internal
modules and important software components when starting up. After
this, the LabMASTER-aw tries to establish a connection to any
connected LabPARTNER-aw units. Any errors in the LabMASTER/
PARTNER-aw hardware or software are then shown in an information
window on the LabMASTER-aw.
English
After some seconds, the system is ready to conduct measurements.
The screen automatically switches to OPERATION MODE. Please
note that the system should already be in operation for several hours
for exact and reproducible measurements. Only this way can all
electronic components have stabilised to the optimum temperature
level and be working at highest precision.
4.2.2. The standard „Operation Mode"
Measurements and analyses can be made in this mode. The display
can be switched from single-chamber display (chambers selectable by
ID) to summary table display. This is very easily done by pressing the
soft key „VIEW“ (single / all). When in single-chamber display, the
current chamber number can be set and displayed with the „Select
Chamber“ soft key. The LabMASTER-aw chamber itself is always
allocated number „0“.
Multifuncion LCD
screen with backlight
Selected
chamber
Number
Actual
value
Functions key
and information
Stable
value
Statusline : Date, time and
logged user
The chamber numbers of connected LabPARTNER-aw units
correspond to the set ID numbers of the respective units. It is possible
to connect up to nine LabPARTNER-aw units with ID No. 1...9 to a
LabMASTER-aw. The summary display table is created dynamically.
Successful communication with the LabPARTNER-aw is thus also
displayed.
www.novasina.ch
15
Elements of the configuration menu:
You open the main menu by pushing the „Settings“ soft key.
Selecting a further menu point (e.g. „3“) and then pressing the
„ENTER“ (5) soft key brings you to the submenu and the corresponding
display window. Pressing the „Previous screen“ soft key (6) brings
you back one menu level.
..
These soft keys let you move the menu selection up or down within
the current window.
The selection in this case must be confirmed with the „ENTER“ (5)
soft key.
Instead of making a selection with the soft keys, it is also possible to use
the keypad for navigating through the various submenus. Each menu point
is pre-allocated a number.
Numeric or alphanumeric keypad
Logout
Delete the last
character
Delete the full line
change the function of the
key AA, aa, 123 (p, q ,r ,s ,7)
Escape
English
In the example given on the left, the „Units…“ function has temporarily
been allocated to button 2 on the keypad. If this button „2“ is pressed, the
function is the same as selecting the row „Units…“ with the soft keys (3 +
4) and then pressing the „ENTER“ soft key (5).
The following device settings are possible for each LabMASTER/
PARTNER-aw:
•
Chamber settings Menu point (0)
•
Sample settings
Menu point (1)
•
System settings
Menu point (2)
4.3. Setting the Instrument
4.3.1. Chamber Settings
(can be set separately for each measuring chamber 0....9, if necessary)
All settings are only ever related to the currently selected measuring
chamber with the corresponding number, which is shown at the top right of
the screen within the „Select chamber“ soft key.
0: Power
0 = OFF
or 1 = ON
(power ON / OFF for a selected chamber, only LabPartners 1....9)
for one selected LabPARTNER-aw
default setting when a system is configured.
This allows to switch ON or OFF the power of the temperature control of an
LabPARTNER-aw. Please switch OFF the power on a LabPARTNER only
if you dont need this during a longer period of days or weeks. Otherwice the
chamber takes a very long time (over hours) to become stable before you
can measure very precise.
16
www.novasina.ch
1: Load from database...
(load one sample parameter set )
So that not all settings need be changed individually for each test
sample, all necessary parameters set for a test sample can be saved
under a name in a database and allocated to a measuring chamber at
any time. A database with up to 10 possible test sample data is available
for this purpose. (See chapter 4.3. probe data base). As soon as a
parameter is subsequently changed, the link to the samples database
is unmade and the display shows „OFF“ to confirm this. If a parameter
needs to be changed generally for a sample, this should be done in the
samples database (see chapter 4.3.1.).
2: Temperature
(temperature setpoint of selected chamber)
A new nominal temperature value for the selected measuring chamber
can be entered with this. Select the menu "Settings -> Chamber
settings -> Temperature". The internal temperature regulator processes
nominal temperatures in the range of 0.0....50.0°C (32.0-122.0°F).
Thus, the measuring chamber can be operated at up to 25°C above or
below the normal environment temperature (as a rule 25°C).
After changing the measuring chamber nominal temperature, the
LabMASTER/PARTNER-aw requires some time to settle down to the
new chamber temperature. During this time, no exact aw measurement
is possible! Every completed input must be confirmed with the „OK“ soft
key.
3: Stab. observation time aw
(stability condition of aw value)
English
After commencing measurement, the analysis phase of the aw-value
sample measuring is activated. The observation time over which the
change in aw value must be less than 0.001 aw can be optimised for
each sample. Together with „Stab. observation time °C“, this is the
most important criteria that must be met for an exact and reliable stable
value display.
The time range of the „Stab. observation time aw“ is 1.0....30.0 min.
Only whole number values are accepted.
4: Stab. observation time °C
(stability cond. of probe temperature)
After commencing measurement, the analysis phase of the temperature
stability of the sample measuring is activated. The observation time
over which the change in aw value must be less than 0.1°C can be
optimised for each sample. Together with „Stab. observation time
aw“, this is the most important criteria that must be met for an exact and
reliable stable value display.
The time range of the „Stab. observation time °C“ is 1.0....30.0 min. Only
whole number values are accepted.
5: Calibration...
(recalibration with SAL-T standards)
With this function, every LabMASTER/PARTNER-aw can be periodically
checked and, if necessary, recalibrated using the Novasina humidity
standard, SAL-T, at various measuring points. For this purpose, a
special box set with 6 SAL-T humidity standards is included with every
LabMaster. In this box are reusable salt tablets in the form of a sample
cup that generate the following humidities: 0.113 aw, 0.328 aw, 0.529 aw,
0.753 aw, 0.901 aw and 0.970 aw.
www.novasina.ch
17
Display all actual calibration points: Reference and „status of cal.“
Clear one or all calibration points if necessary.
Calibrate one point (see chapter 6.4.)
Protect the calibration with a „sensor password“
Please refer to chapter 6.2. for further Information.
6 : Info
(System- and chamber information)
Under this menu point, system information on the LabMASTER/PARTNERaw (depending on selected chamber), and sensor information can be
called up. Changes cannot be made.
Instrument type and serial No. of the instrument
Hardware revision level:
(important for service)
Firmware / software version:
(important for service)
Currently installed sensor type:
(important for replacement)
Serial number of the sensor: (important for service and warranty)
Firmware / software version:
English
Last calibration date/time:
4.3.2. Samples Database
(important for service)
(important for maintenance)
(Database of max.10 sample parameter definitions)
The „Samples database“ is a powerful tool for quickly and correctly setting
all necessary parameters of a measurement relating to a type of sample.
Up to 10 different samples can be defined. The name of the samples
database can be chosen freely. A „Default sample“ was already created
by default. This can be written over, added to or deleted as required.
To create further sample data in the database, please select a free table
space by pressing the soft key „0-9“ or the corresponding number on the
keypad. After this, the system prompts you to enter a suitable name
(confirm with „ENTER“). Now, the appropriate parameters for the sample
can be entered and finalised by pressing the „ENTER“ key.
Sample data is modified in the same way as it is created.
The following parameters must be entered as sample data:
Obvious name of the sample: (max. 21 characters)
Set chamber temperature for this sample: 0....50°C
Stab. observation time aw for this sample: 1....30 min.
Stab. observation time °C for this sample: 1....30 min.
If sample data is no longer needed, it can be deleted. Select the
corresponding row in the samples database table (->ENTER) and then
delete the corresponding name by pressing "Clr" key. This frees up the
table space for new sample data.
18
www.novasina.ch
The sample data are allocated to a measuring chamber in the menu
„Chamber settings“ under point „1 : Load from database“. There, the
desired sample data can be allocated the respective measuring station.
The deallocation is done under the same menu.
The link to the sample data is also automatically unmade as soon as a
parameter is subsequently changed in the „Chamber settings“ menu.
(see status from „Load from database“)
Status: OFF
Status: 0...9
(means no link to the sample data exists)
(a link to the sample data exists)
4.3.3. Printer functions for external printer
From the software version V.1.05 C003 all LabMaster-aw system
have the ability to print out information about measurements and
calibration on a printer. The software supports the protocol standard
ESC/P. Novasina recommends following printer models:
Seiko DPU 411 and 414 thermo paper printer
(only by RS-232 interface)
Protocol printout
English
If you have connected by a RS-232 interface a printer to the LabMasteraw system and you have configured the device following chapter
„printer settings“ the system prints out the results automatically as
soon as a stable value is reached. Actual measuring values of all
connected measuring chambers are printed by pushing the button 0....9
on the LabMaster-aw during the standard operation mode.
• In the „Stable protocol“ values are printed out that were valid at the
time of stability. Attention: on the protocol the user name who is
momentary logged in will be printed out as well.
• In the „Actual protocol“ values are printed out that were valid at the
start of the printing process.
General system settings (function extensions)
After the connection of the main supply and printer cable (RS-232, part
no. 111 7473), all printing functions have to be activated by the
LabMaster-aw software. This shall be done as following:
Communication:
„Settings“ –›„System settings“ –› „Communication“, activation by
selecting the menu point „Printer“. For de-activation please select the
menu point „PC“ (selection for a connection with the NovaLog MC
software).
Printer communication:
„Settings“ –› „System Settings“ –› „Communication“
–› „Printer-configuration“. This menu point is only visible, if the
„Device“ is set on „Printer“.
The following parameters can be selected:
• „Laboratory“:
Laboratory or company name, which should be printed on the
protocol.
www.novasina.ch
19
• „Auto stable printout“ :
If setting is „On“ the measured values are printed out automatically after
reaching the stability (as soon as the green LED is flashing).
• „Line feed, form feed“:
Selection of the number of empty lines after the protocol. With that
function you can define the right position of the paper tear off line. If
there is no number input (delete „0“ –› „FF“), a one page feed will be
performed.
Back to operating mode :
If you want to quit the menu after selecting „Printer“ under menu „Device“ there
is a information window confirming that actual printouts can be started by
selecting a button (0...9). This shall be confirmed by pressing the function
button „OK“.
Printing of calibration data
Prerequisite : Activation of the printer function in the „System settings“
If the LabMaster-aw is configured on a printer, single or all calibration points
can be printed out by selecting the printer function button under the menu
point „Display cal. points“.
Settings on the measurement chamber
English
„Settings“ –› „Chamber Settings“ –› „Calibration“
–› „Displ. cal. points“ or
–› „Displ. single cal. points“
If you press the printer function button in the general view, all calibration
points will be printed out (adjusted and not adjusted points) and information
about date, time, instrument and user of each single point will be also printed.
If you select the printer function button in the single view, only selected
calibration points will be printed.
Printouts on Seiko Printer
****************************************
*
N O V A S I N A
*
*
Water activity meter
*
****************************************
****************************************
*
N O V A S I N A
*
*
Water activity meter
*
****************************************
****************************************
*
N O V A S I N A
*
*
Water activity meter
*
****************************************
LabMaster-aw:
User account:
LabMaster-aw:
User account:
LabMaster-aw:
User account:
SW version 1.04
Default user
Chamber 9:
SW version 1.05
Serial number: 0504004
Sensor Type:
CM-2.06
Serial number: 0504004
last modif:
10.06.2005 11:21:00
Laboratory:
Chamber 9:
SW version 1.05
Serial number: 0504004
Sensor Type:
CM-2.06
Serial number: 0504004
last modif:
10.06.2005 11:21:00
Schnyders Labor
Laboratory:
Product:
SW version 1.04
Default user
.............................
Batch no.: .............................
Batch no.: .............................
Sample file:
Fleischwaren
Stab. obs. time: aw: 5min
°C: 1min
Sample file:
Fleischwaren
Date, time:
Duration:
Temperature:
Stable:
Date, time:
Time:
Temperature:
Actual:
14.06.2005 13:00:00
00:00:05
25.0°C
aw 0.388
14.06.2005 13:00:00
00:00:05
25.0°C
aw 0.388
"Stable" Protokoll
20
C003
Chamber 9:
SW version 1.06
Serial number: LABMAST 0409011
C003
Sensor Type:
CM-2.07
Serial number: 0504004
last modif:
10.06.2005 11:21:00
Laboratory:
Schnyders Labor
Cal.point:
User account:
Last modif:
Instrument:
Ref-Value:
Input Value:
Temperature:
0.064aw
(Calibrated)
Default user
22.06.2005
06:09:00
LabMast 0409011
0.064aw
0.066aw
25.0°C
Schnyders Labor
.............................
Product:
SW version 1.06
Default user
"Actual" Protokoll
www.novasina.ch
"Single cal.point" Protokoll chamber 9
Accessories for printer - LabMaster-aw
Printer cable
Novasina offers a cable set for Seiko printers, which enables to connect a
LabMaster-aw to a Seiko DPU-411 or DPU-414 printer. The cable length
is 1.5m.
Novasina part no. : 111 7473
This cable is not included to the LabMaster-aw!
The printer functions can be used on all versions
„BASIC“, „STANDARD“ and „ADVANCED“.
Printer settings
IS ONLY VALID FOR A thermo paper printer !!
- SEIKO DPU-411 or
- DPU–414
Dip
Dip
Dip
Dip
Dip
Dip
Dip
Dip
SW-1/1
SW-1/2
SW 1/3
SW-1/4
SW-1/5
SW-1/6
SW-1/7
SW-1/8
(OFF)
(ON)
(ON)
(OFF)
(ON)
(OFF)
(ON)
(ON)
Input = Serial
Printing Speed = High
Auto Loading = ON
Auto LF = OFF
Setting Command = Enable
Printing
Density
= 100%
Dip
Dip
Dip
Dip
Dip
Dip
Dip
Dip
SW-2/1
SW-2/2
SW-2/3
SW-2/4
SW-2/5
SW-2/6
SW-2/7
SW-2/8
(ON)
(ON)
(ON)
(ON)
(ON)
(ON)
(ON)
(OFF)
Printing Colums = 40
User Font Back-up = ON
Character Select = Normal
Zero = Normal
International
Character
Set
U.S.A.
Dip
Dip
Dip
Dip
Dip
Dip
Dip
Dip
SW-3/1
SW-3/2
SW-3/3
SW-3/4
SW-3/5
SW-3/6
SW-3/7
SW-3/8
(ON)
(ON)
(ON)
(OFF)
(OFF)
(ON)
(ON)
(ON)
Data Length = 8 bits
Parity Setting = No
Parity Condition = Odd
Busy Control = XON/XOFF
Baud
Rate
Select
= 9600 bps
English
A ESC/P compatible printer shall be connected to the RS-232 interface of
the LabMaster-aw. Novasina recommends the Seiko DPU-414 printer
with following settings:
Dip SW-3/1 through Dip SW3/8 of the Seiko DPU-414 printer have to be set
following the table above. The settings of all other switches are just a
recommendation.
www.novasina.ch
21
4.3.4. General system Settings
Various generally valid parameters that cannot be allocated to a measuring
chamber are managed in this module. The multi-user administration, password
allocation and access protection can be defined here. All of these settings
depend on the LabMASTER-aw version, „BASIC“, „STANDARD“ or
„ADVANCED“. Such parameters may be able to be entered only partially or not
at all, depending on the model.
(see list on page 14, chapter 4)
0 : Set data, time...
(System settings only for LabMASTER-aw)
Each LabMASTER-aw has an internal clock and calendar function that
continues to run even while the unit is switched OFF. By default, the system is
set to GMT (Greenwich Meridian Time). This parameter should be set to local
time and current date after first starting up the system. The easiest way to do
this is with the keypad beside the display. Please separate day, month and year
or hours, minutes and seconds with a dot [.] and conclude the input with „YES“.
The displayed date is in the European format with the pattern:
DD.MM.YYYY (e.g. 17 April 2005 = 17.04.2005)
The displayed time is in 24h format with the pattern: hh.mm.ss
(e.g. 16:45:50 = 04h PM, 45min, 50sec.)
1 : Users...
(only for LabMASTER-aw „STANDARD“ and „ADVANCED“)
English
Every LabMASTER-aw „STANDARD“ and „ADVANCED“ gives the option of
a Multi-User Management system. If a USER wants to measure an aw-Value
on the system unit, he must first log in with User ID and a password. As soon
as all measurements are finished, he must log OFF of the system again by
pressing the "Logout-key".
Up to 10 users can be defined with name and unique password and their rights
managed.
By default, a „Sys Admin“ is set without password protection. These rights are
required for the administration. One person must be responsible for managing
the system as administrator. This person should immediately write over
(rename) „Sys Admin“ with his name and protect his administrator rights with
a password. The „Username“ and the password can be entered using the
keypad.
Swapping from numeric keys to upper or lower case letters is done with the
function button at the top right.
Please keep your password in a safe place. A forgotten administrator password
can only be deactivated in the Novasina factory or at an authorised Novasina
service centre. If this is so, then all saved parameters and data will also be
irretrievably lost. The instrument will then be put back to its original factory
default condition.
Please be careful with UPPER and LOWER cases and NUMERICAL input
when entering a password.
Note: Use only numerical characters for the password. This simplifies input
and is less likely to be forgotten!
22
www.novasina.ch
Defining a user
To define a new user in the system, select a free space in the table (e.g.
No. 3) using the soft keys or the keypad.
Then, you can enter the new user name and finalise it with „ENTER“.
Next, you will have the option of allocating different rights (see „User
Rights“ below) for the respective user. The status (active = YES ;
inactive = NO) is shown. This action is terminated with the key
„Previous screen“.
User Rights
SET Sensor
password
User management system
Probedata base
Yes
Yes
Yes
Yes
No
No
No
No
No
No
No
No
Yes
No
Yes
Yes
No
No
No
No
No
Yes
No
No
No
No
No
No
Yes
Yes
Yes
PERMIT
Calibration
Yes
Yes
No
PERMIT
Sample data base
Yes
Yes
PERMIT
Chamber setting
Yes
General permition
Yes
Yes
English
Administrator
General
system
factory reset
Chamber
Calibration
Yes
Chamber p
parameter
User level
system
Chamber
ON / OFF
Measurement
The user management system gives the administrator the option to
allocate each entered user different rights. The table below gives an
overview of the rights currently possible. These can be extended in
future. Please consult the current user management system while
allocating rights.
Deleting a User
A user can be deleted from the administration by deleting the user
name. There must be at least one „Administrator User“ defined at any
time, however, otherwise the system will be locked completely. Only
administrator rights allow the deletion of users or passwords.
User Password
When first entering a new user, the password must be entered twice
time (to confirm). This helps make sure the password is entered
correctly.
The administrator can see a forgotten user password in the Management
system. (see „User“ -> „1: Password“)
2 : Units...
(for all LabMASTER-aw versions)
A LabMASTER-aw can display the measured values in various different
units. The values are as follows:
Humidity
:
aw-value or relativ humidity % RH
Temperature
:
°C or °F
Date format
:
DD.MM.YYYY, MM.DD.YYYY
or YYYY.MM.DD
There are three different date displays to select from.
Examples
:
DD.MM.YYYY = 03.05.2005 (3 May 2005)
MM.DD.YYYY = 05.15.2005
(15 May 2005)
YYYY.MM.DD = 2005.05.27
(27 May 2005)
www.novasina.ch
23
3 : Buzzer...
(for all LabMASTER-aw versions)
The volume and duration of the acoustic signal upon attained stability can be
set with this.
Volume
:
Stable buzz duration :
4 : LCD Settings...
noise 0....9 : 0=low 9= high
0...120 sec. : 0 = OFF
(for all LabMASTER-aw versions)
The contrast and backlighting can be individually adjusted for optimum screen
readability.
Contrast
Backlight
:
:
0....9
0....9
: 0 = OFF
Since the backlighting is LED lighting, it is always switched on. This does not
affect the service life of the instrument.
5 : Communication..
(abilities of LabMaster-aw versions page 14)
English
It is possible to select various special output devices depending on which
firmware version is being used. Currently the PC and Printer devices are
defined. With the PC device, LabPartner units (1....9) can be connected
parallel over the LabMASTER-aw, the main unit, to a PC that is running the
"NovaLog MC" analysis software and thus data transmitted online.
If you set the Printer device and a printer is connected and configured with a
LabMaster-aw over the RS-232 interface, a protocol can be printed out. It is
possible to print out the "stable" or "actual" protocol. Further settings for the
printer or the protocol can be made under "printer configuration".
If the Printer device is set, there is the possibility to print out a single or several
calibration points by pressing the printer function button under "Display cal.
points".
Should, for example, the measurement data from the LabPARTNER-aw with
measuring chamber No. 3 be printed out over NovaLog MC or the Printer, it
can be activated using key "3" (or selection by arrow keys).
Under menu point Data format you can either select a single channel over
Novalog32 (Chamber x) or you can select the NovaxCom format for the new
software NovaLog MC.
6 : Reset to factory settings
(for all LabMASTER-aw versions)
This function resets the entire system (LabMASTER-aw and, where applicable,
also LabPARTNER-aw) to the original status upon delivery. This function can
only be called up by the user with administrator rights. All settings of the user
management system will be irretrievably lost. Only the serial and software
licence numbers („BASIC“, „STANDARD“ or „ADVANCED“), and the data
based on the sensor, such as adjustments, will be retained.To prevent
unintentional deletion, it must be confirmed twice whether all settings shall
really be reset to default settings or not. The first prompt must be answered with
„Yes“ and the second with „NO“ for this reset function executed.
24
www.novasina.ch
7 : Info
(for all LabMASTER-aw versions)
This menu point contains general information on the hardware and software
of the LabMASTER/PARTNER-aw.
Instrument ID
Hardware
Firmware
:
:
:
LabMaster-aw
L001
V.01.07. C003 (date : 08/05)
This information is very important for the service centre to be able find errors
and functions. It also allows any system updates to be retraced. Please
keep this information at hand whenever contacting your service centre.
8 : Set options code
System expansion :
(for all LabMASTER-aw versions)
„BASIC“ -> „STANDARD“ -> „ADVANCED“
This function allows you to equip a LabMASTER-aw with extended functions
(see "4. Function description"). Doing so requires the currently set and
readable CODE to be provided to a Novasina representative. The
representative will then unlock the corresponiding software functions with a
new CODE. The new CODE is a product from the old CODE and the new
function you need. Please send your actual CODE of the system together
with an order to your local Novasina representative. This software extension
comes at an extra charge.
English
Keep the current code in a safe place. This code only ever relates to one
specific LabMASTER-aw unit. The CODE will be as well on the software
certification paper. Please add the new CODE as well to this paper. The
code must always be presented for any repairs. Only so you can be certain
that the same functions will be available after repair.
A label on the LabMASTER-aw gives information on the system code of the
delivered unit. Please complete this if needed.
5.
Water Activity Measurements
5.1. Carrying Out "aw"-Measurements
•
Switch on the LabMASTER-aw as described in chapter 3.2. After
reaching the chamber temperature, the instrument is ready for measuring
the sample. For a high precision measurement, the system must run hours
before you can start the measurement. The temperature of the complete
system must be stabilised first.
•
Fill the sample cup with the material to be measured. The sample cup
must be completely clean and dry (rub dry with tissue paper if necessary)!
Ideally, always use a fresh cup and dispose of it after use.
Important ! Fill the sample cup to approximately 2/3 with the product to be
measured. Do not overfill the sample cups ! Bulkier material must be
suitably crushed or manually cut into small pieces. Products consisting of
several layers, or an outer coating, must also be crushed (e.g. confectionery
products). Prolonged hand contact with the product must be avoided
(falsification of measured value!). A grinder, if used, must not warm up the
product.
www.novasina.ch
25
•
Open the instrument cover and check the chamber inside. This must be
clean an absolute dry.
•
Make sure an appropriate cell protection filter is installed in front of the
measuring cell unit, should the product sample require such protection
measures. For details, please consult the filter specification sheet.
•
Insert the open sample cup containing the sample into the measuring
chamber (left) and close the cover again. Press the cover completely down,
otherwise the anlaysing function does not start.
Note : To gain time for measuring the next sample while measuring the current
sample, place the next sample cup (with its plastic cover closed!) into the
preconditioning chamber (right) to reach thermal equilibrium, before closing the
instrument cover.
Displayed values
The Novasina LabMASTER-aw continuously measures the water activity (aw
/ %RH) and the temperature (°C/°F) and displays the momentary values with
bigger letters on the screen. If an analysing of an probe will be finished, the
system will fix the result. This result will be presented it with an inverted display
part on the lower part of the screen. The upper part will show the actual value
of the measurement at any time. So you can see after a while how good the
stability parameter are adjusted for this probe.
Selected
Actual
Stable
English
Status
Activating the stability observation function
Press the <Start/Stop/Stable> key; the yellow LED („Analysing“)
flashes. The stability observation function is activated. The elapsed time, aw
value and chamber temperature appear on the display.
Switch OFF
the buzzer!
As soon as the measured values are considered stable, the buzzer sounds
and the green LED „Stable“ lights up. The display now also permanently shows
aw, temperature and elapsed time at that moment. This information disappears
as soon as the cover is opened or the <Start/Stop/Stable> key is pressed
again.
Removing the measured sample
26
•
Open the instrument cover after ending of the analysing and after writing
down the result.
•
Remove the sample cup from the measuring chamber carefully. Do not
empty out any part of the sample.
•
The instrument cover shall be closed now. This helps you for a next quick
measurement.
www.novasina.ch
Note : If heavy concentrations of glycol, glycerine, acetic acid etc. were
present in the sample, leave the cover open to let the cell and its protection
filter recover in the air.
•
If you want to measure the next sample, take it from the pre-conditioning
chamber, open the cup (remove its cover) and place it in the measuring
chamber. The following sample may be put into the pre-conditioning
space before closing the instrument cover.
Note : Leave the instrument switched on so that it is ready to measure at
any time. The power consumption is very low.
If a product sample has a greatly different temperature from that of the
chamber, a temperature gradient inside the chamber may retard the
temperature equilibrium, thus also the aw value. The instrument measures
the different temperatures inside the chamber very accurately and can
detect a large gradient of temperature. It may then display the following text:
"reaching stability is retarded due to too great a temperature difference
inside the measuring chamber". Then you need to wait till the temperature
of the sample will be the same like the chamber temperature. After that start
the analysing again.
5.2. Important Notes About The Sensor
General
English
The sensor supplied with the Novasina LabMASTER-aw was factory
tested and then calibrated at the following seven aw-value reference points
: 0.064 aw, 0.11aw, 0.33aw, 0.53aw, 0.75aw, 0.90aw and 0.97aw.
Humidity sensors are subject to certain ageing phenomena, which manifest
themselves in deviations from the original value. For the most part, these
deviations can be compensated for by recalibration. We therefore
recommend you to periodically check the accuracy at the humidity reference
points and to recalibrate the instrument if required.
Correct handling of the sensor
Note : Before starting the measurement. The Novasina sensor is a highly
sensitive precision device. Please observe the following rules in order to
avoid measuring errors or even destruction of the sensor :
•
Do not physically shock or dip sensors into liquids. If the CM-2 sensor
is dropped down, it will be damaged or this result can be wrong!
•
If substances with aggressive acidic vapours are present, the sensors
must be protected with a chemical pre-filter system. Contact you local
Novasina dealer for the suitable filter protection. Otherwise the system
might drift away permanently.
•
Condensation (saturation humidity 100 %rH), which can be caused by
sudden temperature changes, should be avoided.
•
Sensors that are not in use should be stored in a dust free, neutral
atmosphere at room temperature and ambient humidity (both chambers
in the instrument must be empty before switching OFF the power of a
Lab-MASTER/PARTNER-aw).
www.novasina.ch
27
•
Never open or take the measuring cell apart or clean the sensor with any
chemical or mechanical parts! The sensor itself is not cleanable. All attempt
will expire the warranty.
•
Under no circumstances connect the sensor to an Ohmmeter or such like.
This may damage the sensor and will expire the warranty of the sensor!
Any warranty will expire if one or
more of these points counteracts !!
Measurements up to +/- 1.000 aw
The sensor is capable of measurements up to 1.00 aw (100%RH). A built-in
heating system protects the measuring cell from saturation and therefore
against destruction.
The following points must be borne in mind :
•
The instrument must be switched on before a product sample is placed into
the measuring chamber. Please wait until the instrument has reached the
chosen chamber temperature.
•
At the same time, the next sample can be placed in the pre-conditioning
chamber to reach the same temperature before it is measured.
•
Always first remove the sample from the measuring chamber before an
instrument is switched OFF.
English
Note : If possible, always leave the instrument switched ON. The integrated
heating system protects the sensor from saturation and the instrument is
always ready for the next measurement. At the same time, the next sample can
be preconditioned to the correct temperature. The power consumption is
extremely low.
5.3. Function Principle of Stability Observation
The stability observation function, if activated, observes the changes in aw and
temperature value. Stability will be shown when the change within a selected
time frame is less than the accuracy of the instrument, which is 0.001aw and
0.1°C.
The shortest time window is 1 minute (stability time factor 1), the longest
window is 30 minutes (factor 30). At factor 1, stability will be reached the
fastest, but the aw value may be too far off the requested accuracy of the final
stable aw value. At factor 30, the highest accuracy is attained.
aw-Value / temperature
C h a n g in g o f t h e a w - v a lu e o r t h e p r o b e t e m p e r a t u r e
m u s t b e s t a b le a n d m u s t b e s m a le r t h e n
< 0 .0 0 1 a w a n d < 0 .1 ° C
E x a m p le :
S t a b . o b s e r v a t io n t im e
aw or °C
1 . . . . 3 0 M in
M e a s u r e m e n t i n t e r v a ll
" A n a ly z in g "
28
www.novasina.ch
" s ta b le "
5.4. Setting Stability Observation Time Factors
• Go to the menu "Settings" -> "Chamber Settings" if two or more channels
are used -> "Select chamber" number first. Select (3) for the "stability
observation time factor" for aw, or select (4) for the temperature
observation time factor.
• You will see some values from experience in the table below. After
several tries, you can select the best time factors for your samples,
possibly also using the NovaLog MC analysis program.
• The "aw stability observation time" is the interval of time in which the
measured value may still vary by a minimum value, though less than
0.001aw resp. 0.1°C, such that the instrument assesses it as „stable“.
Factory setting for „aw“
:
1 (= 1 minute, shortest time interval)
Factory setting temperature
:
5 (= 5 minutes)
Factor setting range
:
1 minute....30 minutes
time factor (minutes)
aw
temperature
1
2
3
4
5
7
30
2
3
4
4
5
8
10
English
Recommended stability
Examples of products
Fruit jams, tomato sauces
Chocolate, salmon, pharmaceuticals
Dried meat, pastry products
Clear soups/stock concentrate
Cheese
Butter
Sunflower oil
Recommendation : There are two ways to found the optimum of the
stability factor. The optimum means, a good balance of the measurement
between speed and accuracy. Either you can analyse the curve of the
NovaLog MC for this probe or you can look it on the screen of the
LabMASTER-aw or analyse the difference between the actual value and
the stable value. For quickly attaining a „stable“ value, we recommend
selecting the aw stability factor „1“, but then continuing to measure and
observe a change in the aw value after the „stable“ value has been
displayed. Many food products need a certain period of time to free the
water molecules and reach equilibrium. If you decide that the „stable“ value
deviates too much from the final value, then the stability factor may be
increased.
Please check as well the temperature. This must be absolute stable and on
the same level than the temperature of the chamber. Otherwise any
adjusting of these parameter will be wrong.
The temperature stability observation time may also be changed from the
factor „5“ set by Novasina to a higher factor for products with a temperature
greatly different from that of the chamber (e.g. chilled samples).
www.novasina.ch
29
5.5. Recording Desorption and Adsorption Curves
Most materials and all food products contain water. There are two different kind
of water in a probe. A part of bounded water and free water. A LabMASTER/
PARTNER-aw measure only the part of free water into a probe. But there is a
compounding between the part of free water and bounding water of a probe.
The "Sorptions isotherm" chart gives the depending of both factors. Such
chart are valid and unique only for one type of probe. Novasina has created a
special "SI" set. For such purposes using this set in combination with a
LabMASTER / PARTNER-aw, you can record such "Sorpitons isotherm" for
a product.
Definitions :
The WATER or MOISTURE CONTENT is the weight in % of the total water in
a product. Test methods are e.g. Karl Fischer Titration, or drying balances.
The WATER ACTIVITY, aw, is the free water – the only value that gives
information on the micro-biological safety of a product and especially
important for foodstuffs.
In materials, it is called the RELATIVE EQUILIBRIUM HUMIDITY (% rh). The
range of 0.00....1.00 aw corresponds to 0....100% rh.
English
The relationship between moisture content and water activity is the SI, Sorption
Isotherm curve, which is product and temperature specific. An absolutely
constant temperature during all measurements is therefore very important!
Examples of SI-curves:
30
www.novasina.ch
Recording a Sorption Isotherm curve
Setup the LabMASTER/PARTNER-aw
The lower part of the probe chamber of a LabMASTER/PARTNER-aw
must be prepared first. Change the standard steerage to the special
steerage for SI set. Take a screwdriver No. 2 and replace the steerage (see
pictures below). Be careful regarding a deformation of the steerage that
might affect a correct measurement.
Measure the precise weight of the special probe cap including the
transprotation glass container. This is important for the net weight definition
after changing the weight following the humidification of the probe.
English
Preparing a probe : Fill the special metallic sample cup to 2/3 with the
crushed probe (in order to get the maximum possible surface). Keep your
probe always inside the glass container when you are not using it for
measurments inside the chamber.
Adsorption curve
In order to start, the substance must be dry, so it must first be totally
desiccated in an oven (e.g. 2 hours at 102°C, depending on the material).
1. Close the glas container immediately after taking it out from the drying
oven and for transportation.
2. Weigh the probe afterwards with the closed weighing glass on a precision
balance and define the net weight of the probe.
3.
Put first the SAL-T 6 in the deeper measurement chamber and
afterwards the probe inside the stainless steel basket over it and close the
chamber.
4. After about one hour or more, write the aw value. If you wait longer, the
aw value as well as the weight become higher, moving along the SI-curve.
Therefore the „equilibration time“ is not critical.
5. Weigh the probe again and write the net weight in a table and calculate
the difference between the weights before and after humidification.
6. Put the next SAL-T into the measurement chamber and perform the
same operation at point 2, 3 etc. up to the SAL-T 97 humidity standard.
Based on the acquired data you can define and print the "Adsorption
curve" for a specific product on a paper !
www.novasina.ch
31
Desorption curve
This is in princple the inverse part of an adsorption curve. The substance must
be more humid when starting to weigh (to be safely on the desorption curve to
avoid SI-hysteresis mistakes), so the first salt to use is SAL-T97. Upon
reaching a value well above 0.9, SAL-T90 can be placed in. After about one
hour or more, note the aw value and weigh the substance. Upon waiting longer,
the aw value as well as the weight are lower, moving along the SI-curve, so the
waiting time is not critical.
After that, place in SAL-T75, down to SAL-T6. Then, after totally drying the
substance in the oven, the net (dry) weight is known and all points can be
plotted.
How to proceed :
1. Weigh the tare (empty substance basket and weighing glass)
2. Lift up the cup with a screwdriver; push the deeper cup into place
3. Place in the first SAL-T standard
4. Place basket with substance on top
English
5. Now close the cover and select the desired chamber temperature
6. Wait until the chamber temperature is reached, then wait for equilibrium
(stability observation time factor set as desired).
Weigh the net tara of the empty unit
32
www.novasina.ch
Put the SAL-T standard into the
measurement chamber
Place the probe inside the basket over
the SAL-T into the measurement chamber
Example
•
Selected temperature of Novasina instrument: 25.0°C.
•
The totally desiccated sample has a net weight of 0.485g.
•
SAL-T 11% was placed together with the sample in the
chamber. After about one hour, the aw value was 0.087.
Weighing the sample showed 0.519g, which is a 6.94%
increase in weight; this is the moisture
content at this point!
•
Next salt: SAL-T 33%. Displayed values: 0.290aw, 0.530g
(+ 9.1%).
•
Next salt: SAL-T 53%. Displayed values: 0.523aw, 0.553g
(+13.84%).
•
Next salt: SAL-T 75%. Displayed values: 0.749aw, 0.605g
(+24.55%).
English
of doing a Sorption Isotherm curve (adsorption) with a biscuit:
Greater humidity was not of interest in this „dry biscuit“ case. With
these 5 points, a rough SI curve can be drawn.
www.novasina.ch
33
6. Calibration
6.1. Factory Calibration, Delivery Status
Every new instrument, as well as every new replacement sensor unit, called
CM-2 cell, is delivered already factory calibrated at 7 points : 0.06, 0.11, 0.33,
0.53, 0.75, 0.90 and 0.97aw and a factory certificate. The user therefore only
has to check accuracy and recalibrate, if required, after some time. We
recommend checking the points that cover the products’ aw range, in the
beginning after 2 weeks, then 4 weeks, then 3 months, as long as the values
are within the tolerances specified by the user’s QC manual, or fix shorter
recalibration periods according to personal standards.
An other good way is, to test one point with a Novasina SAL-T standard that fit
near to the last measurement point of the last few probes at the end of a day.
Leave the SAL-T minimum 30 min into the chamber before you write the value
in a table. If you have a bigger drift of the actual measurement accuracy is over
a longer periode, calibrate the system new. You dont need to calibrate any
point of the chamber at once if you measure always in a high aw-value every
time. Then it will be enough, when you check and calibrate only the 0.75, 0.90
and 0,97 aw point.
A sensor unit carries all calibration information. Up to 15 points can be stored.
Please check the sensor calibration data. Most likely a 4% point and all
Novasina standard salts 0.34, 0.63, 0.11, 0.33, 0.53, 0.75, 0.90, 0.97, and 0.98
aw are stored in the memory for automatic recalibration within 15°C and 30°C.
English
Note : Define a standard quality process for your work and define an standard
test procedure for your LabMASTER/PARTNER-aw system.
6.2. Set Sensor Password
Every sensor unit can be used in any of the LabMASTER/PARTNER-aw
instruments and carries all calibration data with it. We call it „intelligent
sensor“ unit. Nevertheless, for highest accuracy, Novasina recommends
checking/recalibrating an instrument once it is finally installed and has been
switched on for several hours. A very good and easy check on some humidity
points is possible using the Novasina SAL-T checks, which are included.
This sensor unit can now be password-protected so that only an administrator
who knows the password has access to the first recalibration of the sensor. The
password protects only the sensor and is stored on the sensor itself. This is set
after the first full calibration in the facory (factory setting of the sensor password
is "8808"). Please change it as a system administrator immediately when
starting operating the device.
After that, recalibration is freely accessible (exception: after a reset to factory
settings).
Attention : Store the password together with your system administrator
password on a secure place. An forgotten password means to send the sensor
back to Novasina. There is no way to reset the sensor!
Set a sensor password:
Go to menu "Settings" -> "Chamber settings" -> "Select chamber" number
(only if you have 2 or more chambers activated), then press (5) "Calibration"
->n (3): now type a "password".
34
www.novasina.ch
6.3. Display Sensor Calibration Points
Information about each calibration point can be seen in this menu. Each
calibration point is stored directly on the intelligent sensor. Information
like calibration date, time and user, who performed the are accessible.
Go to menu "Settings" -> "Chamber settings" -> "Select chamber"
number (only if you have 2 or more chambers activated), then press
"0 : display calibration points" choose a point. If it has been
calibrated, details of the last calibration will be shown after selecting the
point and pressing "Select". The information will show up in a new
window.
6.4. Calibration Procedure
• Before calibrating, we recommend having the instrument switched on
for several hours, e.g. over night, with chamber temperature set
between 15 and 30°C (standard is 25°C), so the following morning the
calibration can be started (this time is necessary for the temperature
stability and accuracy of the many electronic components inside the
device).
• If the SAL-T standards are at a greatly different temperature than the
chamber, please place the next SAL-T standard in the pre-conditioning
chamber. The calibration time will be shorter.
English
• Place a SAL-T humidity standard in the measurement chamber and
put the next SAL-T standard inside the pre-conditioning chamber, then
close it. Set the aw stability and temperature time factor to „5 minutes“
and start the ANALYSING or wait for at least 45 minutes. It is important
to reach an equilibrium in humidity as well as in temperature!
• A calibration is only possible within a certain temperature range. The
sensor carries all humidity standard values in function of the temperature,
so a calibration is always correct within the stored temperature range
of a standard. Usually 15 to 30°C is a sufficient range. Extended ranges
may be available for future sensor units on request.
Please place always at first time the SAL-T 0.75 aw into the chamber.
This special point called basic calibration. If you have one time trouble
about the sensor, it can be possible to fix this if you clear all cal. point
and start a new calibration with the SAL-T 0.75. After that go down to
0.53, then 0.35 and 0.11. Now you can go forward with the 0.90 and at
last 0.97. Check the 0.75 point at the end of a full calibration.
Calibration, re-adjusting
go to the menu "Settings" -> "Chamber settings" -> "Select chamber"
number-> "calibration", then (2) "calibrate".
In case of close together points you will be asked to select the correct
value that corresponds to the SAL-T salt in the chamber.
Menue calibration
www.novasina.ch
35
Select table for
If the actual value is outside of the acceptable tolerance of the sensor,
a warning text appears. Most likely that CM-2 sensor must be replaced.
Calibration is possible: you may be asked (only once for a new sensor) to
enter the sensor password.
The calibration itself is then done immediately and confirmed by „Calibration
was successful“.
Menu calibration
SAL-T 97% rh and the older SALT-T 98%rh: never try to calibrate both!
They are too close together and would disturb the measurement.
Attention : If all calibration points have been cleared, you should start a
new calibration with the base calibration using the SAL-T 75% standard
first. After calibrating this first point, all other desired points can be
calibrated in any order.
English
Type of
Hum.check
36
Novasina EU Toxic Color
type
classe
of salt
Chem.
symbols
% relative humidity in relation
of temperature (x / 100 in aw)
15°C
20°C
25°C
30°C
Literature
Reference
SAL-T / 4
SC-4
T
white
CsF (>25%)
4.3
3.8
3.4
3.0
A
SAL-T / 6
SC-6
Xn
white
LiBr
6.9
6.6
6.4
6.2
A
SAL-T / 11
SC-11
Xn
white
LiCl
11.3
11.3
11.3
11.3
A
SAL-T / 33
SC-33
--
blue
MgCl2-6H2O
33.3
33.1
32.8
32.4
A
SAL-T / 53
SC-53
O
green
Mg(NO3)2-6H2O
55.9
54.4
52.9
51.4
A
SAL-T / 75
SC-75
--
purple
NaCl
75.6
75.5
75.3
75.1
A/B
SAL-T / 90
SC-90
T
white
Ba(Cl)2-2H2O
90.9
90.5
90.1
89.9
C
SAL-T / 97
SC-97
--
yellow
K2SO4 (>20%)
97.9
97.6
97.3
97.0
A
SAL-T / 98
SC-98
T+/N orange K2Cr2O7
98.5
98.2
98.0
98.0
A
Lit :
A : Greenspan, Humidity Fixed points of Binary Saturated Aequeous Solutions
Journal of Research of the National Bureau of Standards Vol. 81A, No1 01/02 1977
B : Robinson R.A. and Stokes R.H. Electrolyte Solutions, Butterworths London 1959
C : Wexler, Humidity and Moisture Vol.3, Fundamentals and Standards, Robert E.Krieger,
Publishing Company Huntingon, New York
www.novasina.ch
6.5. Clear Sensor Calibration Points
This function clears all calibration points in one time and allows to make
a full "basic" re-calibration of the sensor.
The only reason for clearing a point is a value, which is obviously wrong
and no humidity standard available to correct it. Clear all values if their
accuracy is doubtful and make a full new calibration with new standards,
at least at 2 points, for better accuracy at minimum 6 or 7 points from
0.064 to 0.97 aw.
Go to the menu "Settings" -> "Chamber settings" -> "Select
chamber" number-> "clear calibration points" choose a point from
the table to clear, or choose „clear all points“.
6.6.
Interfaces RS-232 and USB
The Novasina LabMASTER-aw can be connected to a PC via the USB
or the RS232 interface (9-pin D-sub plug). Please do not connect both
interface to a PC at the same time. This will not work and maybe it can
damage the system!
English
The software „Novalog MC“ (for Win9x/2000/NT/XP) is also delivered.
It leads the communication and can be used to evaluate the measured
data of several channels of the LabMASTER-aw system. Further the
data's can be exported to Excel and saved on a PC. On the Novalog MC
CD there is an installation program which has to be perfomed.
The data string from the instrument to a PC (only important for
software engineers); applies for "data format" -"Novalog32"
The information comes over the line in a continuous data string from the
LabMASTER-aw system to the Novasina DLL (software part inside
your operating system) to the „Novalog32“ software. The data string
can be as well used for other software implementations. For example
for a connection to a production planning system (called PPS). Any
string has a structure of 23 characters.
Position
12
3
4
5
6
Parameter T T
T
T
T
T
Example
5
.
0
C
2
7
8
9
10
11
12 13
F
F
F
F
F
8
3
.
5%
14
F
15
16
17
18 19
20
21 22 23
D
D
D
D
D
D
D
1
9
.
3
D
6
T:
Temperature in °C
F:
Relative humidity in %rh
D:
Dx values for Novasina internal use only
C:
Carriage return (CR)
L:
Line feed (LF) xxxxxxx
www.novasina.ch
C
L
37
LabPartner
Instead of communication over a RS-232 interface, it can be made over the
USB interface integrated in the LabMASTER-aw. A suitable USB plug is
integrated on the back of the unit.
USB interface
Please use ordinary USB cables that are available in computer stores. The
USB interface uses the USB 1.1 standard.
RS-232 interface
As soon as you connect a LabMASTER-aw with a USB cable to a Windows
PC, Windows will ask you to install two new drivers for the USB as well for
a virtual RS-232 interface to the "NovaLog MC" software. You will find the
drivers on the Novasina „NovaLog MC“ CD under directory "USB-Driver".
After successful installation, the NovaLog MC program can be connected
on a virtual USB COM port and then receive data from the USB interface.
Please check, which virtual COM port no. is used in your Windows system
after the driver installation. This is an important information for the NovaLog
MC software and essential for a working data transmission.
It is not possible to operate both USB and RS-232 at the same time. USB
always takes priority over the RS-232 interface.
English
7. Maintenance
7.1. Cleaning
Caution ! Before cleaning switch OFF the Novasina LabMASTER-aw
and dis-connect it from the mains.
Use a damp cloth to clean the housing of the Novasina LabMASTER-aw
or a LabPARTNER-aw. Use a commercially available mild cleaning agent,
as required. Make sure no water is entering the housing or the connectors.
Caution! Do not use aggressive cleaning agents.
Caution ! Please do NEVER clean the sensor CM-2 itself. It is not
possible to do that! The sensor is an very sensitive element with a
chemical filter protecion on the top. If you blow or touch the filter with
a mechanical part or if you try to clean it with any liquid cleaning
products, the sensor might be damaged!
38
www.novasina.ch
7.2. Sensor Recalibration with Humidity Standards
Like all precision measuring instruments, the Novasina humidity sensor
must be checked periodically. After initial commissioning of the
instrument, we recommend carrying out a calibration
•
every couple of months,
•
always before measuring critical products, at minimum those points
covering the product’s aw range
•
when the instrument was not used over a period of time.
Novasina developed a simple method for checking the sensors with
humidity standards. The humidity standards are saturated aqueous salt
solutions consisting of pure chemical salts and distilled water. If the
humidity standard is in thermal and humidity equilibrium with the
sensor, it can be seen, if the displayed value is within the user’s
tolerance band or outside. If the deviation is greater than desired, a
recalibration is recommended.
The humidity standards should be saturated so that they form a slushy
slurry. Before use we recommend to shake the humidity
standard vigorously.
English
Note: Under normal storage and maintenance conditions the humidity
standards will last for several years.
7.3. Replacing Protective Filters
The use of special pre-filters (available as accessories) is recommended
as protection against faster sensor aging due to chemical aggression.
A destructive effect on a sensor may have e.g. alcohols, aromas,
amines, acids (lactic, formic, sulphuric), hydrocarbons, halogens etc.
Please consult the protection filter specifications.
General rule
Chemical pre-filters are to be used if the admissible workplace
concentrations (MAK-values) are exceeded.
Some examples :
sulphur dioxide
formaldehyde
hydrogen sulfide
ethanol
www.novasina.ch
->
2 ppm
->
2 ppm
->
3 ppm
-> 300 ppm
39
Novasina offers the following protecion filters for the LabMASTER/
PARTNER-aw.
•
Redox filter
Chemical filter:
protects against all kinds of alcohols, aromas, fragrances.
•
eVC-21 chemical filter
Chemical filter:
protects against hydrogen peroxide, acid gases, diluted
acetic and formic acid, sulfur dioxide, chlorine.
•
eVC-26 universal filter
Chemical filter:
protects against a multitude of aggressive substances, e.g.
nitrogen oxides, amines, aldehyde solvents, aromatic hydrocarbons, oil vapours, fine dust particles.
•
eVALC-1 alcohol filter
Mechanical filter:
protects against alcohols.
Note: Certain aggressive vapours may also influence the measured result.
Exactly for that reason, the use of an appropriate protection filter is highly
recommended. A combination of 2 filters may also be used for overall
protection (e.g. eVC-21 and eVALC-1).
Filter replacement
English
Chemical filters must be periodically replaced. Saturated filters falsify the
measuring results and the protective effect of chemical filters also
deteriorates.
No generally valid guidelines can be given concerning the filter service life
as this mainly depends on the concentration of harmful substances and
the operating temperature.
Attention! A damaged filter must be replaced immediately. Please replace
as well any chemical filter periodically and calibrate the system WITH the
filter on board. Do not handling at any time into the chamber without any
glove!
All filter are fixed into the head of the measurement chamber with a snap
ring. It will be possible to put maximum 2 filters in serial line direct behind
the sensor and in front of the measurement chamber. Every filter protection
helps to extend the lifetime of the sensor itself, but extends as well the
measurement time.
40
www.novasina.ch
7.4. Replacing a CM-2 Sensor Unit
Switch off the instrument and disconnect the mains from the system.
•
•
Remove the 3 screws (tool is inside the SAL-T set), carefully pull out the
measuring block (NEVER let drop this unit on the instrument table).
•
Remove the two sensor unit screws on the backside of the measuring
block.
•
Pull out the CM-2 unit.
•
Push the new CM-unit in its position and assemble in the opposite manner.
•
Set the measuring block back into the instrument cover in the right place
(there is only one position possible to click in).
•
Screw in the last 3 screws of the measuring block (don't fix the screws too
tight).
English
•
Warning! Never press with a finger on the top of measuring cells, this might
damage the cell protection filter!
www.novasina.ch
41
7.5. Replacing an Instrument Fuse
The LabMASTER-aw can be connected directly to your local power line
of 90...260V AC. A main fuse protects the power supply against overload.
The fuse is integrated directly inside the mains connector. Please follow the
instructions to replace it with a same type of fuse (1 spare fuse included in
drawer above mains connector).
•
Switch off the LabMASTER/PARTNER-aw.
•
Pull out the mains cable to have access to the fuse drawer.
•
Replace a defective fuse by one of the same type (1 spare fuse
included)!
fuse holder
20 x 5mm
230V / 6.3 A
incl. 1 pc spare fuse
English
main cable
115/ 230 V AC
42
www.novasina.ch
FUSE 20x5mm
1 x 6.3 AT
Technical specifications
General
Mains supply
LabMASTER-aw
LabPARTNER-aw
Power consumption
:
:
:
:
90…260V, 50/60Hz
Fuse: 6.3 A FST (slow blow), 1 spare fuse
Fuse: 6.3 A FST (slow blow), 1 spare fuse
max. 65 W per instrument
(after temperature equilibrium 15 W)
Permissible ambient
Temperature range
Humidity range
Surface area (W x D)
Weight
Protection class
Temperature controller
Temperature setting range
Accuracy of control
Max. cooling in respect of
ambient temperature
Max. deviation
:
:
:
:
:
5…45°C
5...95%rH not saturated !
26 x 44 cm (LabMASTER and PARTNER-aw)
10 kg
(depends on the additional accessories)
IP 21
:
:
0…50 °C
> +/- 0.1°C
:
:
25 °C down to the ambient temperature!
±0.2 °C
English
8.
Measuring system with measuring converter and sensor
Measuring range aw-value sensor :
0.03…1.00aw
Operating range aw-value sensor :
0°C...50°C
(at 25°C and 7 point calibration)
Accuracy when fully calibrated
:
±0.003 aw
( range 0.04...0.97aw) or +/- 0.010aw
Resolution
Repeatability
Temperature sensor accuracy
Temperature sensor resolution
:
:
:
:
0.001 aw
±0.002 aw
±0.3 °C
0.1 °C
Interface
USB / RS-232
:
USB 1.1
RS232, Baud rate 9600, 19’200 ASCII signs
115mm x 86mm, 320 x 240 dot matrix LCD
with LED backlight
60mm x 17mm, 2 x 30 character orientated LCD
with LED backlight
LCD illuminated display
LabMASTER-aw
LCD illuminated display
LabPARNER-aw
Level of sound
Noice level is lower then
:
:
:
< 68 dBA
More technical information and data see as well
operation manual of the LabPartner-aw
www.novasina.ch
43
8.1. Equilibrium humidity values
of the SAL-T humidity source
Type of
Hum.check
EU Toxic
classe
Color
of salt
Chem.
symbols
% relative humidity in relation
of temperature (x / 100 in aw)
Literature
Reference
15°C
20°C
25°C
30°C
3.8
3.4
3.0
SAL-T / 4
SC-4
T
white
CsF (>25%)
4.3
SAL-T / 6
SC-6
Xn
white
LiBr
6.9
6.6
6.4
6.2
A
SAL-T / 11
SC-11
Xn
white
LiCl
11.3
11.3
11.3
11.3
A
SAL-T / 33
SC-33
--
blue
MgCl2-6H2O
33.3
33.1
32.8
32.4
A
SAL-T / 53
SC-53
O
green
Mg(NO3)2-6H2O 55.9
54.4
52.9
51.4
A
SAL-T / 75
SC-75
--
purple
NaCl
75.6
75.5
75.3
75.1
A/B
SAL-T / 90
SC-90
T
white
Ba(Cl)2-2H2O
90.9
90.5
90.1
89.9
C
SAL-T / 97
SC-97
--
yellow
K2SO4 (>20%)
97.9
97.6
97.3
97.0
A
SAL-T / 98
SC-98
T+/N
orange
K2Cr2O7
98.5
98.2
98.0
98.0
A
Lit :
9.
Novasina
type
Troubleshooting
A
A : Greenspan, Humidity Fixed points of Binary Saturated Aequeous Solutions
Journal of Research of the National Bureau of Standards Vol. 81A, No1 01/02 1977
B : Robinson R.A. and Stokes R.H. Electrolyte Solutions, Butterworths London 1959
C : Wexler, Humidity and Moisture Vol.3, Fundamentals and Standards, Robert E.Krieger,
English
9.1. What is wrong, when....?
A connected LabPARTNER-aw is not
found by a LabMASTER ?
1. Your LabMaster has not the "ADVANCED" functions activated.
2. The bus cable or the mains power is not connected correctly.
3. Another LabPARTNER in the system has the same
chamber No.
No recalibration of the aw-value
is possible?
1. The user managment system does not allow the calibration
function.
2. The sensor is protected with an additional password.
3. Your sensor is damaged or badly contaminated. Change the
sensor immediately.
You have a drift of the aw-value after
completing the analising process?
1. The stability observation factor for aw or °C is to short in time.
2. The temperature of the probe is not in equilibrium (Chamber).
3. The probe has an second sorption step.( A fat barrieres
or something else)
Cooling power of the instrument
is at the limit and the temperature of
the chamber is not stable?
1. The abient environment temperature around the instrument is
too high.
2. The probe produces a chemical heating (Process)
3. The internal cooling control does not work properly.
Reading of the LCD screen
is very bad?
1. The contrast of the screen is very low (contrast = 0).
2. The backlight is turned off or the background light is low.
3. The ambient light is bad. Please change the place of the
instrument
You as a user, you have forgotten your
password?
1. Contact your system administrator, he can change your old
password to a new one.
2. If you are a system administrator, you have to reset the
system to the factory status or send the instrument to
the next Novasina service station.
3. Reload the software via RS-232 or USB on the LabMASTER
-> You loose all personal settings of the system!
44
www.novasina.ch
9.2. Error message screens
If any error message appears on the LabMaster-aw screen, please proceed as follows:
* Please write down
the error message carefully. Switch the instrument off
and restart. If the error message recur, please follow the instructions on the
table and/or contact your Novasina representative (www.novasina.com)
Hardware-Errors
error report
error description
"PELTIER Driver!"
cooling unit or electronics defective ! *, return the instrument for repair
"Fan!"
*, return the instrument for repair
ventilator, cabling or fan-electronics
defective !
"Temp control (temp
gauge)!"
*, return the instrument for repair
Table-temperature-sensor, cabling or control-electronics defective !
"Temp gauge head!
Table-temperature-sensor, cabling or con*, return the instrument for repair
trol-electronics defective !
"No humidity sensor!"
Humidity measurement system not recog*, replace humidity sensor, return
nized. Sensor, cabling or -electronics
the instrument for repair
defective !
"Humidity sensor
file system!"
Data system of humidity measurement
*, replace humidity sensor, send
the instrument for repair
system defective. Sensor, cabling or electronics defective !
"Humidity Sensor
capability!"
use a humidity measrement cell
capability of humidity measurement system is wrong. (Sensor is incompatiblewith
to the latest technology
the instrument) !
"Capability Firmware!"
"CRC F-Settings!"
English
needed action
capability of measuring chamber (electroUpdate the firmware
nics) wrong !
EEPROM - content factory settings *destroyed !
"CRC U-Settings!"
EEPROM destroyed !
content
user
"Humidity Gauge
(analog)!"
*, use a new humidity measrement
Humidity measurement system, cabling
cell
or electronics defective !
"Humidity system!"
humidity measurement faulty !
"BUS!"
BUS error ! Communication between *, Check the cabling of the
LabMASTER and PARTNER faulty ! LabPartner-aw
"File format not
supported!"
Sensor incompatible (data - format) !
"Sensor not supported
or defective!"
Sensor incompatible (test circuit) !
"The battery of the data
memory must be replaced!"
Battery empty, defective or no batteryPlease contact your Novasina representative
in the instrument !
www.novasina.ch
settings
*
*
*, Update the latest software, use
a suitable humidity sensor
*, use a suitable humditiy sensor
45
Several errors
error report
error description
needed action
"The SRAM was re-initialized! All data were reset to
default conditions, except
for the calibration values!"
The "battery" - packed RAM -content is destroyed and was new initialised. All settings have been
cancelled except the saved calibration values !
1) press "OK"
2) enter the licence-code under
"System settings" ...->"Set options code". The code is stated on
the licence-certificate or on the
sticker on the bottom of the instrument.
This point does not apply for the
LabMaster-aw "BASIC"-version.
3) set all settings new (date, timet, "user" account, ...)
error report
error description
needed action
"Fatal Error"
fatal hardware- or (mainly) software-error
Please note the error message
carefully, switch the instrument
off and restart. If the error message recur, please contact your
Novasina
representative
(www.novasina.com)
English
Fatal Error
46
www.novasina.ch
www.novasina.ch
0 Display calibration points
0 to 8 calibration points
1 Clear calibration points
2 Calibrate
3 Set sensor password
0 System info chamber
1 System info sensor
6 System info
5
4
3
(0 to 50°C) / (32 to 132°F)
Stability parameter aw
(1 to 30 min)
Stability parameter temp
(1 to 30 min)
Calibration
2 Temperature
0 to 9 data base
_ Don’t load from file (off)
1 Load from database
1 Sample database
English
0 Name
1 Time
2 Stab. Observation time aw
3 Stab. Observation time °C
0 ....(e.g. Bread white)
0 to 9 Sample Database
0 Volume (0 to 9)
1 Stable buzz duration (0 to 120 seconds)
0 Humidity (aw/%RH)
1 Temperature (°C/°F)
2 Data format (D/M/Y; Y/M/D; M/D/Y)
0 to 9 user accounts
0 Name
1 Password
2 Administrator
3 Permit Calibration
4 Permit edit sample database
5 Permit chamber settings
Printer
PC
1 Data format(PC) ... NLOG x
0 to 9 Novalog 32 (Chamber x)
1 Printer configuration ...
0 Laboratory (name)
1 Auto stable printout (on/off)
2 Line feed, form feed (0 to 99)
6 Reset to factory settings
7 Info
8_Set option code
0 Device
5 Communication
0 Contrast (0 to 9)
1 Backlight (0 to 9)
4 LCD settings
3 Buzzer
2 Units
1 Users
0 Date
1 Time
0 Set date, time
0 Power
0 off
1 on
2 System settings
0 Chamber settings
LabMaster-aw menu settings
10. Short Menu overview
47
The Novasina team would like to thank you for your confidence and hope you will enjoy and
obtain successful measurements with the world leader instrument LabMaster-aw for high
performance quality measurement of water activity and its manifold options. You have now the
powerfullest water activity meter with outstanding options, simple handling and best
reproducability for your special application in quality measurements.
In case of any further questions, Novasina and its agencies will be happy to advise you at any
time.
Your Novasina
Consulting, Sales and Service:
Novasina AG, Neuheimstrasse 12, 8853 Lachen, Switzerland
Telephone +41-55-642 67 67, Fax +41-55-642 67 70, e-mail: [email protected], www.novasina.com
48