1
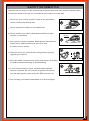
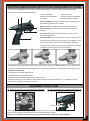
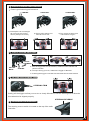
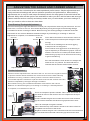
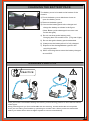
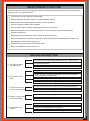
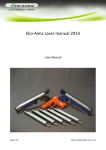
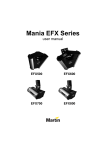
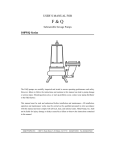
GENERAL INFORMATION
This user's manual is designed for use with your vehicle and contains the instructions you will
need to assemble, operate and maintain your vehicle.
We know you are excited to start driving, but it is very important that you take time to read
the manual even if you are an experienced R/C driver.
Carefully read and follow all instructions in the manual. Failure to not following the instructions
will be considered abuse and and may void the warranty.
Your vehicle is designed to run on uneven or rough terrain. However dust, sand, water and
carpet fibres can lodge in the working parts of your car and can damage your vehicle if not
removed promptly. We do not warranty your vehicle from damage due to outside elements
including sand, dirt or water. The user is responsible for the maintenance and safe operation
of this vehicle.
This product is not a toy. It is not suitable for users under 14 years old unless they are supervised
by an adult.
Never attempt to re-assemble any electronic components. These are carefully calibrated
at the factory.
Only use manufactured parts to upgrade your car. If you perform a drive train upgrade, replace
the entire system (Such as motor, ESC/receiver unit and the servo) so that all components are properly
matched. Any malfunction incurred by custom modification will void your warranty.
Before driving your vehicle, please read this manual completely and examine your vehicle and
radio control for any defects.
For better performance, some adjustments may be necessary.
This vehicle requires one battery pack (included in the car or in the packaging). Make sure the vehicle's
batteries are fully charged before driving.
The transmitter requires two fully charged AA size batteries (not include in the packaging).
A lways remove batteries from the vehicle and the transmitter when it is not in use.
Please operate your vehicle where you have enough space. Don’t run your vehicle in a crowded street.
This product is fully assembled at the factory. We do not take any responsibility for damage and/or
accidents that occur as the result of custom modifications and/or incorrect operation.
1
SAFETY INFORMATION
We want users to enjoy our RC vehicles and to operate them with care. Please read the safety
instructions below to ensure you run/maintain your vehicle in a safe way.
Do not run your vehicle on public roads or any area where
normal vehicles are driving also.
Do not operate the vehicle in a crowded area.
Do not operate your vehicle with obstructed line of sight,
at night, or near water.
Your vehicle is radio controlled. Radio waves are subject to
interference. Radio interference can cause loss
of control of your vehicle.
Take care not to cut yourself while using tools to adjust or
upgrade your vehicle.
Since the model contains many small parts, keep out of reach
of children while assembling or disassembling.
If your vehicle becomes stuck, release the throttle and
retrieve it by hand. Do not continue to apply the throttle or
you may damage the motor and/or the ESC/receiver unit.
Don’t charge your battery unattended or in direct sunlight.
2
GETTING FAMILIARIZED WITH YOUR 2.4GHz RADIO SYSTEM
Your car is equipped with the new 2.4GHz radio system .Please read and understand all
instructions below before operating.
5
1£Steering Wheel
2£Battery Compartment
3£Trigger
4
4£Steering Trim
5£Steering Reverse Switch
6£Power ON/OFF Switch
Steering Wheel: It proportionally operates the right and
left steering control of the model.
1
6
3
Battery Case: It requires 2pcs of AA size batteries.
Power Switch: It is used to turn the radio controller
ON/OFF.
Steering Trim: It is used to adjust the center trim of
the steering channel.
2
Steering Reverse: It allows you to electronically switch
the direction of steering servo travel. For example, if you
move the steering wheel to the right and the steering
servo moves to the left, flip the Steering Reverse Switch
to make the steering servo move to the left.
The battery cover is located on the bottom of the radio controller. Slide the battery cover as shown in
the pictures, Install two AA size batteries into the battery compartment and replace the battery cover.
Battery Precautions:
1)Do not mix new and old batteries.
2)Use batteries of the same brand.
3)Always remove batteries when the car isn’t used.
4) Before using your car, make sure the radio controller has a full battery in it. Low battery power
can lead to the loss of control of your car.
RUNNING YOUR CAR
1 TURN ON THE RECEIVER ON YOUR CAR
2
TURN ON THE RADIO CONTROLLER
Power Switch
Always turn on the radio controller within 5 seconds of turning on the receiver on your car.
The receiver and the radio controller will be automatically bound up.
(Note: If you wait to long with turning on the transmitter they can’t find eachother)
3
3
CHECK STEERING PERFORMANCE
Ensure good steering performance.
CENTRE
TURN LEFT
1) To keep the car run straight
do not move the control
wheel. (Keep it at centre)
4
2) Turn it left to allow your
vehicle turn to left.
TURN RIGHT
3) Turn it right to allow your
vehicle turn to right.
CHECK TRIGGER RESPONSE
PUSH IT
FORWARD
A
B
C
A. Pull the trigger back to accelerate, release it to decelerate and
PULL IT
BACK
CENTRE
push it to brake.
B. To stop running your car, release the trigger to Neutral.
C. Pushing the trigger a second time activates the reverse feature.
5
TO TUNE THE STEERING TRIM
STEERING TRIM
Gently pull the trigger to allow your car to run slowly. Meantime, tune the steering trim to allow the
front wheels to be aligned properly.
STEERING REVERSE
6
TO REVERSE THE STEERING
The steering reverse switch is located on the top of the radio
controller.
4
ADJUSTING TOE ANGLE AND CAMBER ANGLE
Your model can be customized to increase speed and performance. Simple adjustments and
easily maintained settings will assure optimum operation and performance. When making
adjustments, do so only in small steps and always check for other parts of the vehicle that are
affected. Many after market options are available to make your R/C vehicle faster and stronger.
Please read the section carefully and always make sure you write down your base settings in
case you need to refer to them at a later date.
Front Steering Toe Angle Adjustment
The front steering toe angle has influence on how your car performs and how your tires wear. You can
have toe-in, zero toe or toe-out. This can be adjusted by tuning the length of the steering linkage
screwbolts as shown in the figure below. Before tuning, the steering linkage screwbolts should be
removed from the vehicle. Measure the desired length by unscrewing or screwing in. After the
adjustment is complete, re-install them to the car.
Zero Toe
Toe Out
Toe In
Zero Toe
Toe Out
Toe In
Toe-in will be less reactive and cause the vehicle to
under steer(the front wheels push straight on while
turning).
This can be an advantage for drivers struggling
to keep the car in a straight line.
Toe-out will be more aggressive on the steering response especially on small steering inputs. This will
make the car want to over steer(rear wheels slide on
small steering inputs).This is useful as a race tuning
to gain extra steering.
Zero toe will make the front wheels run straight and
make the car very neutral. Tire wear will also be
reduced and the vehicle will feel easier to drive.
Adjust IN HERE
Adjust IN HERE
Adjust IN HERE
Camber Adjustment
Camber can be adjusted on all 4 wheels of the car. You can have negative camber
or positive camber which will affect the contact area of the tire both statically
and while cornering. Camber is mainly used to control the wear of the tire.
You should adjust the camber to equal the wear all across the surface of the tire.
Camber is adjusted by the upper linkage screwbolts.
Note: Before tuning, the screwbolts should be removed from the vehicle.
Measure the desired length by unscrewing or screwing in. After adjustment
is complete, re-install them to the car.
Positive
camber
Negative
camber
FRONT
Adjust IN HERE
REAR
This is an example of positive camber. This is when the bottom of
the wheel is closer to the centre of the car compared to the top of
the wheel.
Positive camber will give less contact area in the corner and less
grip. Excessive amounts will cause less grip and uneven wear.
This is an example of negative camber.
This is when the top of the wheel is closer to the centre of the car
compared to the bottom of the wheel.
Negative camber will give more contact area in the corner and more
grip. Excessive amounts will cause less grip and uneven wear.
5
CHARGING THE BATTERY PACK
The battery cover is located on the bottom of the
chassis.
1) Pinch the battery cover blocks as shown to
open the battery cover.
2) Remove the battery pack.
3) Connect the battery pack to the charger and
charge the battery as shown in the figure.
(Note: Battery with a damaged connector can
not be charged.)
4) Do not overcharge the battery pack.
Charging time is around 2 hours. (Till green Light)
5) Do not charge the battery pack unattended.
6) Always use the battery after it is fully charged.
7) Dispose of the damaged battery pack in the
recycling dustbin.
8) When not using the car store the battery charged
around 50%.
RUNNING PRACTICE
PRACTICE
Once you become confortable driving the vehicle, perform driving practice on the tracks as shown
in the figure.
Keep practising until you feel comfortable with the steering, throttle and brake at low speeds.
Once you are feeling comfortable try operating on another track. When you have mastered the
basics you will be able to drive at higher speeds in a more controlled way.
6
MAINTAINING YOUR CAR
After running your car, the following procedures should be performed regularly and will help to
maintain your car's performance.
Inspect your car for any obvious damage.
Check the gears for wear, debris or broken/slipping teeth.
Check the wheels and tighten the wheel screws properly.
Check for loose screws in the chassis.
Check the wiring for frayed or damaged wires or connectors.
Check the steering servo which will wear out over time and require replacement.
Check all batteries.
Keep the chassis clean and free of sand, dust and moisture.
Remove and clean the motor if necessary. (Never attempt to re-assemble the motor, you
will damage it and void the warranty).
Clean the car body with a soft lint-free cloth.
Remove all batteries when not in use.
TROUBLESHOOTING
1. Check to see if transmitter and car are on. ( See page 3 )
A. The vehicle does
not work at all.
2. Replace batteries.
3. Check if there are damaged parts.
1. Replace or charge the battery pack and/or the radio batteries.
B. The vehicle runs
slow.
2. Make sure the vehicle is geared properly and the pinion
and spur gear are tightened.
3. Clean all bushings or ball bearings.
4. Check for stripped or dirty gears.
C. The throttle works,
but not the steering.
1. Check if the servo feels jammed, try centering it by hand.
2. Check the whole steering system.
1. Check if there are damaged parts.
D. It steers, but throttle
is uncontrollable.
2. Replace or charge the battery pack and/or the radio batteries.
1. Check gear mesh between spur gear and pinion.
E. The vehicle runs
noisily.
2. Check for stripped and/or dirty gears.
3. Clean and oil bushings or ball bearings.
7