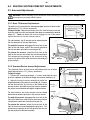
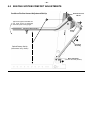
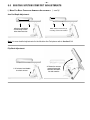
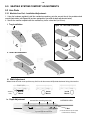
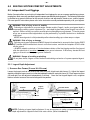
1
Motion Concepts
OWNERS MANUAL
DEALER: This manual contains important safety, maintenance and operating
information specific to the set-up and operation of our Motion Concepts Power
Positioning System. This Manual MUST be given to the user of the product.
BEFORE using this product, please read through the instructions carefully and
save for future reference.
-2-
I m p o r t a n t I n fo r m at i o n
(Please complete this information for your records
and for reference during any warranty claims.)
Motion Concepts
Serial Number:
(Serial Number is located on the
underside of the TRx seat frame)
S/N:
Dealer: _______________________________
Address: _____________________________
Phone #: _____________________________
Purchase Date: _______________________
Power Base (Model): ___________________
This manual may not be reproduced or reprinted either partly or completely without previous
written consent from Motion Concepts or its statutory representatives.
This owner’s manual is compiled from the latest specifications and product information available
at the time of publication. We reserve the right to make any necessary as they become necessary.
Any changes made to our products may cause slight variations between the illustrations and
explanations in this manual and the product you have purchased. If you have any questions or
concerns regarding the information provided in this manual, please contact our Customer Service
Department for assistance.
Motion Concepts LP Copyright
© 2014
-3-
TABLE OF CONTENTS:
1.0
INTRODUCTION
1.1
1.2
1.3
1.4
Important Symbols
Considerations For Use
Limited Warranty
System Identification
2.0
SAFETY INFORMATION
2.1
2.2
2.3
2.4
2.5
2.6
2.7
2.8
Stability
Incline Warnings
General Safety Warnings
Weight Capacity
Flammability
Hardware
OEM Wiring Harneses and Electronics
Motor Vehicle Transportation
3.0
POWER POSITIONING FUNCTIONS
3.1
3.2
3.2.1
3.3
3.4
3.5
3.5.1
3.5.2
3.6
3.7
Programming the Wheelchair/Power Positioning System
Operating the Power Positioning System via the Joystick
Programming the Joystick
Operating the Power Positioning System using a TRX Switch
Configuring the Seat Controls: Direct Mode vs. Toggle Mode
Power Positioning Functions
Standard Power Positioning Functions
Additional Power Positioning Functions
Wheelchair Drive Controls
Operating via Specialty Controls
4.0
ELECTRONICS
4.1
4.1.1
4.1.2
4.2
4.3
4.3.1
4.3.2
4.3.3
4.3.4
4.3.5
4.3.6
Seat/Motor Control, Boxes
Helix Series Control Boxes
M-Series Control Boxes
Wiring Harnesses
Safety Lockout and Limit Switches
Tilt/Recline Drive Lockout (DLO) Limit
Elevate Drive Lockout (DLO) or Elevate Reduced Drive Speed Limit
Max Tilt (Tilt/Recline) Limit
Elevating Seat Lockout Switch
Anti-Tip Latch Limit Switch
Tipsy Angle Sensor
5.0
SEATING SYSTEM COMFORT ADJUSTMENTS
5.1
5.2
5.2.1
5.2.2
5.2.3
Joystick Positioning and Adjustment
Armrest Adjustments
Basic Tilt Armrest Adjustment
Standard Recline Armrest Adjustments
Cantilever Armrest Adjustments
-4-
5.2.4
5.3
5.3.1
5.3.2
5.3.3
5.4
5.5
5.5.1
5.5.2
5.5.3
5.5.4
5.6
5.6.1
5.6.2
5.7
5.7.1
5.7.2
5.8
5.8.1
5.8.2
5.9
5.9.1
5.10
5.10.1
5.11
5.11.1
5.11.2
5.12
5.12.1
5.12.2
Maxx Cantilever (Flip Back) Armrests
Arm Pads
Modular Arm Pad Installation/Adjustment
Optional Arm Pad Installation
Armrest Extensions
Seat Pan Adjustment
Independent Front Riggings
Legrest Depth Adjustment
Swing Away Legrests
Removing Manual Legrests
Individual Footplates
Center Mount Front Riggings
Center Mount Depth Adjustment
Center Mount Footplate/ Foot Platform Adjustment
Calf Pad Adjustments
Independent Calf Pad Adjustment
Malleable Calf Pad Adjustment
Back Adjustments
Back Angle Adjustments for Tilt Only Systems
Height Adjustments for Tilt Only Systems
Lateral Trunk Support Adjustments
Maxx Lateral Trunk Support
Lateral Hip Support Adjustments
Maxx Lateral Hip Support
Headrests
Basic Headrest Set-Up and Installation
Adjustable Headrest Set-Up and Installation
Postural Belts
Types of Postural Bolts
Adjusting the Postural Belt Correctly
6.0
SYSTEM INSTALLATION/ SET-UP/ ADJUSTMENT REVIEW
6.1
Maintenance Schedule
7.0
GENERAL MAINTENANCE & SAFETY
7.1
7.2
7.3
7.4
7.5
7.5.1
7.5.2
Maintenance Schedule
Safety Inspection Checklist
Lubrication
Battery Charging
Battery Testing
Battery Case Draw Test
No Load Voltage Testing
8.0
TROUBLESHOOTING
8.1
Performance Troubleshooting
9.0
ELECTROMAGNETIC INTERFERENCE (EMI) INFORMATION
9.1
Electromagnetic Interference (EMI) From Radio Wave Sources
-5-
1.0
INTRODUCTION
Dear User,
Congratulations on your decision to purchase a Motion Concepts power positioning system. Our goal at
Motion Concepts is to provide you with the best possible seating system. Our close work with many health
care professionals has given us an understanding of the challenges that you may confront, and has enabled
us to design systems that will help to meet your individual positioning needs. We are confident that you
will be delighted with your new positioning system and as you grow or your needs change, your new seating
system will be able to grow and change with you.
Important!
This user manual applies specifically to our Motion Concepts Seating System. It is important that
you read and understand its contents. It is also equally important that you read and understand
the Operating Manual/Instructions provided for your wheelchair power base.
Motion Concepts or their statutory representatives can accept no liability in cases in which the wheelchair
has not been adapted to suit the users’ disabilities.
Some maintenance and adjustments can be performed by the user or his/her attendants, however, due to the
complexity of the Motion Concepts Seating Systems certain adjustments do require technical training and
may only be carried out by your authorized Motion Concepts specialist dealer. Damages and errors caused
by non-observance of the operating manual or as a result of incorrect maintenance are excluded from all
warranties/guarantees.
Contact Information:
If you have any questions or require support concerning your wheelchair seating system, please contact
your authorized Motion Concepts Dealer, who has the necessary training and equipment to meet your
needs, or you may contact Motion Concepts directly for assistance. The more we are able to understand
your needs, the better we will be able to meet them.
CANADA
Motion Concepts LP
84 Citation Drive, Unit 1
Concord, Ontario
L4K 3C1
Tel (local):
Tel (toll free):
Fax:
Tech Service:
@
www.
905-695-0134
866-748-7943
905 695 0138
800-680-4191
[email protected]
www.motionconcepts.com
Tel.:
Tel (toll free):
Fax:
Tech Service:
716-447-0050
866-433-6818
888-433-6834
888-433-6818
USA
Motion Concepts
700 Ensminger Rd, Suite 112
Tonawanda, New York
14150
-6-
1.1
Important Symbols in this Manual
Operating your Motion Concepts Seating System safely depends upon your diligence in following the
warnings, cautions and information provided in this User Manual. Setting up and operating the system safely
also depends on your own good judgement and common sense, as well as that of your provider, caregiver
and/or health professional.
The safety symbols below are used throughout this manual to identify warnings, cautions and important
notes. It is very important for you to read and understand them completely.
Safety Symbols:
WARNING!
This symbol warns you of danger!
• Always follow these instructions to avoid injury to the user or damage to the product!
EXPLOSION HAZARD!
This symbol warns you of an explosion hazard (e.g.; excessive tire pressure in a pneumatic
tire!)
• Always follow the instructions to avoid injury to the user or damage to the product!
BURN HAZARD!
This symbol warns you of potential burns (e.g.; leaking battery acid!)
• Always follow the instructions to avoid injury to the user or damage to the product!
IMPORTANT!
• Important information to remember when operating your Motion Concepts power positioning system
NOTE:
• This symbol identifies general information which is intended to simplify working with your product
and/or which refers to special functions or important instructions.
Requirements:
• This symbol identifies a list of various tools, components and items which you will need in order to
carry out certain work.
READ WELL BEFORE OPERATION!
• This symbol advises you to read information carefully.
PLEASE NOTE: This User Manual and other reference documents are available in PDFformat. The Adobe Reader program offers user-friendly tools (e.g. zoom in/ magnification
tool) to assist individuals with reading difficulties. If an image or drawing size cannot be
increased, please contact Motion Concepts and high-resolution documents will be provided.
-7-
1.2
Considerations For Use
The use of this mobility product is recommended for the following indications:
The inability or a greatly restricted ability to walk within the scope of the basic requirement to be able to move
within one’s own four walls. The need to leave the dwelling place in order to get some fresh air during a short
walk or to reach those places generally to be found at close distance to the dwelling and where everyday
business is carried out.
This powered wheelchair system was designed for persons whose ability to walk is impaired, but who are still
in terms of their eyesight and physically and mentally able to operate an electric vehicle.
Provision of power wheelchairs for interior and exterior areas is advisable if the use of hand-operated
wheelchairs is no longer possible on account of the disability, yet proper operation of an electromotive drive
unit is still practicle.
Please be certain to review all safety warnings provided in Section 2.0 - Safety Information. Please also read
all safety information and manuals provided (separately) with your wheelchair and wheelchair accessories,
including but not limited to the Base Manufacturer’s Owner/Operators Manual.
1.3
Limited Warranty
Disclaimer
Motion concepts makes no claims as to the therapeutic effectiveness of the products. Our only claims relate
to the ability of the products to provide safe and reliable powered repositioning on the equipment onto which
they are installed.
Limited Warranty
All structural components manufactured by Motion Concepts are warranted to be free from defects in materials
and workmanship for the lifetime of the original owner. Actuators and electronic components are warranted to
be free from defects in material and workmanship for a period of two years. If during the warranty period, any
component is determined, at the sole discretion of Motion Concepts, to be defective, such component will be
repaired or replaced at the option of Motion Concepts.
The sole obligation of Motion Concepts under this warranty shall be to repair or replace any component or
components which are found to be defective. For warranty service, contact the dealer from which the system
was purchased. The purchaser of the product is responsible for returning the product to the dealer. Any
defective component, once replaced under warranty, shall become the property of Motion Concepts. If
further service is required, please contact Motion Concepts: Canada 866-748-7943; USA 888-433-6818
Limitations and Exclusions
The foregoing warranty shall apply only to the original purchase and shall not apply to product subjected to
neglect, abuse, improper operation, accidental damage or improper storage. The warranty shall not apply
to products which have been modified or fitted with improper parts or components without the written consent
of Motion Concepts. The warranty shall also not apply to a product which has been damaged as a result of
unauthorized repairs and/or by circumstances not under the control of Motion Concepts.
The foregoing is exclusive and in lieu of all other warranties, expressed or implied, including, without limitation,
implied warranties of merchantability and fitness for a particular purpose. The warranty shall not be extended
beyond the duration of the expressed warranty provided herein. Motion Concepts shall not be liable for
any consequential or incidental damages whatsoever.
Some jurisdictions do not allow the exclusions or limitation of incidental or consequential damages, or limitation
on the length of an implied warranty. Local laws should be reviewed to determine if the above exclusions and
limitations apply.
-8-
1.4
System Identification
Each Motion Concepts seating system is identified by a unique serial number, which allows us to trace the
production history of the system and better equips us to address any service issues that may occur over the
lifetime of the product. The location of the serial number identification plate varies depending on the type
of positioning system installed. There are two possible mounting locations as indicated in the images below.
TRx SEATING SYSTEM
U000000
TRL0007, 00R
Mfg By: Motion Concepts
84 Citation Drive, Concord,
ON, CAN L4K 3C1
TRx SEATING SYSTEM
M
U000000
TRL0007, 00R
Mfg By: Motion Concepts
84 Citation Drive, Concord,
ON, CAN L4K 3C1
-9-
2.0
SAFETY INFORMATION
READ ALL SAFETY INFORMATION THOROUGHLY BEFORE OPERATION!
Your Motion Concepts power positioning system has been specially configured and assembled to the wheelchair
base prior to delivery. Please note that the final configuration and purchasing decision regarding the complete
wheelchair system is the responsibility of the powerchair user, who is capable of making such a decision,
and his/her healthcare professional.
The contents of this manual are based on the expectation that a mobility device expert has fitted the power chair
to the user and has assisted the prescribing healthcare professional in the instruction and use of this device
IMPORTANT! Do not ignore unanswered questions. You have the right to understand the product and
all aspects of its operation. If necessary, please contact your Motion Concepts representative for
information regarding any questions or concerns expressed.
NOTE: The most important link in the delivery chain is you, the end user. You must be satisfied with
the product in terms of function, safety and aesthetics. No sale is complete until you have received
thorough training in all aspects of the care and use of the system.
IMPORTANT! Please be certain to also read and follow the safety warnings provided by the wheelchair
base manufacturer (provided separately)
2.1 Stability
Motion Concepts Power Positioning Systems are designed to accommodate a wide range of user needs.
Only the dealer and the health care professional can ensure that the system meets your individual
requirements. It is your dealer or healthcare professional’s responsibility to ensure that the wheelchair and
the power positioning system are set up properly and safely for your specific needs.
STABILITY WARNINGS!
WARNING! By changing your seating position (tilting/ reclining/ elevating), you are changing the
stability characteristics of the wheelchair.
• It is very important that the system is set up so that it is stable in all seating positions.
WARNING! When evaluating stability, remember the following:
• Determine and establish your personal safety limits by practicing bending, reaching and transferrring
activities in the presence of a a qualified healthcare professional before attempting active use of the
wheelchair.
• Your Motion Concepts seating system can be mounted onto the powerbase in various forward and
aft positions. Make certain that the position selected provides you with maximum stability over the full
range of seating positions.
• Consider all personal gear and accessories (backpacks, vent systems, extra batteries, etc..) that will
be carried on the wheelchair. For example, a loaded backpack, attached to the back of the seating
system, can significantly reduce the rearward stability of your wheelchair.
• Consider the backrest being used. For example, a recessed back can shift your center of gravity
backward and significantly reduce the rearward stability of the wheelchair. Conversely, a thick back
cushion will shift you forward and reduce the wheelchairs forward stability.
• Always shift your weight in the direction you are turning. Shifting weight in the opposite direction of
the turn may compromise stability of the wheelchair base, causing it to tip over.
- 10 -
2.0
SAFETY INFORMATION
STABILITY WARNINGS!
(...cont’d)
• Consider the seat cushion being used. A thick seat cushion will raise your center of gravity and reduce
the wheelchairs stability in all directions.
• All Motion Concepts systems are equipped with drive lockouts. Make certain this is set so as not
to compromise your stability while driving (refer to Section 4.3: Safety Lockouts and Limits)
• All power-bases have programmable controllers which allow adjustment of the maximum acceleration
and deceleration of the wheelchair. Make sure that these are set to an appropriate level for the system
and for you, the user.
• Always take extra precautions when travelling up or down an incline. We recommend a maximum
safe incline/slope angle of 6 degrees for wheelchair travel (with the wheelchair in the fully upright
position). Please refer to your powerbase Owner’s Manual for the maximum recommended safe slope
angle for you specific wheelchair. See also Incline Warnings! (section 2.2 below)
• When operating in reduced speed drive or anti-tipper lockout,always travel on a smooth level surface
to ensure the wheelchair’s stability is not compromised.
• Ensure all medical conditions are considered when setting up your wheelchair. Involuntary muscle
movement such as spasms may affect the stability of the wheelchair, especially when the seating system
is in a tilted or reclined position.
• When a system is fully tilted or reclined, the front wheels of the powerbase should never come
off the ground. If this occurs, please contact your authorised Motion Concepts Dealer/ Representative
immediately to resolve the issue.
2.2 Incline Warnings
Your wheelchairs ability to travel up or down inclines is affected by your weight, travel speed, angle of
approach to the incline and the set-up/configuration of your power positioning system. Therefore, we recommend
that the maximum slope of an incline you attempt to safely ascend or descend on your power chair does not
exceed 6° or the maximum allowable incline listed in the product specifications provided by the wheelchair
base manufacturer.
Recommended Maximum Incline Angle (Ascending and Descending)
6°
WARNING WHEN TRAVELLING ON INCLINES!
WARNING! Danger of damage or personal injury.
• Your power chair has been tested in accordance with certain ANSI-RESNA, and ISO standards,
and you may have the ability to climb slopes steeper than those illustrated above. However, you
should not exceed the performance specifications as provided by your power wheelchair manufacturer.
• Any attempt to climb or descend a slope steeper than that specifically listed in your power wheelchair
product specifications may put your wheelchair in an unstable position and cause it to tip.
• If you must climb or descend a slope greater than the maximum safe recomnmended slope, have an
attendant monitor and assist you for safety.
- 11 -
2.0
SAFETY INFORMATION
WARNINGS WHEN TRAVELLING ON INCLINES (...cont’d)
WARNING! Risk of injury, tipping or damage
• When on any sort of incline, never place the power wheelchair in freewheel mode, especially while
seated on it, or standing next to it.
• When climbing an incline, do not zigzag or drive at an angle up the face of the incline. Always drive
your power wheelchair straight up the incline. This greatly reduces the possibility of tipping. Always
exercise extreme caution when negotiating an incline.
• Never travel up or down potentially hazardous inclines, including but not limited to areas covered
in snow, ice, water, oil film, cut grass, or wet leaves.
• Never travel down an incline or ramp backward. Doing so may cause the power wheelchair to tip.
• Never operate your power positioning system while on an incline.
• Never travel on an incline with your seating system in a standing, elevated, tilted and/or reclined
position.
• When travelling down a ramp or incline, never attempt to drive with power elevating leg rests in
the fully extended position.
2.3 General Safety Warnings
IMPORTANT! Motion Concepts disclaims all responsibility and liability for any personal
injury or damage to property that occurs as a result of improper or unsafe use of the power
positioning system, and/or any unauthorized dealer or third party repairs or modifications
made to the power positioning system or to the wheelchair on which the system is installed.
GENERAL SAFETY & HANDLING WARNINGS!
WARNING! Danger of injury if wheelchair and/or power positioning system is used in any
other way than the purpose described in this manual!
• Only ever use the wheelchair/seating system in accordance with the instructions provided in this
Owners Manual and your powerbase Owners/Operators Manual
• Pay strict attention to all safety information provided.
WARNING! Danger of injury if the wheelchair is driven when ability to operate a vehicle is
impaired by medication or alcohol!
• Never drive the mobility device under the influence of medication or alcohol. If necessary, the mobility
device must be operated by an attendant who is physically and mentally able.
WARNING! Danger of damage or injury if wheelchair is accidentally set into motion!
• Switch the wheelchair power off before you get in, get out or handle unwieldy objects.
• When the drive is disengaged, the brake inside the drive is deactivated. For this reason, pushing the
mobility device by an attendant is only recommended on flat surfaces, never on gradients. Never leave
your mobility device on a gradient with its motors disengaged. Always re-engage the motors immediately
after pushing the mobility device.
WARNING! Risk of Injury or damage if correct or improper replacement (service) parts are used
• Replacement parts for your power positioning system MUST match original Motion Concepts parts
• ALWAYS provide the wheelchair serial number to assist in ordering the correct replacement parts (see
section 1.4).
- 12 -
2.0
SAFETY INFORMATION
GENERAL SAFETY & HANDLING WARNINGS! (...cont’d)
WARNING! Danger of injury if the wheelchair is switched off while driving, for example by pressing the On/Off Button or disconnecting a cable in order to stop abruptly!
• If you have to brake in an emergency, simply release the joystick which will bring you to a halt. (refer
to the joystick operating manual for more information).
WARNING! Danger of injury when transferring a power wheelchair to a vehicle for transport
with the occupant seated in it!
• It is always better to transfer the power wheelchair to a vehicle without the occupant seated in it.
• If the power wheelchair needs to be loaded up a ramp together with its driver, ensure that the ramp
does not exceed the maximum safe slope (Refer to your powerbase Owner’s Manual for the maximum
recommended safe slope angle)
• If the power wheelchair does need to be loaded using a ramp which exceeds the maximum safe slope,
an attendant must safely monitor and assist the loading process.
• As an alternative, a platform lift may be used. Ensure that the total weight of the power wheelchair
does not exceed the maximum permissible weight for the platform lift or winch if you are using.
WARNING! The following guidelines should be adhered to while operating your Motion
Concepts power positioning system to avoid injury and ensure safe operation:
• Never transfer in or out of your wheelchair with the power turned on. Ensure power is off and
wheelchair motor locks are engaged before attempting to transfer in or out of the wheelchair
• Always check your surroundings before operating your Motion Concepts seating system. Make sure
that the way is clear of obstructions throughout the full range of travel before operating any seat positioning
function.
• Never operate the tilt or elevate seat function while underneath a fixed object such as a table or desk.
• Never operate your power positioning system while driving your wheelchair.
• Pinch points may occur during the operation of your power positioning system. Always keep hands
and fingers clear of moving parts to avoid injury.
• Never use the footplates as support during transfers. When transferring in or out of the seating system,
ensure that footplates/foot platforms are in the ‘flipped-up’ or ‘swing-away’ position (where applicable)
• Never drive your wheelchair with the drive lockout system disabled or set beyond the maximum
recommended drive lockout (DLO) limit (refer to Section 4.3: Safety Lockouts & Limit Switches).
• Never allow your Motion Concepts power positioning system to be used as a tie-down point in a
vehicle. Use only the designated anchoring points on the power wheelchair (see Section 2.8.1)
• Never allow your wheelchair to be lifted by any part of the Motion Concepts power positioning system.
• Never extend your arms backward beyond the back when the seating system is in a tilted or reclined
position. This could shift your center of gravity enough to cause the wheelchair to become unstable.
• If you have a wheelchair with anti-tipper lockouts, be aware when these lockouts engage. Always
proceed with caution when driving your wheelchair with the anti-tipper lockouts engaged.
• Never allow items (i.e.; posture belts, backpacks, coats, etc...) to be trapped under your seat when
tilted, or beneath your power legrests when extended, otherwise damage to the system may occur.
- 13 -
2.0
SAFETY INFORMATION
GENERAL SAFETY WARNINGS! (...cont’d)
WARNING! Danger of injury due to improper lifting or dropping of heavy components!
• When maintaining, servicing or lifting any part of your power wheelchair, take into account the weight
of the individual components, especially the batteries. Be sure at all times to adopt the correct lifting
posture and ask for assistance if necessary.
WARNING! Danger of injury by moving parts!
• To avoid personal injury and injury to other individuals from moving wheelchair parts such as wheels,
power legrests, and/or tilt or elevate modules, always be aware of your surroundings, especially
when children are present.
WARNING! Any sudden or gradual deterioration in the function/performance of your power
positioning system (i.e. increased actuator motor/gearbox noise, rattling, sloppiness, etc...)
must be reported to your Dealer immediately.
• A complete wheelchair inspection by a qualified technician is recommended to ensure there is no
unusual wear and tear, or physical damage that requires servicing and/or repair.
WARNING! Danger of accident and loss of guarantee if maintenance is insufficient!
• For reasons of safety and in order to avoid accidents which result from unnoticed wear, it is
recommended that under normal operating conditions your power positioning system undergoes a
complete bi-annual inspection (refer to Section 6.0- General Maintenance and Safety).
- 14 -
2.0
SAFETY INFORMATION
2.4 Weight Capacity
Several factors must be considered when determining the total user weight and the wheelchair weight
capacity. To obtain the weight limitation data for the wheelchair base, refer to your Power Base Owners
Manual (provided separately).
WARNING! Danger of injury if maximum permissible load is exceeded!
• Do not exceed the maximum permissible load/weight capacity of the power positioning system or
the wheelchair base.
• The wheelchair is only designed for use by a single occupant whose maximum weight does not
exceed the maximum permissible load of the device. Never use the wheelchair to transport more than
one person.
IMPORTANT! If you have any concerns or questions regarding weight capacities, or if the total occupant
weight is determined to be greater than the maximum permissable load, please contact our Technical
Service Department immediately.
i) Weight Limitations:
Weight limitation is the total weight (User weight plus any additional items that the user may require [LTV
ventilator, back pack, etc.]). Example: If the weight limitation of the wheelchair is 300 lbs and additional items
equal 25 lbs, subtract 25 lbs from 300 lbs; This means the maximum weight limitation of the user is 275 lbs.
WARNING! The total user weight capacity (including weight limitations) should never exceed the
wheelchair weight capacity or the power positioning system (PPS) weight capacity.
ii) Power Positioning System (PPS) Weight Capacity
The weight capacities for our Motion Concepts power positioning systems vary depending on the type of
seating system module (i.e.; tilt/recline, elevate, scissor lift, etc..) and the type of wheelchair base onto which
the module is being interfaced
WARNING! The weight capacities for the power positioning modules identified in the table
below are provided as a guideline only.
Further limitations may be required depending on the
specific positioning requirements of the end user (including any aformentioned Weight Limitations), as
well as the type of wheelchair base onto which the system is being installed. The maximum allowable
system (PPS) weight capacities will be further assessed at the time of order.
TRx Power Positioning System/Module
UL CG Tilt (Recline)
UL Bariatric CG Tilt (Recline)
UL CG Tilt (Recline) with Full Vent
Scissor Lift Only Module (12" Lift)
Scissor Lift/Tilt Module (12" Lift)
Tilt/Elevating Seat Module (5", 6", 7" Lift)
Tilt/Elevating Seat Module, Heavy Duty (6" Lift)
Elevate Only Module (8" Lift)
Elevating Only Module (7" Lift)
PPS Weight Capacity (see Warning! above)
max 300 lbs (136 kgs)
*300 lbs (136 kgs) - 500 lbs (227 kg)
**225 lbs (102 kgs) / 250 lbs (113 kgs)
max 250 lbs (113 kgs)
max 250 lbs (113 kgs)
max 225 lbs (102 kgs)
max 280 lbs (127 kgs)
max 225 lbs (102 kgs)
max 280 lbs (127 kgs)
*note: max. weight capacity for a Bariatric Seating System will vary depending on the model of wheelchair base
**note: for systems equipped with a full size vent, the max. PPS weight capacity is reduced by 50lbs for UL CGT
systems and 75lbs for the CG Tilt module
- 15 -
2.0
SAFETY INFORMATION
2.5 Flammability
The materials (foam and fabrics) utilized in our Motion Concepts power positioning systems are tested to ensure
compliance with North American Flammability Standards (California Technical Bulletin CA TB 117)
WARNING! Always exercise caution near open flames and cigarettes.
2.6 Hardware
WARNING! Do not substitute hardware
• All hardware used by Motion Concepts in the assembly and installation of our Power Positioning
Systems is high strength. Use only the hardware supplied with the seating system.
Should you require any replacement hardware for your seating system, please contact our Customer Service
Department, or your local authorized Motion Concepts Dealer for assistance.
2.7 OEM Wiring Harnesses and Electronics
The cables and harnesses on your Motion Concepts power positioning system are designed and tested to
meet all necessary safety standards.
WARNING! The wiring harnesses/cables are not to be modified in any way following the
installation of our Motion Concepts power positioning system.
• If installed on previously used product, the existing OEM harnesses on the wheelchair should be
examined for damage/ wear and replaced if necessary. Please consult the wheelchair base manufacturer
if you are unsure as to the status or condition of the existing wiring harness before interfacing with
our Motion Concepts seating system.
WARNING! Danger of fire or breaking down due to electric devices being connected!
• Do not connect any electric devices to your mobility device that are not expressly certified Motion
Concepts for this purpose. Have all electrical installations performed by an authorised Motion Concepts
Dealer.
2.8 Motor Vehicle Transportation
WHEELCHAIR TRANSPORTATION WARNINGS!
WARNING! This wheelchair seating system in combination with the wheelchair base has
NOT been crash tested and may NOT be used as a vehicle seat!
• Your Motion Concepts Power Positioning System (in combination with the OEM wheelchair
power base) has not been tested to the requirements of ISO 7176-19:2001 or ANSI/RESNA WC-19
and may not under any circumstances be used as a vehicle seat or to transport the user in a vehicle.
• Using a wheelchair that does not fulfill these criteria as a vehicle seat can lead to the most
severe injuries and even death in the event of a traffic accident.
- 16 -
2.0
SAFETY INFORMATION
WHEELCHAIR TRANSPORTATION WARNINGS! (...cont’d)
WARNING! When travelling in a motor vehicle you must be properly secured in a motor
vehicle seat with safety belts securely fastened.
• Although your chair may be equipped with a positioning belt, this belt is not designed to provide
proper restraint during motor vehicle transport. DO NOT sit in your wheelchair while it is in a moving
vehicle.
WARNING! Danger of injury if the wheelchair is not properly secured.
• If you are unable to fasten your electric wheelchair securely in a transport vehicle, we recommend
that you do not transport it!
• Before transporting your wheelchair, make sure the motors are engaged and that the wheelchair
power is switched off.
• We strongly recommend securing the wheelchair to the floor of the transporting vehicle.
• The wheelchair should always be anchored facing in the transport vehicle's intended direction of
travel.
• The wheelchair must always be secured in accordance with the wheelchair and anchoring system
manufacturers’ operating manual.
• Always remove and secure any accessory parts fixed to the wheelchair such as chin controls or tables.
• If your wheelchair is equipped with an angle adjustable backrest, then it must be placed in the
upright position.
• Power elevated legrests (if fitted) must be fully lowered prior to transport.
• The elevating actuator or lift module (if fitted) must be fully lowered prior to transport.
WARNING! Danger of injury and wheelchair damage if the seating system is used as a tiedown point during transport.
• Never use any component of the Motion Concepts seating system as a tie-down point to anchor
the wheelchair to the transporting vehicle; Use only the designated/labelled anchoring points on the
wheelchair base.
2.8.1 Anchoring the Wheelchair in a Vehicle (unoccupied):
The following symbol indicates the position of an anchoring point for use with a tie-down
system.
Tie Down
Point
This symbol (bright yellow sticker) on the wheelchair base indicates the anchoring point for
fixation of the wheelchair in a vehicle.
IMPORTANT! Please refer to your Power Base Owners/Operators Manual (provided separately) for
detailed information on anchoring your wheelchair base in a vehicle.
- 17 -
3.0 POWER POSITIONING FUNCTIONS
READ ALL INSRUCTIONS THOROUGHLY BEFORE OPERATING YOUR POWER
POSITIONING SYSTEM
3.1 Programming the Wheelchair/ Power Positioning System
IMPORTANT! For more detailed information on the operation of your specific wheelchair power base
and/or joystick, please consult the Joystick/Remote Owners Manual and/or the Wheelchair Power
Base Owners/Operators Manual - provided separately by the power base manufacturer.
Can programming of the power positioning system be modified?
• Each power positioning system is factory programmed prior to delivery based on the system
requirements and based on safe operating limits.
• Program modifications may be carried out to fit your individual requirements if required. For safety
purposes, Motion Concepts strongly recommends that all program modifications be performed by a
trained/qualified service technician. Note: Certain program/controller modifications require the use of a
specialized hand-held ‘programmer’ that is only available from your service provider
WARNING! Changes to the drive programme can affect the driving characteristics and tipping
stability of the vehicle.
• Motion Concepts factory sets all wheelchair systems with a standard drive programme to ensure
safe operating limits for the finished system.
• Changes to the drive programme (maximum acceleration and deceleration of the wheelchair) must
only be carried out by trained Motion Concepts Dealers! Unauthorized adjustments beyond safe
operating limits will compromise the limited warranty.
3.2 Operating the Power Positioning System via the Joystick
For complete instructions on the safe set-up and operation of the power positioning system through the
joystick, please refer to the Joystick/Remote Owners Manual and/or the Power Base Owners/Operators
Manual provided separately by the power base manufacturer.
In most instances, the power positioning functions available on your Motion Concepts seating system
may be programmed to be operated by means of the joystick control. In order to access/operate the
motor functions via the joystick, the joystick must be switched from ‘Drive Mode’ to the ‘Power Positioning
Mode’. (This is typically accomplished via a Mode Switch on the joystick). The joystick display/features
will vary from one manufacturer to the next; please refer to the Joystick Owners Manual for more
detailed operating instructions. Once properly programmed, the joystick may be used to scroll
through and operate the available power positioning functions. The positioning functions may also
be configured to operate in Toggle mode or Direct mode (refer to Section 3.4).
3.2.1 Programming the Joystick:
WARNING! To ensure your seating system is programmed correctly and safely, Motion Concepts
recommends that all programming, including joysticks, be performed by a Qualified Technician.
Depending on the type of system electronics installed, a specialized hand-held programmer may be
required to program the seat functions into the joystick. For systems equipped with our M-Series electronics,
the remote attendant control (see 4.1.2) is used to program/assign specific motor functions to the joystick.
Please refer Section 4.0 for more detailed information on our system electronics.
- 18 -
3.0 POWER POSITIONING FUNCTIONS
3.3 Operating the Power Positioning System using a TRx Switch
Motion Concepts offers a wide range of manually operated push button switches and toggle switches
that may be utilized to operate specific motor functions on the power positioning system. To activate a
motor/seat function using a TRx switch, simply press and hold the designated push button or toggle switch.
The function will stop when the button is released.
TRx switches can typically be programmed via the seating system electronics to operate in Toggle
mode or Direct mode (refer to Section 3.4). A description of the various Push Button and Toggle
Switches available from Motion Concepts is provided below.
Dual
Push Button Switches (w/ slotted mounts)
Standard dime sized push button switches are available in single,
dual (2) and quad (4) button configurations. Optional feather
touch push buttons are also available in the same configurations,
along with an additional quarter sized single switch option (as
shown). Two buttons are required to operate a seat function in
“Direct” mode, and one button is required to operate a function
in “Toggle” mode.
Single
Feather Touch
(quarter size)
Single
Quad
Single Toggle (w/ LED indicator)
LED
The single toggle switch is capable of operating one function in
“Direct” mode and two functions in “Toggle” mode.
Heavy Duty Toggle
The heavy duty toggle switch utilizes a large top mounted toggle
that is capable of operating one function in “Direct” mode and two
functions in “Toggle” mode. The heavy duty toggle is not equipped
with an LED indicator.
Dual Toggle (w/ LED indicator)
The dual toggle switch is capable of operating two functions in
“Direct” mode and four functions in “Toggle” mode.
LED
LED
4-Way Toggle (w/ LED indicator)
The 4-way toggle switch is capable of operating two functions in
“Direct” mode and four functions in “Toggle” mode.
8-Way Switch (w/ LED indicators)
The 8-way switch ciontrol is capable of operating four functions in
“Direct” mode and up to eight functions in “Toggle” mode. The 8way switch is available with flat style rocker switches (as shown)
or also with raised toggle style switches
LED
LED
- 19 -
3.0 POWER POSITIONING FUNCTIONS
3.4 Configuring the Seat Controls: Direct Mode vs Toggle Mode
TRx Push Buttons, Toggle Switches and Joysticks can be configured to operate in “Direct” mode or “Toggle”
mode. Motion Concepts power positioning systems are typically programmed at the factory to meet customer
specifications.
NOTE: Changes to the original switch configurations should only be performed by a Qualiifed Technician,
and may require the addition of a MACH-C (Multi-Action Custom Hardware Controller) device depending
on the type of electronics installed on the system.
i) Direct Mode: two switches or opposite joystick directions are required for each function, one for
each motor direction.
ii) Toggle Mode: only one switch or one joystick direction is required for each motor function. In this
mode, pressing the switch/joystick once will activate the function; releasing the switch/joystick,
waiting for 2 seconds, then pressing it again will cause the reverse direction of the function to occur.
Tables A. and B. below show a comparison of Direct Mode vs. Toggle Mode when using a dual push button
switch and/or a joystick to control the tilt function on a power positioning system.
Table A: Using a DUAL PUSH BUTTON to control the tilt function:
Direct Mode
Toggle Mode
Push the first button to tilt the seat back. Push the second button to tilt
the seat forward.
Push the first button to tilt the seat back. Release the button, pause for 12 seconds, and push the same button again to tilt the seat forward.
(This configuration allows the second push button to be used for a different
power positioning function (e.g. Recline)).
Table B: Using the JOYSTICK to control the tilt function:
Direct Mode
Toggle Mode
Pull the joystick control backward to tilt the seat back. Push the joystick
forward to tilt the seat forward.
Push the joystick control forward to tilt the seat back. Release the joystick,
pause for 1-2 seconds, and push forward again on the joystick to tilt the
seat forward. (This configuration allows the opposite (rearward) joystick direction
to be used for a different power positioning function (e.g. Recline)).
- 20 -
3.0 POWER POSITIONING FUNCTIONS
3.5 Power Positioning Functions
Our modular seating systems are designed to provide dealers and therapists with the ultimate in
versatility, flexibility and adjustability. Our modular systems can be readily adapted from base to
base. Most modules can be added and subtracted with minimal time and effort.
Note: The available modules and modular combinations are based on many factors including power base type, client
weight and client dimensions. Please call our Customer Service department with specific questions and applications.
3.5.1 Standard Power Positioning Functions
TILT
The tilt function allows for the tilting of a fixed seat frame around an axis of rotation. (Up to 55° of tilt available
CG-TILT
The CG (center of gravity) tilt function compensates for weight shift by sliding the pivot axis and entire seat
assembly forward as the seat tilts back.
RECLINE
The recline function enables users to infinitely change the seat to back angle of their system within a set
range. Typical recline angle range is 93°-168°.
ESR
ESR (extended shear reduction) is synchronized with recline to reduce the amount of shear between the
client and the backrest. This is accomplished using a linkage that slides the backrest on the backposts as
the back reclines.
ELEVATE
An elevating actuator tower allows users to raise their power positioning system 6", 7" or 8” above the
lowest seat-to-floor height of their system (dependent on end user weight) .
SCISSOR LIFT/ LIFT MODULE
The scissor lift module allows users to raise their power positioning system up to 12" above the lowest
seat-to-floor height of their system. The scissor lift may also be combined with a tilt/recline function.
FRONT RIGGINGS
Our wide range of power and manual front riggings are available in an array of sizes and styles including
individual legrests and center-mounted foot platforms to help secure and position clients’ legs. In addition,
we offer a multitude of legrest hangers to accommodate your front rigging choice.
Power legrests may be programmed to operate in one of the 3 following configurations:
Individual (legrests operate independently),
Combined (legrests operate in unison) or
Synchronized (the legrest is sychronized to function together with recline)
3.5.2 Additional Power Positioning Functions
PRECLINE
Available as an option with recline systems, precline adjusts the back angle of the seating system into a
forward position, closing the seat to back angle to less than 90°. (note: the range of recline is decreased
approximately by the number of degrees of precline).
PSB
PSB (power sliding back) allows the back pan to be adjusted vertically (up and down) as a separate seating
function, independent of recline and/or in synchronization with recline.
ANTERIOR ASSIST
Anterior assist is available with the classic UL-II system and offers limited anterior (forward) tilt about a fixed
axis. The rear position of the seat remains constant while the front lowers 5° - 10°.
- 21 -
3.0 POWER POSITIONING FUNCTIONS
3.5.2 Additional Power Positioning Functions (...cont’d)
ANTERIOR TILT
A separate power module designed to allow up to 30° of anterior tilt, while maintaining full posterior tilt
capabilities. The rear of the entire system (ie: tilt or tilt/recline) is raised. This module is intended for use with
our classic UL-II system.
HORIZONTAL TILT
Horizontal tilt systems can be configured for a client to operate in a prone, supine or side lying position. It
offers an adjustable center section with telescoping, angle-adjustable supports on both ends to assist with
visibility, repositioning and transfers.
LATERAL TILT
Lateral tilt modules enable a tilt or tilt/recline system to tilt laterally (side to side) in either direction for pressure
relief.
3.6 Wheelchair Drive Controls
Standard wheelchair drive controls function via the powerbase joystick. Joysticks can vary greatly in their
features and functional capabilities. For detailed instructions on how to operate your specific joystick, please
be certain to read the Power Base/ Joystick Owners Manual provided separately by the base manufacturer.
The following is intended only as a basic overview of a typical wheelchair drive control system:
In order to drive your wheelchair, the joystick module must first be switched into Drive Mode. This is most
commonly accomplished via a mode button or switch on the joystick module. A typical joystick will have
4-5 preset Drive Speeds to choose from, and may also include a separate speed dial (throttle switch) on
the joystick module to vary the speeds within each preset. These drive speeds are often programmed at
the factory for specific driving conditions (e.g.; ramp/curb speed, indoor speed, outdoor speed etc..), but can
be reprogrammed if necessary by a qualified dealer/techinican.
In Drive Mode, the joystick control is used to drive and stop the wheelchair. To drive/steer
the wheelchair, press the joystick control in the direction that you wish to travel. To
stop, release the joystick control so that it returns its home or neutral position.
Joystick Control
NOTE: Your Motion Concepts power positioning system may be configured with a
Reduced Speed Drive limit switch. The system electronics may be programmed
to force the wheelchair to drive at a reduced speed when the seating system
is tilted, reclined and/or elevated beyond a pre-established limit.
3.7 Operating Via Specialty Controls
Your wheelchair base and your Motion Concepts power positioning systems may be configured to operate
via specialty controls such as a Head Array or Sip ‘n Puff control. If your seating system is configured
with a specialty control device, please refer to the Owners/Operators Manual (provided by the device
manufacturer) for detailed operating instructions.
NOTE: Most Motion Concepts power positioning systems can be converted to operate with specialty
controls if required. Please contact our Customer Service Department for additional information and/or
to receive a quote.
- 22 -
4.0 ELECTRONICS
WARNING! Your Motion Concepts power positioning system has been specifically programmed
and configured for use prior to delivery. While certain seating system features and functions
may be adjusted by the user and/or attendant following delivery, to ensure your seating system
is programmed correctly and safely, we strongly recommend that any programming changes to
the electronics only be peformed by a qualified techincian.
Motion Concepts utilizes state of the art electronics to operate our power positioning systems and ensure
the safe operation of the powered wheelchair system. The system electronics will vary depending on the
complexity of the seating system, the type of powerbase onto which the system is installed, and the specific
needs of the end user. There are three key components common to all our electronics: Seat Control Boxes,
Wiring Harnesses and Limit Switches/Sensors. Our Motion Concepts electronics are designed to interface
with all power base electronics platforms and specialty drive controls – including PG, Q-Logic, MK6, RNet,
Curtis and DX2.
Your power positioning system has been configured with one of two unique electronics’ series available
from Motion Concepts: our Helix Series Electronics or our M-Series Electronics. This chapter provides
information and instructions related to both electronic series; Please refer to the section that is applicable to
the type of electronics installed on your power positioning system:
4.1 Seat/Motor Control Boxes
The seat control box is the brain behind our TRx Power Positioning Systems. It is responsible for controlling
the available motor functions (i.e.; tilt, recline, elevate, etc..), as well as signaling the safety limits and lockouts
(i.e.; DLO Limit, Reduced Speed Drive, etc..).
4.1.1 Helix Series Control Boxes
The Helix Series electronic boxes can vary considerably in complexity and programmability, and are categorized
based on the number of motor functions: Single Function, Dual Function and Multi-Function (3 or more).
Our single function control boxes may be further classified as either “Standard” or “Enhanced” electronics.
i) Standard Electronics - simple but effective hard-wired control boxes with limited features and limited
programming/adjustment capabilities.
ii) Enhanced Electronics - These control boxes incorporate ‘plug-in’ ports, along with attendant controls,
motor speed controls, and LED indicators to provide the end user with greater flexibility in terms of programming
and adjustment (refer to the Feature Overview).
M27H
H1.0
M33H
Front
Rear
HSI
HSE
HSQ
M130
Single Function Box
Single Function Box
Dual Function Box
Multi-Function Box
(standard electronics)
(enhanced electronics)
(enhanced electronics)
(Helix Sigma Series)
(enhanced electronics)
- 23 -
4.0 ELECTRONICS
Feature Overview for ‘Enhanced’ Helix Series Control Boxes:
w Attendant Controls- external toggles or touch switches*, that may be used to directly operate the motor
functions on the power positioning system. *utiltizes LED display
w Motor Speed Control- external dials or touch switches* that may be used to adjust the actuator motor
speed for each available power positioning functions (i.e.; tilt, recline, etc,...). *utiltizes LED display
w LED Indicator Light- an external LED light on the control box that serves as a visual indicator to the position/
status of the seating system with respect to safety limits and lockouts (see also Figure 1.0):
RED Light - indicates when seating system is in drive lockout (DLO).
GREEN Light1 - indicates when seating system is in the designated “home” position.
FLASHING RED Light - indicates when a Tilt/Recline seating system is in reduced-speed drive
ALTERNATE FLASHING RED & GREEN - indicates when a elevating seat system is in reduced-speed drive.
1
Note: In the event that a joystick or switch becomes inadvertently stuck, a 60 sec. run-time limit has been incorporated
to avoid damaging motors and/or electronics. If the max. run-time is exceeded, the green light will flash repeatedly
and the control box will temporarily shut down for 30 seconds.
w Memory Seating Programming (Helix Sigma Only)- an external pigtail connector on the Helix Sigma
box, can be connected to our M99 Memory Seating Module to effectively move and recall complex seating
positions with minimum switch access or control. It can be used to directly recall up to four (4) memory positions
at the touch of a button.
Figure 1.0 - Examples of Flashing LED Indicator Lights (Helix Boxes)
Tilt/Recline = home
Elevate = home
Tilt/Recline = home
Elevate = out of home
Tilt/Recline = out of home
Elevate = out of home
Tilt/Recline/Elevating System
(with Reduced Drive)
G
G
R
Solid
Alternate Flashing
Full Speed Drive
Tilt/Recline = home
Tilt/Recline System
(with Reduced Drive)
G
Reduce-Speed Drive
Tilt/Recline = out of home
R
Solid
Full Speed Drive
G
R
G
R
Off
Off
Full Speed Drive
Elevate = home
Tilt/Recline = Reduced Drive
G
R
Flashing
Reduced Drive
R
Solid
Full Speed Drive
Solid
Drive Lockout (DLO)
Tilt/Recline = DLO
G
R
Solid
Drive Lockout (DLO)
Elevate = out of home
Elevate-Only System
(with Reduced Drive)
G
R
G
R
Alternate Flashing
Reduced Speed Drive
G = Green
R = Red
- 24 -
4.0 ELECTRONICS
4.1.2 M-Series Seat Control Boxes
The control boxes for the M-Series electronics are designed for maximum programmability and function, and
their compact design occupies minimal space on the seating system. The fully modular design significantly
reduces and simplifies the electronic wiring on complex and/or specialty control seating systems. Our M-Series
electronics includes the M600 series (multi-function) seat control boxes (up to 6 functions); the M200 series
(dual function) seat control boxes; as well as a basic single channel M136 control box (for single switch
operation). Both the dual function and multi-function control boxes are designed to work seamlessly with
our multi-functional Remote Attendant Control (included). The Remote Attendant Control serves dual purpose
as both an attendant control box for the available seat functions, as well as a hand-held electronics programmer.
The programming capabilities of the remote eliminates the need to adjust dip switches and jumpers inside
the control box, and eliminates the need to incorporate extra electronics into the existing wiring configuration.
M136 Seat Control
M200 Series Seat Control
M600 Series Seat Control
(single switch operated)
(incl. Remote Attendant Control )
(incl. Remote Attendant Control )
Single Function Box
Dual Function Box
Multi (3+) Function Box
Remote
Attendant Control
Feature Overview for M-Series Control Boxes (with Remote Attendant Control):
w Attendant Controls- the remote operates as an attendant control (and LED display) utilizing the touch
switches to scroll through and operate the desired motor functions on the power positioning system.
w Motor Speed Control- The remote allows the individual actuator speeds to be adjusted/set independently
for both Forward and Reverse directions.
w Configuring Switches & Joystick Functions- The installed operator switch and/or joystick (ASM)
can be reconfigured to operate any desired motor function in either toggle or direct mode.
w Setting Limits & Lockout Angles- The remote operates as a hand-held programmer for the Tipsy
Sensor to set the necessary safety limits and lockouts on the power positioning system (see section 4.3)
w LED Indicator Light- an external LED light on the remote attendant control serves as a visual indicator to
the position/ status of the seating system with respect to safety limits and lockouts:
Green Light = indicates that seating system is in the Home position;
Flashing Green = indicates that seating system is Out of Home;
Flashing Red = indicates that a TIlt/Recline and/or Elevating system is in Reduced Speed Drive;
Red Light = indicates the seating system is in Drive Lockout (DLO).
NOTE: Detailed programming/operating instructions are available in the Remote Attendant Control User
Manual (TRD0323) (provided separately)
Important! The M200/M600 series seat controls are equipped with built-in over-current protection. In the
event that a current spike occurs during operation of your power positioning system, the controller is designed
to go into a temporary shutdown to prevent damage to the electronics. If you experience a repeated controller
shutdown, please contact your service provider or our Technical Service Department for assistance.
- 25 -
4.0 ELECTRONICS
4.2 Wiring Harnesses
Wiring Harnesses can be split into two categories: Power Cables and Motor/Actuator Harnesses.
In the case of power cables, there are several unique cables available in order to interface with the various
base electronics (controllers) utilized by the different wheelchair base manufacturers. The number of actuator
harnesses required for any particular power positioning system is determined by the number of motor functions
available.
i) Power Cables - draw power from the wheelchair base in order to operate the power positioning system.
The power cable is the first link in the series of wiring harnesses and typically draws power from the wheelchair
batteries via the base controller (electonics). The power harness may connect directly into power positioning
system (PPS) electronics (control box), or it may be connected in-series with the actuator harness. The final
wiring configuration will vary depending on the type of PPS electronics and the type of wheelchair base.
ii) Motor/Actuator Harnesses - distribute the power to the individual motors on the Power Positioning
System. The number of actuator harnesses is in direct correlation with the number of motor functions available.
4.3 Safety Lockout and Limit Switches
WARNING! Risk of severe injury or death
• The angle at which the limit switches/lockouts are set is critical to the safe operation of the power
positioning system.
• Motion Concepts will not be liable for any injuries or damage sustained when adjustments are made
beyond the factory recommended settings.
• To ensure proper set-up, adjustments to safety lockouts and limits should only be performed by a
Qualified Technician.
WARNING! Never exceed the maximum recommended limits
Safety Lockouts and Limit Switches should be set up to best meet the needs of the user without
compromising the overall stability of the wheelchair.
WARNING! Following any limit or lockout adjustments, always test the seating system over the full
range of motion (i.e.; tilt, recline, elevate) to verify the revised set-up is functioning properly and
ensure that there are no resulting stability or interference issues.
NOTE: Additional safety limits and lockout switches may be required for more complicated/specialized
seating systems. For information on limits/lockouts that are not identified in this manual, please contact
our Technical Service Department for assistance.
NOTE: For detailed programming and operating instructions for ourTipsy Angle Sensors please refer
to the applicable instruction manual provided separately (TRD0275, M11-R Remote Tipsy Sensor
Instructions or TRD0323, Remote Attendant Control User Manual).
- 26 -
4.0 ELECTRONICS
4.3.1 Tilt/Recline Drive Lockout (DLO) Limit
All tilt or recline power positioning systems are equipped with a Drive Lockout (DLO) Limit to prevent the
wheelchair from being driven when the seating system is tilted or reclined beyond a pre-determined safe angle.
Depending on the type of power positioning system (PPS), the DLO limit may be configured using a Ball Switch,
or via our remote Tipsy Angle Sensor (see section 4.3.6).
Note: Systems equipped with a Tipsy Angle Sensor offer a reduced speed drive setting that will trigger the
wheelchair base to drive at approx. 25% of its maximum speed when the back angle extends beyond the home
position (Reduced Drive is typically set to engage at 20° and will stop when the Max DLO limit is reached)
Tilt and/or Recline Systems (Ball Switch- No Reduced Drive):
Max. DLO = 25°
Tilt and/or Recline Systems (Tipsy Sensor- Reduced Drive):
Max. DLO = 30°
Recline DLO
Tilt DLO
(Angle measured from vertical)
max 25° (No Reduced Drive)
max 30° (Tipsy Sensor)
Front
Important! Ensure base is on a level surface when adjusting limits
4.3.2 Elevate Drive Lockout (DLO) or Elevate Reduced Drive Speed Limit
Seating systems that are configured with a power elevating seat (PES) or scissor lift module may be
configured/programmed with either an Elevate Drive Lockout or a Reduced Drive Speed limit. Both
limits utilize a microswitch to trigger the seating system into drive lockout or reduced speed drive as soon
as the seating system is elevated to a pre-determined height beyond the home (fully retracted) position.
Tilt/Recline/Elevate (T/R/E) systems:
Elevate Drive Lockout = Max. 1/2”
Elevate-Only systems:
Elevate Drive Lockout = Max. 2”
Tilt/Recline/Elevate & Elevate-Only systems:
Reduced Speed Drive = Max. 1/2”
T/R/E Drive Lockout
Reduce Speed Drive
Elevate-Only DLO
home
position
1/2” elevated
Front
Important! Ensure base is on a level surface when adjusting settings
2” elevated
- 27 -
4.0 ELECTRONICS
4.3.2 Elevate Drive Lockout (DLO) or Elevate Reduced Drive Speed Limit (...cont’d)
WARNING! Risk of compromised wheelchair stability and serious personal injury.
• Always ensure the wheelchair is on a smooth level surface when driving in an elevated position
(even at reduced speed).
• Never drive up or down an incline while elevated.
• Never reach for items/objects, or shift body position (in any direction) while in an elevated position.
• Never transfer in or out of your wheelchair while elevated.
NOTE: To regain full drive function of the wheelchair, return the seat angle to a more upright position
(when Tilt/Recline DLO is activated), or lower the seat to its home position (when Elevate DLO/ Elevate
Reduced Drive is activated).
4.3.3 Max Tilt (Tilt/Recline) Limit
The Max Tilt limit switch established the maximum back angle for the seating system at full Tilt or Recline or
Tilt/Recline combined. The function of this switch is to prevent the back angle from extending beyond a
maximum pre-set angle. Motion Concepts seating systems are typically preset at the factory to the maximum
allowable angle and do not require any further adjustment unless the max. angle needs to be decreased (see
Warning! below).
Tilt-Only:
Scissor Lift/Tilt Module:
Tilt/Recline, Recline-Only:
Max. Tilt Limit = 55° (Bariatric Max. Tilt Limit = 30° or 45°)
Max. Tilt Limit = 45°
Max. Tilt/Recline Limit = 168°
WARNING! When establishing the max tilt limit, always consider the size and location of any personal
gear that may be carried on the wheelchair, as it could cause interference between the backrest and the
wheelchair base when fully tilted/reclined, and damage the actuator and/or wheelchair.
Max Scissor Lift/Tilt Limit*
Max Tilt Limit*
Max Tilt/Recline Limit
(max. combined tilt/recline angle)
45°
168°
55°
Front
Important! Ensure base is on a level surface when adjusting limits
*NOTE: The Max. Tilt Limit for bariatric systems may be restricted to 30° or 45° based on client weight)
- 28 -
4.0 ELECTRONICS
4.3.4 Elevating Seat Lockout Switch
Elevating seat systems, when combined with tilt and/or recline functions, are equipped with an elevating seat
lockout switch to prevent the PES actuator from elevating (up or down) when the system is tilted or reclined
beyond the established home limit.
All Users:
User Weight ≥ 175 lbs.:
No Elevate if Tilt/Recline “Out of Home” (Max Home Limit = 20°)
No Tilt* if PES “Out of Home” (PES Home = fully retracted)
*system must be tilted (max. 20°) prior to elevate
Max 20°
P
Front
>20 deg.
O
Important! Ensure base is on a level surface when adjusting settings
4.3.5 Anti-Tip Latch Limit Switch
Certain powerbases may come equipped, or may have anti-tip devices added to the wheelchair in order to
ensure stability during tilt, recline or elevating functions. For these powerbases, our electronics are programmed
to engage the anti-tips by means of a limit switch. The Anti-Tip devices are set to engage when the tilt, recline
and/or elevate functions are extended beyond their established home position:
Tilt, Recline, Tilt/Recline:
Elevating systems:
Max. Anti-Tip Latch Limit = 20° (regardless of pre-tilt angle)
Max. Anti-Tip Latch Limit = 1/2” Elevate
4.3.6 Tipsy Angle Sensor
The Tipsy Angle Sensor is a programmable limit switch that utilizes a separate angle sensor mounted to
the seating system. There are 2 models of tipsy sensors available depending on the type of electronics
installed on the PPS. The M11-R Tipsy sensor is designed for use with our multi-function Helix Series electronics
and the M11-R5 Tipsy sensor is utilized with our M-Series (M600/M200/M136) electronics (in combination with
the remote attendant control box).
box
The tipsy angle sensors allows for the individual programming of up to 4 limits: Home/Anti-Tip Limit, Reduced
Speed Drive, DLO Limit and the Max Tilt (Tilt/Recline) Limit.
Home/ Anti-Tip1 Limit
Limit = 0° to 20°
Reduced Speed Drive Limit
Max. Limit = 20°
Drive Lockout (DLO) Limit2
Max. DLO = 30° (Max DLO = 25° if Reduced Drive is not programmed)
Maximum Back Angle3:
Max. Tilt Limit = 55° (for Tilt-only) or 45° (for Scissor Lift/Tilt module)
Max. Tilt/Recline Limit = 168° (Tilt/Recl, Recl-only)
1
Note: the Anti-Tip Limit is only programmable with the M11-R Tipsy Sensors
Note: Do Not exceed the max recommended DLO
3Note: the Max Tilt-Only limit for bariatric systems may be limited to 30° or 45° based on client weight
2
NOTE: For more detailed programming and operating instructions, please refer to the applicable
instruction manual provided separately; TRD0275, M11-R Remote Tipsy Sensor Instructions or
TRD0323, Remote Attendant Control User Manual.
- 29 -
5.0 Seating System Comfort Adjustments
WARNING! Your system has been specially configured and assembled to the wheelchair base prior
to delivery. There are very few adjustments that can be safely performed by the end user. If there is
an adjustment required that is not in this manual, DO NOT perform that adjustment. Contact your service provider and have the seating system serviced by a qualified techinician.
Motion Concepts offers a wide range of positioning features/options and we are constantly coming up with
new innovative products to address the needs of our customers. The following information is provided as a
reference for our typical system configurations. The components/accessories on your wheelchair may differ
from those illustrated in this manual. If you have any questions or concerns related to your specific seating
system that are not addressed in this Owners Manual, please contact your Service Provider or Motion Concepts
directly for further assistance.
Once you become familiar with the operation of your power positioning system, you may find a need to make
some basic adjustments to improve your comfort. The following section identifies several features and
adjustment options common to our power positioning systems.
The following tools are recommended to complete the adjustments contained in this manual:
• metric/standard socket set and ratchet
• metric/standard hex key set
• adjustable wrench
5.1 Joystick Positioning and Adjustment
NOTE: The type of joystick can vary depending on the base electronics and the type of wheelchair
base. The following images are provided for reference only.
i) JOYSTICK DEPTH ADJUSTMENT
• Loosen the adjustment knob (screw) on the outside of the
joystick mounting bracket (1)
• Set the joystick to the desired length by sliding the mounting
tube forward or backward.
• Re-tighten the adjustment knob (screw).
1
Depth Adjustment
ii) JOYSTICK HEIGHT ADJUSTMENT
• Loosen the two mounting screws on the joystick clamping
bracket (2).
• Adjust the lower mounting plate up or down (via slots) of the
mounting bracket to establish the desired joystick height.
• Re-tighten the two mounting screws on the joystick clamping
bracket.
2
Height
Adjustment
iii) JOYSTICK ROTATIONAL ADJUSTMENT
• Loosen the mounting screw on the rotational clamping
bracket (3).
• Rotate the joystick to the desired angle/position.
• Re-tighten the mounting screw on the rotational clamping
bracket.
3
Rotational
Adjustment
- 30 -
5.0 SEATING SYSTEM COMFORT ADJUSTMENTS
5.2 Armrests Adjustments
WARNING! Before travelling in your wheelchair and/or operating your seating system, always ensure
the amrests are securely locked in place.
5.2.1 Basic Tilt Armrest Adjustments:
The basic tilt style armest has a telescoping upper armrest to allow height
adjustments in 1/2” (13mm) increments.
To adjust height: Depress the detent pin at the front of the armrest and
slide the upper armrest (and armpad) up or down as needed to the desired
height (1). (Note: the detent pin must be engaged in one of the preset
adjustment holes to lock the armrest in place).
Detent Pin
1
For side transfers, the tilt armrest can be rotated around
the rear pivot pin on the seat side frame.
To rotate the armrest: disengage the lever lock at the
front of the side frame, and lift the armrest upward so
that it pivots back around the mounting pin (2).
To remove the armrest: unlock the lever lock at the
front of the armrest and rotate the armrest backward.
Pull outward on the plunger at the rear pivot of the
armrest (3) and carefully slide the armrest assembly off
of the pivot pin.
3
Pivot
Pin
2
Plunger
Lever Lock
5.2.2 Standard Recline Armrest Adjustments:
The standard recline armest has an adjustable pivot arm to allow
height adjustments in 1/2” (13mm) increments.
To adjust height:
1. Remove the mounting hardware (2 screws) and slide the inner
pivot arm up/down to the desired height and reinstall hardware (1).
2. Adjust the armrest receiver assembly to match the
height adjustment of the pivot arm assembly (2); (Loosen
the two screws/t-nuts (not shown) on the inside off the
armrest reciever and slide the armrest receiver up/down
the recline cane to the desired height & retighten screws.
For side transfers, the recline armrest can be rotated
backwards around the pivot pin in the armrest receiver.
To rotate the armrest: disengage the lever lock at the
front of the side frame, and lift up on the armrest so that
it pivots back around the armrest receiver/pin (3).
To remove the armrest: unlock the lever lock at the
front of the armrest and disengage the pivot arm. Pull
outward on the plunger at the rear pivot of the armrest
(4) and remove the armrest assembly.
2
Armrest Receiver
1
Pivot Arm
Ass’y
Recline
Cane
Plunger
4
3
Lever Lock
- 31 -
5.0 SEATING SYSTEM COMFORT ADJUSTMENTS
5.2.3 Cantilever Armrests Adjustments:
Motion Concepts cantilever armrests are available in Tilt style or Recline style. Both styles of cantilever
armrests offer a variety of adjustment options; The following sections illustrate the basic adjustments available
for each type.
Note: More complex adjustments that are not described in this manual should only be completed by a
trained/qualified technician. Please contact your service provider for further assistance.
i) CANTILEVER TILT ARMRESTS (CLASSIC UL-II TILT SYSTEM):
Armrest Angle Adjustment:
1. Place the seating system in the fully upright position.
2. Loosen the cam mechanism by loosening the main bolt on the inside of the mounting plate in assembly
(just enough for the cam mechanism to rotate) (refer to images 1A and 1B).
3. With the main bolt loosened, use the Allen Key to rotate the Cam Lobe assembly, which will in turn
adjust the armrest angle (see images 2A, 2B, 2C)
4. Use the allen key to hold the armrest in position, and re-tighten the main bolt to lock the armrest in place.
Note: if desired, the left & right armrests may be adjusted to provide a unique set-up on each armrest.
INSIDE VIEW
1B
main bolt
1A
cam lobe
loosen the main bolt
rotate the cam downward to
lower the armrest angle
2A
Raised Cantilever Armrest Set-Up
-
- 32 -
5.0 SEATING SYSTEM COMFORT ADJUSTMENTS
Armrest Angle Adjustment: (...cont’d)
2B Standard Catilever Armrest Set-Up
(parallel to seat frame)
rotate the cam upward to
lower the armrest angle
2C Lowered Catilever Armrest Set-Up
Note: above images are shown with
the lever lock handle (optional)
CANTILEVER RECLINE ARMRESTS: Range of Adjustment
B. (fully
s
raised)
egree
+10 d
A. (standard set-up)
C. (fully
lowered
)
-10 deg
ree
s
tilt backcane installed at 95
(standard configuration)
o
- 33 -
5.0 SEATING SYSTEM COMFORT ADJUSTMENTS
ii) CANTILEVER RECLINE ARMRESTS (CLASSIC UL-II TILT SYSTEM):
Armrest Angle Configuration Table:
Base Pivot Position
Control Lever Adjustments
Armrest Angle (at Full Recline)
Low Pivot Position
Raised Pivot Position
Cantilever Recline Armrest Adjustment / Set-Up:
NOTE: armrest adjustments should be made with the seat placed in the full upright position:
1
Based on users preferred reclined armrest angle, install the pivot plate at one of the following positions:
i) Low Pivot Position: armrest remains in a more horizontal position (more parallel with seat frame)
when the seating system reclines
ii) Raised Pivot Position: armrest remains in a more perpendicular position (relative to the back
canes) when the seating system reclines
2
Adjust the armrest receiver mounts (left & right) independently to the desired height along the recline
back canes. The receiver mounts control the overall height of each cantilever armrest, and may be
set to different heights if preferred. (Note: In order to properly adjust the receiver mounts, it may be
necessary to remove the hardware (screws x2) that fasten the push rod assembly together).
3
Adjust the mounting position of the pushrod assembly on the control lever, as needed, to establish the
final armrest angle when the back is fully reclined (see Configuration Table above).
4
The push rod assembly can be adjusted inward or outward, as necessary, to set the intial angle of
the armrest tube in the upright seat position. Typical set-up is 0° or horizontal as illustrated above.
- 34 -
5.0 SEATING SYSTEM COMFORT ADJUSTMENTS
Cantilever Recline Armrest Adjustment/Set-Up
Armrest Receiver
Mount
2
Typical set-up places the initial armrest angle around 0°(horizontal)
when the system is fully upright
3
Cantilever Armrest Tube
Control
Lever
4
Push Rod
Assembly
Default Factory Set-Up
(left armrest ass’y shown)
1
Base Pivot Plate
(shown in the lower position)
- 35 -
5.0 SEATING SYSTEM COMFORT ADJUSTMENTS
5.2.4 Maxx Cantilever (Flip Back) Armrests (ULTRA-LOW MAXX SYSTEMS):
Motion Concepts Maxx flip back cantilever armrests are mounted to the seat frame ultra-rail allowing optimal
positioning and independent adjustment. The following section illustrate the range of adjustments available for
the Maxx Cantilver armrest.
i) MAXX CANTILEVER ARMRESTS ADJUSTMENTS:
Height Adjustment:
loosen locking handle to
adjust armrest height
Angle Adjustment:
1/4” (5mm)
hex key
INSIDE VIEW
loosen armrest screws
(x2) to adjust armrest
angle up or down
Depth Adjustment (Ultra-Rail):
Loosen* screws (x2) in the
multi-arm mounting bracket and
slide the armrest assembly to
desired depth along the ultra-rail.
- 36 -
5.0 SEATING SYSTEM COMFORT ADJUSTMENTS
i) MAXX FLIP BACK CANTILEVER ARMRESTS ADJUSTMENTS: (...cont’d)
Arm Pad Depth Adjustment:
adjust arm pad depth
via mounting screws/
holes inarmrest tube
Note: always ensure two (2)
mounting screws are installed
Note: for more detailed adjustments for the Modular Arm Pad please refer to Section 5.3.1
Flip Back Adjustment:
1. lift release lever/handle
to unlock armrest
2. Rotate the armrest
rearward to provide
clearance and allow
for side transfers
- 37 -
5.0 SEATING SYSTEM COMFORT ADJUSTMENTS
5.3 Arm Pads
5.3.1 Modular Arm Pad - Installation/Adjustment:
1. Using the hardware provided, install the moulded arm pad tray onto the armrest tube in the pre-determined
mounting orientation (see Figure 1.0) and arm pad position (see width & depth adjustments below)
2. Secure the modular armpad inside the moulded tray via the velcro tabs (not shown).
i. Tray Installation
Figure 1.0 - Arm Pad Orientation
Taper Forward
1
ii. Arm Pad Installation
Taper Rearward
2
iii. Width Adjustment
*Note: Center & Inside mount positions may limit how far the armrest will flip/rotate backward during side transfers.
FRONT VIEW
Armrest
Tube
Outside
Mount
iv. Depth Adjustment
Center
Mount*
armrest tube mounting holes (x4)
1.75” (45 mm)
e.g. Full Length Arm Pad shown
Inside
Mount*
OVERHEAD VIEW
T-Nut
(T-nuts are offset & may be rotated
to maximize slot clearance)
- 38 -
5.0 SEATING SYSTEM COMFORT ADJUSTMENTS
5.3.2 Optional Arm Pad Installation:
Our tilt, recline and/or cantilever armrest tubes are designed to fit most standard tube mounted armrest pads
available in the marketplace. Arm pad selection is typically made at the time of ordering, and will be preinstalled on the armrest tube, however arm pads can be readily swapped out if necessary. Please refer to
Figure 1.0 below for examples of other armpad options available from Motion Concepts.
Arm pads are typically installed via two mounting screws, which secure the arm pad to the armrest tube as
illustrated below.
Figure 1.0 - Optional Arm Pads Installations (examples shown on a cantilever armrest tube)
Standard Arm Pad* (full)
OVERHEAD VIEW
Flat Arm Pad* (full)
Waterfall Arm Pad (full)
Gel Arm Pad* (long)
*NOTE: Desk Length arm pads also available for the armpads indicated
- 39 -
5.0 SEATING SYSTEM COMFORT ADJUSTMENTS
5.3.3 Armrest Extensions:
Armrest extension tubes are also available from Motion Concepts (sold separately) when longer armrest
lengths are required.
1. Insert the extension tube into the front of the armrest
tube with the mounting hole aligned vertically (1).
2. Install the armpad using the mounting hole in the
extension tube & a mounting hole in the armrest tube (2).
1
Armrest
Extension
Tube
2
5.4 Seat Pan Adjustment
Seat pans may be configured as a one-piece, two-piece or four-piece assembly depending on the type of
seating system installed. Accordingly, the seat pan adjustments may also vary from simple fore/aft depth
adjustment to a full range of width and depth adjustments.
IMPORTANT! When a significant depth adjustment is required, a compensating system adjustment may
also be necessary to ensure the safe operation and performance of the wheelchair/seating system.
We strongly recommend contacting your service provider prior to making any adjustment to the seat
pan (seat depth) to determine if the intended adjustment requires the services of a qualified technician
or healthcare professional.
WARNING! Seat pan (system) width adjustments are more complex and will require additional
adjustments/changes to the seat frame and back assembly. Due to their increased complexity, please
contact your service provider to have the adjustments performed by a qualified technician or healthcare
professional.
WARNING! Seat depth adjustments (including legrest adjustments) can have a significant effect on
the overall stability of the wheelchair. The final set-up must take into account the overall system
stability and the driveability requirements of the end user. Please consult your service provider prior
to making any adjustments
WARNING! Seat pan depth adjustments will often require further adjustments to the legrest(s) and/or
legrest receivers to compensate for the change in seat depth.
Se
at
Se
Pa
n
at
P
an
Se
at
Pa
n
Adjustable Seat Pans:
1-piece seat pan
(depth adjust)
2-piece seat pan
(width/depth adjust)
4-piece seat pan
(width/depth adjust)
- 40 -
5.0 SEATING SYSTEM COMFORT ADJUSTMENTS
5.5 Independent Front Riggings
Motion Concepts offers several styles of independent front riggings for use on our power positioning systems,
ranging from basic manually operated legrests to power operated articulating legrests. The following information
is provided as a general reference for the common features and adjustments found on our various legrests.
For more specific instructions please refer to the instruction manual provided separately with your legrests.
WARNING! Risk of injury or loss of stability
• Following an adjustment to your seat angle, elevate module (if applic.) and/or your legrest depth, a
compensating seating system adjustment (i.e.; seat depth/ legrest knee-to-heel length) may also be
required. Please consult your service provider prior to attempting any adjustments. To ensure proper
set-up, we recommend that adjustments only be performed by a qualified technician or healthcare
professional.
• NEVER leave legrests in a fully extended position when travelling up or down ramps or slopes
WARNING! Risk of injury or damage
• Following any legrest adjustment ALWAYS inspect the wheelchair to ensure the front rigging DOES
NOT interfere with the wheelchair chassis or the front casters, and that the footplates do not collide
with the ground.
• ALWAYS maintain a minimum of 3-inches between bottom of the front riggings and the floor/ground
while the wheelchair is in motion to ensure proper ground clearance. If necessary, elevate the front
rigging or tilt seat to achieve proper ground clearance.
WARNING! Danger of crushing or pinching.
• Do not place hands, fingers or limbs inside the articulating mechanism of a power operated legrest.
5.5.1 Legrest Depth Adjustment
i) STANDARD SIDE FRAMES (CLASSIC UL-II SYSTEM)
Loosen the legrest receiver set screw at the front of the left & right seat side frames (1). Adjust the legrest
depth by sliding the legrest receiver to the desired depth inside the seat side frame (2). Each legrest receiver
(left and right) can be adjusted independently if desired. Once the final legrest depth is set, re-tighten
both set screws to secure the receivers/legrests into position.
Seat Pan
1
Legrest
Receiver
Seat Side Frame
2
Set Screw
infinite depth adjustment
along legrest channel
NOTE: Following a legrest depth adjustment, it may be necessary to make a compensating seat pan
depth adjustment to support the front of the seat cushion. (Refer to section 5.4)
- 41 -
5.0 SEATING SYSTEM COMFORT ADJUSTMENTS
5.5.1 Legrest Depth Adjustment (...cont’d)
ii) EXTRUDED SIDE RAILS (ULTRA-LOW MAXX SYSTEM)
Loosen the legrest receiver screws (x2) at the front of the left and right extruded side rails (1). Adjust the legrest
depth by sliding the legrest to the desired position inside the slotted channel of the receiver assembly (2).
Each legrest receiver (left and right) can be adjusted independently if desired. Once the final legrest depth
is set, re-tighten the receiver screws to secure the legrests into position.
Adjustment Range
=1.5” (38mm)
Legrest
Receiver
1
2
Extruded Side Rail
5.5.2 Swing Away Legrests
The swing-away legrest feature is available on certain models of Motion Concept’s individual legrests to provide the clearance necessary for forward transfers in and out of the chair. Our swing-away legrests utilize a
user friendly lever handle that locks and unlocks the legrest, allowing the legrest pin to pivot/rotate about the
legrest receiver (see examples illustrated below)
e.g.; 70 o Heavy-Duty Swing Away Legrest
ed
ck
lo
un
ed
ck
lo
e.g.; Power Pivot Plus Legrest
- 42 -
5.0 SEATING SYSTEM COMFORT ADJUSTMENTS
5.5.3 Removing Manual Legrests
When necessary, our manual legrests may also be completely removed from the wheelchair, by placing the
lever handle in the unlocked position and lifting the entire legrest assembly upward. To reinstall the legrest,
insert the legrest pin inside the legrest receiver and return the lever handle to the locked position.
5.5.4 Individual Footplates:
i) FLIP-UP FOOTPLATES
All individual legrests available from Motion Concepts (including swing-away models) provide a flip-up footplate
feature to provide leg and foot clearance when transferring to and from the front of the wheelchair. The footplates can be manually raised/flipped-up so that they remain perpendicular to the ground as indicated below.
WARNING! Risk of injury and damage
• Footplates are designed to support your legs and feet from a seated position in the wheelchair;
NEVER stand on footplates when transferring in or out of the wheelchair
• Before operating your wheelchair, ALWAYS ensure footplates are in their full down position and your
feet are properly supported by the heel straps.
e.g.; Flip-up Footplate shown on the Heavy Duty Swing Away Legrest
ii) FOOTPLATE WIDTH & ANGLE ADJUSTMENT
By loosening the clamping block, the entire
footplate position (width) be adjusted in
and out along the pivot post (1). The footplate angle can also be adjusted via the setscrew on the inside of the footplate bracket.
Tightening or loosening the set screw will
increase or decrease the footplate angle
accordingly (2).
clamping
block
nylon set
screw
adjust set screw
depth to alter the
footplate angle
1
BOTTOM
VIEW
2
REAR VIEW
- 43 -
5.0 SEATING SYSTEM COMFORT ADJUSTMENTS
5.6 Center Mount Front Riggings
Motion Concepts offers several styles of center mount front riggings for use on our power positioning systems,
ranging ranging from basic fixed center mount legrests, to fully power operated articulating center mount
legrests. The following information is provided as a general reference for the common features and adjustments
found on our various center mount legrests. For more specific instructions please refer to the legrest instruction
manual provided separately.
IMPORTANT! While some basic adjustments may be performed by the end user or attendant, to ensure
the center mount legrest is safely and properly adjusted, always consult your service provider prior to
any adjustments. Please refer to Warnings! below
WARNING! Risk of injury or loss of stability
• Following an adjustment to your seat angle, elevate module (if applic,) and/or your legrest depth, a
compensating seating system adjustment (i.e.; seat depth/ legrest knee-to-heel length) may also be
required. To ensure proper set-up, we recommend that center mount adjustments only be performed
by a qualified technician or healthcare professional.
• NEVER leave legrests in a fully extended position when travelling up or down ramps or slopes
WARNING! Risk of injury or damage
• Following any legrest adjustment ALWAYS inspect the wheelchair to ensure the front rigging DOES
NOT interfere with the wheelchair chassis or the front casters, and that the footplates do not collide
with the ground.
• ALWAYS maintain a minimum of 3-inches between bottom of the front riggings and the floor/ground
while the wheelchair is in motion to ensure proper ground clearance. If necessary, elevate the front
rigging or tilt seat to achieve proper ground clearance.
WARNING! Danger of crushing or pinching.
• Do not place hands, fingers or limbs inside the articulating mechanism of a power operated legrest.
Power Center Mount Legrest:
(e.g. LNX Legrest shown)
individ
ua
calf pa l
ds
mallea
ble
calf pa
d
individual
foot plates
center mount
platform
- 44 -
5.0 SEATING SYSTEM COMFORT ADJUSTMENTS
5.6.1 Center Mount Depth Adjustments
WARNING! Adjustments involving the legrest depth and seat depth may have a significant effect on
the overall stability of the wheelchair. The final set-up should be determined based on the stability and
driveability requirements of the end user. We recommend that depth adjustments on a center mount
legrest only be performed by a trained technician or healthcare professional.
i) STANDARD SIDE FRAMES (CLASSIC UL-II SYSTEM)
Depth adjustments for our standard side frames are controlled via two depth adjustable legrest receivers which
are secured by a locking screw (1) inside the left and right side frames of the seating system. The adjustable
depth legrest receivers provide infinite depth adjustment within the available channel length on the legrest
receivers (2). To Adjust: Carefully slide/adjust the entire center mount legrest assembly inward or outward via
the channels of the legrest receivers until the desired depth is achieved (see Warning! below).
NOTE: Following a center mount legrest depth adjustment, it may be necessary to make a compensating
seat pan depth adjustment to support the front of the seat cushion.(refer to section 5.4)
Center Mount Legrest Depth Adjustment:
legrest receiver
Seat Cushion
e.g.: LNX Legrest shown
locking screw
2
legrest receiver
1
seat
frame
ii) EXTRUDED SIDE RAILS (ULTRA-LOW MAXX SYSTEM)
IMPORTANT! A depth adjustment to the center mount legrest on an Ultra-Low Maxx system is most
readily/easily performed by adjusting the extruded side rails themselves. Side rail adjustments will
modifiy the overall seat depth relative to the back canes. To ensure proper set-up, extruded side rail
adjustments should only be performed by a qualified technician; please contact your service provider
for depth adjustments.
extruded side rail
- 45 -
5.0 SEATING SYSTEM COMFORT ADJUSTMENTS
5.6.2 Center Mount Footplate/ Foot Platform Adjustments:
WARNING! ALWAYS maintain a minimum of 2.5-inches between bottom of the front riggings and the
floor/ground while the wheelchair is in motion to ensure proper ground clearance. If necessary, elevate
the front rigging or tilt seat to achieve proper ground clearance.
i) FOOT PLATFORM ANGLE ADJUSTMENT
Our center mount foot platforms are angle adjustable via a set screw at the rear of the foot platform. Increasing
or decreasing the screw depth will alter the angle of the platform as illustrated below.
ii) INDIVIDUAL FOOTPLATE ANGLE ADJUSTMENT
As with the center mount platform, our individual footplates
may also be angle adjusted (independently) via a set screw
at the rear of each footplate. Increasing or decreasing the
screw depth will alter the angle of the foot plate accordingly
(Refer to image at right).
iii) FLIP-UP FOOTPLATE/ FOOT PLATFORM
All center mount legrests available from Motion Concepts provide a flip-up footplate feature to provide leg and
foot clearance when transferring to and from the front of the wheelchair. The footplates or foot platform can
be manually raised/flipped-up to remain perpendicular to the ground as indicated below.
WARNING! Risk of injury and damage
• Footplates and foot platforms are designed to support your legs and feet from a seated position in
the wheelchair; NEVER stand on footplates/platforms when transferring in or out of the wheelchair
• Before operating your wheelchair, ALWAYS ensure footplates/platforms are in their full down position
and your feet are properly supported by the heel straps.
Manual Flip-Up
Footplates
Manual Flip-Up
Foot Platform
- 46 -
5.0 SEATING SYSTEM COMFORT ADJUSTMENTS
5.7 Calf Pad Adjustments
5.7.1 Independent Calf Pad Adjustment
Our independent calf pads will vary in style depending on the type of front rigging/legrest installed. The
range of adjustment will also vary slightly depending on the type of legrest and the type of mounting bracket
it utilizes. Examples of common calf pad assemblies are illustrated below.
e.g. Pivot Plus Legrest
e.g. CMX Legrest
e.g. LNX Legrest
Curved calf pads may be adjusted independently on their respective mounting bracket using the mounting
screws at the rear of the calf pads. Calf pads may adjusted (for depth, height & angle) to achieve a variety of
different configurations. The independent pad adjustments provide optimal positioning and comfort for end
users - sample configurations are illustrated below.
Independent Calf Pad Adjustment (Sample Configurations)
Raised Offset
Centered
Extended Position
(maximum)
Lowered Offset
Angled
- 47 -
5.0 SEATING SYSTEM COMFORT ADJUSTMENTS
5.7.2. Malleable Calf Panel (for LNX Legrest Only)
The malleable calf panel provides a greater level of support without the need for a multitude of adjustments.
This unique one-piece calf panel consists of a molded polyurethane foam outer surface and utilizes a steel ‘inner
skeleton’ which allows the pad to be manipulated/shaped (by hand) to match the contour of the clients legs.
The malleable calf panel installs in a fixed position on the legrest assembly. Refer to images below.
Malleable Calf Pad Adjustment
Malleable
Calf Panel
Bendable Inner
Steel Skeleton
Fixed
Mounting
Position
- 48 -
5.0 SEATING SYSTEM COMFORT ADJUSTMENTS
5.8 Back Adjustments
5.8.1 Back Angle Adjustments for Tilt Only Systems
The tilt back cane angle adjustments will vary slightly in appearance between the Classic UL-II system and
the Ultra-Low Maxx system. Both tilt systems can be manually adjusted to one of nine preset angles (1).
There is a total available adjustment range of 40° from the most posterior position to the most anterior position.
The pre-set (factory default) mounting position is 96°.
To Adjust Back Cane Angle:
1. Loosen the upper mounting screw and remove the lower mounting hardware from both the right & left canes.
2. Tilt the canes in either the posterior or anterior direction so that the lower hole in the back cane is aligned
with the desired mounting hole in the triangular mounting bracket (2).
3. Reinstall the lower mounting hardware through the chosen mounting hole and secure it in place;
Re-tighten the upper mounting screw.
Tilt Back Can
e
CLASSIC UL-II TILT ONLY
1
79° 90° 101°112°
76° 86° 96° 106°
ULTRA-LOW MAXX TILT-ONLY:
Default Set-Up
Tilt Back Can
e
2
116°
(Right-Hand Back Cane and Side Frame Shown)
1
79° 90° 101°112°
76° 86° 96° 106°
116°
Default Set-Up
2
(Right-Hand Back Cane and Side Frame Shown)
- 49 -
5.0 SEATING SYSTEM COMFORT ADJUSTMENTS
5.8.2 Back Height Adjustments for Tilt Only Systems
For systems equipped with a standard Motion Concepts back pan, the back height can be easily adjusted
along the length of the tilt back canes if necessary. Infinite height adjustments can be made along the length
of the slotted channel in the Tilt Back Mount Block.
Note: The range of adjustment may be further increased (if necessary) by adjusting the height/mounting
position of the tilt back mount block on the back pan.
To Adjust Back Height:
1. Loosen the 2 screws (left & right) that secure the tilt back mount onto the tilt back canes (1).
(Note: The back pan must be supported when loosening hardware)
2. Slide the back pan (back cushion) vertically along the channel of tilt back mounts until the desired back
height is achieved (2).
3. Retighten mounting hardware (screws x2) to secure the back pan into position.
Height Adjustable
Tilt Back Mount
Height
Adjust Screw
2
1
BACK PAN
(rear view)
- 50 -
5.0 SEATING SYSTEM COMFORT ADJUSTMENTS
5.9 Lateral Trunk Support Adjustments
5.9.1 Maxx Lateral Trunk Support (ULTRA-LOW MAXX SYSTEMS)
Angle Adjustment
MAXX LATERAL
TRUNK SUPPORT
Loosen nuts/screws (x2)
to adjust pad angle
(left assembly shown)
Infinite Angle Adjustment Range
Width Adjustment
Pad Depth Adjustment
Loosen screws (x2) to
adjust bracket width
Loosen screws (x2) to
adjust pad depth
2.5” Pad Depth Adjustment
Total of 3.5” Width Adjustment
(both laterals combined)
Swing-AwayFeature
1
Lift bracket
up to release
Height Adjustment
2
Swing lateral
rearward
Loosen screws (x2)
to adjust lateral
height (or remove)
- 51 -
5.0 SEATING SYSTEM COMFORT ADJUSTMENTS
5.10 Lateral Hip Support Adjustments
5.10.1 Maxx Lateral Hip Support (ULTRA-LOW MAXX)
Width/ Angle Adjustment
Hip Support Lock/Release
Loosen screws (x2) and rotate knuckle
joints to adjust the pad width/angle
Lift handle to unlock hip support
Wide
Offset
Pad Height Adjustments
2 Pa
d He
(via m ight Pos
iti
ounti
ng sl ons
ots)
Standard
Offset
Loosen screws (x2) and adjust hip
pad to desired depth (via slot)
Reduced
Height
Standard
Height
Fore and Aft Depth Adjustment
(via Maxx Ultra-Rail)
Loosen adjustment screw (do not remove)
and adjust the hip support via the ultra-rail
Pad Depth Adjustment
- 52 -
5.0 SEATING SYSTEM COMFORT ADJUSTMENTS
5.11 Headrests
A Motion Concepts offers basic and adjustable headrest options for installation
onto the wheelchair back cushion. The headrest clamp hardware is designed
to install into existing mounting holes in the back pan.
WARNING! Injury hazard during use of the whelchair as a vehicle
seat if a headrest is wrongly adjusted or not installed! This can
cause the neck to be hyperextended during collisions*!
*WARNING! This Motion Concepts seating system has NOT
been crash tested in combination with this wheelchair base
and is NOT approved for use as a vehicle seat during transport.
When travelling in a motor vehicle, the user must be properly
secured in a motor vehicle seat with safety belts securely fastened.
WARNING! For systems equipped with power recline and ESR, always inspect/test the headrest (down
tube) for possible interference over the full range of recline. If interference occurs, the length of the
down tube must be modified as necessary.
NOTE:
• It may be necessary to remove and modify the back cushion cover in order to access the headrest
mounting holes on the back pan.
• An optional shim plate is available and may be installed between the clamp assembly and the back
pan to provide addtional spacing/clearance when required.
5.11.1 Basic Headrest Set-Up and Installation:
Installation/Adjustment:
1. Using the hardware provided, align and install the headrest clamp assembly into the existing mounting holes
in the back pan (1).
2. Secure the headrest pad to the horizontal headrest rod via the mounting hardware provided (2).
3. Adjust the headrest pad to the desired depth via the headrest rod by loosening and tightening the mounting
hardware (3).
4. Adjust the overall height of the headrest pad/mounting post via the clamp assembly (4). For proper set-up
the headrest should be adjusted to the user's ear height.
2
3
4
1
- 53 -
5.0 SEATING SYSTEM COMFORT ADJUSTMENTS
5.11.2 Adjustable Headrest Set-Up and Installation:
Installation/Adjustment:
1. Using the hardware provided, align and install the headrest clamp assembly into the existing mounting holes
in the back pan.
2. Secure the headrest pad to the horizontal headrest rod via
the mounting ring and hardware provided (1).
1
NOTE: The headrest pad can be adjusted to any desired
angle via the pivot ball at the end of the headrest rod by
loosening and tightening the mounting hardware.
3. Adjust the overall height of the headrest pad/mounting
post via the clamp assembly (2). For proper set-up the headrest should be adjusted to the user's ear height.
4. Once the final height position is set, adjust the D-Ring
(with set-screw) so that it rests flush with the top of the clamp
assembly (to prevent slipping) (3).
NOTE: The headrest (and headrest rod) can be further
adjusted for depth and angle via the triangular multi-offset
bracket (4). To make adjustments, loosen the the hardware
in the multi-offset bracket, set headrest to the desired position
and re-tighten hardware.
4
3
2
5.12 Postural Belts
A postural belt is an option which can either be factory installed to the wheelchair or can be retrofitted by your
specialist dealer. If your wheelchair is fitted with a postural belt, your specialist dealer will have informed
you about fitting and usage.
The postural belt is used to help the wheelchair user keep an optimum sitting position. Correct use of the belt
assists the user in sitting securely, comfortably and well-positioned in the wheelchair, especially for users who
experience difficulties with balance while sitting.
IMPORTANT! The postural belt should be used whenever the wheelchair is occupied. The belt should be
tight enough to ensure that you are sitting comfortably & that your body is in the correct sitting position.
WARNING! Risk of injury
• Please ensure your postural belt is properly secured to the wheelchair and is adjusted for comfort
before each use
• Inspect the postural belt for loose parts or damage, incuding tears, worn spots, bent hardware, damaged
latch mechanisms, and/or dirt/debris prior to each use. If you discover a problem please contact you
service provided for maintenance or repair.
• Postural belts are NOT designed for use as a seat belt in a motor vehicle. Nor is your power wheelchair
suitable for use as a vehicle seat. Persons travelling in a vehicle must be properly belted into seats
approved by the vehicle manufacturer.
• Please be certain to read the safety information provided in the manual provided by the belt manufacturer.
WARNING! Risk of crushing or entanglement.
To prevent crushing or entanglement, postural belts should remain secure at all times . NEVER allow
the positioning belt to hang or drag on the floor, or become trapped between the seating system and
the power base.
- 54 -
5.0 SEATING SYSTEM COMFORT ADJUSTMENTS
5.12.1 Types of Postural Belts
Your wheelchair can be fitted with the following postural belt types. If your wheelchair has been fitted with a
different belt to those listed below, please ensure that you have received the manufacturer's documentation
with regard to correct fitting and use.
2-Point Padded Lap Belt
• Center-pull push button, padded lap belt
• Two points of attachment to the wheelchair
• Suitable for supporting users with low tone or weakness
4-Point Padded Lap Belt
• Center-pull push button, padded lap belt
• Four points of attachment to the wheelchair
• Primary attachments position the belt; and Secondary
attachments anchor it in position.
• Holds pelvis in place more aggressively for active users,
or in situations where the user has a lot of movement.
A=2” (50mm), B=3” (76mm), C=11” (28cm), D=60” (152cm)
5.12.2 Adjusting the Postural Belt Correctly
• Ensure that you are sitting correctly, which means that you are sitting right at the back of the seat, your pelvis
is positioned erect and as symmetrically as possible, not to the front, to the side or at one edge of the seat.
• Position the postural belt so that your hipbones can be easily felt above the belt.
• Adjust the belt length using one of the adjustment aids described above. The belt should be adjusted so
that you can fit a flat hand between the belt and your body.
• The buckle should be positioned as centrally as possible. In doing so, please carry out adjustments on both
sides as much as possible.
- 55 -
6.0 SYSTEM INSTALLATION/ SET-UP/ ADJUSTMENT REVIEW
IMPORTANT! Following any installation, set-up and/or adjustment related to the power positioning
system always test the system over its full range of positioning functions to ensure all motors, safety
limits are functioning correctly. Verify that all mounting hardware and critical components are also
installed/adjusted properly.
The following checklist is provided as a reference when conducting a final review/ inspection of the wheelchair.
6.1 System Review Checklist
1.
Check all fasteners/mounting hardware to ensure that they have been properly tightened.
2.
Check the drive lockout limit is funcitoning.
3.
Check the reduced speed drive (if applicable)
4.
Check the tilt (tilt/recline) limit (if applicable).
5.
Check the full range of tilt and recline and elevate (as applicable). Make certain that there
is no interference. Make sure that the wheelchair is stable with the client in it over the entire
range.
6.
Check power legrest function (if applicable). Ensure there is appropriate ground clearance
in the retracted position, and check for interference over the full range of travel.
7.
Check all wires and cables over the complete tilt/recline/elevate range for pulling, crushing
or tight bends.
8
Check that the charger functions properly.
9.
Check that the acceleration and deceleration of the wheelchair have been programmed
to levels appropriate for the user.
10.
Check all of the wheelchair drive functions.
11.
Check that the rod-ends on the tilt and recline actuators have been properly pinned (if applic).
12.
Check the anti-tipper latching system (if applicable).
13.
Check that the anti-tipper extensions are installed (if required).
14.
If the front or rear anti-tippers are adjustable, check that they have been set to the appropriate
postition for the user.
15.
Test drive the wheelchair and operate the power positioning system.
16.
Ensure the Owner’s Manual is provided to the end user.
If you have any concerns or questions regarding your Motion Concepts Power Positioning
System please contact our Techncal Service Department for assistance.
USA: 888-433-6818
CAN: 800-680-4191
- 56 -
7.0 GENERAL MAINTENANCE & SAFETY
IMPORTANT! Motion Concepts disclaims all responsibility and liability for any personal injury
or damage to property that occurs as a result of improper or insufficient maintenance, and/or
any unauthorized Dealer or third-party repairs or modifications made to the power positioning
system or the wheelchair on which the system is installed.
7.1 Maintenance Schedule
To ensure the optimal safety and reliability of your power positioning system, please adhere to the maintenance
schedule/ table below. In addition to the maintenance schedule, please note the following maintenance tasks
and safety warnings that should be incorporated into your daily routine.
Daily Maintenance:
• Check that all switches (push buttons/toggles) that operate your power positioning system are functioning
properly
• Charge batteries (refer to the information provided in this chapter and to your powerbase Owners Manual for
important informaton on battery charging and proper battery care)
IMPORTANT! To ensure your power positioning system is operating properly and safely,
Motion Concepts recommends a complete Dealer inspection be performed on your power
positioning system every six (6) months by a qualified technician.
WARNING! Any sudden or gradual deterioration in the function/performance of your power
positioning system (i.e. increased actuator motor/gearbox noise, rattling, sloppiness, etc...) must
be reported to your Dealer immediately.
• A complete wheelchair inspection by a qualified technician is recommended to ensure there is no unusual
wear and tear, or physical damage that requires servicing and/or repair.
WARNING! Danger of accident if maintenance is insufficient!
• Under difficult operating conditions such as daily travel on steep slopes, or in the case of use in medical
care cases with frequently changing wheelchair users, it is recommended to carry out intermediate
checks on the brakes, accessories and running gear.
• The wheelchair operator is responsible for ensuring that the power wheelchair and seating system
iremains in an operationally reliable condition. Inadequate or neglected care and maintenance of the
mobility device will result in a limitation of the manufacturer's liability.
Important information about maintenance work tools!
Some maintenance work identified in this manual can be carried out by the user without problems,
but does require the correct tools. If you do not have the correct tool available we do not recommend
that you attempt to carry out the relevant work. In this instance, we strongly recommend that you contact
an authorised dealer/specialist to complete the work.
IMPORTANT! Please be certain to read and follow all maintenance and safety information specific to
your wheelchair power base. Refer to your Base Manufacturer’s Owner/Operators Manual (provided
separately).
- 57 -
7.0 GENERAL MAINTENANCE & SAFETY
7.2 Safety Inspection Checklist
Item
Initially
Monthly
6 Months
Periodically
Batteries
load test batteries (individually)
X
X
ensure batteries are clean (free from corrosion/ moisture/
dirt)
X
X
ensure connections are tight and clean
X
X
Electrical / Wiring Harnesses
check for pinches or pulls in wiring (over full range of
seating system)
X
X
Inspect for wear & tear damage to wires
X
X
ensure connections are secure
X
X
Actuators (where applicable)
ensure actuator rod ends are properly pinned
X
X
ensure no interference/ sticking during system operation
(over full range of seating system)
X
X
Inspect for excessive noise or grinding
X
X
Hardware and Components
inspect mounting hardware (seating system to powerbase)
X
inspect all adjustment hardware to ensure nuts and
screws are secure (i.e. side rails, recline module,
legrests/foot plates/receivers
X
X
X
X
X
X
X
X
inspect for loose parts /rattling sounds- ensure all nuts
and screws are secure
Inspect that all pivot points are operating smoothly &
freely and secured (do not overtighten)
Inspect Anti-Dive/ Anti-Tip devices to ensure they are
functioning correctly* and inspect for damage. (*refer to
powerbase owners/operators manual)
X
Limit Switches
ensure electronic anti-tip latch system functions properly
(Quickie S626/S636/S646 only)
X
X
check limit switch settings
X
X
ensure DLO functions correctly
X
X
Pivots, Glide Blocks & Track Maintenance
ensure slide channel is free from dirt/ dust/ grime
lightly lubricate main pivot points, using a general
purpose oil (see Section 7.3 - Lubrication)
X
X
X
- 58 -
7.0 GENERAL MAINTENANCE & SAFETY
7.3 Lubrication
IMPORTANT! To maintain the smooth operation of your Power Positioning System, periodical lubrication
of the main pivot points is recommended. Motion Concepts Seating Systems are pre-lubricated at the
factory, however occassional lubrication using a general purpose oil will help to maintain optimal
performance of your seating system. Avoid the use of heavy grease or high viscosity lubricants as this
can cause a build-up of dirt and contaminates which could reduce overall performance.
TILT MODULE
Pivot Point Lubrication
-Tilt/Elevate the seating system*;
-Use a clean rag to wipe away any dirt, residue around
pivots and along slide channels;
-Lubricate main pivot points (as indicated) on the PPS
module periodically using a general purpose oil.
*Warning! Turn power off to the wheelchair prior to
cleaning and lubricating
LIFT-MODULE
actuator
rod-end
- 59 -
7.0 GENERAL MAINTENANCE & SAFETY
7.3 Lubrication (...cont’d)
Pivot Point Lubrication
CLASSSIC UL CGT-II MODULE
-Tilt the seating system*;
-Use a clean rag to wipe away any dirt, residue
around pivots and inside slider channels.
-Lubricate main pivot points of the UL CGT II subsystem periodically using a general purpose oil.
*Warning! Turn power off to the wheelchair
prior to cleaning and lubricating
actuator rod end
7.4 Battery Charging
WARNING! For detailed information on charging your powerbase batteries, please be certain to read and
follow the instructions provided by the powerbase manufacturer & the battery charger manufacturer.
IMPORTANT INFORMATION ON BATTERY CHARGING:
• Do Not use the charge level indicator on a joystick display to determine the existing battery charge.
The joystick display indicates surface voltage only, and may not be the true charge. (This can be likened
to charging a cell phone; if placed on its charger for a brief time, a cell phone display will often indicate that
the batteries are fully charged, however the cell phone quickly goes dead once it is used).
• Heavily depleted batteries require more time to recharge. Insufficient charge time may result in the
supply of low voltage battery output to the electronics of the power positioning system. Low voltage
output can produce longer duty-cycles and overheating,
overheating which will reduce the life-cycle of these
electronics.
• Smaller on-board chargers are not sufficient to recharge rehab-style power products.
• Batteries that require more frequent charging or take longer to charge than normal, may need to be
replaced.
RECOMMENDED CHARGING PROCEDURES:
N ORMAL C HARGING :
Allow 8 hours for normal charging. (Note:
Note To prolong the life of a battery, frequent charging is recommended,
rather than only charging when necessary).
H EAVILY D EPLETED B ATTERIES :
Severly discharged batteries may require in excess of 16 hours to be properly charged and equalized. (Note:
Note
be certain to understand the charge status indicators on the battery charger- refer to the charger manual).
- 60 -
7.0 GENERAL MAINTENANCE & SAFETY
7.5 Battery Testing
7.5.1 Battery Case Draw Test
1. Inspect battery for signs of corrosion, moisture and/or dirt
that could lead to unnecessary discharge of the battery.
Drag second lead across
battery case
2. Test with Voltmeter by placing one lead on the Positive
(+) RED battery terminal
3. Drag the other lead across the battery case (in different
locations).
4. Voltmeter should read 0 (zero) if there is no discharge from
the battery.
Place lead on positive terminal
7.5.2 No Load Voltage Testing
Test to determine the state of charge of the battery. Refer to the illustration below for testing instructions.
WARNING! Never attempt a voltage measurement with a test lead in the AMP (A) or MILLIAMP (mA)
input terminal. You may be injured or cause damage to the voltmeter.
- 61 -
8.0 TROUBLESHOOTING
IMPORTANT! For additional troubleshooting information regarding the wheelchair powerbase & electronics,
please refer to the Troubleshooting section of the Powerbase Owner’s Manual (provided separately)
8.1 Performance Troubleshooting
NOTE: For further assistance on these or any other issues, please contact our Technical Service
Department.
USA: 888-433-6818
CAN: 800-680-4191
- 62 -
9.0 ELECTRO-MAGNETIC INTERFERENCE (EMI) INFORMATION
ELECTRO-MAGNETIC INTERFERENCE WARNING
WARNING! It is very important that you read this information regarding the possible effects
of electromagnetic interference on your Motion Concepts power positioning system.
In addition, operation of power positioning systems can create electro-magnetic interference,
the effect of which cannot be determined. Please make sure to read the associated warnings
in the user manual for your wheelchair power base.
9.1 Electromagnetic Interference (EMI) From Radio Wave Sources
Power positioning systems may be susceptible to electromagnetic interference (EMI), which is interfering
electromagnetic energy (EM) emitted from sources such as radio stations, TV stations, amateur radio (HAM)
transmitters, two way radios and cellular phones. The interference (from radio wave sources) can cause the
power positioning system to function by itself, or activate in unintended directions. It can also permanently
damage the control system.
The intensity of the interfering EM energy can be measured in volts per meter (V/m). Each power positioning
system can resist EMI up to a certain intensity. This is called its "immunity level", the higher the immunity
level, the greater the protection. At this time, current technology is capable of achieving at least a 20 V/m
immunity level, which would provide useful protection from the more common sources of radiated EMI.
There are a number of sources of relatively intense electromagnetic fields in the everyday environment. Some
of these sources are obvious and easy to avoid. Others are not apparent and exposure is unavoidable.
The sources of radiated EMI can be broadly classified into three types:
1. Hand-held portable transceivers (transmitters-receivers with the antenna mounted directly on the
transmitting unit) - examples include: cellular telephones, citizen band (CB) radios,"walkie-talkies", security,
fire and police transceivers and other personal communication devices.
NOTE: Some cellular telephones and similar devices transmit signals while they are "ON", even when
they are not being used.
2. Medium range mobile transceivers, such as those used in police cars, fire trucks, ambulances, and taxis.
These usually have the antennae mounted on the outside of the vehicle.
3. Long range transmitters and transceivers, such as commercial broadcast transmitters (radio and TV
broadcast antenna towers) and amateur (HAM) radios.
NOTE: Other types of hand held devices, such as cordless phones, laptop computers, AM/FM radios, TV sets, CD players, cassette players, and small appliances such as electric shavers and hair
dryers, so far as we know, are not likely to cause EMI problems to your power wheelchair.
- 63 -
9.0 ELECTRO-MAGNETIC INTERFERENCE (EMI) INFORMATION
Because EM energy rapidly becomes more intense as one moves closer to the transmitting antenna
(source) , the EM fields from hand-held radio wave sources (transceivers) are of special concern. It
is possible to unintentionally bring high levels of EM energy very close to the control system while
using these devices.
WARNING! The warnings listed below are recommended to prevent possible interference
with the control system of the power positioning system.
t
Do not turn on personal communications devices, such as cellular phones, or operate hand held
transceivers (transmitters, receivers), such as citizens band (CB) radios, while the powered
wheelchair is turned on.
t
Be aware of nearby transmitters, such as radio or TV stations, and try to avoid coming close to them.
t
If unintended movement occurs, turn the wheelchair off as soon as it is safe to do so.
t
Be aware that adding accessories or components, or modifying the power positioning system may
make it more susceptible to EMI. Note: There is no easy way to evaluate their effect on the overall
immunity of the powered wheelchair.
t
Report all incidents of unintended movement of the power positioning system to the manufacturer, and note whether there is a source of EMI nearby.
CAUTION! Modification of any kind to the electronics of the power positioning system as manufactured
by Motion Concepts/Motion Solutions may adversely affect the radio frequency interference immunity
(RFI) levels.
CANADA
Motion Concepts LP
84 Citation Drive, Unit 1-7
Concord, Ontario
L4K 3C1
Tel (local):
Tel (toll free):
Fax:
Tech Service:
@
www.
905-695-0134
866-748-7943
905 695 0138
800-680-4191
[email protected]
www.motionconcepts.com
Tel.:
Tel (toll free):
Fax:
Tech Service:
716-447-0050
866-433-6818
888-433-6834
888-433-6818
USA
Motion Concepts
700 Ensminger Rd, Suite 112
Tonawanda, New York
14150
TRD0000 Rev B