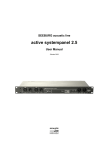
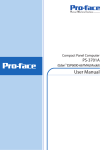
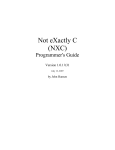
1
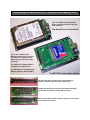
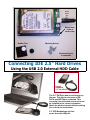
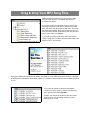
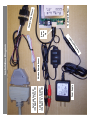
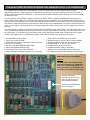
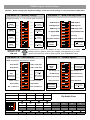
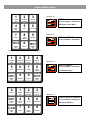
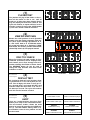
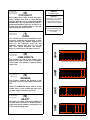
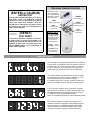
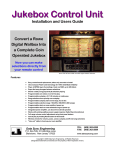
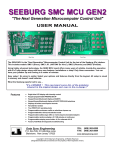
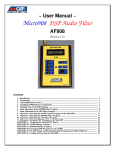
SCD-MP3
HDD or CF MP3 Player
For Your Seeburg SCD Jukebox
•
•
•
•
•
Works with all notebook HDD’s or CF
Supports all layer-III (MP3) encodings
Variable or fixed bit rates to 320 Kbps
Detects master/slave drive setting
Automatic power down on no activity
The SCD-MP3 is a micro-computer based hard disk player that replaces the 60-disc CD player in your
Seeburg model SCD-1x jukebox. The hard disk player works with any jukebox that uses the Sony
model CDK-006 changer. The SCD-MP3 plugs directly into the Control Computer. A new “turbo”
EPROM chip replaces the old program on the PCM computer board. The player takes only minutes to
install, without any modifications to the jukebox. Best of all, the player will not skip and will never need
to be cleaned or lubricated. The new “turbo” program provides super fast plays between song
selections and does not require learn-in. Other features include 60 or 90 CD selections with each
having up to 99 tracks plus random background and stimulation plays.
The player works with any PATA 44-pin ATA/IDE 2.5 inch notebook HDD or Compact Flash memory
card formatted as FAT32. 16 to 20GB should provide enough storage space for your 60 CD jukebox.
DISCLAIMER – PLEASE READ
The SCD-MP3 kit was developed for jukebox owners for non public performance use. We do not
supply jukebox licenses and do not have any knowledge of what is required. It is the jukebox
owners responsibility to obtain all applicable licenses for public performance of copyright music.
Data Sync Engineering
P.O. Box 539, Footbridge Lane, Bldg 3
Blairstown, New Jersey 07825
TEL: (908) 362-6299
FAX: (908) 362-5889
Email: [email protected]
Web: www.datasynceng.com
Copyright © 2003 Data Sync Engineering. All Rights Reserved.
Designated trademarks and brands are the property of their respective owners.
Assembling the Hard Disk Drive or Compact Flash Memory Card
This is the MP3 digital subsystem
player circuit board with a hard disk
drive attached.
The Hard Drive is not included !
This is the Compact Flash
Memory card version. It requires
the "IDE to CF" adapter board
which plugs into the 44-pin IDE
connector.
The "IDE to CF" adapter board is
available as a separate item.
The Hard Drive or Compact Flash
Memory cards are also available.
The MP3-DSP music player system
The hard disk drive has two sets of connector pins.
43-pins on the left side and 4-pins on the right.
Position the disk drive onto the circuit board then align
the left side pins with the 44-pin IDE connector.
Slide the disk drive forward into the connector. The 4-pins
on the right are not used.
Arrow
Faces
Up
Mount-down
holes at
each corner
Rubber Feet
Mounting Screws
Permanent mount
or removable
Connecting IDE 2.5" Hard Drives
Using the USB 2.0 External HDD Cable
Laptop
NoteBook
2.5" Hard Drive
The 2.5" IDE Drive has one connector on
the rear. This 44 pin connector is IDE
DATA and IDE Power combined. This
connector has a blocked socket and must
be installed in the correct orientation.
Match the blocked socket with the missing
pin on the drive mechanism.
2.5" IDE Mechanisms get their
power from the USB port.
Optional Compact Flash Card Adapter
CF Size
2GB
4GB
8GB
16GB
32GB
64GB
@128 Kbps
500
1,000
2,000
4,000
8,000
16,000
@192 Kbps
400
800
1,600
3,200
6,400
12,800
CF Memory
Inserted
here
Approximate song capacities:
Connector
44-Pin IDE
The 44-pin IDE adapter allows Compact Flash
memory card usage. Works with FAT32 formatted
cards 2GB and higher.
Insert the memory card into the adapter then plug
the adapter into the 44-pin IDE connector.
Creating New Folders for Disc Numbers
Connect your disk drive to the HDD USB cable.
Open Windows Explorer
Plug in the HDD USB cable into your computer.
Within a few moments, a new disk drive letter should appear.
For this example we see “Removable Disk F:”
If you did not see a new disk drive letter, follow the instructions
in your USB manual about setting up your new disk drive or
you can visit www.cdadapter.com and go to the FAQ section.
To create a new folder …
Single click the new drive letter to hi-lite,
Click File | New
Then click on Folder
You should see a New Folder name.
Change the name …
The first two letters must be your disc
number from 01 to 06. The following
letters can be any text you choose.
Drag & Drop Your MP3 Song Files
Select the disk and directory for your source of MP3
song files then click the + at “Removable Disk (F:)”
to expand the folders.
If you wish to copy the entire set of songs, click on the
first song at the top, scroll down to the last song, hold
down the SHIFT key then click the last song. The entire
list should be hi-lighted. Move your mouse over the list
then hold down the left mouse button and drag the list to
your F: drive folder “The Beatles”.
If you wish to move a single song, place your mouse
over the song then hold down the left mouse button and
drag it to your F: drive folder.
Previously, folders were numbered to identify disc positions, here, MP3 song names must be numbered
to identify their track position. Most MP3 “rippers” or “extractors” will provide this track numbering feature
for you.
If you need to change or add the track position
number of a song, place the mouse over the song
then right click and select Rename.
Position your mouse to the start of the song name
then left click. You should see a blinking cursor
waiting for you to edit.
Power Supply
Audio Cable to Amplifier
(Unplugged from Sony CD)
Data Cable from PCM
(Unplugged from Sony CD)
Wireless Remote Sensor
ly
pp
u
S
er
w
Po
Installation Diagram
t
ec
n
n
Co
Arrow
Faces
Up
The MP3-DSP Player
Contr
ol Cab
le Con
nect
THE NEW TURBO EPROM PROGRAM FOR SEEBURG SCD-1x CD JUKEBOXES
The Compact Disc was launched on the consumer market in October 1982 from the combined efforts of Philips
(Netherlands) and Sony (Japan). By 1985, CD sales were skyrocketing. A year later, Seeburg introduced it‘s first CD
jukebox called the Laser Music model SCD-1. Thousands of these jukeboxes were manufactured up until the model SCD1F (Skyline) in 1990.
The sound system in this jukebox is superb. Instead of transistors, Seeburg used the latest MOSFET technology in it’s
power amplifier design. Many say it resembles the performance of tube amplifiers. The six speaker system is also unique. It
employs two 2x6 horn tweeters, two 5x7 polycone midrange and two powerful 12” bass reflex woofers. The CD player is the
Sony 60 disc model CDK -006 which has a laser life of about 50,000 hours. Estimated life of this player should be around 20
years (to about 2006). Unfortunately, there are no player replacements which leaves some of these magnificent machines
dormant.
This has captured my interest to develop the Seeburg SCD-1x EPROM program called “turbo”. This new program has some
of the improved SCD features plus an increase to 90 CD’s, but was mainly written to offer better and safer setup of the coin/
bill credit system, a much faster song play response and to work with either the PCM-1000 or PCM-2x00 phono control
module. This, together with a new MP3 player system, adds a whole new life to the Seeburg SCD Jukebox.
•
•
•
•
•
•
•
•
No modifications to the jukebox
Takes only minutes to install
Works with PCM-1000 or PCM-2x00 control computers
No Learn-In is required
Uses the high speed HDD MP3-DSP Player
Super fast response between songs
Can be set for 60 or 90 CD disc selections
Switch selectable coin/dollar credits/bonus or Free Play
•
•
•
•
•
•
•
•
Album plays from ENTER key or 00 track #
Wireless remote for volume, pause, reject and BGM
Background Music on/off from remote or keypad
Play Stimulator at 15, 30, 45 or 60 minutes
Viewable tracks per disc verification
Viewable dip-switch settings verification
“Battery low” and “EPROM checksum” messages
Non destructible Total Lifetime Money & Play counters
PCM-1000 Phono Control Module
NOTICE:
The PCM-2x00 Control Module does
not have a dipswitch “A” component.
In this case, a Virtual Dipswitch “A”
memory location is used instead. See
next page for the VDA one time setup.
Carefully remove the
EPROM from the socket by
gently prying at each end
using a small screwdriver.
Insert the new EPROM with
the notch facing up.
TURBO Program “Switch Settings”
NOTICE ! Before changing the dip-switch settings, record the current settings in case you decide to switch back
Dip-Switch “A” - Monetary settings
Dip-Switch “C” - BGM, Free Play & Stim.
Example ratio setting: 3, 7, 10, 13 and 18 (at $1 increments)
OFF
——
Play
Stimulator
Interval
Credit to Add
1, 2, 3 or 4
(see chart below)
——
——
ON
——
Play Stim. Disabled
Keypad BGM On/Off
OFF
Free Play
Play Stim. Enabled
OFF
OFF
——
8
ON
(see chart below)
OFF
7
——
Pay For Play
BGM Range 61-90
6
OFF
Credit to Add
1, 2, 3 or 4
OFF
5
——
No Keypad BGM
(see chart below)
BGM Reject On
4
OFF
BGM Range, all
OFF
3
——
——
8
($2 or $1)
——
OFF
7
Credit at
8 Units
——
Credit to Add
1, 2, 3 or 4
BGM Reject Off
BGM Enabled
OFF
2
($1.50 or 75¢)
——
BGM Disabled
1
——
——
ON
Credit at
6 Units
($1 or 50¢)
ON
(see chart below)
6
——
Credit to Add
1, 2, 3 or 4
——
5
Credit at
4 Units
OFF
——
4
——
3
(50¢ or 25¢)
OFF
2
——
1
Credit at
2 Units
OFF
——
15, 30, 45
or 60 minutes
(see chart below)
Set switches D1 & D2 off. Set dipswitch “B” equal to the dipswitch “A” monetary
settings, power up jukebox. After PLAY message, reset dipswitch “B” as credit
options and switches D1 & D2 for jukebox model, press PCM RESET button.
Setting the Virtual
Dipswitch “A” for
PCM-2x00.
Dip-Switch “B” - Credit Options
Dip-Switch “D” - Jukebox Options
NOTE: All switches on select Factory Test Mode
1
2
3
4
Play Stimulator
15 Min
30 Min
45 Min
60 Min
Consecutive Tracks
Unlimited
1 per disc
2 per disc
3 per disc
ON
Credit at # Units
Allow Album Play
ON
Album on 00 track
ON
Keep Selections
——
OFF
ON
8
B.A. = 4 Pulses / $
ON
7
Number of ——
Consecutive
Tracks/disc ——
Keep Credits
Disc Range 1-90
6
Erase Selections
——
See Jukebox
Model Setup
For Details
5
Album on Enter key
OFF
——
4
(see chart below)
No Album Play
1 Pulse = 2 Units
ON
OFF
Disc Range 1-60
Bonus Credit
0, 1, 2, 3
4, 5, 6, or
allow Album
OFF
3
——
——
OFF
2
8
B.A. = 1 Pulse / $
OFF
7
Erase Credits
OFF
Add 1 Credit at $2
——
——
Jukebox
Model
Type
1
1 Pulse = 1 Unit
ON
——
ON
6
——
Add 1 Credit at $1
——
OFF
5
After
20 Pulses
Received
ON
4
——
3
$5 Bonus
OFF
2
No $2 Bonus
1
No $1 Bonus
——
Unlimited,
1, 2, or 3
(see chart below)
Dip-Switch Chart
OFF
ON
OFF
ON
OFF
ON
OFF
ON
OFF
ON
OFF
ON
OFF
OFF
ON
ON
OFF
OFF
ON
ON
OFF
ON
OFF
OFF
OFF
OFF
ON
ON
ON
ON
$5 Bonus
No Credits
1 Credit
2 Credits
3 Credits
4 Credits
5 Credits
6 Credits
ALBUM
Dip Switch Features
The PCM-1000 board uses both the keypad module (KM-1000) and service panel module (SPM-1000). The settings of Dipswitch “B” are
copied to a memory location named “VDA”. The settings of Dipswitch “A” are used by the program.
The PCM-2x00 board uses the keypad module (KM-1000) only. Dipswitch “A” is ignored because it is not inserted on the circuit board,
used instead, are the copied settings in memory location named “VDA”.
UNIT CREDITS
Units are used as the method of evaluation for entered coins and bills.
At 25 cents per play (switch B6 on), 1 pulse from the coin or bill acceptor will equal 2 units. This is to say that 1 quarter
would need to be entered to reach the first credit step of Credit at 2 Units. The bill acceptor will produce 4 pulses per dollar
giving 8 units to reach the forth credit step of Credit at 8 Units.
At 50 cents per play (switch B6 off), 1 pulse from the coin or bill acceptor will equal 1 unit. This is to say that 2 quarters
would need to be entered to reach the first credit step of Credit at 2 Units. The bill acceptor will produce 4 pulses per dollar
giving 4 units to reach the second credit step of Credit at 4 Units. It would take $2 worth of coins or bills to reach the forth
credit step of Credit at 8 Units.
After the Credit at 8 Unit step is reached, the unit counter is cleared and the credit steps are again repeated. The pulse
counter is not affected. After a song selection is made, both the unit counter and pulse counter are cleared.
BONUS CREDITS
After unit credits are processed, bonus credits can be added. Bonus credits are based on the accumulative pulse counts
from the coin or bill acceptor. At 4 pulses ($1), switch B1 allows an extra bonus credit to be added. At 8 pulses ($2), switch
B2 allows an extra credit to be added. And finally at 20 pulses ($5), different bonus credits or album selection can be added
by switches B3, B4 & B5.
ERASE CREDITS / KEEP CREDITS
Unused credits remaining on the jukebox when powered-off can either be saved (switch B7 on) or erased (switch B7 off).
BILL ACCEPTOR SETTING: 1 PULSE PER DOLLAR BILL / 4 PULSES PER DOLLAR BILL
Switch B8 is off if Bill Acceptor outputs 1 pulse per dollar bill, switch B8 is on if Bill Acceptor outputs 4 pulses per dollar bill.
BGM DISABLED / BGM ENABLED
When switch C1 is on, background music from the MP3 player can be toggled on/off from the wireless or wired remote. If
switch C4 is also on, background music can be toggled on/off from the keypad by entering “0000”.
A random disc/track background music play will immediately follow the end of the last selected play when no other
selections are waiting to be played. This provides non-stop music plays. The BGM and AUX volume control levels can be
adjusted on jukeboxes that use the PAM-2000 power amplifier module.
The amplifier AUX input is automatically selected when BGM is off and no song selections are being played.
BGM REJECT OFF / BGM REJECT ON
If switch C2 is on, the selected song has priority over background plays. The background song will be rejected.
BGM RANGE ALL DISCS / BGM RANGE 61-90
If switch C3 is off, random background selections will be played from discs (1-60 if D2 is off) or (1-90 if D2 is on).
If switch C3 is on, random background selections will be from discs 61-90 only.
NO KEYPAD BGM / KEYPAD BGM ON-OFF
If both switches C1 & C4 are on, background music can be toggled on/off from either the wireless or wired remote or from
the keypad by entering “0000”. NOTE: Background toggle from keypad requires at least 1 credit or Free Play to operate.
PAY FOR PLAY / FREE PLAY
When switch C5 is on, the display will show FP in the credit digits and allow unlimited selections.
PLAY STIMULATOR FEATURE DISABLED / PLAY STIMULATOR FEATURE ENABLED
If switch C6 is on, the jukebox will select a random disc/track when “no activity” for the time as set by switches C7 & C8.
PLAY STIMULATOR INTERVAL
Switches C7 & C8 set the time period of random plays when there is no jukebox activity. Time period of every 15-min, 30min, 45-min or 60-min can be chosen.
DISC RANGE 1-60 / DISC RANGE 1-90
If D3 is off, disc selection range is 1-60, if switch D3 in on, selection range is 1-90. If the selected disc or track is not found,
the “Error “ message will be displayed.
(D4)
NO ALBUM PLAY / ALLOW ALBUM PLAY
and
(D5)
ALBUM ON ENTER KEY / ALBUM ON “00” TRACK
[ ]
Allow ALBUM selection after 2-digit disc number then ENTER key
Switch “D4” on and switch “D5” off
[ ]
Ignore the ENTER key and allow ALBUM selection on “00” track number
Switch “D4” on and switch “D5” on
[ ]
Ignore the ENTER key and allow ALBUM selections only after $5 worth of credits entered
Switch “D4” off, switch “D5” on and switches “B3”, “B4” & “B5” on
[ ]
Ignore the ENTER key and NO ALBUM selections
Switch “D4” off and switch “D5” on
ERASE SELECTIONS / KEEP SELECTIONS
Any un-played selections remaining in memory when the jukebox is powered-off can either be saved (switch D6 on) or
erased (switch D6 off) when the jukebox power is turned back on.
NUMBER OF CONSECUTIVE TRACKS PER DISC
If switches D7 & D8 are both off, all songs are played in the order as entered, including track after track album plays.
Otherwise, these switches can set the number of track plays allowed on the same disc when more than 1 disc number is
waiting to be played.
For example, if the consecutive track count was set to 2 and the user made 3 disc album selections with the 1st album
having 10 tracks, the 2nd having 12 tracks and the 3rd having 14, the first 2 albums would cycle back and forth playing 2
songs on each until all songs were played on album 1 which would then cause the 2 song cycle between album 2 & 3, then
finally, the balance of all songs on album 3 would be played. This also applies to multiple mixed tracks on the same disc.
“KWIK PICK” SELECTIONS ON JUKEBOX MODELS SCD-1C, SCD-1D & SCD-1F
The “Kwik Pick” lamp will not illuminate until after 10 or more popular hits have accumulated and the jukebox has credits or
is in free play. This only occurs after the TOP 40 has been cleared. Afterwards, the TOP 40 popular hits are updated as
jukebox selections are made. A popular hit is defined as a song that has been played 2 or more times. As new popular hits,
or the same hits are selected, they are placed at the top of the list, and eventually, the older popular hits will drop off.
“TOP 40” LAMP ON JUKEBOX MODELS SCD-1C, SCD-1D & SCD-1F
The “TOP 40” lamp will illuminate when the playing song is found in the popular hits list.
The selection keypad can be alternately switched between selection mode and service mode by pressing the SERVICE
button. When pressed, the message “SCE on” will momentarily appear to indicate the keypad is for service functions,
press it again and the message “SCEoFF” will momentarily appear when in selection mode. Selection mode is entered
when the jukebox is powered-up or the PCM RESET button is pressed.
Entering SERVICE MODE clears the “Check Battery” LED and “bAt Lo” display message
No FREE CREDITS function during PLAYER TEST function.
KEYPAD TEST can only be exited by pressing the PCM RESET button or power-off the jukebox.
Jukebox Model Setup
1
2
3
PLAYER
TEST
DIPSWITCH
SETTINGS
DISC TOC
CHECK
Dipswitch “D”
DISPLAY
TEST
AUDIT
POPULARITY
7
8
9
CLEAR
FREE
CREDITS
REVERSE
Control Computer: PCM-1000
With Audio Power Meter
ON
RESET
ON
REJECT
2
KEYPAD
TEST
SCD-1
Dipswitch “D”
1
ENTER
0
OFF
ON
6
2
5
1
4
OFF
SCD-1A, SCD-1B
Control Computer: PCM-2000
OFF
SERVICE
EXIT
Service Mode switch functions are shown in small print
4
PLAYER
TEST
DIPSWITCH
SETTINGS
DISC TOC
CHECK
DISPLAY
TEST
5
6
7
8
AUDIT
POPULARITY
CLEAR
FREE
CREDITS
RESET
9
0
SERVICE
EXIT
REVERSE
REJECT
KEYPAD
TEST
0
1
2
3
REJECT
PLAYER
TEST
DIPSWITCH
SETTINGS
DISC TOC
CHECK
RESET
4
5
6
SERVICE
EXIT
DISPLAY
TEST
AUDIT
POPULARITY
ALBUM
7
8
9
CLEAR
FREE
CREDITS
REVERSE
OFF
ON
SCCD-1 Classic
Control Computer: PCM-2x00
1015 Bubbler Repro
ENTER
Dipswitch “D”
ON
2
ON
ON
1
KEYPAD
TEST
Dipswitch “D”
ON
3
2
2
1
1
SCD-1C, SCD-1D, SCD-1F
Control Computer: PCM-2100
With 40-Hit Kwik Pick
(1)
PLAYER TEST
The jukebox will play all the tracks on disc 1,
then all the tracks on disc 2, etc., until all
tracks on all discs have been played. During
play, the display will show Disc, Track, t2. The
cycle will continue to repeat until this service
function is exited. Pressing the CLEAR button
(7) will erase stored credits & selections.
(2)
VIEW DIP-SWITCHES
Shows the on/off position of each dip-switch
setting using the display segments. Each button press cycles through dip-switches A, b,
C, and d then back to A. If PCM-1000 board,
the actual dip-switch A is displayed. If PCM2x00 board, the memory location named VDA
(Virtual Dip-switch A) is displayed instead.
4
5
6
OFF
ON
3
OFF
2
OFF
OFF
1
OFF
OFF
ON
ON
7
8
(3)
DISC TOC CHECK
When first entered, the total number of discs
initialized (learned-in) will be displayed then
each button pre ss steps through each disc
number showing the number of tracks found.
The REVERSE button (9) can be used to
change the step direction. Zero track count
indicates “no disc”.
Also from TEST
on the SPM-1000
service keypad
Disc Number
(4)
Number of Tracks
DISPLAY TEST
All six display digits will cycle together showing numericals 0 – 9 at a rate of three per se cond. First all digits will show 0’s then all 1’s
etc., through the 9’s and repeat. All LED’s and
selection lamps will also flash on & off at 11/2 times per second. The cycle will continue
until this service function is exited.
Also from AUDIT
on the SPM-1000
service keypad
(5)
AUDIT
There are 7 audit functions plus clear. Each
button press steps to the next audit function.
The last function, AdtCLr, allows the audit
data to be erased by pressing the CLEAR button (7). The total lifetime money audit is an
accumulative count for this jukebox and will
not be erased.
1
C00000
Total number of coins
5
PL0000
Total # of selections played
2
bL0000
Total number of bills (x4)
6
AL0000
Total # of album selections
3
000000
Total lifetime money
7
Crd000
Number of free credits
4
SL0000
Total # of selections made
8
AdtCLr
Push CLEAR to erase audits
Also from POP
on the SPM-1000
service keypad
(6)
POPULARITY
Each button press steps through disc popularity rankings from least to most popular.
The step direction can be changed by the REVERSE button (9). The last function, POPCLr,
allows the popularity and Top 40 lists to be
erased using the CLEAR button (7). The total
lifetime plays will not be erased.
Also from CLEAR
on the SPM-1000
service keypad
(7)
000000
Total lifetime plays
dPxxyy
“xx” is disc #, “yy” is rank #
Most popular rank is 01
Least popular rank is 60
(—) if disc has never played
POPCLr
Push CLEAR to erase all
popularity rankings and
Top 40 list.
CLEAR
(8)
FREE CREDITS
This function is used to add credits. Each
button press adds 1 credit up to a maximum
of 99 credits. This function is ignored during
Player Test.
Also from REVERSE
on the SPM-1000
service keypad
(9)
SWA
Also from CREDIT
on the SPM-1000
service keypad
Record Your Original Switch Settings Here
ON
1
2
3
4
5
6
7
8
Not available on PCM-2x00 control modules
SWB
This function erases the accumulated counts
of money, selections and popularity. To clear
audits, press (5) until “AdtCLr” appears then
press (7). For popularity, press (6) until
“POPCLr” appears then press (7). You can
also clear stored selections and credits,
press (1), when Player Test starts, press (7).
ON
1
REVERSE
2
3
4
5
6
7
8
2
3
4
5
6
7
8
2
3
4
5
6
7
8
NOTE: to set MP3-DSP player back to normal
volume level (in case remote was lost) press
(1), when Player Test starts, pre ss (9).
ON
1
(0)
REJECT
This button is not the same as the REJECT at
the back of the cabinet. This button causes a
player stop which simulates reaching the end
of the current playing track.
SWD
Also from REJECT
on the SPM-1000
service keypad
SWC
This function switches the direction of the
popularity or disc toc steps while in that function.
ON
1
Wireless Remote Control
(ENTER) or (ALBUM)
KEYPAD TEST
This function displays the name of each keypad button press. On PCM -2x00 equipped
jukeboxes, it will also display the coin, bill acceptor and “Kwik Pick” switches. Once the
keypad test is entered, the only way to exit is
by pressing the reset on the PCM board or
power off the jukebox.
Also from RESET
on the SPM-1000
service keypad
Mute
Toggles pause on/off
VOLDecreases the
volume level
Remote Set Up
(RESET)
SOFT RESET
Remote sensor “eye”
can be placed at the
corner edge inside title
page glass, in speaker
grill or front panel.
This function performs a jukebox “soft reset”.
In other words, as long as the program is operating (not crashed), this function will be re cognized. A “hard reset” can be done by pressing the RESET button on the PCM board or
power off the jukebox.
POWER
Cancels song play
CHAN+
Toggles BGM on/off
(needs switch C1 on)
VOL+
Increases the
volume level
Press & hold POWER
and Mute buttons
simultaneously until
LED flashes on/off
then remains on.
Release buttons
Press VOLOnce
Press CHAN+ 2-Times
Press Mute to save,
LED should turn off,
error if blinking.
Power-Up Displays
This message is momentarily displayed when the jukebox
is powered-up or the RESET button is pressed. If the first
two letters are “JP”, check the 37-pin cable connections.
If only “J” instead of “JP” is displayed, you may have a
problem with the jukebox memory chip or PCM board.
This rotating pattern indicates that the jukebox is waiting
for the player to be ready. Normally it appears for a few
seconds (depending on the number of songs).
If it appears longer than a minute, a player problem may
exist or the Interface Control Unit may not be plugged in.
If at any time the jukebox memory becomes corrupted,
such as from a low battery or severe electrical storm, this
message will appear each time the jukebox is turned on.
It is cleared by entering the SERVICE mode.
NOTE: this indicates popularity and audit data was erased.
This is the final display message which shows a four
character checksum calculation of the EPROM program.
Each new version of an EPROM program will display
different checksum numbers and letters. Refer to this
checksum code when reporting errors and problems.