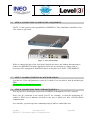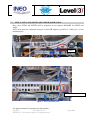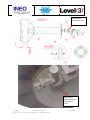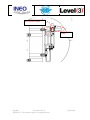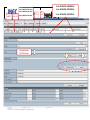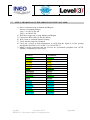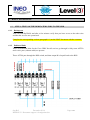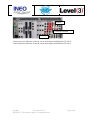
1
RLA/03/901 RCC/18-WP/03 09/02/2015 International Civil Aviation Organization South American Regional Office - Regional Project RLA/03/901 REDDIG Management System and Satellite Segment Administration Eighteenth Meeting of the Coordination Committee (RCC/18) Lima, Peru, 2 to 4 March 2015 Agenda Item 3: Report of the activities carried out to date since the last meeting of the Coordination Committee (Working Paper presented by the Secretariat) SUMMARY This Working Paper presents information on the progress of the implementation of the activities agreed upon at the last meeting of the Coordination Committee (RCC/17) for inclusion in the 2014 work plan. Reference Report of the Seventeenth Meeting of the REDDIG Coordination Committee (RCC/17) Lima, Peru, 24-26 March 2014. ICAO Strategic Objective: 1. A - Safety B – Air navigation capacity and efficiency Background 1.1 The main activities agreed upon at the last meeting of the Coordination Committee (RCC/17) for inclusion in the 2014 work plan, in addition to the operations, support and network maintenance tasks, were the following: a) b) c) d) 2. 2014 training programme; Implementation of new services; Logistic matters of the REDDIG; and Follow up to the implementation of the REDDIG II. Analisys 2014 Training programme 2.1 out: With reference to the training activities, the following courses were carried Factory course on REDDIG II Introduction to REDDIG II Course (Routers and Switches CISCO) Theoretical and practical REDDIG II Course Factory course on REDDIG II 2.2 The factory course as planned was conducted in Velizy, France, from April 21 to May 9, 2014. The course was aimed at personnel of Manaus and Ezeiza NCCs and was attended by three delegates from Brazil, three delegates from Argentina and the administrator of the REDDIG. The program of the course is presented as Appendix A to this working paper. The course material has been placed on the REDDIG II web page www.lima1.icao.int/reddig. RLA/03/901 RCC/18-WP/03 -2- 2.3 The course took place uneventfully and all the topics of the Factory Training programme were covered, including theoretical classes and practical and laboratory exercises where applicable. 2.4 It was recommended that the next REDDIG coordination meeting (RCC/18) analyse the possibility of conducting a specialised course on management and operation of the WhatsUp Gold software within the context of the REDDIG II training plan for 2015, addressed to the technical staff in charge of the REDDIG nodes. More details in WP/04 of this Meeting. REDDIG II introductory course (CISCO routers and switches) 2.5 A course on CISCO routers and switches was held on 29 July to 1 August 2014 in Bogota, Colombia, to provide basic theoretical-practical knowledge on IP devices to those designated to participate in the theoretical-practical course on REDDIG II to be held in Rio, to be supplemented during the theoretical-practical course on the REDDIG II of Rio (11 August to 5 September 2014). 2.6 The course was given by a Colombian entity certified for providing the CISCO course, with the participation of 22 delegates from 9 REDDIG II member States. This event was possible thanks to the support provided by the Aeronautical Administration of Colombia. 2.7 During the course, the participants received theoretical classes on CISCO routers and switches, and did laboratory practice to supplement the theory. Taking into account the short duration of the course, an attempt was made to provide ample information. 2.8 The Member States of project RLA/03/901 as well as the ICAO South American Regional Office thank the Aviation Administration of Colombia for having organized this important course this contributing to the training of the personnel who will be responsible for the maintenance and operation of the REDDIG II. Theoretical and practical REDDIG II Course 2.9 The theoretical-practical course on the REDDIG was held as scheduled in Rio, Brazil, for two weeks. It comprised four sessions: three in Spanish and one in English. The four sessions were carried out in two sections: the first from 11 to 22 August and the second from 25 August to 5 September 2014. 2.10 Two persons were trained for each REDDIG node. Some States had three candidates for each node, as was the case of Argentina, Brazil, Peru, and Bolivia. A total of 39 people were trained; per diems and travel expenditures for 36 people were covered by the contract. The content of the course in Rio is posted on the website of Project RLA/06/901 www.lima1.icao.int/reddig. 2.11 During the theoretical-practical course, it was noted that a significant number of participants had no experience with IP technology and that training in router programming was probably not fully taken advantage of, and many people had difficulties, despite being the most important component of REDDIG II. We feel this is mainly due to lack of basic knowledge of IP networks. Therefore, it is important that each person designated to be in charge of REDDIG II maintenance and operation, in addition to RF and satellite communication knowledge, should have basic knowledge of IP networks, CISCO routers, and switches. Although a course on the subject was conducted in Colombia and the course in Rio offered much information on the topic, we believe that the knowledge provided in these courses cannot be assimilated if the basics are lacking. 2.12 Basic courses on CISCO networks, routers, and switches are given in practically all REDDIG II member States. Aeronautical administrations should train all the technical staff in charge of communication system maintenance and operation through these basic courses, since, nowadays, there are IP networks and devices everywhere. -3- RLA/03/901 RCC/18-WP/03 2.13 In case REDDIG members consider that this type of courses should be given with the support of Project RLA/03/901, working paper WP/04 of this Meeting presents further information as well as a proposal for a basic course on IP networks, CISCO routers, and switches for its analysis and approval by RCC/18. Implementation of new services 2.14 During April 2014, it was successfully completed the testing of end-to-end of the circuit oral ATSd between Foz de Iguaçu (Brazil) Guarani (Paraguay) being in operational performance. Logistic matters of the REDDIG 2.15 The logistic operations, mainly caused by faults in the nodes, include the shipping of equipment or parts of the REDDIG spare parts from the warehouse located in the Regional Office in Lima ICAO or any other node to nodes that require them, including arrangements with factories for the repair of equipment, payment of the transport and the costs involved as well as coordination and support to the States in the import and export processes. 2.16 During year 2014, 11 logistic operations were carried out. The summary of failings and spare parts are presented in Appendix B of this working paper. 2.17 Appendix C presents 2014 statistics regarding the number of mayor attention to the network nodes, as well as its distribution in terms of the type of equipment that requires the attention. 2.18 2014. Appendix D presents the picture of network availability from 2004 until the end of Follow-up to the implementation of the new REDDIG II REDDIG II factory acceptance tests (FAT) 2.19 REDDIG II factory acceptance tests were conducted on 12-16 May 2014 in Vélizy, Paris, at INEO facilities, with the participation of representatives of Project RLA/03/901 members of Argentina, Brazil, Paraguay, and Peru, and the REDDIG II Administration. 2.20 The following activities were conducted during the factory acceptance tests: Verification of cabling and equipment installation on each rack of REDDIG II Verification of models and serial numbers of all REDDIG II equipment Testing of communication links between sites, in a simulated environment Testing of outdoor equipment Testing of indoor equipment Testing of the REDDIG II monitoring system 2.21 For testing purposes, INEO installed in its laboratory all the equipment, cables, and connectors in the respective racks of all REDDIG II nodes. For connections between nodes, coaxial cables were laid between satellite modems, using combiners and splitters. 2.22 Upon completion of the FAT, the group proceeded to accept the FAT with observations, which shall be fully resolved by the INEO & Level 3 consortium as a precondition for acceptance of provisional site acceptance tests (PSAT). RLA/03/901 RCC/18-WP/03 -4- 2.23 In this sense, REDDIG II focal points must be aware of all the observations made during the factory inspection (FAT), which are presented under this agenda item and described in detail in the REDDIG website: www1.lima.icao.int/reddig, making sure that the INEO & Level 3 consortium complies with them; otherwise, it should be reflected as a non-compliance in REDDIG II provisional acceptance tests (PSAT), which are the responsibility of each of the REDDIG II focal points. Results of the Third technical-operational meeting for the implementation of REDDIG II (RTO/3) 2.24 The RTO/3 meeting was held in Bogota, Colombia, on 28-29 July 2014, with the participation of 9 member States (Argentina, Bolivia, Brazil, Chile, Colombia, Ecuador, Paraguay, Trinidad and Tobago, and Uruguay), totalling 19 attendees, including ICAO experts. 2.25 In this meeting important conclusions were formulated, mainly addressed to focal points, on actions required prior to REDDIG II implementation. A list of such conclusions appears in Appendix E to this working paper. 2.26 Main activities include the need for REDDIG II focal points to monitor the implementation of FAT observations by the contractor, the registration of the new frequencies for REDDIG II before the national entities responsible for the radio frequency spectrum, the installation of a redundant Ethernet switch and router for IP services to be carried on the REDDIG II, the installation of cabling for data and voice services to be carried on the REDDIG II, national coordination, as required, for customs clearance of equipment, and maintenance of antennae, since these will continue to operate with REDDIG II, except for the antenna of Paraguay, which will be new. Copy of the RTO/3 final report can be downloaded from the ICAO website: http://www.icao.int/SAM/Pages/MeetingsDocumentation.aspx?m=2014-REDDIGII01. Customs clearance process of REDDIG II equipment 2.27 The RCC/16 meeting formulated Conclusion RCC/16/5 - Customs clearance updatings, requiring Project RLA/03/901 member States to update information concerning national customs clearance requirements and submit it to the ICAO SAM Office. 2.28 Each of the REDDIG II member States sent its requirements, as well as the address and name of the person to whom the REDDIG II provider should deliver the equipment. 2.29 Despite the delivery of REDDIG II equipment should has been made in late July 2014, was delayed by almost two months due to problems encountered by the contractor in obtaining the export license from French customs. French customs wanted to make sure that REDDIG II equipment was not to be used for military purposes. Accordingly, REDDIG member States sent a form signed by the focal point stating that the equipment was only to be used for civilian purposes. 2.30 In order to compensate for the delay, the contractor sent the equipment by air instead of by sea between mid-September to mid-October 2014. 2.31 In order to coordinate customs clearance of REDDIG II equipment with focal points, two teleconferences were held on 1 and 2 October 2014; to report on the date of delivery of the equipment and documents by the contractor for customs clearance by States, as specified in the contract. 2.32 It was agreed with the States that, although the timetable of activities of REDDIG II specified that States had 45 days to clear local customs, they would try to do it in a shorter period of time so that commissioning would not coincide with Christmas holidays. In this regard, each State noted how much time they would require for this process and it was estimated that it would not -5- RLA/03/901 RCC/18-WP/03 exceed one month. During the teleconference it was considered that in the event a State took 45 days or more to clear customs, that REDDIG II provisional acceptance tests (PSAT) should be conducted in January 2015. 2.33 Considering that the process of custom clearance of the equipment in all the States ended in mid-December, 2014 and that implementation of the last-mile links from nodes of the REDDIG II to the Level 3 fiber-optic network entry points was completed by the end of the month of December 2014, the operational implementation of REDDIG II was postponed to mid-January, 2015. INEO & Level 3 consortium was responsibility of the delay. Operational implementation of REDDIG II 2.34 The operational implementation of REDDIG II by the Consortium INEO & Level 3 began on January 15, 2015 and was completed on January 31, 2015. INEO planned to perform it in five days, but was completed in a period of 17 days. 2.35 The implementation comprises the following phases, whose detailed description is presented as Appendix F to this working paper: Preparation of the migration Land network tests Completion of the implementation of outdoor Commissioning of the satellite termination network Finalization 2.36 To follow up on activities in each of these phases as well as in decision making joint migration to the land, the new VSAT network I REDDIG and provisional acceptance (PSAT) in the site more tests tests (NAT) network, daily teleconferences from January 14 to February 5, 2015 were conducted. 3. Suggested action 3.1 The Meeting is invited to: a) Take note of the information provided; b) review the activities performed 2014 that are presented in in section 2 and in the Appendices A to F of this working paper; and c) discuss any other related matter it may deem appropriate for this agenda item. ------ RLA/03/901 RCC/18-WP/03 Appendix A -A2- RLA/03/901 RCC/18-WP/03 RLA/03/901 RCC/18-WP/03 APPENDIX B Summary of faults and spare parts - 2014 FRAD (1) (1) MODEM (3) (2) (1) (2) SSPA (1) (1) Manufacturer: Memotec FX SLIM Card Universal I/O Card : (1) SBMN : (1) SEGU Manufacturer: ViaSat Quad Output P.S. 24 VDC P.S. BPM Module Conn P.S./Backplane : (1) SBRF, (1) SAEZ, (1) SOCA : (1) SAEZ, (1) SOCA : (1) SBRF : (1) SBRF, (1) SPIM Manufacturer: Paradise Datacom SSPA TX Module M&C : (1) SLLP : (1) SLLP Other REDDIG (1) (1) RX Waveguide Switch : (1) SKED Hard Disk, PC Linux : (1) SOCA RLA/03/901 RCC/18-WP/03 Appendix C REDDIG 2014 Attention to nodes =159 25 Events 20 15 10 5 0 SAEZ SBCT SBMN SBRF SCEL SEGU SGAS SKED SLLP Nodes -1- SMPM SOCA SPIM SUMU SVMI SYGC TTZP COCES RLA/03/901 RCC/18-WP/03 Appendix C REDDIG 2014 Distribution of attentions 16 14 12 Events 10 FRAD MODEM 8 SSPA Otros REDDIG EXTERNOS 6 4 2 0 SAEZ SBCT SBMN SBRF SCEL SEGU SGAS SKED SLLP SMPM SOCA Nodes -2- SPIM SUMU SVMI SYGC TTZP COCES RLA/03/901 RCC/18-WP/03 Appendix C REDDIG 2014 Distribution of attention by category of equipment 21 13% FRAD 56 35% 1 EXTERNOS 2 MODEM Other REDDIG SSPA 28 18% 7 4% -3- 47 30% 3 4 5 RLA/03/901 RCC/18-WP/03 Appendix D REDDIG Network Availability 1 0.999952 0.999947 0.999943 0.999905 2004 2005 2006 2007 0.999951 0.99991 2008 2009 0.99998 0.999939 0.999951 0.999945 2010 2011 2012 2013 0.999901 0.9995 0.999 0.9985 0.998 0.9975 0.997 2014 RLA/03/901 RCC/18-WP/03 APPENDIX E Results of the Third technical-operational meeting for the implementation of REDDIG II (RTO/3) No. Conclusion RTO3-1 Proposal to conduct a course on the WhatsUp Gold application That the Eighteenth Meeting of the Coordination Committee of Project RLA/03/901 (RCC/18) to be carried out at the end of the first trimester of 2015 in Lima, Peru, consider the possibility to develop, as part of the training program, a complete course on the application of WhatsUp Gold at the end of the first semester of 2015. RTO3-2 Implementation of the observations made in the FAT That the REDDIG II focal points: take note of all the observations made during the factory inspection (FAT) presented in this agenda item and are detailed on the REDDIG website www1.lima.icao.int/reddig; verify that the INEO & Level 3 Consortium has implemented them during the provisional acceptance tests in the sites (PSAT); and consider the non compliance of the observations as part of the provisional acceptance in the site (PSAT). RTO3-3 Registration of the new REDDIG II frequencies That the REDDIG II focal points proceed to update the information recorded in the national entities that manage the radio frequency spectrum with the new frequencies allocated to REDDIG II by INTELSAT, presented as Appendix F of this agenda day. RTO3-4 Installation of a redundant router and Ethernet switch for the IP native services That the REDDIG member States that will acquire the IP native service in the REDDIG II (AMHS, radar, AIDC, VoIP), proceed to the installation of a redundant router and Ethernet switch to support all the "VLANs" of all IP services, both present and future that will come through the single port of the REDDIG II node. RLA/03/901 RCC/18-WP/03 Appendix F Operational implementation of REDDIG II Migration Support Document Reference: File: ICAO REQUEST FOR TENDER: ST-22501200 Document support à la migration.doc Project: NEW TRANSPORTATION NETWORK OF THE REGIONAL AERONAUTICAL TELECOMMUNICATION NETWORK (REDDIG II) Portion: Document support à la migration.doc DISTRIBUTION COMPANY Intended for INEO E&S Index A Date 04/12/2014 Drafted by C.CHEVALLIER Q t y COMPANY 1 ICAO Intended for 2 Signature Checked by Approved by Our Ref: December 2014 REDDIG II - Document support à la migration.doc Q t y Page 1/82 DOCUMENT HISTORY IND. DATE PAGES OBJECT AUTHOR C.CHEVALLIER A 04/12/2014 82 Initial Document A 05/01/2015 82 Translation-modification Our Ref: December 2014 REDDIG II - Document support à la migration.doc TechnicisCHEVALLIER Page 2/82 CONTENTS MIGRATION SUPPORT DOCUMENT .................................................................................................................. 1 FILE: DOCUMENT SUPPORT A LA MIGRATION.DOC ............................................................................. 1 CONTENTS ................................................................................................................................................................. 3 TABLE OF FIGURES ................................................................................................................................................ 6 1 1.1 1.2 1.3 1.4 1.5 1.6 2 2.1 2.1.1 2.1.2 2.1.3 2.2 2.3 2.3.1 2.3.2 2.4 2.4.1 2.4.2 2.4.3 2.4.4 2.5 2.6 2.7 2.8 2.9 3 3.1 3.1.1 3.1.2 3.1.3 3.1.4 3.2 3.2.1 3.2.2 3.3 3.3.1 3.3.2 3.4 3.4.1 3.4.2 3.5 3.5.1 INTRODUCTION ............................................................................................................................................... 7 PREFACE ............................................................................................................................................................. 7 INSTALLATION CONDITIONS / AREA OF RESPONSIBILITY OF THE FOCAL POINT ..................................................... 8 NEW EQUIPMENT TO BE INSTALLED..................................................................................................................... 9 SITE INDICES (NUMBERS)................................................................................................................................. 10 CONTACTS ........................................................................................................................................................ 10 SITE SPECIFICATIONS ........................................................................................................................................ 10 DAY 1: PREPARATION FOR MIGRATION ............................................................................................... 11 STEP 1: INSPECTION OF COMPLETED WORK ....................................................................................................... 11 Inspection of the lightning connectors ............................................................................................................ 12 Charging and start-up of the Signal TEK II tester .......................................................................................... 12 For the Brazilian sites: IP re-transmitter installation .................................................................................... 12 STEP 2: PREPARATION FOR REPLACEMENT OF THE FEED HORN OR DIAPHRAGM ........................................ 14 STEP 3: POWER-UP PROCEDURE FOR THE INDOOR PART ................................................................................... 15 Power-up procedure for the bay ..................................................................................................................... 15 Power-up procedure for the equipment .......................................................................................................... 16 STEP 4: CHECKING FUTURE CONNECTIONS ........................................................................................................ 17 Identification of the REDDIG I services to be migrated ................................................................................. 17 Confirmation of ability to connect .................................................................................................................. 18 Case of the E&Ms ........................................................................................................................................... 19 Case of the E1s ............................................................................................................................................... 20 STEP 5: CABLING BETWEEN REDDIG I AND REDDIG II .................................................................................. 21 STEP 6: CONNECTION TO THE LEVEL 3 EQUIPMENT ......................................................................................... 22 STEP 7: LOADING THE CISCO CONFIGURATIONS ................................................................................................ 22 STEP 8: CONNECTION TESTS THROUGH LEVEL 3 ............................................................................................ 22 STEP 9: CALL TO MANAUS OR EZEIZA ON THE CONF-CALL NUMBER ................................................................. 23 DAY 2: TESTS ON THE LEVEL 3 NETWORK ........................................................................................... 24 STEP 1: PRE-TESTS ............................................................................................................................................ 24 Sites with the E1 - Columbia, Peru, and Ecuador. ......................................................................................... 24 Sites with the E&M: ........................................................................................................................................ 24 Sites with the FXO: ......................................................................................................................................... 25 LEVEL 3 performance tests ............................................................................................................................ 26 STEP 2: TELEPHONE MIGRATION TO DIAL PLAN 2 .............................................................................................. 26 Pre-migration tests ......................................................................................................................................... 27 Migration ........................................................................................................................................................ 27 STEP 3: ATS-DS (HOTLINE) MIGRATION........................................................................................................ 28 Pre-migration tests ......................................................................................................................................... 28 Migration ........................................................................................................................................................ 28 STEP 4: TELEPHONE MIGRATION TO DIAL PLAN 1 (ATS).................................................................................... 29 Pre-migration tests ......................................................................................................................................... 29 Migration ........................................................................................................................................................ 29 STEP 5: AFTN AND METEO (WEATHER) MIGRATION ................................................................................... 30 Pre-migration tests ......................................................................................................................................... 32 Our Ref: December 2014 REDDIG II - Document support à la migration.doc Page 3/82 3.5.2 3.6 3.6.1 3.6.2 3.7 3.8 3.8.1 3.8.2 3.8.3 3.9 4 Migration ........................................................................................................................................................ 33 STEP 6: MIGRATION OF THE AMHS .................................................................................................................. 35 Pre-migration tests ......................................................................................................................................... 35 Migration ........................................................................................................................................................ 35 STEP 7: RADAR MIGRATION – SUMU AND SAEZ .......................................................................................... 36 STEP 8: RADAR IP TESTS ................................................................................................................................... 37 Sending a multicast feed with VLC. ........................................................................ Erreur ! Signet non défini. Receiving a feed with VLC ...................................................................................... Erreur ! Signet non défini. Activating the tunnels corresponding to the tests............................................................................................ 37 STEP 9: IT IS TIME TO GO HAVE A BEER (OR SOMETHING ELSE) ......................................................................... 37 DAY 3: FINALISING INSTALLATION OF THE OUTDOOR PART ....................................................... 38 4.1 4.2 4.3 4.4 4.5 4.5.1 4.6 4.7 4.8 4.8.1 4.8.2 4.9 4.9.1 4.9.2 4.9.3 4.10 4.10.1 4.10.2 4.11 4.11.1 4.11.2 5 5.1 5.2 5.3 5.3.1 5.3.2 5.4 5.5 5.5.1 5.5.2 5.5.3 5.5.4 5.5.5 5.5.6 5.5.7 6 6.1 6.1.1 6.1.2 6.2 6.2.1 STEP 0-A: REPLACING THE SOURCE ................................................................................................................... 39 STEP 0-A: REPLACING THE DIAPHRAGM ............................................................................................................ 42 STEP 1: ASSEMBLING THE LNBS ON THE WAVEGUIDE SWITCH ......................................................................... 43 STEP 2: ATTACHING THE LNBS TO THE SOURCE ................................................................................................ 44 STEP 3: INSTALLING CABLES ON THE LNBS ...................................................................................................... 47 Connecting the coaxial and switch cables ...................................................................................................... 47 STEP 4: CONNECTING THE POWER SUPPLY ....................................................................................................... 48 STEP 5: INSTALLING THE WAVEGUIDE ............................................................................................................. 51 STEP 6: CONNECTING THE CABLES .................................................................................................................... 54 IBUC – TX 1+1 ............................................................................................................................................... 54 RX 1+1 ............................................................................................................................................................ 55 STEP 6: POWER-UP AND CONFIGURATION PROCEDURE ...................................................................................... 56 Power-up procedure ....................................................................................................................................... 56 Temporary configuration ................................................................................................................................ 56 Finalising the connection ................................................................................................................................ 56 STEP 7: IBUC AND RX 1+1 CONFIGURATION ............................................................................................. 58 IBUC .......................................................................................................................................................... 58 RX 1+1 ....................................................................................................................................................... 60 STEP 8: LINE-UP ............................................................................................................................................... 61 Preparation ................................................................................................................................................ 61 INTELSAT .................................................................................................................................................. 63 DAY 4: COMMISSIONING ON THE VSAT NETWORK ........................................................................... 67 STEP 1: COMMISSIONING THE NETWORK .......................................................................................................... 67 STEP 2: MIGRATION OF THE SERVICES TO THE VSAT LINK ............................................................................... 69 STEP 3: PSAT TESTS - SERVICES ....................................................................................................................... 70 PSAT ............................................................................................................................................................... 70 MEVA: ............................................................................................................................................................ 70 STEP 4: UPDATING THE NMS ............................................................................................................................ 70 STEP 5: REDUNDANCY TESTS (AND NMS DISPLAY) .......................................................................................... 72 Tx 1+1: IBUC redundancy ............................................................................................................................. 72 RX 1+1 ............................................................................................................................................................ 72 Master SkyWAN .............................................................................................................................................. 72 Cisco ............................................................................................................................................................... 73 SkyWAN .......................................................................................................................................................... 73 Ethernet Switch ............................................................................................................................................... 73 RSS .................................................................................................................................................................. 73 DAY 5: FINALISING........................................................................................................................................ 74 STEP 1: TESTS OF THE DEDICATED LINKS TO THE GBB ..................................................................................... 74 Backup test ...................................................................................................................................................... 74 Dedicated links ............................................................................................................................................... 74 STEP 2: NMS TESTS .......................................................................................................................................... 75 Check the active monitors ............................................................................................................................... 75 Our Ref: December 2014 REDDIG II - Document support à la migration.doc Page 4/82 6.2.2 6.2.3 6.3 6.4 6.5 6.5.1 6.5.2 6.5.3 6.5.4 6.5.5 7 7.1 7.1.1 7.1.2 Check the performance monitors .................................................................................................................... 75 Check the connections to the console ports .................................................................................................... 75 STEP 3: MIGRATION OF THE LEVEL 3 EQUIPMENT .............................................................................................. 75 STEP 4: CHECKING THE PSAT DOCUMENT ........................................................................................................ 76 STEP 5: FINALISING THE INSTALLATION ............................................................................................................ 76 Install the VPN in the bay ............................................................................................................................... 76 Finalise the cabling for the services on REDDIG II ....................................................................................... 76 Finishing work ................................................................................................................................................ 76 Removing the outdoor cables from REDDIG I ............................................................................................... 76 Removing the old IBUCs and RX 1+1 ............................................................................................................ 76 APPENDICES .................................................................................................................................................... 78 TELEPHONY ...................................................................................................................................................... 78 Dial plan ......................................................................................................................................................... 78 Additional E&M and E1 commands ............................................................................................................... 78 Our Ref: December 2014 REDDIG II - Document support à la migration.doc Page 5/82 TABLE OF FIGURES Figure 1 - Overview of the IP re-transmitter components, excerpt from the specific plan ...........13 Figure 2 - Voltage measurement at the bay terminals ...................................................................15 Figure 3 - SkyWAN LED error ........................................................... Erreur ! Signet non défini. Figure 4 - SkyWAN start-up sequence ................................................ Erreur ! Signet non défini. Figure 5 - Example of the services on REDDIG I .........................................................................18 Figure 6 - Memotec CX E&M Cabling .........................................................................................20 Figure 7 - REDDIG I and II connection diagram ..........................................................................21 Figure 8 - Cisco 1921 Example .....................................................................................................22 Figure 9 - monitoring PC - COM port 1 ........................................................................................30 Figure 10 - View of the AFTN ports .............................................................................................30 Figure 11 - Hyperterminal Configuration - AFTN ........................................................................31 Figure 12 - HT Configuration - ASCII ..........................................................................................32 Figure 13 – Bogota ........................................................................................................................33 Figure 14 – View of the source .....................................................................................................38 Figure 15 - View of the antenna body ...........................................................................................44 Figure 16 - Replacing LNBs ..........................................................................................................46 Figure 17 - View of the waveguide to be replaced ........................................................................51 Figure 18 - Amphenol data cable ..................................................................................................54 Figure 19 - Handheld terminal.......................................................................................................56 Our Ref: December 2014 REDDIG II - Document support à la migration.doc Page 6/82 1 INTRODUCTION 1.1 PREFACE The REDDIG system, implemented at the beginning of the 2000s, is an ICAO project for air traffic control in South America. It is interconnected with its equivalent in Central America, COCESNA, through the node in Tegucigalpa, Honduras, and with MEVA (CAR- Caribbean zone) through the nodes in Maiquetía, Venezuela and Bogota, Colombia. Each node in the project is identified by its ICAO code (figure 1). The two main nodes on the networks are SBMN (Manaus, Brazil) and SAEZ (Buenos Aires, Argentina). This document is a supplement to the specific installation specifications for each site. Migration of the REDDIG system requires coordination at all times. Communication is currently supported by a VSAT (satellite) network and will be migrated to a mixed VSAT and terrestrial network (Ground Backbone - GBB, MPLS network) managed by LEVEL 3. The objective of the migration is to: - Replace the existing VSAT system. Replace the RF (and VSAT coaxial cables, if this has not already been done) Modify the antenna (horn, diaphragm, and/or paint) Implement a GPS antenna (if this has not already been done) Implement a monitoring system Carry out the system migration This document describes the installation/migration steps (step 2). The pre-installation carried out in 2014, included the implementation of one or two new bays, new coaxial and data cables to the antenna, installation of the outdoor equipment (IBUC, RX1+1, and GPS antenna), and the power-up procedure for the indoor equipment. The migration includes the steps and procedures for moving the REDDIG I services to REDDIG II while minimising the length of any service interruptions (by using the terrestrial network). It is suggested to examine the summary list of all installation tasks in the appendix. Our Ref: December 2014 REDDIG II - Document support à la migration.doc Page 7/82 1.2 INSTALLATION CONDITIONS / AREA OF RESPONSIBILITY OF THE FOCAL POINT The focal point (on-site contact) shall be responsible for the following points: - Publishing Notams (see glossary) to provide alerts about work and potential service disruptions. Providing an uninterruptible power supply Confirming proper operation with air-traffic controllers He/she is not be responsible for the following, but may be requested to: - Provide us with an electrician to install breakers in the electrical panel on site. Make staff available to us to help with installation tasks such as handling Provide us with a pallet truck for transporting cases/bays Help us to identify an outdoor installation site for the GPS site (see below) Provide us with all required access permissions Our Ref: December 2014 REDDIG II - Document support à la migration.doc Page 8/82 1.3 NEW EQUIPMENT TO BE INSTALLED The new equipment to be installed on the site is as follows: - One bay measuring 600 x 1000 x 2000 mm and related equipment (modems, routers, etc.) One redundant IBUC system (Except in Trinidad, to be installed) Coaxial and outdoor data cables Indoor, CAT V, multi-pair data cables (DB25) Two circuit breakers GPS Antenna Remote monitoring screen, with keyboard and mouse IP Telephone The following have not been installed or still need to be installed: - Waveguide switch and LNB on the VSAT antenna source Electrical connection of the IBUCs and RX1+1 (reuse old cables) Renovation of the VSAT antenna (depending upon the site) Replacement of the source (horn) and/or diaphragm on the source (depending upon the site) Commissioning of the new system (line-up) Migration of the services Customer approval Pay special attention to the packing list provided, which includes all equipment sent. Our Ref: December 2014 REDDIG II - Document support à la migration.doc Page 9/82 1.4 SITE INDICES (NUMBERS) Country Argentina Bolivia Curitiba Manaus Recife Chile Colombia Ecuador Paraguay Peru Guyana Guyana (Cayenne) Suriname Trinidad Uruguay Venezuela 1.5 Number 20 25 30 36 38 40 45 50 55 60 90 92 94 91 65 80 CONTACTS See specific technical installation specifications. 1.6 SITE SPECIFICATIONS See specific technical installation specifications. Our Ref: December 2014 REDDIG II - Document support à la migration.doc Page 10/82 2 DAY 1: PREPARATION FOR MIGRATION 2.1 STEP 1: INSPECTION OF COMPLETED WORK To err is human; therefore, it is important to check the installation work to ensure that everything has been completed. Task IBUC installation RX 1+1 installation Coaxial cable pulling Outdoor data cable pulling Amphenol and coaxial connectors Antenna renovation Earthing the IBUCs and RX 1+1 OK /KO Help See installation specifications See installation specifications Appendix 7.7.6 Appendix 7.7.6 Appendices 7.7.1 and 7.7.3 Appendix 7.8 GPS Antenna Installation Wiring from the GPS antenna to the receiver Appendix 7.9 Appendix 7.9 Installation of the bay Installation of the circuit breakers Power-up procedure for the bay Customer connections provided within 5 m Printer and screen installation Connection of the Belden cable to the Gigamedia connector on the bay (see paragraph 2.1.1) See installation specifications See installation specifications Appendix 7.7.4 If the preceding list has not been entirely approved, complete these tasks right away (except for antenna dimensions). Our Ref: December 2014 REDDIG II - Document support à la migration.doc Page 11/82 2.1.1 Inspection of the lightning connectors 1) Ensure that the Belden cable is properly connected to the gigamedia substrate and connected to the lightning connectors. See appendix 7.7.4 for connection information if necessary. 2) Ensure that the outdoor coaxial cables are properly connected to the lightning connectors. Be sure not to cross the Tx and Rx cables, etc. 2.1.2 Charging and start-up of the Signal TEK II tester It is carefully stored in a small fabric carrying case. It is important to charge it, as you may need it for some tests; wiring tests for example (description in the appendix). See its instructions (in your installation file): 156811_SignalTEK_II_Manual_French 2.1.3 For the Brazilian sites: IP re-transmitter installation For the 3 Brazilian sites, because there is a long distance (> 70 m) between the antenna and the bays, installation of a small self-powered (no electrical connection required) IP re-transmitter has been planned for repeating the signal. Unfortunately, this problem was discovered late, and thus the solution to be installed was not tested or ever installed. This is why the changes to the bay plans are shown in red. The assembly consists of 2 parts: a case on the antenna side to be installed contiguous to the antenna power supply SEEE box, and a small powered modem on the bay side. Our Ref: December 2014 REDDIG II - Document support à la migration.doc Page 12/82 For installation, refer both to the bay plans and the specific plans for the IP re-transmitter supplied. Do not connect the antenna-side box to the power supply. Figure 1 - Overview of the IP re-transmitter components, excerpt from the specific plan Our Ref: December 2014 REDDIG II - Document support à la migration.doc Page 13/82 2.2 STEP 2: PREPARATION FOR REPLACEMENT OF THE FEED HORN OR DIAPHRAGM If you are not involved in this replacement, skip to the next step. In the coming days, you must replace part of the antenna, the source or the diaphragm, WITHOUT RE-AIMING THE ANTENNA. Thus, it is necessary to access this part, located more than 1.8 m above the ground. To do so, it is essential to prepare the following for the day the work is to be done (not now): - Your safety harness - Request a ladder from the customer for safety, then access the source by climbing into the dish. - Request a volunteer to do this for you (bonus authorised) - Rent an aerial basket if the other recommendations are not possible. Our Ref: December 2014 REDDIG II - Document support à la migration.doc Page 14/82 2.3 2.3.1 STEP 3: POWER-UP PROCEDURE FOR THE INDOOR PART Power-up procedure for the bay 1- Close the circuit breakers on the control board 2- Set the voltmeter to VAC; connect the terminals to V (red) and COM (black). 3- Measure the voltage at each bay terminal and read the value (230 VAC, except in Trinidad & Tobago, 110 VAC before the transformer). Figure 2 - Voltage measurement at the bay terminals 4- Close the circuit breakers on the bay, waiting at least 3 seconds between each one. The bay now has power. Complete the corresponding section on the PSAT document with the customer, in paragraph 2.2. Our Ref: December 2014 REDDIG II - Document support à la migration.doc Page 15/82 2.3.2 Power-up procedure for the equipment 2.3.2.1 UPS Allow the Eaton UPS (at the bottom of the bay) to charge for 10 minutes before turning it on. Do not turn on the server before this charging time is complete. 2.3.2.2 Other equipment in the bay You may turn on the other equipment without worry. The equipment should start up, and will be operational after 3 min. 2.3.2.3 Power-up procedure for the control-room equipment Turn on the screen in the control room and verify access to the server (display the server screen) and proper function of the mouse, keyboard. Our Ref: December 2014 REDDIG II - Document support à la migration.doc Page 16/82 2.4 2.4.1 STEP 4: CHECKING FUTURE CONNECTIONS Identification of the REDDIG I services to be migrated Identify the REDDIG I service cable, and verify with the customer that the service is in fact operational. If possible, carry out a test, and above all, pay special attention to the AFTNs. Department: Operational Identification Connector yes/no of the gender) existing cable (and Straight/crossover cabling Plan for an appropriate amount of time: identifying each service is not easy; the bay is 10 years old! Complete the corresponding section on the PSAT document with the customer, in paragraph 3.1. Our Ref: December 2014 REDDIG II - Document support à la migration.doc Page 17/82 Figure 3 - Example of the services on REDDIG I 2.4.2 Confirmation of ability to connect If the bay is less than 5 m away, an extension has been provided (and you have gender benders in your equipment bag). Otherwise, the customer should have provided the service at the base of the REDDIG II bay (contractual). Identify the extension for each service, label it (at least temporarily), ensure that it is long enough to make the connection, and check its connector type. Department: Identification Identification of the Comment/ of the extension problem? existing cable Our Ref: December 2014 REDDIG II - Document support à la migration.doc Page 18/82 For help, use the excel document "S… interface wiring .xls", in the 07-REDDIG I info folder. Example: 2.4.3 Case of the E&Ms The wiring for the E&Ms is not straight; it depends heavily upon the products used. With the customer, establish the pin-out. E&M Cable from Memotec CX (existing): Our Ref: December 2014 REDDIG II - Document support à la migration.doc Page 19/82 Figure 4 - Memotec CX E&M Cabling For help, the Cisco wiring diagrams are provided in appendix 7.2. 2.4.4 Case of the E1s The standard cabling for the E1s is straight. The clock may be either sent by the customer's PBX, or by the Cisco. Know that you may have to make a crossover cable, by crossing the green pair (1&2) with the blue pair (4&5). Our Ref: December 2014 REDDIG II - Document support à la migration.doc Page 20/82 2.5 STEP 5: CABLING BETWEEN REDDIG I AND REDDIG II After having identified the customer transitions or connections, connect the transitions to REDDIG II and the connections made by the customer to REDDIG II. Do not disconnect anything from REDDIG I yet. Actual services checking: - AFTN - chain functionnality - phone calls - ... VSAT and MPLS gateway equipments installation Check transition cable length and gender up to patch pannel Existing services stay connected REDDIG I REDDIG II Transition cables installation (no connection to the existing REDDIG system) Figure 5 - REDDIG I and II connection diagram Our Ref: December 2014 REDDIG II - Document support à la migration.doc Page 21/82 2.6 STEP 6: CONNECTION TO THE LEVEL 3 EQUIPMENT LEVEL 3 is the operator of the ground link for REDDIG II. They should have installed a Cisco 1921 router or equivalent. Figure 6 - Cisco 1921 Example With (or without) the help of the focal point, identify the router, and without disconnecting it, connect it to REDDIG II with the appropriate cable (use an extension or a longer cable if necessary). This equipment is identified in boxes on the plans as "LEVEL 3 EQUIPMENT". 2.7 STEP 7: LOADING THE CISCO CONFIGURATIONS Load the new Cisco configurations (version 8). Load the Cisco for chain A, then B, and lastly the GBB. Use appendix 7.3 for help if necessary. 2.8 STEP 8: CONNECTION TESTS THROUGH LEVEL 3 This step involves checking the connection of REDDIG II through the LEVEL 3 network. From your PC connected to the switch (port 22 for example), or from the monitoring PC, conduct a PING test to Manaus, and then to the sites to which you have ATS-DS hotline communication. As a reminder, you must open the command prompt (CMD) to conduct this test. Our Ref: December 2014 REDDIG II - Document support à la migration.doc Page 22/82 IP address of your PC: IP: 10.100.XX.200 MASK: 255.255.255.0 Gateway: 10.100.XX.254 Address for Manaus: 10.100.36.254 If this test fails, ensure that Manaus can be reached (ring me!), and then go to appendix 7.4 to start debugging. 2.9 STEP 9: CALL TO MANAUS OR EZEIZA ON THE CONF-CALL NUMBER Depending upon your zone, use the IP telephone to call Manaus or Ezeiza on the conf-call number: Manaus: 1111 Ezeiza: 1121 This number will be useful for reaching Manaus and Ezeiza for coordinating tests. For the sites in Colombia, Ecuador, and Peru, it is recommended, if you have enough time, to carry out the next step (day 2, step 1), or at least to coordinate its execution for the following day as early as possible (as a disconnection is required for the test). Our Ref: December 2014 REDDIG II - Document support à la migration.doc Page 23/82 3 DAY 2: TESTS ON THE LEVEL 3 NETWORK 3.1 3.1.1 STEP 1: PRE-TESTS Sites with the E1 - Columbia, Peru, and Ecuador. Together with the focal point, under its authorization, disconnect the E1 from REDDIG I and connect it to REDDIG II. It would interrupt the communication, so do it only under its approval. Check the synchronisation of the E1s. To cross TE/NT, the command is as follows: Router # conf t Router (config)# controller e1 ___ (0/y/z : 0/slot/port) Router (configure controller)# clock source___ (internal (NT) / line (TE) / free running) Place a call to Manaus, on dial plan 2 (maintenance/admin), at 3601 or 3602. Receive a call from Manaus on the maintenance line. Correct the parameters if necessary. For more E1 setting commands, refer to appendix 7.5.2. 3.1.2 Sites with the E&M: Select an E&M connection on dial plan 2 (maintenance/admin). Together with the focal point, if possible, and under its supervision and authorization, disconnect the E&M cable from REDDIG I and connect it to REDDIG II (see file: Dial peer numbers – rev final.xlsx) Place a call to your INEO contact in Manaus on dial plan 2 (maintenance), at 3601 or 3602, or in Ezeiza at 2001. If the E&M is on dial plan 1, call Manaus at 3612. Receive a call from Manaus or Ezeiza on the maintenance line (dial plan 2), or on dial plan 1. If nothing happens, check the wiring (see appendix YYY). An LED should light up on the back side of the Cisco E&M card. Correct the parameters if necessary. Our Ref: December 2014 REDDIG II - Document support à la migration.doc Page 24/82 Some basic E&M commands: Router # conf t Router (config)# voice-port ___ (0/y/z : 0/slot/port) Router(config-voiceport)# ___ Cptone ___ (defines the ring type by country) dial-type ___ (defines the digit modulation type) dtmf—touch-tone dialer pulse—pulse dialer impedance ___ (defines the type of impedance) 600c 600r 900c complex1 complex2 operation ___ (defines the type of operation: 2 wire /4 wire) two-wire operation four-wire operation signal ___ (defines the signal type) delay-dial immediate wink-start type ___ (defines the type of E&M) E&M type I E&M type II E&M type III E&M type V For more E&M setting commands, refer to appendix 7.5.2. 3.1.3 Sites with the FXO: Select an FXS connection and an FXO on the Cisco. Connect the FXO to the PBX. Place a call to check the accuracy of the settings. Our Ref: December 2014 REDDIG II - Document support à la migration.doc Page 25/82 3.1.4 LEVEL 3 performance tests Ping the various sites, one after another. Send 100 pings, site by site: Ping 10.100.XX.254 –n 100 Read the min, max, and average delay values, as well as the number of lost packets, and fill in the corresponding section on the PSAT document with the customer, in paragraph 3.2 3.2 STEP 2: TELEPHONE MIGRATION TO DIAL PLAN 2 COORDINATION: To avoid chaos and calls to everyone, we have identified 4 coordinators on the network. The coordinators will authorise calling by the sites under their authority. Similarly, they will communicate with the other coordinators in the event of line tests out of their zone. For example, Argentina will coordinate for Argentina, Chile, Paraguay, and Uruguay. Therefore, Argentina will call Uruguay for example, and ask it to call the other countries. In this case, the other countries will await for a call from Uruguay and will not call anyone else (thus, their line will not give a busy signal...). Dial plan 2 is reserved for maintenance / admin calls. Our Ref: December 2014 REDDIG II - Document support à la migration.doc Page 26/82 3.2.1 Pre-migration tests Disconnect the maintenance telephone from REDDIG I, and connect it to REDDIG II. Conduct a call test to the other maintenance telephones according to the following hierarchy: Country Argentina Bolivia Curitiba Manaus Recife Chile Colombia* Ecuador* Paraguay Peru* Guyana Guyana Suriname Trinidad Uruguay Venezuela Coordinator Argentina Recife Recife Manaus Recife Argentina Manaus Manaus Argentina Manaus Venezuela Venezuela Venezuela Venezuela Argentina Venezuela Sites with E&M will only see the corresponding LED light up. * Sites with an E1 cannot carry out this test. It will be replaced by AFTN tests between these sites. Complete the corresponding section (4.1.1) on the PSAT document with the customer. 3.2.2 Migration Migrate the services according to the same hierarchy, and test. Complete the corresponding section (4.1.2) on the PSAT document with the customer. Our Ref: December 2014 REDDIG II - Document support à la migration.doc Page 27/82 3.3 3.3.1 STEP 3: ATS-DS (HOTLINE) MIGRATION Pre-migration tests Conduct a call test to the other telephones according to the following hierarchy: Country Argentina Bolivia Curitiba Manaus Recife Chile Colombia* Ecuador* Paraguay Peru* Guyana Guyana Suriname Trinidad Uruguay Venezuela Coordinator Argentina Recife Recife Manaus Recife Argentina Manaus Manaus Argentina Manaus Venezuela Venezuela Venezuela Venezuela Argentina Venezuela Sites with E&M will only see the corresponding LED light up. * Sites with an E1 cannot carry out this test. Complete the corresponding section (4.2.1) on the PSAT document with the customer. 3.3.2 Migration Migrate the services according to the same hierarchy. Do not migrate the ATS-DS to Peru, Colombia, or Ecuador. Test. Complete the corresponding section (4.2.2) on the PSAT document with the customer. Our Ref: December 2014 REDDIG II - Document support à la migration.doc Page 28/82 3.4 STEP 4: TELEPHONE MIGRATION TO DIAL PLAN 1 (ATS) Dial plan 1 is reserved for ATS calls, to be dialled. For sites with an E1, a service interruption must be planned (alert those responsible). 3.4.1 Pre-migration tests Conduct a call test to the other telephones according to the following hierarchy: Country Argentina Bolivia Curitiba Manaus Recife Chile Colombia Ecuador Paraguay Peru Guyana Guyana Suriname Trinidad Uruguay Venezuela Coordinator Argentina Recife Recife Manaus Recife Argentina Manaus Manaus Argentina Manaus Venezuela Venezuela Venezuela Venezuela Argentina Venezuela Sites with E&M will only see the corresponding LED light up. Telephones through E1 cannot be pre-tested. Complete the corresponding section (4.3.1) on the PSAT document with the customer. 3.4.2 Migration Migrate the services according to the same hierarchy. Provide as much assistance as possible with the migration of Peru, Columbia, and Ecuador, as they must migrate all of their services at once. Test. Complete the corresponding section (4.3.2) on the PSAT document with the customer. Our Ref: December 2014 REDDIG II - Document support à la migration.doc Page 29/82 3.5 STEP 5: AFTN AND METEO (WEATHER) MIGRATION Here, only AFTNs and METEO will be migrated, do not migrate RADARS for SUMU and SAEZ. AFTN tests must be conducted using the serial/USB adapters provided or COM port 1 on the monitoring PC: COM 1 Figure 7 - monitoring PC - COM port 1 Serial ports, DB 25 male. Figure 8 - View of the AFTN ports Use hyperterminal for asynchronous data transfer. Our Ref: December 2014 REDDIG II - Document support à la migration.doc Page 30/82 The port uses 8 data bits, no parity or flow control bits, 1 stop bit (configuration 8/N/1), typically at 2400 bps, but pay special attention as this depends upon the connection. Configure the connection as follows: Figure 9 - Hyperterminal Configuration - AFTN Our Ref: December 2014 REDDIG II - Document support à la migration.doc Page 31/82 Figure 10 - HT Configuration - ASCII The parameter, "echo typed character locally" will display what you are typing in the window. Once a session has been opened, you can type text, which will be received on the other end. Use the dialpeer.xls file to identify the various connections and their speeds. 3.5.1 Pre-migration tests Conduct a test in hyperterminal by coordinating according to the following hierarchy: Country Argentina Bolivia Curitiba Manaus Recife Chile Colombia* Ecuador* Paraguay Peru* Guyana Guyana Suriname Coordinator Argentina Recife Recife Manaus Recife Argentina Manaus Manaus Argentina Manaus Venezuela Venezuela Venezuela Our Ref: December 2014 REDDIG II - Document support à la migration.doc Page 32/82 Trinidad Uruguay Venezuela Venezuela Argentina Venezuela The coordinator will indicate which site should transmit, and thus the other sites will connect to the corresponding port. Complete the corresponding section (4.4.1) on the PSAT document with the customer. 3.5.2 Migration Migrate the services according to the same hierarchy, and test. E1 DCE RXD TXD P1 P2 + P3 P4 P5 + CONSOLE SLOT 6 E1 E1 Voice communication to REDDIG II nodes and MEVA II nodes VOICE PABX Voice communication MEVA II nodes AFTN connections to REDDIG II and MEVA II nodes E1 AFTN connections to MEVA II nodes AFTN switch Figure 11 – Bogota Colombia: migrate the MEVA connection from Atlanta (KATL) to REDDIG II. Our Ref: December 2014 REDDIG II - Document support à la migration.doc Page 33/82 SLOT5 SLOT 4 SLOT 3 SLOT 2 SLOT 1 VSAT REDDIG I VSAT REDDIG II GBB REDDIG II DAV DAV DCE RXD TXD P1 P2 + P3 P4 P5 + CONSOLE SLOT 6 Voice communication to REDDIG II nodes FXO FXS SLOT5 SLOT 4 SLOT 3 SLOT 2 SLOT 1 AFTN connections to MEVA II nodes Voice communication to MEVA II nodes AFTN switch VOICE INTERFACES Venezuela: leave the MEVA connections on the Memotec CX. Complete the corresponding section (4.4.2) on the PSAT document with the customer. Our Ref: December 2014 REDDIG II - Document support à la migration.doc Page 34/82 3.6 STEP 6: MIGRATION OF THE AMHS The customer must modify the AMHS for the migration. Therefore, a PC to PC test must be conducted before the migration, to show that the link is valid. 3.6.1 Pre-migration tests 1) Connect to Netgear switch A, select a port to which nothing is connected, and modify the port to accept AMHS (VLAN 100): - On the VLAN 100, assign the port to Untagged "U" - On the PVID part, assign the VLAN 100 to this port. For help, refer to the user manual for the Netgear switch. 2) Configure your computer to be on the AMHS network (see dial plan), without giving it a gateway. Your IP address will end in .200. 3) Then ping the gateway (.254). It should respond. 4) Then configure the gateway and ping the gateway of one of the REDDIG sites. If this does not work, conduct a trace route (tracert) to the remote site and check the routing tables (see appendices 7.4.4 and 7.4.5) 5) Ping another REDDIG II PC; coordinate according to the standard table as necessary. Complete the corresponding section (4.5.1)on the PSAT document with the customer. 3.6.2 Migration 1) Ask the customer to load the configuration for its router, in accordance with the addressing plan. 2) Once loaded, connect it to the "IP service" port through the patch panel. 3) Conduct a connection test with a ping, coordinating in the standard way: Country Argentina Bolivia Curitiba Manaus Recife Chile Coordinator Argentina Recife Recife Manaus Recife Argentina Our Ref: December 2014 REDDIG II - Document support à la migration.doc Page 35/82 Colombia* Ecuador* Paraguay Peru* Guyana Guyana Suriname Trinidad Uruguay Venezuela Manaus Manaus Argentina Manaus Venezuela Venezuela Venezuela Venezuela Argentina Venezuela 4) Ask the customer to validate with an AMHS file transfer. Complete the corresponding section (4.5.2)on the PSAT document with the customer. 3.7 STEP 7: RADAR MIGRATION – SUMU AND SAEZ The RADAR ports are DB25. They are planned to be transported in BSTUN (BiSync). Migrate these ports simultaneously between SUMU and SAEZ. Check with the customer to ensure the system is operating properly. Complete the corresponding section (4.6.1) on the PSAT document with the customer. Our Ref: December 2014 REDDIG II - Document support à la migration.doc Page 36/82 3.8 STEP 8: RADAR IP TESTS 1) Connect to Netgear switch A, select a port to which nothing is connected, and modify the port to accept AMHS (VLAN 101): - On the VLAN 101, assign the port to Untagged "U" - On the PVID part, assign the VLAN 101 to this port. 2) 3) 4) 5) For help, refer to the user manual for the Netgear switch. Configure your computer to be on the AMHS network (see dial plan), without giving it a gateway. Your IP address will end in .200. Then ping the gateway (.254). It should respond. Then configure the gateway and ping the gateway of one of the REDDIG sites. If this does not work, conduct a trace route (tracert) to the remote site and check the routing tables (see appendices 7.4.4 and 7.4.5) Ping another REDDIG II PC; coordinate according to the standard table as necessary. Complete the corresponding section (4.5.1)on the PSAT document with the customer. 3.8.1 Activating the tunnels corresponding to the tests The RADAR tunnels have the same interface number as the site to which they go. Thus, a tunnel to Argentina SAEZ will have interface number 20. To Bolivia SLLP, 25, etc. Thus, one can activate or deactivate tunnel interfaces: Router Router Router Router # conf t (config)# interface tunnel XX (config-if)#shut (deactivate) (config-if)#no shut (activate) Activate the tunnels site by site, depending upon the tests to be conducted, on all of the Ciscos (A, B, and GBB). Once the test has been conducted, deactivate the tunnel. Preferably, only have tunnels open to a single site at one time. Complete the corresponding section (4.6.2)on the PSAT document with the customer. 3.9 STEP 9: IT IS TIME TO GO HAVE A BEER (OR SOMETHING ELSE) Our Ref: December 2014 REDDIG II - Document support à la migration.doc Page 37/82 4 DAY 3: FINALISING INSTALLATION OF THE OUTDOOR PART At this point, the services (excluding MEVA) should be functioning on the LEVEL 3 network. Therefore, the VSAT antenna may be turned off. Thus, it is possible to make the equipment replacements next to the antenna. Figure 12 – View of the source Our Ref: December 2014 REDDIG II - Document support à la migration.doc Page 38/82 4.1 STEP 0-A: REPLACING THE SOURCE 1) Assemble the source Sub-reflector support frames Feed Sub reflector Mount the Sub reflector on the feed using the frames and screws: Our Ref: December 2014 REDDIG II - Document support à la migration.doc Page 39/82 2) Turn off the amplifiers (SSPA A and B) and the existing outdoor box (switch box – waveguide) at the electrical panel. If possible, lock it out. Our Ref: December 2014 REDDIG II - Document support à la migration.doc Page 40/82 3) Do not forget you safety harness and hard hat. 4) With the resources defined in paragraph 2.2, access the inside of the dish (or have someone else do so). 5) Bring the new source and its tools with you too (penetrating oil, hex keys, open-ended spanners, and tubular socket wrenches). 6) Use a pencil to draw a line on the existing source and its axis to identify the original position of the source (normally there is a circular guide on the inside). Thus, if it was turned, you will not see one line, but two unaligned segments. 7) Remove the existing source. 8) If necessary, dry the tube (clean dry cloth, and if you have it, an air can). 9) Replace the old source with the new one. Our Ref: December 2014 REDDIG II - Document support à la migration.doc Page 41/82 Complete the corresponding section (5.1.1) on the PSAT document with the customer. 4.2 STEP 0-A: REPLACING THE DIAPHRAGM 1) Turn off the existing SSPAs. 2) Do not forget you safety harness and hard hat. 3) With the resources defined in paragraph 2.2, access the inside of the dish (or have someone else do so). 4) Bring tools with you (penetrating oil, hex keys, open-ended spanners, tubular socket wrenches, and scissors), and something to protect the source temporarily (plastic bag that can be sealed and tape). Diaphragm 5) 6) 7) 8) 9) Use a pencil to draw a line on the existing source and its axis to identify its original position. Remove the upper part of the existing source and take out the old diaphragm. Come down off the antenna, with the old diaphragm and upper part of the feed. Cut the new diaphragm to match the old one. Go back onto the antenna and re-attach everything. Complete the corresponding section (5.1.1) on the PSAT document with the customer. Our Ref: December 2014 REDDIG II - Document support à la migration.doc Page 42/82 4.3 STEP 1: ASSEMBLING THE LNBS ON THE WAVEGUIDE SWITCH 1) Take the LNBs, rectangular seals, Prematex lubricant, and spray grease/silicone (to complete the insulation). 2) Verify that all equipment is dry. For each LNB, 1) Spray the round seal (if there is a groove on the LNB and on the waveguide) or the halfmoon seal (if there is a groove on only one piece of equipment). 2) Insert the seal into the groove 3) Attach the LNB to the waveguide switch (ports 1 and 3) Our Ref: December 2014 REDDIG II - Document support à la migration.doc Page 43/82 4.4 STEP 2: ATTACHING THE LNBS TO THE SOURCE Except for the special case of Paraguay, the LNB is accessed through the trap door behind the antenna body. Antenna body Figure 13 - View of the antenna body Do not turn the existing source. A polarity test will be conducted, so if you do not move the source, you will have nothing to do (except those who will replace it). For information, the screws used to modify the polarisation are as follows: Our Ref: December 2014 REDDIG II - Document support à la migration.doc Page 44/82 Polarisation adjustment zone Polarisation adjustment zone. Adjustment screw Our Ref: December 2014 REDDIG II - Document support à la migration.doc Page 45/82 1) 2) 3) 4) 5) 6) 7) Remove the existing waveguide switch and LNBs Identify the groove type (groove or no groove) on the source Dry the waveguide if necessary Clean the groove Prepare the screws as in paragraph 4.3 In Lima, identify the groove type on the waveguide filter Depending upon the grooves, prepare a rectangular seal (half-moon or round), spray it, and assemble the switch + LNB (and the filter in Lima) on the source as follows: Connections and filter unchanged Figure 14 - Replacing LNBs Our Ref: December 2014 REDDIG II - Document support à la migration.doc Page 46/82 4.5 4.5.1 STEP 3: INSTALLING CABLES ON THE LNBS Connecting the coaxial and switch cables Connect the coaxial cables to the LNBs and the Amphenol to the waveguide switch. 3 J7 - Amphenol 4 J5-coax 1 J4-coax Our Ref: December 2014 REDDIG II - Document support à la migration.doc Page 47/82 4.6 STEP 4: CONNECTING THE POWER SUPPLY 1) Verify that the circuit breakers in 4.1 are in fact open (off). 2) Disconnect the old power supply cables At the SSPAs, disconnect the power supply cable (J7). At the electrical panel, disconnect the 220V AC power supply cable. Our Ref: December 2014 REDDIG II - Document support à la migration.doc Page 48/82 3) With the multimeter, verify that there is no voltage on the three cables. 4) Prepare terminations for the two IBUCs With these same cables, connect the three plugs to the Terrasat power supply cables. To do so, refer to the "IBUC power supply adapter connection procedure" in appendix 7.7.2. 5) Prepare terminations for the RX 1+1. For Brazil, connect the cable coming from the electrical panel (above) to the IP re-transmitter. With the 3m power supply cable provided, put a termination on one side with the Terrasat connector and plug it into the RX1+1, and plug the other side into the IP re-transmitter: Our Ref: December 2014 REDDIG II - Document support à la migration.doc Page 49/82 Our Ref: December 2014 REDDIG II - Document support à la migration.doc Page 50/82 4.7 STEP 5: INSTALLING THE WAVEGUIDE The internal waveguide (in the antenna body) remains unchanged. Only change the one that extends out of the access wall to the antenna body, to the IBUC: Figure 15 - View of the waveguide to be replaced 1) Prepare the new waveguide and the rectangular Terrasat seal kit included in the IBUC carton: Our Ref: December 2014 REDDIG II - Document support à la migration.doc Page 51/82 2) 3) 4) 5) Prepare the screws with lubricant. Disconnect the old waveguide Clean the surface to which the new waveguide will be connected. Use an appropriate seal (it is smaller than the LNB seal), spray it, and attach the waveguide to the antenna pillar. 6) On the IBUC TX 1+1 side, remove the temporary protection from the waveguide switch and install the guide opposite the load, with the standard protective measures (seal, screws, etc.): Our Ref: December 2014 REDDIG II - Document support à la migration.doc Page 52/82 Waveguide Sortie output guide d’onde Load Charge Our Ref: December 2014 REDDIG II - Document support à la migration.doc Page 53/82 4.8 4.8.1 STEP 6: CONNECTING THE CABLES IBUC – TX 1+1 1) Connect the coaxial cable to J6 2) Connect both power supply cables 3) Connect the Belden, Amphenol data cable to J3: Figure 16 - Amphenol data cable Our Ref: December 2014 REDDIG II - Document support à la migration.doc Page 54/82 4.8.2 RX 1+1 1) Connect the coaxial cable from the bay to "L-Band RX" connector J6: Do not finalise the moisture protection measures; wait until the tests and power-up procedures have been completed. Temporarily protect the cables with tape. 2) Connect the power supply cable – FOR BRAZIL In Brazil, there is an IP re-transmitter. Provide power to the IP re-transmitter by Our Ref: December 2014 REDDIG II - Document support à la migration.doc Page 55/82 2) Other sites: connect the power supply cable 4.9 4.9.1 STEP 6: POWER-UP AND CONFIGURATION PROCEDURE Power-up procedure Turn on power to the equipment by closing the circuit breakers that were opened earlier. 4.9.2 Temporary configuration Using the hand held terminal, temporarily configure the RX 1+1 and both IBUCs: Figure 17 - Handheld terminal 1) Connect it to the IBUCs, on J1 for IBUC A and J8 for IBUC B, and on J1 for the RX 1+1. 2) A block will blink. Press the "." button four times 3) When prompted, enter the password, "1234" 4) Navigate through the menus with the left and right arrows, and through the sub-menus with the up and down arrows. 5) For the IBUCs, go to the "TX" menu, then to the "Tx On/off" sub-menu and select Off (memory button 2...). 6) On the "interface" menu, enter the following IP addresses: IBUC A: 10.100.xx.41 IBUC B: 10.100.xx.42 RX1+1: 10.100.xx.43 Mask 255.255.255.0 Gateway: 10.100.XX.254 4.9.3 Finalising the connection 1) Connect the Belden Amphenol data cable to the RX 1+1 on J1. 2) Return to the room in which the bay is located. 3) From the monitoring PC or your computer, ping the equipment. Our Ref: December 2014 REDDIG II - Document support à la migration.doc Page 56/82 If it does not work, check the gigamedia (see paragraph 2.1.1) and lightning connector connections, then check the IP configuration on the equipment. If necessary, you have a TCP/IP test cable from Terrasat: Take your laptop and the cable, go to the antenna, and verify that you are able to send a ping. Correct the cabling if necessary. Our Ref: December 2014 REDDIG II - Document support à la migration.doc Page 57/82 4.10 STEP 7: IBUC AND RX 1+1 CONFIGURATION 4.10.1 IBUC Sign onto the IBUCs using your web browser (password 1234). On the home page (Info), it is possible to identify the power (40 W or 80 W on the IBUC). Configure the following settings: 4.10.1.1 Tx config: 6015 Si envoir d’une porteuse CW: Continuous. Sinon (cas normal): Burst Si IBUC 40W: 26 Si IBUC 80W: 29 Mettre au max (16) et diminuer selon lineup Si IBUC 40W: 26 Si IBUC 80W: 29 Si IBUC 40W: 47 Si IBUC 80W: 50 Laisser par défaut. A ne changer que suivant un test précis sur skywan (variation importante du frequency offset entre IBUC A et B avec désynchronisation) During the SkyWAN line-up, with Intelsat, the transmission power will be adjusted. To limit the maximum output power of the IBUCs, it is preferable to work at the maximum attenuation of the Our Ref: December 2014 REDDIG II - Document support à la migration.doc Page 58/82 IBUCs and minimum attenuation of the SkyWAN, and to then lower the attenuation of the IBUCs depending upon the feedback from Intelsat. During the line-up, you will be asked to transmit a pure carrier wave, CW. In this case, you must change the reading of the IBUCs from "Burst" to "Continuous". 4.10.1.2 Interface config Check the addresses entered in the IP address (10.100.XX.41 and .42), IP subnet mask (255.255.255.0) and gateway fields (10.100.XX.254). The rest are default values. 4.10.1.3 System config Enter the Time settings in UTC time. Custom title: site name 4.10.1.4 Alarm config Normally, the Tx and Temperature alarms must be in Major. 4.10.1.5 Redund cfg Enter the following settings: Set IBUC location: leave the default value Set Online IBUC: used to modify the position of the switch, and thus which IBUC is transmitting to the antenna. Redundancy mode: Reverting: allows switching from A to B and B to A Redundancy switching type: Auto: switching is automatic Auto clone settings: enable: changes to the major settings for the active IBUC will be automatically entered the same on the inactive IBUC. Other IBUC IP address and Other IBUC public Address: 10.100.XX.41 if you are configuring IBUC B and 10.100.XX.42 if you are configuring IBUC A. 4.10.1.6 Alarm log After having configured both IBUCs, clear the log by clicking "clear" Our Ref: December 2014 REDDIG II - Document support à la migration.doc Page 59/82 4.10.2 RX 1+1 4.10.2.1 Rx Cfg 4.10.2.2 Interface Cfg Check the addresses entered in the IP address (10.100.XX.43), IP subnet mask (255.255.255.0) and gateway fields (10.100.XX.254). The rest are default values. 4.10.2.3 System config Enter the Time settings in UTC time. Custom title: site name 4.10.2.4 Alarm config Normally the threshold alarms must be in Major. Deactivate the "10 MHz Alarm" (10 MHz internal to the LNB). 4.10.2.5 Redund cfg Enter the following settings: Set Online RX1+1: used to change the position of the switch and thus which LNB is receiving from the antenna. Redundancy mode: Reverting: allows switching from A to B and B to A Redundancy switching type: Auto: switching is automatic 4.10.2.6 Alarm log Clear the log after having configured the RX 1+1. Our Ref: December 2014 REDDIG II - Document support à la migration.doc Page 60/82 4.11 STEP 8: LINE-UP The line-up consists of calibrating the modems and IBUCs in terms of power and receiving levels. 4.11.1 Preparation 1) 2) 3) 4) 5) 6) Connect to the IBUC from the monitoring PC and check that its attenuation is at maximum Turn off IBUC transmission from the web page (disable) Disconnect the Ethernet cables from SkyWANs A and B Plug an Ethernet connection into port 1 on SkyWAN A Ensure that both the Diag and Operation LEDs are blinking (green and red respectively) Start the ND Satcom Line-Up manager and connect to SkyWAN A (10.100.XX.31) Our Ref: December 2014 REDDIG II - Document support à la migration.doc Page 61/82 7) In the "set parameters" section, configure the settings as follows: EsN0Min=11.2 dB EsN0Mod=13.2 dB EsN0Max=15.2 dB Round trip time: Country Argentina Bolivia Brazil - Curitiba Brazil - Manaus Brazil - Recife Chile Colombia Ecuador RTT (µs) 248574 244585 243661 240511 240004 250862 245122 247620 Paraguay Peru 244568 247153 Uruguay Venezuela 248331 243095 Guyana 240401 French Guyana Trinidad & Tobago 239326 241394 Suriname 239781 8) Do the same thing on SkyWAN B. Our Ref: December 2014 REDDIG II - Document support à la migration.doc Page 62/82 4.11.2 INTELSAT Intelsat owns the satellite. It will be notified of our work. Each site must be verified in terms of polarity and power. To do this, each site must make contact and follow their instructions, or call an auxiliary, which will make contact with Intelsat for it. Country L-band frequency (modem) C-band frequency up Carrier ID Auxiliary Argentina 1 360.504 MHz 6 014. 496 MHz 18663197 Camus Bolivia Brazil - Curitiba Brazil - Manaus Brazil - Recife Chile Colombia 1 359.1065 MHz 6 015.8935 MHz 18663200 Molière 1 360.504 MHz 6 014. 496 MHz 18663197 Camus 1 360.504 MHz 6 014. 496 MHz 18663197 Chevallier 1 357.813 MHz 6 017.187 MHz 18663203 Chevallier 1 360.504 MHz 6 014. 496 MHz 18663197 Camus 1 359.1065 MHz 6 015.8935 MHz 18663200 Molière Ecuador 1 359.1065 MHz 6 015.8935 MHz 18663200 Molière Paraguay 1 359.1065 MHz 6 015.8935 MHz 18663200 Molière Peru Uruguay Venezuela 1 359.1065 MHz 6 015.8935 MHz 18663200 Molière 1 360.504 MHz 6 014.496 MHz 18663197 Camus 1 357.813 MHz 6 017.187 MHz 18663203 Chevallier Guyana 1 357.813 MHz 6 017.187 MHz 18663203 Chevallier French Guyana 1 357.813 MHz 6 017.187 MHz 18663203 Chevallier 1 357.813 MHz 6 017.187 MHz 18663203 Chevallier 1 357.813 MHz 6 017.187 MHz 18663203 Chevallier Trinidad Tobago Suriname & 1) Each auxiliary will coordinate the line-up 2) By request from the auxiliary, authorise transmission from both IBUCs. Notify the auxiliary of the weather, as the line-up must be done in clear weather. 3) By request from the auxiliary, contact Intelsat Our Ref: December 2014 REDDIG II - Document support à la migration.doc Page 63/82 4) Follow its instructions: a. Request confirmation of the proper polarization isolation If necessary, turn the source... Complete the corresponding section (5.2.1, Polarization adjustment) on the PSAT document with the customer. b. Sending an unmodulated carrier wave (Unmodulated CW. Go to the Test section, see below). In test mode, on the SkyWAN, both the diag and operation LEDs will blink green. Adjust the SkyWAN power (lower/increase the attenuators, do not forget to click on 'Txreadjust') If you reach 0 attenuation on the SkyWANs, lower the attenuation on the IBUCs Note the maximum attenuation value. Complete the corresponding section (5.2.1, Line-up with Intelsat ) on the PSAT document with the customer. Our Ref: December 2014 REDDIG II - Document support à la migration.doc Page 64/82 Carrier ID 18663197: 1360504000 Hz Carrier ID 18663200: 1359106500 Hz Carrier ID 18663197: 810,6 kBaud Carrier ID 18663200: 738,6 kBaud m8PSK R23 = 2/3 293 Carrier ID 18663203: 693,3 kBaud Carrier ID 18663203: 1357813000 Hz r02 3 cwUnmodulated ou BERTinTX-Rxmode 2 1 Our Ref: December 2014 REDDIG II - Document support à la migration.doc Page 65/82 4 c. Without touching the SkyWAN attenuators, switch from one IBUC to the other and verify with Intelsat that the difference in levels is less than 0.1 dB. Otherwise, note the difference and adjust the attenuation on the IBUCs so that the output power is the same, to within less than 0.1 dB. d. Sending a modulated carrier wave (BERT in TxRx mode) Adjust the SkyWAN power (lower/increase the attenuators), or the power on the IBUCs. Note the maximum SkyWAN attenuation value. SkyWAN A: Attenuation:__________dB e. Do the same for SkyWAN B, without touching the IBUCs. Note the maximum SkyWAN attenuation value. SkyWAN B: IBUC A: IBUC B: Attenuation:__________dB Attenuation:__________dB Attenuation:__________dB Complete the corresponding section (5.2.1, second table) on the PSAT document with the customer. f. Shut off IBUC transmission. g. In the NDSatcom line-up manager, in the test section, click on transmit Off. Then in the "operation" tab, click "transmit on", and then set "transmit power control" to "off". Then adjust the SkyWAN attenuation to identical values for d. and e. The SkyWAN must again show the Diag and Operation LEDs blinking green and red. Do the same thing on SkyWAN B. DO NOT RECONNECT THE RJ45 CABLES TO THE SKYWANS. Our Ref: December 2014 REDDIG II - Document support à la migration.doc Page 66/82 5 DAY 4: COMMISSIONING ON THE VSAT NETWORK 5.1 STEP 1: COMMISSIONING THE NETWORK 1) Authorise IBUC transmission 2) Check with the Line-Up Manager that the SkyWANs have TPC off and the attenuation values defined yesterday. 3) Both SkyWAN LEDs should then show a steady green light. 4) Wait 10 min. and for clear meteorological conditions, then in the Line-Up Manager, in the monitoring tab (or monitoring screens), "TDMA Power" menu, note the following values (divide by 10, a value of 115 is actually 11.5 dB): - EsToNoRef:________dB (SkyWAN A) - EsToNoOwn:________dB (SkyWAN A) - EsToNoRef:________dB (SkyWAN B) - EsToNoOwn:________dB (SkyWAN B) The EsToNoRef values must be greater than the EsToNoMin value (11.2 dB). The EsToNoOwn values must be greater than the EsToNoMin and EsToNoMod values. 5) In the "Set parameters" tab, Station section, change the EsToNoMax value to the value previously noted in EsToNoOwn (if you have clear skies). 6) In the Operation tab, set TPC (Transmit Power Control) to On. 7) In the "Set parameters" tab, click on get parameters, and then "put in permanent mode". 8) Before restarting the equipment, check that you noted the values in 4), restart the equipment (if it goes into diag mode, steady orange diag LED and operation off for more than 5 min., disconnect and reconnect the power supply cable) and verify that the TPC (On) and EsToNoMax settings were saved. 9) Do the same thing on SkyWAN B. 10) As the SkyWANs are again on the network, switch from IBUC A to IBUC B. There should be no loss of SkyWAN synchronisation (lights that blink for more than 2 sec.). If so, use the Line-Up Manager to connect to one of the SkyWANs that is blinking and go to the supervision/monitoring tab. In the "TDMA frequency" tab, note the "frequency offset" value. Switch IBUCs, wait for the SkyWAN to return to the network and read the setting. This difference must be reduced. To do so, you must change a parameter on the IBUCs: Our Ref: December 2014 REDDIG II - Document support à la migration.doc Page 67/82 Only change one piece of equipment. Note the default values. Change this parameter by lowering or increasing by a large amount (20 for example), and watching the positive or negative effect on the frequency offset during a new switch. Adjust this parameter until a transition without loss of synchronisation is obtained (the SkyWANs. Note this value. Complete the corresponding section (5.2.2) on the PSAT document with the customer. Our Ref: December 2014 REDDIG II - Document support à la migration.doc Page 68/82 5.2 STEP 2: MIGRATION OF THE SERVICES TO THE VSAT LINK 1) Start a continuous ping to Manaus and Bogota Start two command prompts: ping –t 10.100.36.254 and ping –t 10.100.45.254 2) Note the average time to ping Manaus and Bogota 3) Connect the RJ45 cables to the SkyWANs. 4) Wait 5 min. to establish dynamic routing 5) Verify that the ping times changed 6) Carry out a tracert to both destinations to verify that the signal is in fact passing through the SkyWANs: 10.100.XX.31 or 10.100.XX.32. 7) Make a rough verification that the services are operational (telephone call, AFTN, AMHS), coordinating as previously: Country Argentina Bolivia Curitiba Manaus Recife Chile Colombia* Ecuador* Paraguay Peru* Guyana Guyana Suriname Trinidad Uruguay Venezuela Coordinator Argentina Recife Recife Manaus Recife Argentina Manaus Manaus Argentina Manaus Venezuela Venezuela Venezuela Venezuela Argentina Venezuela Our Ref: December 2014 REDDIG II - Document support à la migration.doc Page 69/82 5.3 5.3.1 STEP 3: PSAT TESTS - SERVICES PSAT Carry out the corresponding PSAT tests, in the PSAT file: - Service tests on channel A Service tests on channel B Complete the corresponding section (paragraph 6) on the PSAT document with the customer. 5.3.2 MEVA: In Venezuela, conduct a MEVA interconnection test by calling 18.., 22.., 29.. depending upon the numbers indicated by the focal point. In Columbia, conduct a MEVA interconnection test by calling 22.., 39.. depending upon the numbers indicated by the focal point. Complete the corresponding section on the PSAT document with the customer. Then Continue step 4 then 5 if possible. Otherwise, complete it on the following day. 5.4 STEP 4: UPDATING THE NMS The MIB on the SkyWANs changed. A monitoring update must be carried out. On the monitoring PC, start "What’s Up Gold Admin console". Go to the "Configure" tab, then "Active monitor Library" Our Ref: December 2014 REDDIG II - Document support à la migration.doc Page 70/82 Click on "SkyWAN IDU 1070 - TDMA", then on "Edit" The value .97 is incorrect. Replace with 98 as above. Click OK. Do the same with the IDU 7000. Go to the "Configure" tab, then "Performance Monitor Library", click on SkyWAN IDU 1070 TDM, then Edit and change the value .97 to .98. Do the same thing for the settings on the SkyWAN 7000: Our Ref: December 2014 REDDIG II - Document support à la migration.doc Page 71/82 5.5 STEP 5: REDUNDANCY TESTS (AND NMS DISPLAY) In accordance with the PSAT document, conduct the redundancy tests, checking to ensure that the failure nicknames have been transmitted to the NMS. 5.5.1 Tx 1+1: IBUC redundancy Disconnecting the coaxial cable from the active IBUC and switching. Conduct an A to B and then B to A test. Complete the corresponding section (paragraph 7.1.1) on the PSAT document with the customer. 5.5.2 RX 1+1 Disconnecting the cable from the active LNB (on the RX 1+1) and switching. Conduct an A to B and then B to A test. Complete the corresponding section (paragraph 7.1.2) on the PSAT document with the customer. 5.5.3 Master SkyWAN Only in Manaus and Ezeiza. Disconnect the Tx and Rx cables from the active master, confirm the master relay takeover and that the synch is re-established in a few seconds. Complete the corresponding section (paragraph 7.2) on the PSAT document with the customer. Our Ref: December 2014 REDDIG II - Document support à la migration.doc Page 72/82 5.5.4 Cisco Turn of Cisco 1A and watch the switch to channel B. After having conducted the tests, return to A. Complete the corresponding section (paragraph 7.3.1) on the PSAT document with the customer. 5.5.5 SkyWAN Turn of SkyWAN A and watch the switch to channel B. After having conducted the tests, return to A. Complete the corresponding section (paragraph 7.3.2) on the PSAT document with the customer. 5.5.6 Ethernet Switch Turn off Netgear Ethernet Switch A and watch the switch to channel B. After having conducted the tests, return to A. Complete the corresponding section (paragraph 7.3.3) on the PSAT document with the customer. 5.5.7 RSS Turn off the RSS and confirm that communication is not interrupted. Complete the corresponding section (paragraph 7.3.4) on the PSAT document with the customer. Our Ref: December 2014 REDDIG II - Document support à la migration.doc Page 73/82 6 DAY 5: FINALISING 6.1 6.1.1 STEP 1: TESTS OF THE DEDICATED LINKS TO THE GBB Backup test Turn off both SkyWANs and after a few minutes verify that you have access to the other sites and that the services are operational. Complete the corresponding section (paragraph 8.1) on the PSAT document with the customer. Dedicated links There are dedicated links for the Cisco GBB. Not all services go through it. Only some AFTNs and a voice port (without cable) are present. Rebouclage WB 01 Vers CISCO A Vers CISCO B These AFTNs pass through the RSS switch, and then output B is looped back to the RSS: Vers CISCO GBB 6.1.2 Our Ref: December 2014 REDDIG II - Document support à la migration.doc Page 74/82 Thus, in this example, when the RSS is all in A, input WB 01 is connected to output 1A in WB01-A, to CISCO A. When everything is in B, WB 01 is connected to 1B at WB-01-D, enters through the COM port in slot 4 and exits through 4B on WB-01-B to Cisco B. Thus, if we manually position everything in B, except card 4, which we put in A, we exit on WB01-C, which is connected to the CISCO GBB. 1) Identify the RSS cards used to switch between the CISCO GBB and CISCO B (such as card 4 in the example above). We will call them the GBB cards 2) Shut down Cisco A and then B. The system will switch to B 3) Manually switch the GBB cards (and only this one) 4) Disconnect the service/admin telephone (dial plan 2) and reconnect it to the CISCO GBB (see dial plan file). Do the same thing with the ATS (non hotline). 5) Conduct a ping test to verify that the system is still operational. 6) Place a call to a remote site. Complete the corresponding section (paragraph 8.2) on the PSAT document with the customer. Return the status to normal (turn on Cisco A and then Cisco B, manually switch from RSS to A). 6.2 STEP 2: NMS TESTS In accordance with the PSAT document, check the NMS configuration: See appendix 7.12 for help if necessary. 6.2.1 Check the active monitors 6.2.2 Check the performance monitors 6.2.3 Check the connections to the console ports 6.3 STEP 3: MIGRATION OF THE LEVEL 3 EQUIPMENT If the Level 3 equipment was not installed in the rack, shut it down, install it in the rack, and reconnect it. Manaus will then conduct a test to ensure proper operation. Our Ref: December 2014 REDDIG II - Document support à la migration.doc Page 75/82 6.4 STEP 4: CHECKING THE PSAT DOCUMENT Ensure that on the PSAT document that only equipment removal is missing, and that all service and redundancy tests were completed. 6.5 6.5.1 STEP 5: FINALISING THE INSTALLATION Install the VPN in the bay The VPN was held up in customs and could not be sent. Install it now. And check for its presence on the NMS in green. 6.5.2 Finalise the cabling for the services on REDDIG II Finalise the cabling for the services on REDDIG II with the customer (or if the customer prefers to handle this...). 6.5.3 Finishing work Protect the outdoor connectors with Scotch tape 23 (which can stretch) and 33 (to properly tighten them). Complete the corresponding section (paragraph 5.1.2) on the PSAT document with the customer. 6.5.4 Removing the outdoor cables from REDDIG I Remove the cables from REDDIG I (coaxial and multi-pair), with special care (do not pull out the new ones!). 6.5.5 Removing the old IBUCs and RX 1+1 The existing equipment is owned by the countries and the ICAO. Help them to move it. Modifying the cabling: The IP telephone must pass through the patch panel and the Dataprobe. Take the RJ45/RJ45 connector provided and install it on the patch panel. Connect it to an RJ45 card on the Dataprobe, on one of the two COM ports: Our Ref: December 2014 REDDIG II - Document support à la migration.doc Page 76/82 Port A COM port example Port B Connect port A to Ethernet switch A, on an unused port (and linked to VLAN 1). Connect port B to Ethernet switch B, on an unused port (and linked to VLAN 1). Our Ref: December 2014 REDDIG II - Document support à la migration.doc Page 77/82 7 APPENDICES 7.1 7.1.1 TELEPHONY Dial plan See the "dial plan" file 7.1.2 Additional E&M and E1 commands Router # conf t Router (config)# voice-port ___ number, the time-slot number, for the E1) Router(config-voiceport)# ___ (0/y/z : 0/slot/port or 0/y/z :a: where a is the ds0 http://docwiki.cisco.com/wiki/Cisco_IOS_Voice_Troubleshooting_and_Monitoring_-_E%26M_Interfaces http://www.cisco.com/c/en/us/support/docs/voice/analog-signaling-e-m-did-fxs-fxo/14005-emsupervision.html http://www.cisco.com/en/US/docs/ios/12_3t/voice/command/reference/vrht_t3_ps5207_TSD_Products _Command_Reference_Chapter.html#wp1619902 Leave the default, or increase it to 200. Our Ref: December 2014 REDDIG II - Document support à la migration.doc Page 78/82 Increase it to 1000. Increase it to 5000 (most tolerant system). Our Ref: December 2014 REDDIG II - Document support à la migration.doc Page 79/82 Increase it to 5000 (most tolerant system). Our Ref: December 2014 REDDIG II - Document support à la migration.doc Page 80/82 Leave the default (100). Our Ref: December 2014 REDDIG II - Document support à la migration.doc Page 81/82 Our Ref: December 2014 REDDIG II - Document support à la migration.doc Page 82/82