1
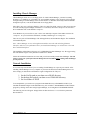
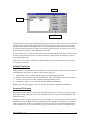
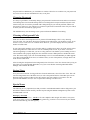
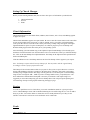
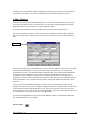
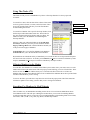
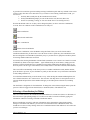
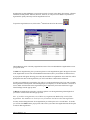
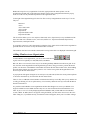
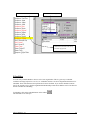
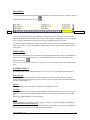
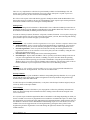
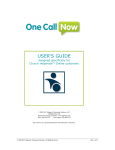
version 2.0 Sunshine Software Developer of Church Manager 2737 Baldwin Street • Jenison, MI 49428 Church Manager 2.0 1 Setting up Church Manager It is very important to correctly set up Church Manager before using it for the first time. Please make sure you make the following settings before entering data into Church Manager to avoid unexpected results. DATES Two very important settings must be made so your computer correctly handles dates for the year 2000 and beyond! Setting One First you should set your Windows operating system. Click Start, Control Panel, and then double click either International Settings or Regional Settings (depending on your operating system). Then click the Date tab, and for the Short Date style select either m/d/yyyy or mm/dd/yyyy. Setting Two Next you will set the database engine. Go into your IDAPI folder (Church Manager by default places this in C:\IDAPI) and double click the file BDECFG.EXE. Click the Date tab, and set FOURDIGITYEAR to TRUE. Then set YEARBIASED to FALSE. Now to save your settings, click File/Save. FUNDS Before using Church Manager for Financial details, it is important to set it up for your Church. First, you need to establish what funds you wish to set up (ie General, Benevolence, Missionary). You can add and delete your entries (except you can't delete the General Fund) before you start entering Financial Data. You can always add a new fund at any time. But you can't delete a Fund which has received Contributions or Pledges. SERVICES You also should enter the Services where Contributions will be received. This allows you to track Contributions for each Service. To do this, Choose Tools/Services from the main screen. You can add/edit new Services anytime, but you can't delete services for which there have been Contributions received. See Services. CHURCH INFORMATION Choose Tools/Church Info and enter the name and address of your Church. This information will be used on reports. Also, tab to Preferences and select the current year. If you desire, you can paste a BITMAP graphic here that will be printed on some of the reports. See Graphics. NETWORK SETTINGS FOR PEER-TO-PEER NETWORKS If you plan to have multiple users running on a Windows Peer-To-Peer network, you must first make some settings to the database engine configuration file. These settings are only necessary if you are going to have multiple users running Church Manager on a peer-to-peer network. For further information, read Getting Started – Network Installation. Church Manager 2.0 2 Let us introduce ourselves… Thank you for purchasing Church Manager. By purchasing this product you also get the following: • • 90 days email support 90 days free upgrades If you purchased this product directly from Sunshine Software, you are automatically registered and are eligible for all of the above. To make it easy to contact us, here is the information. Sunshine Software (a division of Fast Trax) 2737 Baldwin Street Jenison, MI 49428 Internet E-Mail : [email protected] Internet Home Page : http://www.gosunshine.com And now, on with the show! Church Manager 2.0 3 Church Manager 2.0 4 Table of Contents Getting Started __________________________________________________________7 Installing Church Manager __________________________________________________________ 9 Network Installation _______________________________________________________________ 9 Starting Church Manager for the first time _____________________________________________ 11 Overview of the Main Screen _______________________________________________________ 12 Adding Users to the System ________________________________________________________ 12 Setting Permissions _______________________________________________________________ 13 Securing The System______________________________________________________________ 13 Changing Passwords ______________________________________________________________ 14 Choosing a Background Color ______________________________________________________ 14 Saving Views____________________________________________________________________ 14 Special Issues ___________________________________________________________________ 14 Backing Up Your Data ________________________________________________________ 14 Shutting Down Church Manager_________________________________________________ 15 Performance Issues ___________________________________________________________ 16 Entering Setup Data ____________________________________________________17 Setting Up Church Manager ________________________________________________________ 19 Church Information _______________________________________________________________ 19 Services ________________________________________________________________________ 19 Funds __________________________________________________________________________ 19 Adding Member Data____________________________________________________21 Adding Household Records_________________________________________________________ 23 Editing Household Records_________________________________________________________ 23 Adding Members _________________________________________________________________ 24 Parent Lookup _______________________________________________________________ 24 Assigning Envelope Numbers ___________________________________________________ 25 Using The Finder (F3)_____________________________________________________________ 26 Filtering Members in the Finder _____________________________________________________ 26 Searching For Members by Field Criteria ______________________________________________ 26 Moving Between Screens __________________________________________________________ 27 Adding Contributions _____________________________________________________________ 27 Selecting a Contribution for Editing __________________________________________________ 28 Adding Pledges __________________________________________________________________ 29 Adding Organizations _____________________________________________________________ 29 Adding Members to an Organization _________________________________________________ 31 Scheduling ______________________________________________________________________ 32 Adding Schedule Records __________________________________________________________ 33 Deleting Schedule Records _________________________________________________________ 33 Additional Tools ________________________________________________________35 Private Pastoral Notes _____________________________________________________________ 37 Pop-Up Calendar _________________________________________________________________ 37 Phone Book _____________________________________________________________________ 38 Memberships ____________________________________________________________________ 38 And More Tools… _______________________________________________________________ 38 Refresh Records _____________________________________________________________ 38 Statistics____________________________________________________________________ 38 Calculator __________________________________________________________________ 38 Clock ______________________________________________________________________ 38 User Defined Member Status Categories __________________________________________ 38 Church Manager 2.0 5 Reports _______________________________________________________________41 Mailing Labels___________________________________________________________________ 43 Organizations____________________________________________________________________ 43 Schedules_______________________________________________________________________ 43 Envelope Numbers _______________________________________________________________ 43 Talents/Giftings __________________________________________________________________ 43 Family Directory _________________________________________________________________ 44 Members By Status _______________________________________________________________ 44 Member Data ____________________________________________________________________ 44 Birthdays and Anniversaries ________________________________________________________ 44 Member Contributions_____________________________________________________________ 44 Church Financial Reports __________________________________________________________ 44 Pledges By Fund _____________________________________________________________ 44 Pledges By Member __________________________________________________________ 44 Contribution/Pledge Summary __________________________________________________ 44 Contributions By Fund (Member Detail) __________________________________________ 45 Contributions By Payment (Bank Deposit) _________________________________________ 45 Contributions By Member (sort by Member Name) __________________________________ 45 Contributions By Member (sort by Envelope Number) _______________________________ 45 Contributions By Date_________________________________________________________ 45 Contributions Member Summary (By Name) _______________________________________ 45 Contributions Member Summary (By Amount) _____________________________________ 45 Designing Custom Reports _________________________________________________________ 45 Church Manager 2.0 6 Getting Started Church Manager 2.0 7 Church Manager 2.0 8 Installing Church Manager Church Manager comes on two 1.44 floppy disks. To install Church Manager, you must be running Windows 3.1x, Windows 95, or Windows NT. An incredible testimony to the extremely efficient design and tight coding of Church Manager is the fact that while it is a Windows based fully relational database management system, it can still be distributed on two floppy disks! Place disk 1 into your 1.44 floppy disk drive. There is a single file called “setup.exe” that you need to run. You can from the program manager in Windows 3.1x select run, then enter a:/setup.exe. Or select the a: drive and double click on the filename “setup.exe”. From Windows 95 you can click on your a: drive icon under My Computer. Then double click the file “setup.exe”. Or you can click the start button, click Run, and then type in “a:\setup.exe”. There are two parts of Church Manager. The main application, and the Database Engine. The installation will install both parts. Note - Church Manager 2.0 is a 16 bit application and does not work with 32 bit long filenames. Therefore, make sure your path names where you install Church Manager are 8 characters or less and don’t include blank spaces The installation will default to a directory of C:\CHMAN20 (for Church Manager 2.0). We suggest using that. The database engine will by default be installed in C:\IDAPI. Follow the installation instructions on screen and you will successfully install Church Manager. You will need to re-boot your system after Church Manager has been installed before running Church Manager for the first time. Network Installation A few extra steps must be taken if you are running Church Manager on a peer-to-peer network. After installing Church Manager on every computer in your network that will run Church Manager there are three settings you must make to the database engine configuration file. They are: 1. Set the Net Dir path to your data server IDAPI directory 2. Set the data files path to your data server CHMAN20 directory 3. Set Local Share to TRUE To accomplish this, you need to run a program in the IDAPI directory called BDECFG.EXE. If you installed the Database Engine in the default directory, this would be C:\IDAPI\BDECFG.EXE. Run this program by clicking on the name using Program Manager, or selecting Run C:\IDAPI\BDECFG.EXE. The following screens will appear. Simply follow the direction boxes 1-7 to set the three parameters discussed above. Church Manager 2.0 9 1. Click on Paradox 2. Set Net Dir to data server IDAPI path 3. Click on Aliases 4. Click on Church Manager 5. Set path to Data Server CM directory 6. Click on System 7. Set Local Share to TRUE Church Manager 2.0 10 After setting these three parameters, choose File/Save from the menu and then exit the configuration program. You need to do this same procedure on EVERY MACHINE ON THE NETWORK! Each machine keeps its own BDE configuration file and needs to have these paths set to the data server. What the three settings do: NET DIR - To control record sharing, a single network control file for the database engine needs to be defined. This sets the path to that file. While this file can reside anywhere on your network, it is best to set it to the IDAPI directory on your data server. If you get the error “multiple network files in use”, you have not set this path correctly to the same path on each machine. PATH - This must be set to the path of your Church Manager directory on your data server. If different machines have different data sets, this is probably not set properly. LOCAL SHARE - Windows needs this set to true when sharing files on the Microsoft peer-topeer network. Starting Church Manager for the first time Now that you’ve installed Church Manager and set the Network Parameters (if you are running from a network) you are ready to start Church Manager for the first time. Under Windows 3.1x, you will have a folder titled Church Manager. Inside is the Sunshine Software logo with a description of Church Manager. Double Click on it. Under Windows 95 you can start Church Manager from the start menu. The first screen you will be presented with is the Log-On screen. You need to enter correct information here to start and run CM because this is a secured system so only those people you authorized to use it can access data. To access CM the first time, Enter “Pastor” for the username, and “Pastor” for the password. This is CASE SENSITIVE, so be sure to type it exactly as shown above (but don’t include the quote markings). The main screen should quickly pop-up. Toolbar Finder (F3) Selected Member Church Manager 2.0 11 Overview of the Main Screen The main screen of CM is actually composed of two screens. The main container and the Finder. The Finder is movable anywhere within the main container screen. Its position and size can be remembered for each user. More on that later under Saving Views. The Finder can always be selected (activated) by pressing the function key F3. This is the screen used to select a member. Notice it is ALWAYS open and available no matter which other screens you have open and active. The main menu (across the top of the main screen) is dynamic as it will change depending on what other screens you have open as well as what permissions have been assigned to you. The Toolbar has buttons for additional screens that can open and close. These are, in order of appearance from left to right, Households, Members, Contributions, Pledges, Phone Book, Memberships, Organizations, Scheduling, and Funds. If you hold the mouse pointer over a button for a few seconds, a pop-up help window will appear telling you what screen the button will open/close. If the screen is currently closed and you click the button, the screen will open. If the screen is open and you click the speedbutton, the screen will close. The number of buttons visible to each user will be determined by the privileges assigned to them. More about that under Setting Permissions. At the bottom of the main screen is the status bar which shows the currently selected Member and an Envelope number if assigned one. From this main screen you can access every feature and function within Church Manager. Unlike other programs that force you to close one form and open another to do something, Church Manager allows you to have multiple screens open at once! For example, you can be viewing Household records and Member records while adding Organizations. The usefulness of this will become more apparent as you start entering and editing data. If you try to access certain data before entering any records you will get a Beginning of table error message. This is normal and will not occur when you have entered records. Adding Users to the System When you log on to Church Manager for the first time, you log on as Pastor. But now you want to add users and assign permissions for each of them. Let’s add a new user now. (Notice that we are adding Users to the system, not Members. We first want to add Users to Church Manager. These are the people that can start and run Church Manager. Later we will discuss adding members of the congregation to the Church Database) From the Main Menu, click on Tools/Maintain Users. A dialog screen will pop up. A dialog screen is one which forces you to respond to it before it allows you to do other things in the program usually by clicking an OK button or simply closing the screen. Church Manager 2.0 12 Permissions Selected User Last Log On Information The selected user is shown with a right-pointing triangle by his name. To add a new user, Click on the Add button and type in the name and desired password. If you don’t want to assign a password leave it blank and none will be required when logging in. The user can also add/edit his password from the main Menu by clicking Tools/Password. This will allow him to change only his password. No one has access to all of the passwords except someone with Administrator Permission. To edit a current user, select the user by clicking on his name. Then click the Edit button. You can now edit his name, password, and permissions. You save the changes by either clicking on another user’s name or by clicking the OK button. To delete a user, select the user and click on the Delete button. You will be prompted to make sure. Click yes and the user is deleted. Setting Permissions Setting permissions from the Maintain User Dialog allows the Administrator control over what functions of Church Manager users can access. There are four categories. They are: 1. 2. 3. 4. Administrator - access to adding / deleting /editing users and assigning passwords. Pastoral - access to Pastoral tools from the Main Menu. This is for keeping private notes on members. Financial - allows access to setting up Funds and printing financial reports. Contributions - allows access to entering/viewing Contributions and Pledges. Without any permissions assigned, a user can still enter, edit, and delete Households and Members. Securing The System After adding the desired users and setting their individual permissions, it is necessary to secure the system. Why? Because, anyone that has access to this manual knows that you can get into Church Manager with the Pastor account! The Pastor account is a special account that can NOT be deleted. So, to fully secure the system, the System Administrator needs to CHANGE THE PASSWORD OF THE PASTOR ACCOUNT. Now you will have a fully secured system. Be sure to write down and keep in a safe place all user and password information. There is nothing we can do over the telephone to get into your system. If you were to accidentally forget Church Manager 2.0 13 the password for Administrator, you would have to send us a file before we could recover your passwords. So, be sure to save the user information in a safe, secure place. Changing Passwords It is always a good idea to occasionally change your password. From the main menu each user can choose Tools/Change Password From this dialog each user can change their own password (but only their own) whenever they like. You will be presented with a dialog asking for your current password, and the new password you wish to use. You will have to type the new password a second time in the verify box. This is to ensure you have not made any typing errors. The Administrator(s) can also change a user’s password from the Maintain Users Dialog. Choosing a Background Color Each user can choose the background color or pattern of Church Manager. This is set by choosing View/Set Color. You can choose between two patterns (stone and wind) or you can choose a color. If you choose a color, it can be one of 16.7 million colors! However, your video display driver may limit the number of useful colors. If your video card is running in 16 or 256 color mode, it would be best to chose one of the 16 basic colors for the background as it will be easier to view for extended periods of time. If you chose a color and instead of appearing as a solid color you can see a tiny pattern of cross hatches you are running in a lower video mode that can’t properly display the color. Instead it creates a dither pattern to simulate the actual color. This can be tiring if you work on Church Manager a lot. It is recommended that you either upgrade your video card to handle 24 bit color (16.7 million colors), use one of the patterns, or simply choose one of the 16 basic solid colors. After selecting the color/pattern for the background, select View/Save View. Now the next time you log on this will be your set background! Remember, every user can set his/her own background and Church Manager will remember all of them. Saving Views Every user can save his/her viewing preferences. From the main menu, select View/Save View. This will store the background color of the main screen, as well as the position and size of the other open screens. When saving the position of other screens, they must be open. For example, if you want to save the position of the Member screen, be sure it is open when selecting View/Save View. Special Issues The following are very important issues that you need to read and understand in order to fully protect your data. Please read this section carefully, and have anyone using this database management system to read and understand it as well. Backing Up Your Data Only two words of advice here… DO IT!!! We can’t emphasize this enough. All it takes is one system crash, power surge or power interruption, a stray gamma ray, you name it. You can lose all your valuable data. You must back up your data regularly. Church Manager 2.0 14 Church Manager does not include any special utility to backup your data files. Why not when its so important? Because everyone using computers today needs to back up data, and most everyone (those that do back up their data) already have their favorite method. Backing up Church Manager data is simple. Simply back up the entire Church Manager directory on your data server (or your local hard drive if its being run on a single system). You don’t have to worry about subdirectories. All the data is kept in the Church Manager directory where you installed Church Manager. If you used the default this would be C:/CHMAN20. You don’t need to back up the IDAPI database engine directory as that can easily be reinstalled in the event of a crash. Since everyone has their own method, depending on the hardware, Church Manager allows you to use whatever method you now use to back up your data. Some of the more popular methods include backing up to streaming tape, another hard drive on the network, writeable CD-ROM, and zipping down a directory using a utility like pkware PKZIP. No matter which method you wish to use, be sure you do it. If you haven’t been backing up regularly, now is the time to start! If you have any questions about backing up Church Manager data please call. We can help you choose a backup system right for your church if you have not already implemented one. Remember, back up regularly! Shutting Down Church Manager It’s simple, when you want to exit Church Manager you choose File/Exit. Unfortunately, people have a tendency to turn off their computers when they still have programs open. For a relational database system this can spell D-I-S-A-S-T-E-R. Unlike a word processor or spreadsheet where you have one data file open, a relational database can have literally dozens of open files called tables. This is where your data is stored. Each table requires exact integrity in order for the entire system to run. If just one table gets corrupted it can effect the entire system’s ability to link data. Turning off a computer while a program is still running can corrupt data! Why? Well, even though you may think you have saved all tables, some may still reside in RAM memory instead of the hard drive. To increase throughput of today’s advanced operating systems, a lot of caching is going on behind the scene. Therefore, even when you think you have saved all your data, the computer could actually still have a piece of data that hasn’t been written to disk (sitting in the cache). Turning off the computer instantly erases this data and since its never written to disk and the file is closed, the file becomes corrupted. Therefore, to help prevent an accident, if you are not going to be using Church Manager for a while, exit the program instead of leaving it running and walking away from your computer. Who is to say that friend won’t pass by and, wanting to help out, will turn off your computer (you wouldn’t want to waste electricity). Also, ALWAYS exit Windows 3.1x and return to the DOS prompt BEFORE turning off your computer. Again, Windows uses SmartDrive, a disk caching algorithm that stores data in RAM until its written to disk. Windows 95 users are now TOLD when they can turn their computer off (after all the disk caching has been written out to disk). Unfortunately Windows 3.1x does not do this. So in the following order you should: 1. 2. 3. 4. Exit Church Manager Exit all other applications running Exit Windows Then, and only then, turn off your computer. Church Manager 2.0 15 Performance Issues Church Manager is a high performance database system. However, its modern graphic user interface running under Windows places system requirements on your system that were not present in old DOS text based systems. Church Manager is powerful. It let’s you have many screens open at once, all linked up so when you update data in one, data is automatically updated in all the other screens instantly. As you move from one Member to another in the Finder, all the data in all the open screens is updated immediately. Well, this takes resources. If you are running a slower system, or notice a slowdown in system performance make sure you are doing everything you can to free up as many system resources as possible for Church Manager. To do this, close any unneeded screens. Close any other applications that might be running. Minimizing them still places huge demands on system resources. Actually close the other applications. The faster your system is, the less these performance issues will come up. We have tested Church Manager with thousands of Households with incredibly fast performance. But we use Pentium Pro processors in development as well as a 100 megabit per second Ethernet network. Some users will not have this kind of horsepower so performance may become more of an issue. There is also system configuration settings that can effect overall performance. Are you using 16 or 32 bit disk access? Use 32 bit disk access if your hardware supports it. It makes a big difference in disk intensive applications like a database management system. Graphic User Interfaces require a graphics accelerator. If you have an older video card screen updating of all the graphics can really slow performance. The amount of RAM is important. While Church Manager will run in as little as 4 megs of RAM, Windows 3.1x should have as a MINIMUM 8 megs of RAM. More RAM will lead to much better performance. Switching to 16 megs should yield a noticeable improvement. Running Windows 95 requires 8 megs, but it will be slow. Increasing it to 16 megs helps, going to 32 megs really helps. The speed of your hard drive is important. Today’s hard drives are a lot faster than those of only a few years ago. Any of these components can hamper overall throughput. One weak performing component will cause a throughput bottleneck that will slow the entire system performance. Church Manager 2.0 16 Entering Setup Data Church Manager 2.0 17 Church Manager 2.0 18 Setting Up Church Manager Before you start entering Member data, there are three other pieces of information you should enter: 1. 2. 3. Church Information Services Funds Church Information Church Information stores the Church Name, Address, Pastor Names, Active Year, and a Bitmap graphic to appear on reports. Church Name and address appears on report headers. Be sure to enter this. Pastor names can be entered but are not used elsewhere in the program as yet. This is optional. Active year will be used in determining some report dates. Be sure to set this to the current year. Finally, a bitmap image can appear in the upper right hand header of reports. To place a bitmap here, use whatever program you use for bitmap work. Windows Paint program works fine and is part of your operating system. Select the bitmap you want and then copy to the clipboard. Open Church Manager (if not already open) and choose Tools/Church Info from the main menu. Tab over to Preferences. There you will find a bitmap box. Click on the Paste Bitmap from Clipboard button. The bitmap in the clipboard will be pasted into the Preferences/Bitmap box. Click the OK button to save the bitmap and close the form. The bitmap will now appear in your reports. Note - the bitmap is square and will size any bitmap to fit. You may need to edit the original bitmap accordingly to achieve proper proportional results. The bitmap will be resized no matter what size you paste in. Every time a report is drawn to a screen or printer Church Manager will have to render it to the allowed size. Therefore, don’t make your bitmaps extremely large or high resolution. The image will only print out to a one inch square. A normal bitmap image for this size might be 20K - 100K. If you have an image 200K or more, you probably have a lot more information contained in the bitmap that is necessary to render the 1 inch square image. It is suggested you resize the bitmap using your favorite bitmap editor. This will speed up the printing and screen drawing when previewing reports and moving from page to page. Services You can set up different services. This allows you to track contributions made for a given period per service. Church Manager comes with two defined: Morning Service and Evening Service. You can add as many as you like. You can also delete or rename the services already defined for you if they are not suitable. You must have at least one service defined or errors could result. Funds Church Manager 2.0 19 You can track an unlimited number of Funds for Contributions and Pledges. In version 2.0 it is possible to track the money coming in (Income) but not the money going out (Expenses). A later update will include the ability to track outgoing money (Expenses) as well. To set up funds you must have Financial permission set for you, otherwise the Fund speedbutton will not be visible. Assuming you have Financial permission (if not talk to your system administrator), click on the Fund button on the toolbar. This is the far right hand button on the toolbar. A fund dialog will pop-up where you can add, edit and delete funds. You may not delete a fund once contributions or pledges have been entered for that fund. Any number of funds may be added at any time. Church Manager 2.0 20 Adding Member Data Church Manager 2.0 21 Church Manager 2.0 22 Adding Household Records At the top of the record hierarchry is the Household Record. Every Household record must have at least one Member Record related to it (usually the Head of Household). The Member records related to the Household are display on the right hand side of the Household screen. Head of Household Member Records of this Household When you enter a new Household record, a Member record is automatically created for the head of household. Therefore, when entering a new household, enter the name of the person who will be designated as Head Of Household. Then CM will automatically create the corresponding Member record for you. The member status can be edited later from the Member Record if you later determine that person is not the head of household. To enter a new Household, click on the New button. Enter the data in each field. The Label Name is automatically created for you, but you can change it if you like. This is the first line used on a Family Mailing Label when you choose to use the Label name instead of the Head of Household name. When you are in a data edit mode, the bottom of the Household screen turns bright red to let you know that you are presently editing/adding a record. When you have entered the desired information, click on Save. How do I delete a Household record? You don’t. You only delete Member records. If there is only one Member record left, the Household record will be deleted for you. When you open the Household screen, the Main Menu will expand to include the Household commands: Add, Edit, Delete. Of course, as discussed above, you can’t delete a Household record, only Members. This is to protect you from accidentally deleting an entire family and all it’s related records. So if you choose Delete from the Main Menu you will be told you need to delete Members. The menu item was left in for those who have not read this manual and are wondering how to Delete a Family. Of course, everybody always read the manuals, right? Editing Household Records To edit a Household record, simply click the Edit button. Again the bottom of the screen will turn bright red to let you know you are in edit mode, and other buttons will be disabled. Change the data, then press Save to write the changes, or Cancel to cancel the changes and restore the original data. Once you have clicked Save you can’t further undo changes, so be sure you have entered the right information. When pressing Save, you will be presented with a choice to write these same changes to all the Member records. Each Member record can have it’s own address and phone information. (good for family members off to school, etc). So you can either carry forward all address and phone data to Member records or not. If you select NO, no Member records are updated. So, you can change the Household Church Manager 2.0 23 record but not have the Member (head of household) record changed. If you want this record changed as well and have selected NO, you will have to edit the Member Head of Household record as well. Adding Members The Head of Household is automatically added when you add a new Household record. Only the fields present in a Household record are carried forward, so you will want to continue adding other pertinent Member information when the Member record is automatically added. If not open, open the Member screen by clicking on the second-from-the-left toolbar button. This opens the Member record screen. This screen has three notebook tabs: Member Address, Member Detail, and Church Detail. Clicking on one of these three tabs will allow you to enter different fields of data. Notebook Tabs One of the powerful features of Church Manager is that you can have multiple screens open at once. When entering Household and Member records, you can have both screens open. Now you can jump to the Household screen, enter a new household (which will automatically create a Head of Household Member record), then click on the Member screen, click the edit button, and add additional Member record information to the new Member record that has been automatically created for you! For instance, you might want to select the gender of the Head of Household. So, after entering a new Household and saving, click on the Member screen, click Edit, and select Gender (found under the Member Detail Tab). Then click Save. Now you may want to add additional Member records for the current Household. It’s simple! On the Member screen click the New button. All address and phone information is carried forward. And the cursor is placed in the First Name field automatically for you. Just type the first name. Then you can navigate between the Tabs to enter whatever data you wish on the Member. Then when you are done click Save and your new Member record will be saved to the current Household. If you have the Household Screen open, notice that the Members window is automatically updated and now includes the Member you just added. Parent Lookup Church Manager 2.0 24 When entering a Member with a Family Relation of Dependent or Other, you can fill in the Mother and Father name files automatically. Click on the Parent Lookup (under the Member Detail Tab) when adding or editing the Member record and the Parent names will be added automatically. Assigning Envelope Numbers There are three ways to assign an Envelope Number to a member. First, you can type in the desired number in the Member record under the Church Detail Tab. The second way will auto-assign the next available number. Simply click the Plus button on the Member Detail Tab next to the Envelope Number field. This will automatically add the next available Envelope Number. The last way is to globally assign Envelope Numbers with the Envelope Number Tool. You access this dialog from the Main Menu with Tools/Envelopes. You can globally assign to 4 member sets. They are: All - assign a new envelope number to EVERY MEMBER, even if they already have an envelope number. Selected - assign a new envelope number to every member with the Receive Envelope Box checked on the Church Detail Tab of the Member record. Unassigned - assign a new envelope number to EVERY MEMBER that doesn’t have an envelope number assigned yet. Unassigned Selected - assign a new envelope number to every member with the Receive Envelope Box checked and that doesn’t yet have a number assigned. These assignments can not be undone, so be careful when using this tool! You can clear all envelope number assignments with the Clear All button. Again, this will not restore previous Envelope Number assignments, it will just clear the fields to no number assigned. Before making global changes you should print the Envelope Number Report for a hard copy of the currently assigned numbers should you need to refer to the previously assigned Envelope Numbers. Church Manager 2.0 25 Using The Finder (F3) The Finder is what you use to find Members by Name or Envelope Number. It is always open and accessible. To search for a name, click the Search For to Name. Then in the text box type the Last name, a comma, and a First Name. Then press Enter and the Finder will take you to the first Member record matching that criteria. To search for a Member with a specific Envelope Number, click the Envelope radio button under Search For. Then in the text box enter the desired Envelope Number and press Enter. The Finder will take you to the Member record matching that Envelope Number. Filter Indicator Bar Search For Radio Buttons Text Search Box Other keys that work within the Finder are the up and down arrow keys which take you to the previous and next member. Page Up and Page Down will scroll the Members and take you to the previous/next page of Members. Control Home takes you to the first Member in the Database. Control End takes you to the last Member in the Database. Keyboard shortcuts include the ability to immediately set a search for name or envelope number and place the cursor in the text search box. To do this, press Control N (for Name) to search for a Member by name and press Control E (for Envelope) to search for a Member by Envelope Number. Filtering Members in the Finder You can filter what Members are available in the Finder by their Status. Place your mouse cursor over the Finder and click the right mouse button. This will pop up a menu allowing you to set a Finder Filter. There must be at least one Member with the Status you’ve selected or the filter will not be set. If there are Members that meet that criteria then the filter will be set and the Filter Indicator Bar at the top of the Finder will show what Members you are viewing. To remove the filter, repeat the above steps but select ALL from the pop-up menu. The Filter Status Bar will then be update to ALL letting you know that you are viewing ALL Members. Searching For Members by Field Criteria There is another way to find Members matching certain criteria. You can from the Main Menu choose Tools/Member Search. This will open a Dialog Screen that allows you to search for matching Member records from matching criteria you provide. You can finding Members with matching fields of Last Name, First Name, Addr 1, Addr 2, City, State, Zip, Phone, and Envelope Number. Church Manager 2.0 26 You can choose an exact match (case sensitive), a partial match beginning with (not case sensitive), or a partial match anywhere in the string (also not case sensitive). All matching records will be returned. You can then double click on the desired Member or select the desired Member and press Enter on the keyboard and the Member Search screen will close and the Finder will move to the selected Member. Moving Between Screens You can easily move between the multiple screens you can have open in Church Manager using the Function Keys. When a screen is open the corresponding Function Key is shown in the Title Bar. For example the Finder is F3. Just press F3 and the Finder screen becomes the active screen. Adding Contributions To open the Contribution screen you must have Contribution Permission as given by the System Administrator in the Maintain User Dialog. Assuming you have such permission, you can open the Contribution screen by clicking on the third speedbutton. 1. Set Entry Date Church Manager 2.0 2. Set Pmt Method 3. Select Service 27 A great deal of research has gone into making entering Contributions quick and easy. Default values can be set first so they don’t have to be entered for every record. So to start entering Contribution records, you will want to: 1. Set Entry Date (usually the day the Contribution was made) 2. Set Payment Method (perhaps you enter all the checks first, then cash, then coin) 3. Set Service (morning, evening, etc. For more about Services see Setting Services) Now that the default values are set (they can be changed anytime), its time to enter the Contributions received. There are 4 buttons on the Contribution screen. They are: Add a contribution Edit selected contribution Save a contribution Delete selected contribution To add a new Contribution, select the Member using the Finder. Then you can click on the Add a Contribution button. But, you don’t have to use the mouse at all! To speed entry, the Contribution screen has been designed to accommodate keyboard only entry so you don’t have to jump between the keyboard for entering numbers and mouse movement. So, instead, after selecting the Member with the Finder (remember to use Control N or Control E to search for Members by Name or Envelope Number… again without having to use the mouse), simply press the Insert key on the keyboard and a new Contribution record will be added using the default values you set. Now all you have to do is type in the amount, select a fund, and use a reference if desired (check number). The record will be automatically saved when you move to another contribution record, another member, press the down or up arrow, or press the Enter key until you have moved to every field in the Contribution record (ending with Service). To set the Fund without having to use the mouse is easy. After entering the amount and hitting Enter, the active field is Fund. Press Alt + Down Arrow. The select box will drop down. Use the up/down arrow to select the Fund and press Enter. Same method will apply to ANY drop down selection box, including Service. The TD field is a designation for Tax Deductible. To change this value without using the mouse press the space bar. This will toggle it from checked (true) to unchecked (false). The default is true. Selecting a Contribution for Editing There is a record selector in the Contribution Grid that indicates its current state (browse or edit/insert). If the selector has a right-pointing triangle it is in safe browse mode. It can not be edited by typing new information without first clicking on the Edit Contribution button. When a Contribution record is in edit state (information can be changed) the right-pointing triangle changes to an I Beam. This indicates you can write new information to the Contribution record. You should also save the record by clicking on the Save Contribution button if this indicator is on to make sure you have saved changes. Church Manager 2.0 28 Contribution in Safe Browse Mode (triangle) Contribution in Edit Mode (I Beam) Adding Pledges Adding pledges is similar to adding Contributions. All input is available from keyboard keystrokes without having to use the mouse in order to speed entry. To open the Pledge screen you must have Contribution Permission as given by the System Administrator in the Maintain User Dialog. Assuming you have such permission, you can open the Pledge screen by clicking on the fourth speedbutton. Clicking the Pledge speedbutton will pop open the Pledge form as illustrated. 1. Enter year of Pledge Enter the year of the pledge and you are ready to start entering Pledges for that year. You can use the action buttons in the lower right hand corner to add, edit, write, and delete a Pledge. But again, to speed entry, you can simply hit the Insert key on the keyboard to enter a new pledge. You then put in the Amount, the Fund, and the type (weekly, monthly, yearly - one time). After pressing enter of the type, the Total field will fill in automatically. This shows you how much the weekly or monthly pledge will total over the year. To use the Insert key method of keyboard entry it is important to not have the Contribution screen open as it takes precedence over the Insert key! You can have both screen open, but if you press Insert a Contribution will be inserted and not a Pledge. If you need to have both screens open then you will have to use the mouse and click on the + button to add a new Pledge. Otherwise, simple close the Contribution screen while adding pledges and use the Insert key as described above. Adding Organizations Church Manager 2.0 29 Organizations in Church Manager can represent any body of people in the church. For instance, a Finance Committee, Sunday School Teachers, the Choir, Greeters, etc. Anyone can be added to any number of organizations quickly and easily from the Organization screen. To open the Organization screen, click on the 7th button from the left on the tool bar. Church Manager comes with many Organizations entered. You can add and delete Organizations to meet your special needs. To Add a new Organization, place your mouse pointer over the Organizations grid in the upper left corner of the Organization screen. Then click the RIGHT mouse button (have you used that one much before?). A pop-up menu will appear allowing you to add, edit, and delete an Organization. Select Add. You will be prompted for the name of the Organization you wish to add. Enter it and click the OK button. You have now added a new organization. You will see it in the Organizations grid. If you want to include this Organization in the dynamic Talent/Gifting Report (see Reports), be sure the check box is checked. If its not, double click the name in the Organizations grid, or right click your mouse and choose Toggle Talent/Giftings from the pop-up menu. To Delete an Organization, again place your mouse pointer over the Organizations grid and right click your mouse. Choose Delete from the pop-up menu. Note - if you delete an Organization you will delete any Organizational Membership records of that Organization. You would have no record of service for members who had served in that Organization. You may need to change the name of an Organization yet still keep the service records intact. To do this you want to select Edit from the pop-up menu. This will let you rename the Organization but still keep the records for that Organization. Church Manager 2.0 30 Notes can be kept for every Organization. To do this, again position the mouse pointer over the Organization grid and click on the right mouse button. Choose Notes on Organization from the pop-up menu. You can store any information pertinent to the Organization here. To the right of the Organizations grid is the View filter. Activity in Organizations can be any of 7 levels. They are: Interested Active Active Sub Leader Active Leader Experienced Experienced Sub Leader Experienced Leader The View Filter allows you to view only those Interested, Active, Experienced, or any combination of the three. Note that Active includes Active, Active SL, and Active L. Experienced includes Experienced, Experienced SL, and Experienced L. If you quickly want to see who is Interested in joining the Choir, simple click on Choir in the Organization grid and click the View Filter so only the Interested box is checked. The members who have been entered as Interested in serving in the Choir are displayed in the bottom grid. Adding Members to an Organization To add a Member to an Organization, you can use the record buttons. Again, from left to right they are Add, Edit, Write, and Delete. But wait, there’s an even easier, faster way! You can Drag and Drop Members into the lower grid! To do this, first click on the Organization in the Organization grid. Now, using your mouse, position the mouse pointer over the name of the Member in the Finder. Press down the left mouse button. Now, while holding down the mouse button, move the mouse pointer so it is over the lower grid on the Organization screen. Now let up on the left mouse button. A pop-up menu will appear listing the seven activity levels (and Cancel). Move the mouse pointer up/down to select the desired activity level and click the left mouse button. That’s it! You’ve added the selected member with the desired activity level! Why don’t you try another one to really get the hang of it. Its so quick and easy. You can always delete the activity record with the Delete button as shown above. It’s possible to add a Member to an Organization and have him disappear as soon as you add him. You might even think he wasn’t added when he really was. So what would cause this? Remember the View Filter. If you’ve set it so it is only displaying Interested Members and you then add an Active Member record, it WILL be added, but it won’t appear in the grid UNTIL you click on the Active box in the View Filter setting. So, if you add an Activity record and it seems to disappear, check your View Filter settings! Church Manager 2.0 31 2. Click and hold down the left mouse button 1. Click on the desired Organization 3. Drag pointer over this grid and release the left mouse button, then choose the activity level from the pop-up menu. Scheduling You can easily schedule Members who are active in an organization. This is a great way to schedule committee meetings, helpers for a service, etc. A Member must have an Active Organizational Status to be scheduled. Those with Interested or Experienced will not be available. If you need to schedule someone who is not currently active, edit the Organizational Membership record and set him/her Active. He/She will then be available for Scheduling. To Schedule, click on the Schedule button on the toolbar. The Schedule screen will open. Church Manager 2.0 32 1. Click on desired Organization 2. Set Date and Time 3. Drag Member into this grid The selected Organization is displayed in the upper left grid. The Active Members in the selected Organization are displayed in the upper right grid. The scheduled Members are display in the lower grid. Adding Schedule Records To schedule a Member you will need to set the Time and Date of the event. Set the Entry Date. You can pop up a calendar by double clicking the Entry Date text box. As a matter of fact, whenever you need to enter a date in a separate Date field box, simply double click the box and the Date Calendar will pop up. (For more information see Pop-Up Calendar) If you want to filter the Scheduling records enter a date in the View Date box. You can quickly view the current Entry Date only records by clicking on the left pointing arrow after you have set the Entry Date. After setting the Entry Date and Schedule Time, click on the desired Organization in the upper left hand grid. Then click on the Active Member in the right hand grid. Now click on the + button. The Member will be scheduled! That’s easy. But wait, there’s an even EASIER way using, you guessed it, Drag and Drop! After setting the Date, Time, and Organization, simply Drag the Active Member from the upper right grid into the lower grid. That was easy! Let’s try it again. Drag another Member from the upper right grid to the lower grid. The Member is instantly scheduled! Deleting Schedule Records You can Delete a single schedule record by selecting it in the Schedule grid and then clicking on the (-) button. You can Delete Schedule records for a range of dates by clicking on the button with a trash can on it. You will then be prompted for the start and end dates. This global delete function will delete all Schedule records between (inclusive) the two dates for every Organization. Church Manager 2.0 33 Church Manager 2.0 34 Additional Tools Church Manager 2.0 35 Church Manager 2.0 36 Private Pastoral Notes If the user has been granted Pastoral permission (from the User Dialog only accessible by someone with Administrator Privileges), they will have access to Private Pastoral Notes for every Member in the Database. To access these notes select the desired Member in the Finder. Then from the Main Menu choose Pastor/Private Notes. A memo pad will open. The background color is Yellow to designate this is a private note (which differs from the White background when opening the normal Note pad from the Member screen). After typing the notes you can choose OK to save, or Cancel to cancel what you’ve typed. There are two additional function buttons on the lower left hand corner of the private note pad. Insert Date button inserts the current Date and Time (based on the computer’s internal clock… make sure you have set this properly!) into the notepad at the current cursor position. The Print Notes button does just that. It sends the Private Notes to the printer. Pop-Up Calendar A pop-up calendar can be activated anytime you are in a date box (not a date field in a grid). Simply double click on the Date box and the calendar will pop up. Decrement Month Decrement Year Increment Month Increment Year When in edit/insert mode you can double click on a Date box and the pop-up calendar will pop up. Use the buttons on the top of the Calendar to navigate to the desired date. Instead of repetitively clicking on a button, you can hold down the button and the calendar will continuously increment/decrement. When you’ve reached the desired date you double click on the day and the date will be entered into the Date box and the calendar will close. The current record must be in edit/insert mode or you will get a “Dataset not in edit or insert mode” error. This occurs when you double click in a Date box but the current record is not in edit/insert mode. To back out of this error, place the cursor in the Date box and press Escape (ESC) on the keyboard. Of course, you can always type a date into a Date box. It needs to be entered in the format of mm/dd/yy. This might be quicker when you are going back/forward years. Church Manager 2.0 37 Phone Book A convenient Phone Book showing Member Name, Address, and Phone can be quickly opened by clicking on the Phone Book button on the tool bar. Tabs Name Search box You can quickly go to any letter of the alphabet by clicking on one of the Tabs across the bottom of the Phone Book. When the Phone Book is the active screen (the Title Bar is highlighted) you can also quickly go to any letter of the alphabet by simply pressing the corresponding key on the keyboard.. To search for a particular member by name, click in the Yellow box in the lower right hand corner of the phone book. Then you can type the last name, comma, and first name to go to that name, just like you can in the Finder! Memberships You can have a Memberships screen open that shows what Organizations the currently selected Member is involved with or has been involved with. To open the Memberships screen click on the Memberships button on the toolbar. This screen is read only. You can not enter any data in it. To close it simply click the Memberships button again. And More Tools… By selecting Tools from the Main Menu there are a few more tools. We will quickly discuss them here. Refresh Records This refreshes records and is useful especially in a network environment when another user might be adding/deleting/editing records. If other users are on the system you might want to occasionally manually refresh records with this tool. Statistics Opens a dialog that shows the number of Members in the Database by status. Calculator Opens the Windows calculator. By default, the Windows Calculator does not always stay on top, so it can disappear! If you had it opened and it disappears, minimize Church Manager and check if it was hiding out! Then restore Church Manager to continue working. Clock Opens the Windows clock. Again, set it so it will stay on top, or it can hide out behind Church Manager. User Defined Member Status Categories You can define up to 5 separate categories for Member Status. This field is stored as part of each Member record located on the Member screen under the Church Detail Tab. Church Manager 2.0 38 To set these, choose Tools/Define Status from the Main Menu. You will find 5 Status categories named User1, User2, User3, User4, and User5. You can rename each of these to a category of your choosing using 24 characters or less. After typing in your choices click on OK to save, or Cancel to cancel changes. You then can classify the Member to one of these User Defined Categories from the Member Screen. Open the Members screen and Tab to Church Detail. A drop down box named Member Status is found in the upper left hand corner. After setting the Member Status and saving, you can then filter your Finder view to display only those Members with the matching category (see Filtering Members in the Finder - page 26). If you have set the Members to a category and then change the Name of the category, the Members previously assigned to that User category will still belong to the newly named category. For example, if you name User1 to Overseas Missionaries, assign 4 Members to that category, and then change the name of Overseas Missionaries to International Outreach, all Members that were classified as Overseas Missionaries will now be found under the User Defined Status of International Outreach. In addition to being able to quickly filter the Finder to these User Defined Status categories, you can also use these User Defined categories to select whom to include in a Directory report or a Members By Status report. These new categories will also show up in the Statistics screen if there is at least on Member assigned to them. Church Manager 2.0 39 Church Manager 2.0 40 Reports Church Manager 2.0 41 Church Manager 2.0 42 There is a very comprehensive collection of reports instantly available in Church Manager. We will quickly review each report here. But the best way to get to know each report is to print or preview to screen each report once you have entered some meaningful data. We will cover the reports in the order that they appear in the Reports Menu under the Main Menu. Note that not all reports are available to all users of Church Manager. Some reports require certain permissions and will not available to those users lacking the needed permissions. Mailing Labels You can print mailing labels for Members or Households. To have a Member included you must have set the Mailing checkbox on in the Member record (Member screen, Member Detail tab). Likewise, to have a Household record included, the Mailing checkbox must be checked. You can sort either by Lastname, Firstname or Zipcode, Lastname, Firstname. You can print a single page out of an entire report by first previewing, noting the page number you want, then canceling and selecting print (instead of preview) and set the pages you wish to print. Organizations These reports are only available when the Organization screen is open. You have 4 reports to choose from. 1. All Organizations - shows everyone involved in all Organizations by Organization. You can select the level of activity that you want to include by setting the View Filter in the Organization screen. 2. Selected Organization - shows everyone involved in the currently selected Organization in the Organization screen. You can select the level of activity that you want to include by setting the View Filter in the Organization screen. 3. Selected Labels - Prints mailing labels for the Selected Organization. 4. Selected Export - Exports name and address. This is especially useful when sending a form letter to everyone in an Organization. For instance, reminding everyone in the Choir about the upcoming special rehearsal. When exporting you can include a field header. Using this option with Word for Windows allows you to select a field by fieldname when composing your form letter. Refer to the online documentation of your word processor to learn how to use its mail-merge features. Schedules These reports are only available when the Schedule screen is open. You can print the Schedules for a single Organization or All Organizations. You select the start and end date. Envelope Numbers This report allows you to print out Members and their corresponding Envelope Numbers. Its a very good idea to print this report before doing a global reassignment of Envelope Numbers using the Envelope Number Dialog under Main Menu/Tools. You have the option of including All Members, or only those with Envelope Numbers assigned, and you can sort by Name or Envelope Number. Talents/Giftings This is the report you want to distribute to your congregation to collect the preliminary information on them. It is designed to help collect information for those wishing to share their talents and gifts in the service of the Lord. It is a dynamic report in that the Organizations that are included in it will change depending on which you choose to include. You can set any Organization to be included or excluded in this report. To do this, open the Organization screen and in the upper right hand grid of Organization names, double click the name. If the checkbox is checked it will be included in the Talent/Giftings report. If it is not checked, it won’t be included. You can also toggle the status of each Organization by placing the mouse pointer on the Organization grid in the Organization screen and clicking the right mouse button. This will toggle the include checkbox. Church Manager 2.0 43 Family Directory An instant, easy way to publish a Family Directory of Church Members! You can select which Families (by Member Status) to include. The format will include the Family Label Name, address, phone if you select that option, and first names of all Family members. It is sorted alphabetically. Members By Status This report allows you to print out the Name, Address, and if selected, Phone Number of Members matching the selected Status. You can have multiple Status selections. To select more than one Status hold down the shift when clicking on the selections when selecting contiguous selections, or hold down Control when you click to select non-contiguous selections. This is a standard Windows method for multiple selections. You can sort alphabetically, or sort by alphabet but keep the family members together. Member Data This prints ALL field data for Members except the Memo Note field. It also includes Organizational Activity data. You can print this data for the currently selected Member, the entire Family for the selected Member, or for every Member in the Database. Be careful, printing this data for every Member in the database will take a long time and will produce an extremely long report (hundreds of pages to thousands of pages depending of the size of your congregation). Birthdays and Anniversaries A quick and easy way to find out who is having a Birthday or a Wedding Anniversary. The Birthday report prints out everyone that has a birthday during the selected month as well as their age on their birthday. The Anniversary report shows who is having a Wedding Anniversary and how many years they will have been married on their Anniversary. You can also print out mailing labels for everyone included in each report. Member Contributions This report is only available to those with Financial permission. This is the report, usually sent quarterly or yearly, that is sent to each contributing Member. It shows Contributions to date, Contributions for the selected period, Pledges to date, Pledges for the selected period, and Envelope Number. You have an optional message line that can be included on the bottom of each report if desired. This report can be generated for everyone who has the Receive Contribution Report checkbox checked, everyone who has contributed, or for the currently selected Member. You provide the Start Date and End Date. Church Financial Reports These reports are only available to those with Financial permission. There are several reports to provide financial information to the church. In order of menu appearance they are as follows. Pledges By Fund This provides the breakdown of Pledges by Fund and gives the total yearly amount, monthly amount, and weekly amount pledged for each Fund. Pledges By Member This provides for a selected calendar year the Pledges for each member broken down by Fund. Contribution/Pledge Summary Church Manager 2.0 44 Provides a summary for the selected period of total Contributions and total Pledges by Fund. It also reveals the difference between amount pledged and amount received in Contributions for the selected period. Contributions By Fund (Member Detail) This shows the Contributions by Fund for every Member that contributed during the selected period. Contributions By Payment (Bank Deposit) This report is the same as a Bank Deposit Slip. As a matter of fact, some churches have been able to use this report at their local bank to take the place of a hand written deposit slip. Check with your local bank to see if it meets their requirements. It shows Contributions received by payment method (check, currency, coin) for the selected period (usually one day for a deposit slip). Since you want this report to reflect the actual check amount even when that check has been used to provide a contribution to three separate funds, it is important to use the reference for a check number. Multiple Contribution entries (to different funds from one check) will be grouped into one check entry on this report in order to have a report that will indicate the actual single check amount. This technique allows this report to provide the information in a deposit slip type format. Contributions By Member (sort by Member Name) This report shows Contributions sorted by Member Name for the selected period. It shows the Fund detail as well. Contributions By Member (sort by Envelope Number) This report shows Contributions sorted by Envelope Number for the selected period. It shows the Fund detail as well. Contributions By Date This report show for the selected period Contributions for each date entered and provides the Fund detail. Contributions Member Summary (By Name) This report shows every Member, listed alphabetically, that contributed and how much they gave over a selected period. It gives a summary value combining all funds. Contributions Member Summary (By Amount) This report lists every Member that contributed as above, but it is ordered by the total amount given during the selected period. Designing Custom Reports Church Manager also includes a Custom Report Generator and Exporter for those times when the PreDefined reports are not exactly what you need. The Pre-Defined reports are powerful reports with features such as detail line numbering, grouping, and summary fields which the Custom Report Generator can not yet accomplish. Do not try to replace the Pre-Defined reports with your own. Use the Custom Report Generator when you can't seem to find the information you want. For example, maybe you would like a printout of all Heads of Households or Women of the Church. To access the Custom Report Generator/Exporter select Reports/Custom Reports/Exports from the Main Menu. The Custom Report Generator comes with several example reports. To load one, select a report in the grid at the bottom of the screen, such as Funds. After highlighting the Report Title, click the Load button. This Church Manager 2.0 45 loads the report parameters and Runs the SQL. You should now see the SQL string results in the Result Grid in the middle of the screen. Now by clicking the Print button, a Report Preview will appear which can be printed or saved to disk. Notice saving at this level saves the actual text. To save the parameters to a report so it shows changes in data be sure to use the Save button on the SQL Reports and Exports screen. If you are familiar with the local SQL features, you can click the Clear SQL button and type in your own Select statement. To know the field names in each table, just click on the desired table in the listbox in the upper left hand corner. Then a list of available fields will be displayed in the Fields listbox to the right of the Tables listbox. To better familiarize yourself with the Local SQL language see the on-line help for Local SQL. As usual, Church Manager gives you an easier way to create a SQL select statement using Drag and Drop. To print a table with all fields, simple click on the desired Table in the TABLES listbox and drag it over to the SQL box. This simple Select statement will now retrieve all records and all fields of the table selected. Now click on Run SQL and the results will appear in the middle grid. Clicking Print will preview the report. Of course, you don't want all the fields usually. So, again, Church Manager provides an easy method to choose fields using Drag and Drop. First click on the desired table in the TABLES list box. Now, instead of dragging a Table name, go to the FEILDS listbox and select a field. Then drag it into the SQL box. You have now created a select statement for the selected field. Next, select another field in the FIELDS listbox and drag it into the SQL box. A second field has been added to the select statement. Now, before running the SQL you need to again click on the TABLES listbox and drag the Table name into the SQL box. This completes the FROM clause of the SELECT statement. Now you can click on Run SQL and the results should appear. You now can move the column widths of the Result Grid. This will set the column width on the report as well. Now, fill in the Title box with a Report Title. You can then select either Portrait or Landscape orientation. Then click the Print button to preview the custom report you just created. To save this report click the Save button. You will be prompted for a description. Choose Yes and the report as you have defined it will be saved. You can also export the data from a report by clicking on the Export button. You can include field names if desired by clicking on the Export Field Names check box. You will be prompted for a file name. The export file will be saved in a comma-delimited ascii text file. This powerful export feature allows you to export virtually any data in your database in comma-delimited ascii format for use in your word processors and spreadsheets. If the custom pre-built reports and the custom report/export module can't get the type of report you need, you can consider two things: letting our developers create the custom reports your church needs for a small charge, or purchasing a third party Report Writer software package that will easily attach to the industry standard database tables used in Church Manager. Call us for details if you have such a need. Church Manager 2.0 46 INDEX A K Add a new user.................................................13 Adding Contributions .................................27, 29 Adding Funds ...................................................20 Adding Household Records .............................23 Adding Members..............................................24 Adding Members to an Organization ...............31 Adding Organizations ......................................30 Adding Pledges ................................................29 Adding Services ...............................................19 Adding Users to the system..............................12 Assigning Envelope Numbers ..........................25 Keyboard shortcuts...........................................26 B N Beginning of table error ...................................12 Notebook tabs...................................................24 C O Changing Passwords ........................................14 Choosing a Background Color .........................14 Contributions..............................................27, 29 Organizations....................................................30 D Dataset not in edit or insert mode.....................37 Date Calendar ...................................................33 Delete a user .....................................................13 Deleting a Household .......................................23 Designing Custom Reports...............................45 Dialog screen....................................................12 Drag and Drop..................................................31 E Edit a current user ............................................13 Editing Household Records..............................23 F Filter Indicator Bar ...........................................26 Filtering Members in the Finder.......................26 Finder ...............................................................26 I Installing.............................................................9 Church Manager 2.0 L Log-On screen ..................................................11 M Main Screen Overview .....................................12 Memberships ....................................................38 Moving Between Screens .................................27 Multiple network files in use ............................11 Multiple screens................................................24 P Parent Lookup ..................................................25 Pastor account...................................................13 Pledges..............................................................29 Pop Up Calendar ..............................................33 R Reports..............................................................41 S Scheduling ........................................................32 Searching For Members by Field Criteria ........26 Securing The System........................................13 Selecting a Contribution for Editing.................28 Setting Permissions ..........................................13 Shutting Down Church Manager......................15 Special Issues....................................................14 Starting Church Manager for the first time.......11 U User Defined Member Status Categories .........39 Using The Finder (F3) ......................................26 47 Church Manager 2.0 48