1
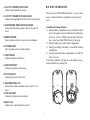
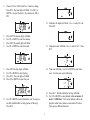
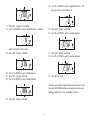
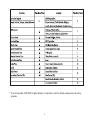
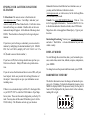
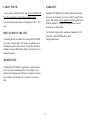
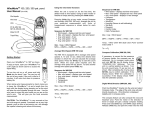
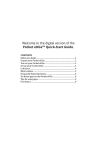
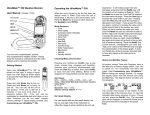
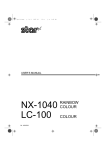
Model : EE-1
Speedtech ECO EDGE TM
User’s Manual
Speedtech ECO EDGE TM
animals. Most often these activities are related to the physiological demands of maintaining optimal foraging and resting times.
Model: EE-1
User,s Manual
The environmental conditions affecting this behavior have been
combined into a single algorithm used to determine optimal activity times. The factors and relationships used in the instrument
were obtained through an extensive study of the scientific literature, and use of well documented animal behavior studies. This
information, combined with discussions with wildlife biologists,
has contributed to the development of the software used in the
Speedtech ECO EDGETM.
INTRODUCTION
Congratulations on purchasing the Speedtech ECO EDGETM.
You now have a technologically advanced instrument, which
will maximize your outdoor exploration.
SCIENTIFIC BASIS
Wildlife scientists have documented daily activity patterns in
animals as diverse and different as marine worms and humans.
These daily or circadian rhythms are believed to result from an
interaction between hormonally triggered reactions in the animals and cyclic environmental events. Combined, these factors
control a wide array of animal functions and behavior including
reproduction, feeding, growth, thermal regulation, body condition and, perhaps most important, seasonal and daily movements.
FEATURES
•
•
•
•
•
•
•
•
•
•
•
•
•
•
While environmental phenomena such as cyclic changes in moon
phase and position relative to the earth have been used to predict
animal behavior with some success, other environmental factors
also play an important role. Photoperiod and sun position have
been conclusively demonstrated to affect the behavior of large
game animals, deer and elk in particular. In addition, seasonal
weather patterns, local weather events, and air temperature all
have been identified in scientific studies as very important factors influencing the activity and behavior of these large game
1
Moon phase & moonrise/moonset position
Sun position / sunrise & sunset times
12 - 24 hour weather forecast
Present & 4-hr future game activity prediction
97-year activity forecast based on future sun/moon information
97-year almanac
Real-time calendar clock
Barometer / 16 hour history
Severe weather audio warning
Temperature: actual or estimated
Altitude
Digital compass
Key lock function
EL back light
IMPORTANT NOTE: The Speedtech ECO EDGE includes two
CR2032 batteries necessary for operation. To maintain their
maximum life during storage and shipping, these batteries
have not been installed. See the Battery Information section
for instructions.
B. TIME/LOCK BUTTON
Displays the current or future mode or locks and unlocks
the control buttons
CONTROL BUTTONS
D. UP (+)/DOWN (-) BUTTONS
Changes parameter values
C. SET/BACKLIGHT BUTTON
Activates back light or enters the setting procedure
INDICATORS
A. MODE/POWER BUTTON
Changes the display mode or turns the unit on and off.
2
BATTERY INFORMATION
A. ACTIVITY PREDICTION METER
Indicates the magnitude of activity
The unit uses two CR2032 lithium batteries. For your convenience, a small screwdriver is provided to remove the back
cover.
B. ACTIVITY PREDICTION BAR GRAPH
Indicates the magnitude of activity for the next four hours
C. BAROMETRIC PRESSURE BAR GRAPH
Indicates the barometric pressure value for the past 16
hours
To Install and Change Batteries:
1) Remove battery compartment cover on backside of instrument. This requires removal of the three (3) small screws
with a No. 0 to No. 1 Phillips head screwdriver Be sure
the + side of your fresh CR2032 battery is facing up.
2) Place the battery(ies) in the circular compartment.
3) Gently press battery until battery is seated flat in battery
compartment.
4) Securely replace the battery compartment cover with the
three (3) screws.
A low-battery indicator will light up on the display screen
when the batteries are running low.
D. PRESENT MODE
Shows prediction for the current date and conditions
E. FUTURE MODE
Shows prediction at the set date and time
F. MOON PHASE
Indicates the phase of the moon
G. MOON POSITION
Indicates the position of the moon
H. SUN POSITION
Indicates the position of the sun
I. WEATHER FORECAST
Indicates the weather conditions for the next 12 to 24
hours
J. LOW BATTERY
Indicates the batteries are running dry
K. KEY LOCK
Indicates the control buttons are locked
3
Battery Life:
After batteries are installed, they have a life expectancy of up
to eight (8) months if the unit is never turned on. With moderate use, battery life is expected to be at least six (6) months.
ECO EDGE turns itself off automatically after 5 minutes.
However, the barometric pressure sensor and the Severe
Weather Alarm will continue to function unless the batteries
are removed.
If user wants to COMPLETELY TURN OFF the unit and
maintain battery life, remove the batteries from the unit. A
piece of tape may be placed between the batteries and the battery contact to store the unit and maintain fresh battery life.
THE BACK LIGHT
The back light feature allows for display readability in low
light situations. To activate back light feature, press SET/
BACKLIGHT button once. Back light will be deactivated
automatically after four seconds.
1. The unit will keep the memory for time zone, altitude, latitude and longitude even when the batteries are replaced. Press
SET to bypass the setting procedure, should the above information still be applicable.
THE KEY LOCK
The control buttons may be locked to avoid accidental changes. To activate lock, press and hold TIME for two seconds. Repeat the procedure to unlock buttons. NOTE: this feature
will be disabled when the unit turns itself off
TURNING UNIT ON OR OFF
Press and hold MODE/POWER for two seconds to turn the
unit on or off.
HOW TO SET THE PARAMETERS
Upon battery installation, the unit will start to measure barometric pressure data every 15 minutes. Monitoring of the barometric pressure data will continue even while unit is turned
off, and will store this information for future use.
Please refer to the TIME ZONE, ALTITUDE, LONGITUDE &
LATITUDE SOURCES to gain specific geographic coordinates prior to beginning the parameter entry process as follows:
1. Press and hold SET. The hour digits will blink.
Once the unit has been turned on, the weather forecast will appear as half-cloudy/half-sunny. The Speedtech ECO EDGE
will need approximately 2 to 3 hours of accumulated data to
calculate the trend of the weather change and report an accurate weather forecast.
4
2.
Choose 12 Hr or 24 Hr clock/Use + button to change.
Press SET. The hour digits will blink. Use UP(+) or
DOWN(-) to enter the hours. Pay attention to AM or
PM.
12. Altitude in Ft display will blink. Use + to select Ft or m.
Press SET.
3.
4.
5.
6.
Press SET. The minute digits will blink.
Use UP or DOWN to enter the minutes.
Press SET. The month digits will blink.
Use UP or DOWN to enter the month.
7.
8.
9.
10.
Press SET. The day digits will blink.
Use UP or DOWN to enter the day.
Press SET. The year digits will blink.
Press UP or DOWN to enter the year.
13. Temperature unit will blink. Use + to select F or C. Press
SET.
14. Time zone will blink. Use UP or DOWN to enter time
zone. *see time zone source following.
15. Press SET. Altitude calibration setting will blink.
16. Use UP or DOWN to enter altitude in feet or meters. (1
meter = 3.2808 feet). Your current altitude will be displayed in either feet or meters as selected in #12 above.
These are two different functions.
11. Use UP or DOWN to enter barometric unit. You may select hPa (millibars/hPa) or inHg (inches of Mercury).
Press SET.
5
24. Use UP or DOWN to enter Longitude direction. You
may select E for east or W for west.
17. Press SET. Latitude N will blink.
18. Use UP or DOWN to enter Latitude direction. You may
25. Press SET. Display will blink.
26. Use UP or DOWN to enter Longitude degrees.
select N for north or S for South.
19. Press SET. Display will blink.
27. Press SET. Display will blink.
28. Use UP or DOWN to enter Longitude minutes.
20. Use UP or DOWN to enter Latitude degrees.
21. Press SET. Display will blink.
22. Use UP or DOWN to enter Latitude minutes.
29. Press SET to finish.
You have successfully completed the parameter entry of your
Speedtech ECO EDGE and are now ready to maximize your
hunting productivity at this geographic location.
23. Press SET. Display will blink.
6
TIME ZONE, ALTITUDE, LATITUDE AND
LONGITUDE SOURCES
The Speedtech ECO EDGE makes its calculations based on
the data entered for the time, date, time zone, altitude, latitude
and longitude. The following information is supplied to assist you with accurate data during your parameter entry.
The time zone value is derived by subtracting GMT (Greenwich Mean Time) from the local time. You may select from -12
to +14 hours. Be sure you make adjustment for daylight saving (DST) when applicable. Find your location on the chart
shown and use the accompanying number during parameter entry. EXAMPLE: On the chart, Eastern Standard Time is -5.
For Daylight Savings Time, the Eastern time becomes -4.
7
* To use the Speedtech ECO EDGE at higher altitudes, it is important to enter the altitude compensation in the setting
procedure.
8
FINDING YOUR LATITUDE/LONGITUDE/
ELEVATION
Remember that most local libraries have Internet access, or
you may ask the Reference Librarian to check
www.topozone.com, or other sources, for the Lat/Long/Elevation information you need.
Canada: Use www.NRCAN-RNCAN.gc.ca. Click on Centre for Topographic Information, then select MAPS 101. Go
to the bottom and select Search on Index; select NTS Index
Maps, then click on Geographical Name Query. Type in your
location.
U.S.Locations: The easiest source is the Internet site:
www.topozone.com. Choose Get a Map and enter your
town or county in the Place Name Search. It will show elevation and Lat/Long as a decimal. Double click on the town
name and a map will appear. At the bottom of the map, select
D/M/S. Then look above the map for Lat/Long in degrees/
minutes.
International Locations: You may use www.mapquest.com
and select World Atlas or locate information for your individual country.
If you know your Lat/Long as a decimal, you can convert to
minutes by multiplying the decimal numbers by 60. EXAMPLE: For Lat 35.407 , multiply .407 x 60 = 24.42. Lat = 35
DISPLAY MODES
24’(Round to nearest whole number.)
To scroll through the current time, date, year, barometric pressure, sunrise time, sunset time, altitude, compass, temperature,
press MODE.
If you have a GPS, the Lat/Long should come up when you
first turn on the unit. Many GPS units also provide elevation.
To change between the present and future mode, press TIME.
If you do not use the Internet and do not own a GPS, call your
local airport, which can provide the Lat/Long/Elevation of
the airport. Some airports can give you information on surrounding areas.
BAROMETRIC HISTORY
The built-in barometer senses the changes in barometric pressure every 15 minutes. To check the barometric pressure, press
MODE to display BARO. The pressure history for the past 16
hours will be displayed in the pressure chart in four columns,
reading left to right.
If there is no convenient airport, call the U.S. Geological Survey at 888 275 8747 to order the USGS Index to Topo Maps
for any state. These are free and are shipped to you free by US
mail. You may also call the same 888 number, press 6 for the
USGS Library. The librarian can look up your location.
9
ACTIVITY METER AND BAR GRAPH
COMPASS
In Present Mode, the activity prediction meter and bar graph
show the intensity of activity at present and up to 4 hours in
the future.
In Future Mode, activity for a certain date and time is shown,
based only on future sun/moon information.
If you travel over a large distance and/or significantly change
altitude, you must re-set the pertinent parameters after reaching
your destination. Wait at least one hour for an accurate activity prediction.
To calibrate your compass, put the Speedtech ECO EDGE in
compass mode. Press and hold SET/Backlight till CAL
blinks. Put the unit on a flat surface or hold it so the LCD is
horizontal, and slowly rotate the instrument 2 times in a full
circle. Then press SET. This will adjust it for deviation. The
compass is dampended and is accurate to +/- 5 .
NOTE: You should take at least 30 seconds for each full rotation and this function should be done in a magnetic-free environment. For example: do not try to calibrate the unit next to a
computer, in a motorized vehicle, or next to appliances operation on 60-cylce current.
TEMPERATURE
Put the unit in temperature mode. The actual temperature
(wherever the unit is located) is displayed. If you want to input a different temperature (of a different location), to achieve a
more accurate prediction, press and hold SET until the temperature blinks. Change the temperature using the +/- buttons.
Press SET. To see any change in the activity prediction, return
to the current time mode. The estimated selection will end automatically after 5 minutes and default to the actual temperature. The prediction, based on the estimated temperature, will
display for 5 minutes, during which the deer head icon will
flash.
ALTIMETER
In the Altimeter mode, the current altitude will be shown in either feet or meters. Keep in mind that altitude is a function of
barometric pressure and will change accordingly. For example,
a low pressure weather system will make the unit think that it
is at a higher altitude. A high pressure system has the opposite effect. If you are climbing or descending, the altitude
should be adjusted at regular intervals to maintain the correct
barometric pressure for an accurate activity prediction.
10
HOW TO SET THE FUTURE MODE
IMPORTANT FEATURE: For any day, including the current
day, you can hold the + button and get an hour-by-hour scrolling prediction and the sun/moon positions will change accordingly. If you scroll past midnight, the date will also
change.
The future mode allows you to preview the activity prediction
on a certain date and time. You will be able to change the time
zone, etc. separately in FUTURE mode without modifying
your initial set up parameters. To enter the parameters for the
future forecast:
1.
2.
3.
4.
5.
6.
7.
8.
9.
10.
11.
12.
13.
14.
15.
1.
2.
Press TIME to display the future mode.
Press and hold SET. The hour digits will blink.
Use UP or DOWN to enter the hours.
Press SET. The minute digits will blink.
Use UP or DOWN to enter the minutes.
Press SET. The month digits will blink.
Follow the same pattern to enter the month, day and year
and press SET each time.
Time zone will blink. Use +/- buttons to change. Press
SET.
Latitude N will blink. Use + button to choose N or S.
Press SET.
Latitude degrees will blink. Use +/- buttons to change.
Press SET.
Latitude minutes will blink. Use +/- buttons to change.
Press SET.
Longitude W will blink. Use + button to choose W or E.
Press SET.
Longitude degrees will blink. Use +/- buttons to change.
Press SET.
Longitude minutes will blink. Use +/- buttons to
change. Press SET.
Press TIME to exit FUTURE mode.
Press TIME to display the future mode.
Use UP (+) or DOWN (-) to change the hour.
WEATHER FORECAST
The ECO EDGE continuously monitors barometric pressure
changes and maintains memory of barometric pressure history,
even when the unit is turned off. The 12 to 24 hour weather
forecast is based on the trends of the barometric pressure history. The effective range is 19 to 31 miles (30 to 50 km).
Note:
1. The accuracy of barometric pressure-based weather forecast is generally 75%. Thus, this instrument cannot be
held responsible for inconveniences caused by an inaccurate forecast.
2. The weather forecast is meant for the next 12 to 24 hours
and does not reflect the current condition.
11
3.
The sunny icon, when appearing at night, implies clear
weather. Rain forecast can also imply snow.
SEVERE WEATHER WARNING
By definition, severe weather occurs waschanged 6 millibars,
(up or down) during a 3 hour period. Severe weather, including wind and rain, generally accompanies falling barometric
pressure. Rising pressure will only result in high winds.
The moon and sun relative positions are also represented in
eight positions, including rising, setting, overhead and underfoot.
When the severe weather-warning feature is activated, the
unit will give out an audio warning and flash the weather
icon. The alarm is muted by pressing any button.
The barometer and severe weather alarm continue to function
when the unit is off. The alarm will sound even if the unit is off,
unless you disable the audio function.
To disable the severe weather warning, press and hold the
DOWN (-) button for 3 seconds in present mode display. A
beep will be sound. To enable the warning, press and hold the
UP (+) button for 3 seconds in present mode display. A series
RESET BUTTON
MOON PHASE, SUN AND MOON POSITIONS
A grey reset button is found inside the battery compartment.
Depressing the reset button will erase all data, including
barometric pressure histories and should only be used in the
event of a malfunction of the ECO EDGE. All parameter entry
must be repeated in the event of reset.
The Speedtech Angler’s EDGE is equipped with a moon
phase scanner for years 2003 to 2099. The moon phase is indicated in eight symbols, including full, waning, quarter, waxing and new.
12
CARRY POUCH
WARRANTY
A carry pouch is included with the unit. The ECO EDGE will
fit in the pouch with or without the mounting bracket.
Speedtech ECO EDGE and all other Speedtech Instruments
have a one-year warranty, as well as a 30-day as new return
policy. Our website at www.speedtech.com has product specifications, answers to frequently asked questions, and user
manuals can be downloaded.
You can also attach the pouch to a belt using its Velcro
loop.
belt
For Technical Support, call your dealer or Speedtech at 703430-8055, 9-5pm (EST) Mon-Fri or email:
[email protected].
HOW TO MOUNT THE UNIT
A mounting bracket is included for securing the ECO EDGE
on a wall or vertical surface. We suggest using Dual Lock, a
self-adhesive, plastic hook-on-hook, 3-M product carried by
hardware stores and Radio Shack. Dual Lock works well in a
damp environment.
MAINTENANCE
The Speedtech ECO EDGE is engineered to operate with precision for years, if handled properly. Do not subject it to extreme shock, electromagnetic influences or immerse it in water.
Do not tamper with internal parts, as none are user-serviceable.
13