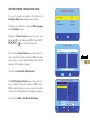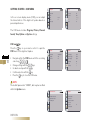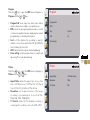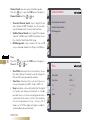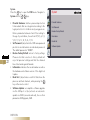
1
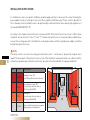
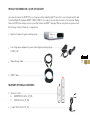
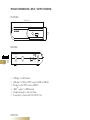
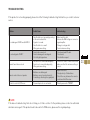
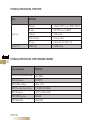
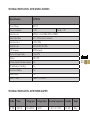
EN
DIGITAL SET TOP BOX, DVB-T/S2
USER MANUAL
subject to modification * 06-2013 * V1
SUMMARY
General Information
04
Installation Wet Rooms
10
Product Information
11
Getting Started
13
Troubleshooting
23
Technical Specification
24
3
GENERAL INFORMATION - SAFETY
•
•
•
•
•
4
•
•
•
CAUTION
Only qualified specialist staff may carry out service tasks. Service work is necessary, if the unit has been damaged,
e.g. if the mains plug or mains cable have been damaged, if liquid or items are present inside the device, if it has
been exposed to water or moisture, if it does not work properly or if it has fallen down.
Never remove the casing covers or modify the product in any way. This can cause an electric shock or burn you.
Immediately pull the plug, if you notice that your product emits smoke, smells burnt or emits unusual noises and
ask your specialist dealer for advice.
Do not allow the product to come into contact with liquids. Liquid in the casing can cause a fire, electric shock or
damage the device. Immediately pull the mains plug out, if an item or liquid gets into the casing. Notice that the
apparatus shall not be exposed to splashing or dripping liquids and no objects filled with liquids, such as vases,
shall be placed on the apparatus.
Keep small items away from the product. These can fall into the casing and cause a fire, an electric shock or
damage the device. Don‘t try to reach into the housing or plugs with wires or the like.
Never touch not-isolated parts of the plug, if the device is connected to the power adapter!
Where the mains plug or an appliance coupler is used as the disconnect device, the disconnect device shall
remain readily operable.
Avoid any impact and do not allow the product to fall!
DSTB-T/S2
GENERAL INFORMATION - INSTALLATION
Operation and Storage Requirements
The ambient temperature for operating the device is between +5 and +50 degrees Celsius. Do not install the device
in the proximity of heat sources, such as heating pipes, heaters, furnaces or other devices, which radiate heat.
Mount the device in such a way that it is protected against moisture. Trouble free operation is ensured up to 75% air
humidity.To prevent fire or electric shock, never allow liquids to enter the unit. The product must be stored in dry and
well-ventilated rooms, without extreme temperature fluctuations. Heat sources and aggressive active substances may
not be stored in the proximity of the device. The required storage temperature is 0°C - +60°C at an air humidity of
5 - 85% RH. The device must be stored in the complete packaging, as delivered.
Installation
Have this product installed by qualified staff only. Use the mounting systems which are specified or recommended
by ad notam. Install the product in a way that it is fixed properly and take care that children are not exposed to danger. Please take extra care during installation, avoid impacts. Before cabling your device, check that the power is off.
To avoid any possibility of electric shock, always connect your equipment to properly earthed outlets. Use of power
cords or adapters other than those provided may cause fire or malfunction. Place this product as close to the power
socket as possible. Leave enough space to insert and remove the power plug on demand. Even if you switch off the
product with your remote control, power is not cut off unless the power cord is unplugged.
Installation Environment
Avoid direct light or sun exposure, direct proximity to heat sources, outdoor installation. The product is specifically
designed for indoor use only. There is the danger of fire and of electric shocks and damage to the device, if it is
operated outdoors. Do not place any heat sources such as radiators and heat registers, etc. near the device.
5
Installation of Power Adapters
The device may only be operated with the provided power adapter. The rated voltage is indicated on the product
label. The device is factory-set to the optimal operating voltage (see Technical Specification). Use only power cords
and plugs that are suitable for your local electrical outlets. Install the power cords in such a way that it does not
obstruct anyone. Ensure furthermore that the cable is not clamped and that it cannot be pulled out accidentally from
the power adapter. Do not install the power cords in the proximity of heating elements and never place heavy items
on the cable or power adapter. Do not modify or arbitrary repair the power cords.
CAUTION
Do not use any power cords or adapters other than those provided with this product! Use of power cords or
adapters other than those provided with this product may cause fire, electric shock or malfunction. If several kinds
of power cords are provided with this product, use the one that fits your power socket. Do not let the adapter hang
down while using. Do not cover or wrap the adapter. Leave space around the adapter to prevent overheating. The
individual components can be destroyed, if the polarity is reversed or an incorrect connection is used.
6
A goodwill replacement is not possible in such cases, since each device is submitted to meticulous quality
inspections prior to shipping. The connecting plugs must be attached in such a way that the connector is held firmly.
Have trained technical personnel install the electrical facilities necessary for mounting. The power adapter has to be
installed in ventilated areas due to the heat emission! Connect the power cord to a grounding outlet! Never cut or
damage the power cord!
Please disconnect the device from the power adapter in the following cases:
• The device is out of use for a lengthy period.
• The device malfunctions or displays other unusual features, necessitating maintenance work.
• During a thunderstorm.
Please plan the positioning of the power adapter and the source cables before proceeding with the structural
measures and positioning of the device. Observe the protection zones when placing the power adapter! For
in-wall applications please bear in mind that the power adapter has to be placed beyond the inset due to heat
emission!
DSTB-T/S2
NOTE
The power adapter should be adequately secured to prevent it from becoming unstable and/or falling. Make sure the
power source circuits are properly grounded. Use the supplied power cord in order to connect it to the power source. If your
installation requires a different power cord, be sure to use an officially approved power cord displaying the mark of the
safety agency that defines the regulations for power cords in your country. Please consider that the AC outlet for the power
adapter is placed within reach and should be easily accessible in case it needs to be powered off.
Do install the product in a dry environment where the operating ambient temperature might not exceed 40°C / 104°F.
Also don´t position the power adapter on top or on the back of the device in order to prevent thermal overload. Ensure
that your installation complies with your national safety rules. Any servicing, adjustment, maintenance or repair must
be performed only by service-trained personnel.
Ensure that the power adapter is installed in a serviceable location, to access it easily in case of a defect. If you choose
to place the power adapter in a separate space, take care that the ventilation is present, because the power adapters
need convection cooling for stable working conditions.
When placing the power adapter in a fully enclosed space, make sure the air flow around the sides and top of the power
adapter is not restricted. According to a common rule of thumb the minimum dimensions for a niche for the power
adapter may be defined as follows: please calculate the length of the power adapter plus an additional gap of at least
100mm all around for DC 12V power adapters.
7
GENERAL INFORMATION - TRADEMARK
®
®
®
ad notam , MIRROR IMAGE , MAGIC MIRROR
AD NOTAM, MIRROR IMAGE and MAGIC MIRROR are trademarks of the ad notam group.
HDMITM
HDMI, HDMI CEC (HDMI Consumer Electronics Control), the HDMI logo and HIGH-DEFINITION MULTIMEDIA
INTERFACE are trademarks of HDMI Licensing LLC.
8
DSTB-T/S2
GENERAL INFORMATION - DISPOSAL OF OLD EQUIPMENT AND BATTERIES
European Union
The following symbol indicates that electrical resp. electronic equipment and batteries signed with this symbol
should not be disposed of as general household waste at its end of life. Instead, the products should be handed over
to the applicable collection points for the recycling of electrical and electronic equipment as well as batteries for
proper treatment, recovery and recycling in accordance with your national legislation and the Directive 2002/96/EC
and 2006/66/EC.
NOTICE: An appendix "Pb" below this symbol indicates that the battery contains lead.
By disposing of the products correctly, you will help to conserve natural resources and will help to prevent potential
negative effects on the environment and human health which could otherwise be caused by inappropriate waste
handling of these products. For more information about collection points and recycling of these products, please
contact your local municipal office or your household waste disposal service. Penalties may be applicable for
incorrect disposal of this waste, in accordance with national legislation.
Other Countries outside the European Union
These symbols are only valid within the European Union. If you wish to dispose of these items outside the European
Union, please do so in accordance with the applicable national legislation or other rules of your country for the
treatment of old electrical and electronic equipment and batteries.
9
INSTALLATION IN WET ROOMS
For installations in wet rooms specific installation guidelines apply, which are to be seen in the context of placing the
power adapter outside of certain protection zones. These regulations differ by region. Please contact a specialist for
this. In Germany electrical installations are to be performed by a skilled technician, while observing the regulations of
the standard DIN VDE 0100 T.701.
According to this standard, ad notam monitor systems with DC 12V (Limited Power Source Class II, SELV) can be
installed at each position (incl. Zones “0” and “1”) in harsh environments, also in showers and above a bath tub as
long as the low voltage product is shielded from a sealed glass surface and the (external) power adapter is installed
beyond these protection zones.
10
NOTE
The safety current source has to be arranged outside the zones 0 - 2 and needs to be protected against direct
impact. The assessment of the protection zones on site of the installation must be performed in accordance with the
valid national guidelines by a skilled local electrician. ad notam will not be held liable for improper installation!
Zone
Class
Requirements
0
IP x6-8
waterproof, max. 12V,
only SELV qualified electronic devices
IP x5
hose waterproof, max. 50V,
only stationary electronic devices
(IP x5 or qualified SELV)
2
IP x4
splashproof,
only stationary electronic devices
(IP x4 or qualified SELV)
3
IP x0-3
devices with at least protection against
dripping water recommended
1
1
DSTB-T/S2
2
2
2250
mm
1
600
mm
0
0
3
PRODUCT INFORMATION - SCOPE OF DELIVERY
ad notam introduces the DSTB-T/S2, a set top box with an inbuilt digital TV tuner that covers all main Satellite and
Terrestrial Digital TV standards (DVB-T / DVB-S / DVB-S2). It is ready to interact with all models of the ad notam Display
Frame Unit (DFU) line and any monitor system that features an HDMITM input port. Before using the device please check
the following contents of the box for completeness:
•
Digital set top box incl. glass mounting system....................
•
Low voltage power adapter incl. power cord and glass mounting system..............................
12V DC, 12W
•
IR pass through cable....................................................................
•
HDMITM cable..............................................................................
RELEVANT OPTIONAL ACCESSORIES
11
B
A
•
IR remote control.................................................................................................................
A
WATERPROOF, Art.No. ET_555
B
SLIMLINE, Art.No. ET_556
•
Y-cable 12V DC, Art.No. ET_551...........................................................................................................................
PRODUCT INFORMATION - INPUT / OUTPUT OVERVIEW
FRONTVIEW
152mm / 5.98“
31mm
1.22“
BACKVIEW
13V/18V
500mA max
12
LNB IN
•
•
•
•
•
•
RF IN
HDMI OUT
IR IN
DC IN
12V / 1A
USB input, 1 x USB terminal
LNB input, 1 x 75Ohm F-TYPE connector (DVB-S / DVB-S2)
RF input, 1 x IEC-TYPE connector (DVB-T)
HDMITM output, 1 x HDMI terminal
IR input (infrared), 1 x mini jack 3.5mm
Power input, 1 x Switchcraft L722 (12V DC / 1A)
DSTB-T/S2
GETTING STARTED - HOW TO CONNECT
ad notam DFU monitor system
Connect an HDMI cable to the HDMI output terminal of the digital set top box and one of the three HDMI inputs of
the DFU.
IR pass through cable
In order to use the integrated IR receiver of a combined DFU monitor system connect an IR pass through cable (ET_545)
to the IR output port of the DFU monitor system and the IR input port of the digital set top box.
External USB media source
Connect an external USB media source to the USB socket to to install a software update, to import channel list
settings from or export channel list settings to a USB device. In order to have access to the USB port also after
installation, we recommend installing a USB extension cable.
Satellite antenna cable
Connect an RF cable to the LNB input port of the digital set top box in order to receive DVB-S and/or DVB-S2 signal
standard.
External TV aerial
Connect an RF cable to the RF input port of the digital set top box in order to receive DVB-T signal standard.
13
GETTING STARTED - REMOTE CONTROL
NOTE
Observe that the contact clip (+)
is connected correctly to the plus
pole of the battery. If the contact
clip is positioned under the
battery, the remote control will
not work.
IR remote control WATERPROOF
LED indicator
Select program directly
Electronic program guide
Teletext / Videotext
14
Cursor up
Cursor down
Cursor left (decrease values)
Cursor right (increase values)
OK, confirm selection
Open / close OSD menu of STB
GOTO
EXIT
Previous channel
Open / close OSD menu of DFU
Switch between TV and radio
Favorite list
Sleeptimer
Aspect ratio
Select audio mode / audio track
functions used for ad notam DFU monitor systems
DSTB-T/S2
Power (toggle power on / off)
Source, signal input
Channel up / down
Volume up / down
Mute (sound on / off)
Channel info / Operation guide
Learn individual commands
Submenu function
Dimmer on / off
Dimmer scene 1 recall
functions used for ad notam lighting solutions
It is possible to program every single key (except for the
key itself) of the learnable IR remote control
WATERPROOF with an individual IR command from a teaching remote control of another IR controlled device.
Programming procedure:
1. Place the IR remote control WATERPROOF (learning) and your external device remote control (teaching) “head to
head”, approximately 30cm apart, as shown below:
IR command
teaching remote control
learning remote control
2. To enter the "learn mode" press and hold the
key until the LED indicator lights constantly. Please note: With no
action for more than 30 seconds the remote control will exit “learn mode” automatically!
3. Press and release a key you wish to program on the learning remote. The LED indicator still lights constantly.
4. Press and release a key you want to capture on the teaching remote. The LED indicator starts to blink slowly
indicating the IR command has been captured.
5. To save this IR code press and release again the key you wish to program on the learning remote. The LED indicator
blinks fast and then lights constantly to indicate this IR code has been saved.
6. To program more keys please repeat steps 3 - 5 while in “learn mode”.
7. To exit “learn mode” please press and release the
key again. The LED indicator is off.
In order to reset all keys to ad notam “factory default” IR commands, please follow the next steps:
1. Press and hold the
and keys simultaneously until the LED indicator lights constantly.
2. Press and release the
key three times in sequence to enter the code "999".
3. The LED indicator will turn off and the remote control has been reset to the initial IR codes.
Adress change procedure:
1. Please note: DFU IR address should be changed previously!
2. Press and hold the
and keys simultaneously until the LED indicator lights constantly.
3. Press and release a sequence of tree numeric keys (address codes "000" to "255" are available).
15
GETTING STARTED - REMOTE CONTROL
IR remote control SLIMLINE
Select program directly
Electronic program guide
Teletext / Videotext
16
Cursor up
Cursor down
Cursor left (decrease values)
Cursor right (increase values)
OK, confirm selection
Open / close OSD menu of STB
EXIT
Switch between TV and radio
Favorite list
GOTO
Previous channel
functions used for ad notam DFU monitor systems
DSTB-T/S2
Power (toggle power on / off)
Source, signal input
Submenu function buttons
Volume up / down
Channel info / Operation guide
Mute (sound on / off)
Channel up / down
Media Player
Open / close OSD menu of DFU
Sleeptimer
Aspect ratio
Select audio mode and audio track
Dimmer on / off
Dimmer scene 1 recall
functions used for ad notam lighting solutions
GETTING STARTED - INSTALLATION GUIDE
If you use the digital set top box for the first time the
Installation Guide will be displayed automatically.
Press the cursor buttons to setup the OSD Language
and the Country location.
Navigate to Channel Search and use the cursor keys
to switch between DVB-S/S2 and DVB-T.
Then press the
key to start the channel scan.
Installation Guide
OSD Language
English
Country
Germany
Channel Search
DVB-S/S2
EXIT
EXIT
OK
Confirm
Channel Search
...MHz/...MHz
Choose from Auto Search, Manual Search.
17
Progress
1%
EXIT
The Satellite Channel Search menu offers options to
tune to digital TV and radio channels in DVB-S and/or
DVB-S2 standard, when you have connected a satellite
antenna to the LNB input port of the digital set top box.
Choose from Satellite, TransPonder Dish Setup.
Radio: 0000
DTV: 0000
The terrestrial Channel Search menu offers options to
tune to digital TV and radio channels in DVB-T standard,
when you have connected an external TV aerial to the RF
input port of the digital set top box.
EXIT
MENU
Skip
Satellite Channel Search
Satellite
001
..... Eutelsat
002
..... Hotbird
003
..... Astra
004
..... Nilesat
...Eutelsat
LNB Type
LNB Power
22KHz
Toneburst
DiSEqC1.0
DiSEqC1.1
Motor
09750/10600
13/18V
Auto
None
None
None
None
...
Density
100%
Quality
GOTO
TransPonder
EXIT
EXIT
87%
OK
Select
Edit
Add
Delete
Scan
GETTING STARTED - OSD MENU
In the on screen display menu (OSD) you can adapt
the characteristics of the digital set top box based on
personal preferences.
Time
Program
Program Edit
Time Offset
Auto
EPG
Time Zone
GMT +1
Sort
By LCN
Date
LCN
On
Time
hh:mm
Sleep
Off
Timer setting
mm/dd/yyyy
The OSD menu includes Program, Picture, Channel
Search, Time, Option and System settings.
OSD navigation
Press the
key on your remote control to open the
OSD menu of the digital set top box.
18
•
•
•
•
•
Navigate within the OSD menu with the according
.
cursor keys
Change settings with the
keys.
Go back one step with the
key.
Confirm selection with the
key.
Press the
key to close the OSD menu.
Picture
Option
Aspect Ratio
16:9 Wide Screen
OSD Language
English
Resolution
1080i
Subtitle Language
English
TV Format
PAL
Audio Language
English
Digital Audio
PCM
Volume
16
IR Address
0
NOTE
The default password is "000000", but may be modified
within the System menu.
Channel Search
System
Terrestrial Channel Search
Parental Guidance
Satellite Channel Search
Set Password
DB Management
Restore Factory Default
Information
Recall List
Software Update
DSTB-T/S2
Off
Program
key to open the OSD menu. Navigate to
Press the
Program with the
or
keys.
Program
•
Program Edit
•
•
•
•
Program Edit: move, skip, lock, delete, favor and/or
rename channels according to your preferences.
EPG: (electronic program guide) provides you with
continuously updated menus displaying broadcast
programming or scheduling information.
Sort: sort the channel list according to specific
defaults, choose from options By LCN, By ONID, By
Service Name, By Service ID.
LCN: (de-)activate the logical channel numbering.
Timer setting: set the program timer for current and
upcoming TV or radio broadcasting.
Picture
Press the
key to open the OSD menu. Navigate to
Picture with the
or
keys.
•
•
•
Aspect Ratio: define the aspect ratio, choose from
Auto, 16:9 Wide Screen, 16:9 Pillar Box, 16:9 Pan &
Scan, 4:3 Full, 4:3 Letter Box, 4:3 Pan & Scan.
Resolution: set the pixel structure of the image
according to your preferences, choose from 576i,
576p, 720p, 1080i, 1080p (50Hz).
TV Format: define the TV standard according to
country specific conditions, choose from PAL, NTSC.
EPG
Sort
By LCN
LCN
On
Timer setting
19
Picture
Aspect Ratio
16:9 Wide Screen
Resolution
1080i
TV Format
PAL
Channel Search (see also section installation guide)
Press the
key to open the OSD menu. Navigate to
Channel Search with the
or
keys.
Channel Search
•
Terrestrial Channel Search
•
•
20
Terrestrial Channel Search: tune to digital TV and
radio channels in DVB-T standard, choose from Auto
Search, Manual Search, Country, Antenna Power.
Satellite Channel Search: tune to digital TV and radio
channels in DVB-S and/or DVB-S2 standard, choose
from Satellite, TransPonder Dish Setup.
DB Management: load a channel list from a USB
source or backup channel list settings to a USB drive.
Time
Press the
key to open the OSD menu. Navigate to
Time with the
or
keys.
•
•
•
Time Offset: determine the local valid time, choose
from Auto, Manual. In manual mode the settings for
Date and Time may be adjusted manually.
Time Zone: determine the local valid time zone,
choose from parameters GMT -12 up to GMT +12.
Sleep: determine a time setting after that the digital
set top box will change automatically to standby
provided there is no timer event programed and no
command from the remote control in the meantime,
choose from parameters 1 hour - 12 hours, Off. If
Sleep is set to Off, the digital set top box is unable to
enter standby mode automatically.
DSTB-T/S2
Satellite Channel Search
DB Management
Time
Time Offset
Auto
Time Zone
GMT +1
Date
mm/dd/yyyy
Time
hh:mm
Sleep
Off
Option
key to open the OSD menu. Navigate to
Press the
Option with the
or
keys.
Option
•
OSD Language
English
Subtitle Language
English
Audio Language
English
Digital Audio
PCM
Volume
16
IR Address
0
•
•
•
•
•
OSD Language: determine the desired language for
the OSD menu, choose from Cesky, Dansk, Deutsch,
English, Español, Français, Italiano, Português,
Svensk.
Subtitle Language: determine the desired language
for the subtitle, choose from the parameters Off and
a wide range of available languages.
Audio Language: determine the desired language
for the audio, choose from a wide range of available
languages.
Digital Audio: define a digital audio format, choose
from parameters Off, PCM, RAW HDMI On, RAW.
Volume: determine a default Volume, choose from
parameters 0 up to 32.
IR Address: determine an individual remote address
code, choose from parameters 0 up to 254. The
default IR address code is 0.
21
System
key to open the OSD menu. Navigate to
Press the
System with the
or
keys.
System
•
Parental Guidance
•
•
22
•
•
•
Parental Guidance: define a password protection
for broadcasts that are categorized according to the
legal protection for children and young persons.
Enter a parameter between 4 and 18 according to
the age of your children, choose from Off, 4, 5, 6, 7, 8,
9, 10, 11, 12, 13, 14, 15, 16, 17, 18.
Set Password: (de-)activate the OSD menu password
protection and determine an individual password.
The default password is "000000".
Restore Factory Default: restore to factory settings.
Please notice that a restore to factory default will
reject all personal settings and that the channels
have to be tuned again afterwards.
Information: indicates the model number as well as
the hardware and software version of the digital set
top box.
Recall List: (de-)activate a recall list that shows the
previous watched channels, when pressing the
key on the remote control.
Software Update: accomplish a software upgrade
via the USB port or (de-)activate an automatic
update via OAD (over-air-download), choose from
parameters USB Upgrade, OAD.
DSTB-T/S2
Set Password
Restore Factory Default
Information
Recall List
Software Update
Off
TROUBLESHOOTING
If the product is not working properly, please check the following troubleshooting hints before you contact customer
service:
Problem
Possible Cause
Troubleshooting
No or bad signal of DVB-S and/or DVB-S2
• Satellite dish is not accurately pointing
at the selected satellite.
• Signal is too weak.
• Satellite dish is too small.
• Wrong antenna setting.
• Adjust satellite dish.
• Increase the LNB voltage or connect a
signal amplifier.
• Change to a larger dish.
• Correct antenna setting.
No or bad signal of DVB-T
• Aerial is disconnected.
• Aerial is damaged or misaligned.
• Out of digital signal area.
• Check aerial and RF cable.
• Check aerial.
• Check with an expert.
Channel Search does not work
• Sat dish is not connected adequately.
• Aerial is not connected adequately.
• Wrong antenna setting.
• Check RF cable connections and
make sure that the antenna setting is
correct.
Remote control does not operate
• Batteries are discharged.
• Batteries are not inserted correctly.
• Something is blocking the signal path.
• Replace batteries.
• Check polarity of the batteries.
• Check the way between the remote
control and the IR receiver.
Not able to enter the OSD menu
• Password protection is activated.
• Default password is "000000".
NOTE
If the above troubleshooting hints do not help you to find a solution for the problem, please contact an authorized
ad notam service agent. If the product needs to be sent in for RMA service, please use the original package.
23
TECHNICAL SPECIFICATION - DSTB PORTS
Ports
Input Ports
Output Ports
24
DSTB-T/S2
LNB Input
1 x 75Ohm F-TYPE connector (DVB-S / DVB-S2)
RF Input
1 x IEC-TYPE connector (DVB-T)
USB Input
1 x USB terminal
IR Input (Infrared)
1 x mini jack 3.5mm
DC Input
1 x Switchcraft L722 (12V DC / 1A)
HDMI Output
1 x HDMI terminal
TECHNICAL SPECIFICATION - DSTB TUNER AND CHANNEL
Tuner and Channel
DSTB-T/S2
DVB-S2 Receiving Channel Range
950-2150MHz
DVB-S2 Modulation
QPSK/8PSK
DVB-S2 LNB Controlling
22KHz, 13/18V
DVB-T Receiving Channel Range
174-230MHz, 470-862MHz
DVB-T Modulation
QPSK/16, QAM/64, QAM
DVB-T OFDM Spectrum
2K and 8K
DVB-T Band Width
7MHz, 8MHz
DSTB-T/S2
TECHNICAL SPECIFICATION - DSTB GENERAL FEATURES
General Features
DSTB-T/S2
Power Voltage
DC 12V
Power Consumption
< 6W
Video Decoder
MPEG-4 / H.264 HP@L4, MPEG-2 MP@HL
Standby < 1W
Video Output Ratio
4:3 / 16:9 / letter box / automatic
Video Resolution
1920 x 1080p
Audio Decoder
AAC/HE-AAC/AC3, DD+
OSD Language
Multi-language
Electronic Program Guide
7 days EPG
Teletext
VBI / OSD
Software Update / Database Update
Yes
TV and Radio List Handling
Yes
Favorite List Editing
Yes
Timer Setting
Yes
HDMITM / HDCP
HDMITM 1.3 / HDCP 1.1
25
TECHNICAL SPECIFICATION - DSTB POWER ADAPTER
Art.No.
Power
Voltage Input
Voltage Output
Operating Temperature
Humidity
Weight
ET_550
12W / 1A
100~240V AC
12V DC
0° - 40°C / 32° - 104°F
20 - 90%
140g
E-Mail:
[email protected]
Web:
www.ad-notam.com