1
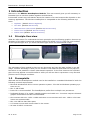
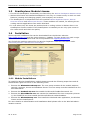
WinCan
ScanExplorer 2.7
User Manual
04/11/2013
CD Lab AG, Irisweg 12, CH-3280 Murten, Tel. +41 (0)26 672 37 37, Fax +41 (0)26 672 37 38, www.wincan.com
ScanExplorer User Manual
1
Introduction ................................................................. 5
1.1
Principle Overview ...................................................................................... 5
1.2
Prerequisits ................................................................................................ 5
1.3
ScanExplorer Module License...................................................................... 6
1.4
1.4.1
Installation ................................................................................................. 6
Module Installations ................................................................................... 6
2
2.1
2.1.1
2.1.2
2.1.3
3
Create a Scan ............................................................... 7
Starting a Scanner Application ................................................................... 7
Starting the DigiSewer Scanning Application ................................................. 7
Starting the Rico RPP Scanning Application ................................................... 7
Starting the IBAK Panoramo Scanning Application ......................................... 8
Open a Scan in ScanExplorer .......................................... 9
3.1
View the Scan Column ................................................................................ 9
3.2
3.2.1
3.2.2
Import a Scan ........................................................................................... 10
Multiple Scans per WinCan Inspection ......................................................... 11
External Scan Path .................................................................................... 11
3.3
Showing a Scan in the standalone ScanExplorer ....................................... 11
3.4
3.4.1
3.4.2
3.4.3
3.4.4
ScanExplorer Windows ............................................................................. 11
Main Window............................................................................................ 11
Overview Window ..................................................................................... 12
Sectionview Window ................................................................................. 13
Front Windows ......................................................................................... 13
3.5
Window Layouts ....................................................................................... 15
4
Navigation................................................................... 16
4.1
Current Position........................................................................................ 16
4.2
Changing the Position ............................................................................... 16
4.3
4.3.1
4.3.2
4.3.3
Changing the View Direction in the front window (Panoramo) ................. 17
Entering the Total view .............................................................................. 17
Navigating in the Total view ....................................................................... 17
Exiting the Total view ................................................................................ 17
4.4
Front- and Backview Correction (DigiSewer & Panoramo)........................ 18
4.5
Shifting along the distance ruler............................................................... 18
4.6
Scrolling with the vertical scrollbar .......................................................... 18
4.7
4.7.1
Zooming ................................................................................................... 20
Zoom Lens Tool (DigiSewer, RPP & Panoramo) ............................................. 20
4.8
Inclination & Height Chart ........................................................................ 21
5
5.1
5.1.1
5.1.2
5.1.3
5.1.4
Creating Graphics & WinCan Observations ........................ 22
Creating Graphics ..................................................................................... 22
Graphics in the Sidescan Drawing Mode ....................................................... 22
Graphics in the Cross Section Mode............................................................. 22
Accuracy of Measurement .......................................................................... 24
Graphic Properties .................................................................................... 25
04.11.2013
Page 2 of 49
ScanExplorer User Manual
5.2
5.2.1
5.2.2
5.2.3
5.2.4
5.2.5
5.2.6
Editing Graphics ....................................................................................... 26
Selecting a Graphic ................................................................................... 26
Deselecting a Graphic ................................................................................ 26
Moving, Editing and Deleteing a Graphic ...................................................... 26
Changing the Graphics Pen & Frame ........................................................... 27
Changing the Font .................................................................................... 27
Graphic Offset in the Front View ................................................................. 27
5.3
5.3.1
Creating a Graphic with WinCan Observation ........................................... 29
Displaying additional database information in the graphic’s label .................... 30
5.4
Creating Observation with automatic Pictures .......................................... 30
5.5
Video Markers for Rico RPP ...................................................................... 31
6
Printing Reports ........................................................... 32
6.1
ScanExplorer Overview Report in WinCan ................................................ 32
6.2
Graphic Report in ScanExplorer ................................................................ 33
7
ScanExplorer Post Processing (DigiSewer) ........................ 35
8
Analysing a Scan .......................................................... 38
8.1
8.1.1
9
Starting the WinCan Scan Analyser .......................................................... 38
Scan Analyser: Straighten Joints ................................................................ 39
Menu Commands ......................................................... 41
9.1
9.1.1
9.1.2
9.1.3
9.1.4
9.1.5
9.1.6
9.1.7
9.1.8
9.1.9
9.1.10
9.1.11
Menu File .................................................................................................. 41
Open ....................................................................................................... 41
Save ....................................................................................................... 41
Close....................................................................................................... 41
Start Scan Analyser .................................................................................. 41
Load Analyser Objects ............................................................................... 41
Inspection Information .............................................................................. 41
Start Post Process (only DigiSewer) ............................................................ 41
Delete old Sidescans (only DigiSewer) ......................................................... 41
Preferences .............................................................................................. 42
Print........................................................................................................ 42
Exit ......................................................................................................... 42
9.2
9.2.1
9.2.2
9.2.3
9.2.4
9.2.5
9.2.6
Menu Edit.................................................................................................. 42
Drawing Modes ......................................................................................... 42
Drawing Tools .......................................................................................... 42
Delete ..................................................................................................... 42
Delete multiple graphics ............................................................................ 42
Change Pen and Framesize ........................................................................ 42
Change Font ............................................................................................ 42
9.3
9.3.1
9.3.2
9.3.3
9.3.4
9.3.5
9.3.6
9.3.7
9.3.8
Menu View ................................................................................................ 42
Hide all graphics ....................................................................................... 42
Show inclination chart ............................................................................... 42
Show height chart..................................................................................... 42
Unit > Meter/Feet ..................................................................................... 42
Zoom ...................................................................................................... 42
Sidescan View Direction ............................................................................. 43
Reset Distance Scale Shift ......................................................................... 43
Reset Clock Scale Shift .............................................................................. 43
04.11.2013
Page 3 of 49
ScanExplorer User Manual
9.3.9
9.3.10
9.3.11
Reset Clock Shift (Scrollbar)....................................................................... 43
Invert Distance ......................................................................................... 43
Show Colormap for Radius Scans ................................................................ 43
9.4
9.4.1
9.4.2
9.4.3
9.4.4
9.4.5
Menu Navigation ....................................................................................... 43
Go to the next graphic............................................................................... 43
Go to the previous graphic ......................................................................... 43
Go to the scan start .................................................................................. 43
Go to the scan end.................................................................................... 43
Mouse wheel direction ............................................................................... 43
9.5
9.5.1
9.5.2
9.5.3
9.5.4
9.5.5
9.5.6
9.5.7
9.5.8
9.5.9
9.5.10
9.5.11
9.5.12
9.5.13
9.5.14
Menu Window ........................................................................................... 43
Overview Window ..................................................................................... 43
Frontview Window .................................................................................... 43
Sectionview Window ................................................................................. 43
3D-Window .............................................................................................. 44
Panoramo Viewer Window (Panoramo) ........................................................ 44
Applying a window layout .......................................................................... 44
Save the current window layout.................................................................. 44
Save as new window layout ....................................................................... 44
Delete window layout ................................................................................ 44
Bring windows to front together.................................................................. 44
Move all windows with main window ........................................................... 44
Do magnetic resize & move ........................................................................ 44
Show Toolbar ........................................................................................... 44
Change Language ..................................................................................... 44
9.6
9.6.1
9.6.2
9.6.3
9.6.4
Menu Help................................................................................................. 44
About ScanExplorer................................................................................... 44
Version .................................................................................................... 44
Show the Quick Help Window ..................................................................... 44
Open ScanExplorer Documentation (PDF) .................................................... 45
9.7
9.7.1
9.7.2
9.7.3
9.7.4
9.7.5
Menu Panoramo ........................................................................................ 45
Panoramo Viewer Settings ......................................................................... 45
Show 3D-Measurements ............................................................................ 45
Edit 3D-Measurements .............................................................................. 45
Open Pointcloud ....................................................................................... 45
Panoramo Viewer Help .............................................................................. 46
10 Appendix .................................................................... 47
10.1
INI-File Parameters .................................................................................. 47
10.2
Document History ..................................................................................... 49
04.11.2013
Page 4 of 49
Introduction: Principle Overview
1 Introduction
Welcome to the WinCan ScanExplorer Module. This user manual gives you all necessary information how to use this module together with WinCan8.
It does NOT contain any information about the creation of a scan because this depends on the
scanning application. The WinCan ScanExplorer is compatible to the following sidescan systems:
•
DigiSewer (Module WinCan DigiSewer)
•
Rico RPP (Module WinCan RPP)
•
IBAK Panoramo & PanoramoSI (Module WinCan Panoramo)
•
Rausch PanCam (Module WinCan PanCam)
•
Radius Scans (Module WinCan LaserScan)
1.1
Principle Overview
What are side scans? To understand the basic principles see the following graphic. Scanner applications of the above mentioned systems produce so-called sidescans from the inner surface
of the inspected pipe as if you would unfold the pipe into a two-dimensional image:
Figure 1: Unfolding the inner pipe surface into a 2D image
The advantage of this method is that you can document and view the pipe surface in one big
image. Another advantage is that you can measure real distances and areas on the pipe surface which is not possible in classic video based inspection. In the first moment this unfolded
pipe view may appear unusual but after a while you will see that it represents a very fast and
precise view of the pipe condition.
1.2
Prerequisits
WinCan8 and the ScanExplorer module need to be installed on a standard Windows PC with the
following minimal requirements:
• Microsoft Windows XP SP3 or newer operation system. 32 or 64 bit Windows operating systems are ok.
• Min. 2 GB of RAM
• Intel CPU is recommended. The ScanExplorer profits from multiple core processors.
• Dedicated DirectX 9 (or newer) capable graphic card width min. 2 monitor outputs. Onboard
graphic accelerators are NOT recommended.
• One monitor with min. 1920 x 1080 resolution or two monitors with min. 1280 x 1024 resolution are recommended.
• Min. 100 GB free hard disc space
• A 3-button mouse with mouse wheel in the center.
• At least 2 USB-2 connectors.
04.11.2013
Page 5 of 49
Introduction: ScanExplorer Module License
1.3
ScanExplorer Module License
• For the full ScanExplorer functionality one has to buy the WinCan ScanExplorer Module License.
• Without this license an installed ScanExplorer runs only in a viewer mode, in witch no modifications (creating and changing graphic, scan analysis) can be done.
• The ScanExplorer is independent from the modules WinCan DigiSewer Scanner, WinCan
Panoramo Scanner and WinCan RPP Scanner. These modules are needed, for starting the according scanner applications from within WinCan8.
• In a car where only the scans are produced and no coding is done in WinCan there is no
ScanExplorer license needed. If the ScanExplorer is installed you can only open a scan in
the viewer mode and check its quality.
1.4
Installation
All the required installation files can be downloaded from the WinCan web site:
http://www.wincan.com and the menu Support > Updates. To have access you need a registered username and password that can be requested from [email protected].
You find all the modules required for the WinCan DigiSewer under the tree menu under
Connectivity modules > WinCan Scan Technologies:
Figure 2: WinCan download page under Support > Upgrades.
1.4.1 Module Installations
To install the WinCan ScanExplorer module please precede the following steps that need all
Administrator rights on the PC in the following order:
1. Execute the WinCan8CoreSetup.exe. The core setup contains all the needed windows
controls, runtimes, drivers and database clients. This core setup must be installed first. Reboot afterwards.
2. Execute the DotNetFx2.0.exe that installs the Microsoft DotNet framework 2.0.
3. Execute the DirectXRedist.exe and extract the installation files into a temporary directory. Run DXSETUP.exe that installs the Microsoft DirectX redistributables.
4. Execute the WinCan8Setup.exe. This installs the WinCan8 main application, the WinCan
Viewer and the ScanExplorer.
For more details on administration and installation detail please refer to the WinCan8 administration manual.
04.11.2013
Page 6 of 49
Create a Scan: Starting a Scanner Application
2
2.1
Create a Scan
Starting a Scanner Application
For a tight integration of the different scanning technologies (DigiSewer, RPP and IBAK Panoramo) it is recommended to the launch the according Scanner application from within WinCan8
with the button:
If you have several scanning modules licensed a dialog appears where you have to choose the
appropriate scanner application. For scanning applications in common is that specific section
and inspection parameters are passed over to the scanner application and that WinCan8 is
sent to sleep during the scanning process. After the scanning process WinCan8 comes back
and has the scanned data in the following directory of the current WinCan8 project:
(WinCan8ProjectFolder)
>
ScanExplorer
>
(SectionAutoNumber)_(InspectionAutonumber)_(ObservationAutonumber)
The subfolder \(SectionAutoNumber)_(InspectionAutonumber)_(ObservationAutonumber) can not be changed.
The auto numbers of section, inspection and observation where chosen for the folder name because this identifiers are always set and will remain also when sections, inspections or observations in between are deleted.
2.1.1 Starting the DigiSewer Scanning Application
Please refer to the WinCan8 DigiSewer manual for more details on this scanning application.
After the scan has been created the data is stored as follows:
(WinCan8ProjectFolder)
>
ScanExplorer
>
(SectionAutoNumber)_(InspectionAutonumber)_(ObservationAutonumber)
>
FRONTVIEW
(folder with all frontviews)
>
SIDESCAN
(folder with all sidescans)
>
HEADER_DS2.txt
(header file used to open ScanExplorer)
2.1.2 Starting the Rico RPP Scanning Application
Please refer to the Rico RPP manual for more details on this scanning application. After the
scan has been created the data is stored as follows:
(WinCan8ProjectFolder)
>
Video
>
*.mpg (VideoFile that was captured during the scan)
>
*.txt
(Time-distance file that was captured during the scan)
>
ScanExplorer
>
(SectionAutoNumber)_(InspectionAutonumber)_(ObservationAutonumber)
>
SIDESCAN
(folder with all sidescans)
>
HEADER_RPP.txt
(header file used to open ScanExplorer)
04.11.2013
Page 7 of 49
Create a Scan: Starting a Scanner Application
2.1.3 Starting the IBAK Panoramo Scanning Application
Before starting the Panoramo Scanner it is mandatory to enter the inner pipe diameter in the
section data as well as the inspection direction in the inspection data.
In addition you have to enter once a valid path for the raw scanning data into the
INI/W8Settings.ini file:
...
[Panoramo]
PanoramoRawDataPath=d:\Panoramo\
...
With this entry the raw data of a Panoramo scan will be stored in the folder:
(PanoramoRawDataPath)
>
(ProjectName)
>
Panoramo_(S#)_(I#)_(O#)
(folder with the raw scan data)
• In the Camera Settings dialog do NOT choose the option for Reverse Scan:
In the Panoramo Camera Settings dialog you should NOT choose the option for reverse
scan. This is not necessary with WinCan8 and causes the scanner to rename the raw data
folder.
• Generate the IPF-file after the scan process:
The IPF-file contains all image data packed in one file. This means that the image data exists now twice: Once in the raw data folder and once in the IPF-file.
After closing the Panoramo scanner WinCan will copy only the IPF-file into the WinCan project folder:
(WinCan8ProjectFolder)
>
ScanExplorer
>
(SectionAutoNumber)_(InspectionAutonumber)_(ObservationAutonumber)
>
SIDESCAN
(Folder for the sidescan minifications)
>
Panoramo_(S#)_(I#)_(O#).ipf
(Panoramo IPF file)
>
*.inc
(Inclination file)
>
HEADER_IPF.txt
(Header file for ScanExplorer)
• Generating all IPF-files of multiple scans at once:
You can create multiple scans without generating the IPF right afterwards. In this case no
IPF is integrated after finishing the single scan. After the last scan is made the Panoramo
scanner can produce unfolds and IPF-files of all those scans together at once. After closing
the scanner, all IPF-files will be moved and attached correctly in the WinCan project.
• Option Panoramo Scanning without sleeping WinCan8:
If you place the following entry into the INI/W8Settings.ini file:
...
[Panoramo]
DoPanoramoScanWithoutSleep=True
...
WinCan8 will not anymore fall asleep after starting the Panoramo scanner. This allows you
to continue to work in WinCan while the scanner application is running. We do not recommend this option because the Panoramo scanner deserves all the operators’ attention. The
IPF-files generated with this option are loaded by double clicking the red bullet in the scan
column.
04.11.2013
Page 8 of 49
Open a Scan in ScanExplorer: View the Scan Column
3
3.1
Open a Scan in ScanExplorer
View the Scan Column
Before you can open or import a scan we need to show the ScanExplorer database column in
the observation column. After starting WinCan8 you have to log in with a username and password and open a new WinCan project. Please refer the WinCan8 Entry manual for more details
about these steps. After this the WinCan8 application screen looks as follows:
Figure 3: WinCan8 Main Screen
Show the Scan column:
After the start-up the columns in the different grids of WinCan8 appear as they are defined in
the selected template. Please read the WinCan8 Administration manual for more details about
templates and their modification. After the first start-up we need to add the ScanExplorer column in the observation grid. In our example we replace the last column (MPEG Counter).
With pressed Control-Key click with the mouse pointer on the header of the column MPEGCounter. This opens the Template-Settings dialog:
04.11.2013
Page 9 of 49
Open a Scan in ScanExplorer: Import a Scan
Figure 4: Template Settings dialog for the ScanExplorer column
Choose in the dropdown list of the Data field property the SO_ScanExFlag1 data field. Set
the Editable property to No. Set a short name (e.g. ScanEx) in the Header property. Click on
the green OK button to close the dialog. After this the last column gets labeled ScanEx and will
show you in the future a Scan Icon if a scan is attached to the observation. The new column
looks like this:
Figure 5: The ScanExplorer column for the first (empty) observation.
3.2
Import a Scan
If you did not create a scan from within WinCan8 you can import a scan either by clicking on
the red bullet in the ScanExplorer column. Alternatively you can use the menu command Tools
> Import tScanExplorer Projects. With a file chooser dialog you select one of the following file
types:
• HEADER_DS2.txt (project file for DigiSewer2 scans)
• HEADER_RPP.txt (project file for RPP scans)
• HEADER_IPF.txt (project file for Panoramo scans)
• *.ipf (IBAK Panoramo scan files): This import automatically creates the correct HEADER_IPF.txt project file.
• HEADER_R3D.txt (project file for a Rausch PanCam scan that was already once imported
in ScanExplorer)
• *.R3D (Rausch PanCam scan files): The ScanExplorer imports all image files and creates
the appropriate HEADER_R3D.txt files
The import process copies the project files into the WinCan8 project folder as follows:
(WinCan8ProjectFolder)\ScanExplorer\(SectionAutoNumber)_(InspectionAutonumber)_(ObservationAutonumber)
This path is automatically generated and can not be modified.
The copy process can last a few minutes depending on the size of the scan. After the import
the ScanExplorer is automatically started and in the cell where the scan is attached you can
see the scan icon:
Figure 6: The scan icon indicating an attached scan.
04.11.2013
Page 10 of 49
Open a Scan in ScanExplorer: Showing a Scan in the standalone ScanExplorer
3.2.1 Multiple Scans per WinCan Inspection
It is possible to import in WinCan several scans per inspection. This means that you can have
in the red observation grid in several observations a scan attached. Please consider the following points:
• This only makes sense if you have to create multiple scans per inspection. This can be the
case, if e.g. the scan file size exceeds a maximum file size.
• For an opposite inspection you have to make a 2nd inspection in WinCan (s. the WinCan
manual).
• It is in your responsibility that the start and end distances of the scans do not overlap or
only have a minimal overlap.
• Joining several inspections in WinCan with scans is not implemented.
3.2.2 External Scan Path
For archiving purpose it may be useful to store scans or videos outside of a WinCan project on
a dedicated server. You can set this by adding e.g. the following entries into the W8settings.ini
file:
[Environment]
...
SideScanFilePath=s:\Scans
ClipFilePath=v:\Videos
Do NOT set these external paths on a PC in the truck where you create the scans.
3.3
Showing a Scan in the standalone ScanExplorer
The ScanExplorer also exists as a standalone application in the WinCan installation directory:
(Program Files)\WinCan v8\WinCan\WinCanScanExplorerStandalone.exe
With the menu command File > Open you can open and view a scan in the ScanExplorer but you
can not create and save graphics. You can only do this when you start the ScanExplorer as
component from within WinCan8.
3.4
ScanExplorer Windows
The ScanExplorer shows up in the original state with 4 windows above WinCan8 on a minimal
screen size of 1024x768 pixels.
Effectively working with WinCan8 & ScanExplorer definitely requires two screens in the dual
view mode. You can work on one screen with a minimal resolution but it is not recommended.
If you do so you always have to switch WinCan8 or the ScanExplorer to the front or to the
back.
3.4.1 Main Window
The ScanExplorer is open and running when at least this window is open. It shows the full
resolution of the unfolded sidescan image with a distance ruler on top of it an a clock hour
scale on the left border of the window. On top of the sidescan you can find the toolbar and on
top of this the menu bar:
04.11.2013
Page 11 of 49
Open a Scan in ScanExplorer: ScanExplorer Windows
Figure 7: ScanExplorer Main Window
3.4.2 Overview Window
This window shows the minification of all sidescan images together. All images are loaded all
the time. This window is available for all scan systems. The height of the sidescan can be adjusted over the context menu. The images will be regenerated and saved for this. Because of
that the resizing option is only available if the data is stored on a harddisc and not on a DVD.
Figure 8: Overview Window
04.11.2013
Page 12 of 49
Open a Scan in ScanExplorer: ScanExplorer Windows
3.4.3 Sectionview Window
o
Show a vertical graphic of the section with all the graphics and their operation code.
o
Pipe and manholes are graphic symbols and are scaled to their sizes.
o
Scan direction is always top-down.
o
By default the section length is measured between the manholes. Alternatively you can set
by the context menu that this length is measured between manhole centre and manhole
centre.
o
The section length is transferred from WinCan to the ScanExplorer at its startup. If there
are no observations recorded in WinCan the section length is often not set. In this case the
ScanExplorer calculates a section length for the section window as scan end distance minus
scan start distance. As soon as observations are recorded in WinCan the section length is
automatically calculated from WinCan and transferred to the ScanExplorer at its next
startup.
The grey shaded part of the pipe in the section window signifies the scanned part of the
section.
o
This window is available for all scan systems.
o
If you export the WinCan project with the WinCan Viewer it is important that you
open the ScanExplorer at least once so that the section length from WinCan is
written into the header file of the ScanExplorer.
Figure 9: Section window: Left: A raw scan from -0.85m to 42.15m. A provisorily length of 43m is calculated.
Middle: After that a section length of 41m where set in WinCan. Right: After that a section length of 50m where set
in WinCan.
3.4.4 Front Windows
The sidescan systems differ mostly in different kinds of front views. There are 3 different
frontview windows in ScanExplorer:
• 3D View Window (all systems): This window shows a virtual 3D view created from the
sidescan images. The 3D-View window is restricted to the straight forward view direction
because this is the only reasonable perspective. Even this perspective is only a virtual and a
04.11.2013
Page 13 of 49
Open a Scan in ScanExplorer: ScanExplorer Windows
near approximation to the "real" reality of circular pipes. It is virtual or artificial because the
sidescan images are remapped onto a perfect circular pipe. The generated view of a joint
e.g. will be always a perfect circle even if the pipe was deformed in reality.
• Frontview Window:
o
DigiSewer: It shows the current frontview image that was stored ca. every 10cm during
the scan. The DigiSewer scanner does not store a video.
o
RPP: It shows the frontview video that was captured while driving forwards into the pipe
o
Panoramo: It shows the current frontview image that is usually stored every 5 cm during the Panoramo scan. In addition you can switch between the front and the back view
image taken at the same position as the frontview image.
• Panoramo Window: This virtual 360 degree look around view is provided through a component provided by IBAK Kiel. It allows you to smoothly move forward and backwards as
well as free 360 degree rotation of the view direction.
In comparison to the 3D-View window is the view from the Panoramo window created from
the 2 fisheye images taken to the front and the back of a Panoramo camera. The Panoramo
window provides perspecitvely correct views to ALL possible view direction.
Figure 10: 3 front views at the same position of a Panoramo scan: 3D view window (left), front view window (middle)
and the Panoramo window.
Figure 11: 2 front views at the same position of a DigiSewer scan: 3D view window (left)and the frontview window
(right).
04.11.2013
Page 14 of 49
Open a Scan in ScanExplorer: Window Layouts
Figure 12: 2 front views at the same position of a Rico RPP scan: 3D view window (left) and the frontview window with
the video playback.
3.5
Window Layouts
No matter if you have one or more screens where you can position the ScanExplorer windows
you can save the settings as a Window Layout. Beside the position different windows it will also
store if a window should stay on top of all windows and if a window is open at all. All commands for the window settings can be found under the menu Window.
04.11.2013
Page 15 of 49
Navigation: Current Position
4 Navigation
This chapter gives you detailed information about how to navigate through a scan and how to
use the keyboard and the mouse to do so. For a quick help you can also have a look at the
Help > Quick help window that lists the most important keyboard short cuts and mouse interactions.
4.1
Current Position
• In all windows except the Panoramo Viewer window and the video window of RPP, you can
see a fine red line indicates the current distance in the pipe. The current clock position is
marked with a little fat red circle.
• All windows are at all times synchronized.
• In the status bar at the lower border of all windows you can see the water flow direction
and the current position.
• By default except for projects with the language USA the distances are shown with metric
units. You can change this with the menu command View > Unit > Feet.
4.2
Changing the Position
You can change the position in many ways:
• Left mouse button:
o
In the main window: Moves the clicked position in the sidescan to the centre of the
window and moves the little red circle to the according clock position. In the main window the red line that shows the current distance stays always in the centre of the window.
o
In the overview window: A click or a move with pressed button repositions the distance line and the little clock position circle to the clicked position in the overview window. The current clipping region from the main window is shown with a dotted red rectangle.
o
In the frontview window of DigiSewer & Panoramo: Moves the distance circle and
the little clock position circle to the clicked spot in the frontview. If another frontview image is closer to the clicked point in the pipe that frontview image changes.
o
In the Panoramo viewer window: A click and the following drag change the view direction. You can look in any direction that you want. A click on the space bar resets the
view to the initial straight forward view.
o
In the frontview window of RPP: Resumes or pauses the video frontview. With the
context menu command Show video properties you can open the video property dialog.
o
Clicking into the position field of the status bar in all windows opens a dialog
where you can enter a desired distance.
• Right mouse button:
o
In the Panoramo viewer and 3D-view window: A click and drag move the current
camera position forward and backwards.
o
In all other windows: A context menu will be opened.
• Mouse Wheel: Moves the current position forwards or backwards:
o
In all windows: The distance moved corresponds to distance between two frontviews.
By default this distance is set to 10cm. Moving direction can be set with the menu command Navigation > Mouse wheel direction (pull):
04.11.2013
•
Pressing the SHIFT-key at the same time moves 1cm.
•
Pressing the ALT-key at the same time increases or decreases an automatic
speed. This way the scan moves automatically without interaction.
Page 16 of 49
Navigation: Changing the View Direction in the front window (Panoramo)
•
Pressing the SHIFT-key at the same time in the 3D window changes the offset
distance. Because of the narrower view angle in the 3D window one could not
see object to the side of the current position that one would see in the frontview
window. The offset distance is shown in round brackets in the position field of
the status bar.
• Keyboard:
o
Key Home: Move to the start of the scan.
o
Key End: Moves to the end of the scan.
o
Key PageUp/PageDown: Moves one page in the main window forwards or backwards.
o
In the Panoramo window: The space key resets the view to the straight forward view.
4.3 Changing the View Direction in the front window
(Panoramo)
For Panoramo the frontview window is not only a frontview window but also allows viewing of
backview images with exact same functionality. Additionally a Total View can be activated which
allows 3D-viewing of the pipe as in Panoramo Viewer. This fisheye view is a combination out of
the frontview and the backview:
Figure 13: Left: Combined front- and backview as a total view. Right: Standard frontview
4.3.1 Entering the Total view
To enter the total view use any of the navigation options listed below. You will notice that you
have entered total view when the flow direction icon at the bottom left of the windows disappears and the surrounded view circle is grey instead of white.
4.3.2 Navigating in the Total view
• Left mouse button with CTRL-key: Dragging while CTRL-key is pressed keeps the clicked
pixel beneath the mouse pointer.
• CTRL-key and cursors: Looks around in pipe by 15 degrees per key press.
4.3.3 Exiting the Total view
For performance reasons it is strongly recommended you exit the Total view to navigate the
Pipe.
• Spacebar: As in Panoramo Viewer the spacebar returns you to looking straight forward. It
also exits Look Around Mode.
• Context menu: When either front- or backview is selected from the context menu the total
view is set back to the chosen standard view.
04.11.2013
Page 17 of 49
Navigation: Front- and Backview Correction (DigiSewer & Panoramo)
4.4 Front- and Backview Correction (DigiSewer &
Panoramo)
Sometimes the DigiSewer & Panoramo fisheye lenses are insufficiently calibrated witch leads to
black borders around the front- or backview. You can correct the centre of the front- or backview by the cursor keys while pressing the ALT-key. The view radius can be adjusted with the
curser left/right keys while pressing the CTRL and the ALT-keys.
Figure 14: Insufficiently calibrated backview
4.5
Shifting along the distance ruler
The sidescans begin at a distance that was set at the scan was created. This information then
is stored within the sidescan filename and can not be changed. If this start distance is not correct you can shift the sidescans along the distance ruler in the main window by pressing &
moving the left mouse button within the ruler. A double click resets the original start distance.
Figure 15: Shifting the sidescans along the distance ruler
4.6
Scrolling with the vertical scrollbar
By moving the vertical scrollbar you can change the cut hour of the sidescan image. The same
cut hour is applied to the overview window. You can shift the sidescan this way max. +/- 6
hours. You can draw this way a graphic object over the cut hour. A double click on the vertical
ruler resets the scrollbar to its default position.
04.11.2013
Page 18 of 49
Navigation: Scrolling with the vertical scrollbar
Figure 16: Left: Main window with default vertical scrollbar position. Right: The same sidescan 6 hours down scrolled.
Notice the selected graphic across the cut hour of the sidescan.
04.11.2013
Page 19 of 49
Navigation: Zooming
4.7
Zooming
4.7.1 Zoom Lens Tool (DigiSewer, RPP & Panoramo)
By pressing the zoom lens button you can activate the zoom tool:
• The zoom lens is red rectangle around the current mouse position and shows the sidescan in
its native resolution which means that one pixel in the scanned image is one pixel in the
zoom lens.
• With DigiSewer & RPP you can change the zoom factor in the range of 50-150% with the
mouse wheel and pressing the CTRL-key at the same time.
• You can move the current sidescan section with the mouse wheel.
• Pressing the left mouse button activates the measuring tool within the zoom lens.
Figure 17: Zoom lens with measuring in the main window
• A ESC-key press or a click on the pointer tool ends the zooming.
04.11.2013
Page 20 of 49
Navigation: Inclination & Height Chart
4.8
Inclination & Height Chart
• By pressing the chart icon with the red line
or with the menu command view > show
inclination chart you can add the inclination chart at the bottom of the main window.
or with the menu command view > show
• By pressing the chart icon with the blue line
height chart you can add the inclination chart at the bottom of the main window.
• The inclination & the height chart are generated from the inclination values measured during the scan. At the moment only the DigiSewer and Panoramo systems captures inclination
values.
• To make the blue inclination line less bumpy it is smoothed by averaging neighboring values. The number of values taken for an average is defined in the ScanExplorer.ini file in the
field INCL_FILTER_WIDTH. A value of 0 avoids averaging and shows the real values captured from the camera inclination sensor.
• The height chart is calculated from the inclination values. If the start and the end height in
the inspection information dialog (File > Inspection information) is set to zero the height line is not
corrected. Because the inclination sensors normally have an error of a certain percentage
the summed up error at the end of the chart can be quite high. If you set a non-zero start
and end height the height line will be corrected so that it fits into those heights.
Figure 18: Main window with inclination and height chart of a horizontal (=0% inclination) test pipe. You can see at
the end of the height chart a summed up error of ca. 3cm on pipe length of 4m.
04.11.2013
Page 21 of 49
Creating Graphics & WinCan Observations: Creating Graphics
5 Creating Graphics & WinCan Observations
5.1
Creating Graphics
5.1.1 Graphics in the Sidescan Drawing Mode
The Sidescan Drawing Mode is activated when first button of the following buttons is down:
• In this mode all graphics will be in the plane of the unfolded pipe surface.
• You can choose between the Measure-2D, Measure-3D, Point, Lines, Polygon, Rectangle or the
Ellipse drawing tool in the toolbar of the main window or in the menu Edit.
• By pressing the ESC-key or selecting the pointer tool you can deselect the current drawing
tool and abort a new drawing.
• The difference between 2D- and 3D-measuring is that with the 2D-measuring you are
measuring a distance on the unfolded 2D pipe surface. With 3D-measuring you can measure
in the 3D pipe space. You can distinguish then by the endpoints. 2D-measurments have a
squared endpoints where as the 3D-measurements have 2 circles as endpoints.
Figure 19: Different distances with 2D- and 3D-measuring. On the sidescan both measurements have the same
distance (left). In the frontview you can see that the 2D-measurment is on the pipe surface, where as the 3Dmeasurement is a straight line in the pipe.
• You can draw in the main window or in the frontview window (DigiSewer & Panoramo).
• The drawing starts with the first press of the left mouse button.
• For lines and polygons a new point will be added on each click.
• To finish a line or a polygon you have to double-click or choose finish graphic from the context menu that opens on a left mouse button click.
5.1.2 Graphics in the Cross Section Mode
The Crosssection Drawing Mode is activated when second button of the following buttons is
down:
• In this mode all graphics will be in the cross section plane of the pipe.
• In this mode you don't have the 3D-measuring tool but in addition you have the water level
drawing tool.
• This drawing mode makes almost only sense in the frontview because the cross section
plane is only a line in the sidescan window.
• The first click will define the cross section plane with a point that is on the pipe surface. The
cross section plane will be indicated with a dotted circle.
04.11.2013
Page 22 of 49
Creating Graphics & WinCan Observations: Creating Graphics
Figure 20: Left: Measuring an intruding object with the 2D-Measuring tool at a joint. In the middle you can see a water
level measuring at the same position. The water level is calculated as an area or as a fraction of the entire cross section in percent. To the right you can see the same graphic as single line in the main window.
It is recommended to set the cross section plane not to close from the view point. Because of
the fact that the frontview images of DigiSewer and Panoramo systems where taken with a
fisheye camera, straight lines on a close cross section appear curved:
Figure 21: The same graphic in a cross section from very close (left) and from a bit further away (right).
04.11.2013
Page 23 of 49
Creating Graphics & WinCan Observations: Creating Graphics
5.1.3 Accuracy of Measurement
The accuracy of measurement of length and area measurements is primarily depending on the
pipe diameter. With a good scan quality you can expect an accuracy of ±3% of the pipe diameter.
The scan quality is depending on the following factors:
• Inner pipe diameter setting: How precise the inner pipe diameter setting corresponds to
the real inner pipe diameter strongly influences the scan quality.
• Camera height setting: A good correspondence of the camera height setting with the real
camera height also strongly influences the scan quality.
• Pipe sediments: Strong sediments in the pipe can change the camera height during the
scan, which again lowers the scan quality.
• Axial direction of the camera: A good parallelism of the camera axis to the pipe axis is
also needed for a good scan quality.
• Distance measurement: A good correspondence of the distance measurement on the cable drum with the real distance of the camera in the pipe is also important for a good scan
quality.
In the following you can see two classic errors (b & c) that will often only be visible at joints:
04.11.2013
Page 24 of 49
Creating Graphics & WinCan Observations: Creating Graphics
5.1.4 Graphic Properties
• When the graphic is finished the Graphic Property dialog shows up where you can change the
graphic properties:
Figure 22: Dialog for the graphic properties
o
Add or change an Observation Text.
o
Add or change the Observation Code. If the graphic will be linked to WinCan a proposed
observation code will automatically fill out all fields in WinCan’s observation panel. For
more information on this please read chapter 5.3 .
o
Change the graphics with the Pen Settings dialog.
o
Apply a layer to a graphic.
o
Check the checkbox Lateral Connection if the graphic stands for a lateral connection. This
draws a smaller pipe segment the Sectionview window.
o
Change the visibility with Show measure in sidescan / frontview (a length for the measurements and the lines and an area for the rest).
o
Link the graphic to a WinCan observation (see the chapter 5.3 ):
• The default graphics pen can be set over the menu command Edit > Change pen.
• The default graphics font can be set for all graphics over the menu command Edit > Change
Font.
• All the graphics information is stored in the project file (s. chapter 3.2 ) of the scan.
04.11.2013
Page 25 of 49
Creating Graphics & WinCan Observations: Editing Graphics
5.2
Editing Graphics
• A graphic consists out of several points.
• When the graphic is selected all points are marked with a little white square. The square of
the corner points have a little cross.
• Beside the points witch define the graphic itself and the bounding rectangle points each
graphic contains two points that define the bounding rectangle of the text.
• The text is automatically built out of the observation text, code and the measure.
• The bounding white rectangle defines the rectangle of the picture that is printed or copied to
WinCan.
Figure 23: A selected polyline with its bounding rectangle of the text and the overall bounding rectangle.
5.2.1 Selecting a Graphic
• In the main & frontview window: With the arrow tool
activated:
o
By clicking into the bounding rectangle of the graphic with the right mouse button.
o
By clicking one of the toolbar buttons
. With the buttons you can position and select
the next graphic to the left or the right from current position. With this method you can
also select graphic that are placed upon each other.
• In the overview window: By clicking into graphic with the left mouse button.
5.2.2 Deselecting a Graphic
• In the main window: By clicking outside of the bounding rectangle with the right mouse
button or by pressing the ESC-key.
• In the overview window: By clicking outside of a graphic with the left mouse button.
5.2.3 Moving, Editing and Deleteing a Graphic
• You can move a selected graphic with the pressed left mouse button.
• You can move a point of a selected graphic with the pressed left mouse button.
• You can delete a point of a selected graphic with the context menu.
• You can change the selected graphics properties in the property dialog that you can open
with the context menu command Properties that you get with a right click on the selected
graphic or by pressing the ENTER-key.
• You can delete a selected graphic with the context menu command Delete graphic on the selected graphic or with a press on the Delete Key.
• If you have moved a graphic after having copied images to WinCan you have to recheck the
copy checkboxes in the property dialog to resend the images to WinCan again.
• You can delete ALL graphics with the menu command Edit > Delete multipele graphics.
04.11.2013
Page 26 of 49
Creating Graphics & WinCan Observations: Editing Graphics
5.2.4 Changing the Graphics Pen & Frame
With the menu command Edit > Change Pen & Frame Size you can open the Pen & Frame Settings
dialog and change the pen and graphic frame properties for all following graphics. If you open
this dialog within the graphic properties dialog changes apply only for the selected graphic.
Figure 24: Pen & Frame Size Settings for graphics
Graphic Frame Size
Since Version 2.5 of the ScanExplorer there are two ways to set the graphic frame that is used
to create the photos for WinCan:
• With the free setting you can freely modify the graphics frame with the corner points of the
graphic as shown in Figure 23.
• All other frame size settings in the dropdown list allow you to define a specific frame side
ratio such as 4:3, 3:2 or 5:4. All ratios can be set with a default text position at the top or at
the bottom of the frame.
You can alter the frame size with the mouse wheel while pressing the CTRL-key.
Figure 25: Graphic with fixed frame size ratio 4:3
5.2.5 Changing the Font
With the menu command Edit > Change Font you can set the type, the style and the size of the
font in which the graphic text are drawn:
• These settings apply for all graphics.
• The size of the font is the maximum allowed size in dots when the text rectangle is resized
and the text fully fits in the rectangle.
• When the text doesn’t fit in the rectangle it is automatically scaled down.
5.2.6 Graphic Offset in the Front View
It can happen that a graphic object in the side scan and in the front view is not precisely at the
same position. This is mostly due to irregular driving which causes a bumpy cable. Over the
entire scan distance these errors should not increase.
04.11.2013
Page 27 of 49
Creating Graphics & WinCan Observations: Editing Graphics
With a selected graphic you can correct small displacements with SHIFT-CTRL mouse wheel.
The offset distance is shown in the 4th field in the status bar of the front view window:
Because the Rico RPP system doesn’t show any graphics in the video front view, the offset distance is applied to the video time. But this only with a selected graphic.
04.11.2013
Page 28 of 49
Creating Graphics & WinCan Observations: Creating a Graphic with WinCan Observation
5.3
Creating a Graphic with WinCan Observation
• If you want to create a graphic that is linked to an observation in WinCan8 you have to
check the Link to WinCan checkbox in the graphics property dialog.
• If you additionally check Copy Photo 1 a picture from the selected source is copied into WinCan’s photo 1 field. Checking the checkbox with graphic draws the graphic with the text into
the image before copying it to WinCan. The graphic can not be removed anymore from the
image.
• If you additionally check Copy Photo 2 a picture from the selected source is copied into WinCan’s photo 2 field. Checking the checkbox with graphic draws the graphic with the text into
the image before copying it to WinCan. The graphic can not be removed anymore from the
image.
• You always can copy the bounding rectangle of a graphic from the Sidescan in the main
window.
• If you want to copy picture from the other windows they must be open.
• After closing the property dialog in the ScanExplorer the observation dialog from
WinCan is automatically opened. The following information from the ScanExplorer are transferred to WinCan8:
o
The center position of the graphic points is used as the observations position.
o
The minimal and maximal clock position is used as the from and to clock position.
o
The photos are copied into the photo fields.
o
If an observation code was transferred and a corresponding code was found in the catalogue the observation will be filled out automatically.
• After closing the observation panel in WinCan the following information are transferred
back into the ScanExplorer:
o
The observation text and code
o
An information if the observation is a lateral related observation.
• Is a graphic linked to an observation in WinCan it will have the following consequences:
o
If you select a graphic in ScanExplorer it automatically activates the row of the associated observation in the observation grid and vice versa.
o
If you move a graphic in ScanExplorer it automatically updates the position of the observation in WinCan but NOT vice versa.
o
If you delete a graphic in ScanExplorer it asks you if you want to delete the associated
observation in WinCan and vice versa.
o
If you recheck the photo copy checkboxes the photos are recopied to WinCan.
04.11.2013
Page 29 of 49
Creating Graphics & WinCan Observations: Creating Observation with automatic Pictures
5.3.1 Displaying additional database information in the graphic’s label
If the observation text and code returned by WinCan is not sufficient you have possibility to
define any combination of database fields from the database tables section (S_T), inspection
(SI_T) and observation (SO_T). This new feature is available with the subscription license
2009.
You have to write the select clause of the SQL statement into the INI\W8Settings.ini file. The
following example adds an information text together out of the observation text, code, section
name, start node and end node. The definition text has to be defined in the INI variable
OBS_INFO in the section [ScanExplorer] and can be any combination of free text in apostrophes and database fieldnames concatenated with a +-sign:
[ScanExplorer]
OBS_INFO='Observation: '+SO_TEXT+' ['+SO_OPCODE+'], Section: '+S_SECTIONNAME+',
Start Node: '+S_STARTNODE+', End Node: '+S_ENDNODE
5.4
Creating Observation with automatic Pictures
If you don’t want to create graphics in the ScanExplorer you can define in the ScanExplorer
Preferences (menu command File > Preferences) from which windows of the ScanExplorer automatically a picture should be generated and transferred to WinCan.
If the ScanExplorer is open while you are creating a new observation in WinCan the automatic
pictures will be inserted in the observation’s picture 1 and/or 2 when the observation is finished.
Figure 26: The ScanExplorer’s Preferences Dialog
04.11.2013
Page 30 of 49
Creating Graphics & WinCan Observations: Video Markers for Rico RPP
5.5
Video Markers for Rico RPP
The ScanExplorer will automatically insert point graphics, when there are video marker entries
in the video’s index file. A video marker is a non-zero number at the 4th place of an index entry:
...
Val00690="530,72;64,05;0"
Val00691="535,08;64,11;0"
Val00690="544,20;64,12;0;1"
Val00692="577,52;64,16;0"
Val00693="577,96;64,25;0"
...
In this example there would be placed a point graphic at the distance of 64.12 m. With a jump
to that graphic the video would be precisely placed at 544.20 seconds.
04.11.2013
Page 31 of 49
Printing Reports: ScanExplorer Overview Report in WinCan
6 Printing Reports
In general you have all reports available from WinCan8 that you can configure in the DocuCenter: See the WinCan8 documentation for detailed information about the different reports.
Figure 27: WinCan8 Docu-Center
6.1
ScanExplorer Overview Report in WinCan
There is one special report in the WinCan Docu-Center that is called ScanExplorer Overview
Report. It shows the entire scan as in the overview with a distance ruler along the sidescan and
an observation legend at the end of the report. The positions of the observations along the
sidescan are indicated with red labels:
04.11.2013
Page 32 of 49
Printing Reports: Graphic Report in ScanExplorer
Figure 28: ScanExplorer overview report from the WinCan Docu-Center
6.2
Graphic Report in ScanExplorer
If you want to print a report about the graphics and their corresponding sidescan background
you can use the Graphics Report from the menu File > Print.
• You can filter out the graphics that should be printed:
o
by a distance range
o
by a string with which the graphics label should start
04.11.2013
Page 33 of 49
Printing Reports: Graphic Report in ScanExplorer
Figure 29: Graphics report with all the joints side by side.
04.11.2013
Page 34 of 49
ScanExplorer Post Processing (DigiSewer): Graphic Report in ScanExplorer
7 ScanExplorer Post Processing (DigiSewer)
The DigiSewer Scanner software is producing in real-time a raw sidescan. Because the encoder
wheel on the cable drum is triggering the moment when the next scan ring is unfolded two
neighboring scan stripes do sometimes not perfectly fit together. Because the matching process is computational very expensive it is done in a fast but not very accurate way.
For a perfect match the ScanExplorer start the so called ScanExplorer Post Process after opening
the scan in the ScanExplorer. The post process is a separate application that runs independently from the ScanExplorer, witch means that you can continue to work in ScanExplorer
in the raw version of the scan, while the post process creates a perfectly matched scan in the
background.
Figure 30: The window of the ScanExplorer Post Process
• Optionally you can a choose to sharpen the sidescan additionally.
• A second feature allows you to additionally correct an axial rotation of the crawler camera,
that leads to curved waterline.
• When the post process is over, the ScanExplorer automatically reloads the new sidescan.
• When you are closing a post processed scan you will be asked if you want to delete the raw
scan files. Click Yes if the post processed scan is better that the original raw scan.
04.11.2013
Page 35 of 49
ScanExplorer Post Processing (DigiSewer): Graphic Report in ScanExplorer
Figure 31: Matching quality before (left) and after the post process (right).
Figure 32: Matching quality detail before (above) and after the post process (below).
Figure 33: A sidescan overview above before and below after the post process with axial rotation. The yellow line
shows the six o’clock bottom line.
04.11.2013
Page 36 of 49
ScanExplorer Post Processing (DigiSewer): Graphic Report in ScanExplorer
If the axial rotation was corrected you will have an additional context menu command Correct
axial rotation in the frontview that automatically rotates the frontview so that the waterline is
again at 6 o’clock:
Figure 34: The frontview without (left) and with (right) axial rotation correction at the same position that is shown in
the
04.11.2013
Page 37 of 49
Analysing a Scan: Starting the WinCan Scan Analyser
8 Analysing a Scan
8.1
Starting the WinCan Scan Analyser
• With the menu command File > Start Scan Analyser you can start the WinCan8 Scan Analyser
application:
Figure 35: WinCan8 Scan Analyser application window
• At the moment it automatically detects by image processing laterals and joints in the
sidescan images.
• After the analysis the Scan Explorer shows a dialog in witch you can decide how the detected objects should be visualized as graphic objects. All detected Laterals have a probability
associated. The number of found laterals up to a specific probability is written in brackets
behind the probability.
Figure 36: Labeling and pen settings fort the detected laterals and joints
• All detected graphics are inserted in their own layer. You can delete them all together with
the menu command Edit > Delete multiple graphics > By layer.
04.11.2013
Page 38 of 49
Analysing a Scan: Starting the WinCan Scan Analyser
Figure 37: The Scan Explorer with the detected objects.
8.1.1 Scan Analyser: Straighten Joints
If the checkbox Straighten Joints is checked the Scan Analyser is able to correct curved joints.
Curved joints are generated whenever the scanning camera was not correctly centered during
the scan. Because the Scan Analyser is modifying the sidescan images, the scan has to be reloaded once with the ScanExplorer.
Figure 38: 2 reasons (b & c) for a non-straight joint in a sidescan.
04.11.2013
Page 39 of 49
Analysing a Scan: Starting the WinCan Scan Analyser
Figure 39: A joint in a sidescan before and after the joint straightening of the Scan Analyser.
04.11.2013
Page 40 of 49
Menu Commands: Menu File
9 Menu Commands
9.1
Menu File
9.1.1 Open
This command is only visible in the standalone version of ScanExplorer and lets you open
ScanExplorer projects.
9.1.2 Save
With this command you can save a ScanExplorer project. All newly added graphics are stored
in the header file of the project. When you close the ScanExplorer window the changes are automatically saved.
9.1.3 Close
This command is only visible in the standalone version of ScanExplorer and lets you close
ScanExplorer projects.
9.1.4 Start Scan Analyser
This command starts the WinCan8 ScanAnalyser. See the according chapter for detailed information.
9.1.5 Load Analyser Objects
Allows you to reload the objects that where found in the previous run of the Scan Analyser.
9.1.6 Inspection Information
This command opens the inspection information dialog:
Figure 40: Inspection Information dialog
9.1.7 Start Post Process (only DigiSewer)
If the Post Process was not launched after the scan process you can start the Post Process with
this menu command. For more information about the post process see the according chapter in
the DigiSewer manual.
9.1.8 Delete old Sidescans (only DigiSewer)
If the Post Process ran after the DigiSewer scanner the old sidescan files can be replaced by
the new ones. The old sidescans as well as the sample files (for the stripes) remain in the
SIDESCAN folder. These files can be deleted with this menu command. For more information
about the post process see the according chapter in the DigiSewer manual.
04.11.2013
Page 41 of 49
Menu Commands: Menu Edit
9.1.9 Preferences
Opens a preferences dialog where you can set some global preferences that are not stored in
scans.
9.1.10
Print
Opens the graphics report print dialog
9.1.11
Exit
Exits the application.
9.2
Menu Edit
9.2.1 Drawing Modes
Selects the drawing mode.
9.2.2 Drawing Tools
Select a drawing tool. Can be used when the toolbar is hidden.
9.2.3 Delete
Deletes the currently selected graphic without warning.
9.2.4 Delete multiple graphics
With this command you can delete all graphics from the project. WARNING: This command can
not be undone! The according WinCan8 observations are not deleted but set as a standard
WinCan observation.
9.2.5 Change Pen and Framesize
Opens the pen and frame size settings dialog. See chapter 5.2.4
9.2.6 Change Font
Opens the font settings dialog in witch you can set the current font settings. See chapter 5.2.5
9.3
Menu View
9.3.1 Hide all graphics
With this command you can hide all graphics. The graphics are not deleted. They are hidden
and a red dashed line is drawn around the sidescan.
9.3.2 Show inclination chart
Shows the inclination chart at the bottom of the main window.
9.3.3 Show height chart
Shows the height chart at the bottom of the main window.
9.3.4 Unit > Meter/Feet
With the sub-command Meter all distance measurements are displayed with metric units.
With the sub-command Feet all distance measurements are displayed feet and inch.
9.3.5 Zoom
Turns on the zoom tool.
04.11.2013
Page 42 of 49
Menu Commands: Menu Navigation
9.3.6 Sidescan View Direction
Changes the view direction of the sidescan in the main window.
9.3.7 Reset Distance Scale Shift
Resets the distance scale shift to its initial position.
9.3.8 Reset Clock Scale Shift
Resets the clock scale shift to its initial position.
9.3.9 Reset Clock Shift (Scrollbar)
Resets the clock scrollbar shift to its initial position.
9.3.10
Invert Distance
Inverts the distance scale such that it counts backwards. A blue distance scale shows that the
distance scale is inverted.
9.3.11
Show Colormap for Radius Scans
Inverts the distance scale such that it counts backwards. A blue distance scale shows that the
distance scale is inverted.
9.4
Menu Navigation
9.4.1 Go to the next graphic
Jumps to the next graphic and selects it.
9.4.2 Go to the previous graphic
Jumps to the previous graphic and selects it.
9.4.3 Go to the scan start
Jumps to the scan start.
9.4.4 Go to the scan end
Jumps to the scan end.
9.4.5 Mouse wheel direction
This menu lets you change the way of how the current position is changed when you pull the
mouse wheel.
9.5
Menu Window
9.5.1 Overview Window
With this command you can show the overview window if it was closed before.
9.5.2 Frontview Window
With this command you can show the frontview window if it was closed before.
9.5.3 Sectionview Window
With this command you can show the sectionview window if it was closed before.
04.11.2013
Page 43 of 49
Menu Commands: Menu Help
9.5.4 3D-Window
With this command you can open the 3D window. In RPP only this or the Frontview window
with the video can be open at the same time.
9.5.5 Panoramo Viewer Window (Panoramo)
With this command you can open and close the Panoramo Viewer window.
9.5.6 Applying a window layout
With this command you can apply a stored layout. You can select a layout from a list that is
stored in the WinCanScanExplorer.ini file.
9.5.7 Save the current window layout
With this command you can save the current window positions in the active layout. Changes
on windows without using this command afterwards are not stored.
9.5.8 Save as new window layout
With this command you can save the current window positions as a new window layout.
9.5.9 Delete window layout
With this command you can delete a layout from the window layout list. You can not delete the
layout with the name “1024x768”.
9.5.10
Bring windows to front together
If this menu item is checked the scan explorer windows are brought to front together if they
are e.g. in the background of WinCan.
9.5.11
Move all windows with main window
If this menu item is checked all windows are moved together with the main window.
9.5.12
Do magnetic resize & move
If this menu is checked the ScanExplorer windows will be magnetically attracted to each other.
9.5.13
Show Toolbar
Shows or hides the toolbar in the main window.
9.5.14
Change Language
With this command you change the language of the ScanExplorer user interface.
9.6
Menu Help
9.6.1 About ScanExplorer
With this command you can open the About dialog with copyright and version info.
9.6.2 Version
Opens the version history file of the ScanExplorer that shows from version to version what has
changed in the application.
9.6.3 Show the Quick Help Window
Shows the quick help dialog about the keyboard shortcuts and the mouse interaction.
04.11.2013
Page 44 of 49
Menu Commands: Menu Panoramo
9.6.4 Open ScanExplorer Documentation (PDF)
With this command you can open this PDF documentation if you have a PDF-reader installed.
9.7
Menu Panoramo
This menu is only available when then the Panoramo Viewer window is open:
Figure 41: The additional windows from the PanoramoViewer: On top-right the pointcloud viewer and the measure
toolbar in the PanoramoViewer.
9.7.1 Panoramo Viewer Settings
This menu command shows the Panoramo settings dialog. Please refer to the original viewer
documentation from IBAK.
9.7.2 Show 3D-Measurements
This option is only available if the scan (e.g. a Panoramo SI scan) contains point cloud information). Please refer to the PanoramoViewer documentation for more help about the measure
features.
9.7.3 Edit 3D-Measurements
This option is only available if the scan (e.g. a Panoramo SI scan) contains point cloud information). This option allows you to measure in 3D in the PanoramoViewer. Please refer to the
PanoramoViewer documentation for more help about the measure features. The measures
done in the PanoramoViewer are not taken over into WinCan.
9.7.4 Open Pointcloud
Starts the Panoramo Pointcloud application.
04.11.2013
Page 45 of 49
Menu Commands: Menu Panoramo
9.7.5 Panoramo Viewer Help
Show the Panoramo Help file.
04.11.2013
Page 46 of 49
Appendix: INI-File Parameters
10 Appendix
10.1 INI-File Parameters
The INI-file with the name WinCanScanExplorer.ini stores some settings of the ScanExplorer.
The original INI-file is placed in the INI-directory within the WinCan8 application directory:
e.g.: c:\Program files\WinCan v8\WinCan\INI\
At the first start-up and after every update this INI-file is copied to the user directory:
e.g.: c:\Documents and Settings\{USERNAME}\Application Data\CDLAB\WinCan8\INI\
The colors in the list below have the following meaning:
• Parameter set by WinCan: The red parameters are set by WinCan if you start the scanner
from within WinCan. If you start the scanner standalone you can set these parameters
yourself.
• Parameters manually set: The black parameters have to be manually set in the INI-file.
Most parameters have to rarely set or should not be changed at all.
• Parameters set by DigiSewer: The green parameters are set by the DigiSewer scanner
application and should not be changed manually.
• Parameters set by ScanExplorer: The blue parameters are set by the ScanExplorer and
should not be changed manually.
[GENERAL]
VERSION=1.50.2510.16496
WINDOW_LEFT=206
WINDOW_RIGHT=1074
WINDOW_TOP=122
WINDOW_BOTTOM=902
#
#
#
#
#
ScanExplorer
Last windows
Last windows
Last windows
Last windows
Version used to check if INI-file is depricated
left position (set by DS)
right position (set by DS)
top position (set by DS)
bottom position (set by DS)
[HEADER]
SCANAPPLICATION=DS2
# Type of scan app. (set by WC)
LANGUAGE=USA
# Application Language (set by WC)
DEFAULT_DATA_PATH=D:\WC8Projects\DS1\DigiSewer #Path where the scan will be stored (set by WC)
SECTION_NO=1
#
SECTION_NAME=
#
SECTION_LENGTH=0
#
SECTION_STARTNODE=
#
SECTION_ENDNODE=
#
SECTION_FLOW=1
#
INSPECTION_NO=1
#
INSPECTION_NAME=1
#
INSPECTION_WEATHER=Sunshine
#
INSPECTION_OPERATOR=M. Hudritsch #
INSPECTION_CLEANING=cleaned
#
INSPECTION_DIRECTION=D
#
INSPECTION_CATALOGUE=obs_pacp.mdb#
CONTRACTOR_NAME=Marcus
#
CONTRACTOR_STREET=Clean 13
#
CONTRACTOR_CITY=Clean City
#
CONTRACTOR_TEL=013 313 13 13
#
CONTRACTOR_FAX=013 313 13 12
#
[email protected]
#
OBSERVATION_NO=1
#
section auto number (set by WC)
section name (is displayed window titlebar if set)
total length of section in m
name of start manhole
name of end manhole
flow direction: 1=start>end, 2=end>start
inspection auto number (set by WC)
inspection name (set by WC)
weather condition (set by WC)
operator name (set by WC)
cleaning condition (set by WC)
D=downstreams, U=upstreams
observation catalogue used for reporting
contractor name (set by WC) (set by WC)
contractor street (set by WC) (set by WC)
contractor city (set by WC) (set by WC)
contractor telephone NO. (set by WC)
contractor fax NO. (set by WC)
contractor email adress (set by WC)
observation auto number (set by WC)
UNIT=M
THUMBNAIL_HEIGHT=100
GRAYSCALE_HEIGHT=500
JPEGQUALITY_SS=90
JPEGQUALITY_FV=90
INCL_FILTER_WIDTH=3
BLACKANDWHITE=0
DOUNFOLDLOG=0
SAVESAMPLES=0
SAMPLEBILINEAR=1
#
#
#
#
#
#
#
#
#
#
unit (M=meter, I=inch)
height if side scan thumbnails in pixels
height if side scan grayscale images in pixels
JPEG quality for side scans (99 is best, 1 is worst)
JPEG quality for front views (99 is best, 1 is worst)
Inclination averaging width (0=no averaging)
0=show side scan preview in color, 1=show it in b/w
0=no log file, 1=log file is written (for development)
0=no stripes saved, 1=stripes are saved
(don’t change)
OBSERVATION_DATE=03/21/06
OBSERVATION_TIME=08:43:59
DISTANCE_START=5
DISTANCE_END=3825
#
#
#
#
observation date (MM/DD/YY) (set by DS)
observation time (HH:MI:SS) (set by DS)
distance start in mm (set by DS)
distance end in mm (set by DS)
04.11.2013
Page 47 of 49
Appendix: INI-File Parameters
DEPTH_START=0.000000
DEPTH_END=0.000000
[ENCODER]
WHEELDIAMETER=63.662000
IMPPERREV=-20
INCLINATION_OFFSET=-250
IMPPERUNFOLD=4
DISTPERFVMMTARGET=100
DISTPERFVMM=90
UNFOLDPERFV=5
USB_INCL_ISAVAILABLE=1
USB_INCL_CHANNEL=2
USB_INCL_MAX=51669.000000
USB_INCL_MIN=10813.000000
# depth start in m (set by DS)
# depth end in m (set by DS)
#
#
#
#
#
#
#
#
#
#
#
encoder wheel diameter in mm (must be very precise)
NO. of impulses per revolution of the encoder
Distance in mm from current pos to incl. sensor
NO. of impulses per unfold (set by DS)
Desired targed distance between frontviews (set by DS)
Real dist. between FV depends on the dist. per unfold
NO. of unfolds per frontview image (set by DS)
0=no inclination, 1=inclination is stored (set by DS)
USB channel for inclination (set by DS)
USB inclination max. value (set by DS)
USB inclination min. value (set by DS)
[RINGCONFIG]
SAMPLEHEIGHT=1000
# Heigth of side scan image in pixels(max. 1500)
SAMPLEWIDTHMIN=60
# Min. width of unfold stripe
SIDESCANW=2000
# Target width of one big side scan image
UNFOLDDIR=-1
# undold direction (1 clockwise, -1 counter-clockwise)
SEARCHSTEPS=0
# if 0 no stripe matching is done (faster) else set it to 3
TOPWIDTH=20
# (don’t change)
CAMERATWIST=0.000000
# (don’t change)
FV_INTERVAL=100
# front view interval distance in mm
DIAMETER=150.000000
# Inner pipe diameter in mm (set by DS)
CAMERAHEIGHT=84.000000
# camera height above pipe ground in mm (set by DS)
CENTERX=346.500000
# Center x-coordinate from lower left corner (set by DS)
CENTERY=296.500000
# Center y-coordinate from lower left corner (set by DS)
VIEWRADIUSX=254.500000
# View radius in x-direction (set by DS)
FACTORRY=1.086444
# Factor for the y-view radius (set by DS)
STARTANGLE=270
# start angle in degress (set by DS)
STARTHOUR=6
# start angle in clock hour (set by DS)
STARTSCANANGLE=51.000000
# (set by DS)
STOREDSETTINGS_01=150mm Concrete Pipe;150;84;12;51.000000
# Stored ring config (set by DS)
STOREDSETTINGS_02=200mm Concrete Pipe;190;100;12;53.500000 # Stored ring config (set by DS)
STOREDSETTINGS_03=300mm Concrete Pipe;350;194;6;52.000000
# Stored ring config (set by DS)
STOREDSETTINGS_04=500mm Clay Pipe;500;273;6;53.000000
# Stored ring config (set by DS)
[CAMERA]
CAMERANAME=IPEK: FUjinon180 NOV05
#Name of camera & lense (don’t change)
WIDTH=720
# front view width in pixels (don’t change)
HEIGHT=576
# front view height in pixels (don’t change)
POLY_X3=0.6147
# Camera calibration parameter (don’t change)
POLY_X2=1.5845
# Camera calibration parameter (don’t change)
POLY_X=257.16
# Camera calibration parameter (don’t change)
POLY_C=0.4275
# Camera calibration parameter (don’t change)
[VIEWER]
# WinCan ScanExplorer & ScanAnalyser Settings (don’t change)
GRAPHIC_WIDTH=3
GRAPHIC_COLOR=-256
GRAPHIC_STYLE=DashDot
GRAPHIC_FONT=Tahoma;10;Bold
INCL_SHOW=False
DEPTH_SHOW=False
DEFAULT_SECT_NAME=Section
DEFAULT_INSP_NAME=Inspection
NEXT_SECT_NO=12
NEXT_INSP_NO=3
MANHOLEDIAMETERPX=40
PRINT_SETTINGS=;;;A4;3;True;25;15;10;10
JOINT_SETTINGS=90;20;2;10;Joint
MAGNETIC_WIDTH=20
WMP_UIMODE=full
WINDOW_LAYOUT_LAST=1024x768
WINDOW_LAYOUT=1024x768;120;0;607;741;False;120;336;902;405;True;False;727;0;295;336;True;False;0;0;1
20;741;True;False;True;True;True
04.11.2013
Page 48 of 49
Appendix: Document History
10.2 Document History
25-APR-06:
Initial version
08-JUN-06:
File > Post Process menu commands added.
29-JUN-06:
Adapted to version 1.300. New screenshots.
04-JUL-06:
WinCan Inclination module info added.
25-JUL-06:
Adapted to application version 1.31
Added chapter about media distribution
27-JUL-06:
Adapted to application version 1.35
17-AUG-06:
Adapted to application version 1.40
30-AUG-06:
Adapted to application version 1.41
11-OCT-06:
More precise installation chapter.
08-NOV-06:
Adaptation to application version 1.5
15-NOV-06:
Adaptation to application version 1.51
21-DEC-06:
Adaptation to application version 1.6
14-FEB-08:
Adaptation to application version 1.7
27-FEB-08:
Adaptation to application version 1.71
09-MAR-08:
Adaptation to application version 1.72
20-APR-08:
Adaptation to application version 1.74
30-APR-08:
Adaptation to application version 2.0
04-JUN-08:
Adaptation to application version 2.01
31-JUL-08:
Adaptation to application version 2.02
13-JAN-09:
Adaptation to application version 2.5
05-APR-11:
Adaptation to application version 2.6
24-AUG-11:
Adaptation to application version 2.7
08-NOV-11:
Adaptation to application version 2.7.0.3
04-NOV-13:
Adaptation to application version 2.7.1.01
04.11.2013
Page 49 of 49