1
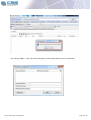
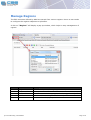
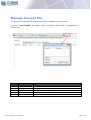
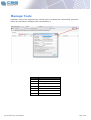
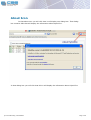
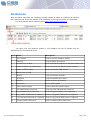
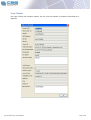
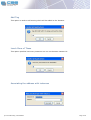
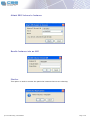
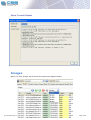
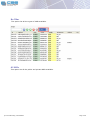
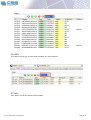
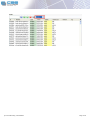
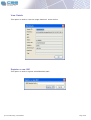
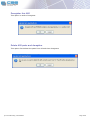
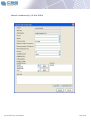
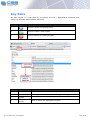
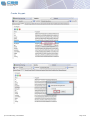
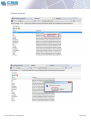
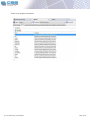
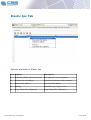
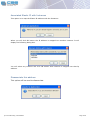
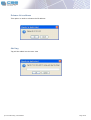
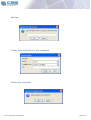
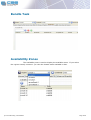
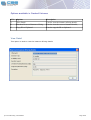
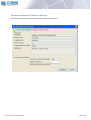
Hybridfox
User Manual
Mar, 2011
© 2010 CSS Corp | Confidential
www.csscorp.com
Table of Contents
1
Introduction ................................................................................................... 4
1.1
Installation .............................................................................................. 4
1.1.1
Environment requirements .................................................................. 4
1.1.2
Download, Install & Configure .............................................................. 4
2 Manage Regions ............................................................................................10
3 Manage Account IDs .......................................................................................11
4 Manage Tools ................................................................................................12
5
About Icon
13
6
Instances
14
7
Images
18
8
Key Pairs
25
9
Security Groups ............................................................................................30
10 Elastic IPs
33
11 Volumes and Snapshots
35
12 Bandle Tasks
41
13 Availability Zones
41
14 Reserved Instances
42
© 2010 CSS Corp | Confidential
Page 2 of 45
Version Control:
Version
Change Description
Date
th
0.1
Creation of user manual
12
0.2
Added
Installation
and
configuration details
Added details of region, account
ids, tools, key pairs & security
groups
12th March 2011
Manoj
12th March 2011
Dhivya
0.3
March 2011
Author
Arun
Acronyms used:
S.No
Acronym
Definitions
1
AWS
Amazon Web Services
2
EC2
Elastic Compute Cloud
© 2010 CSS Corp | Confidential
Page 3 of 45
Introduction
Hybridfox is a Firefox add-on that attempts to get the best of both worlds of popular
Cloud Computing environments, Amazon EC2 (public) and Eucalyptus (private). The idea
is to use one Hybridfox tool, to switch seamlessly between Amazon and Eucalyptus
accounts in order to manage your Cloud "Computing" environment.
Hybridfox can help you to do everything that you could possibly do with Elasticfox, on
the Eucalyptus Computing environment.
•
Manage Images
•
Raise and Stop Instances
•
Manage Instances
•
Manage Elastic IPs
•
Manage Security Groups
•
Manage Key-pairs
•
Manage Elastic Block Storage
Installation
The steps involved in installing the Hybridfox add-on in the Mozilla Firefox browser are
elaborated below with supporting screen shots.
Environment requirements
•
Firefox browser Version Min 2.0 and Max 3.*
Download, Install & Configure
Download the latest version of Hybridfox from the below provide URL:
http://code.google.com/p/hybridfox/
On successful downloading of the Hybridfox add-on, open the downloaded file with the
Mozilla Firefox browser.
© 2010 CSS Corp | Confidential
Page 4 of 45
© 2010 CSS Corp | Confidential
Page 5 of 45
Click on the “Install Now” button, to install the Hybridfox add-on to the Mozilla Firefox
browser.
© 2010 CSS Corp | Confidential
Page 6 of 45
On successful installation, click on the “Restart Firefox” button to view the “Hybridfox”
add-on in the “Tools” menu of Mozilla Firefox.
© 2010 CSS Corp | Confidential
Page 7 of 45
On clicking “Yes”, a pop-up will be displayed, demanding AWS account credentials.
© 2010 CSS Corp | Confidential
Page 8 of 45
S.No
Field
Description
1
Account Name
User friendly names provided by user
2
AWS Access Key
Access Key provided by AWS Management Console
3
AWS Secret Key
Secret Key provided by AWS Management Console
4
Remove Button
Used to remove the account details mapped to Hybridfox
5
Add Button
Used to add a new account details to Hybridfox
6
Close Button
Used to close the pop-up window
The user is allowed to select the fields that need to be displayed in the pop-up window.
The pop-window to manage EC2 credentials shall also be triggered by clicking on
“Credentials”.
© 2010 CSS Corp | Confidential
Page 9 of 45
Manage Regions
The EC2 resources offered by AWS are served from various regions. Hence a user needs
to configure the regions endpoints to Hybridfox.
A click on “Regions” will display a pop-up window, which helps in easy management of
regions.
S.No
Field
Description
1
Region Name
User friendly name for region, provided by user
2
Endpoint URL
An input received from AWS
3
Remove Button
Used to remove existing region details mapped to Hybridfox
4
Add Button
Used to add a new region details to Hybridfox
5
Close Button
Used to close the pop-up window
© 2010 CSS Corp | Confidential
Page 10 of
Manage Account IDs
The Account IDs provided by AWS shall also be configured using Hybridfox.
A click on “Account IDs” will display a pop-up window, which helps in management of
account ids.
S.No
Field
1
Account ID
2
Display Name
3
Remove Button
Used to remove Account ID details mapped to Hybridfox
4
Add Button
Used to add a new Account ID details to Hybridfox
5
Close Button
Used to close the pop-up window
© 2010 CSS Corp | Confidential
Description
Page 11 of
Manage Tools
Hybridfox need to be supported by various tools to manage the various EC2 resources.
Hence an interface to manage tools is provided by it.
© 2010 CSS Corp | Confidential
S.No
Field
1
SSH Command
2
SSH Arguments
3
SSH Key Template
4
EC2 Private Key Template
5
SSH User
6
RDP Commands
7
RDP Arguments
Page 12 of
About Icon
In that about icon you will click that it will display one dialog-box. That dialogbox contains URL that will display the information about hybrid fox.
In that dialog-box you will click that URL it will display the information about Hybrid fox.
© 2010 CSS Corp | Confidential
Page 13 of
Instances
After an AMI is launched, the resulting running system is called an instance. On clicking
the instances tab, it lists the details of an instances is running and which is terminated.
For more details about instances click http://aws.amazon.com/ec2/
On right click the instance window it will displays the list of options and its
description are described as below
S.no Fields
Description
1
View Details
Used to view the instances details
2
Add Tag
Used to add the description.
3
Launch more of these
Used to launch the instance on the same instance id
4
Associate Elastic ip with instance
Used to associate the Elastic Ip with instance.
5
Attach an EBS volume
Used to attach the EBS Volume.
6
Bundle into an AMI
7
Reboot
Used to reboot the instance
8
Terminate
Used to terminate the instance
9
Monitor
Used to monitor the instance.
10
Unmonitor
It is invisible option
11
Show console output
Used to show the console output.
12
Get Administrator password
Used to get the administrator password.
13
Copy Instance Id to Clipboard
Used to copy the instance id to clipboard.
14
Copy Public DNS name to clipboard
Used to copy public DNS name to clipboard
15
Copy Private DNS name to clipboard Used to copy private DNS name to clipboard
16
Connect Public DNS name
© 2010 CSS Corp | Confidential
Used to connect Public DNS name
Page 14 of
View Details
On right clicking the instance option, we can view the details of instance launched as it
appears
© 2010 CSS Corp | Confidential
Page 15 of
Add Tag
This option is used to add a string which will be added to the Instance.
Lunch More of These
This option specifies how many instances can run on the same instance id.
Associating the address with instances
© 2010 CSS Corp | Confidential
Page 16 of
Attach EBS Volume to Instance
Bundle Instance into an AMI
Monitor
This option is used to monitor the particular instance that we are selecting.
© 2010 CSS Corp | Confidential
Page 17 of
Show Console Output
Images
When you click Images tab it will list the options as appears below.
© 2010 CSS Corp | Confidential
Page 18 of
No Filter
This option list all the types of AMIs available.
All AMIs
This option list all the public and private AMIs available.
© 2010 CSS Corp | Confidential
Page 19 of
My AMIs
This option list all the private AMIs available for that instance.
All AKIs
This option list all the Kernal Id's available
© 2010 CSS Corp | Confidential
Page 20 of
© 2010 CSS Corp | Confidential
Page 21 of
All AKIs
This option list all the resource ID's available.
Options available in Images
S.No
Options
Description
1
View Details
It is used to view the details
2
Add Tag
Used to add describe about the instance
3
Register a new AMI
Used to register a new AMI
4
Deregister this AMI
Used to Deregister this AMI.
5
Migrate AMI and register
Used to Migrate AMI.
6
Delete AMI parts and register
Used to Delete AMI parts and register.
7
Lanch intances(s) of this AMI
Used to lanuch the instance of AMI.
8
Copy ID to clipboard
Used to copy the ID in the textbox.
© 2010 CSS Corp | Confidential
Page 22 of
View Details
This option is used to view the image details as shown below.
Register a new AMI
This option is used to register a AMI Manifest path..
© 2010 CSS Corp | Confidential
Page 23 of
Deregister this AMI
This option is used to Deregister
Delete AMI parts and deregister
This option first deletes the parts from S3 and then deregisters
© 2010 CSS Corp | Confidential
Page 24 of
Launch instances(s) of this AMIs
© 2010 CSS Corp | Confidential
Page 25 of
Key Pairs
An SSH keypair is a vital data for connecting to Linux / OpenSolaris instances and
retrieving Windows Administrator password.
S.No
Buttons
Description
1
Used to refresh the keypair data
2
Used to create a new keypair
3
Used to delete an existing keypair
S.No
Field
Description
1
Name
A name provided by user for easy identification of keypair
2
Fingerprint
A data generated by AWS on creating a new keypair
3
Create a new
keypair
Delete
this
keypair
Used to create new keypair for the AWS account
4
© 2010 CSS Corp | Confidential
Used to delete the highlighted keypair
Page 26 of
Create Keypair
© 2010 CSS Corp | Confidential
Page 27 of
© 2010 CSS Corp | Confidential
Page 28 of
Delete Keypair
© 2010 CSS Corp | Confidential
Page 29 of
There is no Keypair on the list
© 2010 CSS Corp | Confidential
Page 30 of
Security Groups
Options available in Security Group
S.no
Options
Description
1
Grant New permission
Create new permission
2
Create a new Security group
Create a new Security group
3
Delete this Security group
Delete a selected Security group
© 2010 CSS Corp | Confidential
Page 31 of
Grant New permission
This will grant a new permission for the selected Security Group
Create a new Security group
This option is used to create a firewall for the particular Instance
© 2010 CSS Corp | Confidential
Page 32 of
Delete this Security group
This option is to remove the Security Group
Options available in Group Permissions
S.no
Options
Description
1
Revoke this permissions
Delete a selected permissions
Revoke this permissions
This option is used to cancel the permission
© 2010 CSS Corp | Confidential
Page 33 of
Elastic Ips Tab
Options available in Elastic Ips
S.no Options
Description
1
Associated Elastic IP with Instances
It is mapped to an any instances
2
Disassociate this address
It will be disassociate with a instances
3
Release this address
To release that address
4
Add tag
To add the tag in tag tree view
5
Copy Elastic IP to Clipboard
Copy Elastic IP to Clipboard
© 2010 CSS Corp | Confidential
Page 34 of
Associated Elastic IP with Instances
This option is to map the Elastic IP address with the Instances
When you will click OK button the IP address is mapped into another instance. It will
display the following dialog-box.
You will select any instance and click OK button that instance is mapped into that Ip
address.
Disassociate this address
This option will be used to disassociate
© 2010 CSS Corp | Confidential
Page 35 of
Release this address
This option is used to releases the IP address
Add tag
Tag will be added into the tree view
© 2010 CSS Corp | Confidential
Page 36 of
Volumes and Snapshots
Options available in Created Volumes
S.No
Options
Description
1
View Details
Details about Volume.
2
Add Tag
To add the new Tag
3
Attach this volume
To attach this Volume
4
Detach this volume
To detach this Volume
5
Force Detach this volume
To Force Detach this volume
6
Create new Volume
Create a new Volume
7
Delete this volume
Delete a selected volume
8
Copy volume ID to clipboard
Copy volume ID to clipboard
© 2010 CSS Corp | Confidential
Page 37 of
View Details
Add Tag
© 2010 CSS Corp | Confidential
Page 38 of
Attach this volume
Detach this volume
Create new Volume
© 2010 CSS Corp | Confidential
Page 39 of
Delete this volume
Options available in Saved Snapshots
S.no Options
Description
1
View Details
To view the details about snapshot
2
Add tag
To add the tag
3
Create new volume from this snapshot
Create new volume through this volume
4
Delete this snapshot
To delete this snapshot
5
Copy Snapshot ID to clipboard
Copy Snapshot ID to clipboard
View Details
© 2010 CSS Corp | Confidential
Page 40 of
Add tag
Create new volume from this snapshot
Delete this snapshot
© 2010 CSS Corp | Confidential
Page 41 of
Bundle Task
Availability Zones
The availability zone is used to display the available zones. If you select
the regions namely us-east-1 you view the hosted zones available in that.
© 2010 CSS Corp | Confidential
Page 42 of
Reserved Instances
Describes the Reserved Instances that you have purchased
© 2010 CSS Corp | Confidential
Page 43 of
Options available in Created Volumes
S.No
Options
Description
1
View Detail.
Used to view the instance offering details.
2
Purchase Reserved Instance offering.
Used to view the reserved instance details,.
3
Copy ID to Clipboard.
Used to copy the ID to clipboard.
View Detail
This option is used to view the instance offering details
© 2010 CSS Corp | Confidential
Page 44 of
Purchase Reserved Instance offering
This option specifies the details about the reserved instances.
© 2010 CSS Corp | Confidential
Page 45 of