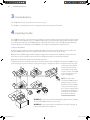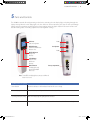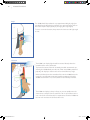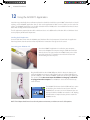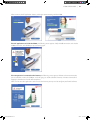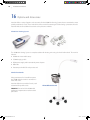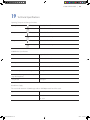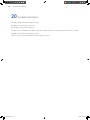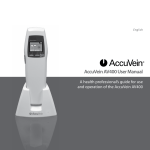
1
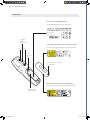
ACCUVEIN® MODEL AV300 VEIN VIEWING SYSTEM
User Manual
Detailed user information and product
specifications for the AV300 vein
viewing system, including accessories
and PC application
AV300
English
UM-English-DVD.indd 1
9/28/11 10:01 PM
II
|
Av300 User mAnUAl
AV300 User manual
Av300 Operating Guide © Accuvein Inc. 2011
Accuvein Inc.
40 Goose Hill road
Phone: (816) 997-9400
Cold spring Harbor, nY 11724
www.accuvein.com/um
United states of America
Accuvein® Av300 is the registered trademark of Accuvein Inc. The content of this manual including all photographs and drawings is the proprietary information of Accuvein Inc.
AV300 is manufactured for:
AccuVein Inc.
40 Goose Hill Road
Cold Spring Harbor, NY 11724
United States of America
IEC/EN 60825-1 Safety of Laser Products
Laser Classification Notice
Laser Product Notice
VISIBLE AND
INVISIBLE LASER
RADIATION.
DO NOT STARE INTO
BEAM. CLASS 2
LASER PRODUCT.
EMERGO EUROPE
Molenstraat 15
2513 BH, The Hague
The Netherlands
Phone: +31.70.345.8570
Fax: +31.70.346.7299
0086
81.6 nJ / 22.6 nJ
Complies with 21 CFR 1040.10 and 1040.11 except for deviations
pursuant to Laser Notice No. 50, dated June 24, 2007.
last revised: september 7th, 2011
nOTe: The photographs in this User manual may show prototype products. The available device and accessories may incorporate changes.
Accuvein reserves the right to discontinue or modify accessories.
Description of Symbols Used
Caution, Warning. see accompanying documents.
The Av300 emits visible and Invisible laser radiation. Do not stare into beam. Class 2 laser product.
Complies with 21 CFr 1040.10 and 1040.11 except for deviations pursuant to laser notice no. 50,
dated June 24, 2007.
Type B Applied Part
Conformité européenne (european Conformity). This symbol means that the device fully complies with european Directive 93/42/eeC
eTl Classified means that most system elements conform to Ul std 60601-1
UM-English-DVD.indd 2
9/28/11 10:01 PM
Av300 User manual | III
SN
Serial Number
REF
Reference to Model Number
UPN
Universal Product Number
EC
REP
European Commission
European Representative
Manufacturer
European Union Waste Electrical and Electronic Equipment Directive Logo. Return is allowed for
proper disposal.
Temperature limitation
Humidity limitation
Do not use if package is damaged
Keep dry
Fragile, handle with care
Reusable packaging
Recyclable packaging
IPX0
Rx Only
No water ingress protection
US federal law restricts this device to sale by or on the order of a physician or other qualified medical professional. For external use only.
Direct Current. Example: 3.7 V
indication of battery voltage
GOST-R. This symbols means that the device fully complies with russian national standards
UM-English-DVD.indd 3
9/28/11 10:01 PM
IV |
Av300 User mAnUAl
Warnings and Cautions
Read all instructions, cautions, and warnings prior to use. This product should be operated only by qualified medical professionals. The AV300 should
not be used as the sole vein location method, and it is not a substitute for sound medical judgment and the visual and tactile location of veins.
Before using the AV300 on a patient, qualified medical professionals must read and understand this AV300 Operating Guide and the AV300 User’s Manual, which
may be found on the DVD provided with the device. Qualified medical professionals contemplating use of the AV300 also should become familiar with how to
properly position the device by following the instructions below. Before first use, users should compare how the AV300 detects veins with visual detection and
palpation techniques. All vein location using the AV300 should be confirmed with appropriate medical judgment based on visual and tactile vein location and
assessment techniques.
Patient and User Safety — Warnings
WARNING: The AV300 enables location of certain peripheral veins, and it is not a substitute for sound medical judgment based on the visual and tactile location
and assessment of veins. The AV300 should be used only as a supplement to the judgment of a qualified medical professional.
WARNING: The AV300 displays only peripheral veins, and does so only to limited depths dependent on a variety of patient factors. The AV300 does not indicate
vein depth.
WARNING: Do not shine vein display light in eyes.
WARNING: Stop using the AV300 if the red light does not turn on when the blue button is pushed.
WARNING: Do not hold the AV300 while performing venipuncture or other medical procedure.
WARNING: Do not use AV300 if the vein display light window is scratched or dirty. The AV300 should be returned to AccuVein for servicing if the vein light
window is scratched.
WARNING: Keep the AV300 and its battery out of the reach of children.
WARNING: Do not use AV300 if fault screen appears.
WARNING: AV300 vein location is dependent on a variety of patient factors and may not display veins on patients with deep veins, skin conditions, hair, scarring
or other highly contoured skin surface, and adipose (fatty) tissue.
WARNING: To view vein location accurately, you must position the AV300 at the proper height and angle, and directly over the center of the vein being assessed.
WARNING: Users should inspect the AV300 to ensure that it is sufficiently clean before each use.
Patient and User Safety — Cautions
CAUTION: The AV300 emits Visible and Invisible laser radiation. Do not stare into beam. The AV300 is a Class 2 laser product.
CAUTION: Blink reflexes can be inhibited or reduced by disease, drugs, or other medical conditions. For patients who might have inhibited or reduced blink
reflexes, AccuVein recommends outfitting the patient with a protective eye shield. A commercially available, laser-safe eye shield that’s suitable for eye protection
is the “Glendale Laser-Aid Eye Shield.” Glendale™ and Laser-Aid® are trademarks of their respective owners.
CAUTION: The CC300 is not to be used in patient environment. The patient environment is defined as being within 1.5m or 5 ft. of the patient.
UM-English-DVD.indd 4
9/28/11 10:01 PM
Av300 User mAnUAl
| V
Equipment Care — Warnings
WARNING: Do not immerse the AV300, the AV300 charging cradle, or the AV300 hands-free stand in liquid or get the AV300 or its components so wet that liquid
spills off.
WARNING: Do not attempt to sterilize the AV300 with heat or pressure sterilization methods.
WARNING: Do not clean the AV300 while in a charging cradle or hands-free stand. Remove the AV300 from the cradle or stand for cleaning.
WARNING: Do not clean the AV300 when the battery door is open or removed.
WARNING: Unplug the charging cradle before cleaning the cradle.
WARNING: Do not scratch the vein display light window; clean only as directed
WARNING: Electromagnetic Interference (EMI) can affect the proper performance of the device. Normal operation can be restored by removing the source of the
interference.
WARNING: The USB port under the battery cover should never be used in a patient environment, or within 1.5m or 5 ft. of the patient.
WARNING: Do not attempt to open, disassemble, or service the battery pack. Do not crush, puncture, short external contacts or dispose of in fire or water. Do not
expose to temperature above 60°C / 140°F.
WARNING: Inspect power cords and supplies for damage. If damage is found, do not use until replacement is obtained.
WARNING: To reduce the risk of fire or shock hazard and annoying interference, use only the recommended accessories and do not expose this equipment to rain
or moisture. Do not disassemble; there are no user serviceable parts inside. Refer servicing to qualified service personnel.
WARNING: Use only the AccuVein® PS310 power supply with the CC300 cradle and the HF300 powered hands-free stand.
WARNING: Use only AccuVein® accessories and replacement parts with the AV300. The use of non AccuVein accessories may degrade safety. The current AccuVein
accessories are summarized in the section Options and Accessories. Visit the AccuVein Web site for additional accessories as they become available.
WARNING: If the Fault screen appears, you should stop using the AV300 immediately and not reuse the device until approved to do so by AccuVein technical
support.
WARNING: The AV300 contains no customer serviceable components. The AV300 and its accessories should be serviced only by an authorized AccuVein repair
department.
WARNING: The USB port under the battery cover should never be used in a patient environment, or within 1.5m or 5 ft. of the patient.
Equipment Care — Cautions
CAUTION: Use only AccuVein approved battery charging accessories, AccuVein BA300 batteries, and AccuVein brand powered stand. If the AV300 will not be used
for an extended time, remove and store battery in a safe, dust-free location.
CAUTION: Be careful not to touch or scratch the vein display light window and lenses. If the vein display light window is scratched the vein display may be affected.
CAUTION: Dispose of used batteries according to manufacturer’s instructions. A lithium ion battery that is recyclable powers the AV300. Please call AccuVein at
(816) 997-9400 for information on how to dispose or recycle this battery.
CAUTION: The AV300 complies with the EMC requirements according to IEC 60601-1-2.
Radio transmitting equipment, cellular phones etc. shall not be used in the close proximity of the device since this could influence the performance of the
device.
Particular precaution must be considered during use of strong emission sources such as High Frequency surgical equipment and similar so that e.g. the
HF-cables are not routed on or near the device. If in doubt, contact a qualified technician or your local representative.
UM-English-DVD.indd 5
9/28/11 10:01 PM
VI | Av300 User manual
Product Labels
Product and Serial Number Label
Location: Bottom of battery compartment
Vein Viewing
Window
(Laser Aperture)
Lens
Laser Safety Label with Laser Classification Notice
Location: Outer face of battery compartment door
Lens
USB
Connection
Port
Unscrew to open battery compartment
(Screw not shown)
Information Label with Laser Product Notice
Location: Inner face of battery compartment door
Battery Compartment
(Battery not shown)
81.6 nJ / 22.6 nJ
UM-English-DVD.indd 6
9/28/11 10:01 PM
Av300 User mAnUAl
| VII
Contents
Section
UM-English-DVD.indd 7
Page Number
1
Intended Use
1
2
Product Description
1
3
Contraindications
2
4
Unpacking the Box
2
5
Parts and Controls
3
6
Using the AV300
4
7
AV300 Power Management
9
8
Using a Hands-Free Stand
12
9
Configuration and Preferences
13
10
Faults and Warnings
17
11
Troubleshooting and Servicing
18
12
Using the AV300 PC Application
20
13
Cleaning and Disinfecting
23
14
Storing and Transporting
24
15
Using the Practice Card
25
16
Options and Accessories
26
17
Warranty
31
18
Limitation of Liability
32
19
Technical Specifications
33
20
Standards Information
34
21
Index
35
9/28/11 10:01 PM
VIII | Av300 User manual
UM-English-DVD.indd 8
9/28/11 10:01 PM
Av300 User manual | 1
1Intended Use
CAUTION: US federal law restricts this device to sale by or on the order of a physician or other
qualified medical professional.
CAUTION: For external use only.
The AccuVein® AV300 is a portable, hand-held instrument that helps qualified medical professionals to locate certain peripheral veins. The AV300 is intended to be used only by qualified
medical personnel and as a supplement to appropriate medical training and experience. The AV300 should not be
used as the sole vein location method, and it is not a substitute for sound medical judgment and the visual and tactile location and assessment of veins.
When used properly, the AV300 accurately locates the vein and is therefore suitable for locating peripheral veins in
connection with medical procedures such as venipuncture.
The AV300 can be used whenever peripheral vein location is appropriate.
2Product Description
The AV300 operates by using infrared light to detect veins beneath the skin, then illuminating the position of the
veins on the skin surface directly above the veins. Qualified medical personnel can observe the displayed vasculature to assist them in finding a vein of the right size and position for venipuncture.
The AV300 only shows peripheral veins. The maximum depth that veins are displayed varies by subject. In addition,
certain subject’s veins or a portion of their veins might not be displayed well or at all. Causes for veins to not be displayed include vein depth, skin conditions (e.g., eczema, tattoos), hair, highly contoured skin surface, and adipose
(fatty) tissue.
Veins are shown because the hemoglobin in blood preferentially absorbs IR light. Because of this, the vasculature
that is displayed represents the contents of the veins and not the entire vein.
When held directly overhead, the AV300 locates the center of a vein with extreme accuracy. Increasing the displacement from directly overhead results in an offset in the displayed vein position.
WARNING: AV300 vein location is dependent on a variety of patient factors and may not display veins on patients
with deep veins, skin conditions, hair, scarring or other highly contoured skin surface, and adipose (fatty) tissue.
The AV300 is not intended to be used as the sole method for locating veins, but should be used either prior to palpation to help identify the location of a vein, or afterwards to confirm or refute the perceived location of a vein.
When using the AV300, qualified medical personnel should always follow the appropriate protocols and practices required by their medical facility.
The AV300 requires no routine or preventative maintenance.
WARNING: Users should inspect the AV300 to ensure that it is sufficiently clean before each use. For more information see section on cleaning in this document.
The AV300 is portable, internally powered by battery, and approved for continuous operation. The AV300 is considered a Type B applied part and is not protected from ingress of water.
WARNING: Do not immerse the AV300, the AV300 charging cradle, or the AV300 hands-free stand in liquid or get
the AV300 or its components so wet that liquid spills off.
UM-English-DVD.indd 1
9/28/11 10:01 PM
2
| Av300 User manual
3Contraindications
The AV300 should not be used to locate veins in or near eyes.
The AV300 is not intended to be used as a diagnostic device or for treatment of any kind.
4Unpacking the Box
The AV300 Vein Viewing System kit contains everything you need to begin using the device right away. This includes
the AV300 and rechargeable battery; a CC300 table-top charging cradle and power supply with international adapters; a literature package with the AV300 Operating Guide, DVD, and practice card; and a USB cable for performing
software upgrades and configuring the AV300 from a PC. Follow the steps below to unpack the box.
3 Steps to Unpack Box:
1. Grip the two tabs with the arrows and pull the top retainer out of the box. Fold the flaps as shown below and
slide the AV300 out from under the clear plastic film. NOTE: Do not use scissors to cut the film.
2. Remove the CC300 charging cradle by pulling it straight up and out. Remove the USB cable. Take out the cardboard tray and open the built-in box to remove the PS310 power supply and international adapters.
3. Remove the literature package from the bottom of the box.
To prepare for first use, remove the protective plastic from the LCD of the AV300. The first time the AV300 is turned
on, the language needs to be selected. Setting the language is described in Section 9. AccuVein recommends fully
charging the device before
first use, which under normal conditions should take
less than an hour. The AV300
1
is then ready for use as it requires no calibration.
AV300
2
PS310
USB Cable
3
CC300
International
Plug Adapters
Lit Pack
NOTE: The DVD included with the AV300 literature
package contains an introductory video of the AV300
and its accessories in operation. The user manual, videos,
and additional educational
material are also available on
the AccuVein website at:
www.accuvein.com/um
WARNING: Use only the AccuVein® PS310 power supply with the CC300 cradle and the HF300 powered hands-free stand.
WARNING: Inspect power cords and supplies for damage. If damaged do
not use until replacement is obtained.
UM-English-DVD.indd 2
9/28/11 10:01 PM
Av300 User mAnUAl
| 3
5 Parts and Controls
The Av300 has controls for easily powering on the device, activating the vein display light, and cycling through vein
display settings. When the vein display light is On, the device can be used to locate veins. You can also cycle through
display settings to optimize vein display for the current subject. When the light is Off, the lCD screen remains available for viewing status and making adjustments to configuration settings.
LCD Screen
Status and Configuration
Lens
Laser Aperture
Right LCD button
Circular Power ON/OFF button
Menu item select
Lens
Middle LCD button
Navigate menu
Data entry
Left LCD button
Enter menu mode
Back function
Data entry
Blue side button
Vein display light control
Alternate Power ON/OFF
Menu escape
Battery compartment
Note: To turn OFF the vein display light at any time, press the Blue side
button for 1/2 second.
Av300 Controls at a glance
Power AV300 ON
Press the blue side button or the Power button beneath the LCD screen on the right
Turn vein display light ON or OFF
While the AV300 is powered ON, press the blue side button for ½ (one-half) second
Cycle through vein display settings
While the vein display light is ON, lightly tap the blue side button
Power AV300 OFF
Press and hold the blue side button for 2 seconds, or press the Power button beneath the LCD screen on the right
UM-English-DVD.indd 3
9/28/11 10:01 PM
4
| Av300 User manual
6Using the AV300
CAUTION: Federal law restricts this device to sale by or on the order of a physician or other qualified medical pro-
fessional.
CAUTION: For external use only.
Below is an overview of how to use the AV300 to locate and assess veins, followed by important details on properly
positioning the device, and recommended techniques for optimizing vein display.
Basic Steps
Before using the AV300 on a subject, read all warnings and cautions at the beginning of this manual.
WARNING: The AV300 enables location of certain peripheral veins, and it is not a substitute for sound medical
judgment based on the visual and tactile location and assessment of veins. The AV300 should be used only as a
supplement to the judgment of a qualified medical professional.
WARNING: The AV300 should only be operated when its battery is sufficiently charged (indicated when the battery icon at the upper right of the LCD screen shows a bar), or when the device is operated in a powered hands-free
stand to ensure AV300 is available for use.
WARNING: Do not shine vein display light in eyes.
CAUTION: The AV300 vein display light comes from two low-power lasers, a red laser at 642 nm and an IR laser at
785 nm. For subjects with ordinary blink reflexes, these Class 2 lasers are safe because the blink reflex limits exposure
and prevents eye damage. However, there is a possibility that eyes of subjects with reduced blink reflexes can be
damaged by staring directly into the AV300 light.
CAUTION: Blink reflexes can be inhibited or reduced by disease, drugs, or other medical conditions. For subjects
who might have inhibited or reduced blink reflexes, AccuVein recommends outfitting the subject with a protective
eye shield. A protective eye shield capable of blocking 642 nm and 785 nm should be used. A commercially available, laser-safe eye shield that’s suitable for eye protection is the “Glendale Laser-Aid Eye Shield.” Glendale™ and Laser-Aid® are trademarks of their respective owners.
1. Power On the AV300 by pressing the rightmost circular Power button beneath the LCD screen. This turns on the
device but does not activate the vein display light.
2. To begin locating and assessing veins, turn the vein display light on by pressing the Blue side button.
Tip: As a convenience, you can power on the AV300 and activate the vein display light at the same time by pressing
the Blue side button to power on the device, instead of the circular Power button.
3. Position the AV300 so the vein display light illuminates your subject’s skin.
WARNING: To ensure accurate vein display, the AV300 must be positioned at a proper height, angle, and centering
over the vein to be assessed, as described in the positioning instructions, below.
4. The AV300 has several settings that can optimize vein display for particular patients and procedures. While the
vein display light is on and the device is properly positioned over the subject’s skin, lightly tap the Blue side button to cycle through each setting and find the one that best locates your subject’s veins. For details, see Vein Display
Settings on page 8.
5. To halt vein display, press the Blue side button for 1/2 (one-half) second to turn the vein display light off (this
leaves the LCD screen on for performing menu functions). Pressing the Left LCD button accomplishes the same
thing. Or press and hold the Blue side button for 2 seconds to turn the entire device off.
UM-English-DVD.indd 4
9/28/11 10:01 PM
Av300 User mAnUAl
| 5
When not being used, the Av300 should be stored in its charging cradle or optional powered hands-free stand. This
protects the Av300 and ensures that the battery is always charged and ready for use.
If you have any questions about the use of the Av300, please contact our Technical support Team at (816) 997-9400.
Our hours of service are monday through Friday 8 am to 8 pm Us Central time.
Positioning the AV300
WARNING: To view vein location accurately, you must position the Av300 at the proper height and angle, and directly over the center of the vein being assessed.
For accurate vein presentation, the Av300 must be positioned at a proper height, angle, and centering over the vein
being located. Once the device is properly positioned, you can vary aspects of its position slightly to enhance vein
presentation. However, for accurate vein presentation, the device must be positioned as follows:
•
Height: Approximately 7 inches from the bottom of the device to the surface of the skin
•
Angle: At a right angle (perpendicular) to vein direction
•
Centering: Centered directly over the vein being located
Height
Position the Av300 about 7 inches (180 mm) directly above the vein to be
located, and at a right angle (perpendicular) to the direction of the veins.
The Av300’s vein display quality can then often be improved by slightly increasing or decreasing the height.
WARNING: Depending on the distance the Av300 is held from the subject’s skin the vein may appear slightly wider or narrower than the actual
vein.
UM-English-DVD.indd 5
9/28/11 10:01 PM
6
|
Av300 User mAnUAl
Angle
The Av300 should be positioned at an approximate 90° right angle (perpendicular) to the direction the vein flows or is expected to flow. You can
then often improve display quality by changing this angle slightly.
To assess a new vein location, always return the device to a 90° right angle
to start.
Centering
The Av300’s vein display light should be centered directly above the
centerline of the vein to be located.
To present the center of the vein accurately, Accuvein recommends positioning the Av300 directly over the vein. When the Av300 is positioned
properly, vein display is accurate and can be viewed from any angle.
When held directly over the centerline of the vein the Av300 locates the
center of a vein extremely accurately. Accuvein recommends that the
Av300 be held within 1/2” (1.25 cm) of either side of directly overhead.
The Av300 vein display is always in focus, so you can quickly move the
device across a subject’s skin to search for a vein. As you evaluate and assess a vein that has been located, it is important to center the Av300 over
the vein and not rotate the device to either side.
UM-English-DVD.indd 6
9/28/11 10:01 PM
Av300 User manual | 7
Good:Vein observed on skin
directly above vein.
Bad:Vein is projected on
skin next to vein.
Keep within
1 in / 2.5 cm of
vein centerline
AV300
AV300
Vein
Vein
Vein
Vein
Cross section
of arm
Cross section
of arm
Techniques and Recommendations
Become familiar with proper use: Before using the AV300 on a subject, the experienced medical practitioner
should become familiar with how to properly position the AV300 to best detect veins. Do so by following the instructions in this manual and using the practice card included with the device.
Also, before first use, AccuVein recommends comparing how the AV300 detects veins, by using a visible vein as a reference or a vein assessed by palpation. Note that when using an AV300, the position of veins and branches can be
assessed and you can also observe where veins do not appear.
Optimize vein display: Once the AV300 is properly positioned over the vein to be located, you can often enhance
the quality of vein display by rotating the AV300 slightly on its axis, moving the device closer or farther from the skin,
and changing the vein display settings. Note that the same setting might present veins differently on different people. It’s therefore important to become familiar with selecting the best setting for each type of patient and procedure. For details, see Vein Display Settings on page 8.
Target the center of the vein: When properly positioned, the AV300 accurately displays the center of the vein.
Some vein display settings might make a vein appear wider than it actually is. However, even if the displayed vein
width is enlarged, when the AV300 is operated properly, the center of the displayed vein matches the center of the
actual vein.
UM-English-DVD.indd 7
9/28/11 10:01 PM
8
| Av300 User manual
Do not hold the AV300 during a manual procedure: Once the desired vein and location are selected, an assistant should hold the device so both of the practitioner’s hands remain free to perform the venipuncture procedure.
The AV300 can also be used in an optional hands-free stand.
Adjust room lighting if necessary: Changing room lighting may help the user better see the vein display.
WARNING: Do not hold the AV300 while performing venipuncture or other medical procedure.
WARNING: The AV300 only shows peripheral veins.
WARNING: Certain subject’s veins or a portion of their veins might not be displayed well or at all. Causes for veins
to not be displayed include veins deeper than about 7mm, skin conditions, hair, highly contoured skin surface, and
adipose (fatty) tissue.
WARNING: The AV300 does not indicate vein depth underneath the skin, which can vary from patient to patient.
The AV300 operator should therefore rely on their training and experience to identify vein depth and evaluate other
information provided by the AV300.
Vein Display Settings
Because individuals and their veins vary, the AV300 provides multiple vein display settings that can optimize how
veins are displayed on different people or for different procedures. While locating and assessing a vein, you can cycle
through the different settings to quickly find one that works best to locate and view your subject’s veins. The same
setting might present veins differently on different people, so it’s important to become familiar with selecting the
best setting for each type of patient and procedure.
To select a vein display setting:
1. Turn the vein display light On by pressing the Blue side button. This initially selects the default vein display setting, which is shown on the LCD screen. To have the AV300 initially select a different setting, you can change the default as described on page 14.
2. Position the AV300 over the vein to be assessed. Then while the vein display light is On, lightly tap the Blue side
button to step through each setting.
NOTE:
You can also select vein display settings using the LCD screen. While the vein display light is On, the screen displays
the current setting. To select another setting, press the Middle LCD button to cycle through the available settings.
WARNING: Some vein display settings might make a vein appear wider than it actually is.
UM-English-DVD.indd 8
9/28/11 10:01 PM
Av300 User manual | 9
7AV300 Power Management
Battery Charge Indicators
100%
<80%
<66%
<33%
<25%
<16%
The AV300 battery indicator indicates how much available operating life is available from the battery. When the battery charge begins to get low, the AV300 issues the follow warnings and should soon be charged:
• <33%: The AV300 beeps 3 times and the battery indicator flashes yellow.
• <25%: The AV300 beeps 3 times and flashes red. The device also beeps 3 times on any screen change.
• <16%: The AV300 beeps 3 times, displays a low battery message, and powers off 1 minute later.
LOW BATTERY
RECHARGE
BATTERY
IMMEDIATELY
Charging the battery
To charge the battery, place the AV300 in its charging cradle with the LCD screen facing outwards. An animated battery charge icon indicates that the battery is being charged.
NOTE: While the device is in its cradle, the AV300 vein display light does not operate and the device cannot be used
for vein assessment. The LCD menu remains active while the AV300 is in the charging cradle so the AV300 configuration can be changed. The device should also be stored in its cradle while performing software updates from a PC.
ER-1
ER-1
You can also charge the battery by placing the AV300 in an optional powered hands-free stand (HF300). While in the
powered hands-free stand, the AV300 can be fully operated. For details, see Options and Accessories on page 26.
Replacing the battery
WARNING: Do not attempt to open, disassemble, or service the battery pack. Do not crush, puncture, short external contacts or dispose of in fire or water. Do not expose to temperature above 60°C / 140°F.
WARNING: Keep the AV300 and its battery out of the reach of children.
CAUTION: Dispose of used batteries according to manufacturer’s instructions. The AV300 is powered by a recyclable lithium ion battery. Please call AccuVein at (816) 997-9400 for information on how to dispose of or recycle battery.
UM-English-DVD.indd 9
9/28/11 10:01 PM
10 | Av300 User manual
When used under normal conditions, the AV300 battery BA300 needs to be replaced about every two years. Longer
charge cycles, shorter operating periods, and Bad Battery alert are all indications that the battery needs replacing.
The BA300 battery is not to be removed or replaced in the patient environment, or within 1.5m or 5 ft. of the patient.
BAD BATTERY
To replace the battery, open the battery compartment on the back of the device. Use a screwdriver or edge of a
small coin as a tool to remove the screw.
The BA300 battery can easily be removed from the battery compartment or inserted, as its shape matches the
AV300 battery compartment.
CAUTION: Be careful not to touch or scratch the window and lenses also on the back of the device. If the vein display light window is scratched the vein display may be affected.
Verifying charge of a replacement battery
When an AV300 battery is not installed in a device, you can still check its charge by inserting a pen or paper clip in
the small hole in the battery (see photo on next page). A green light indicates the battery is charged for at least 30
minutes of normal operation.
WARNING: Keep battery out of reach of children
CAUTION: Use AccuVein approved battery charging accessories and batteries only. The AccuVein BA300 battery
pack has been designed for the AV300. If the AV300 will not be used for extended time, remove and store battery.
UM-English-DVD.indd 10
9/28/11 10:01 PM
Av300 User manual | 11
Press here with paper clip or pen to check charge
Green light indicates good battery
Changing the Power Supply Plug
The AV300 power supply (PS310) has been designed for the international market and comes with a family of plugs
that should fit the electrical systems in most countries. Initially, the power supply is equipped with the North American plug. Before using the AV300 elsewhere, be sure to insert the proper plug for your location.
To remove the current plug: Press and hold the button on the face of the plug. While still pressing the button, rotate the plug to the left (counterclockwise) to remove it.
To insert another plug: Select the appropriate power plug for your location. Then place it into position and rotate
it to the right (clockwise). A faint click can be heard when the plug properly seats into place.
UM-English-DVD.indd 11
9/28/11 10:01 PM
12 |
Av300 User mAnUAl
8 Using a Hands-Free stand
To keep both hands free while performing a medical procedure, without having an assistant hold the device for
you, you can use a hands-free stand. Accuvein optionally
provides both a powered and unpowered stand that each
allow the user to properly position the Av300 and locate
the subject’s veins, without having to hold the device.
The Av300 operates the same in a hands-free stand as
when held by hand.
nOe: Hands-free stands are available from the Accuvein Web site. Also check the site for additional hands-free options that may be made available.
• Powered Hands-Free Stand (HF300):
Powers the Av300, and if a battery is installed, charges the battery.
• Unpowered Hands-Free Stand (HF320 / HF350):
The Av300 runs solely on battery power and must be charged in its charging cradle, the same as when using the
device without a hands-free stand.
To use a hands-free stand, first attach its clamp or screw-mount stud in a desired location, such as the rail of a bed,
edge of a table, or chair arm. Once securely mounted, snap the hands-free coupler onto the stud and press the black
ring down to lock. (see instructions that came with stand for more details.) The arm should now swivel freely.
HF300 Only: Plug power supply into power outlet and plug cord jacks together.
Attaching the AV300
To install the Av300 in the hands-free stand, rotate the device so its base end (with
the metal battery connectors) is facing the connector, with the Av300 lCD screen
pointing up. ease the device into the stand’s cup so the clips snap into the recesses
on the side of the Av300. When the clips are properly attached, you will hear a click
when they engage with the Av300, which should then be held firmly in place.
HF300 Only: Follow the instructions that came in the HF300 kit box for attaching the Av300 permanently to the
hands-free stand with a screw (supplied with kit).
When the Av300 is placed into a powered stand, a tone sounds and the battery indicator
changes to a plug, indicating that the Av300 does not require battery power. During this
time, the Av300’s battery is also being charged.
ER-1
CAUTION: Use only Accuvein brand powered stands.
Viewing
S1
UM-English-DVD.indd 12
When placed in the unpowered stand, the battery indicator shows how much battery life
is left, just as when you use the Av300 as a hand-held device.
Do Not
Shine in Eyes
9/28/11 10:01 PM
Av300 User manual | 13
Positioning the AV300
Once the AV300 is safely installed in a hands-free stand, you can position the device as needed. For accurate vein
location, position the device at the proper height, angle, and centering over the subject’s veins. Use the same positioning
techniques as described earlier in this manual for using the device by hand.
WARNING: The AV300 must be positioned at a proper height, angle and centering to perform accurate vein locating.
When the AV300 is placed into a powered stand, a tone sounds and the battery indicator changes to a plug, indicating
that the AV300 does not require battery power. During this time, the AV300’s battery is also being charged.
CAUTION: Use only AccuVein brand powered stand.
9Configuration and Preferences
You can tailor AV300 operation for particular procedures, users, or preferences by making configuration settings from the
LCD menu.
Making Configuration Settings
From the LCD start screen, display the Settings menu by pressing the Left LCD button, beneath the screen.
ER-1
ER-1
You
can power device
using the 3 buttons beDo Not
Shine in Eyes
Settings
On/Off, enter and navigate the Menu, and make setting adjustments
neath the LCD screen to “press” a corresponding icon.
User
Device
Service
Above: First menu screen “Settings”
Below: Table of all LCD button icons and their functions
Left, Middle & Right LCD buttons
Power device ON/OFF.
Enter Menu mode.
Scroll up/down through a menu or change parameters.
Move to a configuration setting.
Select the current menu option or setting.
Go back to the previous screen.
UM-English-DVD.indd 13
9/28/11 10:01 PM
14 | Av300 User manual
Default Vein Display Setting
To access a favorite vein display setting more easily, you can choose which setting is initially active when the AV300
is powered on.
Settings
User
Device
Service
Device
View Setting
Backlight
Volume
To change the default vein display setting, go to the Settings > Device > View Setting screen. Then use the
right arrow and check mark buttons to select a new default setting. The back arrow returns to previous screen.
Viewing
S1
Do Not
Shine in Eyes
Vein Display Time-Out
The AV300 is initially configured to automatically turn off the vein display light, if the light has been turned on but no
buttons have been pressed for 5 minutes. This reduces the need to handle the AV300.
To change or disable the vein display time-out interval, go to the Settings > Device > Time Out screen. Then
press the left and right arrows to set the interval from between 15 seconds and 45 minutes. Or set the interval to 0
(None) to prevent the vein display light from turning off automatically. Disabling time-out can be helpful when using
the AV300 for long procedures, especially in a powered hands-free stand.
Device
Time Out
Exit
Time Out
10
15 MIN.
SEC.
Time Out
55
45 MIN.
Time Out
NONE
Device time-out: To preserve battery power, the AV300 automatically turns off after remaining unused for more
than 5 minutes (vein display light is off and no buttons are pressed). The exception is if the AV300 is in a powered
hands-free stand, in which case it remains on until turned off manually.
Backlight
The AV300 LCD backlight can be adjusted. The backlight setting dims or brightens the LCD screen in real-time. Selecting the right check mark button saves the setting.
To change the backlight intensity, go to the Settings > Device > Backlight screen.
Backlight
UM-English-DVD.indd 14
9/28/11 10:01 PM
Av300 User manual | 15
Speaker Volume
The AV300 generates a sound when various functions are activated or certain events occur. For example, the device
beeps at power up or down, to announce a low battery or fault screen, when you save a configuration setting, or
when you insert the AV300 in its charger or hands-free stand.
To change the volume or turn sound off, go to the Settings > Device > Volume screen.
Volume
Labeling or Naming
Organizations with multiple AV300s might find it helpful to label each device, for example, with the name of its assigned department or individual user. The name appears at the upper left of the LCD start screen (shown below in
this example as “ER-1”). The AV300 can display up to 14 characters for the name.
Settings
ER-1
Do Not
Shine in Eyes
User
Device
Service
User Menu
Name
Language
To label an AV300, go to the Settings > User > Name screen. From this screen, press the up/down arrows to select
a character, press the green check mark to move to the next character, and continue until you have entered the entire name. Use the left/right arrows to scroll through and change existing characters. When you’re done, select SAVE
and press the green check mark to save the name. Select CLEAR to clear the AV300 name.
Name
E
ER-1
Name
O
ER-1
Name
OR- 1
NOTE:
You can also name an AV300 using the AV300 PC Application. For details, see Using the AV300 PC Application starting on page 20 of this manual.
Setting AV300 language
To set or review the AV300 language, go to the Settings > User > Language screen. The current language is
highlighted with a check mark. Languages are displayed in their native alphabet. Scroll to the desired language with
the up/down arrows and press the green check mark. This sets the device to the new language and exits the screen.
UM-English-DVD.indd 15
9/28/11 10:01 PM
16 | Av300 User manual
Settings
User Menu
User
Device
Service
Name
Language
Language
Exit
English
Spanish
To exit the menu without changing the setting, scroll to the Exit item in the list and press the green check mark
button, or press the Blue side button to escape the menu.
Resetting the AV300
To return all AV300 settings to their initial factory defaults, perform a reset. From the start screen, press and hold the
middle, then left LCD buttons simultaneously, being careful to press the middle LCD button first.
This displays the reset screen. From here, press the left button to return to the start screen, canceling the reset. Or
press the right circular button (green check mark) to reset the AV300.
Resetting the AV300 reverts to the following configuration settings:
ER-1
ER-1
RESET
DEVICE?
Left
Middle
• User Name: BLANK
• Language: ENGLISH
• View Setting: SETTING 1
• Backlight: ON FULL
• Volume: ON FULL
• View Time Out: 5 MIN
UM-English-DVD.indd 16
9/28/11 10:01 PM
Av300 User manual | 17
10Faults and Warnings
If the AV300 detects that it cannot operate properly, it turns off the vein display light and displays a fault or warning
screen.
Fault
FAULT
WARNING: If the Fault screen appears, you should stop using the device immediately. Do not reuse until after contacting AccuVein technical support.
Turn off the AV300 by pressing the right circular Power button under the LCD screen (or the device will automatically
turn off in 30 seconds). If after turning the AV300 back on again it resumes working properly, it’s safe to continue using the device. Otherwise, the AV300 safety check circuitry prevents the vein display from turning on until the device
is serviced.
Should a fault occur, please call AccuVein technical support, even if the device begins working properly again.
Warning: Out of Temperature Range
The AV300 is designed to operate within a temperature range of approximately 5°C / 41°F to 40°C / 104°F. This accommodates using the device inside most clinics and hospitals, in patients homes, and outside in emergency environments. If you attempt to use the device outside this range, the AV300 stops illuminating veins and one of the
following warning screens appears. To resume operation, simply bring the AV300 back within its operating temperature range. You will know the device is safe to be used when it turns on without displaying a too hot or too cold
message.
TOO COLD
TOO HOT
The AV300 battery also cannot be charged when outside of this temperature range. To ensure a proper charge,
maintain the AV300 within the above temperature range when in its charging cradle or powered hands-free stand.
NOTE:
The AV300 warms slightly with use, which might limit the upper end of the operating temperature range further.
UM-English-DVD.indd 17
9/28/11 10:01 PM
18 | Av300 User manual
Warning: Bad Battery
BAD BATTERY
The AV300 checks the battery periodically to ensure that the battery is in good condition. If a Bad Battery warning appears, the AV300 does not function and you must replace the battery. Turn the device off by pressing the right circular
Power button. The unit will turn off automatically in 30 seconds once a bad battery is detected.
11Troubleshooting and Servicing
The AV300 monitors itself and alerts the practitioner whenever proper device operation might be affected. The following table summarizes AccuVein’s recommendations for what to do should any of the following problems occur.
WARNING: To reduce the risk of fire or shock hazard and annoying interference, use only the recommended ac-
cessories and do not expose this equipment to rain or moisture. Do not disassemble; there are no user serviceable
parts inside. Refer servicing to AccuVein service personnel.
WARNING: Use only AccuVein accessories and replacement parts with the AV300. The use of non AccuVein accessories may degrade safety.
CAUTION: Do not disassemble. The AV300 contains no customer serviceable components. The AV300 and its ac-
cessories should be serviced only by an authorized AccuVein repair department.
Current AccuVein accessories are summarized in the section Options and Accessories on page 26. Visit the AccuVein
Web site for additional accessories as they become available.
About and Status Screens
To help diagnose a problem, AccuVein technical support might ask you for information about your AV300, which is
displayed on the About or Status screen.
To reach the About screen: Go to the Settings > Device > Service menu and select the About option. The About
screen shows the serial number, software version, and hardware revision of your individual device. This is a read-only
UM-English-DVD.indd 18
9/28/11 10:01 PM
Av300 User manual | 19
Fault / Warning
Recommended Action
Fault
Contact AccuVein technical support:
Phone: (816) 997-9400
Monday – Friday 8 am to 8 pm US Central Time Zone
Too Cold
Gently warm the AV300 to above 5° C / 40° F
Too Hot
Gently cool the AV300 to below 40° C / 105° F
Bad Battery
Replace the battery (contact AccuVein technical support as listed above)
Battery Low
Charge the AV300 using the cradle or powered hands-free stand. Or replace the battery with a charged battery
screen. The only action choices are to exit the screen with the left or right LCD buttons (or press the Blue side button
to exit the screen).
Service
Settings
User
Device
Service
About
About
Status
SN: ACU000123
SW: v1.6
HW: Rev 1.0
To reach the Status screen: Go to the Settings > Device > Service menu and select the Status option. The Status
screen is a read-only display of a 12-digit system status code number. The only action choices are to exit the screen
with the left or right LCD buttons (or press the Blue side button to exit the screen).
Settings
User
Device
Service
Status
120 00A 310 143
Service
About
Status
To contact AccuVein technical support with any questions or problems:
Phone: (816) 997-9400
Monday – Friday, 8 am to 8 pm, US Central Time
UM-English-DVD.indd 19
9/28/11 10:01 PM
20 | Av300 User manual
12Using the AV300 PC Application
AccuVein may periodically release software updates that should be installed on your AV300. To download and install
updates, use the AV300 PC application. You can also use the application to label or name a device, and to set the language. The AV300 PC application is on the DVD included with the AV300, and is also available for download at AccuVein’s Web site http://www.accuvein.com/um.
The PC application requires Windows XP® or Windows Vista® and a USB interface. Windows XP® and Windows Vista®
are the property of Microsoft Corporation.
Installing the PC Application
Insert the DVD that comes with the AV300 in your (Windows XP or Vista) computer. Or download the application
from http://www.accuvein.com/um. After that, follow the instructions that appear on the screen.
Connecting your AV300 to a PC
Once the AV300 PC Application is installed on your computer,
connect the AV300 to the computer using the USB cable included
with the device. To begin, remove the AV300’s battery cover at the
rear of the device. Use a screwdriver or small coin to loosen the
screw holding the cover in place.
Plug the USB cable into the AV300’s USB port, which is above the battery, and
place the AV300 in its charging cradle. Plug the other end of the USB cable into
your PC’s USB port. Then start the AV300 PC application, which begins looking for
the attached AV300. Be sure to leave the AV300 in its charging cradle while
it’s plugged into the computer. The AV300 fits in the cradle with the battery
cover removed.
ER-1
The AV300 LCD indicates that the USB interface is active
by displaying the animated screen shown at left. No
AV300 buttons are active, and no LCD button icons are
displayed while the AV300 is connected to a PC. Unplug
the USB cable and replace battery cover to return the
AV300 to service.
NOTE: The USB port should never be used in the patient environment, or within 1.5m or 5 ft. of the patient.
UM-English-DVD.indd 20
9/28/11 10:01 PM
Av300 User manual | 21
After a moment, the PC application detects, and begins communicating with the AV300.
If the PC application can’t find the AV300, the following screen appears. Verify the USB connections and that the
AV300 is turned on, and click Retry to try connecting again.
If the computer isn’t connected to the Internet, the following screen appears. Without an Internet connection,
you can still label or name the AV300, or set the language, as described below. However, an Internet connection is
required to download and install software updates.
NOTE: The first time this application seeks to access the Internet you may need to configure your firewall software.
UM-English-DVD.indd 21
9/28/11 10:01 PM
22 | Av300 User manual
Naming an AV300, or Setting the Language from a PC
When the AV300 PC application detects an AV300 that’s been connected to your computer (as described above), the
following screen appears where you can name the device and set the language. Just type a new name in the User
Name field, or select a different language from the pull down menu, and click the Set button.
Updating AV300 Software
The screen that appears when the PC application detects an AV300 also indicates whether new software is available
for the AV300. If an update is available, click the Update button at the bottom of the screen.
Then follow the instructions that appear to download and install the update. It can take about 5 minutes to update
your AV300. While the update in is progress, do not disconnect the AV300 from your computer or interrupt
the computer’s Internet connection.
UM-English-DVD.indd 22
9/28/11 10:01 PM
Av300 User manual | 23
When the update is complete, you have an option to update another AV300. To do so, click Yes and follow instructions that appear to connect another AV300 to the computer and update it. Otherwise, click No.
13Cleaning and Disinfecting
WARNING: Users should inspect the AV300 and clean and disinfect the AV300 as required by their institution’s policies to ensure that it is sufficiently clean before each use.
WARNING: Do not use AV300 if the vein display light window is scratched or dirty. The AV300 should be returned
to AccuVein for servicing if the vein light window is scratched.
WARNING: Do not scratch the vein display light window; clean only as directed.
When cleaning the AV300, observe these warnings or damage to the device can occur:
■■
WARNING: Do not immerse the AV300 in liquid or get the AV300 so wet so that liquid spills off.
■■
WARNING: Do not attempt to sterilize the AV300 with heat or pressure sterilization methods.
■■
WARNING: Do not clean the AV300 while in a charging cradle or hands-free stand. Remove the AV300 from the
cradle or stand for cleaning.
■■
WARNING: Do not clean the AV300 when the battery door is open or removed.
■■
WARNING: Unplug the charging cradle before cleaning the cradle.
■■
WARNING: Unplug the Powered Hands-Free Stand before cleaning the stand.
To clean the body of the AV300 and its charging cradle, use a cloth moistened with soap and water, 70% isopropyl
alcohol, or a 10% dilution of chlorine bleach in distilled water.
You can also use normal household disinfectants and wipes.
For peak performance, the vein display light window and lenses on the back of the device should also be kept clean.
Use only 70% isopropyl alcohol, and following the instructions below.
Cleaning the Vein Display Window and Lenses
Be careful to not touch the optics with your bare hands. Only touch the optical surfaces at the bottom of the AV300
with a lens tissue such as Kim-Wipes®. Kim-Wipes® is the trademark of its owner.
Apply several drops of 70% isopropyl alcohol to another lens tissue, and drag this tissue slowly across surface of the
window and lenses. Allow to dry before use. The solvent should evenly evaporate leaving no spots or streaks. Solvent should be completely evaporated and AV300 should be completely dry before use.
UM-English-DVD.indd 23
9/28/11 10:01 PM
24 | Av300 User manual
14Storing and Transporting
While not in use, the AV300 should be stored in its
charging cradle.
If the AV300 is not going to be used for an extended
period, AccuVein recommends removing its battery
and placing the AV300 in a safe, dust-free location.
Storage Environmental Specifcations
Temperature: -20°C / -4°F to 50°C / 122°F
Humidity: 5% to 85% R H non-condensing
HF350 Wheeled Stand
UM-English-DVD.indd 24
9/28/11 10:01 PM
Av300 User mAnUAl
| 25
15 Using the Practice Card
The Av300 comes with a practice card that demonstrates how to position the device properly over a subject’s skin.
Before using the Av300 on a subject, use the device with the practice card to become familiar with its operation.
Place the printed side of the card face up, as shown below. Turn on the Av300 and its vein display light by pressing
the Blue side button. Hold the Av300 centered over the square about 7” (180 mm) from the bottom of the Av300 to
the surface of the card, so the vein display light fits within the red corner marks. Then adjust the height of the Av300
so the light fills the square.
When you hold the device properly, a “vein” should
appear on the practice card that connects with the
vein drawn on either sides of the display field.
AV300 PRACTICE CARD
Copyright
UM-English-DVD.indd 25
AccuVein, LLC 2009
Printed in USA
0000805B
9/28/11 10:01 PM
26 | Av300 User manual
16Options and Accessories
AccuVein offers a variety of options and accessories for the AV300 Vein Viewing System that are customized to meet
specific practitioner’s needs. These include hands-free stands for mounting the device during a procedure. Visit the
AccuVein Web site for additional accessories as they become available.
AV300 Vein Viewing System
The AV300 Vein Viewing System is a complete solution for locating veins using the hand-held method. The main kit
includes:
■■
AV300 vein viewer with battery
■■
CC300 charging cradle
■■
PS310 power supply with international power adapters
■■
USB cable
■■
Literature pack with DVD and practice card
Hands-Free Stands:
Many practitioners find it useful to operate
the AV300 while the device is mounted in a
hands-free stand.
AccuVein offers three models of stands, each
customized for specific needs.
HF350 Wheeled Stand
WARNING: Do not hold the AV300 while
performing venipuncture or other medical
procedure.
UM-English-DVD.indd 26
9/28/11 10:01 PM
Av300 User manual | 27
HF300 Powered Hands-Free Stand
The HF300 powered hands-free stand is designed for fixed phlebotomy applications. This kit is ideal for a workstation where blood draws or IVs are routine, such as a phlebotomist’s chair. The powered stand does double duty by
leaving your hands free and keeping the battery charged. The HF300 comes with a power supply kit and mounting
hardware that includes a variety of clamps and brackets.
Follow the instructions that came in the HF300 kit box when using the HF300.
HF320 Unpowered Hands-Free Stand
The HF320 unpowered hands-free stand is designed for using the AV300 in different locations, and is therefore ideal for hospital, clinic, and institutional applications. Just attach the stand to a bedrail, table, IV pole, or other furniture,
and you’re ready to locate veins. With the unpowered stand, you operate the AV300 on battery power just as when
using the device by hand, and return the device to its cradle when the battery needs charging.
Included are the MA302 pole clamp and a flexible arm. This clamp fits on vertical or horizontal poles and rails of various sizes and shapes found in medical facilities. It has 3 mounting surfaces allowing maximum flexibility in attaching
the hands-free stand. When not in use, the arm coils up so it can be easily carried.
UM-English-DVD.indd 27
9/28/11 10:01 PM
28 | Av300 User manual
Clamps and Mounts:
MA301Table Clamp
The MA301 table clamp allows mounting either the HF300 powered or HF320 unpowered
hands-free stand on a horizontal surface.
MA302Pole Clamp
The MA302 pole clamp allows mounting either the HF300 powered or
HF320 unpowered hands-free stand on vertical or horizontal poles and rails
of various sizes and shapes found in medical facilities. It has 3 mounting
surfaces allowing maximum flexibility in attaching the hands-free stand.
An MA302 is included in the HF320 unpowered hands-free stand kit.
MA300Horizontal and Vertical Permanent Mount clips
The MA300 mount clips allow permanently mounting an HF300 or HF320 hands-free
stand to a vertical or horizontal surface. Although the mounting location is permanent,
the stand can easily be moved to a different location. These mount clips are included in
the HF300 powered hands-free stand kit.
Batteries and Chargers:
BA300 Spare Battery
The BA300 battery is a spare or replacement battery for the AV300. The BA300 is a
high-capacity rechargeable battery that has a built-in mechanism for checking its
charge while the battery is not installed in the AV300
WARNING: Keep the AV300 and BA300 battery out of the reach of children.
UM-English-DVD.indd 28
9/28/11 10:01 PM
Av300 User manual | 29
CC300 Single Slot Table Top Cradle
The CC300 table-top cradle kit allows charging the AV300 and
provides a safe storage location for the device. This kit comes with a
charging cradle, AC power supply, and multinational adaptors.
CC300 Rev. 1.0
CC300 Rev. 1.0
CB00000000
CC300 Rev. 1.2
CC300 Rev. 1.2
CC00000000
UM-English-DVD.indd 29
9/28/11 10:01 PM
30 | Av300 User manual
PS310 Single Device Power Supply
The PS310 power supply is designed for use with the CC300 charging cradle and the HF300 powered hands-free
stand. This power supply is compatible with North American and International AC outlets.
UM-English-DVD.indd 30
9/28/11 10:01 PM
Av300 User manual | 31
17Warranty
AccuVein warrants that the Equipment conforms to any specifications provided in writing by AccuVein to Customer for
that Equipment, is of sound materials and workmanship, is new and unused, unless otherwise specified, and does not
infringe any patent or registered trademark, copyright or design right owned by any third party.
Except as provided in the above paragraph, ACCUVEIN IS NOT MAKING, AND THE CUSTOMER IS NOT RELYING ON, ANY
REPRESENTATIONS OR WARRANTIES WITH RESPECT TO THE EQUIPMENT, INCLUDING WITHOUT LIMITATION ANY IMPLIED WARRANTY OF MERCHANTABILITY, FITNESS FOR A PARTICULAR USE, OR ARISING FROM COURSE OF PERFORMANCE, COURSE OF DEALING OR USAGE OF TRADE.
Standard Warranty
Standard Warranty Period
The Warranties with respect to any Equipment shall remain in effect for the following period of time after delivery of
the Equipment to the Customer Site (the “Warranty Period”): (1) twelve (12) months for each AccuVein vein illumination
device; (2) ninety (90) days for any battery; and (3) twelve (12) months for all other Equipment.
Notice of Warranty Claim
If at any time during the applicable Warranty Period the Customer believes that the Equipment does not comply with
any of the Warranties, the Customer shall promptly notify AccuVein. If the Customer does not provide that notice within the Warranty Period, the Customer shall not have any right to claim that the Equipment does not comply with the
Warranties. The Customer shall inspect the Equipment promptly after delivery to the Customer Site and promptly notify AccuVein of any alleged breach of any Warranties or any errors relating to the delivery of the Equipment.
Repairs and Replacements
Except as provided in the IP Infringement paragraph below, if within the applicable Warranty Period the Customer
notifies AccuVein that any Equipment does not comply with any of the Warranties and if in fact the Equipment does
not comply with any of the Warranties (not caused by misuse or abuse), AccuVein shall, at AccuVein’s election and expense, either i) repair, or ii) replace, or iii) rework the Equipment, including having the Equipment shipped to AccuVein
(at AccuVein’s expense). The Customer shall comply with AccuVein’s standard procedures and requirements relating
to the return of any Equipment; among other things, the Customer shall not return any Equipment to AccuVein without first obtaining a return authorization from AccuVein. If after a reasonable period of time AccuVein does not repair,
replace or rework the Equipment so that it complies with the Warranties, AccuVein shall refund the purchase price of
that Equipment to the Customer, and the Customer shall (at AccuVein’s expense) return the Equipment to AccuVein.
IP Infringement
In the event that any third party makes any claim (including the commencement of any legal action) against the Customer, AccuVein or any other party alleging that any patents, software or other proprietary rights of AccuVein utilized
or embodied in any Equipment that is a vein illumination device infringe or misappropriate the intellectual property or
proprietary rights of that third party, then AccuVein shall have the right in its discretion either (1) to take action which
will secure the right of the Customer to continue to utilize the Equipment, at no additional cost to the Customer, or (2)
to modify the Equipment in order to eliminate the basis for such an action or claim, at no cost to the Customer, provided that such Equipment, as so modified, will continue to conform to the specifications provided in writing by AccuVein to Customer for that Equipment, or (3) if neither (1) nor (2) is commercially reasonable or practicable, refund the
full purchase price of the Equipment, without further liability of AccuVein.
Exclusive Remedies
The remedies set forth in this description of the Standard Warranty (and, for US Standard Warranty, the “Spare-in-theAir” Warranty Program below) are the SOLE AND EXCLUSIVE remedies for any breach of any of the Warranties.
UM-English-DVD.indd 31
9/28/11 10:01 PM
32 | Av300 User manual
“Spare-in-the-Air” Program
The provisions of the “spare in the air program” shall apply only to US customers eligible for standard US warranty.
If the Customer has a Standard US Warranty, then in addition to the remedies set forth in description of the Standard
Warranty, Repairs and Replacements program above, the Customer is eligible to participate in AccuVein’s “Spare-inthe Air” program for any Equipment that is an AccuVein Vein Illumination Device. Under that program, if the Customer believes that such a device does not comply with the Warranties during the Warranty Period and after consultation
AccuVein issues a return authorization to the Customer, then AccuVein will promptly ship to the Customer for next-day
delivery a new or like-new device even before the Customer returns to AccuVein the original device that the Customer believes does not comply with the Warranties. The Customer can use that device until the Customer receives back
from AccuVein the Customer’s original device (or, if necessary, a replacement device) that complies with the Warranties. In order to participate in that program, the Customer must comply with the procedures established by AccuVein
for that program. AccuVein reserves the right to modify that program from time to time.
18Limitation of Liability
In no event shall either AccuVein or the customer be liable to the other for any incidental, indirect, special or consequential damages (including without limitation lost profits or lost business opportunity) that the other party may incur by reason of its having entered into or relied on a purchase or lease agreement, or arising out of the performance
or breach of such an agreement, even if the party against whom a claim is made was advised or knew of the possibility of such damages. The foregoing limitation shall apply regardless of the form of the claim in which such liability may
be asserted, including breach of contract, tort (including negligence) or otherwise.
UM-English-DVD.indd 32
9/28/11 10:01 PM
Av300 User manual | 33
19Technical Specifications
Operating, Transport and Storage Conditions
Operating
Transport
Storage
Temperature
4°C to 40°C (39°F to 104°F)
Humidity
5% to 85% RH non-condensing
Temperature
-20°C to 50°C (-4°F to 122°F)
Humidity
5% to 85% RH non-condensing
Temperature
-20°C to 50°C (-4°F to 122°F)
Humidity
5% to 85% RH non-condensing
AV300 Product Specifications
Weight
275 grams (9.7 oz.)
Size
5 x 6 x 20 cm (2” x 2.4” x 7.9”)
Water Ingress
IPX0
Battery
AccuVein® BA300 user replaceable Li-Ion 3.7V, 2,400 mAh
Continuous (vein light on) run time on full charge
2 hours typical
Number of standard viewing procedures that can be performed 360
using a fully charged battery
Charge time (full)
2 hours typical
PS310 Power Supply
To be used with AccuVein® CC300 charge cradle and HF300 powered hands-free stand.
Type
Medical Grade
Input
100 – 240 V
50 – 60 Hz
UM-English-DVD.indd 33
9/28/11 10:02 PM
34 | Av300 User manual
20Standards Information
IEC 60601-1 Medical Electrical Equipment Safety
IEC 60601-1-2 Electromagnetic Immunity
IEC/EN 60825-1 Safety of Laser Products
Complies with 21 CFR 1040.10 and 1040.11 except for deviations pursuant to Laser Notice No. 50, dated June 24, 2007.
UL 60601-1 Medical Electrical Equipment Safety
CAN/CSA C22.2 No. 601.1-M90 Medical Electrical Equipment Safety
UM-English-DVD.indd 34
9/28/11 10:02 PM
Av300 User manual | 35
21Index
AV300 PC Labeling and Update Application
20
Battery 10, 11, 29
Battery Charge Indicators 9
Charge time33
Cleaning and Disinfecting23
Faults and Warnings17
Bad Battery
10, 18
Fault
17, 18
Too Cold
17, 18
Too Hot
17, 18
Troubleshooting and Servicing18
IEC 60601-1
II, 34
IEC 60601-1-2
V, 34
Mounting
12, 27
Horizontal surface
27, 28
Pole clamp
27, 28
Table clamp
27, 28
Operating and Storage Conditions33
Positioning the AV300
4, 5, 6, 13
Practice Card 2, 7, 25, 26
Resetting the AV30016
Speaker Volume15
Storage
24, 33
Humidity III, 24, 33
Temperature
III, V, 9, 17, 24, 33
Weight33
UM-English-DVD.indd 35
9/28/11 10:02 PM
AccuVein Inc.
40 Goose Hill Road
Cold Spring Harbor
New York 11724
United States of America
Phone: (816) 997-9400
www.accuvein.com/um
ACU0004604 © 2011, Accuvein Inc. All rights reserved
UM-English-DVD.indd 36
9/28/11 10:02 PM