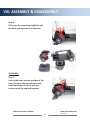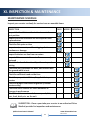
1
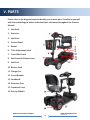
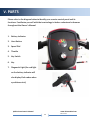
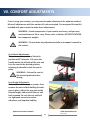
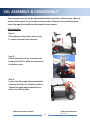
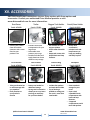
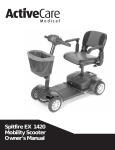
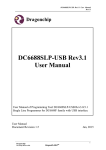
SPITFIRE SCOUT OWNER’S MANUAL TABLE OF CONTENTS I. PREFACE 3 II. SAFETY NOTICES 4 III. SAFETY GUIDELINES 6 IV. EMI & RFI INFORMATION 13 V. PARTS 14 VI. SETUP 16 VII. COMFORT ADJUSTMENTS 20 VIII. ASSEMBLY & DISASSEMBLY 22 IX. OPERATION 25 X. BATTERIES & CHARGING 26 XI. INSPECTION & MAINTENANCE 28 XII. BASIC TROUBLESHOOTING 32 XIII. SPECIFICATIONS 33 XIV. LIMITED WARRANTY 34 XV. ACCESSORIES 36 Spitfire Scout Owner’s Manual www.drivemedical.com 2 REV3.9.29.14 I. PREFACE Please read this Owner’s Manual before operating your scooter for the first time. Improper use or unfamiliarity of the scooter may result in harm, injury, or traffic accidents. This Owner’s Manual includes operation instructions, assembly instructions, and best practices to ensure maximum use from your scooter. The symbols used throughout this Owner’s Manual are explained below. Read carefully, and fully understand the sections marked with these symbols: WARNING – Improper use could lead to death, serious injury, hazardous conditions, or product malfunction. ATTENTION – Improper use could lead to injury and/or damage to your scooter. SUGGESTION – Follow these instructions for best practices, and to keep your scooter in prime operating order. This Owner’s Manual includes a repair maintenance record chart and warranty. Please keep it in a safe place, or with the scooter. If someone else uses the scooter, please provide a copy of the Owner’s Manual for their consideration. This Owner’s Manual is composed from the product design and specifications at the time of publication. As designs change, some illustrations and pictures in the manual may not correspond to the scooter that you purchased. We reserve the right to make design modifications. This product has been designed to provide a comfortable and secure solution for individuals limited to a seated position who are capable of operating a scooter. The manufacturer disclaims all responsibilities for any personal injury or property damage which may occur as a result of improper or unsafe use of this product. Spitfire Scout Owner’s Manual www.drivemedical.com 3 REV3.9.29.14 II. SAFETY NOTICES Read and follow the information in the owner’s manual. Fully charge the battery after every trip and prior to using the scooter. If you do not frequently use the scooter fully charge the batteries every two weeks to prevent battery failure. If the battery gauge drops to red, charge the scooter as soon as possible. Completely discharging the batteries may damage the batteries, or shorten the expected life of the batteries. Batteries contain lead and lead compounds. Wear proper safety attire when handling batteries. Only use sealed lead acid AGM or gel-cell batteries in this product. Keep metal objects away from the battery terminals, electric shock may occur. Always replace both batteries at the same time for optimum performance. Always make sure the power is turned off when getting in and out of the scooter. Always make sure freewheel levers are in the drive position before getting in or out of the scooter. Do not put the scooter in freewheel when on an incline or decline. To ensure the user’s familiarity with the scooter’s operation, practice driving at low speeds in a spacious hazard-free area travelling forward, backward, left, right, decelerating, maneuvering up inclines, and down inclines. Avoid unnecessary movement of the scooter. Never reach, lean or bend when driving your scooter. Spitfire Scout Owner’s Manual www.drivemedical.com 4 REV3.9.29.14 II. SAFETY NOTICES Avoid exposure to moisture, standing water, rain, snow, ice or salt when possible. Store in a clean and dry condition. Do not drive your scooter at night without proper lighting. Do not remove the anti-tip wheels. Keep your feet on the foot board at all times during operation. Do not stand on the foot board. Keep your hands and feet away from moving parts while driving. Be aware of loose fitting clothes that can become caught in the drive wheels. Do not connect an extension cord to the battery charger. Disassembling the controller, motor, or charger by anyone other than an authorized Drive Medical service agent is prohibited, and voids any applicable warranty. Do not take your scooter on roads or highways. Do not operate your scooter when you are tired, or after consuming alcohol. Be cautious when driving your scooter in busy areas or shopping malls. Under no circumstances should the scooter be used as a seat in a motor vehicle. Do not attempt to lift your scooter by any parts other than the frame. If you will be seated in your scooter for an extended period of time, power off the scooter. This will prevent inadvertent movement from unexpected throttle contact. Spitfire Scout Owner’s Manual www.drivemedical.com 5 REV3.9.29.14 III. SAFETY GUIDELINES GENERAL GUIDELINES Before operating your scooter fully read and understand this Owner’s Manual. Be sure to follow the setup instructions prior to using your scooter for the first time. Users may encounter difficult maneuvering situations such as narrow doorways, travelling up and down ramps, cornering, and travelling on uneven terrain. Be sure to lower the speed, take your time, and carefully maneuver the scooter. MODIFICATIONS Do not modify, remove, disable, or add any parts, features, or functions on your scooter. Drive Medical offers a wide variety of accessories for your scooter to help accommodate your needs. WARNING – Do not modify your scooter in any way; doing so will void the warranty. SAFETY CHECK ATTENTION – Inspect the following components before each use: Electrical connections – secure and free from corrosion Freewheel Levers – engaged in drive position Batteries – fully charged and free from corrosion If you notice a problem please contact your authorized Drive Medical Provider for assistance. Spitfire Scout Owner’s Manual www.drivemedical.com 6 REV3.9.29.14 III. SAFETY GUIDELINES WEIGHT CAPACITY This scooter has a maximum weight capacity that should never be exceeded. Please refer to Section XII SPECIFICATIONS for this information. The maximum weight capacity includes the user and any accessories. WARNING – Exceeding the maximum weight capacity will void your warranty. Drive Medical will not be held responsible for injuries and/or damages resulting from failure to observe weight capacities. WARNING – Do not carry passengers on your scooter. Your scooter is designed and tested for one user to operate while seated. INCLINE GUIDELINES Use caution when approaching inclines or declines; if necessary lower the speed before travelling on a slope. When travelling up an incline try to keep the scooter moving forward. If you must come to a stop, use caution and slowly accelerate the scooter forward. When travelling down an incline lower the speed on your scooter to the slowest setting, and proceed cautiously. If the scooter is travelling down the incline faster than you expected, slowly release the throttle to come to a stop, then slightly push the throttle forward to continue safely down the incline. WARNING – Never put the scooter in freewheel model while on an incline. WARNING – Drive your scooter straight up or down an incline, never backwards. Erratic movements, or back and forth patterns may increase the chance of tipping. Spitfire Scout Owner’s Manual www.drivemedical.com 7 REV3.9.29.14 III. SAFETY GUIDELINES WARNING – Do not travel up an incline with the seat completely reclined without an attendant. Inclines vary, and doing so may decrease stability. WARNING – Do not, under any circumstances, travel on a slope greater than the maximum climbing angle for this scooter. Please refer to Section XII SPECIFICATIONS for this information. Exceeding the climbing angle may cause unstable conditions. FREEWHEEL GUIDELINES Your scooter is equipped with manual freewheel levers to maneuver the unit without power. The manual freewheel levers can be engaged or disengaged. Disengaged, or “freewheel” mode, releases the locking mechanism on the gearbox allowing the scooter to roll freely with or without power. Engaged, or “drive” mode, secures the locking mechanism on the gearbox preventing the scooter from rolling freely. WARNING – Never attempt to personally put your scooter in freewheel mode while seated in the unit. WARNING – Never put the scooter in freewheel mode while on an incline. This may cause uncontrollable movements. ATTENTION – When your scooter is in freewheel mode you may feel resistance when maneuvering; this is normal, and prevents damage to the gearbox. ATTENTION – Please refer to Section V PARTS to locate the freewheel levers on your scooter. SUGGESTION – If you hear a “clicking” noise when engaging the throttle, but the scooter will not move – turn off the power, engage the freewheel levers, and power back on to continue. Spitfire Scout Owner’s Manual www.drivemedical.com 8 REV3.9.29.14 III. SAFETY GUIDELINES BRAKES & STOPPING Coming to a stop in your scooter can simply be done by releasing the throttle. The throttle will automatically return to the center position, and the scooter will come to a stop. ATTENTION – Quickly moving the throttle in the opposite direction of travel will cause the scooter to come to an abrupt stop, and if held continuously in the opposite direction may cause erratic movements if you are unfamiliar with the controls. Your scooter is equipped with two types of brake systems: Regenerative brakes – when the throttle is returned to the center position, or stop neutral position, regenerative brakes use electricity to quickly decelerate the vehicle. Park brakes – once the scooter comes to a complete stop the park brake activates automatically locking the drive wheels. OUTDOOR OPERATION & INCLEMENT WEATHER PRECAUTIONS While your scooter is purposed for in-home use to assist you in daily living activities; Drive Medical understands there are times you need to operate the scooter outdoors, and has designed it to perform superbly on level outdoor surfaces. ATTENTION – When operating outdoors avoid uneven terrain, soft surfaces, tall grass, loose gravel, loose sand, fresh water, salt water, edges of streams, lakes or oceans. If you are unsure about a surface, avoid it. Exposure to inclement weather should always be avoided. If you find yourself caught in inclement weather while operating your scooter, proceed to the closest shelter immediately. Completely dry your scooter before operating, charging, or storing. Spitfire Scout Owner’s Manual www.drivemedical.com 9 REV3.9.29.14 III. SAFETY GUIDELINES STEPS, CURBS & FIXED OBSTACLES Use extreme caution when operating your scooter near curbs, porches, stairs, escalators, drop-offs, unprotected ledges, and raised areas. WARNING – Never attempt to navigate your scooter over a fixed obstacle taller than the maximum ground clearance. Please refer to Section XII SPECIFICATIONS for this information. WARNING – Never attempt to navigate your scooter backwards over an obstacle. WARNING – Never attempt to operate your scooter on steps or escalators. ATTENTION – Refer to the following guidelines and diagrams when travelling over a fixed obstacle lower than the maximum ground clearance of your scooter: To maneuver up a fixed obstacle – Approach slowly, and make sure the front of the scooter is perpendicular to the obstacle. Increase the forward speed until the scooter has cleared the obstacle, and then you may reduce the speed or return the throttle to neutral. To maneuver down a fixed obstacle – Approach slowly, and make sure the front of the scooter is perpendicular to the obstacle. Reduce the forward speed just before the front wheels come in contact with the obstacle, and remain at the reduced speed until scooter has cleared the obstacle, and then you may increase the forward speed. CORRECT APPROACH: C U R B INCORRECT APPROACH: Spitfire Scout Owner’s Manual C U R B www.drivemedical.com 10 REV3.9.29.14 III. SAFETY GUIDELINES TRANSPORTING YOUR SCOOTER When transporting your scooter by vehicle it should be securely stowed in the back of a van, truck, or trunk of a car. Adjustable parts should be removed or properly secured during transport. WARNING – Do not sit in your scooter while in a moving vehicle. POSITIONING BELT (OPTIONAL) A safety belt may be included with your scooter. Your authorized Drive Medical Provider, assistive technology therapist, or healthcare professional are responsible for determining your requirement for a safety belt to operate your scooter safely. Once determined, securely fasten the safety belt. WARNING – The safety belt is not designed for use as a seat belt in a motor vehicle, or any other transportation device. TRANSFERS Always have an attendant present while transferring in and out of your scooter. ATTENTION – To reduce the possibility of an injury; perform transfers after the following steps are followed: Safely reduce the distance between your scooter and the object you are transferring onto, ensure your scooter is not in freewheel mode, turn the power off, and flip up or remove the armrests. WARNING – Position yourself as far back possible before transferring, and never place your weight or downward force on adjustable parts. Spitfire Scout Owner’s Manual www.drivemedical.com 11 REV3.9.29.14 III. SAFETY GUIDELINES PHYSICAL LIMITATIONS, Rx DRUGS, ALCOHOL & SMOKING You must exercise awareness, caution, care, and common sense when operating your scooter. Always keep in mind your own limitations, and substance use when operating your scooter. WARNING – Never use your scooter while under the influence of alcohol or mind altering substances. WARNING – Never smoke while seated in your scooter. Damaged or worn upholstery increases the risk of fire hazard, and should be replaced immediately. ATTENTION – Be aware of your own physical limitations when familiarizing yourself with the scooter. ATTENTION – Be aware of precautions, warnings, and safety issues when taking prescribed or over-the-counter drugs while operating your scooter. Spitfire Scout Owner’s Manual www.drivemedical.com 12 REV3.9.29.14 IV. EMI INFORMATION Electromagnetic interference (EMI) tests have shown to produce adverse effects on the performance and control of electrically powered mobility devices. EMI can be produced from different sources such as cellular phones, two-way radios, radio stations, television stations, amateur radio transmitters (HAM), wireless computer links, microwave signals, paging transmitters, and transceivers used by emergency vehicles. The EMI waves can cause unintentional movement of the scooter, or damage to the controller. Every electrical powered mobility device has a resistance to EMI. The higher the resistance level the greater the protection. The intensity of the interference can be measured in volts per meter, V/m. At this time, current technology is capable of achieving an immunity level of 20 V/m, which provides protection from more common sources of EMI. Your scooter, with no modifications, has an immunity level of 20 V/m. EMI becomes more intense as you move closer to the source. The EMI produced from hand-held radios are of special concern. It is possible to unintentionally bring high levels of EMI very close to the scooter’s control system, effecting your movement and braking. The warnings listed below are recommended to prevent possible interference with the control system of your scooter. WARNING – Do not operate hand-held transceivers such as CB (citizens band) radios, or turn on personal communication devices, such as cellular phones, while the scooter is powered on. WARNING – Be aware of nearby transmitters, such as radio or television stations, and avoid close proximity. WARNING – If you experience unintended movement or brake release occurs, power off as soon as it is safe. Please report EMI incidents to Drive Medical. Spitfire Scout Owner’s Manual www.drivemedical.com 13 REV3.9.29.14 V. PARTS Please refer to the diagram below to identify your scooter parts. Familiarize yourself with the terminology to better understand part references throughout the Owner’s Manual. 1. Seat Back 2. Armrests 3. Seat Base 4. Control Panel 5. Basket 6. Tiller Adjustment Knob 7. Front Wheel Lock 8. Seat Swivel & Release Lever 9. Seat Post 10. Battery Pack 11. Charge Port 12. Circuit Breaker 13. Footboard 14. Accessory Post 15. Freewheel Lever 16. Anti-tip Wheels Spitfire Scout Owner’s Manual www.drivemedical.com 14 REV3.9.29.14 V. PARTS Please refer to the diagram below to identify your scooter control panel and its functions. Familiarize yourself with the terminology to better understand references throughout the Owner’s Manual. 1. Battery Indicator 2. Horn Button 3. Speed Dial 4. Throttle 5. Key Switch 6. Key 7. Diagnostic Light (the red light on the battery indicator will also display flash codes when a problem exists) Spitfire Scout Owner’s Manual www.drivemedical.com 15 REV3.9.29.14 VI. SETUP Your scooter requires assembly prior to initial use. Please be sure to follow these steps to properly set up your scooter. Step 1: Insert the seat post into the base of the scooter with the battery lock around the post. Secure tightly with the provided nut and bolt at the desired height. Step 2: Place the battery pack onto the front half of the scooter directly in front of the seat post. Then swivel the battery lock so the long side rests on top of the battery pack, and lock into place. Step 3: While lifting up on the seat release lever, place the seat onto the seat post. Release the lever and rotate the seat until it locks into place. Spitfire Scout Owner’s Manual www.drivemedical.com 16 REV3.9.29.14 VI. SETUP Step 4: Insert the armrests into the attachment points in the seat frame so that the armrests face forward. Secure the armrests in place with the provided star knobs at the desired width. Step 5: Attach the front basket by aligning the bracket on the tiller with the mounting holes on the basket, and then push down to secure in place. Step 6: Fully charge the scooter by inserting the round charger connector into the battery charging terminal on the battery pack, and then insert the 3-pronged plug into a standard electrical outlet. Spitfire Scout Owner’s Manual www.drivemedical.com 17 REV3.9.29.14 VI. SETUP Optional (DLX Models Only): Your scooter comes with interchangeable shrouds, allowing you to customize your scooter to your liking. The DLX models come with the red shrouds installed, and a spare set of blue shrouds included in the box. The shrouds can be interchanged by hand, or using a small pry tool. Be sure not to scratch the painted shrouds while using the pry tool. Control Panel Shroud Replacement: Using your thumb, gently grip the top of the color panel and lift upward until the panel releases. The new panel will snap into place. Front Shroud Replacement: Reach underneath the front shroud, and gently push up on the color panel until it releases from the scooter. The new panel will snap into place. Spitfire Scout Owner’s Manual www.drivemedical.com 18 REV3.9.29.14 VI. SETUP Rear Shroud Replacement: Reach underneath the rear shroud, and gently push up on the color panel until it releases from the scooter. The new panel will snap into place. Spitfire Scout Owner’s Manual www.drivemedical.com 19 REV3.9.29.14 VII. COMFORT ADJUSTMENTS Prior to using your scooter, you may want to make adjustments for optimum comfort. Make all adjustments with the scooter off, and unoccupied. You may need the tool-kit included with your scooter to make these adjustments. WARNING – Some components of your scooter are heavy, and you may need assistance to lift or carry. Please refer to Section XII SPECIFICATIONS for component weights. WARNING – Do not make any adjustments while an occupant is seated in the scooter. Seat Swivel Adjustment: The seat can be rotated and locked in position at 45° intervals. Lift up on the handle under the left side of the seat and turn the seat to the desired position, releasing the handle to lock the seat in place. WARNING – Return the seat to the forward position before driving. Seat Height Adjustment: Remove the seat from your scooter, then remove the nut and bolt holding the seat post in place. Adjust the seat post to the desired height, and reinstall the nut and bolt removed. Be sure the nut and bolt are tightened securely to reduce vibrations, and improve stability. Spitfire Scout Owner’s Manual www.drivemedical.com 20 REV3.9.29.14 VII. COMFORT ADJUSTMENTS Armrest Width: The armrest width can be adjusted by loosening the star knob on the underside of the armrests, and sliding the armrests inward or outward to the desired width. Armrest Angle: The armrest angle can be adjusted by lifting up on the armrest, and tightening or loosening the bolt underneath the armrest. Tightening will lower the angle, and loosening will raise the angle of the armrest. Tiller Angle Adjustment: The angle of the tiller can be adjusted to multiple positions to suit each user. Loosen the knob on the right side of the tiller, reposition the tiller as necessary, and tighten the knob to secure the tiller in place. Spitfire Scout Owner’s Manual www.drivemedical.com 21 REV3.9.29.14 VIII. ASSEMBLY & DISASSEMBLY Your transport scooter can be disassembled into five sections without tools: the seat, basket, battery pack, front section and rear section. Please be sure to follow these steps to properly assemble and disassemble your scooter. Disassembly: Step 1: Pull upward on the swivel release lever to remove the seat from the post. Step 2: Unlock the battery lock, and rotate the battery lock 180° to allow for removal of the battery pack. Step 3: Loosen the tiller angle adjustment knob, and drop the tiller to its lowest position. Tighten the angle adjustment knob to secure the tiller in place. Spitfire Scout Owner’s Manual www.drivemedical.com 22 REV3.9.29.14 VIII. ASSEMBLY & DISASSEMBLY Step 4: Pull up on the connecting handle to split the front and rear section of the base. Assembly: Step 1: Line up the front and rear sections of the base. Lift up on the connecting handle, and slowly lower the front and rear sections until the two lock together. Spitfire Scout Owner’s Manual www.drivemedical.com 23 REV3.9.29.14 VIII. ASSEMBLY & DISASSEMBLY Step 2: Loosen the tiller angle adjustment knob, and raise the tiller to the desired height. Tighten the angle adjustment knob to secure the tiller in place. Step 3: Lower the battery pack in to the compartment on the scooter. Rotate the battery lock over the battery pack, and lock to secure the batteries in place. Step 4: While lifting up on the seat release lever, place the seat onto the seat post. Release the lever and rotate the seat until it locks into place. Spitfire Scout Owner’s Manual www.drivemedical.com 24 REV3.9.29.14 IX. OPERATION After your scooter is assembled, and adjustments have been made you are now ready to operate your scooter. Refer to the tiller diagram in Section V PARTS for key functions. The key switch applies power to the control system electronics, which in turn supplies power to the motors. Turn the key switch with the key inserted to turn on your scooter. ATTENTION – Do not use the key switch to stop, or as a brake. Doing so may shorten the life of the drive components. SUGGESTION – It is recommended you start at the slowest speed setting when familiarizing yourself with your scooter controls. Once you feel comfortable with the controls, and movement of the scooter you may then increase the speed. Rotate the speed knob to the lowest speed setting. Engage the throttle, and begin steering to drive forward, backward, left or right. If you want to stop the scooter, release the throttle and it will automatically return to the center position to stop the unit. Once familiar with the controls rotate the speed knob to increase the top speed to a comfortable setting. When the scooter is turned on, the battery gauge will display red, orange, and green indicators: Red: Your scooter should be charged as soon as possible. Orange: Do not drive your scooter for a long trip. Green: Your scooter has full battery capacity. Spitfire Scout Owner’s Manual www.drivemedical.com 25 REV3.9.29.14 X. BATTERIES & CHARGING CHARGING YOUR SCOOTER To charge your scooter, position the front of the unit next to a standard electrical outlet. Be certain the freewheel levers are engaged, and the power is turned off. Plug the charger into the scooter, and then into the electrical outlet. When the batteries are fully charged remove the charger from the scooter. SUGGESTION – The lights on your charger indicate different charge statuses. The light indicators can be found on the charger itself, or the manual provided with the charger. In most cases your charger will show a red or orange light when charging, and a green light when fully charged. BATTERY BREAK-IN To ensure maximum use from your new batteries fully charge the scooter prior to initial use for 8 to 12 hours. Operate your scooter until the battery gauge shows half capacity, and then give your scooter another full charge for 8 to 12 hours. BATTERY MAINTENANCE & CHARGING HABITS To ensure maximum life from your batteries, and continued use of your scooter please follow these charging guidelines based on your usage: SUGGESTION – If you use your scooter on a daily basis, charge the batteries as soon as you are finished with the day’s activities, and leave it on the charge until you are ready to use the following day. SUGGESTION – If you use your scooter infrequently, charge the batteries once a week for 10 to 14 hours. Spitfire Scout Owner’s Manual www.drivemedical.com 26 REV3.9.29.14 X. BATTERIES & CHARGING BATTERY RANGE There are many factors that affect the range of your batteries, including the surfaces, inclines, curves, or wind you encounter when operating your scooter. If not ideal conditions, all of these factors will reduce the travel time or distance between charges. Follow these suggestions for maximum range: SUGGESTION – Fully charge the batteries prior to any trip, and plan your trip in advance to avoid inclines. SUGGESTION – Limit baggage and accessory weight to essential items, and maintain an even speed avoiding stop-and-go driving. PUBLIC TRANSPORTATION Sealed lead acid AGM or gel-cell batteries are designed for use in scooters. These batteries are Federal Aviation Administration (FAA) approved. Since there is no danger of spillage or leakage, this allows for safe transportation on aircraft, buses, and trains. SUGGESTION – When transporting your scooter on public transportation contact your carrier’s ticket counter in advance to determine their specific requirements. Spitfire Scout Owner’s Manual www.drivemedical.com 27 REV3.9.29.14 XI. INSPECTION & MAINTENANCE GENERAL GUIDELINES Your scooter is an advanced mobility device, and with the correct routine maintenance you can ensure years of maximum use. While some of the maintenance can be done by yourself, you may need assistance from an authorized Drive Medical provider. If you have any doubts, contact your authorized Drive Medical provider. Preventative maintenance is key to keeping your scooter in prime operating condition. Follow the Maintenance Schedule at the end of this section to periodically inspect your scooter for serviceable items. Avoid abuse to the throttle and control functions. Avoid prolonged exposure to extreme heat or cold. Keep the scooter clean and free from moisture. Never use a conditioner on the tread of the wheels. EXPOSURE TO MOISTURE Should your scooter come in contact with water or moisture, dry your scooter thoroughly with a towel. Allow your scooter to sit in a dry place for 8 to 12 hours to allow unseen moisture to evaporate. Check the throttle operation and brakes before using your scooter again. If any items require service please contact your authorized Drive Medical provider. OPERATING TEMPERATURES Your scooter is designed to operate ideally between 18°F and 122°F. In extremely cold conditions your batteries may freeze depending on the battery charge, usage, and composition of the batteries. In extremely hot conditions your scooter may operate at a lower speed. This is due to the safety mechanism built into the unit to prevent damage to the gearbox and other electronic functions when operating too hot. Spitfire Scout Owner’s Manual www.drivemedical.com 28 REV3.9.29.14 XI. INSPECTION & MAINTENANCE STORAGE If you need to store your scooter, be sure it is stored in a dry place free from extreme temperatures. Always fully charge, and then disconnect the batteries prior to storage. ATTENTION – Infrequently charged batteries, or batteries stored without a full charge are susceptible to permanent damage, causing unreliable performance from your scooter. If your scooter is stored for a prolonged period flat spots may develop in the wheels. This will cause an uneven sensation when driving, but should work itself out over time. If you still notice the flat spots after continued use, replace the wheels on your scooter immediately. SUGGESTION – You can place a sturdy platform under the frame of your scooter to bring the wheels off the ground, and weight off the wheels. This will prevent flat spots from developing while storing your scooter. WARNING – Improper storage of your scooter may result in permanent damage to the frame and electronics. CLEANING & DISINFECTION To clean your scooter use a damp cloth with a mild, non-abrasive cleaner on the plastic and metal parts. If necessary, clean your scooter with an approved disinfectant safe for use on your unit. WARNING – Never hose off your scooter or expose it to direct contact with water. WARNING – Never use any chemicals on the upholstery of your seat, this may cause the seat to dry out and crack. Spitfire Scout Owner’s Manual www.drivemedical.com 29 REV3.9.29.14 XI. INSPECTION & MAINTENANCE DISPOSAL OF YOUR SCOOTER & PARTS You must follow applicable local and national regulations when disposing of your scooter, or defective scooter parts. Contact your local waste agency, recycling center, or authorized Drive Medical provider for information on proper disposal. CONTACTING YOUR AUTHORIZED DRIVE MEDICAL PROVIDER The following conditions may indicate a serious problem with your scooter. Contact your authorized Drive Medical provider if one of the following conditions occurs: Motor or gearbox noise Frayed electrical harnesses Cracked or broken connections Uneven wear on the tires Veering to one side Bent or broken wheel assemblies Will not power on Loose seat or seat components SUGGESTION – Fill out your authorized Drive Medical provider’s information below, along with your scooter information for quick reference in the event you may need service. AUTHORIZED DRIVE MEDICAL PROVIDER: ADDRESS: PHONE NUMBER: DATE OF PURCHASE: MODEL: SERIAL NUMBER: Spitfire Scout Owner’s Manual www.drivemedical.com 30 REV3.9.29.14 XI. INSPECTION & MAINTENANCE MAINTENANCE SCHEDULE Inspect your scooter routinely for service issue or wearable items. INSPECTION DAILY WEEKLY MONTHLY Inspect the throttle is not bent when in neutral or rest position Inspect electrical harnesses are not frayed or have exposed wires Check for flat spots on tires Inspect seat, armrests, and front riggings for loose hardware or damage Inspect batteries are free from corrosion Inspect all harnesses to the controller are securely fastened Check the brakes for functionality at lowest speed setting Check the anti-tip wheels for wear, and contact with the ground while at rest Check for sufficient tread on the tires Check for proper tire inflation, if applicable to your scooter Check for proper front wheel alignment (4-wheel scooters only) Check the entire scooter for loose hardware or changes in performance Check the entire scooter and clean any mud, dirt, hair, food, drink, etc. on the unit SUGGESTION – Once a year take your scooter to an authorized Drive Medical provider for inspection and maintenance. Spitfire Scout Owner’s Manual www.drivemedical.com 31 REV3.9.29.14 XII. BASIC TROUBLESHOOTING The diagnostic flash codes for your scooter are designed to help you perform basic troubleshooting quickly and easily. A diagnostic flash code can be displayed in one of two ways: A light labeled “Diagnostic” on the control panel will flash OR The battery indicator light farthest to the left on the battery gauge (red light) will flash a 2 digit fault. Please refer to the diagram below for flash codes, description of problem, and recommended actions. Flash Code Description 1,1 1,2 1,3 1,4 2,3 3,2 3,4 4,5 Recommended Action Power off the scooter, let rest for 15 minutes, and Thermal Fault power on. Throttle Fault Check throttle connection, replace if necessary. Check speed pot connection, replace speed pot if Speed Pot Fault necessary. Low Voltage Charge the battery pack. Main Fault Contact your authorized Drive Medical provider. Brake Fault Engage the freewheel lever to “drive” mode. Make sure the throttle is in the rest or neutral Throttle Fault position when powering on. Check connections to the battery & charge the Battery Fault battery pack if necessary. Once the recommended action is taken, turn the scooter off and then back on again to clear the flash code. If the problem was not corrected, or another problem exists the controller may display another flash code. ATTENTION – Your scooter may have a diagnostic light on the tiller that will stay on constantly. The light will begin to flash when you have a serviceable item. A Spitfire Scout Owner’s Manual www.drivemedical.com 32 REV3.9.29.14 XIII. SPECIFICATIONS WEIGHT CAPACITY TOP SPEED* ESTIMATED RANGE* MAX. CLIMBING ANGLE TURNING RADIUS GROUND CLEARANCE LENGTH WIDTH HEIGHT WIDTH DEPTH BACK HEIGHT MOTOR CONTROLLER BATTERIES BATTERY CHARGER BRAKES FREEWHEEL MODE FRONT WHEELS REAR WHEELS ANTI-TIP WHEELS BASE WEIGHT BATTERY WEIGHT (PAIR) SEAT WEIGHT HEAVIEST PIECE WEIGHT TOTAL WEIGHT 300 lbs. 4.25 mph 9 miles (12AH), 15 miles (20AH) 6° 45.5” (3-Wheel), 53.75” (4-Wheel) 2.5” OVERALL DIMENSIONS 42.5” 21.25” 36” SEAT DIMENSIONS 16.5” 13.5” 14” POWER 270W x 4700RPM CTE 45A 12AH or 20AH 2A Electromagnetic YES 8” x 2” 8” x 2” 2” x ¾” WEIGHTS 49 lbs. (3-Wheel), 58 lbs. (4-Wheel) 20 lbs. (12AH), 28 lbs. (20AH) 16 lbs. Front Section: 29 lbs. (3-Wheel), 38 lbs. (4-Wheel) 85 lbs. (3-Wheel), 94 lbs. (4-Wheel) Country of Origin: Vietnam * Speed and range vary with user weight, type of terrain, battery charge and condition The information contained herein is correct at the time of publication; Drive Medical reserves the right to alter specifications without prior notice. Spitfire Scout Owner’s Manual www.drivemedical.com 33 REV3.9.29.14 XIV. LIMITED WARRANTY For the warranty periods listed below, beginning at the date of original purchase, Drive Medical will repair or replace, at its option to the original purchaser, free of charge, any of the following parts found upon examination by an authorized representative of Drive Medical to be defective in materials and/or workmanship. The warranties contained herein extend and apply only to the original purchaser. Limited Lifetime o Main Frame o Seat Post 14 Months o Electrical harness o Joystick o Controller o PC Board o Charger o Throttle o Platform o Frame Welds o Motor / o Brakes gearbox electromagnetic assembly function ONLY 6 Months o Batteries are covered by a separate 6 month warranty provided by the battery manufacturer The following items are warranted to be free of defects in workmanship and material at the time of delivery. If the following items are found to be defective or damaged immediately after the product is removed from the box, Drive Medical will repair or replace, at its option to the original purchaser, free of charge, the following items: o Plastic shrouds o Plastic footrests o Upholstery and Seating o Metal connection pins, hardware, nuts, bolts & star knobs o Tires o o Floor mats o o Armrest o pads o Bearings o and bushings Tubes Swing arm Fuses and Bulbs Front rigging mounting brackets o Anti-tip wheels o Motor brushes o Plastic connections o Plastic components, excluding body ADDITIONAL COMPONENTS Items not mentioned or listed are covered at the discretion of Drive Medical. Any accessories, standard or optional, supplied by Drive Medical, are covered for a period of one year from the date of purchase with the particular unit. Spitfire Scout Owner’s Manual www.drivemedical.com 34 REV3.9.29.14 XIV. LIMITED WARRANTY RECONDITIONED UNITS WARRANTY implied warranties are excluded. This is the exclusive remedy. Liabilities for incidental, punitive, special and consequential damages under any and all warranties are excluded. All reconditioned units are covered by a 90-day warranty from Drive Medical effective from the date of purchase. REPLACEMENT PARTS WARRANTY Some states do not allow limitations on how long an implied warranty lasts or do not allow the exclusion or limitation of incidental, punitive, special and consequential damages. The above limitation or exclusion may not apply to you. Parts that are supplied by Drive Medical as replacements to warranted parts will be warranted for a period of time equal to the remainder of the original part’s warranty period. SERVICE CHECKS AND WARRANTY SERVICE Warranty service must be performed by an authorized Drive Medical provider. Do not return faulty parts to Drive Medical without prior written authorization. All transportation costs and shipping damage incurred while submitting parts for repair or replacement are the responsibility of Drive Medical. This warranty gives you specific rights and you may also have other rights which vary from state to state. WARRANTY EXCLUSIONS o o o o o o o Plastic shrouds and footrests Upholstery and seating Tires and tubes Brake pads Fuses Motor brushes Circumstances beyond the control of Drive Medical o Labor, service calls, shipping and other charges incurred for repair of the product, unless specifically authorized by Drive Medical. o Repairs and/or modifications made to any part without specific consent from Drive Medical. Failure to follow the instructions, warnings and notes in the owner’s manual and those located on your Drive Medical product can result in personal injury or product damage and will void Drive Medical’s product warranty. There is no other express warranty. IMPLIED WARRANTIES Implied warranties, including those of merchantability and fitness for a particular purpose, are limited to one (1) year from the date of original purchase and to the extent permitted by law. Any and all other Spitfire Scout Owner’s Manual www.drivemedical.com 35 REV3.9.29.14 XV. ACCESSORIES Add functionality and convenience to your Drive scooter with these options and accessories. Contact your authorized Drive Medical provider or visit www.drivemedical.com for more information. Dust Cover Trailer Oxygen Tank Holder Crutch/Cane Holder Part#: AZ1000 Part#: AT1000 Part#: AH2000 Part#: AH1000 o Protect your scooter from dirt and the elements with a cover fitted to your product’s size o Provides convenient transportation for your large items o Removable cover protects your cargo o Durable soft-sides and tough aluminum frame allow for easy storage o For use with “D” size oxygen cylinders o Constructed of durable steel o Keeps tank secure with helpful hook-and-loop fasteners o Sturdy steel construction o Includes hook-and- loop-fasteners to keep your walking aid safely in place Drink Holder Rear Basket Armrest Bag Backpack Part#: AZ0060 Part#: AB2100 Part#: AB1010 Part#: AB1120 o Take your favorite hot or cold beverage with you anywhere o Easily attaches to your product’s armrest o Roomy rear basket for additional storage o Strong steel construction allows you to carry items too large or too heavy for your front basket o Includes four pockets and mesh drink holder o Top of the bag is padded so resting your arm on it is even more comfortable o Great seat-back storage for your items o Super-sized, expandable main compartment with hook and loop fasteners o 2 zippered compartments and 2 mesh side pockets Spitfire Scout Owner’s Manual www.drivemedical.com 36 REV3.9.29.14 Drive Medical Design & Manufacturing 99 Seaview Boulevard Port Washington, NY Tel: (516) 998-4600 Fax: (516) 566-2043 www.drivemedical.com Spitfire Scout Owner’s Manual www.drivemedical.com 37 REV3.9.29.14