1
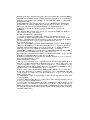
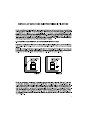
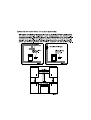
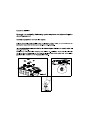
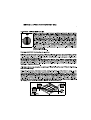
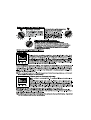
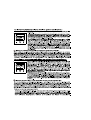
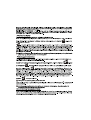
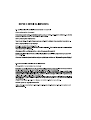
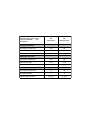
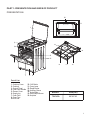
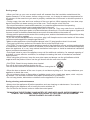
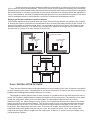
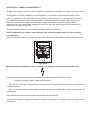
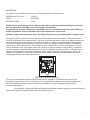
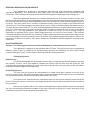
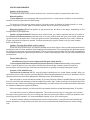
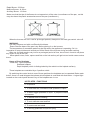
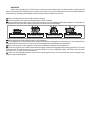
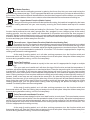
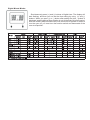
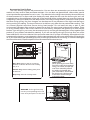
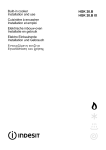
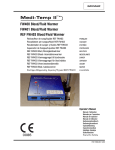
EG631M
UFG-60300
10
11
1
2
12
3
16
9
8
4
13
7
5
14
15
6
UFG-60300
60 * 60 * 85
2. ÐÑÏÅÉÄÏÐÏÉÇÓÅÉÓ ÁÓÖÁËÅÉÁÓ
ÄÉÁÂÁÓÔÅ ÁÕÔÏ ÔÏ ÅÃ×ÅÉÑÉÄÉÏ ÏÄÇÃÉÙÍ ÐÑÏÓÅÊÔÉÊÁ ÊÁÉ ÐËÇÑÙÓ ÐÑÉÍ
×ÑÇÓÉÌÏÐÏÉÇÓÅÔÅ ÔÇ ÓÕÓÊÅÕÇ ÓÁÓ ÊÁÉ ÖÕËÁÎÔÅ ÔÏ ÓÅ ÅÕÊÏËÁ
ÐÑÏÓÂÁÓÉÌÏ ÌÅÑÏÓ ÃÉÁ ÍÁ ÔÏ ÓÕÌÂÏÕËÅÕÅÓÔÅ ÏÔÁÍ ×ÑÅÉÁÆÅÔÁÉ.
ÔÏ ÐÁÑÏÍ ÅÃ×ÅÉÑÉÄÉÏ Å×ÅÉ ÓÕÍÔÁ×ÈÅÉ ÃÉÁ ÍÁ ×ÑÇÓÉÌÏÐÏÉÅÉÔÁÉ ÃÉÁ
ÐÅÑÉÓÓÏÔÅÑÁ ÁÐÏ ÅÍÁ ÌÏÍÔÅËÁ. Ç ÓÕÓÊÅÕÇ ÓÁÓ ÅÍÄÅ×ÅÔÁÉ ÍÁ ÌÇ
ÄÉÁÈÅÔÅÉ ÏÑÉÓÌÅÍÅÓ ÁÐÏ ÔÉÓ ÄÕÍÁÔÏÔÇÔÅÓ ÐÏÕ ÅÎÇÃÏÕÍÔÁÉ ÓÔÏ
ÐÁÑÏÍ ÅÃ×ÅÉÑÉÄÉÏ. ÐÑÏÓÅÎÔÅ ÔÉÓ ÅÊÖÑÁÓÅÉÓ ÐÏÕ Å×ÏÕÍ ÁÑÉÈÌÏÕÓ
ÅÍÙ ÄÉÁÂÁÆÅÔÅ ÔÏ ÐÁÑÏÍ ÅÃ×ÅÉÑÉÄÉÏ ÏÄÇÃÉÙÍ.
ÃåíéêÝò ðñïåéäïðïéÞóåéò áóöáëåßáò:
Ç óõóêåõÞ áõôÞ ìðïñåß íá ÷ñçóéìïðïéçèåß áðü ðáéäéÜ
áðü 8 åôþí êáé Üíù êáé áðü Üôïìá ìå ìåéùìÝíåò
óùìáôéêÝò, áéóèçôçñéáêÝò Þ ðíåõìáôéêÝò éêáíüôçôåò Þ
ìå Ýëëåéøç åìðåéñßáò êáé ãíþóçò, áí ôïõò Ý÷åé äïèåß
åðéôÞñçóç Þ åêðáßäåõóç ó÷åôéêÜ ìå ôç ÷ñÞóç ôçò
óõóêåõÞò ìå áóöáëÞ ôñüðï êáé êáôáíïïýí ôïõò
åíå÷üìåíïõò êéíäýíïõò. Ôá ðáéäéÜ äåí èá ðñÝðåé íá
ðáßæïõí ìå ôç óõóêåõÞ. Ï êáèáñéóìüò êáé ç
óõíôÞñçóç áðü ôï ÷ñÞóôç äåí èá ðñÝðåé íá ãßíåôáé
áðü ðáéäéÜ ÷ùñßò åðßâëåøç.
ÐÑÏÅÉÄÏÐÏÉÇÓÇ: Ç óõóêåõÞ êáé ôá ðñïóðåëÜóéìá
ìÝñç ôçò áðïêôïýí õøçëÞ èåñìïêñáóßá êáôÜ ôç
÷ñÞóç. Èá ðñÝðåé íá ðñïóÝ÷åôå éäéáßôåñá íá ìçí
áããßæåôå ôéò áíôéóôÜóåéò èÝñìáíóçò. ÐñÝðåé íá êñáôÜôå
ìáêñéÜ ôá ðáéäéÜ êÜôù ôùí 8 åôþí åêôüò áí âñßóêïíôáé
õðü óõíå÷Þ åðßâëåøç.
ÐÑÏÅÉÄÏÐÏÉÇÓÇ: Ç óõóêåõÞ êáé ôá ðñïóðåëÜóéìá
ìÝñç ôçò áðïêôïýí õøçëÞ èåñìïêñáóßá êáôÜ ôç
÷ñÞóç. Èá ðñÝðåé íá ðñïóÝ÷åôå éäéáßôåñá íá ìçí
áããßæåôå ôéò áíôéóôÜóåéò èÝñìáíóçò. ÐñÝðåé íá êñáôÜôå
ìáêñéÜ ôá ðáéäéÜ êÜôù ôùí 8 åôþí åêôüò áí âñßóêïíôáé
õðü óõíå÷Þ åðßâëåøç.
ÐÑÏÅÉÄÏÐÏÉÇÓÇ: Ôï ìáãåßñåìá ìå ëßðïò Þ ëÜäé óå
ðëÜêá åóôéþí ÷ùñßò åðéôÞñçóç ìðïñåß íá åßíáé
åðéêßíäõíï êáé íá áðïôåëÝóåé áéôßá ðõñêáãéÜò. ÐÏÔÅ
ìçí åðé÷åéñÞóåôå íá óâÞóåôå ìéá öùôéÜ ìå íåñü, áëëÜ
áðåíåñãïðïéÞóôå ôç óõóêåõÞ êáé êáôüðéí êáëýøôå ôç
öëüãá, ð.÷. ìå Ýíá êÜëõììá Þ ìå ðõñßìá÷ç êïõâÝñôá.
ÐÑÏÅÉÄÏÐÏÉÇÓÇ: Êßíäõíïò ðõñêáãéÜò: ìçí
áðïèçêåýåôå åßäç ðÜíù óôéò åðéöÜíåéåò ìáãåéñÝìáôïò.
ÐÑÏÅÉÄÏÐÏÉÇÓÇ: Áí åìöáíéóôåß ñùãìÞ óôçí
åðéöÜíåéá, áðåíåñãïðïéÞóôå ôç óõóêåõÞ ãéá íá
áðïöýãåôå ôï åíäå÷üìåíï ôçò çëåêôñïðëçîßáò.
Ãéá ðëÜêåò åóôéþí ðïõ ðåñéëáìâÜíïõí êÜëõììá,
ïðïéïäÞðïôå õëéêü ðïõ ÷ýíåôáé ðñÝðåé íá áöáéñåßôáé
áðü ôï êÜëõììá ðñéí ôï áíïßîåôå. Åðßóçò, ðñÝðåé íá
áöÞíåôå íá êñõþóåé ç åðéöÜíåéá ôçò ðëÜêáò åóôéþí
ðñéí êëåßóåôå ôï êÜëõììá.
Ç óõóêåõÞ äåí ðñïïñßæåôáé ãéá ÷åéñéóìü ìÝóù
åîùôåñéêïý ÷ñïíïäéáêüðôç Þ ÷ùñéóôïý óõóôÞìáôïò
ôçëå÷åéñéóìïý.
Ãéá íá áðïôñÝøåôå áíáôñïðÞ ôçò óõóêåõÞò, ðñÝðåé íá
åãêáôáóôáèïýí ôá óôçñßãìáôá óôáèåñïðïßçóçò.
Ç óõóêåõÞ èåñìáßíåôáé ðïëý êáôÜ ôç ÷ñÞóç ôçò. Èá
ðñÝðåé íá ðñïóÝ÷åôå éäéáßôåñá íá ìçí áããßæåôå ôéò
áíôéóôÜóåéò ìÝóá óôï öïýñíï.
ÊáôÜ ôç ÷ñÞóç, ïé ëáâÝò ðïõ ÷ñçóéìïðïéïýíôáé ãéá
óýíôïìï ÷ñüíï óôçí êáíïíéêÞ ÷ñÞóç ìðïñåß íá
áðïêôÞóïõí õøçëÞ èåñìïêñáóßá.
Ìç ÷ñçóéìïðïéåßôå óêëçñÜ êáèáñéóôéêÜ ðïõ ÷áñÜæïõí
Þ áé÷ìçñÝò ìåôáëëéêÝò îýóôñåò ãéá íá êáèáñßóåôå ôï
ôæÜìé ôçò ðüñôáò ôïõ öïýñíïõ êáé Üëëåò åðéöÜíåéåò,
ãéáôß ìðïñïýí íá ÷áñÜîïõí ôçí åðéöÜíåéá, ðñÜãìá
ðïõ ìðïñåß íá ðñïêáëÝóåé èñáýóç ôïõ ôæáìéïý Þ
æçìéÜ óôçí åðéöÜíåéá.
Ìç ÷ñçóéìïðïéåßôå áôìïêáèáñéóôÝò ãéá ôïí êáèáñéóìü
ôçò óõóêåõÞò.
ÐÑÏÅÉÄÏÐÏÉÇÓÇ: Âåâáéùèåßôå üôé ç óõóêåõÞ Ý÷åé
áðåíåñãïðïéçèåß ðñéí áíôéêáôáóôÞóåôå ôç ëÜìðá, ãéá
íá áðïöýãåôå ôçí ðéèáíüôçôá çëåêôñïðëçîßáò.
ÐÑÏÓÏ×Ç: ÏñéóìÝíá ðñïóðåëÜóéìá ôìÞìáôá ôçò
óõóêåõÞò ìðïñåß íá Ý÷ïõí õøçëÞ èåñìïêñáóßá êáôÜ
ôï ìáãåßñåìá Þ ôï øÞóéìï óôï ãêñéë. ÊñáôÜôå ìáêñéÜ
ôá ìéêñÜ ðáéäéÜ.
Ç óõóêåõÞ óáò Ý÷åé ðáñá÷èåß óå óõììüñöùóç ìå üëá ôá åöáñìüóéìá ôïðéêÜ êáé
äéåèíÞ ðñüôõðá êáé êáíïíéóìïýò.
Ïé åñãáóßåò óõíôÞñçóçò êáé åðéóêåõþí ðñÝðåé íá ãßíïíôáé ìüíï áðü
åîïõóéïäïôçìÝíïõò ôå÷íéêïýò óÝñâéò. Åñãáóßåò åãêáôÜóôáóçò êáé åðéóêåõþí ðïõ
åêôåëïýíôáé áðü ìç åîïõóéïäïôçìÝíïõò ôå÷íéêïýò ìðïñåß íá óáò åêèÝóïõí óå
êéíäýíïõò. Åßíáé åðéêßíäõíï íá áëëÜîåôå Þ íá ôñïðïðïéÞóåôå ôéò ðñïäéáãñáöÝò
ôçò óõóêåõÞò ìå ïðïéïäÞðïôå ôñüðï.
Ðñéí ôçí åãêáôÜóôáóç âåâáéùèåßôå üôé óõìöùíïýí ïé ôïðéêÝò óõíèÞêåò äéáíïìÞò
(öýóç ôïõ áåñßïõ êáé ðßåóç ôïõ áåñßïõ Þ ç ôÜóç êáé óõ÷íüôçôá ôçò ðáñï÷Þò
ñåýìáôïò) ìå ôéò ñõèìßóåéò ôçò óõóêåõÞò. Ïé óõíèÞêåò ñýèìéóçò ãéá ôç óõóêåõÞ
áõôÞ áíáöÝñïíôáé óôçí åôéêÝôá.
ÏÐÑÓÏ×Ç: Ç óõóêåõÞ áõôÞ Ý÷åé ó÷åäéáóôåß ìüíï ãéá ìáãåßñåìá öáãçôïý êáé
ðñïïñßæåôáé ãéá ïéêéáêÞ ÷ñÞóç óå åóùôåñéêü ÷þñï. Äåí èá ðñÝðåé íá
÷ñçóéìïðïéåßôáé ãéá ïðïéïíäÞðïôå Üëëï óêïðü Þ ïðïéáäÞðïôå Üëëç åöáñìïãÞ,
üðùò ãéá ìç ïéêéáêÞ ÷ñÞóç Þ óå åðáããåëìáôéêü ðåñéâÜëëïí Þ ãéá èÝñìáíóç
÷þñùí.
Ìçí åðé÷åéñÞóåôå íá áíõøþóåôå Þ íá ìåôáêéíÞóåôå ôçí óõóêåõÞ ôñáâþíôáò ôç
ëáâÞ ôçò ðüñôáò.
Ç óõóêåõÞ áõôÞ äåí åßíáé óõíäåäåìÝíç ìå äéÜôáîç áðïìÜêñõíóçò ôùí ðñïúüíôùí
êáýóçò. ÐñÝðåé íá åãêáôáóôáèåß êáé íá óõíäåèåß óýìöùíá ìå ôïõò éó÷ýïíôåò
êáíïíéóìïýò åãêáôáóôÜóåùí. Èá ðñÝðåé íá äïèåß éäéáßôåñç ðñïóï÷Þ óôéò ó÷åôéêÝò
áðáéôÞóåéò ðïõ áöïñïýí ôïí åîáåñéóìü. (ìüíï ãéá óõóêåõÝò áåñßïõ)
Áí ìåôÜ áðü 15 äåõôåñüëåðôá äåí Ý÷åé áíÜøåé ç åóôßá áåñßïõ, óôáìáôÞóôå ôç
÷ñÞóç ôç äéÜôáîçò êáé áíïßîôå ôçí ðüñôá ôïõ èáëÜìïõ êáé/Þ ðåñéìÝíåôå
ôïõëÜ÷éóôïí 1 ëåðôü ðñéí åðé÷åéñÞóåôå ðÜëé íá áíÜøåôå ôçí åóôßá áåñßïõ. (ìüíï
ãéá óõóêåõÝò áåñßïõ)
ÐñÝðåé íá ëáìâÜíïíôáé üëá ôá äõíáôÜ ìÝôñá ðñïóôáóßáò ãéá íá äéáóöáëßæåôáé ç
áóöÜëåéÜ óáò. ÅðåéäÞ ôï ãõáëß ìðïñåß íá óðÜóåé, èá ðñÝðåé íá ðñïóÝ÷åôå êáôÜ ôïí
êáèáñéóìü ôïõ, þóôå íá áðïöýãåôå íá ôï ÷áñÜîåôå. Áðïöýãåôå íá ÷ôõðÞóåôå ôï
ãõáëß ìå áîåóïõÜñ.
Âåâáéùèåßôå üôé ôï êáëþäéï ñåýìáôïò äåí èá óõìðéåóôåß êáôÜ ôçí åãêáôÜóôáóç
ôçò óõóêåõÞò. Áí Ý÷åé õðïóôåß æçìéÜ ôï êáëþäéï ñåýìáôïò, ãéá íá áðïöýãåôå
êéíäýíïõò, áõôü ðñÝðåé íá áíôéêáôáóôáèåß áðü ôïí êáôáóêåõáóôÞ, ôïí
áíôéðñüóùðü ôïõ ãéá ôå÷íéêÞ åîõðçñÝôçóç Þ Üëëá Üôïìá ìå ðáñüìïéá
åîåéäßêåõóç.
¼ôáí åßíáé áíïéêôÞ ç ðüñôá ôïõ öïýñíïõ, ìçí áöÞíåôå ôá ðáéäéÜ íá áíåâáßíïõí
óôçí ðüñôá Þ íá êÜèïíôáé ó' áõôÞ.
ÐñïåéäïðïéÞóåéò ãéá ôçí åãêáôÜóôáóç:
Ìç ÷ñçóéìïðïéÞóåôå ôç óõóêåõÞ ðñéí ïëïêëçñùèåß ç åãêáôÜóôáóÞ ôçò.
Ç óõóêåõÞ ðñÝðåé íá åãêáôáóôáèåß êáé íá ôåèåß óå ÷ñÞóç áðü åîïõóéïäïôçìÝíï
ôå÷íéêü. Ï êáôáóêåõáóôÞò äåí åßíáé õðåýèõíïò ãéá ïðïéáäÞðïôå æçìéÜ ìðïñåß íá
ðñïêëçèåß áðü ëáíèáóìÝíç ôïðïèÝôçóç êáé åãêáôÜóôáóç áðü ìç
åîïõóéïäïôçìÝíá Üôïìá.
¼ôáí áðïóõóêåõÜæåôå ôç óõóêåõÞ, âåâáéùèåßôå üôé äåí Ý÷åé õðïóôåß æçìéÜ êáôÜ ôç
ìåôáöïñÜ. Óå ðåñßðôùóç ïðïéïõóäÞðïôå åëáôôþìáôïò, ìç ÷ñçóéìïðïéÞóåôå ôç
óõóêåõÞ, áëëÜ áðåõèõíèåßôå áìÝóùò óôï åîïõóéïäïôçìÝíï ÓÝñâéò. ÅðåéäÞ ôá
õëéêÜ ðïõ ÷ñçóéìïðïéïýíôáé ãéá ôç óõóêåõáóßá (íÜéëïí, óõíäåôÞñåò
óõññáðôéêþí, öåëéæüë êëð.) ìðïñåß íá Ý÷ïõí åðéâëáâåßò åðéðôþóåéò óôá ðáéäéÜ,
èá ðñÝðåé íá ôá óõëëÝãåôå êáé íá ôá áðïìáêñýíåôå Üìåóá.
ÐñïóôáôÝøôå ôç óõóêåõÞ óáò áðü ôéò áôìïóöáéñéêÝò åðéäñÜóåéò. Ìçí ôçí áöÞíåôå
åêôåèåéìÝíç óôéò åðéäñÜóåéò üðùò Þëéï, âñï÷Þ, ÷éüíé êëð.
Ôá õëéêÜ ðïõ ðåñéâÜëëïõí ôç óõóêåõÞ (íôïõëÜðé) ðñÝðåé íá ìðïñïýí íá áíôÝ÷ïõí
èåñìïêñáóßåò ôïõëÜ÷éóôïí 100°C.
ÊáôÜ ôç äéÜñêåéá ôçò ÷ñÞóçò:
¼ôáí ÷ñçóéìïðïéÞóåôå ôï öïýñíï óáò ãéá ðñþôç öïñÜ, èá ðñïêýøåé êÜðïéá ïóìÞ
áðü ôá ìïíùôéêÜ õëéêÜ êáé ôéò áíôéóôÜóåéò èÝñìáíóçò. Ãéá ôï ëüãï áõôü, ðñéí
÷ñçóéìïðïéÞóåôå ôï öïýñíï óáò, ÷ñçóéìïðïéÞóôå ôïí ÷ùñßò ðåñéå÷üìåíá óôç
ìÝãéóôç èåñìïêñáóßá ãéá 45 ëåðôÜ. Óõã÷ñüíùò ÷ñåéÜæåôáé íá áåñßæåôå óùóôÜ ôï
ðåñéâÜëëïí óôï ïðïßï åßíáé åãêáôåóôçìÝíïò ï öïýñíïò.
ÊáôÜ ôç ÷ñÞóç, ïé åîùôåñéêÝò êáé åóùôåñéêÝò åðéöÜíåéåò ôïõ öïýñíïõ áðïêôïýí
õøçëÞ èåñìïêñáóßá. Åíþ áíïßãåôå ôçí ðüñôá ôïõ öïýñíïõ, óôáèåßôå ëßãï ðßóù ãéá
íá áðïöýãåôå ôïí êáõôü áôìü ðïõ åîÝñ÷åôáé áðü ôï öïýñíï. ºóùò õðÜñîåé
êßíäõíïò åãêáõìÜôùí.
Ìç äéáôçñåßôå åýöëåêôá Þ êáýóéìá åßäç, ìÝóá Þ êïíôÜ óôç óõóêåõÞ üôáí áõôÞ
÷ñçóéìïðïéåßôáé.
×ñçóéìïðïéåßôå ðÜíôá ãÜíôéá öïýñíïõ ãéá íá áðïìáêñýíåôå óêåýç öáãçôïý áðü ôï
öïýñíï Þ íá ôá ôïðïèåôåßôå óå áõôüí.
Ìçí áöÞíåôå ôç óõóêåõÞ ìáãåéñÝìáôïò üôáí ìáãåéñåýåôå ìå ëßðïò Þ ëÜäé. Ìðïñåß
íá áíáöëåãïýí óå ðåñßðôùóç õðåñèÝñìáíóçò. ÐïôÝ ìçí ðñïóðáèÞóåôå íá
êáôáðïëåìÞóåôå ìå íåñü ôéò öëüãåò áðü ëÜäé ðïõ êáßãåôáé. Êáëýøôå ôçí êáôóáñüëá
Þ ôï ôçãÜíé ìå ôï êáðÜêé ôïõ ãéá íá êáôáðíßîåôå ôç öëüãá êáé áðåíåñãïðïéÞóôå ôç
óõóêåõÞ ìáãåéñÝìáôïò.
100
100
ÓùëÞíáò
áåñßïõ
ÓùëÞíáò
áåñßïõ
ÓùëÞíáò
áåñßïõ
ÓùëÞíáò
áåñßïõ
Óôåãáíïðïßçóç
Óôåãáíïðïßçóç
ÅîÜñôçìá
óýíäåóçò
åýêáìðôïõ
óùëÞíá
Åýêáìðôïò
óùëÞíáò
áåñßïõ ìå
êïëÜñï
ÐñïóáñìïãÝáò
Ìç÷áíéêüò
åýêáìðôïò
óùëÞíáò
áåñßïõ
Óôåãáíïðïßçóç
Ìç÷áíéêüò
åýêáìðôïò
óùëÞíáò
áåñßïõ
Ìç÷áíéêüò
åýêáìðôïò
óùëÞíáò
áåñßïõ
Το μοντέλο 865 ALG είναι εξοπλισμένο με δίσκο (ταψί) βάθους 80 mm. Για αποδοτική
χρήση τοποθετείτε το δίσκο στην 3η θέση. Ο δίσκος 80 mm δεν θα πρέπει να
χρησιμοποιείται στην 1η (τη χαμηλότερη) θέση.
Δεν συνιστάται μαγείρεμα με δύο δίσκους των 80 mm ταυτόχρονα.
90
80
10
70
20
60
30
50
40
-
+
2
1-2
3
1-4
1-4
2
1-2
1-2
1-2-3
1-2
1-2
1-2-3
1-2-3
1-2-3
1-2
1-2-3
4
3-4
4
G30 28-30mbar 5.8 kW 418 g/h
Κατηγορία: II2H3B/P
GR
Κατηγορίας 1
NG
G20 20 mbar
LPG
G30 28-30 mbar
Εγχυτήρας (1/100 mm)
115
85
Ονομαστική (KW)
2,75
3
261,9 l/h
218,1 g/h
97
65
1,75
1,75
166,7 l/h
127,2 g/h
Εγχυτήρας (1/100 mm)
72
50
Ονομαστική (KW)
1
1
95,2 l/h
72,7 g/h
ΤΑΧΕΙΑ ΚΑΥΣΤΗΡΑ
ΚΑΤΑΝΑΛΩΣΗ ΣΤΗΝ 1h
MEDIUM ΚΑΥΣΤΗΡΑ
Εγχυτήρας (1/100 mm)
Ονομαστική (KW)
ΚΑΤΑΝΑΛΩΣΗ ΣΤΗΝ 1h
Εφεδρικό καυστήρα
ΚΑΤΑΝΑΛΩΣΗ ΣΤΗΝ 1h
UFG-60300
OPERATING AND INSTALLATION
INSTRUCTIONS OF DUAL FUEL
FREESTANDING OVEN
EG631M
Dear Customer,
Our goal is to offer you products with high quality that exceed your expectations. Your
appliance is produced in modern facilities carefully and particularly tested for quality.
This manual is prepared in order to help you use your appliance that is manufactured
by the most recent technology, with confidence and maximum effciency.
Before using your appliance, carefully read this guide that includes the basic
information for right and safe installation, maintenance and use please contact to
the nearest Authorized Service for the installation of your product.
CE Declaration of conformity
This cooking hob has been designed to be used only for cooking. Any other
use (such as heating a room) is improper and dangerous.
This cooking hob has been designed, constructed, and marketed incompliance
with:
- Safety requirements of the "Gas" Directive 2009/142/EC;
- Safety requirements of the "Low voltage" Directive 2006/95/EC;
- Safety requirements of the “EMC” Directive 2004/108/EC;
- Requirements of the Directive 93/68/EC.
CONTENTS:
1.PRESENTATION SIZES OF PRODUCT
2. WARNINGS
3. INSTALLATION AND PREPARATIONS FOR USE
4. INSTALLATION OF OVEN
5. CLEANING AND MAINTENANCE
6. SERVICE AND TRANSPORT
PART 1: PRESENTATION AND SIZES OF PRODUCT
PRESENTATION :
10
11
1
2
12
3
16
9
8
4
13
7
5
14
15
6
Part of List:
1- Cooktop Cover
2- Cooktop
3- Control Panel
4- Oven Door Handle
5- Drawer Cover
6- Supply leg
7- Oven Door
8- Oven Tray
9-Wire Grid
10- Grill Broiler
11- Oven Lamp
12- Rapid Burner
13- Auxillary Burner
14- Hobe Grids
15- Semi-Rapid Burner
16- Hotplate
MODEL
SIZE(cm)
UFG-60300
EG631M
60*60*85
1
PART 2 SAFETY WARNINGS
READ THESE INSTRUCTIONS CAREFULLY AND COMPLETELY BEFORE USING YOUR
APPLIANCE, AND KEEP IT IN A CONVENIENT PLACE FOR REFERENCE WHEN NECESSARY.
THIS MANUAL IS PREPARED FOR MORE THAN ONE MODEL IN COMMON. YOUR APPLIANCE
MAY NOT HAVE SOME OF THE FEATURES THAT ARE EXPLAINED IN THIS MANUAL. PAY
ATTENTION TO THE EXPRESSIONS THAT HAVE FIGURES, WHILE YOU ARE READING THE
OPERATING MANUAL.
General Safety Warnings
- This appliance can be used by children aged
from 8 years and above and persons with
reduced physical, sensory or mental capabilities
or lack of experience and knowledge if they
have been given supervision or instruction
concerning use of the appliance in a safe way
and understand the hazards involved. Children
shall not play with the appliance. Cleaning and
user maintenance shall not be made by children
without supervision.
- WARNING: The appliance and its accessible
parts become hot during use. Care should be
taken to avoid touching heating elements.
Children less than 8 years of age shall be kept
away unless continuously supervised.
- WARNING: Unattended cooking on a hob with
fat or oil can be dangerous and may result in
fire. NEVER try to extinguish a fire with water,
but switch off the appliance and then cover
flame e.g. with a lid or a fire blanket.
- WARNING: Danger of fire: do not store items
on the cooking surfaces.
- WARNING: If the surface is cracked, switch off
the appliance to avoid the possibility of electric
shock.
- For hobs incorporating a lid, any spillage
should be removed from the lid before opening.
And also the hob surface should be allowed to
cool before closing the lid.
- The appliance is not intended to be operated
by means of an external timer or separate
remote-control system.
- WARNING: In order to prevent tipping of the
appliance, the stabilizing brackets must be
installed. (For detail information please read the
anti-tilting kit set guide.)
- During use, the appliance becomes hot. Care
should be taken to avoid touching heating
elements inside the oven.
- During use, handles held for short periods in
normal use can get hot.
- Do not use harsh abrasive cleaners or sharp
metal scrapers to clean the oven door glass and
other surface since they can scratch the surface,
which may result in shattering of the glass or
damage to the surface.
- Do not use steam cleaners for cleaning the
appliance.
5
- WARNING: Ensure that the appliance is
switched off before replacing the lamp to avoid
the possibility of electric shock.
- CAUTION: Accessible parts may be hot when
the cooking or grilling is in use. Young children
should be kept away.
• Your appliance is produced in accordance with all applicable local and international standards and
regulations.
• Maintenance and repair work must be made only by authorized service technicians. Installation and
repair work that is carried out by unauthorized technicians may endanger you. It is dangerous to alter
or modify the specifications of the appliance in any way.
• Prior to installation, ensure that the local distribution conditions (nature of the gas and gas pressure
or electricity voltage and frequency) and the requirements of the appliance are compatible. The
requirements for this appliance are stated on the label.
• CAUTION: This appliance is designed only for cooking food and is intended for indoor domestic
household use only and should not be used for any other purpose or in any other application, such
as for non-domestic use or in a commercial environment or room heating.
• Do not try to lift or move the appliance by pulling the door handle.
• This appliance is not connected to a combustion products evacuation device. It shall be installed
and connected in accordance with current installation regulations. Particular attention shall be given
to the relevant requirements regarding ventilation.
• If after 15 s the burner has not lit, stop operating the device and open the compartment door and/or
wait at least 1 min before attempting a further ignition of the burner.
• These instructions are only valid if the country symbol appears on the appliance. If the symbol does
not appear on the appliance, it is necessary to refer to the technical instructions which will provide
the necessary instructions concerning modification of the appliance to the conditions of use of the
country.
• All possible security measures have been taken to ensure your safety. Since the glass may break,
you should be careful while cleaning to avoid scratching. Avoid hitting or knocking on the glass with
accessories.
• Ensure that the supply cord is not wedged during the installation. If the supply cord is damaged, it
must be replaced by the manufacturer, its service agent or similarly qualified persons in order to
prevent a hazard.
• While the oven door is open, do not let children climb on the door or sit on it.
Installation Warnings
• Do not operate the appliance before it is fully installed.
• The appliance must be installed by an authorized technician and put into use. The producer is
notresponsible for any damage that might be caused by defective placement and installation by
unauthorized people.
• When you unpack the appliance, make sure that it is not damaged during transportation. In case of
any defect; do not use the appliance and contact a qualified service agent immediately. As the
materials used for packaging (nylon, staplers, styrofoam...etc) may cause harmful effects to children,
they should be collected and removed immediately.
• Protect your appliance against atmospheric effects. Do not expose it to effects such as sun, rain, snow
etc.
• The surrounding materials of the appliance (cabinet) must be able to withstand a temperature of min
100°C.
During usage
• When you first run your oven a certain smell will emanate from the insulation materials and the
heater elements. For this reason, before using your oven, run it empty at maximum temperature for
45 minutes. At the same time you need to properly ventilate the environment in which the product is
installed.
• During usage, the outer and inner surfaces of the oven get hot. While opening the oven door, step
back to avoid the hot steam coming out of the oven. There may be a risk of burns.
• Do not put flammable or combustible materials, in or near the appliance when it is operating.
• Always use oven gloves to remove and replace food in the oven.
• Do not leave the cooker while cooking with solid or liquid oils. They may catch fire on condition of
extreme heating. Never pour water on to flames that are caused by oil. Cover the saucepan or frypan with
its cover in order to choke the flame that has occured in this case and turn the cooker off.
• Always position pans over the centre of the cooking zone, and turn the handles to a safe position so they
cannot be knocked or grabbed.
• If you will not use the appliance for a long time, plug it off. Keep the main control switch off. Also when
you do not use the appliance, keep the gas valve off.
• Make sure the appliance control knobs are always in the "0" (stop) position when it is not used.
• The trays incline when pulled out. Be careful not to let hot liquid spill over.
• CAUTION: The use of a gas cooking appliance results in the production of heat, moisture and products
of combustion in the room in which it is installed. Ensure that the kitchen is well ventilated especially
when the appliance is in use, keep natural ventilation holes open or install a mechanical ventilation
device (mechanical extractor hood).
• Prolonged intensive use of the appliance may call for additional ventilation, for example opening of
a window, or more effective ventilation, for example increasing the level of mechanical ventilation
where present.
• While using the grill burner, keep the oven door open and always use the grill deflector shield
supplied with the product. Never use the grill burner with the oven door closed.
• CAUTION: Glass lids may shatter when heated.
Turn off all the burners before shutting the lid.
The hob surface should be allowed to cool before closing the lid.
• When the door or drawer of the oven is open, do not leave anything on it. You may unbalance your
appliance or break the cover.
• Do not put heavy things or flammable or ignitable goods (nylon, plastic bag, paper, cloth...etc) into
the drawer. This includes cookware with plastic accessories (e.g. handles).
• Do not hang towels, dishcloths or clothes from the appliance or its handles.
During cleaning and maintenance
• Always turn the appliance off before operations such as cleaning or maintenance. You can do it
after plugging the appliance off or turning the main switches off.
• Do not remove the control knobs to clean the control panel.
TO MAINTAIN THE EFFICIENCY AND SAFETY OF YOUR APPLIANCE, WE RECOMMEND YOU
ALWAYS USE ORIGINAL SPARE PARTS AND TO CALL ONLY OUR AUTHORIZED
SERVICE AGENTS IN CASE OF NEED.
Part 3: INSTALLATION AND PREPARATION FOR USE
This modern, functional and practical oven, that was manufactured with the parts and materials
of highest quality, will meet your cooking needs in every aspect. You must surely read this manual so that
you don't have any problem in future and to be able to have satisfactory results. The following information
are the required rules for right installation and service processes. It must be read especially by the
technician who will install the appliance.
Contact To Authorized Service For Mounting Of Your Oven.
ENVIRONMENT WHERE YOUR APPLIANCE WILL BE INSTALLED
Your oven must be set up and used in a place where it will always have ventilation. While operating, this
appliance needs 2m3 /h air per kw input. There must be a natural ventilation enough to provide the gas to be
used in the environment. The average air flow must directly come in through the air holes that will be
opened on the walls that are opened towards outside.
Air inlet section
min. 100cm2
Figure 1
Air inlet section
min. 100cm2
Figure 2
3
These air holes must have at least the effective cross section of 100cm3 for fresh air circulation
(One or more air holes can be opened.). This hole (or holes) must be opened so that they are not blocked.
Preferably they must be placed close to the bottom and at opposite side of the smokes of the burned gases
that were emptied. If it seems not possible to open these ventilations in the place where the appliance is
set up, the needed air can also be obtained through the next room, provided that this place is not a bed
room or a dangerous place. In this case this “next room” must also be ventilated as required.
Emptying of the Burned Gases from Environment
The cooking appliances that operate with gas, throw the burned gas wastes out directly to the outside
or through the cooker hoods that are connected to the a chimney that opens directly to the outisde. If it
seems not possible to install a cooker hood, it is required to set an electric fan on the window or wall
that has access to fresh air. This electric fan must have the capacity to change the air of the kitchen
environment 4-5 times of its own volume of air per hour
Cooker hood flue
Electrical ventilator
Air inlet section
min. 100cm2
Air inlet section
min. 100cm2
Figure 4
Figure 3
Min. 60 cm.
COOKER HOOD
Figure 5
Part 4 : INSTALLATION OF OVEN
There are some factors that must be paid attention to while installing your oven. Surely be very careful
to while installing your oven. Pay attention to our below instructions in order to be able to prevent any
problems and/or dangerous situations that may occur later.
The appliance can be placed close to other furniture on condition that in the area where the oven is
set up, the furniture's height does not exceed the height of the cooker panel. Pay attention not to place
it near the refrigerator, there must be no flammable or inflammable materials such as curtain,
waterproof cloth, etc. that will begin to burn quickly. It is required that there must be least a 2cm blank
space around the oven for air circulation. The furniture close to oven must be manufactured resistant
to temperatures up to 100C. If the kitchen furniture are higher than the hob plate of the oven, it must
be at least 10cm away from the oven's side. The minimum heights from the oven's pan and wall
cupboards and cooker hoods with fan over the oven, are shown as above. Thus, the cooker hood
must be at minimum 650mm height from the cooker pan. If there is no cooker hood, this height must
not be less than 700mm.
4
ADJUSTMENT OF FEET
Your oven stands on 4 adjustable feet. When the oven is placed where it will be used, check if the
oven is balanced. If it is not balanced, you can make the adjustment by turning the feet clockwise if required.
It is possible to raise the appliance maximum 5mm by the feet. If the feet are adjusted appropriately, it is
required not to move the appliance by dragging, it should be moved by lifting it up.
GAS CONNECTION
The connection of the appliance should be performed in accordance with local and international
standards and regulations applicable. You can find the information related to appropriate gas types and
appropriate gas injectors on technical data table. If the pressure of used gas is different than these values
stated of the or not stable in your area, it is required to affix an available pressure regulator on the gas inlet.
It is certainly required to contact to the authorized service to make these adjusments.
If the gas connection is made by a flexible hose that is fixed on the gas inlet of appliance, it must
be fixed by a pipe collar as well. Connect your appliance with a short and durable hose that is as close as
possible to the gas source. The hose's permitted maximum lenght is 1.5m. The hose that brings gas to the
appliance must be changed once a year for your security.
The points that must be checked during flexible hose assembly
The hose must be kept clear from areas that may heat up to temperatures in excess of 90C. The
hose must not be ruptured, bent or folded. The hose must be kept clear of sharp corners, moving things,
and should not be defective. Before assembly, it must be checked whether there is any production defect.
As gas is turned on, all connection parts and hose must be checked with bubbly water or leakage fluids. Do
not use naked flame to check gas leakage. All metal components used during gas connection must be clear
of rust. Also check the expiry dates of components used.
The points that must be checked during Fixed gas connection assembly
To assemble a fixed gas connection (gas connection made by threads, e.g. a nut), there are
different methods used in different areas. The most common parts are already supplied with your
appliance. Any other part can be supplied as spare part.
During connections always keep the nut on the gas manifold fixed, while rotating the counterpart. Use spanners of appropriate size for safe connection. For all surfaces between different components,
always use the seals provided in the spare set. The seals used during connection should also be approved
to be used in gas connections. Do not use plumbing seals for gas connections.
Remember that this appliance is prepeared to be connected to gas supply in the country for
which it has been produced. The main country of destination is marked on the rear cover of the appliance. If
you need to use it in another country, any of the connections in the figure below can be required. In such a
case, contact local authorities to learn the correct gas connection.
Gas Pipe
Seal
Gas Pipe
Gas Pipe
Gas Pipe
Seal
Hose
Fitting
Adapter
Gas Hose
with Collar
Mechanical
Gas Hose
Seal
Mechanical
Gas Hose
Mechanical
Gas Hose
It is required to call the authorized service to be able to make the gas connections appropriately and in
compliance with safety standards.
ATTENTION Surely do not use any match and lighter for control of gas leakage.
5
ELECTRICAL CONNECTION AND SAFETY
All types free standing ovens in which termýnals for permanent connectýon by means of terminal block.
This appliance must be installed by a qualified person in accordance with the latest edition of the
national regulations in the destination country and in compliance with the manufacturer instructions
The appliance does not incorporate any means for disconnection from power supply. Means for
disconnection from the supply mains having a contact separation in all poles that provide full
disconnection under overvoltage category III conditions must be incorporated in the fixed wiring in
accordance with the wiring rules.
The disconnection means must be easily reachable after the installation
60x60 combined oven (electric oven with gas hob and one hotplate) does not have a supply
cord with plug.
N
YELLOW+GREEN
L
BLUE
BROWN
Near terminal block there is an electric scheme that You have to use when connecting the power cord
220- 240 V ~
Warning: Before obtaining access to terminals, all supply circuits must be disconnected
Use only ordinary polyvinyl chloride sheathed cord (code designation 60227 IEC 53)
Connect the supply cable of appropriate section :
Do not leave anything on it when the door or drawer of oven is open. You may unbalance your appliance
or break the cover.
Do not put heavy things or flammable, burnable goods(nylon, plastic bag, paper, cloth etc.)into the
lower drawer.
Plug it off when you do not use the appliance and keep the gas valve off.
Product your appliance against atmospheric effects. Do not leave it to effects such as un,rain, snow,
powder etc.
6
IMPORTANT:
The wires in mains lead are coloured in accordance with the following code:
GREEN and YELLOW …………. EARTH
BLUE ……………………………..NEUTRAL
BROWN or RED………………….LIVE
50x60 full gas oven with gas hob, with gas hob and one hotplate and 60x60 electric oven with
gas hob types free standing ovens with supply cord and plug
This appliance must be installed by a qualified person in accordance with the latest edition of
theIEE regulations and in compliance with the manufacturer instructions
H05VV-F power cable should be used. The cable dimension must be appropriate to above table.
N
YELLOW+GREEN
L
BLUE
BROWN
During the electric connection, follow the instructions stated in the user manual. The earthing cable
must be connected to the earth terminal. You have to ensure the power cord with suitable insulation to
be connected to the power source during the connection . If there is no appropriate earthed electric
outlet in accordance with regulations in the place where the appliance will be installed, immediately
contact to our authorized service. The earthed electric outlet must be close to the appliance. Do not
use an extension cord. The power cord must not touch to the hot surface of the product. In case the
cord is damaged, contact Authorized Service to have it changed. Any wrong electric connection may
damage your appliance, as well as endangering your safety, rendering your guarantee invalid. The
appliance is adjusted for 230V 50Hz electricity. If the network electricity is different than this value,
immediately contact your authorized service.
Electrical Connection Diagram
The supply cord should be kept away from hot parts of appliance. Otherwise the cord may be
damaged, causing short circuit. The producer firm declares that it has no responsibility against any
kind of damages and losses that are caused by improper connections that are performed by
unauthorized people.
For protection, you should install an all pole disconnector inside the supply circuit with a contact
opening of at least 3.0 mm rated 32 A and delay functioning type.
7
GENERAL WARNINGS AND MEASURES
Your appliance is produced in accordance with the local and international standards and
regulations applicable. The maintenance and repair works must be made only by authorized service
technicians. The installation and repair works without following proper knowledge may endanger you.
While your appliance operates, its outside surfaces heat up. The interior surfaces of oven, and
the flue outlets are quite hot. Even if the appliance is turned off, these parts keep its heat for a specific time.
Do not touch onto hot surfaces, and keep children away. Do not leave the cooker while cooking with solid or
liquid oils. They may catch fire on condition of extreme heating. Never pour water to the flames that are
caused by oil. Cover the saucepan or frypan with its cover in order to choke the flame that has occured in
this case and turn the cooker off. The oven and heat adjustment switches must be adjusted for cooking in
your oven. Otherwise the oven does not operate. When the door or drawer of oven is open do not leave
anything on it . You may unbalance your appliance or break the cover. Do not put heavy things or
flammable or ignitable goods (nylon, plastic bag,paper,cloth...etc) into the lover drawer. This includes
cookware with plastic accessories (e.g. handles). Plug the appliance off the electrical network when you do
not use the appliance and keep the gas valve off. Protect your appliance against atmospheric effects. Do
not leave it to effects such as sun, rain, snow, powder etc. Remember that this appliance is designed for
indoor use.
GAS CONVERSIONS
Caution : The following procedures must be undertaken by authorized service personnel.
Your appliance is adjusted to be operated with LPG gas. The gas burners can be adapted to
different types of gas, by replacing the corresponding injectors and adjusting minimum flame length
suitable to the gas in use. For this purpose, following steps should be performed:
Changing Injectors:
Hob Burners:
Cut off the feeding gas flow and electric current. Remove the hob cap and the adapter. Unscrew
the injectors. For this, use a 7mm spanner. Replace the injector with the ones from the spare set, with
corresponding diameters suitable to the type of gas that is going to be used, according to the information
chart (which is also supplied in the spare set).
Oven/Grill Injectors:
The oven and grill injectors are assembled by a single screw that is placed on the tip of the
burner. For grill burners, this screw is already visible. Remove the screw, pull the grill burner to yourself and
you will see the injector revealed on the rear surface of the oven cavity.
For oven burners, open the drawer compartment and you will see the assembly screw below the
burner. Remove the screw, move the burner diagonally and the injector will be revealed on the rear side of
the burner box.
Remove the injectors with a 7mm spanner and replace the injector with the ones from the spare
set, with corresponding diameters suitable to the type of gas that is going to be used, according to the
information chart (which is also supplied in the spare set).
8
Figure 6
Figure 8
Figure 7
Figure 9
Adjusting The Reduced Flame Position :
The flame length in the minimum position is adjusted with a flat screw located on the valve. For
valves with FFD, the screw is located on the side of the valve spindle. For valves without FFD, the
screw is located inside the valve spindle. For easier reduced flame adjustment, we advise to remove
the control panel (and microswitch, if present) during adjustment.The position the by pass screw must
be loosened in transformation from LPG to NG. In transformation from NG to LPG, the same screw
must be fastened. Make sure that the appliance is unpluged from the electric current and the gas feed
is open. To determine the min. position, ignite the burners and leave them on in minimum position.
Remove the knobs because the screws are accesible only when the knobs are removed. With the help
of a small screwdriver fasten or loosen the by pass screw around 90 degrees. When the flame has a
length of at least 4mm, the gas is well distributed. Make sure that the flame does not die out when
passing from the maximum position to the minimum position. Create an artificial wind with your hand
toward the flame to see if the flames are stable. For oven burner, operate the oven burner at min.
position for 5 minutes, then open and close the oven door for 2-3 times to check the flame stability of
the burner.
Changing the Gas Inlet
For some countries, the gas inlet type can be different for NG/LPG gases. In such a case, remove the
current connection components and nuts (if any) and connect the new gas supply accordingly. In all
conditions, all components used in gas connections should be approved by local and/or international
authorities. In all gas connections, refer to the “ASSEMBLY OF GAS SUPPLY AND LEAKAGE CHECK”
clause explained before.
9
USE OF GAS BURNERS
Ignition of the burners:
To determine which knob controls which burner, check the position symbol above the knob.:
Manual Ignition:
If your appliance is not equipped with any ignition aid or in case there is a failure in the electricity
network, follow the procedures listed below:
To ignite one of the burner, press and turn its knob counter-clockwise so that the knob is in max.
position, approach a match, taper or another manual aid to its upper circumference.
Electrical Ignition:Electrical ignition of gas burners can be done in two ways; depending on the
configuration of your appliance.
Ignition by Spark Button:Press the valve of the burner you want to operate and turn the valve in
the counter-clockwise direction so that the knob is in max. position and with your other hand, press the
ignition button at the same time. Press the ignition button immediately, because if you wait, a build up
of gas may cause the flame to spread. Continue pressing the ignition button until you see a stable
flame on the burner.
Ignition Through Hob Valve (micro switch)
Press the valve of the burner you want to operate and turn the valve in the counterclockwise direction
so that the knob is in max. position, while keeping the knob pressed. The spark plugs will generate sparks
as long as you keep the control knob pressed. The micro switch placed under the knob will automatically
create sparks through the spark plug of the burner. Continue pressing the knob until you see a stable flame
on the burner.
Flame Safety Device:
Hob Burners (If your hob is equipped with gas safety device )
Hobs equipped with flame failure device provide security in case of accidentally extinguished
flame. If such a case occurs, the device will block the burners gas channels and will avoid any
accumulation of unburned gas. Wait 90 seconds before re-igniting an extinguished gas burner.
Control of the Hob Burners
The knob has 3 positions: Off (0), max (big flame symbol) and min (small flame symbol). After you
ignite the burner in max. position; you can adjust the flame length between max. and min. positions. Do not
operate the burners when the knob position is between max. and off positions.
After the ignition, check the flames visually. If you see yellow tip, lifted or unstable flames; turn the gas
flow off, and check the assembly of burner caps and crowns. Also, make sure that no liquid has flown into
the burner cups. If the burner flames go out accidentally, turn the burners off, ventilate the kitchen with fresh
air, and do not attempt re-ignition for 90 sec.
When turning the hob off, turn the knob in the clockwise direction so that the knob shows “0” position.
Your hob has burners of different diameters. The most economic way of using gas is too choose
the correct size gas burners for your cooking pan size and to bring the flame to minimum position once
the boiling point is reached. It is recommended to always cover your cooking pan.
In order to obtain maximum performance from the main burners, use pots with the following flat
bottom diameters. Using smaller pots than the minimum dimensions stated below will cause energy
loss.
10
Rapid Burner: 22-26cm
Medium Burner: 14-22cm
Auxiliary Burner: 12-18cm
Make sure that the tips of the flames do not spread out of the outer circumference of the pan, as this
may also harm the plastic accessories around the pan (handles etc.)
When the burners are not in use for prolonged periods, always turn the main gas control valve off.
WARNING:
Use only flat pans and with a sufficiently thick base.
Ensure that the base of the pan is dry before placing it on the burners.
The temperature of accessible parts may be high when the appliance is operating. So it is
imperative to keep children and animals out of the reach of the burners during and after cooking.
After use, the hob remains very hot for a prolonged period of time, do not touch it and do not place
any object on top of the hob.
Never place knives, forks, spoons and lids on the hob as they will get hot and could cause serious
burns.
Usage of Your Hotplates
There are 2 Types hotplates
Standard hotplate
Rapid hotplate (which is distinguished by the red dot on the hotplate surface)
These hotplates are controlled by a 6 position switch.
By switching the control knob to one of these positions the hotplates can be operated. Below each
button, there is a small diagram that shows which hotplate is controlled with that button. A signal light
located on the control panel shows if any of the hotplates are in use.
HOTPLATES - FUNCTIONS
0 off position
1 To melt bitter etc. And warm smal quantiles of liquid
2 To warm bigger quantites of liquid. To prepare creams
and sauces
3 To defrost food for cooking
4 To cook delicate meat and fish
5 To roast meat and steak
6 To boil big quantites of liquid for frying
11
WARNING
When the operating for the first time or whenever the hotplate has not been used for prolonged of
time it is necessary to eliminate any humidity which may have accumulated around the electrical elements
of the plate by operating the hotplate on its lowest setting for about 20 minutes.
Use only flat pans and with a sufficiently thick base.
Never use pans with a smaller diameter than of the hotplate.
Ensure that the base of the pan is dry before placing it on the hotplate. While the hotplate is in operation it
is important to ensure that the pan is centered correctly above the hotplate.
CORRECT
WRONG
pot bottom is round
WRONG
pot buttom is small
WRONG
pot buttom does not sit well
Never operate the hob without pans on the hotplates.
The temperature of accessible parts maybe high when the appliance is operating. So it is imperative to
keep children and animals out of the reach of the hotplate during and after the operation.
If you note a crack on the hotplate it must be immediately switched off and replaced.
To ensure long life, the hotplate must be thoroughly cleaned with appropriate cleaning products. To avoid
rustiness and to keep them new it is recommended to rub the hotplates lightly with tissue with a small
amount of oil. Do not use a steam cleaner.
After use, the hotplates remain very hot for a prolonged of time, do not touch them and to not place any
object on top of the hotplate.
12
USE OF OVEN PART
Oven Function Selector Switch:
Enables you to select the function of the oven. Each position of the selector knob activates the function
that is shown on the symbol of that position. The explanation of each symbol is given in the table below.
For functions other than oven light and defrost, the function you have selected will not be activated unless
you adjust the temperature with thermostat knob, to a position other than “0”.
Oven Thermostat:
Enables you to adjust the the oven temperature. The thermostat operates with on-off cycles,
maintaining the temperature that you adjusted inside the oven cavity. During the off-cycle, the heaters
inside the oven are turned off. You can check if the thermostat is in the on or off cycle by the thermostat
lamp, the lamp is on when the heaters inside the oven are on.
WARNING: During cooking process, hot steam will accumulate inside the oven, and this steam is
invisible when the oven is hot and oven door is closed. When you need to open the oven door in such a
case, hold the oven door handle keeping your face and arms away from the oven, so that the vapor that
will escape from theopened oven door will not harm you or other people around the oven.
13
Oven Functions:
Oven functions, which can be selected by the oven function switch, are summarized in the following
table:
Your oven's lamp starts to operating.
Your oven's lamp, red warning lamp and fan start to operating.
It performs the function of defrosting your frozen food.
Your oven's thermostat and warning lamps and lower and upper heaters start operating.
Your oven's thermostat and warning lamps and turbo heater, fan are put into use.
Your oven's thermostat and warning lamps and fan, upper and lower
heaters start operating.
Your oven's thermostat and warning lamps and grill heater and chicken turning function
start operating.
Your oven's thermostat and warning lamps and upper heater, grill heater and chicken turning
functions start operating.
Your oven's thermostat and warning lamps and upper heater, grill heater and chicken turning
and fan functions start operating.
Your oven's thermostat and lamps, lower heater operate
Your oven's thermostat and warning lamps, turbo heater, lower heater and fan start operating.
Your oven'sthermostat and warning lamps,lower heater and start operating.
14
Ice Metter Function:
You can start the defrosting process by placing the frozen food into your oven and turning the
switch onto the determined sign. This is a program that does not cook the food, just helps to defrost them in
a short time. Place the food that will be defrosted on the third shelf support from the bottom, on a wire grid.
Place a tray into the bottom of the oven in order to collect the water that occurs because of melting ice.
Lower - Upper Heater Functio n(Static Cooker)
This type of cooking, also defined as the traditional cooking, the heat that is supplied by the lower
and upper heating elements into your oven equally, ensuring the food's bottom and top to be cooked
equally.
It is recommended to make pre heating for 10 minutes. The Lower-Upper Heater location is the
function that is preferred to cook cake, sponge cake, flan, spaghetti in oven, lasagna, pizza. At the end of
cooking process, turn the oven's switch and thermostat to off position and cancel the time program if
adjusted. Take the cooked food from the oven, put onto a safe place and open and keep the oven door open
to ensure that the oven is cooled down completely. As the oven will be hot during this time, stay away from
the oven and keep your children away from the oven.
Fan and Lower - Upper Heater Function (Static Cooker Heating Fan)
During this function, the heated air generated by top and bottom heating elements is circulated
by the fan behind the rear wall of main oven. Turn your main oven's switch as it will show the sign of this
function and set the temperature. If available, adjust the digital programmer or mechanical timer. Place the
tray on the grid. It is recommended to preheat for 10 minutes. This function is appropriate for single tray
cooking and it is best for cooking pastries.
At the end of cooking period, as in all other cooking processes; turn the function switch and
thermostat switch off. Take the cooking tray out and put it onto a safe place. Keep the children away from
hot oven during and after cooking, until it is cool completely.
Turbo Fan Function:
This function spreads heated air equally in the oven and it is appropriate for single or multiple
trays cooking.
Turn your main oven's switch as it will show the sign of this function and set the temperature. If
available, adjust the digital programmer or mechanical timer. Place the tray on the grid. It is recommended
to preheat for 10 minutes. If you have two trays of food that you will cook in your oven; you must use that
heat for your oven, heat of which of the heats that is appropriate for your food while adjusting the cooking
heat. Cooking two trays of food requires additional cooking period according to the single tray cooking. In
general, foods in two trays are not cooked at the same time. So, take the tray that you observed that is
cooked, from the oven, go on cooking for the other tray of food. As there will be heat transfer between two
trays during the cooking of two trays of food, the cooking quality will be lower than the single tray. While
cooking double trays, you can get a better cooking result by changing the places and ways of trays if
needed. For details, please see the cooking table.
At the end of cooking period, as in all other cooking processes; turn the function switch and
thermostat switch off. Take the cooking tray out and put it onto a safe place. Keep the children away from
hot oven during and after cooking, until it is cool completely.
Turbo Fan and Lower Heater Function:
Turbo fan and lower heater function is an ideal function to cook pizza. The lower heater ensures
the pizza paste to be cooked while Turbo fan spreads the heat of oven equally. Adjust the heat adjustment
switch of your oven to the wished temperature, also turn the function switch as it will show this function's
sign and adjust the oven's time to the offered time for cooking and pre heat the oven for 10 minutes. This
function is appropriate for cooking one tray.
At the end of cooking period, as in all other cooking processes; turn the function switch and
thermostat switch off. Take the cooking tray out and put it onto a safe place. Keep the children away from
hot oven during and after cooking, until it is cool completely.
15
Grill + Rotisserie Function:
This function is used for grilling. In order to grill, please use the grill pan supplied with your
product. Turn your top oven's switch as it will show the sign of this function. For details, please refer to the
cooking table.
At the end of grilling, as in all other cooking processes; turn the function switch off. Take the grill
pan out by using the special handle and put the pan onto a safe place. Keep the children away from hot
oven during and after grilling, until it is cool completely.
WARNING: Max. Thermostat setting for this function: 1900C.
The rotisserie function is used to roast meat, especially whole chicken on a skewer. To use this
function, place the skewer through the meat, by thrusting the skewer inside the meat. Fix the meat tightly in
its place by using the two forks placed on the skewer. Place a tray on the 3rd shelf. Place the skewer
housing on the tray as appropriate, and place the skewer on the housing, while the tip of the skewer is
inserted into the rotor hole.
When this function is selected, the skewer rotor always operates. But you can use this function
for conventional grilling without skewer as well.
Double Grill + Rotisserie Function:
This function is used to grill rapidly and to roast chicken, or cook food on a skewer. This function
has a wider grilling area compared to conventional grilling. To make roasting, use the "roasting skewer". To
grill, place the food onto the grill, also the grill onto the shelf at top level. You can start to grill after placing
the oven tray onto the 3rd Shelf. The tray that is placed onto the 3rd Shelf will ensure collection of oils that
drop from food. Turn your oven's heat set up switch as it will show the sign of this function. Place your food
into the oven after pre heating of 5 minutes.
At the end of cooking period, as in all other cooking processes; turn the function switch and
thermostat switch off. Take the cooking tray out and put it onto a safe place. Keep the children away from
hot oven during and after cooking, until it is cool completely.
WARNING: Max. Thermostat setting for this function: 1900C.
Grill + Rotisserie + Fan Function:
In this function, grill and upper heater and the fan that ensures to roast perfectly. It is also used to
grill, to roast chicken and cooked food on a skewer. To make roasting; use the "roasting skewer". To grill,
place the food onto the grill, also the grill onto the shelf at the toppest level. You can start to grill after placing
the oven tray onto the 3rd Shelf. The tray that is placed onto the 3rd Shelf will ensure collection of oils that
drop from food. Turn your oven's heat set up switch as it will show the sign of this function. Place your food
into the oven after pre heating of 5 minutes.
At the end of cooking period, as in all other cooking processes; turn the function switch and
thermostat switch off. Take the cooking tray out and put it onto a safe place. Keep the children away from
hot oven during and after cooking, until it is cool completely.
WARNING: Max. Thermostat setting for this function: 1900C.
Lower Heating Function:
In this function, only the lower heating element is activated. Lower heating function is best
suitable for heating cold food instead of cooking.
Lower Heater + Fan Function:
In this function, the lower heating element is activated together with the fan. Lower heating
function is best suitable for heating cold food rapidly.
16
Energy Saving
-
During use of electrical cookers, it is required to use saucepans having flat bases.
Choose a cookware of proper size.
Using a cookware lid will reduce cooking times.
Minimize the amount of liquid or fat to reduce cooking times.
When liquid starts boiling, reduce the heat setting.
Oven door should not be opened often during cooking period.
Timer Operation
Mechanical Timer
Manual Operation: Rotate the timer knob in the counter-clockwise direction so that the knob
points “M”. In this position, the oven will continue to operate as long as function selector and thermostat
knobs are on.
Operation with Timer: Rotate the timer knob in the clockwise direction and adjust the time that
you need. As soon as you release the knob, the timer will start count-down from the adjusted time. When
the timer hits “0”, the oven will stop operating.
Manual Operation
Timer Operation
Mechanical Minute Minder
Rotate the timer knob in the clockwise direction and adjust the time that you need. As soon as you
release the knob, the timer will start count-down from the adjusted time. When the timer hits “0”, the timer
will make a ringing sound. However, this is just to remind you that the time you adjusted has finished: the
oven will continue to operate as long as function selector and thermostat knobs are on.
Minute Minder
17
Digital Timer
Time of Day Adjustment:
A
-
MODE
+
Figure 18
Before starting to use your oven, you need to adjust your timer. When the
electric power is connected to your oven, the symbol “A” and three “0” s will
begin to flash on the screen. In this state, your oven will not operate. Press
the Press the (+) and (-) keys simultaneously. The symbol symbol will
appear on the screen. Also, the dot in the middle of the screen will begin to
flash. Using the (+) and (-) keys, adjust the day's time while this dot is
flashing. After the adjustment, wait for a short time and the dot will be lit
continously. You need to repeat this procedure every time you plug your
appliance to the electric network or when the power is restored after a
blackout.
Press the MODE key in the middle. Thesymbol will flash on the screen.
Also, three "0" s will appear. Adjust the desired time period for the warning
by using (+) and (-) keys while the symbol is flashing. Some time after the
completion of the adjustment, the symbol will begin to light continuously.
When the symbol begins to light continuously, the audible warning time
adjustment is done.
The audible warning time can be set to a time between the time range of 0 and 23.59
?
When the time is up, the timer gives an audible warning and the symbol begins to flash on the screen.
Pressing any key will stop the audible warning and the symbol disappears on the screen.
Audible Warning Time Adjustment is for warning purposes only. The oven will still
continue to operate after the adjusted time is up.
Semi Automatic Programming According to Cooking Duration :
This function is used to cook in the desired time duration.
A
-
The foods to be cooked are put into the oven. The oven is adjusted to the
desired cooking function. The oven thermostat is adjusted to the desired
degree depending on the dish to be cooked.
du r
MODE
+
Figure 20
?
Keep pressing on the MODE button until you see "dur" (stands for
duration) on the timer screen. When you see "dur" on the timer screen, the
symbol (A) will begin to flash. Adjust the cooking duration for the food you
wish to cook, by using the (+) and (-) keys while the timer is in this position.
Some time after the adjustment operation is completed, the day's time will
appear on the screen and the symbols (A) and will begin to continuously
light on the screen. While doing this, the oven will also start to operate.
A cooking period between the time range of 0 and 10 hours can be set.
At the completion of the set duration, the timer will stop the oven and give an audible warning. Also,
the symbol (A) will begin to flash on the screen. After bringing the oven button and oven hermostat button
to 0 position, pressing any button of the timer will end the audible warning. Also, the timer will be brought to
manual use function.
18
Semi-Automatic Programming According to End Time :
This function is used to cook according to the desired end time of cooking.
The food to be cooked is put into the oven. The oven is adjusted to the
desired cooking function. The oven thermostat is adjusted to the desired
degree depending on the dish to be cooked. Keep pressing on the MODE
button until you see "end" on the timer screen. When you see "end" on the
timer screen, the symbol (A) and the day's time will begin to flash. Adjust the
finishing time for the food you wish to cook, by using the (+) and (-) keys
while the timer is in this position. Some time after the adjustment operation
is completed, the day's time will appear on the screen and the symbols (A)
and will begin to continuously light on the screen. While doing this, the oven
will also start to operate.
You can set a time which can be up to 10 hours after the current day's time.
At the completion of the set end time, the timer will stop the oven and give an audible warning.
Also, the symbol (A) will begin to flash on the screen. After bringing the oven button and oven thermostat
button to 0 position, pressing any button of the timer will end the audible warning. Also, the timer will return
to manual use function.
Full-Automatic Programming:
This function is used to cook after a certain timeof day, within a certain duration. The food to be
cooked is put into the oven. The oven is adjusted to the desired cooking function. The oven thermostat is
adjusted to the desired degree depending on the dish to be cooked.
First; keep pressing on the MODE button until you see "dur" on the timer screen. When you see "dur"
on the timer screen, the symbol (A) will begin to flash. Adjust the cooking period for the food you wish to
cook, by using the (+) and (-) keys while the timer is in this position. Some time after the adjustment
operation is completed, the day's time will appear on the screen and the symbols (A) and will begin to
continuously light on the screen.
A cooking period between the time range of 0 and 10 hours can be set.
Second; keep pressing on the MODE button until you see "end" on the timer screen. When you see
"end" on the timer screen, the symbol (A) and the day's time will begin to flash, with the addition of the set
cooking period. Adjust the finishing time for the food, by using the (+) and (-) keys while the timer is in this
position. Some time after the adjustment operation is completed, the day's time will appear on the screen
and the symbol (A) will begin to continuously light on the screen.
You can set a time which can be up 23.59 hours after the time obtained by adding the
cooking period to the current day's time.
The oven will start operating at the time calculated by deducting the cooking period from the set end time,
and will stop at the set end time. The timer will give an audible warning and the symbol (A) will begin to
flash. After bringing the oven button and oven thermostat button to 0 position, pressing any button of the
timer will end the audible warning. Also, the timer will be brought to manual use function.
19
Digital Minute Minder
Simultaneously press (+) and (-) buttons of digital timer. The display will
start flashing, and then you can set the time setting by using (+) and (-)
buttons. When you pres (+) or (-) button after setting the time, symbol is
displayed, and the desired time duration is set. At the end of this time period,
timer will make a beep sound but the oven continues to operate. In order to
turn the oven off, you must turn the function switch and thermostat of the
oven to off position.
min
min
min
min
1-2-3
1-2
1-2
1-2-3
1-2
1-2-3
1-2-3
1-2
1-2-3
2
2
2
1-2
1-2
4
3-4
4
1-4
1-4
20
Accessories Used in Oven
The oven already supplied with accessories. You can also use accessories you purchase from the
market, but they must be heat and flame resistant. You can also use glass dishes, cake molds, special
oven trays that are appropriate for use in oven. Pay attention to the using instructions by the manufacturer
of those acessories. In case small size dishes are used, place the dish onto the chrome grid, as it will
completely be on the middle part of the grid. If the food that will be cooked does not cover the oven tray
completely, if the food is taken from the deep freezer or the tray is being used for collection of food's juices
that flow during grilling, the form changes can be observed in tray because of the high heat that occur
during cooking or roasting. The tray will return to its old form only when the tray cooled after cooking. This
is a normal physical event that occurs during heat transfer. Do not leave this tray or dish in cold
environment right away after cooking in glasss tray or dish. Do not put onto cold and wet surfaces. Place
on a dry kitchen cloth or dish cross, ensure it to cools slowly. Otherwise the glass tray or dish may be
broken. If you will grill in your oven; we recommend you to use the grill that was given in tray together with
product (If your product includes this material). If you will use the big wire grill; put a tray onto one of the
lower shelves for oils to be collected. Also put some water into it for ease of cleaning. As explained in the
corresponding clauses, never attempt to use the gas operated grill grill burner without the grill protection
lid. If your oven has a gas operated grill burner, but the grill protection lid is missing, or if the lid is damaged
and cannot be used, request a spare lid from the nearest authorized service.
5. rack
4. rack
3. rack
2. rack
1. rack
Wire Grid: Used for grills or for placing
different containers other than the cooking
tray on it.
Shallow Tray: Used for baking pastry such
as flans etc.
Deep Tray: Used for cooking stews.
child lock
Child Lock
When opening the oven door;
first lift the child lock upwards
using your hand, and pull the
oven door towards yourself
by holding its handle with
your other hand, and release
the child lock. A slight push
to the door will be enough
to close the door.
WARNING- Fit the grid correctly
into any correspondingrack in the
oven cavity and push it to the end.
21
Part 5 : CLEANING AND MAINTENANCE OF YOUR OVEN
CLEANING
Be sure that all control switches are off and your appliance cooled before cleaning your oven. Plug
off the appliance. Check whether they are appropriate and recommended by the manufacturer before
using the cleaning materials on your oven. As they may damage the surfaces, do not use caustic
creams, abrasive cleaning powders, thick wire wool or hard tools. In case the liquids that overflow
around your oven burn, the enameled parts may be damaged. Immediately clean the overflown
liquids.
Cleaning of Inside of Your Oven
Surely plug off the oven before starting cleaning. The inside of enameled oven is cleaned in the
best way when the oven is warm. Wipe the oven with a soft cloth that had been soaked in soapy water
after each use. Later wipe it with a wet cloth once more and then dry it. It may be required to use a
liquid cleaning material from time to time and make a complete cleaning. Do not clean with dry/powder
cleaners or steam cleaners.
Cleaning of Your Oven Cover
In order to be able to clean the cover of your oven from inside and outside, use a glass cleaner. Then
rinse, dry it with a dry cloth.
Cleaning of Gas Cooker - Hob Part
Lift up the saucepan supports, caps and crowns of hob burners. Wipe and clean the back panel with a
soapy cloth. Wash the caps and crowns of hob burners and rinse them. Do not leave them wet,
immediately dry them with paper cloth. After cleaning, make sure that you re-assemble the parts correctly.
Do not clean any part of the hob with metal sponge. It causes the surface be scratched. The pan support
top surfaces may be scratched in time due to usage. These parts will not get rusted and it is not a
production fault. During cleaning of the hob plate, make sure that no water flows inside the burner cups, as
this may block the injectors.
Burner Caps:
Periodically, enameled pan support, enameled covers, burner heads must be washed with soapy
warm water rinsed and dried. After drying them thoroughly, replace them correctly.
Enamelled Parts:
In order to keep them a new, it is necessary to clean them frequently with mild warm soapy water and
then dry with cloth. Do not wash them while hot and never use abrasive powders or abrasive cleaning
materials. Do not leave vinegar, coffee, milk, salt, water, lemon, or tomato juice to remain in contact with
enameled parts for long periods of time.
Stainless Steel:
Stainless steel parts must be cleaned frequently with mildly warm soapy water and a soft sponge
and then dry with a soft cloth. Do not use abrasive powders or abrasive cleaning metarials. Do not
leave vinegar, coffee, milk, salt, water, lemon or tomato juice to remain in contact with stainless steel
parts long periods of time.
22
MAINTENANCE
Change of Oven Lamp
At first plug the oven off from electric supply and make sure that oven is cool. Remove the bulb
after removing the cover in front of lamp. Assemble the new bulb resistant to 300 C to the place of the
bulb that you removed (230 V, 25 Watt, Type E14). Place the lamp protective glass. Your oven will be
ready for use after this process.
Other Controls
Periodically check the gas connection pipe. Even if any simple abnormality is felt, inform the technical
service to have it changed. We recommend the gas connection parts to be changed once a year. If any
abnormality is felt while operating the control knobs of cooker and oven, contact to the authorized service.
BASIC TROUBLESHOOTING BEFORE CONTACTING SERVICE
If the oven does not operate
The oven may be plugged off, there has been a black out. On models fitted with a timer, time may not
be regulated.
If the oven does not heat ;
The heat may be not adjusted with oven's heater control switch.
If the interior lighting lamp does not light ;
The electricity must be controlled. It must be controlled whether the lamps are defective. If they
are defective, you can change them as following the guide.
Cooking (If lower-upper part does not cook equally) ;
Check the shelf locations, cooking period and heat values according to the manual.
Except these, if you still have any problem with your product, please call to the. Authorized Service
INFORMATION RELATED TO TRANSPORT
If you need any transport ; keep the original case of product and carry it with its original case when
needed to be carried. Follow the transport signs on case. Tape the cooker on upper parts, caps and
crowns and pan supports to the cooking panels. Place a paper between the upper cover and cooking
panel, cover the upper cover, then tape it to the side surfaces of oven. Tape cardboard or paper onto
the front cover on interior glass of oven as it will be suitable to the traysi, for the wire grill and trays in
your oven not to damage to the oven's cover during transport. Also tape the oven'scovers to the side
walls.
If it does not have the original case, prepeare a carriage box so that the appliance, especially
external surfaces (glass and painted surfaces) of oven is protected against external forces.
23
Part 6 : SERVICE AND TRANSPORT
Requirements Before Contacting to Service
If the oven does not operate;
The oven may be plugged off, there has been a blow-out. On models fitted with a
timer, time may not be regulated.
If the oven does not heat;
The heat may be not adjusted with oven's heater control switch.
If the interior lighting lamp does not light;
The electricity must be controlled.
It must be controlled whether the lamps are defective. If they are defective, you can change them as
following the guide.
Cooking ( if lower-upper part does not cook equally ) ;
Control the shelf locations, cooking period and heat values according to the manual.
Except these, if you still have any problem with your product, please call to the
"Authorized Service".
Information Related to Transport
If you need any transport;
Keep the original case of product and carry it with its original case when needed to be carried. Follow the
transport signs on case.
Tape the cooker on upper parts, hats and heads and saucepan carriers to the
cooking panels.
Place a paper between the upper cover and cooking panel, cover the upper cover, then tape it to the side
surfaces of oven.
Tape cardboard or paper onto the front cover on interior glass of oven as it will be suitable to the trays, for
the wire grill and trays in your oven not to damage to the oven's cover during transport.
Also tape the oven's covers to the side walls. If it does not have the original case;
Take measure for the external surfaces (glass and painted surfaces) of oven against possible blows.
24
Injector Table:
G30 28-30mbar 5.8 kW 418 g/h
II2H3B/P
GR
Class: 1
G20
20 mbar
G30
28-30 mbar
DIA. of INJECTOR (1/100mm)
115
85
NOMINAL RATING (KW)
2,75
3
261,9 l/h
218,1 g/h
97
65
1,75
1,75
166,7 l/h
127,2 g/h
DIA. of INJECTOR (1/100mm)
72
50
NOMINAL RATING (KW)
1
1
95,2 l/h
72,7 g/h
LARGE BURNER
CONSUMPTION
MEDIUM BURNER
DIA. of INJECTOR (1/100mm)
NOMINAL RATING (KW)
CONSUMPTION
SMALL BURNER
CONSUMPTION
25
52096847
5207768803/13
08/12