1
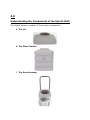
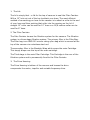
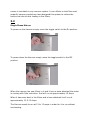
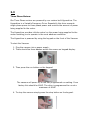
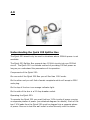
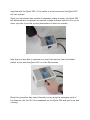
Hypervac Technologies Revolution Hybrid 220V user Manual Welcome to the Next Generation of Duct Cleaning The Revolution Hybrid This Manual is supplied to you for your protection and to provide you with many years of trouble free and safe operation of your Hypervac Technologies Product. This Manual will guide you through the safe operation and maintenance of your Revolution Hybrid 220 Volt. Important Notice 1.0 !DANGER Hazard of electrical shock! Wait three minutes after disconnecting power before servicing the drive components. !WARNING This unit contains a high speed impellor blade which could cause injury or even death. Do not operate unit without filter cartridge in place and latched down securely. Do not move unit until power is disconnected and blade has come to a full stop. Do not service unit until power is disconnected and blade has come to a full stop. !CAUTION Consult qualified personnel with questions. All electrical repairs must be performed by trained and qualified personnel only. Note: User assumes all responsibility on use of this machine. It is the responsibility of the user to check all inbound and outbound voltage and total amperage draw to verify these are not going to be overloaded. The user agrees to test the amperage draw of any machine or outlet they are going to use. Meters are cheap and mistakes are expensive. If you are not completely sure of how to use this machine or how to properly plug in this machine in a safe manner then consult a local qualified professional to aid in the safe use of this machine. User agrees to hold Hypervac Technologies or any of its employees or agents harmless in the event that this machine is not operated in a safe and proper manner. Remember just because a plug fits does not necessarily mean it is safe to use. Table of Contents 1.0 Important Notice 1.1 Resale of goods 2.0 Understanding the components of the Hybrid 220V 2.1 Understanding the 220 Volt System 2.2 Single Phase Motors 2.3 Three Phase Motors 3.0 Cleaning the Filtration System 4.0 Understanding the Quick 220 Splitter Box 4.1 Reasons for the Quick 220 not to operate 1.1 Resale of goods: In the event of the resale of any goods, in whatever form, Resellers/Buyers will include the following language in a conspicuous place and in a conspicuous manner in a written agreement covering such sale: The manufacturer makes no warranty or representation, express or implied, by operation of law or otherwise, as the merchantability or fitness for a particular purpose for the goods sold hereunder. Buyer acknowledges that it alone has determined that the goods hereunder will suitably meet the requirements of their intended use. In no event will the Manufacturer be liable for consequential, incidental or other damages. Even if the repair or replacement remedy shall be deemed to have failed of its essential purpose under section 2-719 of the Uniform Commercial Code, the manufacturer shall have no liability to Buyer for consequential damages. Resellers/Buyers agree to also include this entire document including the warnings and cautions above in a conspicuous place and in a conspicuous manner in writing to instruct users on the safe usage of the product. 2.0 Understanding the Components of the Hybrid 220V The Hybrid Vacuum consists of Three main components: 1. The Lid 2. The Filter Canister 3. The Drive Housing 1. The Lid: The lid is simply that – a lid for the top of vacuum to seal the Filter Canister. With a 10” hole cut out of the top to attach your hose. The most efficient method of connecting you hose to the vacuum is to attach a collar to the end of your hose and then pushing that collar into the opening on the lid. A straight 10” collar can be used for 10” hose or a 10/8 reducer collar can be used for 8” hose. 2. The Filter Canister: The filter Canister houses the filtration system for the vacuum. The filtration system is a three stage filtration system. The primary filter is the Filter Bag. The Filter bag is an NMO 100 micron rating nylon bag which is secured at the top of the vacuum via a stainless steel rod. The secondary filter is the Biostatic Wrap which wraps the main Cartridge. This simply drops over the top of the main cartridge. The Third stage is the main Filter Cartridge. This Cartridge is the core of the filtration system and is permanently fixed to the Filter Canister 3. The Drive Housing: The Drive Housing is bottom of the vacuum and houses the drive components the motor, impellor and variable frequency drive. 2.1 Understanding the 220 Volt Vacuum System This section covers both the Single Phase 220 Volt system and the Three Phase 220 Volt System. To determine whether your Vacuum is either a Single Phase unit or a Three Phase unit is easy. The Single Phase units have a simple On/Off Toggle switch on the front of the Vacuum to operate. The Three Phase units are equipped with a keypad on the front of the Vacuum to operate. In order to get the most out of your 220 Volt vacuum system it’s important to know the parameters in which the electrical system of the vacuum runs. The 220 Volt Vacuum is a very highly powered machine that will run for many years problem free providing you understand how the amperage draws of the vacuum work. The 220 Volt has been designed to compensate for filter loading. The reason for this is because we know throughout the life of the vacuum it will likely always have some dust loaded in the filter system. When vacuums become loaded with dust the torque of the impellor is greatly reduced once a small amount of dust has built up in the filter system. This of course is inevitable in any vacuum system. In our efforts to build the most powerful vacuum possible we have designed this system to reduce the suction lost due to dust loading in the filters. 2.2 Single Phase Motors: To power on the Vacuum simply move the toggle switch to the On position. To power down the Vacuum simply move the toggle switch to the Off position. When the vacuum has new filters in it and it has no hose attached the motor is running with little restriction. And will run at approximately 15 Amps. When it has some dust in the filters and a hose attached it will run at approximately 12.5-13 Amps. The Vacuum needs to run at 12 to 13 amps in order for it to run without overheating. Generally if the Vacuum is running off a dryer plug with hose attached to the Vacuum and the duct work you are cleaning, the amperage will be dropped enough you will never have a problem. It is only times when you may have the Vacuum hooked up to large ductwork, with brand new filters, and it has no real restriction against the impellor will it ever be a problem. If you are finding that the vacuum is overheating or you have blown a breaker it probably means you do not have enough restriction on the suction and the Vacuum is running over amperage. This normally happens if you are: 1. Running the Vacuum without a hose. If the Vacuum is run wide open without a hose attached the motor will overcompensate and cause the amperage to increase thus over heating the motor or cause the Vacuum to trip a breaker switch. 2. Have the vacuum attached to as large duct without the vents sealed off. 3. You are running in an old building with weak electrical supply. 4. You are running in a building with an inadequate electrical supply, such as an ATCO trailer. 5. The electrical circuit you are plugged into is currently loaded with another appliance or lighting that is pulling electricity away from the vacuum. 6. The filters are brand new. 7. Also note, restricting the airflow to zero will also cause the motor to overheat. 8. You are using an extension cord that is too light duty. Minimum requirements for extension cords are as follows: Up to 100ft - 12 Gauge 100 + ft 10 Gauge - When the Vacuum is running with brand new filters, it may require you to manually restrict the airflow until the filters get a bit of dust in them. If the motor overheats or uses too much amperage, due to having no restriction, there are a number of things you can do to create restriction: 1. You must run the vacuum with hose attached. You may actually have to run with a longer hose until the filters get some dust in them. 2. Using an 8” hose also works well to create restriction 3. Place a filter pad in the top of the vacuum to create restriction. 4. Seal off the vents of the ductwork you are cleaning to create restriction. The motor is equipped with a safety thermal overload. If the motor overheats the thermal overload will trip and shut the motor down. Once the motor cools down the thermal overload will most likely reset, if it does not reset itself this can manually be done by pressing down on the red button on the side of the motor. To do this first ensure power is disconnected to the vacuum and the impellor has come to a full stop. Then remove the switch plate on the front of the vacuum to access to motor. On the right hand side of the motor you will find the thermal overload switch. Simply press it down. The thermal overload will not reset until the motor has sufficiently cooled. You will feel a click. No click = no reset. Reassemble the vacuum and your back up and running. When using the vacuum after it has shut down it is important to determine the cause of and then correct the problem. Keep in mind once your vacuum gets used a bit, it will be natural for some of the dust to stay in your filter even after cleaning. This small amount of dust will normally reduce the amperage of the vacuum to optimal operating parameters. Using a Generator for power supply: Try not to run this unit from a generator. Although most generators will technically be able to run this vacuum according to the specs outlined in their user guide, many of them do not have enough amperage to get the vacuum through the start up surge that is required to get the vacuum running. The vacuum needs 60 amps for a split second to start the unit. If a generator has to be used, we have found the Baldor brand 6500Watt or larger seems to be the only unit that has worked well for this application. We have tested almost all other brands of similar sized generators and none of them can handle the start up surge. 2.3 Three Phase Motors: Our Three Phase motors are powered by our custom built Hyperdrive. The Hyperdrive is a Variable Frequency Drive. Essentially this drive converts single phase power to three phase power and controls the amount of power being supplied to the motor. The Hyperdrive provides infinite control on the power being supplied to the motor enabling you to operate in the most adverse conditions. The Hyperdrive is powered by using the keypad on the front of the Vacuum. To start the Vacuum: 1. Plug the vacuum into a power supply. 2. There should be three dashes across the screen on keypad display. 3. Then press the run button on the keypad. The vacuum will power up to the last programmed run setting. From factory this should be 60HZ. The drive is programmed to run at a maximum of 60HZ. 4. To stop the vacuum simply press the stop button on the keypad. The Hyperdrive is programmed to run the motor at a constant 12.5 amps. The Hyperdrive also enables the motor to begin operation with a soft start eliminating the initial power surge of a Single Phase motor. If there is a need to run the Vacuum at lower amps because of adverse power conditions simply press the down arrow on the keypad to reduce the amperage sent to the motor. When powering up the Vacuum it will automatically power up to the last speed setting used on the keypad. The Forward/Reverse button on the keypad is factory disabled. Never under any circumstance should the Vacuum be run in reverse direction. NOTE: Do not change any Parameters of the Hyperdrive. The Parameters of the Hyperdrive are preset for optimal operation of the Vacuum. Changing any of the Parameters of the Hyperdrive will cause the Vacuum to run ineffectively and/or not to operate at all. Changing the Parameters of the Hyperdrive should only be done by a trained and qualified technician. The Hyperdrive is factory programmed to run off 240 Volts. If the Vacuum shuts down and a PF Fault message is displayed on the Keypad this means that the wrong voltage is being supplied to the drive. This commonly means that the Vacuum is plugged into a lower power outlet – typically 208 Voltage. To rectify this simply dial down the operational hertz of the Vacuum by pressing the down arrow on the keypad to 55Hz. If you continue to have this problem please call our Technical Support for further instructions. Please call our Technical Support for help if needed. !WARNING The Hyperdrive retains electricity even after power is disconnected! Wait minimum 3 (Three) minutes before doing any servicing on the Vacuum. 3.0 Cleaning the Filtration System The Filter Bag: The Bag should be cleaned after every duct cleaning job. To clean the filter bag simply remove it from the vacuum, empty the large debris into a garbage bag or can then blow the bag out with your air pressure. The Filter Bag can also be washed with water or in a washing machine. Just don’t let your wife catch you! The Biostatic Wrap: The Wrap should be cleaned after every duct cleaning job To clean the Biostatic Wrap simply remove it from the vacuum and blow it out with your air pressure. The Biostatic Wrap can also be cleaned and washed. The Main Filter Cartridge: The Main Cartridge should be cleaned after every 2-3 duct cleaning jobs. Or at the end of each day to provide you with the best efficiency of the filter and to also prolong the life of the filter. To clean the Main Filter Cartridge, remove the filter canister from the Drive Housing. Turn the filter upside down (preferably on top of a garbage bag). Blow the filter out from the inside out with your air pressure. Turn the Filter Canister back to its upright position and give the inside of the canister a quick blow out to remove any remaining dust on the walls of the Canister. 4.0 Understanding the Quick 220 Splitter Box The Quick 220 should only be used in situations where 220Volt power is not available. The Quick 220 Splitter Box converts two 110Volt circuits into one 220Volt circuit. The Quick 220 is a failsafe method of providing 220Volt power as long as you understand the parameters of its operation. Components of the Quick 220: On one end of the Quick 220 Box you will find two 110V cords. On the other end you will find a female receptacle which will accept a 220V male plug. On the top of the box is an orange indicator light. On the side of the box is a 20 Amp breaker switch. Operating the Quick 220: To operate the Quick 220 you must find two 110V circuits of power running on separate phases of power (see attached diagram for details). Each of the two 110V leads from the Quick 220 must be plugged into a separate phase of power. Be sure to test the wall outlet is wired correctly with the tester supplied with the Quick 220. If the outlet is wired incorrectly the Quick 220 will not operate. Once you have found two outlets on separate phase of power the Quick 220 will automatically recognise this and the orange indicator light will turn on to show you that it has the correct parameters in which to operate. Now that you are able to operate you must then ensure that the breaker switch on the side the Quick 220 is in the ON position. Once this procedure has been followed you can plug the extension cord of the Vacuum into the 220 Volt receptacle on the Quick 220 and you’re up and running. 4.1 Reasons for the Quick 220 not to operate: 1. No 220 Volt power. Houses built before the 1930’s may only have one Phase of power. 2. Wall outlet is wired incorrectly. Use the circuit tester provided to test the wall outlet. 3. Extension cord is wired incorrectly. 4. The most common problem is GFI circuits. These are found mostly in bathrooms and kitchens. These circuits will often trip once you turn the Vacuum on. Also new homes built in the last 2-3 years now require bedroom wall plugs to be equipped with short circuit interrupters. These are also a common problem with the Quick 220. Try to avoid these outlets if possible. To run the Vacuum at peak operating power the Quick 220 will draw approximately 12.5 Amps from each leg of 110V power. Hallway, furnace room and living room plugs seem to work the best. Most times problems can be easily solved over the phone with a little education. Please don’t hesitate to call us with any questions. There isn’t a question you could ask us that we haven’t heard before and found a solution for. Like they say – There is no such thing a dumb question! Phone calls are cheap! Mistakes are expensive! We can be contacted by email at [email protected] or simply by calling us at: