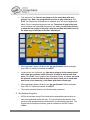
1
WU-Minn HCP Q3 Data Release: Reference Manual Appendix IV – HCP Protocol Standard Operating Procedures 23 September 2013 Q3 Reference Manual – Appendix IV | WU-Minn Consortium of the NIH Human Connectome Project Page 1 Table of Contents Session 1: 3T Structural Scanning Standard Operating Procedure ........................................ 4 I. Scope .............................................................................................................................. 4 II. Procedures and quality metrics: ..................................................................................... 4 III. Staff training and error prevention measures ................................................................14 IV. Internal HCP auditing ...................................................................................................15 V. Related SOPs: ..............................................................................................................15 VI. Document control .........................................................................................................15 Session 2: 3T R-fMRI and T-fMRI (first of two R-fMRI/T-fMRI sessions) Standard Operating Procedure .............................................................................................................................16 I. Scope .............................................................................................................................16 II. Procedures and quality metrics: ....................................................................................16 III. Staff training and error prevention measures ................................................................29 IV. Internal HCP auditing ...................................................................................................29 V. Related SOPs: ..............................................................................................................30 VI. Document control .........................................................................................................30 Session 3: 3T Diffusion Scanning Standard Operating Procedure .........................................31 I. Scope .............................................................................................................................31 II. Procedures and quality metrics: ....................................................................................31 III. Staff training and error prevention measures ................................................................42 IV. Internal HCP auditing ...................................................................................................42 V. Related SOPs: ..............................................................................................................42 VI. Document control .........................................................................................................42 Session 4: 3T R-fMRI and T-fMRI (second of two R-fMRI/T-fMRI sessions) Standard Operating Procedure .............................................................................................................43 I. Scope .............................................................................................................................43 II. Procedures and quality metrics: ....................................................................................43 III. Staff training and error prevention measures ................................................................56 IV. Internal HCP auditing ...................................................................................................56 V. Related SOPs: ..............................................................................................................57 Q3 Reference Manual – Appendix IV | WU-Minn Consortium of the NIH Human Connectome Project Page 2 VI. Document control .........................................................................................................57 Non-Toolbox Behavioral Testing Standard Operating Procedure ..........................................58 I. Scope .............................................................................................................................58 II. Procedures: ...................................................................................................................58 IV. Quality Metrics .............................................................................................................83 V. Related SOPs: ..............................................................................................................84 VI. Document control .........................................................................................................84 NIH-Toolbox Behavioral Testing Standard Operating Procedure...........................................85 I. Scope .............................................................................................................................85 II. Setup and Pre-Assessment Quality Metrics:..................................................................85 III. Administer Toolbox – Assessment Center ....................................................................88 III. Request and Download Data from Assessment Center ..............................................121 IV. Upload data to Connectome DB .................................................................................123 V. Staff training and error prevention measures ..............................................................124 VI. Internal HCP auditing .................................................................................................124 VII. Related SOPs: ..........................................................................................................125 VIII. Document control .....................................................................................................125 Mock Scanner Training Standard Operating Procedure ......................................................126 I. Scope ...........................................................................................................................126 II. Procedures and quality metrics: ..................................................................................126 III. Staff training and error prevention measures ..............................................................130 IV. Related SOPs: ...........................................................................................................131 VI. Document control .......................................................................................................131 Q3 Reference Manual – Appendix IV | WU-Minn Consortium of the NIH Human Connectome Project Page 3 Session 1: 3T Structural Scanning Standard Operating Procedure Version 3 Effective Dates: September 21, 2012 to [date of issuance of a revision] Author(s): Greg Burgess, Deanna Barch, Michael Harms, Dan Nolan, and OTHERS The procedures in this SOP should be followed exactly. If changes to the SOP are needed, please send suggested edits to G. Burgess, M. Harms, D. Barch and S. Curtiss I. Scope This standard operating procedure (SOP) begins with booting the scanner computer, logging in, preparing the scanner room for the participant, and positioning the participant in the scanner. The SOP then describes the procedures and quality control (QC) metrics that will be performed during the first scan session for each participant, which will be comprised of structural T1- and T2-weighted scans. Part or all of this SOP may also be used if a participant needs to be rescanned because of issues with scan quality. The output of this SOP will be scan data that will be uploaded to Connectome DB. Comments that are entered into the Session Checklist may also be entered into Connectome DB. II. Procedures and quality metrics: Session 1 Detailed Scanning SOP 1. Login to RIIS: 1.1. Get unique access code for participant ♦ To access the scanner, you will need an access code unique to each participant. ♦ Access codes can be reused for all sessions of the same participant. ♦ To generate access codes go to (http://radsci2.neuroimage.wustl.edu/cgibin/riiscgi/RIISconfirm.pl). ♦ You will need your NP number, Race, Gender, and Handedness of the participant. ♦ N.B., Date of Birth is not allowed by IRB protocol. Therefore, you will need to use the fictitious DOB of 01/01/01. ♦ To access RIIS (Research Imaging Information System), you will need a RIIS login name and password. To create a RIIS login name and password go to (http://www.nil.wustl.edu/csg/faqs/riislogin.html). 1.2. Login to “Use Skyra” with MR access code 2. Prepare scanner computer: Q3 Reference Manual – Appendix IV | WU-Minn Consortium of the NIH Human Connectome Project Page 4 2.1. Ensure that scanner computer has been booted up. ♦ When fully ready, console will say “Waiting for patient registration” in lower left-hand corner. ♦ It requires roughly 30 minutes to boot before the first scan begins. ♦ Do not begin subsequent procedures involving the scanner console until the computer is fully ready. (Can proceed to other non-scanner steps in the interest of time.) ♦ Ensure that pre-scan QC has been completed: See Skyra Maintenance and Performance Verification SOP, Step II.3. 2.2. Register new patient: ♦ In the top left click File > Register New Patient ♦ Fill in required fields (Card 1): • Last Name = HCP ID Designation (e.g., 123401) • Patient ID = HCP ID Designation with session identifier (e.g., 123401_strc) • Date of birth = 1 / 1 / 1980 (use participant’s year of birth, but not month or day) • Enter participant Gender, Height, and Weight • In Additional Info section, enter the Project name “Project:HCP_Phase2” • Patient position = Head first – Supine • Enter the initials of both operators in the operator section • Click Exam ♦ Fill in required fields (Card 2): • Body part examined = Brain • Select appropriate protocol: HCP > Phase2_User > HCP: Structurals 2.3. Load protocol: ♦ [IMPORTANT] Wait until anterior head coil is connected before loading protocol. Otherwise, you will need to manually enable HEA head coil in localizer scan. ♦ Load full protocol into exam card • Select full protocol (not individual scans), click left facing “<<” button to load scans into exam card. 2.4. Ensure correct MR sequences are loaded: ♦ Session 1 scans are: Localizer, AAHScout, Localizer_aligned, T1w_MPR1_PMC, T2w_SPC1_PMC, T1w_MPR2_PMC, T2w_SPC2_PMC, FieldMap, AFI, BIAS_32CH, BIAS_BC 3. Prepare scanner room equipment prior to arrival of participant 3.1. Subject display (LCD projector): Q3 Reference Manual – Appendix IV | WU-Minn Consortium of the NIH Human Connectome Project Page 5 ♦ Turn it on using remote control; close RF shielded box tightly ♦ Make sure Lucite screen is properly placed (align with line on floor) ♦ If bulb is burned out, call Fran Miezin (2-8875) 3.2. Physiological monitoring: ♦ Set up Pulseox sensor • Get Pulseox sensor from charging rack in control room • Ensure appropriate finger clip is installed for size of left-hand ring finger 4. Prepare control room equipment prior to arrival of participant 4.1. Head Tracker (MPT) system ♦ Ensure Head Tracker camera power supply is on / plugged in ♦ Turn on the Head Tracker computer • If not already on, press the circular power button on large silver computer on floor in middle of the desk. • Upon startup you should see four windows and no reported errors ♦ Verify bore marker is being received • Check Preview Window for large square with black-and-white checks • Check Secured core shell for continuous series of numeric values with no error messages ♦ On Siemens host computer, before each session (with patient table at home position), please run fixed target recalibration "XPaceRecal -m recal -n 1000" from the command line "run" window as part of motion camera QC 4.2. Display computer ♦ Ensure that Participant Display computer is booted; log into Toolbox Admin account ♦ Ensure that KVM switch is set to Display computer and HCP icon shows on lower LCD monitor 5. Prepare scanner room prior to arrival of participant 5.1. Collect or locate the following: ♦ Fresh linens (sheet, pillowcase and blanket) from cabinet in scanner room (second from right) or their previously-used linens from their “belongings” bag. ♦ Appropriate head cushion from drawer in scanner room (second from right). ♦ Appropriate foam head blocks from drawer in scanner room (furthest right). ♦ Disposable ear covers from drawer in scanner room (furthest right). ♦ The leg cushion wedge from counter in scanner room. (Extra support may still be needed, but may hit the bore when entering the scanner) ♦ A pair of noise reduction ear plugs (furthest right). ♦ Vitamin E capsule and cloth tape from drawer in scanner room (furthest right). ♦ The presentation mirror, attached to the plastic stilts, from counter in scanner room ♦ Moire pattern chip for the motion detection system from drawer in scanner room (furthest right) ♦ The 32-channel head coil from table Q3 Reference Manual – Appendix IV | WU-Minn Consortium of the NIH Human Connectome Project Page 6 5.2. Ensure that bore fan is on max ♦ Hit fan icon on side of scanner, and turn jog dial to increase speed to max. 5.3. Prepare scanner bed ♦ Ensure that scanner bed is fully extended and lowered (N.B. If table won’t move, check table lock buttons on both sides of bed are seated.) ♦ Put correct foam padding on scanner bed: We use the standard Siemens 3 piece foam pads. ♦ Place sheet over foam padding ♦ Cover foam padding as completely as possible tucking in the top and bottom edges. Avoid leaving the sheets along the rails, because they can catch as the participant is inserted into scanner bore. 5.4. Prepare cushions ♦ Wrap the pillowcase around head pillow: Fold leftover pillowcase under padding on scanner bed (not under participant’s head) ♦ Wrap the foam head blocks with headphone ear covers. ♦ Wrap the leg cushion in a pillow case if one is not already around it and place in the lower section of the scanner bed 5.5. Prepare earbuds and emergency bulb ♦ Put earplugs on earbuds: Be sure earplugs are put on earbuds before participant arrives at scanner (but don't connect earbud cables until participant is laying down). ♦ Ensure “Emergency bulb” is attached 5.6. Prepare the 32-channel head coil ♦ If a phantom is present in the head coil or on the scanner bed, return it carefully to the appropriate stand on the shelf ♦ If the bottom section of the head coil is present, confirm that plugs are firmly connected ♦ If the bottom section of the head coil is not attached, do the following: • Retrieve the 32-channel head coil. It will be on the shelf in a box labeled ‘FRAGILE.’ • Remove the bottom section from the box and place it at the top of the scanner bed, the bottom section connects on the participant’s right-hand side. ♦ Retrieve the top section of the head coil from the box and place it nearby for when participants are loaded. 6. Prepare participant for scan session 6.1. Review MR screening form 6.2. Politely request that participant try using restroom before scan session: ♦ “We’ll stop here now so you can try to use the restroom before the scan” ♦ “The scan may last over an hour. We get the best quality data if we don’t need to stop in the middle of the scan. So, it would help if you tried to use the restroom.” 6.3. Ask participant to store locker key and belonging bag in control room 6.4. Ask participant which video they would like to watch during scan Q3 Reference Manual – Appendix IV | WU-Minn Consortium of the NIH Human Connectome Project Page 7 6.5. At entrance to scanner room, do head-to-toe verbal sweep for metal: ♦ Metal in clothing: Look for substantial metal embedded in clothing, or metal in contact with skin. Ask as specifically and clinically as possible whether participant is wearing underwire bra. Antimicrobial clothing with invisible silver microfiber? If needed, allow the participant to change into scrubs located in intake room ♦ Hair: Do you have anything in your hair? Hairclips, bobby pins? ♦ Piercings: Piercings in your ears or tongue? Any other piercings, necklaces, or jewelry? ♦ Stored items: Anything at all in your front pockets, back pockets, socks or shoes? Carrying credit cards or anything else in bra? Is anything else being stored anywhere on your person (waistband etc)? ♦ Do you mind taking your shoes off here? (This is a low-priority safety and data quality check to avoid metal in participants’ shoes. Don’t force it if they are really uncomfortable. Give back up socks if participant is not wearing socks.) 7. Position the participant in the scanner. 7.1. Have the participant sit on the scanner bed 7.2. Give participant warning about peripheral stimulation: ♦ Tell participants what peripheral stimulation feels like, instruct them not to clasp hands together. This warning could happen outside of scanner room, but it is important to make sure they know. ♦ [IMPORTANT] If participants are wearing shorts, either separate their legs with a towel or sheet or change into scrubs to avoid peripheral stimulation (and cardiac stimulation). ♦ "Some participants have reported that they feel a little stimulation in their body while they are in the scanner. It may feel like pins and needles, or like muscle twitches.” ♦ “Clasping your hands or crossing your arms could make this worse, so please avoid that while in the scanner. Instead, keep your arms at your side, with your hands on the scanner bed or on your thighs." ♦ “If you feel anything, it will probably be very mild. If it gets painful, you could always let us know by squeezing the emergency bulb. But otherwise, it should get less intense over time.” 7.3. Tell participant about emergency bulb ♦ Tell participant that we will be taping emergency bulb to thigh. To avoid triggering it accidentally, subject should not hold it in the scanner. Should only require a slight movement to grab it. ♦ Instruct the participant to squeeze emergency bulb if there are any emergency issues during the scan (e.g., peripheral stimulation is too painful, scanner noise Q3 Reference Manual – Appendix IV | WU-Minn Consortium of the NIH Human Connectome Project Page 8 becomes painful because earplugs fall out). If it cannot wait without endangering your health and safety, squeeze the emergency bulb. Otherwise, if it is something that can wait until the end of the scan, like needing to use the restroom, please wait and we will check in with you every few minutes. ♦ Tape emergency bulb to thigh 7.4. Explain how we communicate with participant ♦ Tell participant: “While you are in the scanner, we will be communicating with you either by the speaker in the scanner room or by the earbuds you will be wearing. We will check on how you are doing and tell you what to expect next. To reduce movement associated with speaking, please try to answer with yes or no, and to keep your head as still as possible when you answer. Of course, if you need to tell us something that cannot be communicated by just a yes or no, you should say it.” 7.5. Insert noise reduction earbuds ♦ Be sure there is no audio playing over earbuds before giving them to participant. ♦ Instruct participants to squeeze the earplugs between their fingers until they are as small as possible, making sure tips of earplugs aren't pinched off. Audio channel should be open. ♦ Give them the noise reduction earbuds. Watch participants insert into their ears and hold them while they expand. If they’re having issues, offer to hold their earlobe back. Also consider different size earplugs. Tape the earbuds to the ears and tape the wires to the participant’s chest to avoid knocking out the earplugs. ♦ Once earplugs are in place, be sure to talk directly to participants' faces, and to speak loudly. 7.6. Route all cables down participants' stomachs with tape ♦ Avoid cables going under participant’s arms or getting caught in track next to bed. 7.7. Ask participant to lie down ♦ Ask them to guide their head and shoulders onto the top part of the bed, to be careful not to lay on the bottom section of the head coil 7.8. Position leg cushion ♦ Have the participant lift their legs. Place the covered leg cushion beneath their thighs such that their feet come off the sloped end. This should take pressure off of their lower back. Ask them if they are comfortable, or if they need more support 7.9. Place Moire pattern chip on bridge of nose ♦ Explain what you’re doing, and ask participant to close their eyes Q3 Reference Manual – Appendix IV | WU-Minn Consortium of the NIH Human Connectome Project Page 9 ♦ Shape small piece of clay into an approx 1 cm cube, and premolded around pinky finger. Ensure that clay has sufficient surface area to make contact with Moire pattern chip, and is sufficiently thin on sides to avoid obstructing participant’s view ♦ Gently press onto bridge of the participant’s nose, between their eyes. Best to ask participants to close eyes. If participant needs glasses in scanner, place the chip lower on the nose. ♦ Press the Moire pattern chip firmly into the clay. May require pressing simultaneously on sides of nose and edges of chip with a little force. ♦ Check placement of chip • Have participant move head around a bit. Confirm that the chip and clay are firmly and rigidly coupled with the participant’s head. • Ask participant to raise their eyebrows, to furrow their brows, and to scrunch their noses. Observe how much the chip moves to decide whether to change placement. ♦ Instruct the participant that anything that would move the chip independently of the head (wrinkling nose or brows, bumping into head coil) should be avoided 7.10. Fit pulseox clip on participant ♦ Hold pulseox sensor near scanner LCD to get signal to appear on LCD before putting on participant ♦ Put pulseox on participant’s left hand ring finger ♦ Explain to participant where to rest hands to avoid issues with pulseox. Hands at sides on scanner table is best, or on thighs for larger participants. 7.11. Ensure participants are comfortable ♦ Ask participants to relax: “At this point, take a second to relax. Take a deep breath if you need, and try to settle down into the scanner bed.” ♦ Ask participant leading questions to identify discomfort: “Do you feel anything that might start to get uncomfortable after an hour without moving?” • We need to take hints about participants' comfort level. "I should be OK" means I'm not great, but I'll try to live with it. • Consider places to put additional padding that might alleviate pressure (under neck, small of back, elbows) ♦ Give participant a blanket: Tell the participant that there is a light breeze flowing through the scanner bore. Ask the participant if they want a blanket or a lighter sheet. Pull blanket up to cover bare arms, and tuck lightly under arms. (A blanket or sheet helps arms slide when entering bore; Also blankets can be removed if subject gets warm, but it’s much harder to put one on during scan. Q3 Reference Manual – Appendix IV | WU-Minn Consortium of the NIH Human Connectome Project Page 10 7.12. Ensure that head is placed optimally in head coil ♦ Position head in coil: Line on coil should go roughly 1 finger-width above eyebrows ♦ Look from foot of bed to determine if head needs to be shifted to participant's left / right, or if head (nose) needs to be rolled to participant's left or right. Help participant reposition by demonstrating with your hand as a guide for their adjustments. When telling participants how to adjust their head, hold hand above their eyes along the axis of their head, and move hand in direction you want them to move. Make small movements for small adjustments. ♦ Place the covered foam head blocks on each side of the participants’ face at temples, careful not to knock out the earplugs, and also ensuring comfort for the duration of the scan. The goal is a snug, but comfortable fit of the foam blocks around the participant’s head. Check that participants' heads don't move substantially in coil when padding head with cushions. ♦ After padding head, double-check optimal placement of head in head coil. 7.13. Attach top section of head coil ♦ Once the participant is settled, place the top section of the 32ch coil in place over the bottom section; it will click into place on both sides. Plug the head coil in on right side, being careful to line up the pins before applying any pressure. Confirm that both elements of the coil are detected on LCD display on the front face of the scanner bore. (N.B., Very large heads that don’t fit into 32ch head coil will not be scanned) ♦ [IMPORTANT] Ensure that Moire pattern chip will not hit nose portion of head coil, and will not be obscured after small movements. Change placement to alleviate potential issues. ♦ Perform one final check that participant is comfortable. ♦ [IMPORTANT] Tell participant "From this point forward, we want you to keep your head as still as possible" 7.14. Raise bed up ♦ Raise bed up to Home before putting mirror on (simply hit Home icon on side of scanner) 7.15. Attach the plastic mirror onto the top section of head coil ♦ Place corrective goggles on head coil if necessary. ♦ After placing mirror, ask participants if the LCD screen is in the middle of the mirror 7.16. Complete laser align procedure ♦ Explain to participant what you’re doing. Ask participant to close eyes. Q3 Reference Manual – Appendix IV | WU-Minn Consortium of the NIH Human Connectome Project Page 11 ♦ While in Home position (bed fully up, but not moved into bore, LCD will say Home), turn on laser light. ♦ Use positioning dial to slowly move bed until light is close to line on coil. From here, adjust further so that light is just above patient eyebrow. ♦ [IMPORTANT] When properly positioned, turn off light again to lock in positioning. 7.17. Feed the bed into the scanner ♦ Make sure that LCD on the scanner shows table positioning screen so Isocenter can be found. If necessary, change screens using the small jog dial on the front of the scanner. ♦ Tell participants that “People usually like to keep their eyes closed as they go into the scanner. Also, place your hands on your thighs and tuck your elbows to your side as you go in. You can put your hands back to your sides once you’re in. Are you ready?” ♦ Proceed slowly to ensure that arms, blankets, cables, etc. go in smoothly ♦ Stop when LCD screen says “Isocenter” (at 0 mm). Reverse bed if numbers are negative. Never intentionally send bed past Isocenter. 7.18. Speak with participant ♦ Experimenter in control room should speak with participant before experimenter in scanner room leaves. 7.19. Firmly close scanner room door ♦ Leave room and ensure that scanner room door is firmly closed to avoid RF interference from outside of room 8. Begin Scanning 8.1. Check in / remind participant to stay still ♦ “Are you doing OK? As a reminder, during the scan session, I will be checking on how you are doing by asking you yes or no questions. Please try to keep your head as still as possible when you answer.” 8.2. Turn off lights during scan session 8.3. Check Moire pattern chip on Head Tracking window ♦ Confirm that entire Moire pattern chip is fully visible within the Preview_Window. • If Moire pattern chip is not fully visible, or is very close to the edge of the Preview_Window, ask the participant to move his/her head in an appropriate direction. Confirm that resulting position of the head is still comfortable. If not comfortable, then eject table from the bore and reposition head from scratch. Q3 Reference Manual – Appendix IV | WU-Minn Consortium of the NIH Human Connectome Project Page 12 ♦ Confirm that software is successfully making measurements (not issuing error messages). 8.4. Start head tracker movie player ♦ Launch “Head Tracker Video Player” using shortcut on Windows Desktop ♦ Enter Session ID into dialog box ♦ Find desired video file(s) using File dialog window ♦ Hit ‘p’ to pause between scans (to talk to participant) and ‘p’ again to play ♦ Hit ‘g’ for a motion graph, ctrl-o to open a new video file, ‘d’ to play a DVD, and <esc> to quit. 8.5. Run Localizer and AAHScout ♦ Look for larger errors like not capturing participant’s head, or artifact from metal in hair 8.6. Run Localizer_Aligned and check quality ♦ Before running T1w anatomical, confirm that slice prescription returned by AutoAlign captures all of the participant’s head (including cerebellum), with room to spare at all margins and no wrap-around at the superior, anterior, or posterior edges. ♦ If this is not the case, adjust the FOV manually and report this to Michael Harms/Linda Hood for investigation. 8.7. Run T1w_MPR1_PMC, T2w_SPC1_PMC, T1w_MPR2_PMC, T2w_SPC2_PMC in order ♦ Quality check: Image quality of T1w and T2w anatomical images • Check the 1st anatomical image for quality while the 2nd is being acquired. • Check 2nd anatomical image for quality immediately after it has been acquired ♦ Quality check: Excessive movement • Visually monitor participant’s movement on the Head Tracker Preview_Window. If excessive movement is observed early in the scan (e.g., first third to half), abort the scan, and communicate with the participant appropriately. Then start the scan over. If excessive movement is observed late in the scan (e.g., second half), allow scan to complete, evaluate image quality and append new scan to end of session if time allows (or collect T1w and T2w pair in Session 5). 8.8. Run FieldMap, AFI, BIAS_32CH, BIAS_BC in order ♦ IMPORTANT: Prior to removing participant from scanner, carefully check image quality of all four anatomical scans (T1w and T2w). If any are of poor quality, rerun that specific scan (be sure to re-run the one with the desired phase encoding polarity). If Session 5 is necessary, re-run T1w and T2w pair. ♦ Quality check: Session documentation worksheet (aka readme) Q3 Reference Manual – Appendix IV | WU-Minn Consortium of the NIH Human Connectome Project Page 13 • Ensure that any abnormalities, issues, or atypical occurrences for each scan are documented in detail on the readme. 9. Ending Procedures 9.1. Put physiological monitoring sensors back on charging rack in control room 9.2. Get auxiliary data from devices ♦ Head tracker log files: from scanner host C:\MedCom\log\temp\xpace ♦ Siemens physio log files: from scanner host C:\MedCom\log\physio 9.3. A participant may re-use their own linens. Thus, it is not necessary to replace the linens between two or more sequential sessions with the same participant. However, if a different participant is scheduled for the subsequent session, collect the linens and place them in their “belongings” bag for their next session. 9.4. Quality check: Session documentation worksheet (aka readme) ♦ After data upload to intraDB, transpose notes from readme into notes field ♦ Change usability field to “Unusable” for any certain unusable images (scanner crashed, aborted scans, wrong sequence run, scan was re-run and replaced with later scan, etc.) 9.5. After the last scan of the day, bring the scanner bed back to the Home position 10. Notify Cindy Feldt if Re-scan is needed 11. Upload Data to IntraDB 11.1. Ensure that all data has reconstructed (is it listed in Patient Browser?) 11.2. Imaging Data ♦ In Patient Browser, Click on full session, choose “Send to…” and select “HCP IntraDB” 11.3. Head Motion Log Files 11.4. Physiology Log Files III. Staff training and error prevention measures Before independently performing the procedures described in this SOP, HCP staff members will be trained as follows: • • Read this SOP. Observe the procedures, when performed by trained study staff or an HCP investigator, two times. Q3 Reference Manual – Appendix IV | WU-Minn Consortium of the NIH Human Connectome Project Page 14 • Follow the procedures under the direct supervision of trained study staff or an HCP investigator four times. IV. Internal HCP auditing Internal HCP audits of the procedures in this SOP are recommended to include the following steps: • • • Review two randomly-selected Session Checklist for each Session type. Verify that all required fields have been filled out on each Checklist and that in each case what on the Session Checklist conforms with the note fields for the same Session in intraDB Observe at least 2 operators performing 2 or more scans each, to check for adherence to the SOP and consistency between operators. Discuss with operators which aspects of procedure are difficult to follow as stated in the SOP, and modify SOP or retrain operators as necessary. V. Related SOPs: • Skyra Maintenance and Performance Verification (describes once-daily QC procedures). VI. Document control Document location: This SOP is an on-line document https://wiki.humanconnectome.org/display/cSOPs/Current+SOPs. Paper copies are valid only on the day they are printed. Refer to the author if you are in any doubt about the accuracy of any document(s). Document approval: This SOP requires the approval of the responsible investigator, as do any changes thereto. This SOP has been approved by: Dr. Deanna Barch Q3 Reference Manual – Appendix IV | WU-Minn Consortium of the NIH Human Connectome Project Page 15 Session 2: 3T R-fMRI and T-fMRI (first of two R-fMRI/T-fMRI sessions) Standard Operating Procedure Version 3 Effective Dates: September 21, 2012 to [date of issuance of a revision] Author(s): Greg Burgess, Deanna Barch, Michael Harms, Dan Nolan, and OTHERS The procedures in this SOP should be followed exactly. If changes to the SOP are needed, please send suggested edits to G. Burgess, M. Harms, D. Barch and S. Curtiss I. Scope This standard operating procedure (SOP) begins with booting the scanner computer, logging in, preparing the scanner room for the participant, and positioning the participant in the scanner. The SOP then describes the procedures and quality control (QC) metrics that will be performed during the second scan session for each participant, which will be comprised of resting-state and task-evoked fMRI scans. Part or all of this SOP may also be used if a participant needs to be re-scanned because of issues with scan quality. The output of this SOP will be scan data that will be uploaded to Connectome DB. Comments that are entered into the Session Checklist may also be entered into Connectome DB. II. Procedures and quality metrics: Session 2 Detailed Scanning SOP 1. Login to RIIS: 1.1. Get unique access code for participant ♦ To access the scanner, you will need an access code unique to each participant. ♦ Access codes can be reused for all sessions of the same participant. ♦ To generate access codes go to (http://radsci2.neuroimage.wustl.edu/cgibin/riiscgi/RIISconfirm.pl). ♦ You will need your NP number, Race, Gender, and Handedness of the participant. ♦ N.B., Date of Birth is not allowed by IRB protocol. Therefore, you will need to use the fictitious DOB of 01/01/01. ♦ To access RIIS (Research Imaging Information System), you will need a RIIS login name and password. To create a RIIS login name and password go to (http://www.nil.wustl.edu/csg/faqs/riislogin.html). 1.2. Login to “Use Skyra” with MR access code Q3 Reference Manual – Appendix IV | WU-Minn Consortium of the NIH Human Connectome Project Page 16 2. Prepare scanner computer: 2.1. Ensure that scanner computer has been booted up. ♦ When fully ready, console will say “Waiting for patient registration” in lower left-hand corner. ♦ It requires roughly 30 minutes to boot before the first scan begins. ♦ Do not begin subsequent procedures involving the scanner console until the computer is fully ready. (Can proceed to other non-scanner steps in the interest of time.) ♦ Ensure that pre-scan QC has been completed: See Skyra Maintenance and Performance Verification SOP, Step II.3. 2.2. Register new patient: ♦ In the top left click File > Register New Patient ♦ Fill in required fields (Card 1): • Last Name = HCP ID Designation (e.g., 123401) • Patient ID = HCP ID Designation with session identifier (e.g., 123401_strc) • Date of birth = 1 / 1 / 1980 (use participant’s year of birth, but not month or day) • Enter participant Gender, Height, and Weight • In Additional Info section, enter the Project name “Project:HCP_Phase2” • Patient position = Head first – Supine • Enter the initials of both operators in the operator section • Click Exam ♦ Fill in required fields (Card 2): • Body part examined = Brain • Select appropriate protocol: HCP > Phase2_User > HCP: FNCA: rs-fMRI and TfMRI 2.3. Load protocol: ♦ [IMPORTANT] Wait until anterior head coil is connected before loading protocol. Otherwise, you will need to manually enable HEA head coil in localizer scan. ♦ Load full protocol into exam card • Select full protocol (not individual scans), click left facing “<<” button to load scans into exam card. 2.4. Ensure correct MR sequences are loaded: ♦ Session 2 scans are: Localizer, AAHScout, Localizer_aligned, BOLD_RL_SB_SE, BOLD_LR_SB_SE, BOLD_REST1_RL, BOLD_REST2_LR, FieldMap, BIAS_32CH, BIAS_BC, BOLD_WM1_RL, BOLD_WM2_LR, Q3 Reference Manual – Appendix IV | WU-Minn Consortium of the NIH Human Connectome Project Page 17 BOLD_GAMBLING1_RL, BOLD_GAMBLING2_LR, BOLD_MOTOR1_RL, BOLD_MOTOR2_LR, FieldMap 3. Prepare scanner room equipment prior to arrival of participant 3.1. Subject display (LCD projector): ♦ Turn it on using remote control; close RF shielded box tightly ♦ Make sure Lucite screen is properly placed (align with line on floor) ♦ If bulb is burned out, call Fran Miezin (2-8875) 3.2. Physiological monitoring: ♦ Set up Pulseox sensor • Get Pulseox sensor from charging rack in control room • Ensure appropriate finger clip is installed for size of left-hand ring finger ♦ Set up Respiratory monitor • Get ECG/respiration sensor from charging rack in control room • Collect respiration balloon (do not attach yet) • Ensure ECG leads are covered with towel 4. Prepare control room equipment prior to arrival of participant 4.1. Head Tracker (MPT) system ♦ Ensure Head Tracker camera power supply is on / plugged in ♦ Turn on the Head Tracker computer • If not already on, press the circular power button on large silver computer on floor in middle of the desk. • Upon startup you should see four windows and no reported errors ♦ Verify bore marker is being received • Check Preview Window for large square with black-and-white checks • Check Secured core shell for continuous series of numeric values with no error messages ♦ On Siemens host computer, before each session (with patient table at home position), please run fixed target recalibration "XPaceRecal -m recal -n 1000" from the command line "run" window as part of motion camera QC 4.2. Display computer ♦ Ensure that Participant Display computer is booted; log into Toolbox Admin account ♦ Open scripts directory: Run HCP Scripts > Session 2 • Scripts are numbered in order that they need to be run. ♦ Button Box script and Visual Test script need to be run prior to starting first task scan. • Launch Button Box test script and ensure that it is visible on the projector ♦ Ensure that KVM switch is set to Display computer and HCP icon shows on lower LCD monitor 5. Prepare scanner room prior to arrival of participant 5.1. Locate and collect necessary supplies: Q3 Reference Manual – Appendix IV | WU-Minn Consortium of the NIH Human Connectome Project Page 18 ♦ Fresh linens (sheet, pillowcase and blanket) from cabinet in scanner room (second from right) or their previously-used linens from their “belongings” bag. ♦ Appropriate head cushion from drawer in scanner room (second from right). ♦ Appropriate foam head blocks from drawer in scanner room (furthest right). ♦ Disposable ear covers from drawer in scanner room (furthest right). ♦ The leg cushion wedge from counter in scanner room. (Extra support may still be needed, but may hit the bore when entering the scanner) ♦ A pair of noise reduction ear plugs (furthest right). ♦ Vitamin E capsule and cloth tape from drawer in scanner room (furthest right). ♦ The presentation mirror, attached to the plastic stilts, from counter in scanner room ♦ Moire pattern chip for the motion detection system from drawer in scanner room (furthest right) ♦ Siemens physio sensors (pulseox and ECG/respiratory) ♦ The 32-channel head coil from table 5.2. Ensure that bore fan is on max ♦ Hit fan icon on side of scanner, and turn jog dial to increase speed to max. 5.3. Prepare scanner bed ♦ Ensure that scanner bed is fully extended and lowered (N.B. If table won’t move, check table lock buttons on both sides of bed are seated.) ♦ Put correct foam padding on scanner bed: We use the standard Siemens 3 piece foam pads. ♦ Place sheet over foam padding ♦ Cover foam padding as completely as possible tucking in the top and bottom edges. Avoid leaving the sheets along the rails, because they can catch as the participant is inserted into scanner bore. 5.4. Prepare cushions ♦ Wrap the pillowcase around head pillow: Fold leftover pillowcase under padding on scanner bed (not under participant’s head) ♦ Wrap the foam head blocks with headphone ear covers. ♦ Wrap the leg cushion in a pillow case if one is not already around it and place in the lower section of the scanner bed 5.5. Prepare earbuds, button box, physio sensors, and emergency bulb ♦ Put earplugs on earbuds: Be sure earplugs are put on earbuds before participant arrives at scanner (but don't connect earbud cables until participant is laying down). ♦ Ensure “Emergency bulb” is attached ♦ Ensure that fiber-optic button box is ready: Invalid (red) button should be covered ♦ Make sure that ECG leads on ECG/respiration sensor are wrapped in sheet or towel 5.6. Prepare the 32-channel head coil ♦ If a phantom is present in the head coil or on the scanner bed, return it carefully to the appropriate stand on the shelf Q3 Reference Manual – Appendix IV | WU-Minn Consortium of the NIH Human Connectome Project Page 19 ♦ If the bottom section of the head coil is present, confirm that plugs are firmly connected ♦ If the bottom section of the head coil is not attached, do the following: • Retrieve the 32-channel head coil from counter. • Remove the bottom section from the box and place it at the top of the scanner bed, the bottom section connects on the participant’s right-hand side. ♦ Retrieve the top section of the head coil from the box and place it nearby for when participants are loaded. 6. Prepare participant for scan session 6.1. Review MR screening form 6.2. Politely request that participant try using restroom before scan session ♦ “We’ll stop here now so you can try to use the restroom before the scan” ♦ “The scan may last over an hour. We get the best quality data if we don’t need to stop in the middle of the scan. So, it would help if you tried to use the restroom.” 6.3. Ask participant to store locker key and belonging bag in control room 6.4. At entrance to scanner room, do head-to-toe verbal sweep for metal ♦ Metal in clothing: Look for substantial metal embedded in clothing, or metal in contact with skin. Ask as specifically and clinically as possible whether participant is wearing underwire bra. Antimicrobial clothing with invisible silver microfiber? If needed, allow the participant to change into scrubs located in intake room ♦ Hair: Do you have anything in your hair? Hairclips, bobby pins? ♦ Piercings: Piercings in your ears or tongue? Any other piercings, necklaces, or jewelry? ♦ Stored items: Anything at all in your front pockets, back pockets, socks or shoes? Carrying credit cards or anything else in bra? Is anything else being stored anywhere on your person (waistband etc)? ♦ Do you mind taking your shoes off here? (For this session, removing shoes may help participants during MOTOR task. It is also a low-priority safety and data quality check to avoid metal in participants’ shoes. Don’t force it if they are really uncomfortable. Give back up socks if participant is not wearing socks.) 6.5. Quality check: Vision check. ♦ Poor vision will have been determined previously during EVA session. If corrective lenses are required, use Snellen index output by EVA or redo quickly with eye chart in scanner. Select proper lenses and modified goggles from middle room. Attempt to correct to 20/40 or better. 7. Position the participant in the scanner. 7.1. Have the participant sit on the scanner bed 7.2. Fit respiratory band on participant: ♦ Explain the purpose of respiratory band and show them the monitoring screen before they lay down. Q3 Reference Manual – Appendix IV | WU-Minn Consortium of the NIH Human Connectome Project Page 20 ♦ Hold monitor near scanner LCD screen and squeeze balloon repeatedly to get signal to appear on LCD (may take ~ 15 seconds) ♦ Put respiration band on participant near waistband. This will likely need to be moved and adjusted after subject lies down to optimize signal. 7.3. Give participant warning about peripheral stimulation: ♦ [IMPORTANT] If participants are wearing shorts, either separate their legs with a towel or sheet or change into scrubs to avoid peripheral stimulation (and cardiac stimulation). ♦ Tell participants what peripheral stimulation feels like, instruct them not to clasp hands together. This warning could happen outside of scanner room, but it is important to make sure they know. ♦ "Some participants have reported that they feel peripheral stimulation in the scanner. It may feel like pins and needles, or like muscle twitches.” ♦ “Clasping your hands or crossing your arms could make this worse, so please avoid that while in the scanner. Instead, keep your arms at your side, with your hands on the scanner bed or on your thighs." ♦ “If you feel anything, it will probably be very mild. If it gets painful, you could always let us know by squeezing the emergency bulb. But otherwise, it should get less intense over time.” 7.4. Tell participant about emergency bulb ♦ Tell participant that we will be taping emergency bulb to thigh. To avoid triggering it accidentally, subject should not hold it in the scanner. Should only require a slight movement to grab it. ♦ Instruct the participant to squeeze emergency bulb if there are any emergency issues during the scan (e.g., peripheral stimulation is too painful, scanner noise becomes painful because earplugs fall out). If it cannot wait without endangering health and safety, squeeze the emergency bulb. Otherwise, if it is something that can wait until the end of the scan, like needing to use the restroom, please wait and we will check in with you every few minutes. ♦ Tape emergency bulb to thigh 7.5. Explain how we communicate with participant ♦ Tell participant: “While you are in the scanner, we will be communicating with you either by the speaker in the scanner room or by the earbuds you will be wearing. We will check on how you are doing and tell you what to expect next. To reduce movement associated with speaking, please try to answer with yes or no, and to keep your head as still as possible when you answer. Of course, if you need to tell us something that cannot be communicated by just a yes or no, you should say it.” Q3 Reference Manual – Appendix IV | WU-Minn Consortium of the NIH Human Connectome Project Page 21 7.6. Insert noise reduction earbuds ♦ Be sure there is no audio playing over earbuds before giving them to participant. ♦ Instruct participants to squeeze the earplugs between their fingers until they are as small as possible, making sure tips of earplugs aren't pinched off. Audio channel should be open. ♦ Give them the noise reduction earbuds. Watch participants insert into their ears and hold them while they expand. If they’re having issues, offer to hold their earlobe back. Also consider different size earplugs. Tape the earbuds to the ears and tape the wires to the participant’s chest to avoid knocking out the earplugs. ♦ Once earplugs are in place, be sure to talk directly to participants' faces, and to speak loudly. 7.7. Route all cables down participants' stomachs with tape ♦ Avoid cables going under participant’s arms or getting caught in track next to bed. 7.8. Ask participant to lie down ♦ Ask them to guide their head and shoulders onto the top part of the bed, to be careful not to lay on the bottom section of the head coil 7.9. Position leg cushion ♦ Have the participant lift their legs. Place the covered leg cushion beneath their thighs such that their feet come off the sloped end. This should take pressure off of their lower back. Ask them if they are comfortable, or if they need more support 7.10. Place Moire pattern chip on bridge of nose ♦ Explain what you’re doing, and ask participant to close their eyes ♦ Shape small piece of clay into an approx 1 cm cube, and premolded around pinky finger. Ensure that clay has sufficient surface area to make contact with moire chip, and is sufficiently thin on sides to avoid obstructing participant’s view ♦ Gently press onto bridge of the participant’s nose, between their eyes. Best to ask participants to close eyes. If participant needs glasses in scanner, place the chip lower on the nose. ♦ Press the Moire pattern chip firmly into the clay. May require pressing simultaneously on sides of nose and edges of chip with a little force. ♦ Check placement of chip • Have participant move head around a bit. Confirm that the chip and clay are firmly and rigidly coupled with the participant’s head. Q3 Reference Manual – Appendix IV | WU-Minn Consortium of the NIH Human Connectome Project Page 22 • Ask participant to raise their eyebrows, to furrow their brows, and to scrunch their noses. Observe how much the chip moves to decide whether to change placement. ♦ Instruct the participant that anything that would move the chip independently of the head (wrinkling nose or brows, bumping into head coil) should be avoided 7.11. Fit pulseox clip on participant ♦ Hold pulseox sensor near scanner LCD to get signal to appear on LCD before putting on participant ♦ Put pulseox on participant’s left hand ring finger ♦ Explain to participant where to rest hands to avoid issues with pulseox. Hands at sides on scanner table is best, or on thighs for larger participants. 7.12. Give button box to participant ♦ Explain button box and how to hold it (be sure participant can see it during explanation) ♦ Place button box in participant’s hand so that it can be comfortably reached ♦ Tape cord onto thigh 7.13. Ensure participants are comfortable ♦ Ask participants to relax: “At this point, take a second to relax. Take a deep breath if you need, and try to settle down into the scanner bed.” ♦ Ask participant leading questions to identify discomfort: “Do you feel anything that might start to get uncomfortable after an hour without moving?” • We need to take hints about participants' comfort level. "I should be OK" means I'm not great, but I'll try to live with it. • Consider places to put additional padding that might alleviate pressure (under neck, small of back, elbows) ♦ Give participant a blanket: Tell the participant that there is a light breeze flowing through the scanner bore. Ask the participant if they want a blanket or a lighter sheet. Pull blanket up to cover bare arms, and tuck lightly under arms. (A blanket or sheet helps arms slide when entering bore; Also blankets can be removed if subject gets warm, but it’s much harder to put one on during scan. 7.14. Ensure that head is placed optimally in head coil ♦ Position head in coil: Line on coil should go roughly 1 finger-width above eyebrows ♦ Look from foot of bed to determine if head needs to be shifted to participant's left / right, or if head (nose) needs to be rolled to participant's left or right. Help participant reposition by demonstrating with your hand as a guide for their Q3 Reference Manual – Appendix IV | WU-Minn Consortium of the NIH Human Connectome Project Page 23 adjustments. When telling participants how to adjust their head, hold hand above their eyes along the axis of their head, and move hand in direction you want them to move. Make small movements for small adjustments. ♦ Place the covered foam head blocks on each side of the participants’ face at temples, careful not to knock out the earplugs, and also ensuring comfort for the duration of the scan. The goal is a snug, but comfortable fit of the foam blocks around the participant’s head. Check that participants' heads don't move substantially in coil when padding head with cushions. ♦ After padding head, double-check optimal placement of head in head coil. 7.15. Attach top section of head coil ♦ Once the participant is settled, place the top section of the 32ch coil in place over the bottom section; it will click into place on both sides. Plug the head coil in on right side, being careful to line up the pins before applying any pressure. Confirm that both elements of the coil are detected on LCD display on the front face of the scanner bore. (N.B., Very large heads that don’t fit into 32ch head coil will not be scanned) ♦ [IMPORTANT] Ensure that Moire tracker chip will not hit nose portion of head coil, and will not be obscured after small movements. Change placement to alleviate potential issues. ♦ Perform one final check that participant is comfortable. ♦ [IMPORTANT] Tell participant "From this point forward, we want you to keep your head as still as possible" 7.16. Raise bed up ♦ Raise bed up to Home before putting mirror on (simply hit Home icon on side of scanner) 7.17. Attach the plastic mirror onto the top section of head coil ♦ Place corrective goggles on head coil if necessary. ♦ After placing mirror, ask participants if the LCD screen is in the middle of the mirror 7.18. Complete laser align procedure ♦ Explain to participant what you’re doing. Ask participant to close eyes. ♦ While in Home position (bed fully up, but not moved into bore, LCD will say Home), turn on laser light. ♦ Use positioning dial to slowly move bed until light is close to line on coil. From here, adjust further so that light is just above patient eyebrow. ♦ [IMPORTANT] When properly positioned, turn off light again to lock in positioning. Q3 Reference Manual – Appendix IV | WU-Minn Consortium of the NIH Human Connectome Project Page 24 7.19. Feed the bed into the scanner ♦ Make sure that LCD on the scanner shows table positioning screen so Isocenter can be found. If necessary, change screens using the small jog dial on the front of the scanner. ♦ Tell participants that “People usually like to keep their eyes closed as they go into the scanner. Also, place your hands on your thighs and tuck your elbows to your side as you go in. You can put your hands back to your sides once you’re in. Are you ready?” ♦ Proceed slowly to ensure that arms, blankets, cables, etc. go in smoothly ♦ Stop when LCD screen says “Isocenter” (at 0 mm). Reverse bed if numbers are negative. Never intentionally send bed past Isocenter. 7.20. Speak with participant ♦ Experimenter in control room should speak with participant before experimenter in scanner room leaves. 7.21. Firmly close scanner room door ♦ Leave room and ensure that scanner room door is firmly closed to avoid RF interference from outside of room 8. Begin Scanning 8.1. Check in / remind participant to stay still ♦ “Are you doing OK? As a reminder, during the scan session, I will be checking on how you are doing by asking you yes or no questions. Please try to keep your head as still as possible when you answer.” 8.2. Turn off lights during scan session 8.3. Check Moire chip on Head Tracking window ♦ Confirm that entire Moire chip is fully visible within the Preview_Window. ♦ If Moire chip is not fully visible, or is very close to the edge of the Preview_Window, ask the participant to move his/her head in an appropriate direction. Confirm that resulting position of the head is still comfortable. If not comfortable, then eject table from the bore and reposition head from scratch. ♦ Confirm that software is successfully making measurements (not issuing error messages). 8.4. Run Localizer and AAHScout ♦ Look for larger errors like not capturing participant’s head, or artifact from metal in hair 8.5. Run Localizer_Aligned and check quality Q3 Reference Manual – Appendix IV | WU-Minn Consortium of the NIH Human Connectome Project Page 25 ♦ Before running T1w anatomical, confirm that slice prescription returned by AutoAlign captures all of the participant’s head (including cerebellum), with room to spare at all margins and no wrap-around at the superior, anterior, or posterior edges. ♦ If this is not the case, adjust the FOV manually and report this to Michael Harms/Linda Hood for investigation. 8.6. Run BOLD_RL_SB_SE, BOLD_LR_SB_SE in order ♦ Check inline display to ensure adequate FOV and no clear artifact 8.7. Run Resting state scans ♦ Run E-Prime script 1: Resting State • Read Instructions to participant verbatim • Reiterate “Please do your best to keep still, stay awake, and we’ll check with you in 15 minutes” • Keep E-Prime script running while you check with participant, and start second BOLDREST scan • Script will keep fixation cross on screen for specific number of TRs equal to REST1+REST2. ♦ Run BOLD_REST1_RL, BOLD_REST2_LR in order ♦ Quality check: Excessive movement • Visually monitor participant’s movement on the MPT Preview_Window. If excessive movement is observed early in the scan (e.g., first third), abort the scan, and communicate with the participant appropriately. Then start the scan over. If excessive movement is observed late in the scan (e.g., second half), allow scan to complete. Tell participant that it appeared that there was a large amount of movement during that scan, and that they should relax and do their best to stay still. Note issue with movement in readme / intraDB. ♦ Quality check: Spiking. In the inline display window, monitor for the occurrence of any strangely bright slices or bands. If these occur, record the incidence on the readme. 8.8. Run FieldMap, BIAS_32CH, BIAS_BC in order 8.9. Run Button Box and Visual check scripts ♦ Run Script 2: Button Box checking script • Read Instructions verbatim • Quality check: Button box. Ask participant to push buttons using eprime script. If this does not work, adjust button box or contact Fran Miezin for back up box ♦ Run script 3: Visual Presentation Check Script. Q3 Reference Manual – Appendix IV | WU-Minn Consortium of the NIH Human Connectome Project Page 26 8.10. • Read instructions to the participant. • Quality check: Fix presentation equipment. If the participant cannot see all three boxes, check power on LCD projector, adjust mirror, or fix Lucite screen and redo the check. Repeat until the participant can see all three boxes. Run Task fMRI ♦ After resting state scans, task fMRI scans will be run. Windows shortcuts are located on the E-Prime Desktop > ”Run HCP Experiments”. The basic process for each is • Load E-Prime script for upcoming task. Enter Session ID and correct run number. • Read recap instructions aloud to participant before 1st run of the task. (Skip recap instructions before 2nd run of task.) • Progress to “Get Ready” screen • Load MR sequence and initiate scan after progressing to “Get Ready” screen • Monitor performance feedback screen, head tracker camera, eye tracker, and scanner console for QC issues • Speak to participant after each scan run to ensure they are still OK ♦ Run scans BOLD_WM1_RL, BOLD_WM2_LR, BOLD_GAMBLING1_RL, BOLD_GAMBLING2_LR, BOLD_MOTOR1_RL, BOLD_MOTOR2_LR in order • [IMPORTANT] Be certain to run RECOGNITION task outside of scanner within 10 minutes of completing scan. ♦ If scan is aborted prior to completion (due to scanner, E-Prime, or performance issues), run scan with same phase encoding direction before proceeding to next task • If participant completed less than roughly 20% of task before scan was aborted: ⇒ Use same run number (i.e. same stimuli and trial order) when launching EPrime ⇒ Use same run number for Series Description name on scanner ⇒ Example: If BOLD_WM1_RL was aborted before participant completed 20% of task, start E-Prime with same run number, copy scan in exam card, run scan again immediately without changing Series Description name. • If participant completed more than roughly 20% of task before scan was aborted: ⇒ Use new run number (i.e., new stimuli and trial order) when launching EPrime ⇒ Example: If BOLD_WM1_RL was aborted after participant completed 20% of task, start E-Prime with unique run number (since run 2 is still in the queue, use run 3), copy BOLD_WM1_RL scan in exam card, change run number in Series Description name from BOLD_WM1_RL to BOLD_WM3_RL, run new scan immediately. Q3 Reference Manual – Appendix IV | WU-Minn Consortium of the NIH Human Connectome Project Page 27 ♦ Quality check: Task performance. During the scan, monitor that the participant is performing the tasks correctly. • • • • • Total number of valid responses should be at least 60% percent of current trial number Monitor for 5 or more consecutive non-responses Monitor for 5 or more consecutive RTs < 200ms If any of these are observed early in the scan (e.g., first third), abort the scan, and communicate with the participant appropriately. Then start the scan over. If these are observed late in scan, take note on readme, and communicate with the participant appropriately. Then add an additional scan of that type (with the same phase encode direction). ♦ Quality check: Motor Task performance. • Check for foot movements during foot blocks (on correct side of participant’s body) ♦ Quality check: Session documentation worksheet (aka readme) • Ensure that any abnormalities, issues, or atypical occurrences for each scan are documented in detail on the readme. 9. Ending Procedures 9.1. RECOGNITION task ♦ Must be completed outside of the scanner within 10 minutes of completing the scan session. Bring the participant out of the scanner and offer them the option of going to the bathroom. Immediately complete the recognition task after the bathroom break. ♦ When launching E-Prime script, use the two run numbers for which there were complete WM sessions in the scanner. For example, if BOLD_WM1_RL crashed and the participant subsequently completed BOLD_WM2_LR and BOLD_WM3_RL, use run 2 and run 3 of the REC task. 9.2. Put physiological monitoring sensors back on charging rack in control room 9.3. Get auxiliary data from devices ♦ Head tracker log files: from scanner host C:\MedCom\log\temp\xpace ♦ Siemens physio log files: from scanner host C:\MedCom\log\physio 9.4. Save participant’s linens ♦ A participant may re-use their own linens. Thus, it is not necessary to replace the linens between two or more sequential sessions with the same participant. However, if a different participant is scheduled for the subsequent session, collect the linens and place them in their “belongings” bag for their next session. Q3 Reference Manual – Appendix IV | WU-Minn Consortium of the NIH Human Connectome Project Page 28 9.5. Quality check: Session documentation worksheet (aka readme) ♦ After data upload to intraDB, transpose notes from readme into notes field ♦ Change usability field to “Unusable” for any certain unusable images (scanner crashed, aborted scans, wrong sequence run, scan was re-run and replaced with later scan, etc.) 9.6. After the last scan of the day, bring the scanner bed back to the Home position 10. Notify Cindy Feldt if Re-scan is needed 11. Upload Data to IntraDB 11.1. Ensure that all data has reconstructed (is it listed in Patient Browser?) 11.2. Imaging Data ♦ In Patient Browser, Click on full session, choose “Send to…” and select “HCP IntraDB” 11.3. Head Motion Log Files 11.4. Physiology Log Files 11.5. E-Prime Files III. Staff training and error prevention measures Before independently performing the procedures described in this SOP, HCP staff members will be trained as follows: • • • Read this SOP. Observe the procedures, when performed by trained study staff or an HCP investigator, two times. Follow the procedures under the direct supervision of trained study staff or an HCP investigator four times. IV. Internal HCP auditing Internal HCP audits of the procedures in this SOP are recommended to include the following steps: • Review two randomly-selected Session Checklist for each Session type. Verify that all required fields have been filled out on each Checklist and that in each case what on the Session Checklist conforms with the note fields for the same Session in intraDB Q3 Reference Manual – Appendix IV | WU-Minn Consortium of the NIH Human Connectome Project Page 29 • • Observe at least 2 operators performing 2 or more scans each, to check for adherence to the SOP and consistency between operators. Discuss with operators which aspects of procedure are difficult to follow as stated in the SOP, and modify SOP or retrain operators as necessary. V. Related SOPs: • Skyra Maintenance and Performance Verification (describes once-daily QC procedures). VI. Document control Document location: This SOP is an on-line document https://wiki.humanconnectome.org/display/cSOPs/Current+SOPs. Paper copies are valid only on the day they are printed. Refer to the author if you are in any doubt about the accuracy of any document(s). Document approval: This SOP requires the approval of the responsible investigator, as do any changes thereto. This SOP has been approved by: Dr. Deanna Barch Q3 Reference Manual – Appendix IV | WU-Minn Consortium of the NIH Human Connectome Project Page 30 Session 3: 3T Diffusion Scanning Standard Operating Procedure Version 2 Effective Dates: September 21, 2012 to [date of issuance of a revision] Author(s): Greg Burgess, Deanna Barch, Michael Harms, Dan Nolan, and OTHERS The procedures in this SOP should be followed exactly. If changes to the SOP are needed, please send suggested edits to G. Burgess, M. Harms, D. Barch and S. Curtiss I. Scope This standard operating procedure (SOP) begins with booting the scanner computer, logging in, preparing the scanner room for the participant, and positioning the participant in the scanner. The SOP then describes the procedures and quality control (QC) metrics that will be performed during the third scan session for each participant, which will be comprised of multiple paired diffusion scans. Part or all of this SOP may also be used if a participant needs to be re-scanned because of issues with scan quality. The output of this SOP will be scan data that will be uploaded to Connectome DB. Comments that are entered into the Session Checklist may also be entered into Connectome DB. II. Procedures and quality metrics: Session 3 Detailed Scanning SOP 1. Login to RIIS: 1.1. Get unique access code for participant ♦ To access the scanner, you will need an access code unique to each participant. ♦ Access codes can be reused for all sessions of the same participant. ♦ To generate access codes go to (http://radsci2.neuroimage.wustl.edu/cgibin/riiscgi/RIISconfirm.pl). ♦ You will need your NP number, Race, Gender, and Handedness of the participant. ♦ N.B., Date of Birth is not allowed by IRB protocol. Therefore, you will need to use the fictitious DOB of 01/01/01. ♦ To access RIIS (Research Imaging Information System), you will need a RIIS login name and password. To create a RIIS login name and password go to (http://www.nil.wustl.edu/csg/faqs/riislogin.html). 1.2. Login to “Use Skyra” with MR access code 2. Prepare scanner computer: 2.1. Ensure that scanner computer has been booted up. Q3 Reference Manual – Appendix IV | WU-Minn Consortium of the NIH Human Connectome Project Page 31 ♦ When fully ready, console will say “Waiting for patient registration” in lower left-hand corner. ♦ It requires roughly 30 minutes to boot before the first scan begins. ♦ Do not begin subsequent procedures involving the scanner console until the computer is fully ready. (Can proceed to other non-scanner steps in the interest of time.) ♦ Ensure that pre-scan QC has been completed: See Skyra Maintenance and Performance Verification SOP, Step II.3. 2.2. Register new patient: ♦ In the top left click File > Register New Patient ♦ Fill in required fields (Card 1): • Last Name = HCP ID Designation (e.g., 123401) • Patient ID = HCP ID Designation with session identifier (e.g., 123401_diff) • Date of birth = 1 / 1 / 1980 (use participant’s year of birth, but not month or day) • Enter participant Gender, Height, and Weight • In Additional Info section, enter the Project name “Project:HCP_Phase2” • Patient position = Head first – Supine • Enter the initials of both operators in the operator section • Click Exam ♦ Fill in required fields (Card 2): • Body part examined = Brain • Select appropriate protocol: HCP > Phase2_User > HCP: dMRI 2.3. Load protocol: ♦ [IMPORTANT] Wait until anterior head coil is connected before loading protocol. Otherwise, you will need to manually enable HEA head coil in localizer scan. ♦ Load full protocol into exam card • Select full protocol (not individual scans), click left facing “<<” button to load scans into exam card. 2.4. Ensure correct MR sequences are loaded: ♦ Session 3 scans are: Localizer, AAHScout, Localizer_aligned, BIAS_BC, BIAS_32CH, DWI_RL_dir95, DWI_LR_dir95, DWI_RL_dir96, DWI_LR_dir96, DWI_RL_dir97, DWI_LR_dir97 3. Prepare scanner room equipment prior to arrival of participant 3.1. Subject display (LCD projector): Q3 Reference Manual – Appendix IV | WU-Minn Consortium of the NIH Human Connectome Project Page 32 ♦ Turn it on using remote control; close RF shielded box tightly ♦ Make sure Lucite screen is properly placed (align with line on floor) ♦ If bulb is burned out, call Fran Miezin (2-8875) 3.2. Physiological monitoring: ♦ Set up Pulseox sensor • Get Pulseox sensor from charging rack in control room • Ensure appropriate finger clip is installed for size of left-hand ring finger 4. Prepare control room equipment prior to arrival of participant 4.1. Head Tracker (MPT) system ♦ Ensure Head Tracker camera power supply is on / plugged in ♦ Turn on the Head Tracker computer • If not already on, press the circular power button on large silver computer on floor in middle of the desk. • Upon startup you should see four windows and no reported errors ♦ Verify bore marker is being received • Check Preview Window for large square with black-and-white checks • Check Secured core shell for continuous series of numeric values with no error messages ♦ On Siemens host computer, before each session (with patient table at home position), please run fixed target recalibration "XPaceRecal -m recal -n 1000" from the command line "run" window as part of motion camera QC 4.2. Display computer ♦ Ensure that Participant Display computer is booted; log into Toolbox Admin account ♦ Ensure that KVM switch is set to Display computer and HCP icon shows on lower LCD monitor 5. Prepare scanner room prior to arrival of participant 5.1. Collect or locate the following: ♦ Fresh linens (sheet, pillowcase and blanket) from cabinet in scanner room (second from right) or their previously-used linens from their “belongings” bag. ♦ Appropriate head cushion from drawer in scanner room (second from right). ♦ Appropriate foam head blocks from drawer in scanner room (furthest right). ♦ Disposable ear covers from drawer in scanner room (furthest right). ♦ The leg cushion wedge from counter in scanner room. (Extra support may still be needed, but may hit the bore when entering the scanner) ♦ A pair of noise reduction ear plugs (furthest right). ♦ Vitamin E capsule and cloth tape from drawer in scanner room (furthest right). ♦ The presentation mirror, attached to the plastic stilts, from counter in scanner room Q3 Reference Manual – Appendix IV | WU-Minn Consortium of the NIH Human Connectome Project Page 33 ♦ Moire pattern chip for the motion detection system from drawer in scanner room (furthest right) ♦ The 32-channel head coil from table 5.2. Ensure that bore fan is on max ♦ Hit fan icon on side of scanner, and turn jog dial to increase speed to max. 5.3. Prepare scanner bed ♦ Ensure that scanner bed is fully extended and lowered (N.B. If table won’t move, check table lock buttons on both sides of bed are seated.) ♦ Put correct foam padding on scanner bed: We use the standard Siemens 3 piece foam pads. ♦ Place sheet over foam padding ♦ Cover foam padding as completely as possible tucking in the top and bottom edges. Avoid leaving the sheets along the rails, because they can catch as the participant is inserted into scanner bore. 5.4. Prepare cushions ♦ Wrap the pillowcase around head pillow: Fold leftover pillowcase under padding on scanner bed (not under participant’s head) ♦ Wrap the foam head blocks with headphone ear covers. ♦ Wrap the leg cushion in a pillow case if one is not already around it and place in the lower section of the scanner bed 5.5. Prepare earbuds and emergency bulb ♦ Put earplugs on earbuds: Be sure earplugs are put on earbuds before participant arrives at scanner (but don't connect earbud cables until participant is laying down). ♦ Ensure “Emergency bulb” is attached 5.6. Prepare the 32-channel head coil ♦ If a phantom is present in the head coil or on the scanner bed, return it carefully to the appropriate stand on the shelf ♦ If the bottom section of the head coil is present, confirm that plugs are firmly connected ♦ If the bottom section of the head coil is not attached, do the following: • Retrieve the 32-channel head coil. It will be on the shelf in a box labeled ‘FRAGILE.’ • Remove the bottom section from the box and place it at the top of the scanner bed, the bottom section connects on the participant’s right-hand side. ♦ Retrieve the top section of the head coil from the box and place it nearby for when participants are loaded. 6. Prepare participant for scan session 6.1. Review MR screening form 6.2. Politely request that participant try using restroom before scan session: ♦ “We’ll stop here now so you can try to use the restroom before the scan” Q3 Reference Manual – Appendix IV | WU-Minn Consortium of the NIH Human Connectome Project Page 34 ♦ “The scan may last over an hour. We get the best quality data if we don’t need to stop in the middle of the scan. So, it would help if you tried to use the restroom.” 6.3. Ask participant to store locker key and belonging bag in control room 6.4. Ask participant which video they would like to watch during scan 6.5. At entrance to scanner room, do head-to-toe verbal sweep for metal: ♦ Metal in clothing: Look for substantial metal embedded in clothing, or metal in contact with skin. Ask as specifically and clinically as possible whether participant is wearing underwire bra. Antimicrobial clothing with invisible silver microfiber? If needed, allow the participant to change into scrubs located in intake room ♦ Hair: Do you have anything in your hair? Hairclips, bobby pins? ♦ Piercings: Piercings in your ears or tongue? Any other piercings, necklaces, or jewelry? ♦ Stored items: Anything at all in your front pockets, back pockets, socks or shoes? Carrying credit cards or anything else in bra? Is anything else being stored anywhere on your person (waistband etc)? ♦ Do you mind taking your shoes off here? (This is a low-priority safety and data quality check to avoid metal in participants’ shoes. Don’t force it if they are really uncomfortable. Give back up socks if participant is not wearing socks.) 7. Position the participant in the scanner. 7.1. Have the participant sit on the scanner bed 7.2. [IMPORTANT} Give participant warning about peripheral stimulation: ♦ Tell participants what peripheral stimulation feels like, instruct them not to clasp hands together. This warning could happen outside of scanner room, but it is important to make sure they know. ♦ "Some participants have reported that they feel a little stimulation in their body while they are in the scanner. It may feel like pins and needles, or like muscle twitches.” ♦ [IMPORTANT] Eliminate situations that may induce peripheral stimulation • If participants are wearing shorts, either separate their legs with a towel or sheet or change into scrubs to avoid peripheral stimulation (and cardiac stimulation). • “Clasping your hands or crossing your arms could make this worse, so please avoid that while in the scanner. Instead, keep your arms at your side, with your hands on the scanner bed or on your thighs." ♦ “If you feel anything, it will probably be very mild. If it gets painful, you could always let us know by squeezing the emergency bulb. But otherwise, it should get less intense over time.” 7.3. Tell participant about emergency bulb Q3 Reference Manual – Appendix IV | WU-Minn Consortium of the NIH Human Connectome Project Page 35 ♦ Tell participant that we will be taping emergency bulb to thigh. To avoid triggering it accidentally, subject should not hold it in the scanner. Should only require a slight movement to grab it. ♦ Instruct the participant to squeeze emergency bulb if there are any emergency issues during the scan (e.g., peripheral stimulation is too painful, scanner noise becomes painful because earplugs fall out). If it cannot wait without endangering your health and safety, squeeze the emergency bulb. Otherwise, if it is something that can wait until the end of the scan, like needing to use the restroom, please wait and we will check in with you every few minutes. ♦ Tape emergency bulb to thigh 7.4. Explain how we communicate with participant ♦ Tell participant: “While you are in the scanner, we will be communicating with you either by the speaker in the scanner room or by the earbuds you will be wearing. We will check on how you are doing and tell you what to expect next. To reduce movement associated with speaking, please try to answer with yes or no, and to keep your head as still as possible when you answer. Of course, if you need to tell us something that cannot be communicated by just a yes or no, you should say it.” 7.5. Insert noise reduction earbuds ♦ Be sure there is no audio playing over earbuds before giving them to participant. ♦ Instruct participants to squeeze the earplugs between their fingers until they are as small as possible, making sure tips of earplugs aren't pinched off. Audio channel should be open. ♦ Give them the noise reduction earbuds. Watch participants insert into their ears and hold them while they expand. If they’re having issues, offer to hold their earlobe back. Also consider different size earplugs. Tape the earbuds to the ears and tape the wires to the participant’s chest to avoid knocking out the earplugs. ♦ Once earplugs are in place, be sure to talk directly to participants' faces, and to speak loudly. 7.6. Route all cables down participants' stomachs with tape ♦ Avoid cables going under participant’s arms or getting caught in track next to bed. 7.7. Ask participant to lie down ♦ Ask them to guide their head and shoulders onto the top part of the bed, to be careful not to lay on the bottom section of the head coil 7.8. Position leg cushion Q3 Reference Manual – Appendix IV | WU-Minn Consortium of the NIH Human Connectome Project Page 36 ♦ Have the participant lift their legs. Place the covered leg cushion beneath their thighs such that their feet come off the sloped end. This should take pressure off of their lower back. Ask them if they are comfortable, or if they need more support 7.9. Place moire’ tracker chip on bridge of nose ♦ Explain what you’re doing, and ask participant to close their eyes ♦ Shape small piece of clay into an approx 1 cm cube, and premolded around pinky finger. Ensure that clay has sufficient surface area to make contact with moire chip, and is sufficiently thin on sides to avoid obstructing participant’s view ♦ Gently press onto bridge of the participant’s nose, between their eyes. Best to ask participants to close eyes. If participant needs glasses in scanner, place the chip lower on the nose. ♦ Press the Moire pattern chip firmly into the clay. May require pressing simultaneously on sides of nose and edges of chip with a little force. ♦ Check placement of chip • Have participant move head around a bit. Confirm that the chip and clay are firmly and rigidly coupled with the participant’s head. • Ask participant to raise their eyebrows, to furrow their brows, and to scrunch their noses. Observe how much the chip moves to decide whether to change placement. ♦ Instruct the participant that anything that would move the chip independently of the head (wrinkling nose or brows, bumping into head coil) should be avoided 7.10. Fit pulseox clip on participant ♦ Hold pulseox sensor near scanner LCD to get signal to appear on LCD before putting on participant ♦ Put pulseox on participant’s left hand ring finger ♦ Explain to participant where to rest hands to avoid issues with pulseox. Hands at sides on scanner table is best, or on thighs for larger participants. 7.11. Ensure participants are comfortable ♦ Ask participants to relax: “At this point, take a second to relax. Take a deep breath if you need, and try to settle down into the scanner bed.” ♦ Ask participant leading questions to identify discomfort: “Do you feel anything that might start to get uncomfortable after an hour without moving?” • We need to take hints about participants' comfort level. "I should be OK" means I'm not great, but I'll try to live with it. Q3 Reference Manual – Appendix IV | WU-Minn Consortium of the NIH Human Connectome Project Page 37 • Consider places to put additional padding that might alleviate pressure (under neck, small of back, elbows) ♦ Give participant a blanket: Tell the participant that there is a light breeze flowing through the scanner bore. Ask the participant if they want a blanket or a lighter sheet. Pull blanket up to cover bare arms, and tuck lightly under arms. (A blanket or sheet helps arms slide when entering bore; Also blankets can be removed if subject gets warm, but it’s much harder to put one on during scan. 7.12. Ensure that head is placed optimally in head coil ♦ Position head in coil: Line on coil should go roughly 1 finger-width above eyebrows ♦ Look from foot of bed to determine if head needs to be shifted to participant's left / right, or if head (nose) needs to be rolled to participant's left or right. Help participant reposition by demonstrating with your hand as a guide for their adjustments. When telling participants how to adjust their head, hold hand above their eyes along the axis of their head, and move hand in direction you want them to move. Make small movements for small adjustments. ♦ Place the covered foam head blocks on each side of the participants’ face at temples, careful not to knock out the earplugs, and also ensuring comfort for the duration of the scan. The goal is a snug, but comfortable fit of the foam blocks around the participant’s head. Check that participants' heads don't move substantially in coil when padding head with cushions. ♦ After padding head, double-check optimal placement of head in head coil. 7.13. Attach top section of head coil ♦ Once the participant is settled, place the top section of the 32ch coil in place over the bottom section; it will click into place on both sides. Plug the head coil in on right side, being careful to line up the pins before applying any pressure. Confirm that both elements of the coil are detected on LCD display on the front face of the scanner bore. (N.B., Very large heads that don’t fit into 32ch head coil will not be scanned) ♦ [IMPORTANT] Ensure that moire’ tracker chip will not hit nose portion of head coil, and will not be obscured after small movements. Change placement to alleviate potential issues. ♦ Perform one final check that participant is comfortable. ♦ [IMPORTANT] Tell participant "From this point forward, we want you to keep your head as still as possible" 7.14. Raise bed up Q3 Reference Manual – Appendix IV | WU-Minn Consortium of the NIH Human Connectome Project Page 38 ♦ Raise bed up to Home before putting mirror on (simply hit Home icon on side of scanner) 7.15. Attach the plastic mirror onto the top section of head coil ♦ Place corrective goggles on head coil if necessary. ♦ After placing mirror, ask participants if the LCD screen is in the middle of the mirror 7.16. Complete laser align procedure ♦ Explain to participant what you’re doing. Ask participant to close eyes. ♦ While in Home position (bed fully up, but not moved into bore, LCD will say Home), turn on laser light. ♦ Use positioning dial to slowly move bed until light is close to line on coil. From here, adjust further so that light is just above patient eyebrow. ♦ [IMPORTANT] When properly positioned, turn off light again to lock in positioning. 7.17. Feed the bed into the scanner ♦ Make sure that LCD on the scanner shows table positioning screen so Isocenter can be found. If necessary, change screens using the small jog dial on the front of the scanner. ♦ Tell participants that “People usually like to keep their eyes closed as they go into the scanner. Also, place your hands on your thighs and tuck your elbows to your side as you go in. You can put your hands back to your sides once you’re in. Are you ready?” ♦ Proceed slowly to ensure that arms, blankets, cables, etc. go in smoothly ♦ Stop when LCD screen says “Isocenter” (at 0 mm). Reverse bed if numbers are negative. Never intentionally send bed past Isocenter. 7.18. Speak with participant ♦ Experimenter in control room should speak with participant before experimenter in scanner room leaves. 7.19. Firmly close scanner room door ♦ Leave room and ensure that scanner room door is firmly closed to avoid RF interference from outside of room 8. Begin Scanning 8.1. Check in / remind participant to stay still ♦ “Are you doing OK? As a reminder, during the scan session, I will be checking on how you are doing by asking you yes or no questions. Please try to keep your head as still as possible when you answer.” Q3 Reference Manual – Appendix IV | WU-Minn Consortium of the NIH Human Connectome Project Page 39 8.2. Turn off lights during scan session 8.3. Check Moire chip on Head Tracking window ♦ Confirm that entire Moire chip is fully visible within the Preview_Window. • If Moire chip is not fully visible, or is very close to the edge of the Preview_Window, ask the participant to move his/her head in an appropriate direction. Confirm that resulting position of the head is still comfortable. If not comfortable, then eject table from the bore and reposition head from scratch. ♦ Confirm that software is successfully making measurements (not issuing error messages). 8.4. Start head tracker movie player ♦ Launch “Head Tracker Video Player” using shortcut on Windows Desktop ♦ Enter Session ID into dialog box ♦ Find desired video file(s) using File dialog window ♦ Hit ‘p’ to pause between scans (to talk to participant) and ‘p’ again to play ♦ Hit ‘g’ for a motion graph, ctrl-o to open a new video file, ‘d’ to play a DVD, and <esc> to quit. 8.5. Run Localizer and AAHScout ♦ Look for larger errors like not capturing participant’s head, or artifact from metal in hair 8.6. Run Localizer_Aligned and check quality ♦ Before running BIAS scans, confirm that slice prescription returned by AutoAlign captures all of the participant’s head (including cerebellum), with room to spare at all margins and no wrap-around at the superior, anterior, or posterior edges. ♦ If this is not the case, adjust the FOV manually and report this to Michael Harms/Linda Hood for investigation. 8.7. Run BIAS_BC and BIAS_32CH in order 8.8. Run DWI_RL_dir95, DWI_LR_dir95, DWI_RL_dir96, DWI_LR_dir96, and DWI_RL_dir97, DWI_LR_dir97 ♦ Quality check: Image quality of DWI images ♦ Quality check: Excessive movement • Visually monitor participant’s movement on the MPT Preview_Window. If excessive movement is observed early in the scan (e.g., first third to half), abort the scan, and communicate with the participant appropriately. Then start the scan over. If excessive movement is observed late in the scan (e.g., second half), allow scan to complete, evaluate image quality and append new scan to end of session if time allows. Q3 Reference Manual – Appendix IV | WU-Minn Consortium of the NIH Human Connectome Project Page 40 8.9. Run final FieldMap 8.10. Do final QC check on images ♦ IMPORTANT: Prior to removing participant from scanner, carefully check image quality of all dMRI scans. If any are of poor quality, re-run that specific scan (be sure to re-run the one with the desired phase encoding polarity). If Session 5 is necessary, re-run phase-encode direction (RL and LR) pair. ♦ Quality check: Session documentation worksheet (aka readme) • Ensure that any abnormalities, issues, or atypical occurrences for each scan are documented in detail on the readme. 9. Ending Procedures 9.1. Put physiological monitoring sensors back on charging rack in control room 9.2. Get auxiliary data from devices ♦ Head tracker log files: from scanner host C:\MedCom\log\temp\xpace ♦ Siemens physio log files: from scanner host C:\MedCom\log\physio 9.3. A participant may re-use their own linens. Thus, it is not necessary to replace the linens between two or more sequential sessions with the same participant. However, if a different participant is scheduled for the subsequent session, collect the linens and place them in their “belongings” bag for their next session. 9.4. Quality check: Session documentation worksheet (aka readme) ♦ After data upload to intraDB, transpose notes from readme into notes field ♦ Change usability field to “Unusable” for any certain unusable images (scanner crashed, aborted scans, wrong sequence run, scan was re-run and replaced with later scan, etc.) 9.5. After the last scan of the day, bring the scanner bed back to the Home position 10. Notify Cindy Feldt if Re-scan is needed 11. Upload Data to IntraDB 11.1. Ensure that all data has reconstructed (is it listed in Patient Browser?) 11.2. Imaging Data ♦ In Patient Browser, Click on full session, choose “Send to…” and select “HCP IntraDB” 11.3. Head Motion Log Files 11.4. Physiology Log Files Q3 Reference Manual – Appendix IV | WU-Minn Consortium of the NIH Human Connectome Project Page 41 III. Staff training and error prevention measures Before independently performing the procedures described in this SOP, HCP staff members will be trained as follows: • • • Read this SOP. Observe the procedures, when performed by trained study staff or an HCP investigator, two times. Follow the procedures under the direct supervision of trained study staff or an HCP investigator four times. IV. Internal HCP auditing Internal HCP audits of the procedures in this SOP are recommended to include the following steps: • • • Review two randomly-selected Session Checklist for each Session type. Verify that all required fields have been filled out on each Checklist and that in each case what on the Session Checklist conforms with the note fields for the same Session in intraDB Observe at least 2 operators performing 2 or more scans each, to check for adherence to the SOP and consistency between operators. Discuss with operators which aspects of procedure are difficult to follow as stated in the SOP, and modify SOP or retrain operators as necessary. V. Related SOPs: • Skyra Maintenance and Performance Verification (describes once-daily QC procedures). VI. Document control Document location: This SOP is an on-line document https://wiki.humanconnectome.org/display/cSOPs/Current+SOPs. Paper copies are valid only on the day they are printed. Refer to the author if you are in any doubt about the accuracy of any document(s). Document approval: This SOP requires the approval of the responsible investigator, as do any changes thereto. This SOP has been approved by: Dr. Deanna Barch Q3 Reference Manual – Appendix IV | WU-Minn Consortium of the NIH Human Connectome Project Page 42 Session 4: 3T R-fMRI and T-fMRI (second of two R-fMRI/T-fMRI sessions) Standard Operating Procedure Version 2 Effective Dates: September 21, 2012 to [date of issuance of a revision] Author(s): Greg Burgess, Deanna Barch, Michael Harms, Dan Nolan, and OTHERS The procedures in this SOP should be followed exactly. If changes to the SOP are needed, please send suggested edits to G. Burgess, M. Harms, D. Barch and S. Curtiss I. Scope This standard operating procedure (SOP) begins with booting the scanner computer, logging in, preparing the scanner room for the participant, and positioning the participant in the scanner. The SOP then describes the procedures and quality control (QC) metrics that will be performed during the fourth scan session for each participant, which will be comprised of resting-state and task-evoked fMRI scans. Part or all of this SOP may also be used if a participant needs to be re-scanned because of issues with scan quality. The output of this SOP will be scan data that will be uploaded to Connectome DB. Comments that are entered into the Session Checklist may also be entered into Connectome DB. II. Procedures and quality metrics: Session 4 Detailed Scanning SOP 1. Login to RIIS: 1.1. Get unique access code for participant ♦ To access the scanner, you will need an access code unique to each participant. ♦ Access codes can be reused for all sessions of the same participant. ♦ To generate access codes go to (http://radsci2.neuroimage.wustl.edu/cgibin/riiscgi/RIISconfirm.pl). ♦ You will need your NP number, Race, Gender, and Handedness of the participant. ♦ N.B., Date of Birth is not allowed by IRB protocol. Therefore, you will need to use the fictitious DOB of 01/01/01. ♦ To access RIIS (Research Imaging Information System), you will need a RIIS login name and password. To create a RIIS login name and password go to (http://www.nil.wustl.edu/csg/faqs/riislogin.html). 1.2. Login to “Use Skyra” with MR access code Q3 Reference Manual – Appendix IV | WU-Minn Consortium of the NIH Human Connectome Project Page 43 2. Prepare scanner computer: 2.1. Ensure that scanner computer has been booted up. ♦ When fully ready, console will say “Waiting for patient registration” in lower left-hand corner. ♦ It requires roughly 30 minutes to boot before the first scan begins. ♦ Do not begin subsequent procedures involving the scanner console until the computer is fully ready. (Can proceed to other non-scanner steps in the interest of time.) ♦ Ensure that pre-scan QC has been completed: See Skyra Maintenance and Performance Verification SOP, Step II.3. 2.2. Register new patient: ♦ In the top left click File > Register New Patient ♦ Fill in required fields (Card 1): • Last Name = HCP ID Designation (e.g., 123401) • Patient ID = HCP ID Designation with session identifier (e.g., 123401_fncb) • Date of birth = 1 / 1 / 1980 (use participant’s year of birth, but not month or day) • Enter participant Gender, Height, and Weight • In Additional Info section, enter the Project name “Project:HCP_Phase2” • Patient position = Head first – Supine • Enter the initials of both operators in the operator section • Click Exam ♦ Fill in required fields (Card 2): • Body part examined = Brain • Select appropriate protocol: HCP > Phase2_User > HCP: FNCB: rs-fMRI and TfMRI 2.3. Load protocol: ♦ [IMPORTANT] Wait until anterior head coil is connected before loading protocol. Otherwise, you will need to manually enable HEA head coil in localizer scan. ♦ Load full protocol into exam card • Select full protocol (not individual scans), click left facing “<<” button to load scans into exam card. 2.4. Ensure correct MR sequences are loaded: ♦ Session 2 scans are: Localizer, AAHScout, Localizer_aligned, BIAS_BC, BIAS_32CH, BOLD_RL_SB_SE, BOLD_LR_SB_SE, BOLD_REST3_RL, BOLD_REST4_LR, FieldMap, BOLD_RL_SB_SE, BOLD_LR_SB_SE, Q3 Reference Manual – Appendix IV | WU-Minn Consortium of the NIH Human Connectome Project Page 44 BOLD_LANGUAGE1_RL, BOLD_LANGUAGE2_LR, BOLD_SOCIAL1_RL, BOLD_SOCIAL2_LR, BOLD_RELATIONAL1_RL, BOLD_RELATIONAL2_LR, BOLD_EMOTION1_RL, BOLD_EMOTION2_LR, FieldMap 3. Prepare scanner room equipment prior to arrival of participant 3.1. Subject display (LCD projector): ♦ Turn it on using remote control; close RF shielded box tightly ♦ Make sure Lucite screen is properly placed (align line on floor) ♦ If bulb is burned out, call Fran Miezin (2-8875) 3.2. Physiological monitoring: ♦ Set up Pulseox sensor • Get Pulseox sensor from charging rack in control room • Ensure appropriate finger clip is installed for size of left-hand ring finger ♦ Set up Respiratory monitor • Get ECG/respiration sensor from charging rack in control room • Collect respiration balloon (do not attach yet) • Ensure ECG leads are covered with towel 4. Prepare control room equipment prior to arrival of participant 4.1. Head Tracker (MPT) system ♦ Ensure Head Tracker camera power supply is on / plugged in ♦ Turn on the Head Tracker computer • If not already on, press the circular power button on large silver computer on floor in middle of the desk. • Upon startup you should see four windows and no reported errors ♦ Verify bore marker is being received • Check Preview Window for large square with black-and-white checks • Check Secured core shell for continuous series of numeric values with no error messages ♦ On Siemens host computer, before each session (with patient table at home position), please run fixed target recalibration "XPaceRecal -m recal -n 1000" from the command line "run" window as part of motion camera QC 4.2. Display computer ♦ Ensure that Participant Display computer is booted; log into Toolbox Admin account ♦ Open scripts directory: Run HCP Scripts > Session 4 • Scripts are numbered in order that they need to be run. ♦ Button Box script and Visual Test script need to be run prior to starting first task scan. • Launch Button Box test script and ensure that it is visible on the projector ♦ Ensure that KVM switch is set to Display computer and HCP icon shows on lower LCD monitor 5. Prepare scanner room prior to arrival of participant Q3 Reference Manual – Appendix IV | WU-Minn Consortium of the NIH Human Connectome Project Page 45 5.1. Collect or locate the following: ♦ Fresh linens (sheet, pillowcase and blanket) from cabinet in scanner room (second from right) or their previously-used linens from their “belongings” bag. ♦ Appropriate head cushion from drawer in scanner room (second from right). ♦ Appropriate foam head blocks from drawer in scanner room (furthest right). ♦ Disposable ear covers from drawer in scanner room (furthest right). ♦ The leg cushion wedge from counter in scanner room. (Extra support may still be needed, but may hit the bore when entering the scanner) ♦ A pair of noise reduction ear plugs (furthest right). ♦ Vitamin E capsule and cloth tape from drawer in scanner room (furthest right). ♦ The presentation mirror, attached to the plastic stilts, from counter in scanner room ♦ Moire pattern chip for the motion detection system from drawer in scanner room (furthest right) ♦ Siemens physio sensors (pulseox and ECG/respiratory) ♦ The 32-channel head coil from table 5.2. Ensure that bore fan is on max ♦ Hit fan icon on side of scanner, and turn jog dial to increase speed to max. 5.3. Prepare scanner bed ♦ Ensure that scanner bed is fully extended and lowered (N.B. If table won’t move, check table lock buttons on both sides of bed are seated.) ♦ Put correct foam padding on scanner bed: We use the standard Siemens 3 piece foam pads. ♦ Place sheet over foam padding ♦ Cover foam padding as completely as possible tucking in the top and bottom edges. Avoid leaving the sheets along the rails, because they can catch as the participant is inserted into scanner bore. 5.4. Prepare cushions ♦ Wrap the pillowcase around head pillow: Fold leftover pillowcase under padding on scanner bed (not under participant’s head) ♦ Wrap the foam head blocks with headphone ear covers. ♦ Wrap the leg cushion in a pillow case if one is not already around it and place in the lower section of the scanner bed 5.5. Prepare earbuds, button box, physio sensors, and emergency bulb ♦ Put earplugs on earbuds: Be sure earplugs are put on earbuds before participant arrives at scanner (but don't connect earbud cables until participant is laying down). ♦ Ensure “Emergency bulb” is attached ♦ Ensure that fiber-optic button box is ready: Invalid (red) button should be covered ♦ Make sure that ECG leads on ECG/respiration sensor are wrapped in sheet or towel 5.6. Prepare the 32-channel head coil Q3 Reference Manual – Appendix IV | WU-Minn Consortium of the NIH Human Connectome Project Page 46 ♦ If a phantom is present in the head coil or on the scanner bed, return it carefully to the appropriate stand on the shelf ♦ If the bottom section of the head coil is present, confirm that plugs are firmly connected ♦ If the bottom section of the head coil is not attached, do the following: • Retrieve the 32-channel head coil from counter. • Remove the bottom section from the box and place it at the top of the scanner bed, the bottom section connects on the participant’s right-hand side. ♦ Retrieve the top section of the head coil from the box and place it nearby for when participants are loaded. 6. Prepare participant for scan session 6.1. Review MR screening form 6.2. Politely request that participant try using restroom before scan session: ♦ “We’ll stop here now so you can try to use the restroom before the scan” ♦ “The scan may last over an hour. We get the best quality data if we don’t need to stop in the middle of the scan. So, it would help if you tried to use the restroom.” 6.3. Ask participant to store locker key and belonging bag in control room 6.4. At entrance to scanner room, do head-to-toe verbal sweep for metal: ♦ Metal in clothing: Look for substantial metal embedded in clothing, or metal in contact with skin. Ask as specifically and clinically as possible whether participant is wearing underwire bra. Antimicrobial clothing with invisible silver microfiber? If needed, allow the participant to change into scrubs located in intake room ♦ Hair: Do you have anything in your hair? Hairclips, bobby pins? ♦ Piercings: Piercings in your ears or tongue? Any other piercings, necklaces, or jewelry? ♦ Stored items: Anything at all in your front pockets, back pockets, socks or shoes? Carrying credit cards or anything else in bra? Is anything else being stored anywhere on your person (waistband etc)? ♦ Do you mind taking your shoes off here? (For this session, removing shoes may help participants during MOTOR task. It is also a low-priority safety and data quality check to avoid metal in participants’ shoes. Don’t force it if they are really uncomfortable. Give back up socks if participant is not wearing socks.) 6.5. Quality check: Vision check. ♦ Poor vision will have been determined previously during EVA session. If corrective lenses are required, use Snellen index output by EVA or redo quickly with eye chart in scanner. Select proper lenses and modified goggles from middle room. Attempt to correct to 20/40 or better. 7. Position the participant in the scanner. 7.1. Have the participant sit on the scanner bed 7.2. Fit respiratory band on participant: Q3 Reference Manual – Appendix IV | WU-Minn Consortium of the NIH Human Connectome Project Page 47 ♦ Explain the purpose of respiratory band and show them the monitoring screen before they lay down. ♦ Hold monitor near scanner LCD screen and squeeze balloon repeatedly to get signal to appear on LCD (may take ~ 15 seconds) ♦ Put respiration band on participant near waistband. This will likely need to be moved and adjusted after subject lies down to optimize signal. 7.3. Give participant warning about peripheral stimulation: ♦ [IMPORTANT] If participants are wearing shorts, either separate their legs with a towel or sheet or change into scrubs to avoid peripheral stimulation (and cardiac stimulation). ♦ Tell participants what peripheral stimulation feels like, instruct them not to clasp hands together. This warning could happen outside of scanner room, but it is important to make sure they know. ♦ "Some participants have reported that they feel peripheral stimulation in the scanner. It may feel like pins and needles, or like muscle twitches.” ♦ “Clasping your hands or crossing your arms could make this worse, so please avoid that while in the scanner. Instead, keep your arms at your side, with your hands on the scanner bed or on your thighs." ♦ “If you feel anything, it will probably be very mild. If it gets painful, you could always let us know by squeezing the emergency bulb. But otherwise, it should get less intense over time.” 7.4. Tell participant about emergency bulb ♦ Tell participant that we will be taping emergency bulb to thigh. To avoid triggering it accidentally, subject should not hold it in the scanner. Should only require a slight movement to grab it. ♦ Instruct the participant to squeeze emergency bulb if there are any emergency issues during the scan (e.g., peripheral stimulation is too painful, scanner noise becomes painful because earplugs fall out). If it cannot wait without endangering health and safety, squeeze the emergency bulb. Otherwise, if it is something that can wait until the end of the scan, like needing to use the restroom, please wait and we will check in with you every few minutes. ♦ Tape emergency bulb to thigh 7.5. Explain how we communicate with participant ♦ Tell participant: “While you are in the scanner, we will be communicating with you either by the speaker in the scanner room or by the earbuds you will be wearing. We will check on how you are doing and tell you what to expect next. To reduce movement associated with speaking, please try to answer with yes or no, and to Q3 Reference Manual – Appendix IV | WU-Minn Consortium of the NIH Human Connectome Project Page 48 keep your head as still as possible when you answer. Of course, if you need to tell us something that cannot be communicated by just a yes or no, you should say it.” 7.6. Insert noise reduction earbuds ♦ Be sure there is no audio playing over earbuds before giving them to participant. ♦ Instruct participants to squeeze the earplugs between their fingers until they are as small as possible, making sure tips of earplugs aren't pinched off. Audio channel should be open. ♦ Give them the noise reduction earbuds. Watch participants insert into their ears and hold them while they expand. If they’re having issues, offer to hold their earlobe back. Also consider different size earplugs. Tape the earbuds to the ears and tape the wires to the participant’s chest to avoid knocking out the earplugs. ♦ Once earplugs are in place, be sure to talk directly to participants' faces, and to speak loudly. 7.7. Route all cables down participants' stomachs with tape ♦ Avoid cables going under participant’s arms or getting caught in track next to bed. 7.8. Ask participant to lie down ♦ Ask them to guide their head and shoulders onto the top part of the bed, to be careful not to lay on the bottom section of the head coil 7.9. Position leg cushion ♦ Have the participant lift their legs. Place the covered leg cushion beneath their thighs such that their feet come off the sloped end. This should take pressure off of their lower back. Ask them if they are comfortable, or if they need more support 7.10. Place moire’ tracker chip on bridge of nose ♦ Explain what you’re doing, and ask participant to close their eyes ♦ Shape small piece of clay into an approx 1 cm cube, and premolded around pinky finger. Ensure that clay has sufficient surface area to make contact with moire chip, and is sufficiently thin on sides to avoid obstructing participant’s view ♦ Gently press onto bridge of the participant’s nose, between their eyes. Best to ask participants to close eyes. If participant needs glasses in scanner, place the chip lower on the nose. ♦ Press the Moire pattern chip firmly into the clay. May require pressing simultaneously on sides of nose and edges of chip with a little force. ♦ Check placement of chip • Have participant move head around a bit. Confirm that the chip and clay are firmly and rigidly coupled with the participant’s head. Q3 Reference Manual – Appendix IV | WU-Minn Consortium of the NIH Human Connectome Project Page 49 • Ask participant to raise their eyebrows, to furrow their brows, and to scrunch their noses. Observe how much the chip moves to decide whether to change placement. ♦ Instruct the participant that anything that would move the chip independently of the head (wrinkling nose or brows, bumping into head coil) should be avoided 7.11. Fit pulseox clip on participant ♦ Hold pulseox sensor near scanner LCD to get signal to appear on LCD before putting on participant ♦ Put pulseox on participant’s left hand ring finger ♦ Explain to participant where to rest hands to avoid issues with pulseox. Hands at sides on scanner table is best, or on thighs for larger participants. 7.12. Give button box to participant ♦ Explain button box and how to hold it (be sure participant can see it during explanation) ♦ Place button box in participant’s hand so that it can be comfortably reached ♦ Tape cord onto thigh 7.13. Ensure participants are comfortable ♦ Ask participants to relax: “At this point, take a second to relax. Take a deep breath if you need, and try to settle down into the scanner bed.” ♦ Ask participant leading questions to identify discomfort: “Do you feel anything that might start to get uncomfortable after an hour without moving?” • We need to take hints about participants' comfort level. "I should be OK" means I'm not great, but I'll try to live with it. • Consider places to put additional padding that might alleviate pressure (under neck, small of back, elbows) ♦ Give participant a blanket: Tell the participant that there is a light breeze flowing through the scanner bore. Ask the participant if they want a blanket or a lighter sheet. Pull blanket up to cover bare arms, and tuck lightly under arms. (A blanket or sheet helps arms slide when entering bore; Also blankets can be removed if subject gets warm, but it’s much harder to put one on during scan. 7.14. Ensure that head is placed optimally in head coil ♦ Position head in coil: Line on coil should go roughly 1 finger-width above eyebrows ♦ Look from foot of bed to determine if head needs to be shifted to participant's left / right, or if head (nose) needs to be rolled to participant's left or right. Help participant reposition by demonstrating with your hand as a guide for their Q3 Reference Manual – Appendix IV | WU-Minn Consortium of the NIH Human Connectome Project Page 50 adjustments. When telling participants how to adjust their head, hold hand above their eyes along the axis of their head, and move hand in direction you want them to move. Make small movements for small adjustments. ♦ Place the covered foam head blocks on each side of the participants’ face at temples, careful not to knock out the earplugs, and also ensuring comfort for the duration of the scan. The goal is a snug, but comfortable fit of the foam blocks around the participant’s head. Check that participants' heads don't move substantially in coil when padding head with cushions. ♦ After padding head, double-check optimal placement of head in head coil. 7.15. Attach top section of head coil ♦ Once the participant is settled, place the top section of the 32ch coil in place over the bottom section; it will click into place on both sides. Plug the head coil in on right side, being careful to line up the pins before applying any pressure. Confirm that both elements of the coil are detected on LCD display on the front face of the scanner bore. (N.B., Very large heads that don’t fit into 32ch head coil will not be scanned) ♦ [IMPORTANT] Ensure that moire’ tracker chip will not hit nose portion of head coil, and will not be obscured after small movements. Change placement to alleviate potential issues. ♦ Perform one final check that participant is comfortable. ♦ [IMPORTANT] Tell participant "From this point forward, we want you to keep your head as still as possible" 7.16. Raise bed up ♦ Raise bed up to Home before putting mirror on (simply hit Home icon on side of scanner) 7.17. Attach the plastic mirror onto the top section of head coil ♦ Place corrective goggles on head coil if necessary. ♦ After placing mirror, ask participants if the LCD screen is in the middle of the mirror 7.18. Complete laser align procedure ♦ Explain to participant what you’re doing. Ask participant to close eyes. ♦ While in Home position (bed fully up, but not moved into bore, LCD will say Home), turn on laser light. ♦ Use positioning dial to slowly move bed until light is close to line on coil. From here, adjust further so that light is just above patient eyebrow. ♦ [IMPORTANT] When properly positioned, turn off light again to lock in positioning. Q3 Reference Manual – Appendix IV | WU-Minn Consortium of the NIH Human Connectome Project Page 51 7.19. Feed the bed into the scanner ♦ Make sure that LCD on the scanner shows table positioning screen so Isocenter can be found. If necessary, change screens using the small jog dial on the front of the scanner. ♦ Tell participants that “People usually like to keep their eyes closed as they go into the scanner. Also, place your hands on your thighs and tuck your elbows to your side as you go in. You can put your hands back to your sides once you’re in. Are you ready?” ♦ Proceed slowly to ensure that arms, blankets, cables, etc. go in smoothly ♦ Stop when LCD screen says “Isocenter” (at 0 mm). Reverse bed if numbers are negative. Never intentionally send bed past Isocenter. 7.20. Speak with participant ♦ Experimenter in control room should speak with participant before experimenter in scanner room leaves. 7.21. Firmly close scanner room door ♦ Leave room and ensure that scanner room door is firmly closed to avoid RF interference from outside of room 8. Begin Scanning 8.1. Check in / remind participant to stay still ♦ “Are you doing OK? As a reminder, during the scan session, I will be checking on how you are doing by asking you yes or no questions. Please try to keep your head as still as possible when you answer.” 8.2. Turn off lights during scan session 8.3. Check Moire chip on Head Tracking window ♦ Confirm that entire Moire chip is fully visible within the Preview_Window. • If Moire chip is not fully visible, or is very close to the edge of the Preview_Window, ask the participant to move his/her head in an appropriate direction. Confirm that resulting position of the head is still comfortable. If not comfortable, then eject table from the bore and reposition head from scratch. ♦ Confirm that software is successfully making measurements (not issuing error messages). 8.4. Run Localizer and AAHScout ♦ Look for larger errors like not capturing participant’s head, or artifact from metal in hair 8.5. Run Localizer_Aligned and check quality Q3 Reference Manual – Appendix IV | WU-Minn Consortium of the NIH Human Connectome Project Page 52 ♦ Before running T1w anatomical, confirm that slice prescription returned by AutoAlign captures all of the participant’s head (including cerebellum), with room to spare at all margins and no wrap-around at the superior, anterior, or posterior edges. ♦ If this is not the case, adjust the FOV manually and report this to Michael Harms/Linda Hood for investigation. 8.6. Run BIAS_BC, BIAS_32CH, BOLD_RL_SB_SE, BOLD_LR_SB_SE in order ♦ Check inline display to ensure adequate FOV and no clear artifact 8.7. Run Resting state scans ♦ Run E-Prime script 1: Resting State • Read Instructions to participant verbatim • Reiterate “Please do your best to keep still, stay awake, and we’ll check with you in 15 minutes” • Keep E-Prime script running while you check with participant, and start second BOLDREST scan • Script will keep fixation cross on screen for specific number of TRs equal to REST1+REST2. ♦ Run BOLD_REST3_RL, BOLD_REST4_LR in order ♦ Quality check: Excessive movement • Visually monitor participant’s movement on the MPT Preview_Window. If excessive movement is observed early in the scan (e.g., first third), abort the scan, and communicate with the participant appropriately. Then start the scan over. If excessive movement is observed late in the scan (e.g., second half), allow scan to complete. Tell participant that it appeared that there was a large amount of movement during that scan, and that they should relax and do their best to stay still. Note issue with movement in readme / intraDB. ♦ Quality check: Spiking. In the inline display window, monitor for the occurrence of any strangely bright slices or bands. If these occur, record the incidence on the readme. 8.8. Run FieldMap 8.9. Run Button Box and Visual check scripts ♦ Run Script 2: Button Box checking script • Read Instructions verbatim • Quality check: Button box. Ask participant to push buttons using eprime script. If this does not work, adjust button box or contact Fran Miezin for back up box ♦ Run script 3: Visual Presentation Check Script. Q3 Reference Manual – Appendix IV | WU-Minn Consortium of the NIH Human Connectome Project Page 53 8.10. • Read instructions to the participant. • Quality check: Fix presentation equipment. If the participant cannot see all three boxes, check power on LCD projector, adjust mirror, or fix Lucite screen and redo the check. Repeat until the participant can see all three boxes. Run Audio test script during BOLD_RL_SB_SE and BOLD_LR_SB_SE ♦ Run Script 4: Audio test script ♦ Read instructions verbatim ♦ Switch earbud input on Sony amp to MiniPhono (i.e., Participant Display Computer) ♦ Advance to “Get Ready” screen ♦ Begin BOLD scan ♦ Watch screen to determine if participant needed volume louder, softer, or if they’ve quit the test script. 8.11. Run Task fMRI ♦ After resting state scans, task fMRI scans will be run. Windows shortcuts are located on the E-Prime Desktop > ”Run HCP Experiments”. The basic process for each is • Load E-Prime script for upcoming task. Enter Session ID and correct run number. • Read recap instructions aloud to participant before 1st run of the task. (Skip recap instructions before 2nd run of task.) • Progress to “Get Ready” screen • Load MR sequence and initiate scan after progressing to “Get Ready” screen • Monitor performance feedback screen, head tracker camera, eye tracker, and scanner console for QC issues • Speak to participant after each scan run to ensure they are still OK ♦ Run scans BOLD_LANGUAGE1_RL, BOLD_LANGUAGE2_LR, BOLD_SOCIAL1_RL, BOLD_SOCIAL2_LR, BOLD_RELATIONAL1_RL, BOLD_RELATIONAL2_LR, BOLD_EMOTION1_RL, BOLD_EMOTION2_LR in order • [IMPORTANT] Ensure that earbud input is switched to “Mini-phono” before starting LANGAUGE scans, and back to “Mic” to talk to participant ♦ If scan is aborted prior to completion (due to scanner, E-Prime, or performance issues), run scan with same phase encoding direction before proceeding to next task • If participant completed less than roughly 20% of task before scan was aborted: ⇒ Use same run number (i.e. same stimuli and trial order) when launching EPrime Q3 Reference Manual – Appendix IV | WU-Minn Consortium of the NIH Human Connectome Project Page 54 • • ⇒ Use same run number for Series Description name on scanner ⇒ Example: If BOLD_ LANGUAGE 1_RL was aborted before participant completed 20% of task, start E-Prime with same run number, copy scan in exam card, run scan again immediately without changing Series Description name. If participant completed more than roughly 20% of task before scan was aborted: ⇒ Use new run number (i.e., new stimuli and trial order) when launching EPrime Example: If BOLD_LANGUAGE1_RL was aborted after participant completed 20% of task, start E-Prime with unique run number (since run 2 is still in the queue, use run 3), copy BOLD_ LANGUAGE 1_RL scan in exam card, change run number in Series Description name from BOLD_ LANGUAGE 1_RL to BOLD_ LANGUAGE 3_RL, run new scan immediately. ♦ Quality check: Task performance. During the scan, monitor that the participant is performing the tasks correctly. • • • • • Total number of valid responses should be at least 60% percent of current trial number Monitor for 5 or more consecutive non-responses Monitor for 5 or more consecutive RTs < 200ms If any of these are observed early in the scan (e.g., first third), abort the scan, and communicate with the participant appropriately. Then start the scan over. If these are observed late in scan, take note on readme, and communicate with the participant appropriately. Then add an additional scan of that type (with the same phase encode direction). ♦ Quality check: Session documentation worksheet (aka readme) • Ensure that any abnormalities, issues, or atypical occurrences for each scan are documented in detail on the readme. 9. Ending Procedures 9.1. Put physiological monitoring sensors back on charging rack in control room 9.2. Get auxiliary data from devices ♦ Head tracker log files: from scanner host C:\MedCom\log\temp\xpace ♦ Siemens physio log files: 9.3. A participant may re-use their own linens. Thus, it is not necessary to replace the linens between two or more sequential sessions with the same participant. However, if a different participant is scheduled for the subsequent session, collect the linens and place them in their “belongings” bag for their next session. 9.4. Quality check: Session documentation worksheet (aka readme) Q3 Reference Manual – Appendix IV | WU-Minn Consortium of the NIH Human Connectome Project Page 55 ♦ After data upload to intraDB, transpose notes from readme into notes field ♦ Change usability field to “Unusable” for any certain unusable images (scanner crashed, aborted scans, wrong sequence run, scan was re-run and replaced with later scan, etc.) 9.5. After the last scan of the day, bring the scanner bed back to the Home position 10. Notify Cindy Feldt if Re-scan is needed 11. Upload Data to IntraDB 11.1. Ensure that all data has reconstructed (is it listed in Patient Browser?) 11.2. Imaging Data ♦ In Patient Browser, Click on full session, choose “Send to…” and select “HCP IntraDB” 11.3. Head Motion Log Files 11.4. Physiology Log Files 11.5. E-Prime Files III. Staff training and error prevention measures Before independently performing the procedures described in this SOP, HCP staff members will be trained as follows: • • • Read this SOP. Observe the procedures, when performed by trained study staff or an HCP investigator, two times. Follow the procedures under the direct supervision of trained study staff or an HCP investigator four times. IV. Internal HCP auditing Internal HCP audits of the procedures in this SOP are recommended to include the following steps: • • Review two randomly-selected Session Checklist for each Session type. Verify that all required fields have been filled out on each Checklist and that in each case what on the Session Checklist conforms with the note fields for the same Session in intraDB Observe at least 2 operators performing 2 or more scans each, to check for adherence to the SOP and consistency between operators. Q3 Reference Manual – Appendix IV | WU-Minn Consortium of the NIH Human Connectome Project Page 56 • Discuss with operators which aspects of procedure are difficult to follow as stated in the SOP, and modify SOP or retrain operators as necessary. V. Related SOPs: • Skyra Maintenance and Performance Verification (describes once-daily QC procedures). VI. Document control Document location: This SOP is an on-line document https://wiki.humanconnectome.org/display/cSOPs/Current+SOPs. Paper copies are valid only on the day they are printed. Refer to the author if you are in any doubt about the accuracy of any document(s). Document approval: This SOP requires the approval of the responsible investigator, as do any changes thereto. This SOP has been approved by: Dr. Deanna Barch Q3 Reference Manual – Appendix IV | WU-Minn Consortium of the NIH Human Connectome Project Page 57 Non-Toolbox Behavioral Testing Standard Operating Procedure Version 2 Effective Dates: September 19th, 2012 to [date of issuance of a revision] Planned Review Date: November 15, 2012 Author(s): Cindy Feldt and Deanna Barch The procedures in this SOP should be followed exactly. If changes to the SOP are needed, please send suggested edits to D. Barch, C. Feldt and S. Curtiss I. Scope This standard operating procedure (SOP) describes the procedures and quality control (QC) metrics that will be performed during the non-NIH Toolbox behavioral testing, also known as PennCNP developed by the Gur group at University of Pennsylvania. For further information, including additional manuals and factsheets, please see https://penncnp.med.upenn.edu/doc.pl. It is recommended to read the Administrator’s Manual on this page prior to using this SOP. You must have a login and password to view this information. To obtain a login and password or for other help, contact [email protected]. Requests for logins/passwords will need to be approved by Dr. Deanna Barch. II. Procedures: 1. Have Farnsworth D-15 and MARS testing materials out and ready for use. Also have instructions and score sheets out prior to bringing the participant in the room. Materials for both paper and pencil tests are stored in the organizer on top of the small desk in both exam rooms. 2. OPEN FIREFOX and go to: https://penncnp.med.upenn.edu DO NOT USE THE BACK AND FORWARD BROWSER BUTTONS In the left column, choose Administer CNP Battery. Administrator ID: Your username Password: Your password Q3 Reference Manual – Appendix IV | WU-Minn Consortium of the NIH Human Connectome Project Page 58 3. REGISTER SUBJECT. You will get a screen that looks like: Fill out the above form as follows: Administrator ID: Your username Battery: CONNECTv1: Battery for Connectome Project Site ID: 228WUST Local Subject ID: Leave blank Family ID: click NONFAM Study Subject ID: ###### (6-digit HCP Subject ID) BBLID: Leave blank Click “Start Testing”. The next page will look like the following: Q3 Reference Manual – Appendix IV | WU-Minn Consortium of the NIH Human Connectome Project Page 59 Enter the following information: Date of Birth: Gender: Handedness: Comments: If the person has a vision prescription, please list it here. Ask the participant if have a vision correction (glasses, reading glasses, contacts) and what the strength is, if they know. Leave the following fields blank: Age: Leave blank WRAT Score: Leave blank Education: Leave blank Father’s Education: Leave blank Mother’s Education: Leave blank Click “Submit”. You will see the following Screen: Q3 Reference Manual – Appendix IV | WU-Minn Consortium of the NIH Human Connectome Project Page 60 For all parts of this computer battery, if the participant wishes to withdraw from the remainder of all tests, the administrator must individually “skip” each test for the participant or the system will return you to the last completed point upon next login. If you do not wish to end the test permanently but rather to break temporarily, you can close at any point and will be returned to that point at next login. 4. PAPER AND PENCIL TESTS On the Paper and Pencil Test Scores page, click “Click Here to Continue”. You will get a screen that looks like the following: Q3 Reference Manual – Appendix IV | WU-Minn Consortium of the NIH Human Connectome Project Page 61 Once you have administered the Farnsworth (Described next), you will enter the scores on this screen. FARNSWORTH D-15 DICHOTOMOUS COLOR VISION TEST Ask the participant how the lighting is, if it’s too bright or not bright enough. [Open the case and move all caps (except the test cap), to the top of the open case in random order, color-side up. Leave the test cap pressed onto the block in the bottom of the case. Take out a score sheet from the D-15 Folder.] [Gesturing to the test cap] Say: I would like you to choose the cap that is closest in color to this one and place it next to this cap. [After the participant does that, right or wrong] Say: Please continue to place the caps in order by choosing the cap that is closest in color to the one before. [Do not prompt the participant or correct his/her responses.] [A reasonable time for this task is 1-2 minutes. The participant may check and alter his/her sequence.] Q3 Reference Manual – Appendix IV | WU-Minn Consortium of the NIH Human Connectome Project Page 62 Scoring the Farnsworth Test (i) Using the Farnsworth Dichotomous Color Vision Test: Panel 15 Score Sheet, record the numbers from the backs of the caps in order from left to right. To do this, close the case from bottom up and gently turn the case back over and open it so that the caps (except the test cap) are upside down. • If all of the caps are in order from 1-15, do not retest and proceed to entering the scores on the PennCNP website, choosing “Normal” for Color Vision Category. Always Click on “Binocular.” On the GUR website, enter the participant’s (self-reported) vision correction, if wearing glasses or contacts. If the participant does not know, click “Unknown.” Click “Click Here to Continue”. • If the participant does not get all the caps in order from 1-15, retest one time. (ii) Color Vision Category: Using the scoring chart, plot the participant’s response for test and retest (if applicable) by connecting the dots in the order the participant placed the caps, beginning at the P. If needed, a ruler is in the exam room desk drawer. Normal = (a) all the caps are placed correctly. (b) a maximum of two single transformations (swaps) of adjacent caps – diagram shows one transformation (c) one tritan crossing (line is parallel to tritan line) Q3 Reference Manual – Appendix IV | WU-Minn Consortium of the NIH Human Connectome Project Page 63 Normal - a) Normal - b) Normal - c) Protan = Using this model or the model in the instructions, if any line is parallel to the Protan line, choose Protan (a). Protan - a) Deutan = Using this model or the model in the instructions, if any line is parallel to the Deutan line, choose Deutan (a). Deutan - a) Q3 Reference Manual – Appendix IV | WU-Minn Consortium of the NIH Human Connectome Project Page 64 Tritan = Using this model or the model in the instructions, if two or more lines are parallel to the Tritan line, choose Tritan (a). Tritan - a) (iii) After scoring is complete, record the numbers for both the test and retest (if applicable) on the website. Enter the participant’s (self-reported) vision correction, if wearing glasses or contacts. If the participant does not know, click “Unknown.” Record the numbers for both the test and retest (if applicable) on the website. Enter the appropriate Color Vision Category from drop down menu. Be aware that the program will let you enter Normal vision even if the numbers results are that of an abnormal result – Please double-check your entry before clicking continue. Click “Click Here to Continue” You will get a screen that looks like the following: Q3 Reference Manual – Appendix IV | WU-Minn Consortium of the NIH Human Connectome Project Page 65 Once you have administered the Mars Letter Contrast Sensitivity Test (described below), you will enter the scores on this screen. MARS LETTER CONTRAST SENSITIVITY TEST [Chart, instructions and scoring sheet are kept in the organizer on top of the small desk both testing rooms. Score using the Form # scoring box that corresponds to the Form # on the bottom-center of each chart. Also mark binocular. You will only test binocular vision, not each eye individually.] Dim the lights to the red line (the lowest they will go without turning off). Ask the participant to stand with their heels on the red tape. They should be between 16 and 23 inches from the chart. You can measure the distance from the wall to their eyes, if necessary. The tape measure is on the small desk in both exam rooms. Hang the chart on the Velcro. The participant should keep both eyes open and wear any glasses or contacts as usual. Say: Beginning with the letter in the top-left corner and reading across the row, read each letter to me. There is only a certain set of letters that you can respond with and I will let you know if you give me a letter that is not allowed. Please continue until I tell you to stop or there are no more letters. Read the letters from left to right across each line of the chart. [Using the scoring chart for the appropriate form #, record the participant’s responses. If he/she responds with a letter other than C, D, H, K N, O, R, S, V, or Z, or with a number, do not Q3 Reference Manual – Appendix IV | WU-Minn Consortium of the NIH Human Connectome Project Page 66 score his/her response as incorrect. Instead, inform the participant of the restricted letter set [C, D, H, K, N, O, R, S, V, Z] and ask for another response. Encourage the participant to guess even when he/she reports that the letters appear too faint. Do not terminate testing because the participant has given up or has stopped responding.] Scoring the MARS test [Mark an X in the scoring sheet for each letter incorrectly identified. Terminate testing only when the participant makes two consecutive errors or reaches the end of the chart.] Score the log contrast sensitivity value by using the log number of the last correct letter (prior to two consecutive incorrect responses or the end of the chart), and the number of incorrect responses up to that point (not including the terminating incorrect responses). If the participant reaches the end without two consecutive incorrect responses, simply use the last letter’s value. [On the PennCNP website, enter Log Score of Last Correct Letter. Then, enter Number of Total Errors (prior to and not including the two consecutive errors terminating the test, then tab to or click on the box for “Final Score”. The system will calculate the log number for you. It should equal the Log CS value at final correct response, minus 0.04 for each incorrect response. For an example of scoring, see the MARS User Manual.] Click “Click Here to Continue”. The next screen will ask you to confirm the paper and pencil test scores. It looks like the following: Q3 Reference Manual – Appendix IV | WU-Minn Consortium of the NIH Human Connectome Project Page 67 Confirm that the scores entered on the website match the paper forms. Click “Click Here to Continue”. 5. COMPUTER TASKS The next page asks you to choose which computer test you would like to do and enter any comments. It looks like the following: For “Test Status,” always choose C1. Enter any applicable information in the comment section – this may include questions or concerns from the participant, computer or lighting issues, etc., or leave blank if there are no comments. The next screen will tell you which computer tests have been completed, that this is not a recommended break point and which task is next. It looks like the following: Q3 Reference Manual – Appendix IV | WU-Minn Consortium of the NIH Human Connectome Project Page 68 Click “Continue”. You will see a screen that looks like the following: Say: We will now be doing the rest of the tasks on the computer. Each task is a little different and has its own set of instructions. I will go through the instructions and practice with you. After the practice, you will be able to ask questions about the task, then I will turn around and allow you to complete the task. When the screen shows the task is complete and ready to be submitted, let me know and we will move on to the next one. [Read through the instructions on each screen and watch the participant practice. Once he/she seems confident to start the task, allow the participant to continue.] C1 – DELAYED DISCOUNTING When the participant is ready to begin, click “Click Here to Continue.” Read the Screen, by saying: The purpose of this task is to measure your preferences for different hypothetical amounts of money. Please make your decisions as if all choices involved were real. We are interested in which reward you would choose to receive if you were offered these choices for real. There are no correct or incorrect choices. Two amounts of money will appear on the screen. One amount can be received right now. The other amount can be Q3 Reference Manual – Appendix IV | WU-Minn Consortium of the NIH Human Connectome Project Page 69 received later. The screen will show you how long you will have to wait to receive that amount. The amount of the “right now” reward will change after each of your decisions. The “later” reward will stay the same for a group of choices. Click “Click here to Continue” Read the Screen, by saying: Indicate the option you would prefer by clicking on one of the blue buttons. You will get to practice before you begin, so don’t worry if you might not understand everything yet. Many people say the task makes more sense once they begin. During practice, ask as many questions as you like. Once the actual task begins, we cannot answer any further questions, so please be sure you understand the decision-making task before the end of the practice choices. Do you have any questions? [Before the practice, if you need to review any of the instructions, please click the “Go Back” button in the bottom-left of the page. Do not use the browser back button.] Click: “Click Here to Continue” You will now see a “BEGIN PRACTICE” screen. It looks like: Say: Do you have any questions before we begin? If the participant is ready to do the Practice, click “Click Here to Continue”. [The participant will complete 4 practice statements] [Answer any questions, repeat practice, if necessary, by clicking the “Go Back” button, repeat instructions and practice.] If the participant is ready for task, on BEGIN TEST page, click “Click Here to Continue”. [The participant will complete 60 test statements.] Q3 Reference Manual – Appendix IV | WU-Minn Consortium of the NIH Human Connectome Project Page 70 When the task is done, the next page will look like the following: “Results have been saved for: Delayed Discounting Task” page – leave test status as C1, report any applicable comments. Click “Submit” The next screen will tell you which computer tests have been completed, that this is not a recommended break point and which task is next. It looks like: Click “Continue”. C1 - NEO-FFM Clicking “Cancel” during this task will skip the remaining questions and not allow you to go back in. Inform the participant not to click “Cancel”, and to ask you, the administrator, if they have any questions or concerns. The next screen looks like: Q3 Reference Manual – Appendix IV | WU-Minn Consortium of the NIH Human Connectome Project Page 71 Say: The following questions contain phrases describing people’s behavior. Please indicate how each statement describes YOU by choosing a response from the following scale. Please base your answers on how you are NOW, not how you would like to be or how you think a person should be. For the following questions, please select the response which most closely matches how you feel. Please respond to every item. If you are not sure, give you best estimate. Use SD for Strongly disagree, D for Disagree, N for Neither disagree nor agree, A for Agree and SA for Strongly Agree. Do you understand the instructions? Click “Yes” or “No”, then “Continue”. If “No,” repeat instructions, then click “Continue” if the participant understands. Say: For the following questions, please select a number which most closely matches how you feel. Tell the participant that you will sit at the other table, for their privacy, but if they have any questions they should ask. Go sit at the other table with your back to the participant. [The participant will read through statements and make his/her responses. If the participant wants to change his/her mind, he/she can simply click the preferred response. Make sure the participant answers each statement. When the participant is done with each page (2-4), instruct him/her to click “Continue”.] On Results page, leave test status as C1 and enter any applicable comments or concerns. Click “Continue”. The next screen will tell you which computer tests have been completed, that this is not a recommended break point and which test is next. Q3 Reference Manual – Appendix IV | WU-Minn Consortium of the NIH Human Connectome Project Page 72 Click “Continue”. C1 – SHORT PENN CONTINUOUS PERFORMANCE TASK – NUMBER LETTER VISION When the participant is ready to begin, click “Click Here to Continue”. Say: This test has two parts. In the first part, you will see lines on the screen. Whenever the lines make a complete NUMBER, quickly press the spacebar. [Explain examples to the participant and answer any questions.] Say: Let’s practice. Click: “Click Here to Continue”. Begin NUMBER Practice: Click, “Click Here to Continue”. The next screen quickly counts down 5 seconds and starts practice. Say: Press the space bar to respond. [The screen will display “Correct” feedback when the participant answers correctly. If incorrect, there will be a prompt screen.] If the participant pressed spacebar for an incomplete NUMBER: Say: That was INCORRECT. You did not see a complete number. Press the spacebar only when you see a complete number. Press the spacebar to continue. If the participant did not press spacebar for a complete NUMBER: Say: That was INCORRECT. You saw a complete number but did not press the spacebar. Press the spacebar whenever you see a complete NUMBER. Press the spacebar to continue. [The practice will continue.] Say: Fantastic! In the second part, whenever the lines form a complete CAPITAL LETTER, quickly press the spacebar. [Explain examples to the participant and answer any questions.] Say: Let’s practice. Q3 Reference Manual – Appendix IV | WU-Minn Consortium of the NIH Human Connectome Project Page 73 Click “Click Here to Continue” When the participant is ready to begin, click “Click Here to Continue”. Say: Press the spacebar to respond. [The participant will receive “Correct” feedback if the answer is correct. If incorrect, there will be a prompt screen.] If the participant pressed spacebar for an incomplete LETTER: Say: That was INCORRECT. You did not see a complete letter. Press the spacebar only when you see a complete letter. Press the spacebar to continue. If the participant did not press spacebar for a complete LETTER: Say: That was INCORRECT. You saw a complete CAPITAL LETTER but did not press the spacebar. Press the spacebar whenever you see a complete CAPITAL LETTER. Press the spacebar to continue. [The practice will continue.] Say: GREAT. Remember: In the first half, press the spacebar when you see a NUMBER. In the second half, press the spacebar when you see a LETTER. A message will tell you when to switch. [If the participant needs to repeat the practice(s), press the Go Back button in the bottom-left corner.] When the participant is ready to go on to the task, click “Click Here to Continue”. Say: In the test, you will see different numbers and capital letters than you saw in the practice. Here are some examples: [review examples with the participant]. Let’s begin! Click “Click Here to Continue”. Say: You will not receive feedback during the test. Remember to press the spacebar to respond. When the participant is ready to begin, click “Click Here to Continue.” Q3 Reference Manual – Appendix IV | WU-Minn Consortium of the NIH Human Connectome Project Page 74 On Results page, enter any applicable comments or concerns. Leave Test Status as C1 and click “Submit”. The next screen will tell you which computer tests have been completed, this is not a recommended break point and which test is next. Click “Continue”. C1 – PENN WORD MEMORY TEST When the participant is ready to begin, click “Click Here To Continue”. Say: This is a test of your ability to remember new words. You will be shown a series of words. Try to remember each word. You will later be shown another group of words. This second group will include the words you have been asked to remember, mixed with an equal number of new words. You will be asked to decide whether each word in the second group is one of the words in the first set. Click “Click Here to Continue”. On the Begin Presentation Screen, click “Click Here to Continue” when the participant is ready to begin. [Words will be displayed to the participant that he/she should try to remember.] Say: This is a test of your ability to remember new words. Now that you have seen some words, you will be shown a new group of words. This new group will include the words you have seen mixed with an equal number of new words. You will be asked to decide whether each word in the second group is one of the words in the first set. You will have four choices: Definitely Yes, Probably Yes, Probably No, Definitely No. Definitely Yes = I am sure I saw the word in the first set. Probably Yes = I think I saw the word in the first set. Probably No = I think the word was not in the first set. Definitely No = I am sure the word was not in the first set. Use the mouse to select your response for each word. Click “Click Here to Continue”. [The participant will respond to each word presented using the mouse.] On Results page, enter any applicable comments or concerns. Leave Test Status as C1 and click “Submit”. Q3 Reference Manual – Appendix IV | WU-Minn Consortium of the NIH Human Connectome Project Page 75 The next screen will tell you which computer tests have been completed, this is not a recommended break point and which test is next. Click “Continue”. C1 - PENN MATRIX ANALYSIS TEST When the participant is ready to begin, click “Click Here to Continue”. Say: In this test, you will see a pattern on each page. Each pattern will be missing a piece. Click on the square at the bottom that best completes the pattern. Let’s practice. Click “Click Here to Continue”. When the participant is ready to begin, click “Click Here to Continue”. [The participant will start the practice. Feedback will be at the top of the page. There will be three practice patterns. If the participant would like to practice again, press the Go Back button in the bottom-left.] When ready to start the task say: The test will begin. Click only ONCE on your answer. Click “Click Here to Continue”. [There is no time limit for answering. If the participant appears stuck, prompt him/her to guess.] On Results page, enter any applicable comments or concerns. Leave Test Status as C1 and click “Submit”. The next screen will tell you which computer tests have been completed, this is not a recommended break point and which test is next. Click “Continue”. Q3 Reference Manual – Appendix IV | WU-Minn Consortium of the NIH Human Connectome Project Page 76 C1- VARIABLE SHORT PENN LINE ORIENTATION TEST When the participant is ready to begin, click “Click Here to Continue”. Say: You will see two lines. The RED line is fixed in place. The BLUE line can be rotated around its center. Rotate the BLUE line until it has the same orientation as (or is parallel to) the RED line. [Review the examples with the participant and answer any questions]. Can you show me with two fingers what parallel lines look like? [The participant is to demonstrate with his/her fingers what parallel lines look like.] Click “Click Here to Continue”. Say: Rotate the BLUE line by clicking on the square buttons. The picture on the button shows the direction that the BLUE line will rotate. Try to rotate the BLUE line to the correct position with as few clicks as you can. Click “Finished” when you are done. Let’s practice. Click “Click Here to Continue”. [The participant will complete one practice as instructed. Prompt him/her to begin, if necessary.] Say: The lines will begin in different places on each page. They will also move a different amount with each click on different pages. Just remember to rotate the BLUE line so it is parallel to the red line. Please sit at your normal viewing distance from the screen and use only your eyes to judge the positions of the lines. The test will begin now. Click “Click Here to Continue”. Say: Do you have any questions before we begin? [If the participant would like to review the instructions, press the “Go Back” Button in the bottomleft.] When the participant is ready to begin, click “Click Here to Continue”. On Results page, enter any applicable comments or concerns. Leave Test Status as C1 and click “Submit”. The next screen will tell you which computer tests have been completed, this is not a recommended break point and which task is next. Q3 Reference Manual – Appendix IV | WU-Minn Consortium of the NIH Human Connectome Project Page 77 Click “Continue”. C1 – PENN EMOTION RECOGNITION TEST When the participant is ready to begin, click “Click Here to Continue”. Say: In this test, you will see some faces. Look carefully at each face and decide what emotion is showing. How does this person feel? Click on the word that best describes the emotion. Click “Click Here to Continue”. Say: If the person isn’t showing any feeling, click on “No Emotion.” Let’s try a practice face… Click “Click Here to Continue”. When the participant is ready to begin, click “Click Here to Continue”. [The participant will click on the emotion word that matches the expression. Feedback will be presented at the top of the screen.] Click “Click Here to Continue”. Say: The test will begin now. Remember to look at each face carefully. Be as fast and as accurate as you can. Click “Click Here to Continue”. When the participant is ready to begin, click “Click Here to Continue”. On Results page, enter any applicable comments or concerns. Leave Test Status as C1 and click “Submit”. The next screen will tell you which computer tests have been completed, this is not a recommended break point and which task is next. Click “Continue”. Q3 Reference Manual – Appendix IV | WU-Minn Consortium of the NIH Human Connectome Project Page 78 C1 - ASR VIII SCALE Say: Below is a list of items that describe people. For each item, please click on 0, 1, or 2 to describe yourself over the past 6 months. Please answer all items as well as you can, even if some do not seem to apply to you. [Show the participant that 0 = Not True, 1 = Sometimes True and 2=Often True. ] Tell the participant that the program will not progress to the next page if they do not respond to each answer. There will be a red message at the top of the screen and the numbers of the unanswered statement(s) will turn red. Tell the participant that you will sit at the other table, for their privacy, but if they have any questions they should ask. Go sit at the other table with your back to the participant. The participant can change his/her answer if necessary prior to moving to the next page. On #56, if the participant appears confused or questions where the response buttons are, prompt him/her to answer statement a) through i). The participant should click “Continue at the bottom of each Page 1-6.] On Results page, enter any applicable comments or concerns. Leave Test Status as C1 and click “Submit”. The next screen will tell you that the battery is complete. Click “Submit”. Testing is complete and all data has been saved to the PennCNP website. [You should receive an email confirming submission of the data to the PennCNP lab.] 6. STOPPING AND RESTARTING TESTING To stop the battery, click “Quit” on the page that states which tests you have completed and which test is next, or you can close your browser. Your work up to that point (the most recent completed test) will be saved. To restart, enter the participant’s ID number on the registration screen. You will be informed that testing for this participant was started on a certain date and is incomplete. Please choose “Continue Battery” or “Restart Battery”. Unless there is a specific reason, you should choose “Continue Battery”. The program will take you to the next incomplete test. Continue as described above. Q3 Reference Manual – Appendix IV | WU-Minn Consortium of the NIH Human Connectome Project Page 79 7. DATA RETRIEVAL At the end of each day of testing, the data collected in the Other Behavioral Testing (Gur) session should be retrieved for upload into Connectome DB as described in this section and the Data Upload SOP. TO VIEW RESULTS/SCORES and RETRIEVE DATA Open FIREFOX and Go to: https://penncnp.med.upenn.edu DO NOT USE THE BACK AND FORWARD BROWSER BUTTONS In the left column, choose View Results/Scores Administrator ID: Your username Password: Your password The screen will look like: Click on CONNETv1 under “Battery” Q3 Reference Manual – Appendix IV | WU-Minn Consortium of the NIH Human Connectome Project Page 80 Click on “Include Incomplete Batteries” at the bottom of the upper half of the screen. Under Report Options for Exporting Test Scores, change report to ##:” CONNECTv1_scores_duplicate_….” Each administrator will have their own ##, i.e. 16:CONNECTv1_scores_duplicate_feldtcfeldtc Click on Export Report To CSV. You will get the following screen: Click on “Download Data”. Q3 Reference Manual – Appendix IV | WU-Minn Consortium of the NIH Human Connectome Project Page 81 It will ask you what you want to do with the data. Click “Save File” Then click “Logout”. In the Firefox menu, go to the “Window” pull down menu. Click on “Downloads” The file you just downloaded should be the first file in the list. The first four numbers should be the year, and the second four numbers should be the month and date. If you double click on it, it should open in Excel. This is the file that will need to be uploaded into the ConnectomeDB. Study Coordinator will double check that all participants’ data are intraDB weekly. A spreadsheet of these checks will be kept by the coordinator. TO UPLOAD DATA TO THE CONNECTOME DB Open Mozilla Firefox. Go to https://intradb.humanconnectome.org/ and login Click on Phase II Family Subjects. Click on Upload. Q3 Reference Manual – Appendix IV | WU-Minn Consortium of the NIH Human Connectome Project Page 82 Click on Upload GUR (Behavioral) Export File. Browse for the saved GUR Export .csv file. If applicable, click the box to update all existing records. Click submit. IV. Quality Metrics 1. Staff training and error prevention measures • Before independently performing the procedures described in this SOP, HCP staff members will be trained as follows: • Read the PennCNP Administrator’s Manual • Read this SOP • Observe the procedures, when performed by trained study staff or an HCP investigator, at least twice. • Follow the procedures under the direct supervision of trained study staff or an HCP investigator at least three times. • Staff members’ observations, concerns, and suggestions for error prevention and improving consistency will be an agenda item at staff meetings at least monthly. 2. Internal HCP auditing/calibrations • To verify that different RAs are performing the testing in a consistent manner, the mean, range and standard deviation of scores for each test will be examined. These data can be calculated and reported in Connectome DB and will be examined quarterly for at least the first year (in July and October 2012 and January, April and July 2013). Thereafter, if there have been no personnel Q3 Reference Manual – Appendix IV | WU-Minn Consortium of the NIH Human Connectome Project Page 83 changes among the RAs, data will be examined at least every 6 months. If a new RA is hired, cross-RA consistency for each RA will again be evaluated quarterly for the first six months. Acceptance criteria: Each individual RA’s test means should fall within a 90% confidence interval of the grouped means of all RAs. Each individual RA’s test ranges should appear quantitatively similar to the group mean. Failure response: Any RA whose results do not meet the acceptance criteria for any test will be re-trained on this behavioral test. • • Other periodic internal HCP audits of the procedures in this SOP are recommended to include the following steps: Each new RA will be observed quarterly for the first six months and every six months thereafter. Any questions or observations about consistency between RAs should be discussed with Deanna Barch for potential follow-up. V. Related SOPs: • Connectome DB Data Upload SOP VI. Document control Document location: This SOP is an on-line document https://wiki.humanconnectome.org/display/cSOPs/Current+SOPs. Paper copies are valid only on the day they are printed. Refer to the author(s) if you have any doubt about the accuracy of this document. Document approval: This SOP requires the approval of the responsible investigator, as do any changes thereto. This SOP has been approved by: Dr. Deanna Barch Q3 Reference Manual – Appendix IV | WU-Minn Consortium of the NIH Human Connectome Project Page 84 NIH-Toolbox Behavioral Testing Standard Operating Procedure Version 1 Effective Dates: August 10, 2012 to [date of issuance of a revision] Planned Review Date: August 15, 2012 Author(s): Cindy Feldt and Deanna Barch The procedures in this SOP should be followed exactly. If changes to the SOP are needed, please send suggested edits to D. Barch, C. Feldt and S. Curtiss I. Scope This standard operating procedure (SOP) describes the methods and quality control (QC) metrics that will be performed as part of the NIH Toolbox Behavioral Testing. The output of this SOP will be data that will be scored and normed at Northwestern University, then returned upon request to WashU for upload into Connectome DB. II. Setup and Pre-Assessment Quality Metrics: 1. Set-up • Ensure that all computer equipment meets requirements described in NIH Toolbox Manual (ver.6.4.12), including two corded mice (one each for participant and examiner) and a separate keyboard and 19” widescreen monitor for the participant. • Examiner should sit to the right of the participant, preferably around the corner of the desk to ensure that the participant cannot see the examiner’s screen. • It is preferable that the examiner have a chair with wheels for moving between both computers. The participant should have a chair without wheels to inhibit excess motion or fidgeting and to ensure stability during the hand dexterity test. The participant’s chair should also have no arm rests, also for administering hand dexterity test. • Have all supplies arranged and ready for testing prior to bringing participant in the testing room. • Supplies for walk tests are located in the tall shelf outside the Bay 2 Control Room. Q3 Reference Manual – Appendix IV | WU-Minn Consortium of the NIH Human Connectome Project Page 85 • All supplies requiring batteries should be turned on and checked for power prior to bringing participant in testing room. • When participant is brought into testing room, double-check which hand they prefer to use for the mouse and keyboard arrows – arrange space accordingly. • Ask the participant if the lighting is too bright or dim, and adjust if necessary. • Put Testing in Progress Sign on outside door jam and request quiet from HCP staff. • Pick up 1 Liter each of NaCL and quinine taste solutions from Metabolic Kitchen Barnard 543 every Monday after 9am. Contact Johanna Sonnenschein at 314362-7630 or [email protected] to arrange pickup. • Taste solutions will be either wrapped in foil or in tinted glass containers to protect them from light exposure. Put the bottles in the small refrigerator in the observation room, HCP Suite 1104C. Keep taste solutions refrigerated until day of use. Set out amount to be used each day, at least two hours prior to use, to warm to room temperature. Using pipette, put 10 mL of each solution in medicine cups, put medicine cups in muffin pans. Both solutions are clear, like water. Make sure you put the quinine solution in the muffin tin marked “Quinine” and put the NaCl in the muffin tin marked “NaCl”. Always cover completely with foil. Turn out the lights when you leave the room. Dump any unused solution at the end of the day. Throw away the used medicine cups and used pipettes. Prior to picking up new solutions on Monday, dump any unused solution and return bottles to Johanna. • When returning from Walking Tests, pick up one cup of each taste solution in the observation room, 1104C and take to the testing room for participant use. These individual cups no longer needs to be covered with foil – re-cover any unused cups (cups for other participants the same day) with foil and turn off the light when leaving the room. 2. Supplies • 9-Hole Peg-Test Kit with non-slip pad and 4-5 extra pegs • Stopwatch (off-white with milliseconds – located outside Bay 2 Control Room) • Tape Measure (located outside Bay 2 Control Room) • Clipboard • Blue (as needed) and White masking tape (only when rebuilding walking course) • Two 8-inch colored cones (located outside Bay 2 Control Room) Q3 Reference Manual – Appendix IV | WU-Minn Consortium of the NIH Human Connectome Project Page 86 • Dynamometer • Armless chair w/o wheels • Small Stool if needed (for participants whose feet do not comfortable touch the floor from chair). • Laminated instruction sheets for Motor domain (located outside Bay 2 Control Room) • Scratch n’ sniff cards (set of 9) per participant w/guitar pick for scratching (have extra guitar picks and paper towel handy) • Paper towels • Sanitary wipes • Cup of water for taste test • Laminated instruction cards for taste procedure • Gloves • Two cotton-tipped applicators • Test solutions 1 and 2 for taste test, one 10 mL medicine cup of NaCl solution, one 10 mL cup of quinine solution • Cup of room-temperature purified water from water cooler in lobby • Cup for spitting • Absorbent pad to go under spit cup • Headset supplied by Northwestern University • External soundcard supplied by Northwestern University • RadioShack sound meter with Digital-Acoustics Coupler for headset calibration (only for audition Hearing Threshold battery, not needed for Words in Noise). 3. Pre-assessment Quality checks • All RAs will have an mp3 file named English Reading Pronunciations containing the appropriate pronunciation for each word presented during this task. They should be familiar with all of the words and the appropriate pronunciations prior to administering this task. The English word list and pronunciation guide is available on the NIH Toolbox website. • Batteries are needed for stopwatches (watch battery) and dynamometers (AA). Q3 Reference Manual – Appendix IV | WU-Minn Consortium of the NIH Human Connectome Project Page 87 • Check the atomic clock online at http://www.time.gov/, click on the State of Missouri for Central Time. Make sure the time on the stopwatch is correct and that it is keeping time with the atomic clock. If it is not (if it’s slow), replace the battery and tell the study coordinator. • Remaining battery life is to be checked prior to starting testing with participant. If power is low (as indicated by battery meter on dynamometer or by dim display on stopwatch, or by atomic clock check), replace batteries and notify coordinator that backup batteries were used. • Test dynamometer once prior to bringing participant in room. • Check walk course monthly to ensure tape hasn’t been moved and isn’t too worn. If it shows signs of wear and tear, replace with new tape. Measure before placing new tape. • Keep taste solutions refrigerated in tinted liter bottles and capped. Set out amount to be used each day, at least two hours prior to use, to warm to room temperature. Each cup should have 10 mL of solution. Put medicine cups in muffin pans and cover pans with tin foil. Turn out lights when you leave the room. • Calibrate headphones for Hearing Threshold testing (not Words in Noise) if headphones are dropped or location of testing changes (i.e. different room, etc.). See calibration manual provided by Northwestern. • Test audio through laptop and headphones. III. Administer Toolbox – Assessment Center 1. Launching Study – Only needs to be done when study is launched for the first time or after changes to battery. • USE INTERNET EXPLORER ONLY • Click on Internet Explorer on Toolbox Laptop. You should be taken directly to the participant login page: Q3 Reference Manual – Appendix IV | WU-Minn Consortium of the NIH Human Connectome Project Page 88 • If you are not taken to the above page, click on the Favorites icon and click HCP. • If you, still, are not taken to the above page, you must go to https://www.assessmentcenter.net/Default.aspx • Login in, in the upper right hand corner. • Click on Preview Tab (clicking on the HCP link will not take you anywhere) • Click Launch Study. That page looks like this: Q3 Reference Manual – Appendix IV | WU-Minn Consortium of the NIH Human Connectome Project Page 89 • Click on the link to start the study, and you will be taken to the “Welcome to HCP” participant login page. • Study Coordinator will pre-register all participants after they are scheduled and confirm their visit. 2. Pre-Register Participant • Click on Internet Explorer. Go to Assessment Center, https://www.assessmentcenter.net/Default.aspx • Login • Go to the Administration Tab and click Find/Create Login • You will be taken to this page: Q3 Reference Manual – Appendix IV | WU-Minn Consortium of the NIH Human Connectome Project Page 90 • Study Arm = Assessment; Schedule = Default, Date Approach=Date of testing, Site=Internet, Check Create participant login, Login=SubID (HCP 6-digit subject #), Password=hcp (always all low-caps), baseline=null (leave blank), Consent=Yes for all Phase II participants, Test for practice or test run used by staff, leave non-Enrollment and Reason off Study blank. DO NOT CLICK REGISTER PARTICIPANT YET. • Click on Participant Details tab • Enter participant’s age, gender, ethnicity and race. This information should be in Strata. Ethnicity may not always be in Strata. If ethnicity is unknown, click Not Q3 Reference Manual – Appendix IV | WU-Minn Consortium of the NIH Human Connectome Project Page 91 Provided and update after Intake Session. DO NOT ENTER DOB. Leave Doctor field blank. DO NOT CLICK REGISTER PARTICIPANT. • Click on Registration Details Tab, Click Register Participant. • If running participant immediately, at the computer you used to register, you can click on the link at the bottom of the Registration Details Page to launch their study. If running participant on a separate computer and/or at a later time, log out of Assessment Center and close page. 3. Participant Login • Click on Internet Explorer. The Home Page should be set to the participant login page. If not, click the favorites icon in the upper-right corner, click on Toolbox, and you will be taken to the participant login page. The login is the participant’s Subject ID. The pin is hcp. • Enter participant’s age or ask participant to enter their age, ethnicity, race, and gender. (This will pop up on the participant’s screen). • During the testing, if you need to switch screens or have easy access to the participant’s screen, rather than typing over their shoulder, please press fn+f7 and switch from extend to computer-only. Remember to switch this back when you want the participant to have access to the main screen again. • The Examiner’s screens will give you the options to Skip Test or Stop Test. If you click either of these options, you will not go be able to go back later and restart those particular tests. 4. Domain 1 – Handedness and Education • Ask the participant if he/she is right or left handed, or unsure. The examiner will choose the response using the handedness screen drop-down menu. Make sure what you enter matches their dominant hand as designated on the participant readme. Verify with the participant that the keyboard and mouse are positioned for the hand they prefer to use them with. • Ask the participant their education level and enter it using the drop-down menu. If they are currently in school, you will count how many years but not include the degree if they have not completed it yet (i.e. if they are in their second year of their Bachelor’s Program, please enter 13 years of school completed). Q3 Reference Manual – Appendix IV | WU-Minn Consortium of the NIH Human Connectome Project Page 92 5. Domain 2 – Cognition A. Picture Vocabulary • Read the instructions from the Examiner’s screen: Say: “You are going to be asked the meaning of some words. For each item, you will hear a word and see four pictures on the screen. Click on the picture that you think best matches the meaning of the word that was said. If you are not sure, make your best guess. If you need to hear the word again, click on the button that has a picture of an EAR, also called the PLAY AGAIN button. After you make your choice and click on a picture, the computer will automatically go to the next word and pictures. You will keep hearing words and clicking on pictures until you are done. If you want to change your choice, click on the button with the HAND that says GO BACK and change your choice. Each time you make a choice, the computer automatically gives you a new word and a new set of pictures. Remember, if you are not sure of an answer, make your best guess. Tell me when you are ready to start.” • When the participant is ready to begin, press the “Next” button. You must click on the word NEXT and not the hand. This applies to all buttons – always click on the words: the symbols do not work. • Practice item 1: The computer says: Let’s try one for practice: Banana. Click on the picture of Banana. If correct, the computer says: That’s right! The computer will automatically go to the next practice item. If incorrect, the Banana picture lights up and the computer says: This is a banana. Let’s try again. • The examiner should allow the participant up to three chances to correctly answer this practice item. After three unsuccessful attempts by the participant, the examiner should click on the picture of the banana and say: “This is a banana.” The computer will automatically go to the next practice item. • Practice item 2: The computer says: Let’s try another word: Spoon. Click on the picture of Spoon. If correct, the computer says: That’s right! If incorrect, the Spoon picture lights up and the computer says: This is a spoon. Let’s try again. The examiner should allow the participant up to three chances to correctly answer this practice item. After three unsuccessful attempts by the participant, the examiner should click on the picture of the spoon and say: “This is a spoon.” • Before going on, the examiner should review the task with the participant, saying: “Remember, you will hear a word and then you will see four pictures. One of the pictures will show what the word means. Click on that picture; then you will hear another word and see four more pictures. Again, click on the picture that shows what the word means. If you don’t know an answer, Q3 Reference Manual – Appendix IV | WU-Minn Consortium of the NIH Human Connectome Project Page 93 make your best guess. Any questions?” The examiner should answer any questions the participant asks before moving on. • Test items: The examiner says: “Now, we’re going to do some more. Some of the words will be easier and some will be more difficult. Just try your best on each question. When you’re ready, click the NEXT button to start.” • Words and sets of pictures will be presented until the test is completed. Each time, the recording will say: [Word]. If necessary, prompt the participants that they will hear only the word presented each time and no introductory phrase, such as click on the…. • Remember: If a participant has difficulty using the mouse, he/she may point and the examiner can operate the mouse. If the participant says that he/she does not understand the word after several repetitions, the examiner may say the word one more time. B. Flanker • Be aware that the examiner instructions will appear on the participant’s screen. Please position your chair to read from the participant’s screen. • Move the participant’s mouse back – he/she will use the navigation left/right arrows for this task. • Practice Introduction: Say: “In this task, you will see a row of arrows. You should choose the button that matches the way the MIDDLE arrow is pointing.” • Point to the left arrow on the participant’s screen and demonstrate the use of the index finger only to choose the correct arrow. Q3 Reference Manual – Appendix IV | WU-Minn Consortium of the NIH Human Connectome Project Page 94 • Say: “If the MIDDLE arrow is pointing this way, choose this button.” Press the correct arrow for the participant with your index finger. • Say: “If the MIDDLE arrow is pointing that way, choose that button.” Press the correct arrow for the participant with your index finger. • Say: “Sometimes all the arrows point the same way. Sometimes the middle arrow faces or points a different way, like this [picture of incongruent arrows]. You should always choose the button that matches the way the MIDDLE arrow is pointing. You will see the word MIDDLE to remind you.” Press the correct arrow for the participant with your index finger. • Transition to practice items: Say: “Now you try. Keep your eyes on the star. Answer as fast as you can without making mistakes. If you make a mistake, just keep going.” Click “Next” on examiner’s screen. • The participant will complete four practice items. Make sure they are using the index finger only, on their dominant hand. If you see them using two fingers, one on each arrow, remind them to use only their index finger. • If the participant misses more than one practice item, he/she will be directed to complete another set of four practice items. Repeat practice instructions, read from the screen, and answer any questions the participant has. • If the participant misses more than one item on each of the three practice trial sets, the Flanker task will terminate and will move on to the next task, List Sorting. • If the participant gets at least three practice items correct on any of the practice trials, he/she will move directly to the Flanker task. Q3 Reference Manual – Appendix IV | WU-Minn Consortium of the NIH Human Connectome Project Page 95 • Test Items Introduction: “Now you’re ready to do this without me. Keep your eyes on the star. Answer as fast as you can without making mistakes. If you make a mistake, just keep going.” The participant will complete 20 test items. Watch to make sure they only use their index finger to respond. C. List Sorting • For the practice items, participants have 3 tries to answer correctly. The examiner records the participant’s performance on the examiner screen by indicating which trial the participant answered correctly. The last choice on the examiner screen indicates that the participant never answered correctly; when this happens, the test will be discontinued and no more items will be presented. • Introduction: Say: “I’m going to show you some pictures one at a time on the screen. After each set of pictures, you will see a blank screen. When you see the blank screen, I want you to tell me the names of the pictures in size order from smallest to biggest. For example, if I show you a motorcycle, a bus, and a car, you would say: motorcycle, car, bus. Do you have any questions? Let’s practice.” Click “Start Test”. • Trial 1: Click PLAY; when the screen is blank, say: “Tell me the animals in size order.” • Correct Response: If participant says DOG, HORSE, say: “That’s right.” Click #1; then click NEXT. Computer automatically goes to next item. Q3 Reference Manual – Appendix IV | WU-Minn Consortium of the NIH Human Connectome Project Page 96 • Incorrect Response: If participant does not say DOG, HORSE, say: “Let’s try that again.” • Trial 2: say: “You saw a DOG and a HORSE; the DOG is smaller than the HORSE. Tell me the animals in size order.” If participant says DOG, HORSE, say: “That’s right.” Click #2; then click NEXT. Computer automatically goes to next item. If participant does not say DOG, HORSE, say: “Let’s try that one more time.” • Trial 3: Click PLAY again; when screen is blank, say: “You saw a DOG and a HORSE; the DOG is smaller than the HORSE. Tell me the animals in size order. Now you tell me the smaller animal (wait for response). Now tell me the bigger animal.” If participant says DOG, HORSE, say: “That’s right.” Click #3; then click NEXT. Computer automatically goes to next item. If participant answers one or both parts of the question incorrectly after 3 trials, click #4; then click NEXT. Test will be discontinued. • 1-List Practice Item 2: Say: “Now we are going to do some more. Are you ready?” • Trial 1: Click PLAY; when the screen is blank, say: “Tell me the animals in size order, starting with the smallest animal.” • Correct Response: If participant says RABBIT, SHEEP, ELEPHANT, say: “That’s right.” Click #1; then click NEXT. Computer automatically goes to next item. • Incorrect Response: If participant does not say RABBIT, SHEEP, ELEPHANT, say: “Let’s try that again.” • Trial 2: say: “You saw a RABBIT, SHEEP and ELEPHANT; the RABBIT is smaller than the SHEEP and the SHEEP is smaller than the ELEPHANT. The RABBIT is the smallest animal, the SHEEP is the next biggest animal, and the ELEPHANT is the biggest animal. Now, tell me the animals in size order, starting with the smallest animal.” If participant says RABBIT, SHEEP, ELEPHANT, say: “That’s right.” Click #2; then click NEXT. Computer automatically goes to next item. If participant does not say RABBIT, SHEEP, ELEPHANT, say: “Let’s try that once more.” • Trial 3: Click PLAY again; when screen is blank, say: “You saw a RABBIT, SHEEP and ELEPHANT; the RABBIT is smaller than the SHEEP and the SHEEP is smaller than the ELEPHANT. The RABBIT is the smallest animal, the SHEEP is the next biggest animal, and the ELEPHANT is the biggest animal. Now, tell me the animals in size order, starting with the smallest animal.” If participant says RABBIT, SHEEP, ELEPHANT, say: “That’s right.” Click #3; then click NEXT. Computer automatically goes to next item. Q3 Reference Manual – Appendix IV | WU-Minn Consortium of the NIH Human Connectome Project Page 97 • 1-List Test Items: Say: “Let’s look at some more pictures. Remember, after you see the pictures you will see a blank screen. Once you see this blank screen, I want you to tell me what you just saw in size order from smallest to biggest. It is important to pay attention to the size of the object on the screen when putting things in size order from smallest to biggest.” Click NEXT. Click PLAY; say (for the first item and then only as necessary): “Once you see the blank screen, tell me what you just saw in size order from smallest to largest.” Mark the item CORRECT (Yes) or INCORRECT (No) based on the participant’s response. • If the participant makes a CORRECT response, the computer will bring up the Pumpkin, Strawberry, Banana series and continue until the participant completes all the items or until a discontinue criterion is met. • If the participant makes an INCORRECT response, the computer will bring up another 2stimulus series: Bird, Cow. If a participant does not succeed with the first item of a set, the second item of that set will be presented (see the tables at end of the introduction for a complete list of 1-List and 2-List test items). 2-List Condition • Introduction. Say: “We’re going to look at more pictures. This time, you will see both food and animals in a set of pictures. I’d like you to tell me the food first, and then the animals, in size order from smallest to biggest. It is important to pay attention to the size of the object on the screen when putting things in size order from smallest to biggest. Let’s start by looking at some more pictures together.” Click NEXT. • 2-List Practice Item 1: Trial 1: Click PLAY; when screen is blank, say: “Tell me the food, then the animal.” • Correct Response: If participant says BANANA, BEAR, say: “That’s right.” Click #1; then click NEXT. Computer automatically goes to next item. Q3 Reference Manual – Appendix IV | WU-Minn Consortium of the NIH Human Connectome Project Page 98 • Incorrect Response: If participant does not say BANANA, BEAR, say: “Let’s try that again.” • Trial 2: say: “The BEAR is an animal; the BANANA is a food. Now you tell me the food first and then the animal.” If participant says BANANA, BEAR, say: “That’s right.” Click #2; then click NEXT. Computer automatically goes to next item. If participant does not say BANANA, BEAR, say: “Let’s try that once more.” • Trial 3: Click PLAY again; when screen is blank, say: “The BEAR is an animal; the BANANA is a food. Now you tell me the food first and then the animal.” If participant says BANANA, BEAR, say:” That’s right.” Click #3; then click NEXT. Computer automatically goes to next item. • If participant answers any part of the question incorrectly after 3 trials, click #4; then click NEXT. Test will be discontinued. • 2-List Practice Item 2: Say: “Now we are going to do some more.” • Trial 1: Click PLAY; when screen is blank, say: “Tell me the food in size order from smallest to biggest and then tell me the animals in size order from smallest to biggest.” • Correct Response: If participant says PINEAPPLE, FROG, TIGER, say: “That’s right.” Click #1; then click NEXT. Computer automatically goes to next item. • Incorrect Response: If participant does not say PINEAPPLE, FROG, TIGER, say: Let’s try that again.” • Trial 2: say: “You saw a frog, a pineapple, and a tiger. The pineapple is a food; the frog is the smallest animal, and the tiger is the biggest animal. Now, you tell me the food in size order starting with the smallest food, and then the animals in size order, from smallest to biggest.” If participant says PINEAPPLE, FROG, TIGER, say: “That’s right.” Click #2; then click NEXT. Computer automatically goes to next item. If participant does not say PINEAPPLE, FROG, TIGER, say: Let’s try that once more.” • Trial 3: Click PLAY again; when screen is blank, say: “You saw a frog, a pineapple, and a tiger. The pineapple is a food; the frog is the smallest animal, and the tiger is the biggest animal. Now, you tell me the food in size order starting with the smallest food, and then the animals in size order, from smallest to biggest.” If participant says PINEAPPLE, FROG, TIGER, say: “That’s right.” Click #3; then click NEXT. Computer automatically goes to next item. • If participant answers any part of the question incorrectly after 3 trials, click #4; then click NEXT. Test will be discontinued. • 2-List Test Items: Say (for the first item and then only as necessary): “Let’s look at some more pictures. Remember, after you see the pictures, you will see a blank screen. Once you see this blank screen, tell me the foods first in size order from smallest to biggest, then the animals, in size order from Q3 Reference Manual – Appendix IV | WU-Minn Consortium of the NIH Human Connectome Project Page 99 smallest to biggest.” Click PLAY; mark the item CORRECT (Yes) or INCORRECT (No) based on the participant’s response. • If the participant makes a CORRECT response to Cow, Popcorn, the computer will bring up a 3-stimulus item: Elephant, Pumpkin, Duck, and continue until the participant completes all the items or until a discontinue criterion is met. • If the participant makes an INCORRECT response to Cow, Popcorn, the computer will bring up another 2-stimulus item: Rabbit, Corn. If a participant does not succeed with the first item of a set, the second item will be presented. If a participant is incorrect on both parts of an item set, the test is discontinued. D. Dimensional Change Card Sort (DCCS) • Practice Intro: Say: “We’re going to play a matching game with colors and shapes.” Click NEXT. • Say: “We’ll play the SHAPE game first. In the SHAPE game, choose the picture that’s the same SHAPE as the picture in the middle of the screen. If it’s a BOAT, choose this picture. If it’s a RABBIT, choose that picture.” Point to boat, press correct arrow, demonstrate use of index finger only (on dominant hand.) • Say: “Now you try. Keep your eyes on the star. Answer as fast as you can without making mistakes. If you make a mistake, just keep going.” Press NEXT. • If the participant does not respond after 5 seconds, the examiner should prompt him/her, saying: “Choose one of the pictures.” • If more practice is needed, previous instructions will repeat. Show participant again, repeat practice. Q3 Reference Manual – Appendix IV | WU-Minn Consortium of the NIH Human Connectome Project Page 100 • The participant must get at least 3 out of 4 practice trials correct in order to advance to the test trials. If the participant gets fewer than 3 out of 4 practice trials correct, he/she will complete up to two more sets of 4 practice trials, with the same cutoff in order to advance to the test trials. If the participant does not meet the cutoff, the task will automatically terminate (i.e., will advance to final screen). • Say: ““We can also match by COLOR. In the COLOR game, choose the picture that’s the same COLOR as the picture in the middle of the screen. If it’s WHITE, choose this picture. If it’s BROWN, choose that picture.” • Say: “Now you try. Keep your eyes on the star. Answer as fast as you can without making mistakes. If you make a mistake, just keep going.” Press NEXT. • Test items: Say: “Now we’re going to play both games together. Remember when you see the word SHAPE, choose the picture tha’ts the same SHAPE as the picture in the middle of the screen. When you see the word COLOR, choose the picture that’s the same COLOR as the picture in the middle of the screen.” Remind participant to use only the index finger on their dominant hand to press the arrows. Click NEXT. • Say: “Now you try. Keep your eyes on the star. Answer as fast as you can without making mistakes. If you make a mistake, just keep going.” Press NEXT. • The examiner should not prompt the participant to respond during the test trials. If the participant does not respond after 10 seconds, the program will automatically advance to the next test trial. • There are 30 mixed trials. E. Pattern Comparison Processing Speed (PC) • Say: “I am going to show you some pictures. On each screen there are two pictures. Sometimes the two pictures are the same, and sometimes the two pictures are NOT the same. If the pictures look the same, choose YES by pressing this button (demonstrate pressing LEFT arrow). If they do NOT look the same, choose NO by pressing this button (demonstrate pressing RIGHT arrow). If you make a mistake during the practice, you will hear a message to try again. I would like you to use your (dominant hand) index finger (show appropriate finger) to respond.” • Say: “Let’s begin our practice.” Click NEXT. • Say: “Are these the same? Remember, choose YES if they look alike or are the same and choose NOT if they do not look alike or are NOT the same.” Q3 Reference Manual – Appendix IV | WU-Minn Consortium of the NIH Human Connectome Project Page 101 • Discontinue questions or prompting when participant understands instructions and task. • The pattern comparison practice items all have the same format. The examiner asks if the two pictures are the same or not the same. If the participant answers correctly, the computer says: “Good Job.” If participant answers incorrectly, the computer explains how the response is wrong and the examiner say: “Let’s try again. Are these the same?” If the participant does not choose the correct response on the second try, the computer moves to the next practice item after repeating the explanation above. The first practice item is detailed below and other items are outlined. • For each practice item, say: “Are these the same”? If correct (YES), computer says: That’s right! Next item will appear. If incorrect (NO), computer says: These pictures look alike or are the same; both pictures are flowers, so choose YES. YES will flash and item will stay on screen. Say: “Let’s try again. Are these the same?” If participant has chosen YES, computer says: That’s right!” Next item will appear. If participant chooses incorrectly again, the computer moves to the next practice item after repeating the explanation above. • If the participant does not respond correctly after both trials on 2 of the 6 practice items, testing will automatically be discontinued. • Test items, say: “Now we’ll do some more. Remember, use your (dominant hand) index finger to respond. Choose YES if the pictures look the same and choose NO if they do NOT look the same” (point to corresponding arrow for YES and NO). “It is important that you choose as quickly as you can.” Click NEXT to start test and, if necessary, give prompts. F. Picture Sequence Memory (PSM) Q3 Reference Manual – Appendix IV | WU-Minn Consortium of the NIH Human Connectome Project Page 102 • Most of the instructions are on the examiner’s screen. • Training Sequence: Before moving on to practice, you must demonstrate moving the boxes on the screen and have the participant demonstrate back to you. Step 1: Moving pictures from the yellow box to the gray boxes. Step 2: Moving pictures from the gray boxes back to the yellow box. Step 3: Moving pictures between the gray boxes. • When first screen appears, say: Now we are going to play a memory game but first I am going to teach you how to move the pictures on this screen. Say: Here you see some pictures in a yellow box (flowers and vase)… You MUST CLICK PLAY to start the training sequence, then read the TRAINING 02 STEP SEQUENCE instructions. The NEXT button will not be activated until the sequence is completed by both the experimenter and the participant, per the instructions on the experimenter’s screen. When completed, click NEXT. • Practice Sequence: There is only 1 practice sequence. Participants will have 4 trials to learn the task. If participant does not succeed in 4 or fewer trials, PSM testing is discontinued automatically. • Before beginning, say: Now, we’re going to play the memory game. I will show you some pictures on the computer. I want you to remember them; then, I want you to show them back to me in the same way I showed you. Now, I’m going to show you how to go camping. Click PLAY. • As pictures are presented, a voice recording will say the appropriate labels. Point to completed sequence and say: That’s how to go camping. • Once computer has scrambled pictures, say: Now, I want you to move the pictures to show me how to go camping. I want you to show them back to me in the same way, in the same order that I showed you. • When participant appears finished, say, Are you finished? When participant says YES or is obviously finished, click NEXT. • If correct, say: That’s right. You showed me how to go camping. You know how to play the game! Now we’re done with practice. Click NEXT. • If participant gives incorrect response, say: Let’s try that again. I am going to show you again how to go camping. Click PLAY. The pictures will again appear and the voice recordings will play. Then say: That’s how to go camping. I want you to put the pictures in the same order, in the same way that I just showed you. Now you try it again. • If participant does not succeed with the Practice Sequence after 4 trials, PSM testing is discontinued. Q3 Reference Manual – Appendix IV | WU-Minn Consortium of the NIH Human Connectome Project Page 103 • Test sequence, Say: Now we are going to do the same thing with more pictures. Say: Now I am going to show you how to play in the park. Click PLAY. As the pictures are presented, a recorded voice will say the appropriate labels. Point to completed sequence and say: That’s how to play in the park. Once computer has scrambled the pictures, say: Now, you move the pictures to show me how to play in the park. I want you to show them back to me in the same way, in the same order that I showed you. • When participant appears finished, ask: Are you finished? When participant says YES or is obviously finished, click NEXT. • Introduce next set of pictures; say: Now we’re going to do the same pictures with some more pictures added. Everyone is asked to do this more than once. Click PLAY. Once computer has scrambled pictures, say: Now, you move the pictures to show me how to play in the park. I want you to show them back to me in the same way, in the same order that I showed you. • When participant appears finished, ask: Are you finished? When participant says YES or is obviously finished, click NEXT. • The test will end itself when the 2 trials have been presented. G. Oral Reading Recognition • All RAs should have an mp3 file containing the appropriate pronunciation for each word presented during this task. They should be familiar with all of the words and the appropriate pronunciations prior to administering this task. The English word list and pronunciation guide is available on the NIH Toolbox website. Q3 Reference Manual – Appendix IV | WU-Minn Consortium of the NIH Human Connectome Project Page 104 • Say: Now I’m going to show you some letters and some words. I want you to read each letter or word out loud. Read each one loud enough so that I can hear you. Some will be easy and some will be hard. Don’t worry if you don’t know the word or its meaning – just read it out loud the best you can. Let’s begin. Click START TEST. • When the first item appears, say: Tell me, what is this letter/word? (Say whichever is appropriate. This prompt can be repeated as many times as is needed.) • If the participant says: I don’t know this one or I can’t read it, say: It is OK if you don’t know the word or what it means – just try to read it as best you can. This prompt can be used to reassure participants if they refuse to read the letters/words. If, after prompting, a participant refuses to offer a response, mark the item incorrect (No) and the computer will move on to the next item. • Once the examiner scores an item (selects Yes or No), he or she should select the NEXT button to move on to the next item. NOTE: The examiner cannot change an item after selecting the NEXT button. 6. Motor Domain • The RA will have a Motor Domain Data Collection Form for each participant. If test is done at computer in testing room (peg test or Dynamometer), data can be Q3 Reference Manual – Appendix IV | WU-Minn Consortium of the NIH Human Connectome Project Page 105 entered on computer rather than on the paper form. Results of both walking tests must be entered on the paper form, then entered into the computer upon return to the exam room. This form should be labeled with the participant’s ID and kept with all other forms throughout the participant’s sessions, then returned to coordinator at the end of the participant’s last session. A. 9-Hole Pegboard Dexterity Test • Set up 9-hole peg test using Rolyan 9-Hole Peg Test Kit as shown below but with all 9 pegs in the dish. Keep extra pegs in your hand. • Place the pegboard on the table, positioning it in front and at the center of the participant’s body. Place the cup with the 9 pegs on the side of the hand being tested. The hand not being tested can be used to stabilize the board. The hand being tested should be flat on the table (palm down) until the administrator says Go. • Participant will practice with dominant hand and then do dominant hand test trial. Then, participant will practice with non-dominant hand and do that test trial. • Practice: Say: In this activity, we are going to see how fast you work with your hands. If handedness not known, use protocol. If examiner knows, say: You usually use this hand, right? (Point to dominant hand.) • Dominant Practice: Say: This is a pegboard and these are the pegs. All the pegs are the same. Pick up the pegs one at a time using this (dominant hand, say: your right or left) hand only. Put them in the holes one at a time until all 9 holes are filled. Then take them all out, one at a time, like this. (Demonstrate). The pegs can be put in the holes or taken out in any order. I have extra pegs, so if you drop a peg, don’t go after it. I’ll put in another one. Continue: Let’s practice with this (point; say: your right or left) hand. You can use your other hand to hold the board in place. Are you ready? 3, Q3 Reference Manual – Appendix IV | WU-Minn Consortium of the NIH Human Connectome Project Page 106 2, 1, Go! Start timer on screen when you say go, move cursor to stop button, and stop timer when participant places final peg back in cup. • Test Trial (dominant): Say: Now I will time how fast you can do this. Pick up the pegs one at a time using only this (point; say: your right or left) hand. Put them in the holes, one at a time, until all 9 holes are filled. Then take them all out, one at a time. The pegs can be put in the holes or taken out in any order. Remember to work as fast as you can. Are you ready? 3, 2, 1 Go! Start timer on screen when you say go, move cursor to stop button, and stop timer when participant places final peg back in cup. As participant is placing final peg, say: And take them out. • Non-Dominant Practice: Turn pegboard around, say: Now we are going to do the same thing with your other hand. Again, pick up the pegs one at a time using only this (point; say: your right or left) hand. Put them in the holes, one at a time, until all 9 holes are filled. Then take them all out, one at a time. The pegs can be put in the holes or taken out in any order. Continue: Let’s practice. Remember, you can use your other hand to hold the board in place. Make sure participant has their hand palm down on the table. Say: Are you ready? 3, 2, 1, Go! Start timer on screen when you say go, move cursor to stop button, and stop timer when participant places final peg back in cup. • Test Trial (non-dominant ): Say: Now I will time how fast you can do this. Pick up the pegs one at a time using this (point; say: right or left) hand only. Put Q3 Reference Manual – Appendix IV | WU-Minn Consortium of the NIH Human Connectome Project Page 107 them in the holes, one at a time, until all 9 holes are filled. Then take them all out, one at a time. The pegs can be put in the holes or taken out in any order. Remember to go as fast as you can. Are you ready? 3, 2, 1 Go! Start timer on screen when you say go, move cursor to stop button, and stop timer when participant places final peg back in cup. As participant is placing final peg, say: And take them out. B. Grip Strength • Move or ask participant to move their chair out from the desk and face you (the experimenter). Demonstrate proper posture to participant by sitting straight in the chair, with your back NOT touching or resting on the back of the chair, both feet firmly against the floor, elbows bent at a 90-degree angle and not touching your side. Ask participant to sit the same way, check and correct if necessary. If participant is unable to touch the floor, ask them to scoot forward in the chair and/or give them a stool for their feet. • Show dynamometer; say: We will use this machine to measure how strong your hands are. You will squeeze the handle 2 times (one practice and one test trial) with each hand while your arm is against your side and your elbow is bent like this (90 degrees). The handle won’t move, but the machine will show how hard you squeezed. See? Show participant the force measurement. Do you have any questions? • In this task, you will test the practice each hand first, then test each hand, unlike the peg test. Q3 Reference Manual – Appendix IV | WU-Minn Consortium of the NIH Human Connectome Project Page 108 • Practice (dominant hand): Say: Let’s practice; first we’ll use this (point to dominant hand; say your right or left as appropriate) hand. When I say ‘squeeze,’ I want you to squeeze the handle hard but not as hard as you can. Support dynamometer by resting one hand at the back of the machine, without applying counter pressure, and one hand under the machine. Continue: Ready? 3-2-1-squeeze. After 3-4 seconds, say: Stop. Press RESET and TEST on dynamometer before next trial. • Practice (non-dominant hand): Say: Now we’ll practice with your other hand (put dynamometer in non-dominant hand; say your right or left as appropriate). When I say ‘squeeze,’ I want you to squeeze the handle hard but not as hard as you can. Support dynamometer during testing as shown earlier. Continue: Ready? 3-2-1-squeeze. After 3-4 seconds, say: Stop. Press RESET and TEST on dynamometer before next trial. • Test Trial (dominant hand): Say: Now we’re going to test each hand, beginning with this (point to dominant hand; say your right or left as appropriate) hand. When I say ‘squeeze’, this time I want you to squeeze the handle as hard as you can. Support dynamometer during testing. Continue: Ready? 3-2-1-squeeze! Harder, harder, harder. After 3-4 seconds, say: Stop. • Record force to nearest tenth of a pound on the computer screen. Press RESET and TEST on dynamometer before next trial. • Test Trial (non-dominant): Say: OK, now we’re going to test your other (point to non-dominant hand; say your right or left as appropriate) hand. When I say ‘squeeze,’ this time I want you to squeeze the handle as hard as you can. Support dynamometer during testing. Continue: Ready? 3-2-1-squeeze! Harder, harder, harder. After 3-4 seconds, say: Stop. Record force to nearest tenth of a pound on the computer screen. Turn off dynamometer when testing is completed. Q3 Reference Manual – Appendix IV | WU-Minn Consortium of the NIH Human Connectome Project Page 109 C. 4-Meter Walk Gait Speed • Take participant down to walking course, located outside of Bay 2 Control Room. • Read from laminated instructions located on shelf outside Bay 2 Control Room. • Set up 2 cones – place one cone on the tape where the participant will start from. Place the other cone 1 meter past the line they will cross (4-meters from the start line). • Practice Trial: Show the walking course; say: This activity involves walking from one place to another. This is our walking course (point to the course). I want you to walk to the other end of the course at your usual speed, just as if you were walking down the street to go to the store. • The examiner explains the walk: Let me show you what I want you to do. Put both your feet together behind this line. Walk all the way past the cone on the other end before you stop. Before demonstration, say: 3, 2, 1, Go! After examiner returns, have participant stand with both feet touching the start line and say: When I want you to start, I will say: 3, 2, 1, go. Do you have any questions? • Say: Now you try. Remember to walk at your usual speed and keep walking until you pass the cone. Ready? 3, 2, 1, Go! When participant passes the cone, say: That’s good. Do you have any questions? (Answer any questions.) Q3 Reference Manual – Appendix IV | WU-Minn Consortium of the NIH Human Connectome Project Page 110 • Trial 1: Say: This time, I am going to time you as you walk at your usual speed. Are you ready? 3, 2, 1, Go! • Begin timing (press start/stop button) when the participant steps over (first footfall) the starting line. Walk behind and to the side of the participant as he/she walks. Stop timing when one of the participant’s feet is completely across end/finish line (the line at 4 meters – not the line at 5.0 meters). If the participant stumbles or tries to run, void that trial and ask the participant to do another trial. Record the data on the HCP Checklist and later transfer to the computer data entry forms. • Trial 2: Say: Now I want you to repeat the walk. Remember to walk at your usual pace, and go all the way past the other end of the course. I am going to time you as you walk at your usual speed. Are you ready? 3, 2, 1, Go! • Begin timing (press start/stop button) when the participant steps over (first footfall) the starting line. Walk behind and to the side of the participant as he/she walks. Stop timing when one of the participant’s feet is completely across end/finish line (the line at 4 meters – not the line at 5.0 meters). If the participant stumbles or tries to run, void that trial and ask the participant to do another trial. Record the data on the HCP Checklist and later transfer to the computer data entry forms. • If needed, have the participant rest on a chair for at least one minute before the next task. D. 2-Minute Walk Endurance • Move the cones to the center of the start and finish line. These lines should be 50 feet apart with tape lines every 10 feet. Q3 Reference Manual – Appendix IV | WU-Minn Consortium of the NIH Human Connectome Project Page 111 • Make sure the cones are on the inside of the line so the participant can lap around each cone without going significantly beyond the 50-foot course. • Introduce the task; say: This is an activity that shows how physically fit you are by seeing how far you can walk in 2 minutes. I will ask you to walk as fast as you can until I ask you to stop. I know this is hard for some people so don’t worry if you have to slow down or rest. If you do stop or slow down, start walking again as soon as you feel you are ready do so. • Ask: Is there any reason you cannot do the walk? Does anything hurt or are you in pain? What I would like here is to have you walk as far as you can in this short period of time. If participant does not feel he or she can do this task, note this on the record sheet and continue with another measure. Q3 Reference Manual – Appendix IV | WU-Minn Consortium of the NIH Human Connectome Project Page 112 • Continue: You and I will not talk while you are walking because this might make you walk more slowly. I will, however, let you know how much time you have to walk and when you are almost done. • While demonstrating first part of the task, say: Let me show you what you are going to do. You will start with your feet behind this line. When I say ‘Go,’ you will walk back and forth around the cones as fast as you can without running or hurting yourself. You will begin after I say ‘Ready, 3, 2, 1, Go!’ As you pass the cone, do not stop or slow down. When I tell you to stop, stop where you are on the path until I come to you. • Demonstrate task and say: Watch me as I show you. You see that I am walking fast but not running and that I am not slowing or stopping when I pass the cone. Do you have any questions? Answer questions as necessary. • Ask participant to walk course once down and back; say: Now you can practice. Walk the path, out and back one time; go around the cone without slowing down. Ready, 3, 2, 1, Go! When participant is finished, say: Do you have any questions? Answer any questions participant has. • Continue: This time, I will be timing you. Remember, when I say ‘Go,’ walk back and forth around the cones as fast as possible for 2 minutes without running or hurting yourself. Ready, 3, 2, 1, Go! • Examiner should begin timing and marking off laps on lap grid as they are completed; specifically, each time participant goes around a cone, mark off a number on data sheet grid (all turns around cone away from examiner should be odd numbers and all turns around cone nearest examiner should be even numbers). At the same time, examiner should provide the following feedback:** • 1 minute: You are doing well. You have 1 minute to go. • If participant is resting at one-minute reminder, encourage him/her to continue and change statement to the following: You have only 1 minute left. Rest as long as you need; start walking again as soon as you feel able to do so. • When time reads 1:45, tell the participant: In a moment, I’m going to ask you to stop. When I do, just stop right where you are and I will come to you. When 5 seconds remain, examiner should count down: 5, 4, 3, 2, 1, stop. • Put a piece of tape or a pen (or some other type of marker) on the floor to mark where participant stopped; the tape should be placed behind the participant’s heel. Measure distance from the last lap to the tape. Put distance on the record sheet and later transfer it to computer. • After completing both walking tests, go back to the testing room and enter the information for both tests. The 4-meter walk test screen looks like this: Q3 Reference Manual – Appendix IV | WU-Minn Consortium of the NIH Human Connectome Project Page 113 • The 2-minute walk test screen looks like this: 7. Emotional Health A. Say, After I read these instructions, please go through all of the surveys on your own. There will be pauses and further instruction screens. Read through the screens and click “Continue” when you’re ready. Please let me know when you’ve finished the pain survey. I will stay in the room, but will sit at the other table for your privacy. If you have any questions, please ask. Sit with your back to the participant. B. Say, On the next screens, we will ask you questions about your thoughts, feelings and behaviors. Read each question carefully and answer as well as you can. There is no right or wrong answer, only what is true for you and describes your thoughts, feelings, and behaviors. Some questions may seem similar to ones you have already answered. This is intentional. Please consider each question by itself and choose an answer that shows how you behave or what you really feel or believe. After you make your choice, the computer will automatically go on to the next question. If you want to change your answer, Q3 Reference Manual – Appendix IV | WU-Minn Consortium of the NIH Human Connectome Project Page 114 click on the GO BACK button to return to the question, then choose a different answer. Click on the CONTINUE button when you are ready to begin. C. Shortcut keys • For the emotion and most of the pain questions you can use the alt keys plus a number to answer questions. • Alt+1 would be the top response, Alt+2 would be the second from the top, etc. • For the vertical scales alt + the number of the scale would choice the response. • To go back use alt+b and to skip an item use alt+k. 8. Sensory A. Pain • Listen and occasionally check to see if participant has gotten to Pain survey yet. They are to continue through this without assistance from experimenter, for their privacy, but experimenter needs to press Start on the test screen, which only pops up on the experimenter’s screen. Click “Next.” Go back to table with your back turned to the participant. B. Odor Identification • Get a guitar pick. Make sure it is clean and does not have any residue from previous scratch-n-sniff card. Hand the pick to the participant. • Read instructions from the experimenter’s screen. • Before beginning the task, say, This task involves smelling various odors, one at a time, and then trying to identify them. The odors that you will smell are chosen from a variety of foods and objects that people experience in everyday life. We are using scratch ‘n’ sniff cards to present the odors. • Say, Take this scratcher and scratch the first card; smell it right after you scratch it, then look at the pictures on the screen. Click on the picture that best shows the odor that you smelled on the card. A new set of pictures will then appear on the screen and you will be asked to identify the odor on the next card. If you want to change your last answer, click on the GO BACK button. Q3 Reference Manual – Appendix IV | WU-Minn Consortium of the NIH Human Connectome Project Page 115 • The examiner should repeat this sequence of handing the cards to the participant to scratch, smell, and identify until all the cards have been used. For each trial, or as needed, repeat what was said above: Take this scratcher and scratch this card; smell it, then look at the pictures on the screen. Click on the picture that best shows the odor that you smelled on the card. If you want to go back to change your last answer, click on the GO BACK button. • If the participant needs help scratching the cards, the experimenter can scratch it for them. • When the participant has completed all 9 cards, say: You have finished this activity. Throw the scratched cards away. Wipe off the pick with a wipe and put away. C. Hearing Threshold • Hearing Threshold was not available for HCP use at the beginning of Phase II, 8/8/2012. It is planned to be available by the end of September 2012 and will be collected on all participants from the date is available through the end of the study. • Say: Now I will ask you to wear these headphones. If you are wearing hearing aids, I will ask you to remove them for the hearing test. Once the headphones are on, we will begin testing your hearing. I will ask you to choose your response with the mouse. The computer will give you the instructions. I will put the headphones on you now and we can get started with the instructions. • Examiner should put the red headphone on the right ear and the blue headphone on the left ear. Adjust the headphone band to provide a comfortable fit. Because wearing the headphones muffles external sounds, while wearing headphones, some participants may not hear the examiner well or at all in the case of some hearing losses. If a participant reports that he/she cannot hear the examiner, Q3 Reference Manual – Appendix IV | WU-Minn Consortium of the NIH Human Connectome Project Page 116 remove the headphones when re-instructing the participant and then replace them when you are ready to begin again. • If the participant has difficulty using the mouse, he/she may point and the examiner may operate the mouse and/or keyboard. The examiner should say something like the following: You can point to or tell me your choice and then I will enter your choice. • The participant should be seated at a table in front of the monitor, keyboard, and mouse. The equipment should be positioned such that the participant can easily and comfortably see the monitor and use the mouse for responding. Like other toolbox measures, the participant-examiner positioning should support the examiner’s ability to see and hear the participant during testing and to allow the examiner to interact with the participant, if needed. During the test, the examiner should monitor the participant’s progress in the test. • Once the headphones are placed, all the instructions are on the screen and through the headphones. D. Words in Noise • Most instructions to the participants are on the examiner screen. • Note: If a participant wears hearing aids, they should be removed for the duration of this task. • Before placing headphone, the examiner needs to make sure that he/she can see the participant’s face and hear his/her responses. • Say, You will hear a woman asking you to repeat various words. Repeat the words she asks out loud so that I can hear you. For example, if you hear her say ‘Say the word dog,’ you would say ‘dog.’ If you are not sure what she said, just say what you think you heard. You will also hear people talking in the background. Do your best to ignore them and focus on the woman’s voice asking you to repeat the words. Do you have any questions? Answer any questions. Say, Let’s begin. • Place earphones on the participant’s head, making sure that the right earphone is over the right ear and the left earphone is over the left ear, and click BEGIN TESTING EAR 1 Button. Q3 Reference Manual – Appendix IV | WU-Minn Consortium of the NIH Human Connectome Project Page 117 • When all five words at a given level are incorrect, the audio files will stop and the examiner’s screen will show: Ear 1 testing is completed. If the participant repeats some words from each of the 7 levels, then, when all the audio files are presented, the examiner’s screen will show: Ear 1 testing is completed. • Then the examiner should say to the participant: Now, we are going on to the other ear. Click on the BEGIN TESTING EAR 2 button. . Again, when all five words at a given level are incorrect, the audio files will stop and the examiner’s screen will show: Ear 2 testing is completed. If the participant repeats some words from each of the 7 levels, then, when all the audio files are presented, the examiner’s screen will show: Ear 2 testing is completed. • Ask the participant to take off the earphones. E. Regional Taste Intensity Test • Have one medicine cup of each solution, two sterile cotton-tipped applicators, gloves for examiner, one cup of room temperature water from the water cooler in the waiting area, a cup or pitcher for the participant to spit into and paper towels ready for use. • Some of the instructions are on the screen; the other instructions are on the taste solutions laminate found in each testing room. • Say: Now I am going to test your sense of taste. To do this we will be using a salty flavor and a flavor found in tonic water. • Demonstration instructions for learning to use the scale. Say: Before the tasting, I am going to ask you to use this scale to rate how weak or strong some sensations are to you. Some of these sensations are things that you will experience. Some of these sensations are what you will recall experiencing in the past. Q3 Reference Manual – Appendix IV | WU-Minn Consortium of the NIH Human Connectome Project Page 118 • Continue: This scale ranges from ‘no sensation’ at the bottom to the ‘strongest sensation of any kind’ at the top. The top of the scale (Strongest Sensation of Any Kind) refers to any kind of experience, for example sound, brightness of light, even those sensations that might be painful. Point to the scale on the screen and use one finger to indicate the bottom to the top, saying, This is how you use this scale. Demonstrate how the participant can use the mouse pointer on the scale. • Continue the demonstration by showing the scale and saying: You can use the mouse pointer to choose a word on the scale that describes what you experience or what you remember. You can click anywhere on the line. For example, if the sensation you experience is more than ’moderate‘ but not quite ’strong,‘ you can use the mouse pointer to mark a spot between moderate and strong. Demonstrate for the participant. • Say: Move the mouse pointer until you think it best represents how you feel, and then click on that spot on the scale. If you would like, you can fine-tune your rating by using the up and down arrows on the computer keyboard. When you are happy with the position of the mark, click on the OK button. • Once the participant has clicked the OK button say: Let’s try some examples. • The practice trial questions are on both the examiner and participant screens. Q3 Reference Manual – Appendix IV | WU-Minn Consortium of the NIH Human Connectome Project Page 119 • Test Items - Say: Before we begin, please rinse out your mouth two times with the bottled water and then spit the rinse water into this container. • Continue: Now, I am going to ask you to rate the strength of these tastes. First, I will put some of the solution across the tip of your tongue and ask for a rating. To begin, I will put on these gloves. Show the laminate to the participant. • Step 1: The examiner should put on gloves for the remainder of this measure. • Step 2: Put the swab into the cup of solution and say: Then, I will put this sterile cotton swab into the solution. • Continue: Now hold your tongue out. Starting with Test Item 1, say: Then, I am going to start on your left side and gently put some solution across the tip of your tongue. • Test Item 1: Using the cotton swab paint the quinine on the tip of the tongue as described earlier, and say: Now, show me the strength or intensity of the taste on the scale you used before. Click the OK button when you are finished. If you should accidentally swallow any, it will not hurt you. Have participant rinse out mouth with bottled water between items; say: Please rinse out your mouth two times with the bottled water and spit the rinse water into this container. Q3 Reference Manual – Appendix IV | WU-Minn Consortium of the NIH Human Connectome Project Page 120 • Test Item 2: Using the cotton swab paint the salt solution (NaCl) on the tip of the tongue as described earlier, and say: Now, show me the strength or intensity of the taste on the scale you used before. Click the OK button when you are finished. If you should accidentally swallow any, it will not hurt you. Have participant rinse out mouth with bottled water between items; say: Please rinse out your mouth two times with the bottled water and spit the rinse water into this container. • Test Item 3: Hand the participant a small cup with quinine and say: Next, I would like you to sip all of the solution in this cup. Try not to drink the solution, but hold it and gently move it around in your mouth until I tell you to spit it out in this container. If you should accidentally swallow any, it will not hurt you. Count for three seconds (one-thousand-one, onethousand-two, one-thousand-three) and then say: Spit out the solution in your mouth and swallow whatever remains. Then, rate the strength or intensity of the taste on the same scale you used before. Click the OK button when you are finished. Have participant rinse out mouth with bottled water between items; say: Please rinse out your mouth two times with the bottled water and spit the rinse water into this container. • Test Item 4: Hand the participant a small cup with salt solution (NaCl) and say: Next, I would like you to sip all of the solution in this cup. Try not to drink the solution, but hold it and gently move it around in your mouth until I tell you to spit it out in this container. If you should accidentally swallow any, it will not hurt you. Count for three seconds (one-thousand-one, one-thousand-two, one-thousand-three)and then say: Spit out the solution in your mouth and swallow whatever remains. Then, rate the strength or intensity of the taste on the same scale you used before. Click the OK button when you are finished. • After the last item is administered, give the participants the bottle of water and encourage them to drink it and/or rinse some more. The examiner should say: Now that we have finished, you might want to drink some more water to clean out your mouth. • This concludes the Toolbox testing. III. Request and Download Data from Assessment Center 1. Log in to Assessment Center http://www.assessmentcenter.net/ 2. Click on the Administration tab Q3 Reference Manual – Appendix IV | WU-Minn Consortium of the NIH Human Connectome Project Page 121 3. Click on Request Assessment Data. 4. You will see this pop-up. (Pop-ups must be allowed) 5. Click “Continue” 6. When you see that the date and time have been updated on the “Download Assessment Data From…” button, click on that button. Sometimes, this takes a little while due to the amount of data in the file. 7. Download the data and save to your desktop or a Toolbox folder. 8. In the same Administration Tab, click on “Request Assessment Scores.” Q3 Reference Manual – Appendix IV | WU-Minn Consortium of the NIH Human Connectome Project Page 122 9. Click on Continue in the pop-up. 10. When the Download Assessment Scores From…button has updated to the most recent date and time, click that button. 11. Download the data and save to your desktop or a Toolbox Folder. IV. Upload data to Connectome DB 1. Open Mozilla Firefox. 2. Go to https://intradb.humanconnectome.org/ and login 3. Click on Phase II Family Subjects. 1. Click on Upload. 2. There will be an option to Upload Toolbox Raw Data and Upload Toolbox Scored Data. Q3 Reference Manual – Appendix IV | WU-Minn Consortium of the NIH Human Connectome Project Page 123 3. First, click on Upload Toolbox Raw Data. Browse for the saved Assessment Data file. If applicable, check the box to update all existing records (if changes have been made to previous records) and click submit. 4. Next, click on Upload Toolbox Scored Data. Browse for the saved Assessment Scores file. If applicable, click the box to update all existing records, and click submit. V. Staff training and error prevention measures 1. Before independently performing the procedures described in this SOP, HCP staff members will be trained as follows: • • • • • • • • Read the NIH Toolbox Training Manual Read the NIH Toolbox Administration Manual Listen to the English Reading Pronunciation mp3s for all words potentially presented in the Oral Reading Recognition Test. Watch NIH Toolbox Administration and Training Videos found on www.assessmentcenter.net under Video Tutorials. Read this SOP. Observe the procedures, when performed by trained study staff or an HCP investigator, at least twice. Follow the procedures under the direct supervision of trained study staff or an HCP investigator at least three times. Staff members’ observations, concerns, and suggestions for error prevention and improving consistency will be an agenda item at staff meetings at least monthly. VI. Internal HCP auditing 1. Internal HCP audits of the procedures in this SOP are recommended to include the following steps: • To verify that different RAs are performing the testing in a consistent manner, the mean, range and standard deviation of scores for each test will be examined. These data can be calculated and reported in Connectome DB and will be examined quarterly for at least the first year (in July and October 2012 and January, April and July 2013). Thereafter, if there have been no personnel changes among the RAs, data will be examined at least every 6 months. If a new RA is hired, cross-RA consistency for each RA will again be evaluated quarterly for the first six months. Q3 Reference Manual – Appendix IV | WU-Minn Consortium of the NIH Human Connectome Project Page 124 • Acceptance criteria: Each individual RA’s test means should fall within a 90% confidence interval of the grouped means of all RAs. Each individual RA’s test ranges should appear quantitatively similar to the group mean. • Failure response: Any RA whose results do not meet the acceptance criteria for any test will be re-trained on this behavioral test. 2. Other periodic internal HCP audits of the procedures in this SOP are recommended to include the following steps: • Each new RA will be observed quarterly for the first six months and every six months thereafter. Any questions or observations about consistency between RAs should be discussed with Deanna Barch for potential follow-up. VII. Related SOPs: 1. Connectome DB Data Upload SOP VIII. Document control Document location: This SOP is an on-line document https://wiki.humanconnectome.org/display/cSOPs/Current+SOPs. Paper copies are valid only on the day they are printed. Refer to the author if you are in any doubt about the accuracy of any document(s). Document approval: This SOP requires the approval of the responsible investigator, as do any changes thereto. Documents are not valid without an approval signature. This SOP has been approved by: Dr. Deanna Barch Q3 Reference Manual – Appendix IV | WU-Minn Consortium of the NIH Human Connectome Project Page 125 Mock Scanner Training Standard Operating Procedure Version 2 Effective Dates: September 19th, 2012 to [date of issuance of a revision] Planned Review Date: November 15, 2012 Author(s): Cindy Feldt and Deanna Barch The procedures in this SOP should be followed exactly. If changes to the SOP are needed, please send suggested edits to D. Barch, C. Feldt and S. Curtiss I. Scope This standard operating procedure (SOP) describes the methods and quality control (QC) metrics that will be performed prior each participant’s first MRI scan at Washington University in St. Louis. This procedure will help acclimate participants to the scanner environment. A mock 32-channel head coil will be used to give RAs insight on comfortably loading participants into the head coil, what types of foam and pillows to use, etc. Participants will complete mock scanner training, which shows a target and crosshairs that they will control with their head movement. The aim of this session is to get insight on each participant’s fit in the head coil, let participants practice being still, answer any questions or concerns they have before and after being in the mock scanner and cover all safety issues regarding MR sessions, including completing the HCP MR Safety Screener. II. Procedures and quality metrics: 1. When the participant is scheduled, the coordinator (or RA) will schedule a mock scanner session on the RA’s calendar and on the MIRSharepoint Mock Scanner Calendar http://mirsharepoint.wustl.edu/Lists/Mock%20Scanner%20Room/calendar.aspx 2. The Mock Scanner Room key is in the key cup in the top drawer of the extra cubicle in the HCP Suite, Room 1104G. 3. If there are any problems with any of the mock scanner equipment, alert Fran Meizin. If you cannot find the key, alert the coordinator or Linda Hood. 4. Make sure there are sheets, washcloths, pillowcases, a pillow and foam pad in the mock scanner room. The sheets are kept in the cabinet directly in front of the Mock Scanner Room door as you walk in. Change the linens for each participant. Refill these linens as necessary (before they run out). Q3 Reference Manual – Appendix IV | WU-Minn Consortium of the NIH Human Connectome Project Page 126 5. Set up mock scanner room (prior to bringing participant in room) • Get the 32-channel mock coil and mirror out of the bottom-right cabinet in the mock scanner room. • On back of the mock scanner bore, turn Flock of Birds from Standby to Fly. • Turn on projector power strip, then turn on projector • Turn on Dell computer. Login is Mscanner, no password needed. • Double-click MoTrak icon on desktop. o Go to Tools, Options, General, Pause movie when crosshair leaves (drop-down menu), choose green circle. o Set target dimensions to Angle: 1.2 x 1.2 Position: 2.6 x 2.6 • If MoTrak gives an error message, click cancel, exit (X out of) program, turn computer off, turn Flock of Birds off and back on to Fly, turn computer back on, click MoTrak. Make sure this is working before bringing participant in the room, as it would be uncomfortable for them to wait inside the mock scanner during this reboot, which could take 5 to 10 minutes. • Cover the mock scanner table with a sheet and use the small foam block (covered with a pillow case) for their head. Have two extra pillow cases, a blanket, and two washcloths available, if needed, for participant comfort. Set out the pillow to put beneath the participant’s knees. 6. Bring participant into Mock Scanner Room • Show participant the mock scanner and explain to them that there are no magnets in this machine. • Complete the HCP MR Safety Screener and keep in participant’s folder on the clipboard. • Introduce the head-to-toe check, explain that this will be done before each scan and stress the importance of not putting things back in their pockets, etc., between now and their scan sessions. • For the head-to-toe check, the RA will ask the participant if they have anything in their hair, on their ears, in their pockets, etc., working from head to toe. • Explain what will be done in the mock scanner: o They will lie on the table. o You will put a strap around their head (let them know that, in the real scanner, this will be a piece of clay and a disc). o You will put the head coil above their head. o You will put a mirror on top of the head coil so they can see the screen behind the scanner. o They will slide into the mock scanner and will control a target with their head for five minutes – remind them of the importance of being still. o You will ask them to make different types of movements with their head, face and body, and they should note how this affects the crosshair. Q3 Reference Manual – Appendix IV | WU-Minn Consortium of the NIH Human Connectome Project Page 127 They will also watch a movie clip for five minutes and the show will pause if they move their head too much (outside of the target zone). o They will hear noises similar to what the actual scanner will make. 7. Load participant in mock scanner • Have table in home position. • Ask the participant to sit in on the table and help them lower into the base of the head coil. • Slip the gray band around participant’s forehead; attach the hooks to the small gray motion detector. Be sure motion detector is in the center of the participant’s forehead. Move the detector’s cord out of the way of the table to ensure the table doesn’t run over or damage it when sending participant into the bore. • Use washcloths to stabilize participant’s head in coil. Make a note of how much padding was needed to stabilize the participant’s head and how much room was in the coil. • Note how much space is between the participant’s neck and the table or pillow. Put a washcloth under their neck if there is room • Remind the participant to get comfortable and relax. Please spend a few minutes ensuring that participants understand what you mean by relax, and helping them to find a position in which they can imagine being comfortable for approximately 1 hour, without feeling too tense or having the urge to move. • Place the pillow under the participant’s knees. This may need to be doubled so the participant’s knees are bent enough so that their back is flat on the table. • Explain the extra instruments that will be used during the actual scans and purpose of each. Head tracker (clay and square motion detector) Vitamin E capsules (1 for most participants, 3 for MEG participants) PulseOx and respiratory belt/cardiac leads. Button Box Panic bulb • Hand participant mock button box. Although they will not use it during the mock scan, they can figure out how to comfortably hold it during their scan. • Let the participant know to rest their elbows at their sides and not to cross their hands. • If the participant is wearing shorts (or a skirt), let them know that they will get a towel to put between their legs. • Offer participant blanket – cover, if requested. • Put mirror on top of coil. Make sure participant can see the center of the screen (it should be displaying the MoTrak control panel or crosshairs). It is possible that the mock 32-channel coil may not be able to fit over the MoTrak tracker. In these cases, let the participant experience going in and out of the coil once with o Q3 Reference Manual – Appendix IV | WU-Minn Consortium of the NIH Human Connectome Project Page 128 the mock coil on, then remove the coil, put on the tracker, put participant into the scanner, put mirror on through the back of the bore and do the mock training without the coil. • Warn the participant that the mock scanner table automatically moves into the bore, first slowly then quickly. Ask them if they are ready, tell them how to best position their arms so they don’t touch the sides of the bore (or put towel, pillow case or blanket around their arm so they don’t feel the bore). • Press red button on black box to move participant into the scanner. Check on participant once they are in the scanner. 8. Run MoTrak Mock Scanner Training: • Click on the Running Man Icon to start tracking head motion with the target and crosshairs. • Remind the participant that they will try to keep the crosshairs in the center of the target by moving as little as possible, including keeping their mouth, face, arms and legs still. Remind them that the best way to do this is to relax. • Warn participant that you will turn on some sounds that are similar to what the real scanner will make. o Go to the desktop, click on MR Sounds, choose any sound other than ambient noise and run for 1-2 minutes – every 1-2 minutes, you will switch to a new sound until you have run played all three. • Practice with crosshairs and sounds for 5-6 minutes (or until all sounds have been played). • During this time, ask the participant to make several normal movements and to pay attention to how the crosshair moves: 1. Wiggle/scrunch your nose 2. Move your chin down slightly. 3. Move your chin up slightly 4. Yawn. 5. Bend your legs up/in and down/out 6. Shrug your shoulders • If the participant’s head moves significantly and is out of the target zone even when still, click on Center in the top toolbox in MoTrak control center to re-center the crosshairs in the target. • Tell the participant that they will now watch a movie clip for 5 minutes and the movie will pause if their head moves too much. If the movie pauses, the RA will switch their view to crosshairs so they can get back in the target zone, then the movie will play again (and RA will switch their view back to the movie. • Set up movie o Ask participant if they prefer Bug’s Life, Toy Story or Ratatouille (or other film clip if available). Q3 Reference Manual – Appendix IV | WU-Minn Consortium of the NIH Human Connectome Project Page 129 In MoTrak control center, go to Tools, Options, Movie Setting. Click Browse, Desktop, Movies, choose movie, click OK. o In top toolbar (in MoTrak control center) click on view user display, click full screen. o Change user display to movie (from target), also in view user display menu (must do these two steps separately). o Click play icon in lower left (MoTrak Control Center). o If movie pauses, go to View User Display menu, change to target, let participant get back in the target zone, switch back to movie. o Do this for five minutes. • Tell participant they are finished and you will bring the table out. Press red button to move table out of the bore. • Take off the mirror, head coil and motion detector and strap • Place strap on counter, connect motion detector to Velcro at the side of the table. • Help participant up. 9. After mock scanner training • Discuss any needs for further padding (head, lumbar support, neck, etc.), address any questions or concerns. • Note any concerns or issues with head coil fit, etc., on participant’s Scan Session 1 readme and/or the participant’s HCP checklist (which should be on the RA’s clipboard). • Put 32-channel mock head coil back in the cabinet. • Remove all used linens and put in a dirty linen receptacle. Replace linens when they are getting low. 10. Quality Metrics • Instructions and troubleshooting procedures are posted on the side of the mock scanner, just behind the Dell computer. • RAs will check target dimensions before every session. o III. Staff training and error prevention measures 1. Before independently performing the procedures described in this SOP, HCP staff members will be trained as follows: • • • • Read this SOP. Observe a trained HCP staff person administer a mock scanner training session. Be observed (assisted) by a trained HCP staff person while administering first two mock scanner sessions. Be observed by a trained HCP staff person quarterly for first six months and once every six months thereafter. Q3 Reference Manual – Appendix IV | WU-Minn Consortium of the NIH Human Connectome Project Page 130 • • Mock Scanner Training will be a regular agenda item for weekly meetings to address any questions or concerns. The mock scanner training session should last approximately 30 minutes and take less than 10 minutes to set up. IV. Related SOPs: • All Scan Session SOPs VI. Document control Document location: This SOP is an on-line document https://wiki.humanconnectome.org/display/cSOPs/Current+SOPs. Paper copies are valid only on the day they are printed. Refer to the author if you are in any doubt about the accuracy of any document(s). Document approval: This SOP requires the approval of the responsible investigator, as do any changes thereto. This SOP has been approved by: Dr. Deanna Barch Q3 Reference Manual – Appendix IV | WU-Minn Consortium of the NIH Human Connectome Project Page 131