1
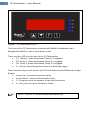
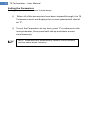
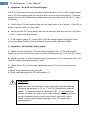
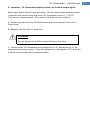
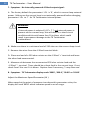
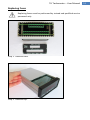
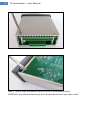
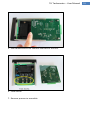
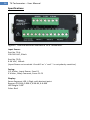
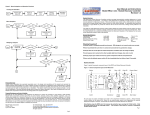
User Manual T6 Tachometer Online: www.PharesElectronics.com Telephone: 727-623-0894 P.O. Box 67251 St. Petersburg, Florida 33736 Table of Contents Overview ....................................................................................... 1 Description .................................................................................... 1 Wiring ........................................................................................... 1 T6 Tachometer Front ................................................................... 2 Set or Change Parameters ........................................................... 3 Exiting the Parameters .................................................................. 4 T6 Tachometer Parameters ....................................................... 5-7 Troubleshooting ....................................................................... 8-12 Replacing Fuses .................................................................... 13-15 Specifications ......................................................................... 16-17 Warranty and Disclaimer ............................................................. 18 Cleaning Instructions ................................................................... 19 Contact Information ..................................................................... 19 T6 Tachometer – User Manual Overview The T6 Tachometer is a panel mount unit which monitors over speed, under speed, zero speed and at-speed conditions, utilizing a 4-digit display, 0-10V and 4-20mA output signals and three independent isolated relay outputs for speed condition status. The T6 Tachometer helps prevent equipment damage and material spoilage via prompt alert for stalled (zero speed) or under speed condition. It is particularly useful for monitoring under speed conditions as this often indicates an unexpected increase in load which may indicate that an unwanted stoppage is about to occur. Description The T6 Tachometer is an actual tachometer, not a rate meter posing as one. The T6 Tachometer uses frequency input from a variety of sensors to determine the presence of motion or the lack thereof. Speed is measured in RPM and is monitored using the following output options: • Visual speed indication via 4-digit LED display. • 0-10V and 4-20mA analog scaled output signals. • Three Form C relay outputs. The T6 Tachometer has 3 SPDT Relays with independent set points. When motion reaches set point, the relay outputs change state. They remain in this state until either under speed or zero speed condition occurs. The T6 Tachometer features universal sensor input: 24Vdc, NPN or PNP, 2 or 3 wire sensor. Sensor types compatible with the T6 Tachometer: • Hall Effect • Photoeye • Inductive • Capacitive • Encoder Wiring: For connecting power to the (T6-A) AC unit, use minimum 18AWG wire, connect Line lead to terminal marked “L” and connect Neutral lead to terminal marked “N” and the protective earthing (grounding) lead to the terminal marked . A switch or circuit breaker must be included in the installation, it must be suitably located and easily reached, it must be marked as the disconnecting device for the equipment. 1 2 T6 Tachometer – User Manual Figure 1. T6 Tachometer Front The front of the T6 Tachometer complies with NEMA 4 standards and is designed and built for use in wash down areas. There are four LED’s on the face of the T6 Tachometer: • R1 – Relay 1, when illuminated, Relay 1 is engaged. • R2 - Relay 2, when illuminated, Relay 2 is engaged. • R3 - Relay 3, when illuminated, Relay 3 is engaged. • S – Sensor, when illuminated, Sensor is detecting target. There are four keys on the face of the T6 Tachometer located below the 4 digit display: • Arrow Up – Increase Parameter Value • Arrow Down – Decrease Parameter Value • P – Program, press to advance to the next Parameter • S – Set, press to access Parameter Value NOTE: There is a 4 second delay upon power up. T6 Tachometer – User Manual Set or Change Parameters The T6 Tachometer Parameters can be set while reading motion. Therefore it is recommended that the parameters are set when motion at the point of measure is stopped and the T6 Tachometer reads ‘0’. NOTE: Some Parameter changes take effect in real time during adjustment, while others take effect when the Parameter is Set and advanced, not upon Parameter access exit or when power is cycled. Press ‘P’ to enter Program mode. The display will read COdE. The correct code must be entered to allow access to the parameters. To unlock the parameters press ‘S’ to change the value. Use the arrow up key until the display reads 10 and Press ‘P’. (10 is the factory default unlock code) If the correct code is entered, the display will read ‘PPR’ (Pulses per Revolution). This is the first parameter. For a complete list of the parameters, please see “T6 Tachometer Parameters” below. NOTE: If an incorrect code is entered, the parameter access function is terminated. Press ‘P’ to step through each Parameter. Press ‘S’ to enable the value to be changed. Press either the Up or Down key to change the value. When the desired value is displayed, press ‘P’ to set and advance to the next parameter. NOTE: Holding the up or down key automatically repeats and accelerates the displayed values. When held for 4 seconds acceleration is x10 and 7 seconds is x100. 3 4 T6 Tachometer – User Manual Exiting the Parameters Exiting the parameters occurs in two ways: 1) When all of the parameters have been stepped through, the T6 Tachometer exits and displays the current speed which should be ‘0’. 2) To exit the Parameters at any time, press ‘P’ to advance to the next parameter, then press both the up and down arrows simultaneously. NOTE: Parameters are automatically saved to FLASH memory and are power down retentive. T6 Tachometer – User Manual T6 Tachometer Parameters COdE – Parameter code to allow entry to changing parameters. Factory set at 10 PPr – Pulses per Revolution (1-500). AuE – Number of samples to Average (0-100). Averaging stabilizes the read out when speed at the point of measure isn’t steady. dPn – Number of decimal places to display (0-3). Changes where the decimal point is displayed. In addition to changing where the decimal point is displayed, this parameter changes the relay set point, changes the analog output signal, the min/max setting resolution and changes the sensitivity. 0 – 9.999, 0-99.99, 0-999.0, 0-9999 Speed Range Parameter: The L O and HI Parameters set the minimum and maximum displayed ranges, alarm ranges and analog output ranges. L O – Minimum speed. When speed at the point of measure drops below this parameter value, the display will read ‘0’. This allows quicker response time when using a single digit PPR. Hi - Max Speed. When speed at the point of measure rises above this parameter value, the display will read ‘9999’ which indicates speed is out of range. 5 6 T6 Tachometer – User Manual 4-20mA Output Signal Range: The i 4 and i 20 Parameters set the 4-20mA Output Signal span across the speed range selected above. The 4-20mA current loop can be powered via the T6 Tachometer or with a 24 Vdc external power supply. i 4– 4mA Output Signal. Can be set anywhere between L O and HI value, but must be lower than 20mA parameter value. i 20 – 20mA Output Signal. Can be set anywhere between L O and HI value, but must be higher than 4mA parameter value. i L Pr – Current loop – 4-20mA Loop powered externally (0) 4-20mA Loop powered via T6 Tachometer (1) WARNING: Make sure the current loop is not externally powered before setting the i L Pr parameter to internal power. If internal power is selected (i L Pr ‘1’) and external power is present on the current loop, this will result in a short circuit condition which could result in permanent damage to the T6 Tachometer motherboard. 0- 10 Volt Output Range: The V0 and U10 Parameters set the 0-10 Volt Output Signal span across the speed range selected above. U0 – 0 volt output signal. Can be set anywhere between L O and HI value, but must be lower than 10 volt parameter. U10 – 10 volt output signal. Can be set anywhere between L O and HI value, but must be higher than 0 volt parameter. T6 Tachometer – User Manual Relay On and Relay Off Parameters: The Relay On and Relay Off parameters can be set to engage and disengage each relay at a specific speed. A gap between the Relay On and Relay Off Parameters, or deadband, is recommended. For example, using a speed range of 0-1,000 RPM, if the Relay On parameter is 170 RPM, the Relay Off parameter should be 150 RPM. This gap or deadband prevents relay chatter as speed drops to the Relay Off setting. Generally, a 10 percent deadband is recommended, although it may not be suitable for all speed monitoring applications. For example, it may need to be widened for higher speed applications and narrowed for slower speed applications. R1on – Relay 1 on set point. Can be set anywhere between L O and HI value, but must be higher than Relay 1 Off parameter. R1oF – Relay 1 off set point. Can be set anywhere between L O and HI value, but must be lower than Relay 1 On parameter. R2on – Relay 2 on set point. Can be set anywhere between L O and HI value, but must be higher than Relay 2 Off parameter. R2oF – Relay 2 off set point. Can be set anywhere between L O and HI value, but must be lower than Relay 2 On parameter. R3on – Relay 3 on set point. Can be set anywhere between L O and HI value, but must be higher than Relay 3 Off parameter. R3oF – Relay 3 off set point. Can be set anywhere between L O and HI value, but must be lower than Relay 3 On parameter. Br t – Display brightness 0- 10 unL – Allows the unlock code to be changed. NOTE: When changing Parameter access code, if the new code is lost, enter 99 to reset to factory default. Entering 99 resets all parameters to factory default. 7 8 T6 Tachometer – User Manual Troubleshooting If the tachometer is not working properly, check the following troubleshooting procedures. 1. Symptom - T6 Tachometer Display is blank – no digits lit: A. Check Power – Approximately 2 seconds after power up there should be a ‘0’ on the display. If not, check power on L1 and L2 or ‘+’ and ‘-‘ for AC or DC units respectively. If power is present but the display is blank, the T6 Tachometer main power input circuit may have a blown fuse (F4). This fuse is inside the back of the unit. Remove power to the unit before removing terminal blocks on the back of the unit. B. Verify that the sensor wiring is correct. Turn off power to the unit. Remove the sensor wires from the terminal strip and restart the unit. If the display reads ‘0’, there is a problem with the sensor wiring or the sensor. C. If the problem persists, reattach the sensor wires and repeat the same test for the 0-10V and 4-20mA wiring, if used. If the display reads ‘0’ when the wires are removed, there is either a short circuit in the wiring or a problem with the device associated with the wiring. Check the wiring and device(s). 2. Symptom - The T6 Tachometer display reads ‘0’ when there is motion at the point of measure: A. Check Sensor - Slowly rotate the Sensor Target. The sensor LED (‘S’) on the bottom right front of the T6 Tachometer should blink as the target passes the sensor or illuminate when the target is aligned with the sensor. If not, check the following: B. Check voltage on ‘+’ and ‘-‘ on the “Sensor” portion of the terminal strip. There should be 24 Vdc present at said terminals. C. Verify sensor is 24VDC. D. Verify the Sensor wiring. If using a Phares Electronics Sensor, the red and black wires attach to ‘+’ and ‘-‘ respectively, although Phares Electronics Sensors are not polarity sensitive. The white wire goes to ‘Sig’. E. Verify the gap between the Sensor and the Target. If using Phares Electronics Sensor and Magnetic Disk, the gap should be 1/8 to 7/16 inch. F. If Sensor LED illuminates bright regardless of the motion, make sure the sensor is positioned properly to change state as the Sensor Target rotates. T6 Tachometer – User Manual G. Remove sensor wires from terminal block and place a jumper from ‘Sig’ to either ‘+’ or ‘-‘ and check the ‘S’ LED on the front of the T6 Tachometer. It should be illuminated. Do not jumper ‘+’ and ‘-‘ as this will result in short circuit condition and could damage the T6 Tachometer power supply. H. Verify Sensor field wiring for continuity. If the field wiring is good, replace the Sensor. 3. Symptom - Relay(s) do not energize: The Relay(s) energizes when speed at the point of measure exceeds a preset minimum (set point). If speed at the point of measure is above the set point, and the Relay is not energized (indicating under speed), perform the following tests: A. Check parameters R1on, R2on and/or R3on to make sure they are set correctly and check R1oF , R2oF and R3oF to make sure they are set to a lesser value than R1on, R2on or R3on. For example, if R1on is set at 170, then R1oF must be set below 170, perhaps at 150. So for this example, R1on = 170 and R1oF = 150. B. With speed at the point of measure above set point, check the status of the appropriate Relay LED (R1, R2, R3) on the front right of the T6 Tachometer. If the Relay LED is on, then the circuit board is functioning properly. If the Relay LED is not on, check the Sensor LED (S) as it should be blinking. C. If the Relay LED(s) is lit and speed is above set point, check the Relay fuse(s) located inside the back of the T6 Tachometer. Make sure power to the T6 Tachometer and all associated wiring is turned off before removing the terminal blocks on the rear of the unit. Fuses F1, F2 and F3 provide current overload protection to the relay contacts on R1, R2 and R3 respectively. D. If the Relay LED is on, but the Relay itself is not on, there may be a faulty Relay. 9 10 T6 Tachometer – User Manual 4. Symptom - No 0-10 Volt Output Signal: If the T6 Tachometer display is blank and/or there is no 0-10 Volt output signal, the 0-10 Volt output signal wiring may be in a short circuit condition. Remove power from the T6 Tachometer and remove wiring from the 0-10 Volt ‘+’ and ‘-‘ terminals. A. Check fuse F4 in the back of the unit to make sure it isn’t blown. If fuse F4 is blown, replace with a ½ amp fuse. B. Power up the T6 Tachometer, but do not connect the wires to the 0-10 Volt ‘+’ and ‘-‘ terminals at this point. C. If the display reads ‘0’, check the 0-10 Volt output signal wiring for short circuit condition before reconnecting the wires to the terminal block. 5. Symptom - No 4-20mA output signal: A. Make sure parameters i 4 (4mA Output Signal) and i 20 (20mA Output Signal) are set at the correct value and are set between the L O and HI value. B. Make sure the i 4 (4mA Output Signal) parameter is set lower than the i 20 (20mA Output Signal) parameter value. C. Check thei L Pr current loop parameter to see if it is set to the correct value: 4-20mA Loop powered externally (0) 4-20mA Loop powered via T6 Tachometer (1) WARNING: Make sure the current loop is not externally powered before changing parameter i L Pr to ‘1’ for T6 Tachometer internal power. If internal power is selected (i L Pr ‘1’) and external power is present on the current loop, this will result in a short circuit condition which could cause fuse F4 to blow, which could result in permanent damage to the T6 Tachometer motherboard. T6 Tachometer – User Manual 6. Symptom - T6 Tachometer display is blank, no 4-20mA output signal: Main input power fuse F4 may be blown. This can occur when external power is used for the current loop and the i L Pr parameter is set at ‘1’ for T6 Tachometer internal power. This results in a short circuit condition. A. Remove power from the T6 Tachometer and remove power from the 420mA loop. B. Replace fuse F4 with a ½ amp fuse. WARNING: Do not power the 4-20mA external loop at this time. C. Power up the T6 Tachometer and change the i L Pr parameter to ‘0’ for external current loop power. Once this parameter is changed to (‘0’), then the 4-20mA current loop can be powered safely. 11 12 T6 Tachometer – User Manual 7. Symptom - No internally powered 4-20mA output signal: A. The factory default for parameter i L Pr is ‘0’, which is current loop external power. Make sure the current loop is not externally powered before changing parameter i L Pr to ‘1’ for T6 Tachometer internal power. WARNING: If internal power is selected (i L Pr ‘1’) and external power is present on the current loop, this will result in a short circuit condition which could cause fuse F4 to blow, which could result in permanent damage to the T6 Tachometer motherboard. B. Make sure there is a minimum load of 250 ohms on the current loop circuit. C. Remove the wires from the 4-20mA terminal block. D. Place one lead of a 250 ohm resistor on the 4-20mA ‘+’ terminal and leave the other lead unconnected. E. Measure mA between the unconnected 250 ohm resistor lead and the 4-20mA ‘-‘ terminal. There should be at least 4mA in the current loop. If not, check Fuse F4 to see if it is blown. Replace fuse if necessary, ½ amp fuse max. 8. Symptom - T6 Tachometer display reads ‘9999’, ‘999.9’, ‘99.99’ or ‘9.999’. Adjust the Maximum Speed Parameter (Hi ). When speed at the point of measure rises above this parameter value, the display will read ‘9999’ which indicates speed is out of range. T6 Tachometer – User Manual Replacing Fuses Replacing fuses must be performed by trained and qualified service personnel only. Step 1. Remove back. Step 2. Remove top. 13 14 T6 Tachometer – User Manual Step 3. Remove the 2 screws from bottom of enclosure. Step 4. Insert small screwdriver tip into notch in Motherboard and CAREFULLY pry Motherboard away from Display Board until you hear a click. T6 Tachometer – User Manual 5. Side Motherboard out towards the back of the unit. 6. Fuse access. 7. Reverse process to assemble. 15 16 T6 Tachometer – User Manual Specifications Figure 2. Terminal blocks on the back of T6-A Tachometer. Input Power: Part No. T6-A 100-240 VAC, 50mA Part No. T6-D 9-36 VDC, 140mA (Input Power on terminals L1 and L2 or ‘+’ and ‘-‘ is not polarity sensitive.) Fusing: 1/2 A Max., Input Power, Fuse F4 3 A Max., Relay Common, Fuses F1-F3 Display: Seven Segment LED, 4 Digit, with decimal point. Ranges: 0-9,999, 0-999.9, 0-99.99, 0-9.999 LED Height: 0.50" Color: Red T6 Tachometer – User Manual Dimensions: 1.6875" H x 3.5625" W x 5.3750" D Depth measurement includes terminal blocks. Cutout Dimensions: 1.75" H x 3.60" W, +/- 0.025” Weight: 1 LB. Accuracy: +/- 2 Least Significant Digits Analog Outputs, Scaled: 0-10 Volt 4-20mA, T6 Tachometer internal power 24VDC, 250 or 500 Ohm load 4-20mA external power @ 24VDC, 250 or 500 Ohm load 4-20mA external power @ 12VDC, 250 Ohm load 4-14.60mA external power @ 12VDC, 500 Ohm load Universal Signal Input: 24VDC, Sinking or Sourcing, NPN or PNP, 2 or 3 Wire Sensor Input Current: 0.14mA (min.) Relays: Quantity of 3, each with 1 NO/NC (Form C) Contact Contact Rating: 3A @125 VAC Enclosure: Aluminum enclosure, gasketed, with side mounting bars for control panel installation. When properly installed, gasket will provide a NEMA 4 seal. 17 18 T6 Tachometer – User Manual Warranty All products are thoroughly tested before shipping. If a product is found to be defective within 30 days from the date of purchase, not the date of installation, we will repair or replace the unit. The defective unit must be received and tested at Phares Electronics, LLC before a replacement is shipped. If a replacement is needed before the defective unit arrives at Phares Electronics, LLC, the replacement will be charged to your credit card, or invoiced to your Net30 Account. A credit will be issued once the unit is received at Phares Electronics, LLC and deemed defective upon inspection and testing. Please call us for return shipping instructions. The warranty is void if the unit is physically damaged from abuse or misuse, or if the unit shows evidence of excessive current, heat, moisture, vibration, or operating conditions outside of design limits or unauthorized modification. The above constitutes the sole and exclusive warranty provided by Phares Electronics, LLC. In no event shall Phares Electronics, LLC, or its agents, be liable for any damages, whether direct, indirect, consequential, punitive or otherwise, arising out of any product or service provided or arranged by Phares Electronics, LLC. Disclaimer THE T6 TACHOMETER IS NOT INTENDED FOR SAFETY CRITICAL APPLICATIONS. USERS OF THIS PHARES ELECTRONICS, LLC PRODUCT IN SUCH APPLICATIONS ASSUME ALL RISKS OF SUCH USE AND SHALL INDEMNIFY PHARES ELECTRONICS, LLC AGAINST ALL DAMAGES, INCLUDING ATTORNEY’S FEES AND COSTS, RESULTING FROM SUCH USE. T6 Tachometer – User Manual Cleaning Instructions Use soap and water to clean the membrane on the front of the T6 Tachometer. Do not use solvents. Contact Information Web Site: www.PharesElectronics.com Telephone: (727) 623-0894 Mailing Address: Phares Electronics, LLC P.O. Box 67251 St. Petersburg, FL 33736 USA Last revised May 18, 2015 © Phares Electronics, LLC 19