1
Enterprise Point-of-Sale (EPOS)
EnterprisePOS Desktop User Manual
Revision 3: January 2004
TABLE OF CONTENTS
Welcome To EnterprisePOS .................................................................................................................................... 6
Use and Documentation of Control Conventions
7
Using EnterprisePOS Documentation
8
EnterprisePOS Documentation and Technical Support
8
Chapter 1. Quick Start (Post Setup)........................................................................................................................ 1
Using the System the First Time
Logging In
Login Buttons
The Security Lock Key
2
3
5
5
Codes You Need to Know
Product Types
Tax Levels
Product Categories and Auto-Inventory Numbering
Entering Product Categories and Sub-Categories
Default Customer Action Types
7
7
8
9
10
11
Data Input / Output
14
Data Entry from Scratch
Inventory-Based Companies / The Sale-Order Cycle
Data Entry Options Pros and Cons
The EnterprisePOS Desktop
EPOS Today
15
15
16
17
18
Chapter 2. Setting Up Vendors................................................................................................................................ 1
Accessing Vendors / Orders Tab
2
Entering a New Vendor
Enter Vendor Contact Information
Select Specialize Product Categories
Entering Vendor Products
Importing a Product Line or Vendor Contact Information
Entering NEW Product Line Records
2
3
4
4
6
6
Displaying and Reviewing Vendor Information
7
Finding a Record - Using the Search Engine
Search Criteria – Database Fields
Different Search Types
Performing a Vendor DB Search
Searching with Adhoc Database Queries
Search Criteria Short Cuts & Examples
7
8
9
9
10
13
Deleting Vendor Records
15
Vendor Reports
Custom Reports
15
16
Chapter 3. Entering and Processing Orders ......................................................................................................... 1
Product Ordering
2
Welcome to EPOS
1
Order Statuses and the Order Life-Cycle
2
Entering New Orders
Entering a Purchase Requisition
Entering Order Detail Information
Assigning a Customer to an Order
Entering Purchase Order Origin Information
Entering Ordered Products
Entering New Products Never Ordered Before
Assigning Items to Customers / The ‘Distribution List’
Entering Additional Order Costs
3
4
5
5
6
7
8
9
10
Requisition to Purchase Order Conversion / Assigning a PO #
Finding a Requisition to Approve
Approving a Requisition
11
11
11
Printing or Faxing Orders
12
Submitting an Order
13
Deleting Orders
13
Placing Orders from the Stock Shortage Box
14
Receiving Orders
Displaying Received Items
Displaying and/or Receiving Back Orders
15
16
17
Displaying Received History
18
Chapter 4. Inventory Control.................................................................................................................................... 1
Stock Tab
Search for Inventory Items
2
2
Entering New Inventory
Saving Product Detail
Adding New Stock – Final Summary
3
7
8
Displaying / Printing Product Details
Product View for Customers (Read Only)
Printing Product Detail
8
8
9
Repairs/RMAs Tab
New Repair Entry Methods
Entering New Repairs
Entering Services to be used in Repairs
Create a Work Order
Save Work Order
Adding a NEW Repair to Stock
10
10
12
14
17
21
22
Inventory Area Reports
23
Chapter 5. Customer / Point-Of-Sale Tools ........................................................................................................... 1
2
Accessing Customers Area
2
Entering New Customers – From the Desktop
Save Customer Record
Customer Screen Buttons
3
5
5
Displaying and Editing Customer Records – From the Desktop
7
ENTERPRISE POS User Manual
Recording New Transactions from the Customer Screen
REQUIRED / DESIRED fields.
7
8
Entering a New Sales Proposal (QUOTES)
Perform Searches for Customer and Item(s)
10
10
Recording New Credit from Customer Account Detail
Enter Data
13
13
Recording General Customer Actions
14
Entering Work Orders for a Customer
15
Customer Area Reports
18
Chapter 6. The QUICK SALE / Express Check-Out.............................................................................................. 1
The Speedy Sales Process – Some Forethought
2
Accessing the QUICK SALE Screen
2
Accessing the Express Check-Out Screen
3
About the Screen Itself
Custom and Options Menu Bar
Invoice Screen Fields
5
6
6
Entering a New Express Sale (Using Quick Scan)
Ringing Up a Standard Sale
Non-Standard Sales
9
9
11
Using the Quick Entry Method for Systems without Bar-Code Scanners
Enter Payment Type and Amount
12
13
Applying In-Store Credit Toward a Sale (AFTER TAX)
13
Applying In-Store Credit Toward a Sale (BEFORE TAX)
15
Issuing New Credit to a Customer from the Point-Of-Sale
16
Entering a New Layaway (from Quick Sale)
18
Performing an Express Return or Refund for a Customer
The Customer Has Their Receipt
The Customer Does NOT Have Their Receipt
Searching Existing Customer Accounts at the Point-of-Sale
20
20
20
21
Entering an Express Sales Proposal (QUOTE)
21
Voiding a Sale
22
Entering an Express Accounts Receivable
Pre-Define a Customer Charge Account – Management’s Role
How to Use Customer Charge Accounts at the Point-Of-Sale – The Cashier’s Role
23
23
24
Other ‘Express’ Transactions
Express Work Order Entry
Express Action
Express WISH LIST Entry
Cashing Out from the Invoice Screen – The Z Report
25
25
26
28
30
Chapter 7. Cashing Out at End of Day / Shift ....................................................................................................... 1
The CASH OUT Screen Layout
Daily Totals Tab
2
3
Welcome to EPOS
3
Goods Sold Today Tab
Activity for Today Tab
Balance Sheet Tab
Screen Buttons and Settings
Today’s Drawer Totals
8
8
10
10
11
Counting Tender
The Cash Drawer Count Screen
12
12
Saving / Printing the Z Report
14
Chapter 8. Other Financial and Marketing Tools................................................................................................. 1
Accessing / Using Financial And Marketing Tools
2
Sales Analysis
Layout of the Sales Analysis Screen
Payments / In-Flow Analysis
Invoices / Sales Analysis
Goods Sold Analysis
3
3
5
6
9
Account Actions / Credits
Analyzing Customer Account Actions
Analyzing Customer / Store Credit History
12
15
16
Marketing Analysis / Trends
Screen Layout
Forecasting Using Historical Full-Month Data
System Forecast for the Day Based on History
Trending
Interpreting Your Data / Making Decisions
18
18
20
22
23
26
Chapter 9. Report Engine / Reporting Menu ........................................................................................................ 1
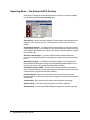
Reporting Menu – The EnterprisePOS Desktop
Setup Reports – Main Maintenance Menu
Custom-Direct Reports
Export Reports
Application (Screen-Specific) Reports
2
3
3
4
6
Report Maintenance
EnterprisePOS Desktop Report Maintenance
Application (Screen Specific) Reports Maintenance
7
7
10
Creating Report Templates from Scratch
EnterprisePOS Report Designer (Crystal)
EnterprisePOS Labels
The Labels Screen
Product Labels
Address Labels
Recommendations
12
12
21
21
22
26
26
Printing a Report
The Print Screen
27
27
Chapter 10. The File / Edit / View Menus.............................................................................................................. 33
The EnterprisePOS Desktop File Menu
New / Change Form View – Creating NEW Screens
4
ENTERPRISE POS User Manual
34
34
Printer / Page Setup
Import / Export Business Profile
Import / Export Transactions
Change Desktop Control Bar
Exit
38
39
41
43
44
The Edit Menu
Undo, Cut, Copy, and Paste
Delete Selected Record
Open Selected Record
Copy Customer Actions (Customer Area only)
45
45
45
45
45
The View Menu
Current User (Who’s Logged In)
Status Bar
Viewing Reporting Engine / Stock Shortage
47
47
47
48
Appendix A. The Employee Time Clock Utility .................................................................................................... 1
Welcome to EPOS
5
Welcome To EnterprisePOS
Welcome to the Enterprise Point-of-Sale (POS) system. This application is a Database
Management System (DBMS) used for recording day-to-day sales transactions as well as
detailed inventory control, purchase order, vendor, and customer information tracking. The
system is designed for use with a variety of peripherals to efficiently capture, process, and
report on this data to avoid customer wait time at the point-of-sale. Some examples of
these peripherals include hand scanners for bar code reading, receipt printers, cash
drawers, and magnetic strip readers (for swiping credit cards or driver’s licenses).
This manual has been designed to fit the way users say they work. The emphasis is on
getting the job done in the easiest and quickest way possible. To eliminate confusion,
screen shots have been inserted throughout the documentation to demonstrate
procedures.
This manual contains instructions for both typical and sophisticated tasks. It also contains
a great deal of conceptual information to better understand databases, reporting, financial
accounting, as well as the program itself. The chapters are created with the inexperienced
user in mind.
Core procedures are described step by step with screen shots depicting each step being
done to create a foundation of system familiarity for these tasks as well as other related
tasks.
What you will find in this chapter…
6
Use and Documentation of Control Conventions
7
Using EnterprisePOS Documentation
8
EnterprisePOS Documentation and Technical Support
8
ENTERPRISE POS User Manual
Use and Documentation of Control Conventions
All manuals of the EPOS system use the following conventions:
Commands and
Buttons
Keyboard Keys /
Combinations
For easy recognition, screen command names and button names through out the system
will be in bold and referenced as they appear in the application.
Keyboard keys, keyboard shortcuts, and key combinations will be referenced in bold
characters as well, for example, the F12 button or the Tab button. If it is a keyboard
combination, it will be referenced with a hyphen between keys such as Ctrl-Alt-Del or the
Shift-Insert key.
Note that different keyboard types or keyboards from various manufacturers may call
different keys different things. For example, the Enter key on one keyboard may be called
the Return key on another. For the purposes of this manual the “Enter” word will be used
to reference this new line key. If you have difficulty finding specific keys referenced in this
manual, contact someone where you purchased the PC to assist you.
Also note that some keys have pictures instead of words on them. For example, on newer
Microsoft-compatible keyboards there exists a key with only the Windows symbol on it.
When pressed the key will pull up the Windows “Start” menu bar from the bottom left
portion of your computer. This is the only picture button that will ever be referenced in this
manual and will be called the START button.
Dialog Boxes, Screens, and Controls
Non-bolded italics will be used to reference the names of dialog boxes, screen names, or
controls on screens. For example, the Products screen, the Delete Action. Are you
SURE?, the Custo table, the Back Ordered option box, etc.
Other Conventions
Table names and fields within the actual database file or server itself are referenced in the
following format:
{Custo.Last_Name}
“Custo” represents the physical name of the database table.
“Last_Name” represents the actual database field name.
Filenames, PC names, drive letters, or physical locations on a computer’s hard disk are
referenced using drive letters with back slashes separating the folders and filenames as
follows.
“C:\WINDOWS\SYSTEM\User.dat”
Regardless what actual drive letter (hard drive, partition, network, etc.) the file being
referenced is located on, for the purposes of this manual specific drive letters refer to
specific physical locations.
C – refers to the local computer’s hard disk whether it is actually C or not
D – refers to the computer’s CD-ROM drive whether it is actually D or not
F – refers to a network drive letter whether it is actually on F or not
“\WINDOWS\SYSTEM\” is an example of the file’s actual location or path. This path will
always be in capital letters. The text immediately following the path is always the file itself
as it is named on the computer or network file server.
Portions of underlined text within normally formatted text require special attention.
Welcome to EPOS
7
NOTES are used to provide extra or special information regarding the preceding topic.
Related Topics are lists pointing to other topics in this manual or other user manuals that
provide details, related procedures, alternative methods for accomplishing the same task,
or additional uses for the same dialog box, button, or screen control.
Throughout the manual there may be Text Boxes associated with certain screen shots.
These text boxes direct the user to specific areas of a picture that reiterate or support the
discussion in the section. Pay special attention to these text boxes since they describe
important screen areas.
Using EnterprisePOS Documentation
In addition to the user manuals, there is also a Systems Manual that is designed for
System Administrators who physically set up and maintain the system. This user manual
will not touch on system administration functions outside of brief overviews as needed. If
you need any system settings or user accounts changed consult the Systems Manual or
contact your designated Systems Administrator. Examples of these tasks include
changing user information (Ids, passwords, etc.), changing system access rights, special
settings for program operation, screen and field customizations, and other system-related
tasks. These tasks are important functions that support the effective usage of the system.
EnterprisePOS Documentation and Technical Support
The Help system file includes all information in this User Manual as well as the Systems
Manager Manual. However, there are other avenues for you to find the help you need.
Web Site
If you need more
help…
Visit our web site at http://www.Vydata.com for new updates, support Q&A, FAQ’s,
etc.
E-Mail
E-mail our System Support division at the address: [email protected].
Send Vydata Systems Corp. a description of the problem or issue, your name or
company name, physical address, return email address, and the serial number key
you were assigned when you purchased the software (on the back of the CD). The
registration key allows support personnel to look up the type of support you have to
better serve your needs. If you purchased additional support, the support personnel
want to make sure to mark your issue as priority. We want to make sure you get what
you pay for!
Telephone Support
If you’d prefer to talk to a real person, feel free to call our offices directly at (225) 2726767.
If a technician is not able to immediately assist you when you call, an operator will
have someone paged to call you back.
8
ENTERPRISE POS User Manual
Chapter 1. Quick Start (Post Setup)
What you will find in this chapter…
2
3
5
5
Using the System the First Time
Logging In
Login Buttons
The Security Lock Key
Codes You Need to Know
Product Types
Tax Levels
Product Categories and Auto-Inventory Numbering
Entering Product Categories and Sub-Categories
Default Customer Action Types
7
7
8
9
10
11
Data Input / Output
14
Data Entry from Scratch
Inventory-Based Companies / The Sale-Order Cycle
Data Entry Options Pros and Cons
The EnterprisePOS Desktop
EPOS Today
15
15
16
17
18
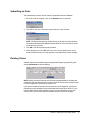
Chapter 1. Getting Started
1
Using the System the First Time
After you or the Systems Administrator installs the system following the steps in the
Systems Manual, there are a few things to keep in mind that will help you get started using
the system to its full potential.
The system looks best in either 800x600 resolution with small fonts or 1024x768
resolution with large fonts. If you notice the fonts look a little strange, you may want to
adjust your screen resolution. How high you can go with your screen resolution
depends on your computer’s video card. Going too high in resolution will make some
of the screen controls look abnormal. Also, use at least 256 colors – the more colors
the better. Contact the company you purchased your PC from to make sure you have
the best video settings possible.
If you are using a cash register machine, don’t forget to fasten the hardware lock key
to the printer port. You’ll need this key to be able to ring up sales. See the Security
Lock Key details in the next section for more information.
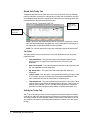
Learn the layout of the EPOS Desktop if you’ll be doing other tasks besides ringing up
sales. The EPOS Desktop is easier to use if you understand the logic behind the
layout. It looks a lot like a spiral notebook of information separated by 3 tabs. Think of
it as your notebook of required tasks from right to left (much like a timeline going in
reverse). The far right tab holds vendor and ordering information. Generally, you enter
vendors and orders first to get product in. Once orders are received, the products
move into inventory (the middle tab) allowing them to be sold. Once sales are made,
the products move into actual customer account actions (sales) under the Point-ofSale (left) tab. This whole process is called the Sale-Order Cycle and is explained
further in the upcoming Data Entry from Scratch section.
Learn where the programs are located on your computer. For example, you may want
to have your Systems Administrator put a shortcut for the EPOS Desktop in your
startup folder to have the register come up to the sign-on screen when the machine
boots up. Also, you’ll want to be familiar with how to find the Administration Utility
(ADMIN.EXE) and the Emergency Settings program (SETTINGS.EXE). These two
programs could help you out of a bind. The Administration Utility will allow you to
change your user account (for example, change your password or general
information), and the Emergency Settings program will recreate the settings file if
database corruption occurs. These programs (along with others) will be located in the
Enterprise POS folder after installation.
You run the Enterprise POS system by double clicking on the EPOS icon. The EPOS
Desktop screen should then appear. If you’re setup as a cashier, you’ll go right from
the login screen to what’s called the Express Check-Out screen to begin processing
sales. All functions can be executed from the EPOS Desktop, however, the folder
includes many other application modules that can be executed as stand-alone.
The icons for all EPOS application modules are (by default) installed in \Program
Files\EPOS. Under your Programs group, you’ll see the Enterprise POS folder among
your other installed programs. For simplicity, you’ll notice the EPOS Desktop icon is
also installed on the START menu itself. By clicking START, you should see an icon
for EPOS at the top of the menu. However, this is not the EPOS folder. This will only
run the Desktop application. Although this makes it easier for cashiers to enter the
system, you may want to create an icon directly on the Windows desktop or add it to
your STARTUP group as mentioned earlier.
You can easily add the EPOS Desktop icon to the Windows desktop by right-clicking
with the mouse on an icon in the EPOS folder, then (while holding the button down)
2
ENTERPRISE POS User Manual
drag the icon to the Windows desktop. When you release the mouse you’ll have a
menu pop-up, simply select the Create Short-Cut Here option. The icon is then
created on the Windows desktop.
Enterprise POS Desktop Folder
The EPOS Desktop application has a Windows media icon (shown to the left).
In summary, if you kept all defaults during installation, launching the Desktop application is
as follows.
1. Click the START button.
2. Click Programs.
3. Click on the Enterprise POS program group.
4. Click on Enterprise POS in the pull down menu to launch the program.
OR…
1. Click the START button.
2. Click on Enterprise POS at the top of the START menu to launch the program.
NOTE: These instructions may vary slightly depending on your version of Windows.
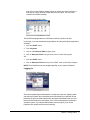
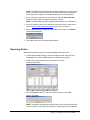
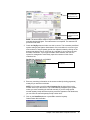
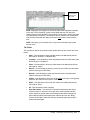
Logging In
Enterprise POS splash screen
Since the designated System Administrator is usually the person who originally installs
and sets up the system, this is usually the person who assigns your initial login ID and
password. As part of the initial setup process, the System Administrator sets up a User
Name (ID) and Password for each system user. A user ID and password is required to
access the system. If your System Administrator has not yet given you an ID and
Password, then contact him/her before proceeding.
Chapter 1. Getting Started
3
NOTE: If this is the first time the system is executed, you may get a screen asking you to
enter a serial number along with a few initial setup questions. Don’t attempt to answer
these yourself unless you were involved in the initial install process. Contact your
designated System Administrator to help you. There are certain questions that are
extensions to questions asked during installation. If you answer a question wrong, you
could encounter errors in your system. This is covered in the Systems Manual. You can,
however, by-pass the setup questions by just entering the serial number (on the back of
the CD) and clicking Enter System. This should get you going until a System
Administrator can look at why this screen is being displayed.
Welcome New User
Point-of-Sale / Information Management System (IMS) Login
To sign on :
1. Enter your assigned user ID in the User Name field (if not already displayed). Hit
[Enter].
3. Enter your password in the Password field.
4. If the location option is there, select the store’s location from the list. Otherwise,
just click OK or hit the [Enter] key to enter the system.
User Name
This is your unique user identification code. It could be your first name, an ID #, a last
name, etc. The only limitation is it shouldn’t be longer than 15 characters. This ID will
associate your name with all transactions recorded in the system at this machine.
A default ID can be setup in the User Name field to save login time. If you will be using
this system exclusively, you may want to have your user ID displayed at each login.
Contact your System Administrator or consult the Systems Manual to enable this system
setting option.
Password
4
ENTERPRISE POS User Manual
The System Administrator usually assigns all user passwords initially, however you can
change your own password by entering the Administration Utility later. Your System
Administrator can show you how to do this since this is covered in detail in the Systems
Manual.
Location
The Location field allows a user to log into different store locations from one site. It is
usually used at a home office of a multi-location organization, but is rarely used at
individual store sites. If your organization has only one store location, this option should be
turned off to avoid user confusion. If this field is showing up in your login box, check with
your System Administrator to make sure you’re using the correct location ID in this field
before attempting a login.
NOTE: If you get an error before the sign on box comes up, this usually means the file
locations are set up incorrectly. As mentioned previously, there is an Emergency Settings
program (Settings.exe) that you can run to fix problems like this. However, you should
contact your Systems Administrator to before making any changes you’re not sure about.
Login Buttons
OK - The button that logs you on. Hitting the Enter key will do the same thing.
PRACTICE - This button will enter you into the practice mode. It will give you plenty of
test data to get used to the system. The database that is used is usually located in a
\PRACTICE\ folder within the database path by default, but could be where ever your
Systems Administrator has placed it under System Settings. The system will then ask
you if you want to use the practice administrative settings or use your own. We
suggest using your own (by clicking NO) to get an accurate test of YOUR business
settings against the test data. This is a good way to flush out business profile
configuration errors. If your Systems Administrator made a few mistakes while
customizing your system, you’ll probably find them here. If you successfully record
data and ring up sales in practice mode, everything should be just fine in production.
Usually you’ll see problems in practice mode long before they come up in production.
CANCEL - This button will close the system.
JUST CLOCK ME IN / OUT (not shown) - The long bottom button will only record the
user as “clocked in” if they are presently clocked out, or vise versa. You can use the
TimeCloc.EXE utility to view everyone that is clocked in and clocked out. Using this
small application module that comes bundled with the EPOS Desktop is covered in
the Appendix of this manual.
The Security Lock Key
NOTE: Your system should’ve come with a hardware lock key. This key is a small adapter
that plugs into your printer port on each register computer. No back-office computer (for
financial work, entering orders, stock, vendors, etc.) is required to have a key on it - only
the registers. You will not be able to ring-up any new sales without this key. Your printer
Chapter 1. Getting Started
5
will plug into the key after the key is securely fastened to the computer’s printer port. The
register computer should have no problems printing through it to the printer.
If you are missing this key, contact your Systems Administrator or the distributor of your
software. It should have been shipped with your product. If the key is misplaced or
additional registers are added to the system, more keys can be purchased directly from
the manufacturer.
If your system is having problems seeing the key even when it is plugged in, make sure
the drivers for the key are installed and the Sentinel SuperPro (SSP) Server is running.
The SSP Server is the utility that checks the key. When your system was installed it
should’ve placed the server component in the computer’s Windows STARTUP group and
should be loaded automatically. However, if you’re getting security violation errors when
attempting to ring up a new sale, this may not be the case. Try running the spnsrv9x.exe
program in the EPOS Desktop folder. If the server program is not running, this will start it
up. Otherwise, it will tell you if it’s already running or if the drivers for the key need to be
installed. The drivers for the hardware key are located on the CD in a separate folder
called \HWDrivers\. Simply run the SETUP.EXE program within this folder to install the
drivers and fix the problem.
6
ENTERPRISE POS User Manual
Codes You Need to Know
The Enterprise POS system contains some specific codes that cannot be changed or
customized. These codes are used by the system in day-to-day transactions, and it is
important to completely understand their uses.
Product Types
Product Types describe exactly how each product is treated or processed in the system.
Each Product Type is completely different and independent of each other and is identified
by an integer value from 0 to 4 as follows.
0 = Non-Quantity Items (items in which quantity is always ignored. For example, it is
often used for service or items on consignment)
1 = Miscellaneous, One-of-a-Kind Products (items that are unique and can’t be
replaced – when they are sold, they’re gone and can’t be reordered. For example,
antique goods)
2 = Custom Assemblies; In-Store Kits (items in which their raw materials are actually
physical stock in inventory as well)
3 = Standard Products (items regularly ordered from vendors)
4 = Weighted Parts
Service Products
The first product type (0) is for non-quantity items. The items defined by these product
types are usually internal or external services where quantity is used (as hours worked),
but is never processed or monitored by the system (quantity is never checked to make
sure you’re not low on stock). There is no physical stock for these products.
NOTE: Be sure to consult a CPA before using these types of products to avoid over or
under paying sales taxes. Most states do not charge tax on service, however you should
check and make sure. You can easily mark any product non-taxable if you need to. See
the Tax Levels section later in this chapter for more detail on this topic.
Miscellaneous, One-of-a-Kind Products
A Product Type of 1 is for miscellaneous or one-of-a-kind products. These are basically
tangible goods that cannot be reordered from where you bought them. Products of type 1
always have either a quantity of 1 or zero (in stock or sold).
Custom Assemblies or Kits
A Product Type of 2 is for custom assemblies and in-store kits. These products represent
in-store creations or assembled items based on existing stock used as raw materials.
The quantities that make up the items of type 2 depend on the quantity of their individual
components. Once a “Kit” has used inventory items as raw materials, the quantity of the
items become committed. This means the raw material products are still physically in
stock, but cannot be sold because they are presently included within a kit. For example, a
jeweler may have a diamond ring that was assembled in-store and entered as a “kit”
product type 2. The individual components in this kit would be loose stones (weighted
parts) which are product type 4 (see below).
Chapter 1. Getting Started
7
Note that the “parts” for these kits can be assembled using any other type of product other
than services (type 0).
Standard Products
A Product Type of 3 is for standard vendor-ordered products. These are products that are
included in a vendor’s product line or catalog and are usually ordered through the
EnterprisePOS Purchase Order module. These products can be marked to alert you when
stock runs low.
Weighted Parts
Product Type 4 is reserved for Weighted Parts, or loose raw materials. Generally these
items are used in custom kits (product type 2). The cost information of these items are
usually based on a cost/unit basis. For example, a grocery store may treat vegetables as
weighted parts whose cost is measured by the pound. Similarly a jeweler may treat loose
gems or diamonds by cost/karat.
Other
There are actually Product Types of 5 and greater that are only used at the point-of-sale.
When you want to just enter a comment line on an invoice, or you’re listing the
components of a kit, the system automatically assigns a product type of 5 to these line
items. This tells the system not to process quantity when the sale is committed.
Tax Levels
A Tax Level is a product code from zero to two (0-2) that tells the system how to process
the sales tax for an item at the point-of-sale. The different levels are:
0 = Taxable Product (Default)
1 = Variably Taxable Product
2 = Nontaxable Product
Taxable Product
The first tax level is the default for all new products. A product with a tax level of zero
simply means no special tax processing is required for the product at the time of the sale.
The system uses the default tax rate that is on the invoice.
Variably Taxable Product
The next tax level is a value of 1 and tells the system that the product may or may not be
taxable – taxability is variable. In the system settings (consult the Systems Manual for
details), you can set the purchase amount at which this product becomes nontaxable at
the point-of-sale. Products with this tax level would then remain taxable until the customer
purchase amount reached this level for this specific product. When enough of this item is
purchased to reach this amount, the system automatically skips over this line item when
calculating sales tax. The entire amount of that specific line item would become
nontaxable.
For example, this is widely used in the coin industry. Coin collectors get a tax break when
purchasing a large amount of rare or old coins.
8
ENTERPRISE POS User Manual
Nontaxable Product
The next and final tax level is a value of 2 and tells the system that this product is never
taxed. If several items exist on an invoice and one or more are nontaxable, the system
automatically skips over these line items when calculating the tax for the sale.
For example, this is widely used for including service on invoices. Service is usually not
taxed depending on the tax laws of the state. Another common use is for separating items
designated strictly for mail order sales.
Product Categories and Auto-Inventory Numbering
Product categories and sub-categories are used throughout the system and are very
important for number stock and tracking special product types.
Product categories are alphanumeric fields. They can have any type of characters within
their name (numbers, letters, certain “legal” symbols such as dashes or slashes, etc.).
However, if you want to allow the system to auto-assign product inventory numbers within
a designated range (usually called a product series), then you must begin each product
category with the minimum starting inventory number in that range. Values in this range
become available product inventory numbers to be automatically assigned by the system
and can be used in bar-coding.
For example, if you wanted to place the following categories into your system…
Diamond jewelry products
Pearl products
Colored stone products
Gold products
Silver products
It’s recommended that you number them based on the starting stock number in that
category as follows (assuming you wanted 5 digit stock numbers).
10000-Diamond Jewelry
20000-Pearls
30000-Colored Stones
40000-Gold Items
50000-Silver Items
In this example, the first range or series would be from 10,000 to 19,999. The next series
would begin at 20,000 and go to 29,999, and so on. This is an efficient way to keep strict
control of inventory within these 5 different product categories listed above as well as to
facilitate reporting and product searching. This is similar to the Dewey Decimal system
adopted by libraries to keep track of many thousands of special book categories.
When entering new product, the user only has to select the product category for the
system to automatically assign a new stock number within this range. You can also enter
sub-categories within each category to further segregate your product data.
A little planning time is needed on the size of your stock numbers to ensure you have
enough numbers available within a given category. You may want to use a range of
100,000 numbers or more for each category to be safe – it’s up to you.
Chapter 1. Getting Started
9
If no available number is found within a Product Category range for a new product, the
system notifies the user and uses an inventory number not in a range or above the last
category range. If you want to change the suggested inventory number for the new
product, you can do so before it is saved. Once it is saved, it keeps the number for good.
To free up the assigned inventory number for another product, the new product that holds
the number must be deleted. This is really the main reason automatic assignment of
inventory numbers takes a huge burden off the user. When you get to the point of having
tens of thousands of inventory items in the system, it may be difficult finding the next
available number if you do the number assignments manually.
Entering Product Categories and Sub-Categories
You enter new product categories one of 3 places, either when you load the system for the
first time (an option on the welcome screen), the button next to the product category
dropdown list when entering new products, or from the Customization Utility (see the
Systems Manual).
On the Product Categories setup screen you can simply enter the categories you want,
then click SAVE to commit them to the system. Selecting a category in the list, then
clicking the SUB-CATEGORIES button will allow you to enter all the sub-categories for
that category.
Your Systems Administrator should be the only person that changes these values in any
way since they affect all areas of the system. If you feel the product categories are
structured wrong for your location based on this discussion, see your Systems
Administrator immediately. Inventory problems (such as misplaced inventory) could occur
if the product categories are changed after product has already been entered.
Keep in mind that your store can still use your own form of inventory numbering and
benefit from this Dewey-Decimal-like system at the same time. You can accomplish this
by allowing the Inventory/stock Numbers to be auto-assigned, and use other fields in the
product record such as Style_Num for your store’s own manually-assigned numbers. This
can be a cost code, vendor code, or whatever long string of information you may want on
a product ticket or inventory label. Or, you may assign it to be the bar code that is
physically on the box from the manufacturer. However you use it, you’re able to assign
that field as the field to scan on at the point-of-sale.
10
ENTERPRISE POS User Manual
Default Customer Action Types
Action types define any activity to a customer’s account. It can literally be anything from a
notation about a customer stopping by or calling on up to a financial transaction such as
an actual sale. You are allowed to add your own action types as well. However there are
several types used specifically by the system that you can’t change which include the
following.
ACTION
INVOICE
INVOICE-AR
LAYAWAY
QUOTE
VOID
RETURN
REFUND
W/O
ORDER
CONSIGNMENT
WISH
Other common action types that can be added (and often are) are WISH and DONATION
to name a few.
ACTION Type
Action types of ACTION are nothing more than customer account notations. A user can
enter these types of actions to record any general store activity from a specific customer.
INVOICE Type
Action types of INVOICE signify a sale. These are automatically generated by the system
into a customer’s account when a regular sale happens. When these actions are selected
(double clicked), the invoice from the sale itself is displayed.
INVOICE-AR Type
Action types of INVOICE-AR signify an Accounts Receivable sale. These are
automatically generated by the system into a customer’s account when a sale with an
UNPAID BALANCE happens. These usually require more information from a customer
because store credit must be extended to them before the sale is completed. When these
actions are selected (double clicked), the invoice from the AR sale itself is displayed.
LAYAWAY Type
LAYAWAY action types work exactly like a regular sale (INVOICE action type), however,
they define future sales. Future sales are simply money collected from a customer that
applies to a sale on a designated future date. This lay-away sale becomes an actual sale
when it is paid in full; hence these action types are always temporary. Less information is
required from the customer because the product is usually kept in the store until the
Chapter 1. Getting Started
11
customer finishes payment, therefore the risk to the store is much less than with an
Accounts Receivable sale where the unpaid product leaves the store.
QUOTE Type
A QUOTE action type is for sales proposals only. There is a designated screen setup in
the system for proposal creation that can be later converted to actual sales. Unlike the
LAYAWAY action type that converts to an INVOICE action type when paid out, QUOTE
actions will remain once converted to a sale unless it is selected for deletion during the
conversion.
VOID Type
A VOID occurs when a transaction-based action (INVOICE, INVOICE-AR, or LAYAWAY)
is deleted. These actions are only displayed on the daily cash-out screen and
administrative screens to show management when voids were performed. Voiding a sale
is the only way to completely remove a posted sale from the system. Each time a sale is
made, numerous behind-the-scene transactions take place making it impossible to simply
delete the invoice record. Performing a VOID properly removes the sale by reversing all
these transactions.
RETURN and REFUND Types
These two actions are very similar in that they both refer to a customer bringing back
product after the sale. How the transaction of returning the product is processed between
the store and the customer is where the difference lies.
The REFUND action type is used by the system to designate the customer received some
sort of monetary funds back when the product was returned to stock. It says the customer
received their money back in some form.
The RETURN action type is used by the system to designate the customer received some
sort of store credit and did not get any funds back when the product was returned to
stock.
The difference between these two action types and a VOID is that a VOID erases the
sales transaction like it never happened and must be performed the day of the sale. A
RETURN or REFUND lets the sale stand in the history of the system but adjusts the
invoice to reflect the return of product or refund of funds. Also, you cannot partially void an
invoice – it is all or nothing. However, you can process a RETURN or REFUND for only
one or more line items of a specific invoice.
A VOID is usually a mistake made by a cashier while a RETURN or REFUND is usually
the result of a bad product or service, or the customer changed their mind.
W/O Types
The W/O action types refer to Work Orders. Work orders are service jobs that are usually
initiated by the customer. The work order enters a queue to be addressed by the service
department. Once the service department has completed their work and updated the work
order, the work order action in the customer’s account changes to reflect this. The cashier
can then convert the work order to an invoice to complete the sale. As with a QUOTE, the
W/O action remains in the system as completed and closed, and a new sale action is
entered to reflect the sale.
ORDER Types
12
ENTERPRISE POS User Manual
The ORDER types are for customer special orders. You can create a new special order
(purchase order) for a customer to select items that you may be out of stock on. When the
special order is generated, all corresponding purchase orders are generated under all
vendor accounts for you. As stock comes in, you can receive these vendor orders.
Opening up the special order will reveal a status of all individual vendor orders for you.
When all PO (vendor purchase orders) are in, you can receive the special order to
automatically generate a customer invoice for all items received.
CONSIGNMENT Types
The CONSIGNMENT type is a list of items that you have CONSIGNED to a customer. It is
just a memo list of items owned by you, but are presently located at a customer’s site. You
consign items the same way you would sell items to a customer. However, no money is
taken from the customer (except a possible deposit) and a deadline date is entered. The
system will notify you when you are approaching this date in order to bill your customer for
the goods. To bill the customer, you can convert the CONSIGNMENT MEMO to an
INVOICE-AR Accounts Receivable, then mail them your invoice.
WISH Types
The WISH type defines a customer WISH LIST. This is a list of products that can be
purchased from by other customers. A wedding registry is common usage of this action
type. You can enter a new WISH for a customer then select a list of items from your stock.
The system tracks which items have been purchased (how many, and by whom) and
scratches the items off the list one at a time.
Chapter 1. Getting Started
13
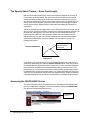
Data Input / Output
Processing data in the system happens via database transactions. The term transaction
will be used throughout the manual involving the processing of data, so it is important to
understand how the term relates to the system.
A transaction is simply defined as a business action or deal. For the purposes of this
system, a transaction occurs when any database process is performed in which the writing
or changing of data is involved. So by definition, all business actions involving the inputting
of data in the database are automatically transactions. All business actions involving
database input/output combinations are transactions. All business actions involving only
data output are not transactions.
For example, viewing a report is not a transaction (only output). Entering a new customer
is a transaction (only input). Scrolling through a table of data is not a transaction (only
output). Entering a sale for a customer is a transaction (both input and output when the
receipt is printed). Sliding a customer’s driver’s license that fills in data on the screen is not
a transaction, it is inputted to the screen only. However, once the SAVE button is clicked
to record the swiped data on the screen, it is entered in the database (input), which
becomes a transaction.
It is important to keep in mind when these transactions occur. If you are finished entering
data on an invoice during a sale but haven’t clicked the SAVE/PRINT button to submit the
invoice, then no transaction has occurred. Hence, if there were a loss of electrical power
causing the PC to shut off, you would completely lose the invoice if you did not have a
chance to SAVE it. This is because a database transaction had not occurred. If a
transaction occurred, you could simply restart the machine to reprint the invoice if needed.
However, outside of hardware failure you don’t have to worry about losing work. The
system will always ask you to verify your action if you attempt to leave a screen-full of data
without saving your changes.
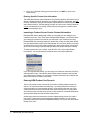
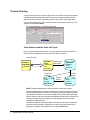
The diagram below helps better illustrate these concepts.
Data input via
hand scanners,
keyboards, etc.
Transaction data
is saved
14
ENTERPRISE POS User Manual
Data Entry from Scratch
Some businesses choose to import their existing data into the system when upgrading
from an older POS if they’re lucky enough to have a data structure that is compatible with
today’s standards. Unfortunately, most businesses are forced to enter the majority of their
data from scratch when changing systems. When entering all new data, care should be
taken as to exactly how you start. This will avoid having to go back later and rework your
data.
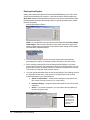
Inventory-Based Companies / The Sale-Order Cycle
The best way to begin an inventory-based business operation from scratch (after all initial
setup and customizing is complete) is to first enter all your vendors. The next step is to
place purchase orders with these vendors for new product. When the new orders arrive,
receiving the orders in the system will automatically create new inventory records. At this
point, the system is ready to begin handling new customer sales. As sales are generated,
new customer records are created and inventory quantity is used up. The system notifies
you when the quantity drops too low (if set up) to re-order, and the cycle begins all over
again. However, everything basically begins with the vendors (the “Vendors” button on the
bottom far left of the EnterprisePOS Desktop main screen).
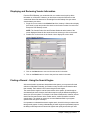
Order Placed
with Vendor
Order Received
– Product
Moved to Stock
The SaleOrder Cycle
Stock Runs Low
– User Notified
of Shortage
Customer
Sales Occur
Entering all your vendors, then entering product within each vendor record may not always
be feasible initially. You may already have hundreds or thousands of items existing in
inventory already that would make entering inventory this way very tedious and involved.
Also, your company may choose not to keep track of vendors at all. For whatever the
reason, the system gives you the option of entering directly into inventory and by-passing
this vendor order cycle altogether.
Whether or not you choose to enter your inventory directly or not, you still need to enter all
your vendor information first if possible. As you’re entering each inventory item directly into
stock, you can select the product’s primary vendor from a dropdown box included in the
table. This will put the item in inventory and connect it to the vendor you selected.
However, if you don’t enter vendors initially, the drop down boxes for each inventory will
be blank. You’ll then have the tedious task of going back through your inventory later and
picking which item goes to what vendor. The vendors are always the first place to start.
Chapter 1. Getting Started
15
Vendor Product Lines
A vendor’s product line is a list of available products that you, the customer, can order
from – same as a vendor catalog. Once a vendor’s product line is in your system you can
order from it at any time. Initially you may have to manually type product into a purchase
order when order from the vendor, but when the order is received, that information is
stored in their product line. Every time an order is received, the product line is updated for
the next time you order from them. There are ways to import a vendor’s product line to
avoid typing the product data in manually as long as the vendor’s product data can be
obtained in a readable ASCII text-based format.
Keep in mind if you manually add stock to your INVENTORY, the product line will not get
updated. Your inventory is what you physically have in the store while the vendor product
line is a catalog of items that you may or may not have at any given time. To
accommodate for this, there is a utility under the Administration menu that will move all
vendor products into their primary vendor’s product line after you finish manually entering
stock in inventory. See the next chapter for much more details on this subject.
Data Entry Options Pros and Cons
Paralleling = Running parallel with your current or “old” system (at least until your
current stock is depleted) is one option.
Instead of wasting countless employee hours entering stock after the new system is in
place, you can run both systems together until you sell off old inventory (in the old
system) while reordering and replenishing stock in the new system. New product
database records will be generated automatically in EPOS as orders are received in
the system. Eventually all “old” inventory is used up leaving all inventory records in the
EPOS system from received orders. When you finally make it down to only a few
hundred items in the old system, it may be beneficial to take a couple hours after work
one day and enter the rest of remaining old stock, thus retiring the old system
altogether.
The advantage of this option is that it saves a great deal of employee time entering
inventory since inventory is entered over the course of this “transition” time period
while running both systems. This option also gives you the advantage of getting the
system, installing, setting up, and begin usage all in the same day. This is also a great
way to train employees. Cashiers can use the system a little at the time and get used
to it. If there are any problems in configuration, reporting, or setup of the new system,
the cashiers always have the old system to fall back on until the kinks are worked out.
Unfortunately, the disadvantages of this option are quite numerous. First of all, you
may incur additional hardware costs to keep both systems running together. You may
have upgrade to a new receipt printer or scanner that is not supported in the old
system. You may have an old system that must run on a stand-alone DOS-based
machine while this system is graphics-based requiring some version of Microsoft
Windows. This may require you to have two separate computers just for 1 check out
station.
Another disadvantage is the length of time of this “transition” period of running both
systems parallel. If your store has a large existing inventory, this could mean a very
long transition period before all the stock is depleted. Running two systems makes it
more difficult for employees to check customers out as well since they’ll be required to
check if the inventory is in the new system first, and if not, they have to switch to the
old system to make the sale.
16
ENTERPRISE POS User Manual
Also, reporting becomes more difficult and manual. To do your monthly sales taxes,
for example, will require consolidation of two separate reports. The end of year
income taxes are also an accounting headache. Not to mention the figuring of
employee time and commissions become a tedious task.
Replacement = Just replacing your old system at once by shutting the store down to
enter stock or entering stock on off days is another option.
This option involves entering as much inventory as possible to allow you to run the
system and completely shutting down the old system from operation. Sometimes this
involves a conversion of old data and prior rigorous employee training program. The
service cost on the front end is usually much more expensive due to the training and
data conversion tasks involved.
Companies that use this approach usually go through several weeks of initial
problems to work through as they adjust to the new system. This is also a dangerous
option to just jump into without extensive prior planning. Without a good business
plan, you may find yourself having to go back and change data that was entered
before because you didn’t quite understand how things worked at the time. Maybe
you changed your mind on how you want the product names structured. Well, after
entering hundreds of products, this becomes a huge amount of rework. The Parallel
option mentioned previously at least gives you the time to learn the system and is
much easier to correct mistakes over time since only a handful of data is entered
daily.
However, if companies can tolerate a few days to weeks of confusion and problemfixing, this is by-far the better option. You won’t have the inventory, financial
accounting, and reporting problems of dealing with two separate systems using this
method. Totaling out your old system, printing final reports, then starting the new
system on a designated day is much easier from an income tax stand-point as well.
Employee commissions also become easier to track. Although there is much more
initial turmoil in using this method, and your cashiers will probably dread it, as a
manager you'll be glad you did a month or two down the road.
Which option is right for your store depends largely on the size of your inventory and
amount of data in the old system. Paralleling an old system isn’t really an option for
large stores with many thousands of inventory items. It makes it way too difficult to
keep up with which items are old and new as well as slowing down the check out
process. The parallel option is great for newer or small businesses with moderate to
low inventory, or a company that is very comfortable with their old system and want to
customize the new one a little over time.
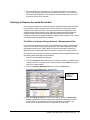
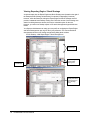
The EnterprisePOS Desktop
If you are a supervisor or high-end user, you will generally be logging into the
EnterprisePOS Desktop. The Desktop allows you to easily enter new or manipulate data.
It is not designed for cashiers.
The toolbar to the left of the Desktop defines which system area you wish to enter
(Customers, Inventory, or Vendors). The area to the right of the Desktop lists available
reports for the area you’re currently in and includes warning indicators at the bottom for
low inventory and product internet updates.
Chapter 1. Getting Started
17
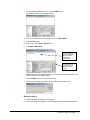
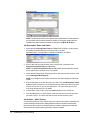
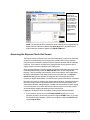
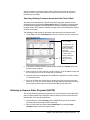
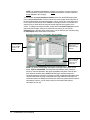
EPOS Today
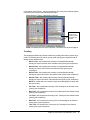
The initial screen of the EnterprisePOS Desktop is always “EPOS Today” which shows all
recent activity for your organization and notifies you of anything (quotes, consignments,
accounts receivables, layways, orders, etc.) that’s expired or coming due soon.
You can click any area listed to display a list of the items below. Double-clicking on any
item will launch it for viewing. A print button is available to send the data to the printer.
EnterprisePOS Desktop – EPOS Today
Initially, you will not have anything on this page since your database will start out empty.
As explained in the previous section, it is recommended to enter your vendors first to place
orders for stock, so click the “Vendors” button on the left and proceed to the next chapter.
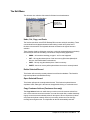
REPORTS
The REPORTS area to the right lists the reports in the area you are currently in. To run a
report, you can double-click it. To edit a report, you can either right-click, then select the
menu option to EDIT the report, or you can select “Setup Reports” under the “Reporting”
menu at the top. See the chapter on editing reports for more information.
INTERNET Queue and Stock Shortage
INTERNET Queue – Shows inventory that’s changed that are marked for selling on
the Internet. The Internet update module is launched when the globe icon is clicked
and your web-site is updated. This requires setup by your software distributor and/or
web provider.
Stock Shortage - This indicator is a fire extinguisher that flashes when inventory is low
in stock; low stock items appear here when the inventory item’s On-Hand quantity
value falls below the Minimum quantity value set when the product record was
originally created. Simply by double-clicking the low-inventory item number displayed
in this box (to the right of the fire extinguisher) will allow you to quickly reorder stock.
You can even place an order for all low-quantity items (for a specific vendor) in the
box at once – simply by double-clicking a value in the box!
18
ENTERPRISE POS User Manual
Chapter 2. Setting Up Vendors
One of the recommended first tasks for setting up a new EnterprisePOS system is to set
up vendors to begin placing purchase orders (PO’s) and building a store inventory. All
functions relating to tracking orders or maintaining vendor product lines (a catalog to order
from) is performed in this area.
What you will find in this chapter…
Accessing Vendors / Orders Tab
2
Entering a New Vendor
Enter Vendor Contact Information
Select Specialize Product Categories
Entering Vendor Products
Importing a Product Line or Vendor Contact Information
Entering NEW Product Line Records
2
3
4
4
6
6
Displaying and Reviewing Vendor Information
7
Finding a Record - Using the Search Engine
Search Criteria – Database Fields
Different Search Types
Performing a Vendor DB Search
Searching with Adhoc Database Queries
Search Criteria Short Cuts & Examples
7
8
9
9
10
13
Deleting Vendor Records
15
Vendor Reports
Custom Reports
15
16
Chapter 2. Setting Up Vendors
1
Accessing Vendors / Orders Tab
Vendors/Orders are accessed from the main EnterprisePOS Desktop screen by clicking
the Vendors button on the left.
Entering a New Vendor
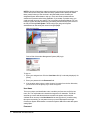
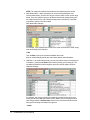
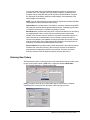
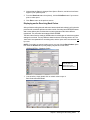
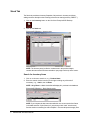
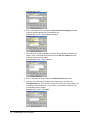
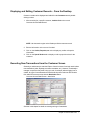
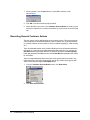
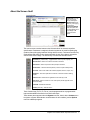
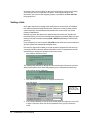
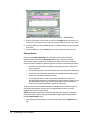
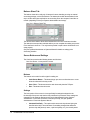
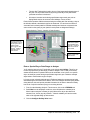
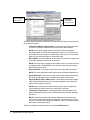
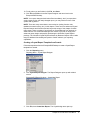
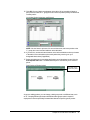
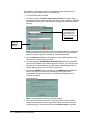
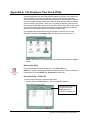
New Vendors can be entered one of two ways. Either click the NEW button to the right of
the vendor table, or right-click in the table and select “New Vendor”.
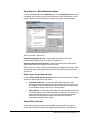
EPOS Desktop – Entering a New Vendor
These are the
same - both enter
a NEW vendor
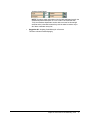
Notice the Enter New Vendor Number pop-up window appears. A unique vendor
account number is required for the system to track this vendor.
Enter New Vendor Number
NOTE: AUTO appears in the text field below that instructs the system to automatically
calculate a vendor account number for you. This is nothing more than a unique
number that the system uses for tracking this vendor. You can manually overtype this
value with your own vendor number if you already have an existing number scheme
to identify your vendors, but you must make sure the number is unique. Two vendors
can not have the same vendor account number.
Click OK to now begin entering vendor information on the following screen.
2
ENTERPRISE POS User Manual
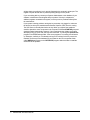
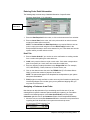
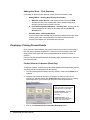
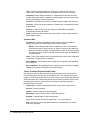
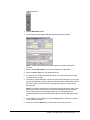
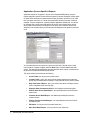
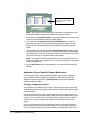
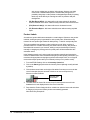
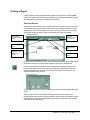
Vendor Detail Screen
NOTE: The Vendor Detail screen appears and allows you to fill in information needed
for the vendor record. Notice the assigned vendor number appears in the Vendor #
field. Also notice there may be some fields disabled on the screen, to customize this
screen you can click “File”, then “Customize Form”. This is where you can enable
fields, add or rename fields, remove fields, etc.
Enter Vendor Contact Information
1. Enter the vendor’s company name in the Vendor Name field.
2. Enter the name of a contact or account representative for the vendor in the
Contact Name/Account Rep field.
3. Enter an email address for the vendor contact in the Contact Email field.
4. Enter a web site address for the company if applicable.
5. Enter the mailing address in the Vendor’s Mailing Address fields.
NOTE: This address should preferably be a physical location address and not
just a postal box address. This is important if communication to the vendor
requires overnight or express mailing services.
6. Enter a remittance address in the Remit To fields if different than the mailing
address.
7. Enter all Specialize Category fields (see next section).
8. Enter telephone numbers in the Contact Numbers fields for Sales, Services,
and Fax.
9. Enter comments that you want recorded for this vendor in the Notes field.
Remember, no customer or vendor will ever see this information (not included on
any standard system reports), so you can be brutally honest regarding notes on
cost, service, and so forth. That’s a good way to give your supervisors (or
whomever is doing the ordering) some good money-saving tips when dealing
with this specific vendor.
Chapter 2. Setting Up Vendors
3
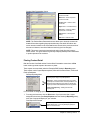
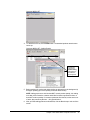
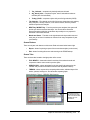
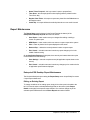
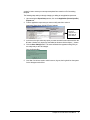
Select Specialize Product Categories
These are simply product categories that the vendor specializes in. This allows you to
group specific vendors for ordering certain types of products or reporting purposes.
You can skip these fields or disable them (when you “Customize Form” under the “File”
menu) if this is data that your location is not interested in tracking.
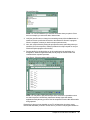
1. Click on the down arrow at the end of the Specialize Cat. 1 field and select the
appropriate product category.
Vendor Detail – Specialize Category fields selection
NOTE: The number of category fields that appear here is dependent on your system
setup.
2. Click on the down arrow at the end of each specialize category field and select a
category, as applicable. A maximum of 5 special product categories are allowed
for each vendor.
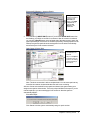
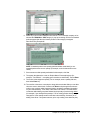
Entering Vendor Products
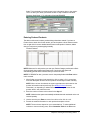
The Vendor Account Activity portion of the Vendor Detail screen contains three tabs:
Inventory – DIRECT tab – allows a product to be entered directly in inventory
automatically marking this vendor as the item’s Primary Vendor
Specific Product Line tab – contains vendor’s product line information – similar to an
on-line catalog of available items the store can order
Purchase Orders tab – contains vendor order history – all open, received, or backordered orders for this vendor
Vendor Account Activity Tables
Inventory – DIRECT (Entering Existing Inventory)
The left-most tab is used for entering inventory from a vendor that is already in stock. This
will not add the item to the vendor’s available product line (the middle tab) for ordering, but
it manually places stock in inventory and assigns this vendor as this item’s primary vendor
at the same time.
4
ENTERPRISE POS User Manual
NOTE: Adding product to this table by-passes the Sale-Order Cycle mentioned in the
previous chapter. You are manually placing the item in inventory without placing an order.
This is not recommended unless you are entering existing stock initially. Keep in mind you
can also enter inventory directly on the EnterprisePOS Desktop main screen under the
Inventory section, however, the items entered on the main screen will not have this vendor
assigned to them as primary. Entering inventory directly from the EPOS Desktop main
screen is covered later in this manual.
Remember before any product, product line, or orders are entered for this NEW vendor
you must save the contact information entered previously. To do this, click the Save
button on the left.
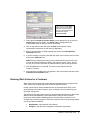
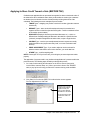
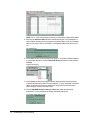
Adding Inventory Directly
1. Click NEW button at the right side of the Inventory – DIRECT table on the Vendor
Detail screen. The new products screen opens.
New Product
Note: You can also
customize these
screen fields under
“File”, “Customize
Form”
Note: You can click
this button to enter
new categories and
sub-categories
Note: All products
entered under a
vendor’s account is a
product type 3 by
default
2. Click on the Product Category field and select a product category from the
dropdown list. This will generate a new stock number to the left. You can then
select a sub-category to the right if appropriate.
3. Enter a product name in the field immediately below the Product Category field
(note this field can be customized to be called anything). You won’t be able to
save this product without a name/description of some kind.
4. Click the Add Quantity button on the left and put in the number of items you
have in your inventory of this item for this vendor.
5. Now enter all related cost data (Unit Cost, a Mark-Up factor, a Unit Price, etc.).
The system will automatically calculated the numbers as you type as long as you
have a quantity of 1 or higher.
6. This is all the data you must enter initially, so your product is ready for saving. If
you want to enter more descriptive product data, you can do this on the Desc.
Detail tab before saving. Now, click the SAVE button. You’ll see the item added
to the vendors list in the background.
7. To enter another new product, go back to step 2 above and repeat these steps
(you don’t have to leave this screen to enter another new product).
Chapter 2. Setting Up Vendors
5
8. When you’re finished entering your new products, click EXIT to return to the
vendor screen
Entering Specific Product Line Information
The middle tab under the vendor information is for products specific to this vendor’s line of
offered or available products, referred to as a vendor’s product line. Remember, this NOT
inventory. Sometimes users get confused with what the difference between a product line
and inventory exactly is. The best analogy is to think of it as an on-line catalog of what you
can get. Just because you’re looking at a list of what you can get from a vendor doesn’t
mean it is necessarily in stock.
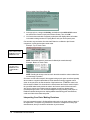
Importing a Product Line or Vendor Contact Information
EnterprisePOS offers a catalog utility in which you can build your own catalog for your
customers (under the “Tools” menu of the EnterprisePOS Desktop). You can then export
your catalog as a product line to send to your customers. If your customers are using
EnterprisePOS, they can simply import your product line, so they can easily order directly
from you without having to type in your data manually. You can do the same if you receive
a product line from one of your vendors assuming it is in the proper format. This will save
you the time from having to manually enter purchase order product data when ordering.
To import a product line from a vendor, under the “File” menu, click “Import Product
Line/Catalog”. You can also export a product line in the menu option right below.
Vendor File Menu
If you are using Microsoft Outlook, you can export your contacts as vcard files (VCF files)
and import them in here. This will take all the Outlook contact information and pull it into
your vendor screen. Likewise, you can export a vendor’s information into a vcard file and
import it into Outlook to create a new contact.
Entering NEW Product Line Records
There is only 2 ways to enter new product line records or editing existing records. One
way is to use the recommended automated way – by ordering new product. When you
enter new product in an order and later receive it, it not only goes into stock, but a new
vendor product line record is entered with all the values from the order. You may adjust
your inventory record over the course of time, but the product line record will always show
you the product details from the last order of this product.
Another way to enter new product line records or editing existing records is to create a
new screen. A special form must be designed to edit these records. You can create a
product line edit screen under the EnterprisePOS Desktop “File” menu, then select “New /
Change Form View”.
6
ENTERPRISE POS User Manual
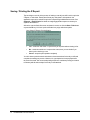
Displaying and Reviewing Vendor Information
From the EPOS Desktop, you can double click on a vendor record to pull up all the
information on a full-screen. However, you don’t have to enter the full screen to view
vendor data. Most of the data can be viewed right from the Desktop. How you want to
view the data is your choice.
1. Single click on a vendor in the Vendor List of the Vendors / Orders tab to display
that vendor’s order and product line detail on the Vendor Product Line tab on the
Enterprise POS Desktop screen.
NOTE: The Vendor Product Line and Purchase Orders tab at the bottom of the
screen displays all items for this vendor account as soon as you click on the record.
2. Double click on the vendor in the Vendor List to display full screen detail.
Vendor Detail (Full-Screen)
3. Click on the Next button to move to the next vendor in the table.
4. Click on the Back button to move to the previous vendor in the table.
Finding a Record - Using the Search Engine
After several vendor records have been added to the system, you may need to find and
edit some of this data. Eventually, you’ll have too many records to scroll down the table
lists manually. That’s when it’s time to start using the search engine.
The vendor search engine is used to locate vendors in the system. All search engines
work basically the same, however, the fields to search on may be different depending on
where you are in the system. For example, in the Point-of-Sale section, customer account
data is used for search criteria. In the Vendor section, vendor information is used for
search criteria. The criteria you search on are actual database fields in your system
specific to the area you’re currently in.
It is important to understand how search engines work, since this is how you retrieve data
throughout the system. A strong understanding of search engines may drastically improve
the ability to efficiently maneuver around the system and quickly access data you need.
Chapter 2. Setting Up Vendors
7
Search Criteria – Database Fields
EnterprisePOS Desktop – Vendors Search Criteria
Select the item you want to search on by either clicking on a column or selecting from the
dropdown list on the left as in the picture above.
These field names can be customized specific to your business profile using the
Customizing Utility. Fields can also be added and removed from this list by using the same
utility. You can customize this field list or the table below by right-clicking in the top left
corner of the table and selecting “Customize Table”.
Some examples of search criteria that you’ll probably use more often are:
Vendor Name
Contact Email
Vendor Address
Vendor City
Vendor State
Vendor Zip
Remit Address
Remit City
The next dropdown box is the operand which describes how the search operation is to be
performed.
EnterprisePOS Desktop – Vendors Search Operand
The operand can be any of the following:
Equal sign (=)
Greater than sign (>)
Less than sign (<)
Greater than or equal to sign (>=)
Less than or equal to sign (<=)
Not equal to sign (<>)
Like
Not Like
8
ENTERPRISE POS User Manual
“Like” and “Not Like” are used only with fields that are of string or “text” value. For
example, you can’t use a greater than symbol to search for someone’s name. If you
try to do this, the system automatically changes the operand to “Like”. Using “Like” or
“Not Like” allows the user to use wildcards, i.e., asterisks, percent signs, ampersands,
or pounds (* % &), that replace portions of unknown text in a search.
Wildcards work well when you’re not sure about the wording or spelling of the
complete portion of text you’re trying to find. You only need to enter a portion of it to
search the database for the customer. Using the equal sign on a string or text field
requires the user to spell the value exactly before a match is found.
* The asterisk is used to replace text in Microsoft Access string fields (for example,
John Do*)
% The percent sign is also used to replace text, but is generally better in all types of
databases (works in Microsoft SQL, Access, and Oracle)
& The ampersand replaces a single character when you are unsure of it (for example,
Jo&& Doe)
It is important to NEVER use these characters in your data since it could cause your
searches to not work.
Different Search Types
To the right of the search engine box at the top of any screen on the EnterprisePOS
Desktop, you’ll see 3 search options to the right.
1.
DB Search – Populates the table with all records returned from your search.
For example, if your search or query returned only 5 records, then only 5
records would be in the table.
2.
Find – Just searches the list of records already displayed in the table and
highlights the record in the table below when it finds it. For example, if you
have 5000 records in your table below, your search would take you right to the
record you’re looking for in that list.
3.
Filter – Further filters the list of records that are already displayed. The DB
Search will run the search on the entire database, but the Filter search runs the
search on only the values displayed in the list below and will filter the list to a
smaller subset of the original list. You can keep filtering records over and over
again if you wish.
Performing a Vendor DB Search
1. Click Vendors on the EnterprisePOS Desktop and make sure the DB Search
option is selected at the top.
The DB Search will
search the entire
database and give us all
records in the table below
2. Click on the column to search on, e.g., Vendor Name.
3. Since the search is for a name, use the operand Like to perform the search.
4. Enter the vendor’s name or partial name and wildcard, e.g., *Test*, in the field on
the right, then hit Enter.
Chapter 2. Setting Up Vendors
9
EnterprisePOS Desktop – Vendor Search EXAMPLE
Points the search
engine to the Vendors
table and selects field
by clicking on a column
Notice that the system displays the information in the table after Enter is hit.
NOTE: You can hit Enter without a value in the box to the right to bring up all records.
NOTE: To perform a Product Line or Orders search, simply click on the table. You
can then repeat the process starting at step 2. You can search on any table in the
system the same way.
Searching with Adhoc Database Queries
Setting Up a new Adhoc Database Query
For more complex searching you can create a database query. You do this by clicking the
ellipse button next to the far right dropdown box.
EnterprisePOS Desktop – Adhoc Search Engine
The Adhoc Query
setup button
EnterprisePOS Adhoc Queries
Initially, there are no
queries
NOTE: The following requires some knowledge of SQL (Structured Query Language).
There are plenty of published books on writing database query statements using SQL. We
recommend only the usage of “SELECT” statements in querying your database. Any other
statements may harm the database.
10
ENTERPRISE POS User Manual
1. On the ADHOC QUERIES screen, click the NEW button
EnterprisePOS Adhoc Query Design Screen
2. Click on a field in the list to the bottom left, e.g., Vendor Name.
3. Click the Like button.
4. Enter *Test* in the Search Value button.
5. Click Add to Statement.
EnterprisePOS Adhoc Query Design Screen
You can manually type
the SQL statement or
allow the system to
create it with the
buttons below
The JOIN button can
be used to join other
tables for complex
queries
NOTE: We have now created a simple query to do the exact same thing we did
in our search in the previous section.
6. Click the SAVE button to save your new query.
7. Now enter a description to make it easier to identify your query later.
Running a Query
1. Click on the table you want to run the query on.
2. Click on the adhoc query button. You should see the query you just saved in the list.
Chapter 2. Setting Up Vendors
11
EnterprisePOS Adhoc Queries
3. Double-click on the query you want to run. The screen will exit back to the
EnterprisePOS Desktop to display your results.
EnterprisePOS Adhoc Query Results
NOTE: We got the same result as the previous section search
Using PROMPTS in your Queries
You can use the word PROMPT in your SQL Statement to prompt the user for a value.
For example, if we wanted the system to prompt the user for the vendor name, we can
replace the search value with the word “PROMPT”.
We can open back up our query and EDIT it to make this change as a test.
EnterprisePOS Adhoc Query Design
Now we can re-SAVE the query and run it again to get the following.
To get the same result we can enter the value “test” in the box and click OK or hit Enter.
NOTE: The Adhoc Queries are available for all tables in the system. Once the data is
displayed in the table, this data is available to all the reports simply by double-clicking on a
report on the right-hand side of the screen.
12
ENTERPRISE POS User Manual
Search Criteria Short Cuts & Examples
There are several short cuts and tricks that will help you find data quickly in search engine
boxes throughout the system, the following are just a few of them.
If you want to try some of the following examples yourself, login to the practice database
as the Administrator. Do this by clicking the Practice button at the initial login screen. The
following examples are done from the main EnterprisePOS Desktop.
1. Finding Criteria = When scrolling through the dropdown list of fields (criteria) to search
on, you can type speed up the pace by typing the first letter of what you’re searching
for.
Finding Search Criteria Example
For example, if you trying to find the field Product Name in a long list of fields to
search on (under the Inventory Control tab), you can just keep pressing the letter “P”
until it is highlighted in the list. Every time you hit a letter key it skips down the list to
the next field beginning with that letter.
2. Date Ranges = Instead of using BOTH search boxes to do a date range (using the
top for a FROM date and the bottom for a TO date), you can use a hyphen to
designate the range between two date values on a single search box.
Date Range Example
Records
Returned
fall within
this range
For example, if you want to pull all product records entered in the system between the
dates of 10/01/00 and 11/01/00. You can select the Origination Date field in the
criteria box to the left, then enter the following value using the equal (=) operand:
10/01/00-11/01/00
Now hit Enter to pull up all records that fall within this date range (for this field) in the
table below. Scroll to the table to the right a little with the arrow keys below to see the
far right columns to make sure the data returned is correct.
Chapter 2. Setting Up Vendors
13
NOTE: The range will include the actual start and end dates themselves as well.
3. Date Abbreviations = When searching on an entire month (probably the most
common date search), you don’t have to type a whole 2 dates or even use the range
above. There is a shortcut to give you all data for the month by simply entering only
the 2-digit month, then the year. Omitting the day portion of the date (a 2-part date
only) tells the system to use this method.
Date Abbreviation Example
For example, if you wanted all the records for the month of November of 2000, simply
enter the following in the date field:
11/00
Then hit Enter to pull up all records that fall within this month.
Keep in mind the 4-digit year will also work in these last two date calculations.
4. Wildcards = As mentioned previously, you can surround the text you’re searching for
in asterisks (*) and press the Enter key to find the record(s) you’re looking for. The
text within the asterisks could be anywhere in the field, and the system will find it.
Wildcards Example
For example, let’s say you’re looking for candle-type product but are unsure as to
exactly how the Store Manager entered it in the system since it’s missing a product
label. Simply select the Product Name criteria in one of the search fields to the left,
then type the following in the blank to the right of it:
*candle*
14
ENTERPRISE POS User Manual
Hitting Enter after the above text would pull up all records with the text “candle”
anywhere in this Product Name field. Notice all the records returned show the word
“candle” in various areas throughout the field. Keep in mind this with ONLY work with
string/text fields. You can not use this on number or currency fields.
5. Filter Searches = Also mentioned previously, the filter search is a great way to further
divide a group of records to better help you find what you need. You can do a combo
(or duel) search by simply selecting another search value and click the Filter option
before hitting Enter.
NOTE: You can use the same methods of searching on any field and any search
engine in the system.
Deleting Vendor Records
From the EPOS Desktop, you can remove a vendor from the system simply by clicking on
the record and pressing the F12 key or right-clicking and selecting Delete Vendor.
EnterprisePOS Desktop – Deleting a Vendor
NOTE: Deleting a vendor will not remove any order history or the product line that once
belonged to that vendor. The system will prompt you to delete these values as well if you
wish, however, it is usually good to keep these records for historical purposes.
You can also delete individual order and product line records the same way. Simply select
the value and hit the F12 key or right-click Delete.
Vendor Reports
The Enterprise POS application provides certain system and custom reports in the
program that can be customized depending on the specific needs of your company. The
Systems Administrator or Store Manager is usually the person responsible for
customization of the reports and setting up privileges for users who generate and print the
reports. The reports can be generated using Crystal Reports, Word, or Excel. Under the
EnterprisePOS Desktop Reporting menu there are tools to assist you in building reports
using these tools.
To run any report, you simply double-click on a report you want to run on the right hand
side of the screen under the “REPORTS” section.
Chapter 2. Setting Up Vendors
15
Print Screen - Example Vendor List
Page number (on
page 1 of 21)
246 total
records
Send to printer
Export to a file
Resize (currently
set to 50% of
original)
Custom Reports
These reports are designed to run stand-alone and independent of the system (or any
table). Therefore, the reports usually have custom criteria built into the report itself to pull
the data it needs instead of relying on the system’s search engine like the system reports
do. The custom reports are not effected by the search engine results and only report data
directly from the database. You could run this report anywhere on the network (from
outside of the system) and get the exact same results back.
NOTE: The only real difference between Custom and System reports are behind-thescenes. The reports are both displayed in the same window (as shown above) and work
the same after the records are displayed. Data is extracted from the selected table for
System reports.
16
ENTERPRISE POS User Manual
Chapter 3. Entering and Processing Orders
After the initial vendor setup of contact information and any existing inventory you may
want to enter direct in your inventory, you can begin placing new product orders with
vendors to either replenish or build stock. Orders are created, displayed, and tracked
through the Vendors / Orders tab of the main EnterprisePOS Desktop screen. They can
also be accessed or processed from directly within a vendor full-screen record as well. For
questions on accessing the Vendors Orders area or purchase orders within a vendor
account please refer to Chapter 2 for details.
What you will find in this chapter…
Product Ordering
Order Statuses and the Order Life-Cycle
2
2
Entering New Orders
Entering a Purchase Requisition
Entering Order Detail Information
Assigning a Customer to an Order
Entering Purchase Order Origin Information
Entering Ordered Products
Entering New Products Never Ordered Before
Assigning Items to Customers / The ‘Distribution List’
Entering Additional Order Costs
3
4
5
5
6
7
8
9
10
Requisition to Purchase Order Conversion / Assigning a PO #
Finding a Requisition to Approve
Approving a Requisition
11
11
11
Printing or Faxing Orders
12
Submitting an Order
13
Deleting Orders
13
Placing Orders from the Stock Shortage Box
14
Receiving Orders
Displaying Received Items
Displaying and/or Receiving Back Orders
15
16
17
Displaying Received History
18
Chapter 3. Entering and Processing Orders
1
Product Ordering
To begin entering orders for a vendor, single click on the vendor record itself to show the
values below associated with that vendor. The bottom two tables will display all items
within the vendor’s product line (left table) and the vendor’s order history (right table).
You can either double-click to enter a vendor to enter a new purchase order, or you can
right-click and select New Order.
EnterprisePOS Desktop – Entering a New Order
Order Statuses and the Order Life-Cycle
Every order goes through what we refer to as a life cycle from the time the need for an
order of product is identified to the point at which the order is received.
Order Life-Cycle
Purchase
Requisition
Is generated
Conversion
Purchase
Order
Is approved
and
generated
Order placed
with Vendor
Product did
Not Arrive
Order
marked
Back Order
Open Order
Database
record
generated
Product
Arrives!
Product
Arrives!
Order
marked
Received
NOTE: Purchase Requisitions are simply requests for orders to be placed.
Purchase Requisitions are requests to order product. These order types are usually
taken by employees that do not have the required access rights to assign purchase
order numbers. Purchase order numbers usually come from the store’s accounting
system, however, they can be assigned automatically by EPOS. Since a PO # from a
company is usually as good as payment, most businesses will often limit PO #
generation to supervisors only.
Purchase Requisitions solves the problem of supervisors that may not always be in
the office to place the orders. It allows users to enter all order information for the
Supervisor to “approve” the requisition into a purchase ORDER later.
2
ENTERPRISE POS User Manual
You can also setup users to have different approval accesses for conversion into
purchase orders. For example, user A may be able to approve a requisition into a
purchase order up to $5,000, while user B may have a $1,000 limitation. This gives
the Supervisor the flexibility to instill some responsibility to more trustworthy users
while limiting the amount of risk.
NOTE: Any user with the proper security access can by-pass the purchase requisition
step altogether and issue purchase orders directly.
Open Orders are purchase orders. The status for a purchase order becomes OPEN
when the order is saved after being placed with the vendor. It basically says the order
is in-transit from the vendor, or product is physically on the way.
Back Orders are purchase orders with some or all products that were not received by
the designated date. Often, a vendor will send something by the required date
whether or not the entire order can be filled. A back order is treated the same as an
Open Order with an unspecified date of arrival. Usually, a portion of the order is
received. If this happens, two database records are generated. One for the received
product marked with a status of Received and the remaining unreceived product is
entered into a new order record with this Back Order status.
Received Orders are purchase orders in which all products in the order have arrived
and have been moved into inventory. After an order is received, the quantities for
these products are adjusted to reflect the new products. This order record then
becomes closed and used for historical purposes only from this point on.
Entering New Orders
After selecting the vendor in which to place an order, either double-click the vendor record
to open up the vendor to place a NEW order, or right-click and select New Order.
EnterprisePOS Desktop – Entering a New Order
Initially, you’ll get a screen for you to select which type of order to enter, a purchase
requisition (PR) or order (PO). Click the button of the order type you want.
Chapter 3. Entering and Processing Orders
3
Entering a Purchase Requisition
1. After vendor selection, and clicking New Order, if you have your own order
(requisition) number, enter it in the box marked New PR #, otherwise the system
will automatically generate a number for you by leaving AUTO in the box, then
click the PURCHASE REQUISITION button.
Purchase Order Requisition
Order Date – When
order was placed
Date Required – When
you need it to come in
Cancel Date – When
you no longer want it
Origin – Shipping and
Routing Information
Table of your
customized product
fields – shows the items
being ordered.
Customize this table
under the File menu
NOTE: The user is not allowed to enter a PO number here (with asterisks) unless
they have the proper rights. However, even if the user has rights and a PO # is
entered here, it’s not “official” until the requisition is converted to an actual PO.
Detail – tab that includes specific detail about order shipping, payment terms, etc.
Origin - tab that includes all information about where the order came from and where
it’s going.
Order Costs – fields for entering tax, shipping, and other associated costs for the
order that is totaled with the items in the table to produce the Total Order cost.
Control Panel – function buttons.
Submit – submits/saves the order to the database.
Receive – receives an order and commits inventory. Note that this button first
becomes Convert after a requisition is entered. A requisition must be converted to a
PO before stock can be received.
Print/Fax – allows printing or faxing the order directly to the vendor.
Labels – allows printing of labels for product selected. Even before an order is
received, you can use this button to print labels for product in the table.
Dist Costs – allows distribution of shipping and other costs among the items ordered.
MU – Sets a mark-up factor for the entire order. It allows you to mark everything up a
certain percentage to obtain a UNIT PRICE for all items before you receive everything
to stock.
Exit – exits the Order Detail screen and returns you to the previous screen.
4
ENTERPRISE POS User Manual
Entering Order Detail Information
The following steps cover the entry of detailed information of a specific order.
Purchase Order Detail – P.O. Information
The current
order status
1. Enter the Date Required for the order, or click on the down arrow for a calendar.
2. Enter a Cancel Date for the order, this is the point at which an order becomes
null and void when still not received.
NOTE: The Cancel Date and Date Required are not required fields to save an
order, but we recommend using them for the EPOS Today function in the
EnterprisePOS Desktop to track order statuses for you. These dates are how the
system notifies you when orders are late.
Detail Tab
3. Enter a Vendor Order # if you receive an order confirmation or tracking number
from a vendor after placing the order with them.
4. Job # is only used to reference a job or work order. If this order corresponds to
parts for a specific job / work order, then enter this number here.
5. Enter any shipping method information in the Shipped Via field. For example,
UPS, Hand Delivery, FedEx, Airborne, US Postal Service, etc.
6. Click on the down arrow at the end of the TERMS field (For Purchase Orders
ONLY) to select the method of payment for the order.
NOTE: The options that appear in the dropdown list are dependent on your system
setup and customizations.
7. FOB (freight on board) text field is used to enter any brief notations regarding the
items being shipped. If the vendor gives you any additional shipping data, you
may want to record it here.
Assigning a Customer to an Order
Note that you can skip this section if you are ordering stock for the store. If you are
ordering stock for specific customers (that are already in the system), you can add the
customer in the following steps or use the New Special Order menu item under
Customers right-click menu in the Customers section of the EnterprisePOS Desktop.
1. Move the mouse over the For Customer ID field to view brief tool-tip instructions
regarding the field. Most fields in the system have these help notes.
For Customer ID Field Instruction Text
Chapter 3. Entering and Processing Orders
5
2. Double click in the For Customer ID field to view a list of customers to choose
from.
MARK THIS ENTIRE ORDER FOR A SPECIFIC CUSTOMER?
NOTE: A popup window will ask if you are sure.
3. If you’re SURE you want to mark the entire order for a specific customer, Click
Yes. Otherwise click No to abort the action.
NOTE: If you click Yes, a Search Box window appears for you to find your customer.
Customer Search Box
4. Perform a search for the customer.
5. Double click or press F10 to select the customer record.
6. Notice when you return to the Purchase Order Detail screen, the customer
number appears in the For Customer ID field and each product that is assigned
to the order will be specifically assigned or “ordered for” that customer.
Entering Purchase Order Origin Information
The origin information tells where the order is coming from (or where you bought it) as well
as where it is being shipped.
1. Click on the Origin tab.
Purchase Order Detail – P.O. Information Origin tab
NOTE: The vendor name, number, and contact information appear in the Vendor
Information (RECEIVED ORDER) portion of the screen; store information such as
store identification and the name of the person placing the order appears in the Store
Information (PLACED ORDER) portion. The fields on your screen may appear
different depending on previous customizations by your System
Administrator/Manager.
2. If the address the product is being shipped to differs from where it normally is
shipped, you can manually type in the address under the Ship TO Address
6
ENTERPRISE POS User Manual
fields. This is basically just a way to type in the information given to the vendor.
This is so later you’ll know you told this vendor to ship to a different location.
Purchase Order Detail – P.O. Information Origin tab EXAMPLE
Entering Ordered Products
The table on this screen is where products being ordered are entered. If you have a
Product Line to search from for this vendor, you can drop down a list of values to search
from or right-click for a more detailed search screen to add product. However, without
data, you may have to just start typing manually.
Products Ordered
NOTE: Make sure for each product you enter your Product Category and leave the Stock
# column blank when ordering brand new items. If you do this, the system will
automatically generate stock numbers when you receive the order.
NOTE: To REMOVE an item, just enter a zero in the quantity field and hit Enter and the
row is removed.
1. After finding your product in the search list, click to select it. If it is a new item,
enter the description and the vendor’s product number/style number manually.
NOTE: When an item is selected, the system populates the cells based on the
product information entered previously (see Adding Products for more
information), or depending on what was entered in the original order for this
product when it was ordered as new.
2. Enter the number of items to be ordered in the Qty cell.
NOTE: Notice that the system automatically calculates the total cost based on the unit
cost and quantity.
3. Use the arrow keys or Enter to move from cell to cell or click in a cell.
4. Record the needed information in each product description column.
NOTE: These columns depend on your customizations. To select additional
columns or remove existing ones, select Customize Table in the File menu.
Chapter 3. Entering and Processing Orders
7
5. Enter the UNIT COST for this item.
Purchase Order Detail
6. After entering the COST, you’ll probably get a box that asks you if you want to
calculate the UNIT PRICE using a mark-up factor. At this point, you probably
don’t have a mark-up factor yet, but if you did, you could click Yes and have the
UNIT PRICE automatically calculate. Otherwise, clicking No would keep the price
and recalculate the mark-up value.
7. Enter the Product Category field. This is probably the most important column.
8. Enter the Min Qty field. This column will define the Minimum Quantity your
system will allow before alerting you that you are LOW in stock. Leave this
column blank if you don’t want the system to monitor this items inventory level.
9. Enter the Restock Qty field. This column is used when you replenish your
inventory from the low-inventory warning indicator. If you had a minimum quantity
of 5 and a restock level of 10 for this item, when quantity dropped to 5 and you
re-ordered, a quantity value of 10 would be automatically ordered.
10. Enter the Consign? field. If you are getting this item on consignment from a
vendor (the vendor owns the product until you sell it), then set this field to YES. It
will automatically mark this item as a consignment item when you receive it into
your inventory and will notify you that payment is due to this vendor upon selling
the item.
11. Repeat this process for all other items you add to the order.
Entering New Products Never Ordered Before
NOTE: It is important to fill out as much data as possible when entering new products that
you want created in inventory when the order is received. The more columns of data you
fill out now, the better. Note the following important columns that can not be customized.
Total – The extended cost total that includes unit cost multiplied by quantity with the
added cost value on top of it. It shows the total cost amount for that line item.
B.O. – Stands for Back Ordered. Clicking the column value changes the box in the
row to a checkmark. Check this only when an order comes in, but this line item wasn’t
received.
8
ENTERPRISE POS User Manual
For Customer – This value is the ID of the customer that this product was ordered for
or assigned to. You won’t be entering this value at this point, but see the next section
for further detail.
Quoted Price – This is the Unit Price or quoted price value. If you don’t change this
price value before product is received, then it automatically becomes the new price for
the item.
Product Category – You are not allowed to even save a purchase order without this.
You must some form of product category before product is received. This system
must know where to place the new product in the database.
Product Type – This is the product type field as described in Chapter 1 of this manual
which is :
0 = Non-Quantity Item
1 = Misc. One-Of-A-Kind Item
2 = “Kit” or Custom Inventory Item
3 = Standard or Vendor Ordered Item
4 = Weighted Part Item
By definition, all items ordered through the Purchase Order system should be a
product type 3.
Assigning Items to Customers / The ‘Distribution List’
When product being ordered is assigned to a specific customer, the product will appear in
the customer’s Special Orders section of their account (the Customer Detail screen).
You can assign each item’s order quantity to different customers by double clicking on the
For Customer column for a specific line item in the table. This pulls up the quantity
distribution list for that item allowing you to break up the quantity for specific customers.
ITEM QUANTITY DISTRIBUTION
ADD to List – Search for customers
to add item quantity
EDIT Selected – Edit the quantity
assigned for the customer
REMOVE from List – Removes the
customer from this item’s distribution
list
NOTE: If you want to assign the whole order to a customer, put your cursor in the For
Customer ID field and double click as described in the Assigning a Customer to an Order
section of this chapter.
Chapter 3. Entering and Processing Orders
9
Entering Additional Order Costs
The bottom portion of the screen displays the total order amount from the various line
items in the table as well as the additional costs manually entered for tax, shipping, etc.
1. Notice that the total for the order is automatically calculated by the system in the
Total Order $ field.
Purchase Order Detail – Products Ordered With This Shipment
2. Enter tax amounts for the order (if any) in the Tax Cost field and hit Enter.
3. Enter the cost of shipping (if any) in the Shipping Cost field and hit Enter.
4. Enter any other associated costs (if any) in the Other Cost field and hit Enter.
5. The last step involves the distribution of these additional costs into the individual
product line items so the inventory costs can be adjusted when the order is
received. Notice the column marked Added Cost in the table. This is where the
additional costs are distributed automatically by the system for each item.
Distribute Costs
1. To distribute the added costs evenly among the ordered items, click on the Dist
Cost button or press F9.
Distribute All Added Costs Evenly?
2. Click Yes to distribute the added costs evenly.
Order Costs
3. Notice that the Total Added Costs field (which holds the total additional cost
amount) is evenly divided among the items in the above table (in the Added
Cost column).
4. Now, if you want to reduce the additional costs of certain items and increase
others, you can do so by manually adjusting the values in the Added Cost
column for each item. However, the total of all the rows must equal the total
value in the Total Added Costs field. You can have more added costs than are
distributed among the line items, but you cannot have more. To add additional
costs to the line items in excess of the total for the order, you must first add to the
order cost fields at the bottom of the screen first.
10
ENTERPRISE POS User Manual
Requisition to Purchase Order Conversion / Assigning a PO #
Once all the information has been entered into a purchase requisition, all the designated
vendor contact person has to do is approve and convert the requisition to a purchase
order for the system to automatically assign the next available purchase order number
(PO #). If this designated company / store associate already has a PO # generated from
an external accounting software, they can simply enter this value manually.
Finding a Requisition to Approve
From the EnterprisePOS Desktop, click on the Purchase Orders tab to view all orders,
then click on the vendor at the top. You’ll see this vendor’s list of purchase orders.
EnterprisePOS Desktop – Vendors
Approving a Requisition
Approving an order requisition simply means you, as the approver, agrees to initiate the
order as “official” and authorize eventual payment to the vendor.
1. First, double-click on the order requisition you have found in your search with the
status of REQUEST. The order screen opens up with all order detail for the
requisition.
2. Click the (F8) Convert button or press the F8 key.
Purchase Order Detail – Convert to PO?
3. Click Yes.
4. If you did not enter a purchase order number (PO #) manually on this requisition
before clicking the convert button, then the system will ask you if you want one
assigned.
NO PO # - GENERATE ONE?
Chapter 3. Entering and Processing Orders
11
5. Click Yes (unless, of course, you forgot to enter a PO # that you already had. If so,
click No, enter the PO # in the order, then return to step 1 to start over).
6. The system will assign a PO # and tell you the process finished successfully. The
order status then changes from REQUEST to OPEN and is ready to be received
when the stock finally arrives in the future.
7. Now click EXIT to return to the main screen
EnterprisePOS Desktop - Vendors
Our order status now
has changed to OPEN!
The order has been
placed
Printing or Faxing Orders
Orders may be displayed, printed, or faxed directly from the EnterprisePOS system.
1. Click on the (F6) Print/Fax button itself or press F6 to print the order.
Print or Fax This Form – View It First?
NOTE: The Print or Fax This Form – View It First popup window asks if you want to
view the purchase order first.
2. Click Yes to view before printing or faxing. The print preview screen appears
before anything is printed or faxed. Then, you can print from the print preview
screen using the printer icon on the top menu toolbar.
3. Click No to not view it first and send it directly to the printer or fax.
4. Click Cancel to stop without viewing, printing, or faxing.
NOTE: The process of faxing from here is no different than printing in EPOS. With a fax
modem setup on your computer, the order form can be printed to the fax modem that will
forward the document to a designated fax phone number. Most modems will set
themselves up as a printer during driver installation for this very purpose. See your
computer or modem vendor for more information on how to setup your computer and/or
modem to utilize this function.
NOTE: Remember you can customize these reports under the EnterprisePOS Desktop
Reporting menu.
12
ENTERPRISE POS User Manual
Submitting an Order
The Submit button is used to save or resave a completed order to the database.
1. When the order is complete, click on the Submit button or press F2.
Submit Order Verification
2. Click Yes on the order verification popup window to save the order.
Record Saved
NOTE: The Record Saved popup window informs you that the new order has been
successfully submitted to the database and that the items in the order will be moved
to inventory once received.
3. Click OK on the Record Saved popup window.
4. Notice that when you click Exit and return to the Vendor Detail screen or the
EnterprisePOS Desktop, the order appears in the table with the latest changes.
Deleting Orders
Selected orders can be deleted from the EnterprisePOS Desktop by right-clicking then
selecting Delete Order or with the F12 key.
Deleting Orders from EnterprisePOS Desktop Right-Click Menu
NOTE: Deleting a received order will not reverse the quantity additions to inventory that
resulted from the order being receiving. In other words, all received items remain received
in inventory regardless if you delete old orders or not.
If you want to completely reverse a received order like it never happened, you’ll have to
manually reduce the quantities of each product that was received in the order. So, if you
made a mistake with an order and want to remove it, make absolutely sure you don’t
receive it first or you’ll be faced with some additional work to reverse the changes.
Chapter 3. Entering and Processing Orders
13
Placing Orders from the Stock Shortage Box
To completely automate your ordering process, you can place orders only when your
system tells you you’re low on stock. Items low in stock appear in the Stock Shortage box
in the bottom right corner of the EPOS Desktop.
When entering new products within an order for the first time or entering new product
directly into inventory, remember to set the Inventory Warning switch on (with the number
‘1’ in the column) and enter a minimum quantity value. This will cause the item to be
automatically monitored by the system for any stock shortages. A stock shortage would
occur when the total quantity on-hand for the item drops below the minimum quantity
value.
EnterprisePOS Desktop – Stock Shortage ALERT!
Store inventory numbers that identify “low stock” items appear in the Stock Shortage box.
Every user on the network running the EnterprisePOS Desktop (usually everyone except
cashiers) will be able to see this stock shortage list and the blinking fire hydrant icon
warning.
The continuous blinking hydrant can be annoying for some users, so it is possible to click it
and turn it off. However, the box with the low stock items remain in the list.
Stop This Warning For Now?
Users can simply double click on the item(s) in the Stock Shortage box to reorder.
NOTE: The only way to remove an item from the Stock Shortage box is to place an order
and receive it or increase the quantity directly otherwise the warning indicator will continue
to blink.
1. Double-click on an item in the Stock Shortage box. The EPOS Product Detail box
appears asking you what to do with the item you just double-clicked on.
EPOS Product Detail
Launches the
screen for
customer viewing
(no cost data)
Launches the screen
for store employees
ONLY (has cost data)
Orders all items in the
Shortage box from this
same vendor!
Order this item
14
ENTERPRISE POS User Manual
NOTE: The EPOS Product Detail screen appears and allows you to review product
sales or cost detail, order the selected item, or order all low-inventory items for the
vendor (bulk order – a big time saver when ordering ALL low inventory items).
2. If you only want to order the item you clicked on, click the Order This Item
button and select either a Purchase Requisition or Order.
NOTE: The Order Detail screen then appears with the line item you selected in it.
3. Enter the quantity of items to be ordered and other information on the screen.
See the Entering Order Detail Information section above for details.
4. When finished entering all applicable information for the order, click Submit.
Submit Order Verification
5. Click Yes on the order verification popup window.
Receiving Orders
When orders have been received, they are immediately moved into stock.
1. At the EnterprisePOS Desktop, select the vendor you want and open up an
outstanding order with an OPEN status, then double-click to open it.
2. Double click on the order that you want to mark for receipt.
Purchase Order Detail
nd
3. Click the Receive button (2 from the left at the bottom) or press F8.
Receive This Order
NOTE: The Receive This Order popup window asks if you want to mark item in this
order as received. It also lets you know that if you marked any items in the table as
Chapter 3. Entering and Processing Orders
15
back ordered (B.O.) it will filter out these items into a new order (since these items
have still not been received).
4. Click Yes if you want to mark all items as received.
5. If you omitted the stock/inventory numbers for any of the items (which you should
for new items), you will get a confirmation box to create these numbers for either
this item or ALL items in the order. Just click AUTO-ASSIGN ALL.
New Inventory Item (Stock) Number
6. Did you forget a UNIT PRICE column value? If you did, you’ll get the following
message for each item to enter this value
Enter Unit Price
Receiving Complete
NOTE: The Receiving Complete popup window tells you the total number of line
items on the order that was successfully received and committed to inventory as well
as any items marked “B.O.” (back-ordered) that were filtered out into a new order.
7. Click OK.
8. Click Exit to return to the previous screen.
9. Notice Date Received column now displays the current date indicating its receipt
and the order status is now RECEIVED.
Displaying Received Items
1. Double click on the received order.
16
ENTERPRISE POS User Manual
2. Noticed that the Status is changed from Open to Receive, and all received items
appear in pink (shaded) area.
3. From the Received status view (above), click the Print/Fax button if you want to
print an order report.
4. Click Exit to return to the previous screen.
Displaying and/or Receiving Back Orders
After you finish receiving the order with some items marked back ordered, you’ll notice the
previous order record has split into two order records. One order has a RECEIVED status
with a recent delivery time, and the other one having the same PO # with a different
requisition #. This new order has a status of BACK ORDER.
The back orders function exactly as OPEN orders since both types of orders have product
waiting to be received. The only difference between the two is how they came to be. The
“back order” was spawned from an existing order, and the “open order” was saved as new
by a user.
NOTE: From within an opened vendor screen, you can click the Back Orders option
box under the Orders tab to quickly display only the back order items.
VENDOR DETAIL – Displaying Orders
Click an option button to
show all orders of a
specific type for this
vendor in the table below
1. Just as before, simply double click on a back order to open it.
Back Order Information Detail
Chapter 3. Entering and Processing Orders
17
2. Notice that Back Order appears in the Status portion along with the Original
Req. (order) #.
3. To receive the back order, click the Receive button or press F8 just as before
with an OPEN order.
Displaying Received History
The Enterprise POS system tracks and records a received order history for each vendor.
This history can be used to review the vendor’s ability to provide on-time orders and track
how often orders were back ordered or received past the required date.
1. Double click on the vendor for which you want to display order history.
2. Click on the Order tab and click on Received (History).
Vendor Detail
Click on Received option
button to show all orders
that were ever received
from this vendor
3. Scroll through the list of received orders to review the historical information or
double-click an order record to select it.
18
ENTERPRISE POS User Manual
Chapter 4. Inventory Control
This chapter covers the aspects of EPOS inventory control. This chapter covers aspects of
entering inventory DIRECT (outside of the Sale-Order process described previously) as
well as accounting for damaged or repaired merchandise. The Inventory section of the
EntprisePOS Desktop contains two tabs: Stock and Repairs / RMAs, each of which are
discussed in this chapter.
What you will find in this chapter…
Stock Tab
Search for Inventory Items
2
2
Entering New Inventory
Saving Product Detail
Adding New Stock – Final Summary
3
7
8
Displaying / Printing Product Details
Product View for Customers (Read Only)
Printing Product Detail
8
8
9
Repairs/RMAs Tab
New Repair Entry Methods
Entering New Repairs
Entering Services to be used in Repairs
Create a Work Order
Save Work Order
Adding a NEW Repair to Stock
10
10
12
14
17
21
22
Inventory Area Reports
23
Chapter 4. Inventory Control
1
Stock Tab
The Stock tab provides an Inventory Snapshot of all products in inventory and allows
adding new items directly into the inventory (referred to as entering inventory “DIRECT”).
1. Click on the Inventory button on the left of the EnterprisePOS Desktop.
2. Click on the Stock tab.
EnterprisePOS Desktop – Inventory area
NOTE: The Inventory area, just like the Vendors area in the previous chapter,
contains the same search functions and adhoc query engine at the top of the screen.
Search for Inventory Items
1. Click on a column to search on, e.g., Product Name.
2. Enter the search criteria in the box to the right including any wild cards if
necessary, e.g., *chain*, then hit Enter.
NOTE: Hitting Enter in a blank criteria field will display ALL products in the database.
EnterprisePOS Desktop – Stock Search results
NOTE: If you compare the last screen shot with this one, we can see the list of items
in the table went from 5 (all of them) to 3 (only the ones with “chain” in their name).
See the section on searching for data in Chapter 2. These techniques also apply here.
2
ENTERPRISE POS User Manual
Entering New Inventory
1. From the EnterprisePOS Desktop Inventory Stock tab, Click the vertical ADD TO
STOCK button on the right-hand side of the table or right-click anywhere in the
table and select New Product.
New Inventory Item
Enter new products
by right-click, then
New Product or the
ADD TO STOCK
button
2. The product cost detail screen then appears awaiting input of the new inventory
item(s).
Product Cost Detail Screen – Blank
3. Select a product category in the Product Category dropdown box.
NEW Stock #?
4. To automatically assign a stock # within this category, click Yes.
Chapter 4. Inventory Control
3
5. If applicable, enter a Sub-Category in the box to the right of the product
category.
6. Below the product category field is the item description or product name, you
must have this item valued. Enter this now.
7. Select a Vendor in the box below the item description / product name field.
8. Enter other numbers to the left below the stock # if applicable (these are
optional).
9. Click Add Quantity and add the number of items you have in stock.
10. Enter any Cost / Price information in the middle portion of the screen.
NOTE: Entering the M.U. (mark up factor) will automatically determine price.
11. Set the Product Type in the dropdown box below (service, one-of-a-kind,
custom kit, vendor ordered item, or weighted part).
12. Check the Low Inventory Warnings at… if you want to set the quantity level
that the system warns you when stock is “low”.
13. If you are using the Internet Update utility to update your website as product data
changes, then select the Sell this Item on the Internet option.
14. If this is a normal, taxable item, you can leave the tax level at 0, otherwise select
2 for a taxable item at a certain sale price, or 3 for a non-taxable item.
15. Enter any descriptive data (if needed) on other tabs, then click SAVE. Notice the
record appears in the Desktop table in the background.
16. You can go back to step 2 to select another product category and repeat this
process to enter another new inventory item.
Tabs (Product Details)
Desc. Detail – provides for recording detailed descriptive information including serial
number requirements, and related documents
Desc. Detail Tab
General tab – Used for
customizable description fields
(top field is a further description of
the product, case location is
where the item is located in the
store, etc.). You can also set a
specific barcode label format used
by BarTender software, setup
this product to not calculate sales
commission, and enter serial
numbers (if applicable). Finally,
this tab has store-only product
notes and a “pop-up message”
box when this item is selected at
the point-of-sale.
Other tabs – You can have up to
3 other descriptive detail tabs (all
customizable) to further describe
the product based on type.
4
ENTERPRISE POS User Manual
Components (Parts) – (For Product Type 2 – Custom Kits ONLY) Includes all
component-level raw material detail for a kit product.
Components (Parts)
Changing the Product
Type on the General tab to
2 (a custom kit) will enable
this tab which includes all
components of this custom
in-store created product.
Click ADD PART to add raw
materials (other items from
inventory) to this product.
The costs for the items will
get tallied in the Total Part
Cost field. You can
customize additional cost
fields on this screen if you
want further cost detail or
even IMPORT Labor
(service cost) from the Time
Clock module to total at the
end in the Total Cost of Kit
Qty / $$ Detail – Has more quantity, cost, and pricing detail
Qty / $$ Detail Tab
Cost Detail – Includes raw
product part cost (from
Components (Parts) tab if
applicable) and any
customized additional costs
to equal the Unit Cost
Price Detail – Includes the
M.U. (mark up) from the
Unit Cost to obtain the Unit
Price. There are 2 additional
min/max price fields you can
also add based on a price
formula (see below) *
Quantity Detail – Shows all
quantity information
Non-Qty Detail – Detail for
non-quantity items (Service
products – type 0)
* Price formulas are basic calculations used to automatically create other price
derivatives of the unit price field.
The unit price field is referred to as variable “A”, the first price derivative is referred to
rd
as variable “B”, and the 3 price is variable “C”. You can use these variables in basic
algebraic formulas for automatic determining the other 2 prices.
Some examples include :
1. A/2 – The Unit Price (A) divided by 2
2. A*2 – The Unit Price (A) multiplied by 2
3. A+B/2 – The Unit Price (A) and first price derivative added then divided by 2 (you
would do this in the C price only)
And so on…
Chapter 4. Inventory Control
5
Substitutes – When this product is selected at the point of sale, this tab defines what
“extra” items are included along with this product or when it is out of stock.
Click ADD next to the top
table to enter some
alternative products for
when this product is out of
stock or REMOVE will
remove the substitutes from
the list
Special Product Relations
– This identifies any Tag
Along Products or other
stock items that may also be
included at the point of sale
when this item is selected
(such as batteries, a special
container, specific cleaning
products, an appraisal, etc.).
The Parent Product is only
used when this item is a
sub-item of another
Pic. / Attachments – Where any pictures or attachments for this product are held.
Click Change/Add Picture
to add a picture to the
product. There is no limit to
how many pictures you can
add. You may want to add
various angles of the same
picture so when you click on
down the picture list it shows
all angles of the item. Clear
Picture removes the picture
from the list and Edit
Picture will open it for
editing.
Click ADD under
Attachments to add an
item that you want to be
able to launch from this
product (like a Word
document or something).
Product Types
Remember the Product Type field (along with the Product Category field) on the
General tab are equally important and need to be fully understood. You need to make
sure you select the proper “type” of product, so your product will behave properly
throughout the system. You should double check to make sure this field is correct
before saving. For more detail on the various Product Types, see Chapter 1.
6
ENTERPRISE POS User Manual
Button Bar
Next – Moves to next product record (only in product edit mode)
Back – Moves to previous product record (also only in product edit mode)
Save – Saves the product
Add Quantity – Adds quantity to this product
Remove Quantity – Removes quantity from this product
Undo – Undoes all changes (good for playing with the numbers without saving)
Print – Prints a detailed product information report
Exit – Exits this screen
Product “File” Menu
Print Screen – Just sends the displayed portion of the
screen to the default printer
Customize Form / Parts Table – Launches the
Customizing Utility to allow you to add/remove fields, change
field names, customized the parts table columns, etc.
Change ORIGIN Date – (Only when editing an existing
product) Allows you to change when the product was
created
Exit – Exits this screen
Saving Product Detail
1. When you have completed entering all the necessary information for the new
product on the Product Cost Detail screen, click on the Save button.
Save Verification
2. Click Yes on the Save Verification box or click No to return to the Product Cost
Detail screen without saving.
Record Saved
3. Click OK on the Record Saved popup window.
4. Notice that the new product now appears in the background table.
Chapter 4. Inventory Control
7
Adding New Stock – Final Summary
In summary, we have seen that new stock can be entered in a number of ways.
•
Adding DIRECT : Entering Stock Directly into Inventory
1. Within the Vendor Record – After opening a vendor record, the NEW
vertical button next to the inventory table can be clicked to add product
directly to inventory under a vendor’s account.
2. From the EnterprisePOS Desktop – Inventory Area - inventory can be
entered straight into the Stock tab by clicking the vertical ADD TO
STOCK button.
•
Purchase Orders : Ordering New Stock
A new Purchase Order can have new product items entered into the order. Upon
receiving of the order, new product items in the order are then moved into
inventory. See Chapter 3 for more details on this process.
Displaying / Printing Product Details
Once a product is in the database, the product inventory record can be accessed at any
time and does not go away regardless if it is sold out or not. If all quantity is sold, it will
simply remain in the system with a zero quantity waiting to be reordered, remade, or
removed.
From the main EnterprisePOS Desktop, the following steps demonstrate how to view and
print product records.
Product View for Customers (Read Only)
To display a customer / sales view for product detail (displays all descriptive data, pictures,
and pricing, but NO cost information), do the following.
1. From the EnterprisePOS Desktop Inventory section, make sure the Stock tab is
selected.
2. Apply the search criteria discussion in Chapter 2 to find the product you’re
looking for in the table below, then double-click the product to open it. A dialog
screen appears for you to select how you wish to view the product data.
EPOS Product Detail
Product View for Customers – An
aid for sales staff. It shows all product
detail without any cost information
Product Cost Detail – All product
detail (the screen discussed
previously)
Product Form View – If you
designed your own product screen,
you can select and use it here
3. Click on the Product View for Customers (Read Only) folder.
8
ENTERPRISE POS User Manual
Product Sales Presentation Screen
Next button – Moves to the next
product in the table
Back button – Moves to previous
product in the table
Order It button – Places an order
for this item
Buy It button – Purchases this item
Print button – Prints any detailed
reports (with no cost data)
History button – Shows product
history
Exit button – Exits this screen
NOTE: The Product Sales Presentation screen allows you to show the customer all
detailed information regarding the product without any cost detail. All fields on this
screen are also included on the Cost Detail screen covered in the previous section of
this manual. However, here all the fields are read-only (can’t be changed).
NOTE: This screen can also be launched at the point-of-sale from the inventory
search screen. This gives cashiers a great way to display detailed product information
or product pictures to the customer.
Printing Product Detail
Both the Product Cost Detail and the Product Sales Presentation screen have a Print
button used to generate reports to the screen or printer.
These reports are customized under the EnterprisePOS Desktop’s Reporting menu.
These reports can be Crystal Report templates, Microsoft Word documents, or Microsoft
Excel spreadsheets.
Desktop Reporting Menu
Setup Reports – Where you configure report printing or
exporting, report design, or special operations.
Designers – These 4 report designers allow you to build a
Crystal report, a Word document, an Excel spreadsheet, or a
BarTender barcode label and print it right from EPOS like a
regular report with all associated data sent to the application.
Labels / Auto-Reporting – Labeling and automatic
reporting tools.
For more detail on changing reports, see the chapter on reports later in this manual.
1. From any product screen, click the Print button. If you have more than 1 report
assigned to the screen (from Setup Reports under the Desktop’s Reporting menu),
then a list of reports will display for your selection.
Print Report List Example
In this example, the user has 2 reports setup to print in the
product detail screen, one is a Crystal Report (rpt file), the
other is a Word document.
Chapter 4. Inventory Control
9
2. Resize the print preview window using the mouse. Position the mouse over the edge
of the print preview window, you’ll notice the mouse arrow change. Then, hold the left
mouse button down and drag one side of the window outward until the window opens
up enough for your viewing pleasure.
3. Use the resize box to change the size of the report in the window (makes it easier to
read).
4. When you’re finished viewing it and want to send it to the printer, simply click the print
icon at the top of the window.
Print Preview Screen – Example Crystal Report
The resize box (at
50% normal size)
Print button – sends
report to the printer
For more detail on the report preview screen shown above, see Chapter 9 – Report
Engine.
Repairs/RMAs Tab
The Repairs / RMAs tab displays items that have been returned or sent to a vendor for
repair. It allows scheduling new repairs and work orders and provides the ability to return
newly repaired stock back to inventory.
New Repair Entry Methods
There are 2 places to enter a new repair.
1. From the EnterprisePOS Desktop, in the Inventory area under the Repairs / RMA
tab. From this table you can right-click in the table and select New Repair(s) or click
the vertical NEW button next to the table. Either way will open the new repairs entry
screen for the entering of items that are needing service of some kind (whether they
are in your inventory as of yet or not). Entering repairs from here does not
automatically assume that the item or items to be repaired came from a customer
although it may have. From here you have the option of entering general repairs and
leaving customer information blank.
10
ENTERPRISE POS User Manual
EnterprisePOS Desktop – Inventory Repairs
Entering new repairs
at the Point-of-Sale for
a customer, click
Quick Sale (see
below), or click NEW
on Repairs tab, or
right-click New
Repair(s) in the
repairs table
2. From the sales (or QUICK SALE) screen. If you click the QUICK SALE button from
the Desktop, you’ll begin a new sale for a customer. After the customer is selected,
you can click a Repairs button on the left-hand side of the sales screen to enter new
repairs specifically for a customer. As mentioned previously, entering repairs from the
Desktop are general repairs whereas entering them from the sales screen always
assumes they are for the customer selected.
Sales Screen (Point-of-Sale)
Step 1 : The customer
was selected on the
ticket first
Step 2 : Then Repairs
is clicked to enter new
repairs or view existing
repairs specifically for
this customer.
Note: The above screen shot is after a completed sale. You can enter repairs at any
time after the customer is selected whether the sale is new or existing.
After one of these two methods for new repairs are selected, the system wants you to
assign a new repair or ticket number. This is any unique identifier for the repair. If you do
manual repair slips, you can manually type in the number or allow the system to
automatically assign it.
Enter New Repair
Click Yes to have the system automatically assign a repair number.
Chapter 4. Inventory Control
11
Entering New Repairs
Initially, when entering new repairs from the EnterprisePOS Desktop, you’ll notice a few
extra columns pertaining to the customer. These can be blank. If entering repairs from
Quick Sale, this data is stored behind the scenes from the invoice customer data. These
Desktop-entered repairs are also missing a button to copy the selected repair or repairs
into the invoice ticket.
Entering Store Repairs Screen
NOTE: You can right-click in the top left corner of the table and select View / Modify
Table Design to add or remove columns you don’t need. Some of the steps in the
following section may be unnecessary for your store’s needs. Simply use this feature
to remove these unneeded columns.
Customize Repairs Table
1. The initial repair number is shown in the first column (either automatically
generated by the system or manually entered). Hit enter for the next column.
2. When entering repairs directly from the EnterprisePOS Desktop, you’ll have
some customer columns (not shown when entering from Point-of-Sale). You can
double-click to select an existing customer or enter the information from scratch.
Then hit enter to skip past each customer column.
3. You now need product data about the item being repaired. The following columns
are important for data entry of the product to be repaired (the order of these
columns depends on your customizations).
a. Article / Product Name – a brief product description (can double-click
this column to search inventory if it is a stock item)
b. Product Category – categorize this product based on your own product
categories
c.
Picture – for insurance purposes, you may want to take a snapshot of
the item using this button
Repaired Product Data Columns
If you have a
scanner or digital
camera hooked up,
you can scan it in
here or search the
network to add a
picture file.
12
ENTERPRISE POS User Manual
Repair Pic
Clicking View Picture after
adding the picture file will
bring up a photo of the item
that can be resized for
more detail.
4. Repair Type : Next you need to enter what type (or category) of service is to be
performed in the Repair Type column. This can be defined as the service
product category of the job to be performed. The dropdown selection list for
Repair Type can be populated one of two ways.
a. Entering combo-box entries directly into the Repair Type column while
customizing the repairs table
b. Using a Product Category called Repairs and entering sub-categories
for it – these sub-categories when then display here
In this example, the
system located a Product
Category with the word
“repair” in it. Within this
category, the system
found a list of subcategories in which it used
for the Repair Type
column. This is easier than
manually entering default
selections for this column.
5. Immediately following the Repair Type field should be the Service / Work to Do
column. Here you can double-click it to see a list of available services for this
sub-category Repair Type selected, or manually type what service work is to be
done.
6. Dates and Cost data : The remaining optional fields include information you may
or may not wish to track. You can customize the table to not show these
columns.
Repairs – Date In, Vendor info, Date to, Date Back, Cost, and Price
Chapter 4. Inventory Control
13
a. Date in – Date the product came in for repair from the customer or store
(defaults to today’s date and will automatically store this date each time if
the column is removed – here you have the option of modifying it)
b. Vendor Name – External service provider (if applicable)
c.
Vendor RMA # - The vendors Returned Merchandise Authorization
number, or the number the vendor gives to you when you send their
product back
d. Date to Vendor – The date the item was sent to the vendor
e. Date Back – The date the item was received from the vendor
f.
Pickup Date – The date the item was picked up from the customer
(Note, it is not shown above. If you don’t place it as a column, the system
will automatically record the date that it was entered into an invoice or
“paid for”. The system assumes the date the customer pays for it is the
pickup date. If this is not the case, you should customize the table and
add the column.)
7. Click SAVE ALL when you’re sure all relevant data has been entered.
8. Click EXIT to return to the Desktop or the Sales screen.
NOTE: Double-click back on any repair from the EnterprisePOS Desktop or click the
Repairs button again from the sales screen in order to view the repairs you just
entered to make additional changes if needed now or at a later date. After any
changes are made, simply click SAVE ALL again to commit those changes to the
database.
Entering Services to be used in Repairs
Services, just like your regular store inventory, are considered products in EnterprisePOS.
They are Product Type 0 (zero) inventory that stand for non-quantity products. Service
items can be used in the Work to Do column when entering repairs or creating Work
Orders (in the following section).
To enter these products, there is a tool called the Service Master under the Tools menu of
the EnterprisePOS Desktop.
EnterprisePOS Repairs/Service Master
This runs a separate program with the filename ServiceMaster.exe.
The Service Master Console opens right up ready for you to begin entering new service
products.
14
ENTERPRISE POS User Manual
Service Master Console
You can then select your REPAIRS product, and see a list of all sub-categories (or Repair
Types as defined in the previous section) in the box to the right of the category selected.
Repair sub-categories
are used as Repair
Types
Once you have selected the correct repair category and sub-category (repair type),
you can start entering data. The system asks you to “refresh table” after each
category selection as a check to pull in the existing products of this category or not
since the list could be long.
1. With the selected category and repair type selected at the top, click ADD ROW.
This will generate new stock numbers for these service products within the
REPAIRS category.
2. Style # - This can be any number you select (the vendor’s product number, for
example).
3. Price – The retail price for the customer which may or may not include parts.
4. Express – The maximum price they “could” pay if not paid on time after service
is completed (an incentive to pay)
5. Cost Code – This can be a tool that determines a wealth of information for you. If
used properly, it can track for you the service cost, part cost, the commission for
your service provider employee or vendor, profit per job, etc.
Format for the cost code field is as follows : #PPPPa
# = Any bogus number to throw off a customer, usually 9 is used
PPPP = The total labor charge (no parts) where the last 2 PP values are the
decimal points, for example 2350 would be for $23.50
a = Cost commission factor (percentage for service provider)
See below for examples of how the cost code is used.
Chapter 4. Inventory Control
15
6. Finally, enter a description of the service in the last column. This becomes
the “Product Name” field after the data is saved to inventory.
7. Hit Enter on the last column and a new service product row will be entered
and the next stock number will automatically generated.
8. After all products are entered in this category and sub-category, click SAVE
ALL to save all your changes to the database.
Using the Cost Code and Service Master OPTIONS
There are settings in the Service Master to improve data-entry and to further verify the
cost calculations are being done correctly. You should check these settings before too
much effort is put into data entry. These settings can be found under the OPTIONS button.
Service Master Options
Use Price as Product Cost – Will treat the Price column
as the Unit Price in inventory when the SAVE ALL is done
(if checked and a cost code is not used, the price entered
here also becomes the product’s cost instead of 0).
Only Service Items – Shows only items with a Product
Type 0 (services) in each category selected (otherwise
non-service items would clutter the table!)
Auto-Stock #’s – Generates a new stock number
automatically when a new row is added
Show COST Columns – Shows all hidden cost columns
Auto-Cost Code – Default cost code to use each new row
Vendor – The default vendor to use for all items in table
Cost Code Configuration (See below)
The Cost Code Configuration section under OPTIONS defines both the letter at the end
of the cost code (the service provider commission or labor cost) and the part Cost
Devide-By Factor. After the service provider’s commission is deducted from the Price, a
certain percentage of what is left is the product or parts cost, this is the Divide-By Factor.
This factor as shown in the example above accounts for a 3-time mark up, so to figure out
the part cost after subtracting the service cost you would divide-by 3. You can have up to 3
different cost-code sales provider commission letters as shown above as the letters a, b,
and c. The following demonstrates some examples. You can practice these examples
yourself after selecting the Show COST Columns under OPTIONS to see the hidden
columns.
Some example cost codes
Stock #91010 shown above (row 1) is a service product with a retail price of $75.00. We
see the cost code is 92250a for this item.
This tells us the following…
Labor Charge : $22.50 (we get this from the 2250 value in the cost code)
Estimated Part Cost : $17.50 (we get this because $75.00 - $22.50 / 3 = $17.50)
16
ENTERPRISE POS User Manual
Estimated Service Commission : $4.95 (we get this from the “a” value… $22.50 x 22%)
Estimated Total Cost : $22.45 (we get this total cost for the item by $4.95 + $17.50)
Estimated Total Profit : $52.55 (we get the profit from price – cost, $75.00 - $22.45)
All the data above can be derived from the simple cost code which can be placed on a
product label and is completely meaningless to a customer. It shows 5 pieces of cost/price
information in this single code and these numbers are all committed to the database when
the SAVE ALL button is clicked.
There are many books written on this service parts/cost method. If you wish to leave the
part costs out of your service items, you can always make the total labor charge equal to
the price. This signifies that the entire price is the labor charge. This will allow you to keep
the cost code a little more simplified and add parts later within a work order. The usage of
work orders allows the passing of repairs to multiple service providers and allows multiple
parts and products to be added along the way. Later, the work order can be converted to
an invoice when the entire amount is billed. Usage of work orders allow the system to take
your repairs process even further.
Create a Work Order
Generally, the Work Order button under the Repairs / RMAs tab is used only when your
store has an in-house work shop, and you want to keep strict control and scheduling of
work internal to your organization.
Work orders created through the Inventory area of the EnterprisePOS Desktop are
usually generated for broken or damaged inventory items that cannot be sent back to the
vendor but are scheduled for maintenance. Work orders specifically for a customer should
be generated via the Customers area of the EnterprisePOS Desktop or within a sale.
The store can use a work order generated in the Inventory area to schedule a repair
internally with the intention of reselling the item later as refurbished merchandise. Usually,
a store with an internal work shop would have a separate product category for used or
refurbished items where this product would move to once the work order is complete, and
the item is returned to stock.
The following steps outlines this process.
1. Pull the broken item out of stock and enter a new repair record as explained in
the previous section.
2. With the repair (you just entered) selected, click the vertical Work Order button
next to the repairs table.
Add a Work Order to This Repair?
3. Click Yes to create the work order.
Chapter 4. Inventory Control
17
New Work Order
NOTE: The New Work Order screen appears and provides fields for entering data for
the work order and job actions needed to complete it. The system assigns the next
available work order number that cannot be changed in the Work Order # field.
Job Description, Dates, and Status
1. Notice that the Job Origination Date and Time fields are filled in by the system
and reflect the date and time the new work order is created.
New Work Order – Job Origination, Completion, Description, and Status
2. Enter a date and time that the work order is required for completion in the
Required Completion Date and Time fields.
NOTE: The Actual Completion Date and Time fields are automatically entered
by the system when the work order is completed.
3. Notice that the Status/Work Summary portion of the screen shows the work order
as an Unassigned New Request.
NOTE: If you assign the work order to a technician, the status changes to reflect that
update.
4. Enter a description of the job and work to be done in the Job Description / Work
to do text field. Remember to be as descriptive as possible since this will be sent
into the work queue for your service technicians. The more detail your in-store
work shop has about the job, the better!
5. At the bottom of the screen, select your sales rep ID from the combo box.
6. Click the Save button or hit the F2 key. It will save the new work order and ask if
you want to print it. The work order has now moved into the work queue.
Job Actions – Add a Product
You can add a product or part to a work order if you need to from inventory. Generally, the
service technicians would do this (adding whatever product is needed to complete the
job). However, there may be an occasion where the cashier or sales person would add
some product the customer wants to purchase and have installed.
18
ENTERPRISE POS User Manual
For example, a customer may purchase car stereo speakers from a car audio shop and
want it installed. Maybe the store wants to include both the speakers and installation costs
in the work order and the customer pays when the job is complete. In this situation, the
sales person may add the speakers to the work order to be rung up with the service after
installation.
1. Double click in a row in the Job Actions portion of the screen to add a product to
the work order.
Job Actions
Inventory Search
NOTE: The same Inventory Search popup window appears as described previously.
2. Use the search criteria to find the product you’re looking for and press Enter.
3. Double click on or press F10 to select a product.
Job Actions
NOTE: The selected product appears in the table.
4. Enter any additional information in the remaining columns of the table for this
item or change any default information for this item as needed.
Quantity
Price/Rate
Total
Work Action
Article Description/Work Performed
Work By
Job Actions – Add Work
Occasionally, the sales person or cashier may select the work that needs to be done
before hand. In this case, they will need to enter a work item self.
1. To add work to a work order, click the Add Work button.
Chapter 4. Inventory Control
19
Add New Work To Job
2. Click on the down arrow at the end of the Service Product Category field and
select the product category from the dropdown list.
Add New Work To Job – Service Product Category
3. When the service product category is selected, it will populate the product box
below it. Click on the down arrow at the end of the Service Product field and
select the type of service product.
Add New Work To Job – Service Product
4. Enter a description of the work done in the Work Performed text field.
5. Enter the time required (or promised to the customer) for the work in the
Hours/Quantity field. Since cashiers usually do not know how long it takes to do
something, they normally enter a 1 for quantity. The technician doing the work
can adjust this later if needed.
Add New Work To Job – Hours/Rate
20
ENTERPRISE POS User Manual
NOTE: The system calculates the total cost and populates the Total field based on
the entered hours and designated rate. The value in the Rate field is a default value
entered by the system from the unit price value of the service product selected above.
The fields in the Work Expenses (Employee Reimbursements) portion of the
screen are only reimbursements of personal expenses incurred by the technician
doing the work. Leave these fields blank.
6. Click on the Add button or press F2 to add the work to the repair.
Save Work
7. Click Yes to save this work to the job.
Job Actions – Work Added
NOTE: The work now appears in the data table on the New Work Order screen.
Complete Remainder of Information (if any)
1. Click the down arrow at the end of the Sales Rep/Technician field and select the
person responsible for the work order if not already there.
New Work Order
2. Enter any comments or notes in the Notes (Work Order Only) text field.
New Work Order – completed EXAMPLE
Save Work Order
1. Click on the Save button or press F7 to save the Work Order.
Chapter 4. Inventory Control
21
Save
2. Click Yes to save the Work Order as a New Request.
Print Work Order
3. Click Yes on the Print Work Order popup window if you want to send the Work
Order directly to the printer (to print a copy for the customer), or you can simply
print it to the screen by clicking No. Cancel will not print at all.
Adding a NEW Repair to Stock
The ADD TO STOCK function is used to move a repaired item back into inventory stock
after it is repaired. Whether a work order is created internally or the item is sent off for
repair, you still must “cost” the item back into inventory after it’s repaired if you want to
resell it.
If you don’t have an internal work shop, there’s no reason to waste time and effort creating
a work order. Just simply update the repair record with the final repair cost information
when you receive the item back from the vendor. Once the cost information is entered in
the repair, you’re allowed to “cost” it back into inventory.
1. Click on the Repairs / RMAs tab within the Inventory area.
2. Click on the finished repair to be moved back to stock and click the Add To
Stock button.
Add Repair to Stock
NOTE: The Add Repair to Stock popup window appears and asks if you want to
move the repair to stock as a cost. It informs you that you must do this before you can
charge a customer for a repair service. The repair number then becomes the
Inventory Number to be used on the invoice. Before you do this operation, make sure
to enter as much information in this repair record as possible to avoid blank fields in
inventory when it’s transferred over.
3. Click Yes to proceed.
Enter Product Category
22
ENTERPRISE POS User Manual
NOTE: The Enter Product Category popup window appears and provides information
regarding moving the cost record to the appropriate inventory product category. The
system searches to find a Product Category that is currently being used as a repair or
refurbish category and places it in the box as the default. If the system selects the
wrong one, or you just want the item in another Product Category, you can change it
yourself.
4. Make sure the product category is correct and click OK.
Operation Completed
NOTE: The Operation Completed verification popup window verifies the completion of
the operation and informs you that the repair service is now ready to be sold to a
customer.
5. Click OK.
NOTE: When you return to the EnterprisePOS Desktop, the item should be under the
Stock tab now. You will need to search for the item if you want it to now show up.
NOTE: Notice that when the converted item is pulled up on the Stock side, the new
repair item has been added to the inventory with the repair number as the newly
assigned stock number.
Inventory Area Reports
The EnterprisePOS Desktop reports box (on the far right side of the Desktop) will show a
list of reports as they are related to Inventory or Repairs when you click on the
corresponding tab. These can all be customized under the Desktop’s Reporting menu or
by simply right-clicking on a report and selecting Edit Report Template. See the chapter
later in this manual (Chapter 9 – Report Engine) that specifically goes over the editing of
these reports.
When you first install the system, only the most basic and general reports are displayed
but there are over 150 default reports right out of the box that can be customized to fit your
company needs. They just need to be added to your system.
Report Engine for Inventory Control Tab
The Inventory Stock tab is
selected, so Inventory
Reports are displayed.
You can right-click, then
Edit Report Template to
modify the report for
adding your own logos,
moving fields, deleting
report objects, changing
wording on reports, etc. or
select New Report to
build a new one in this
area.
Chapter 4. Inventory Control
23
Chapter 5. Customer / Point-Of-Sale Tools
At this point in the manual, you should have completed the following tasks.
•
Entry of all vendors and purchase orders (in Vendors area) – for ordering new
stock (Chapters 2 & 3)
•
Entry of your existing inventory (in Inventory area) – to account for existing
inventory in your store prior to usage of EnterprisePOS (Chapters 4)
Now you can begin processing your daily customer transactions. This is the focus of
Chapter 5.
What you will find in this chapter…
Accessing Customers Area
2
Entering New Customers – From the Desktop
Save Customer Record
Customer Screen Buttons
3
5
5
Displaying and Editing Customer Records – From the Desktop
7
Recording New Transactions from the Customer Screen
REQUIRED / DESIRED fields.
7
8
Entering a New Sales Proposal (QUOTES)
Perform Searches for Customer and Item(s)
10
10
Recording New Credit from Customer Account Detail
Enter Data
13
13
Recording General Customer Actions
14
Entering Work Orders for a Customer
15
Customer Area Reports
18
Chapter 5. Point-of-Sale Tools
1
Accessing Customers Area
When opening the EnterprisePOS Desktop, you’ll notice the “area” of the Desktop
immediately under the initial EPOS Today area is reserved for Customers. This is
generally the most often used area of the system because it handles the tracking of
customer data and processing of transactions (or customer activity). This, of course, is the
heart of every business.
EnterprisePOS Desktop Customers Area
A customer list is
shown in the top
table, the selected
customer’s actions
and credits are
displayed below.
Initially, your table
will be empty (as
shown here) prior
to entering sales.
Prior to this chapter, we’ve initiated the ordering of new stock. When the stock is received
and the inventory is populated (or inventory has been manually entered) we have
merchandise to sell.
As we sell to new customers at the Point-of-Sale on other computers designated as
“registers” or sales stations, a manager looking at this table would begin to see it grow.
Each time a new customer is entered at the point-of-sale, a new record will appear in this
top table. Over time, this table should grow significantly as your business grows.
The customer ACTIONS (sales, layaways, work orders, special orders, wishes, general
notes, credits, etc.) would all appear in the table below (on the left tab). A specific
customer’s account actions are displayed below when a customer record is selected in the
top table. Likewise, there is a tab to the right of the Actions table to hold customer CREDIT
data (or anything you owe customers : outstanding deposits, gift certificates, coupons,
trades, etc.).
A computer becomes a “register” when a cashier signs into it from the login screen. If you
have that user assigned to a “cashier” employee group, then the system opens the sales
screen up for them to immediately begin taking sales. Use the User / Security
Administration Module (under the Administration menu) in order to assign users to
groups and adjust system rights (privileges). See your Systems Manager manual for more
information.
2
ENTERPRISE POS User Manual
Entering New Customers – From the Desktop
From the Customers area, you can enter a new customer either by using the vertical New
button on the right end of the Customer List table, or by right-clicking, and selecting New
Customer.
1. A box appears for you to enter the new customer ID number (customer account
number). This can be manually entered, or you can allow the system to
automatically assign it.
Enter the Customer ID
NOTE: Under the
Administration menu, then
System Settings, you can
assign a starting customer
number. If you want the system
to automatically assign the
numbers after starting at a
specific number, do this there.
2. On the Customer Account Detail screen, enter all appropriate detail under the
General tab. This includes customer name fields, address 1 and 2 (usually
renamed to be billing and shipping address), all contact phone numbers,
customer email, etc.
Customer Account Detail
Customer name fields
NOTE: Hitting the Enter
key will format the field to
be proper text. The Tab
key skips to the next field.
NOTE: As with other
screens, you can
customize all fields on this
screen under the File
menu.
3. Click on the Personal tab to enter more sensitive account information (such as
credit or charge account balance information). Cashiers would generally not have
access to this area unless specifically granted by the Administrator.
Customer Account Detail
Billing / Account Info –
Where a charge account for
this customer is setup (to
issue them sales ON
ACCOUNT).
Dates – Where important
dates are stored for
marketing purposes.
Chapter 5. Point-of-Sale Tools
3
4. Billing / Account Info – Although not required and can be setup on the fly at the
Point-of-Sale, this information will allow the customer to have a charge account
with the store to allow account receivables sales.
a. Account Type – Defines the maximum length of accounts receivable
sales setup on this charge account. Values can be Net30, Net60, Net90,
th
Net120, Net30-60 (payment due on the 30 , then last payment on the
th
th
60 day), Net30-60-90 (same, but last payment is on the 90 day), and
Net30-60-90-120.
b. Account Price Level – If you have a special pricing list (special product
pricing for certain customers), you can select a price level here. For
example, you may charge your wholesaler customers less than your
retailer customers.
c.
Last Billed – If automatic billing is setup (for example, automatic
monthly billing of customers), this will show the last date the customer
was billed.
d. Charge Account option – Sets the customer to allow account
receivable sales (sales with an unpaid balance where product physically
leaves the store).
e. Enforce $$ Limits option – If set, if the customer has used up their
account balance, they can not expand this balance at the point-of-sale.
Expansion of the account would require a manager to open the Personal
tab of this screen and manually do it – a cashier at the point-of-sale
could not. Be forewarned when this option is not on. By not having this
option checked you are allowing unlimited expansion of the customer’s
charge account.
f.
Credit Limit - If this is a charge account, enter the customer’s Credit
Limit here. This is the total amount (the limit) of their charge account
credit.
g. Disc. % - If you don’t want to use Price Levels, but an overall discount
for everything this customer purchases, then enter this discount
percentage in the Disc. % field. If this field is used, the discount will
apply to the unit price of everything purchased for this customer. The
discount will go until it hits a Minimum Price value (if set) for the item
being purchased. Minimum prices take precedence over everything else.
See Chapter 4 for more details.
h. Use Fin. Charges option - If you want to charge late fees for a charge
account customer, the check the Use Fin. Charges box. This will
automatically tack on a finance charge to late bills for this customer
based on your prior set finance rate under System Settings (found under
the Administration menu on the EnterprisePOS Desktop).
4
i.
Auto-Bill Account option - Check the Auto-Bill Account only if this is
a customer you want billed each month. Keep in mind, a quote must be
set up to model after first, and the customer must be setup in the
Automated Billing Utility as well. See the Automated Billing Utility manual
for more details.
j.
Employee option - Check the Employee box to indicate whether this is
a customer / employee. This is for notation purposes only, the system
will not do processing on this field.
ENTERPRISE POS User Manual
k.
Tax Excempt option - If the customer is tax exempt, then check the Tax
Exempt box to automatically wipe out the tax value on every sales ticket.
5. Dates – Enter any special dates for the customer. This could be a customer
birthday, anniversary, etc. that the store wants to use for marketing. These fields
(as with most fields) can be selected for entry at the point-of-sale, so the cashier
can collect this data for management later. If you track this data, the system will
tell you when customers have these dates due each month in advance. For
example, in March, you can have a list of all anniversaries for the month of April
for sending out discount cards to everyone offering 10% their next purchase!
Personal Customized Fields
6. You may notice up to 3 fields on the far left portion of the Personal tab. These
are general data fields located on the personal side of the customer’s account.
They are nothing more than customizable fields by the Systems Administrator
that can be used to gather data at the point-of-sale. If you have any of these
three fields, you can enter them now.
Personal Notes
The last area on the personal tab is for any additional information that may be somewhat
personal or management-specific.
7. Enter any additional notes under the Personal Memo area by clicking New.
8. In the box, type your notation and click OK, you’ll see your new notation appear
in the list. If you make a mistake, click Delete.
9. Another field to the right of the Personal Memo field is also used for marketing
purposes.
Save Customer Record
After you finish entering all needed customer data on both screen tabs, you must save the
new customer record.
10. Click on the Save button to save the customer information.
Record Saved
11. Click OK on the Record Saved popup window to save the customer record in the
system database.
12. Click Exit to return to the EnterprisePOS Desktop.
Customer Screen Buttons
The button bar on the left of the screen, sometimes called the Control Panel, contain
the following buttons.
Chapter 5. Point-of-Sale Tools
5
Customer Screen Buttons
Next – Moves to the next customer record in the table
Back – Moves to the previous customer record in the table
Save – Saves the customer record
New Action – Adds a new general action, sale, layaway, accounts
receivable, work order, quote, credit, etc. to this customer account
Delete – Deletes a customer action or credit from this customer account
Print – Prints a detail customer report
History – Shows the history of this customer
Exit – Exits this screen
6
ENTERPRISE POS User Manual
Displaying and Editing Customer Records – From the Desktop
Customer records can be displayed and edited from the Customers area by doubleclicking on them.
1. After searching for a specific customer, double-click on the record.
Customer Account Detail Record
NOTE: Use the search engine on the Desktop to find the customer record.
2. Edit the information on the screen if needed.
3. Click on the Credits, Deposits, etc. tab to display any credits or deposits
information.
4. Click on the Special Orders tab to display or edit any special orders for the
customer.
Recording New Transactions from the Customer Screen
Generally, a cashier setup to enter the Express Check-Out screen from login would collect
new transactions (sales, layaways, accounts receivables, etc.). However, occasionally a
manager or supervisor may need to ring up a sale, for example, without logging in as a
cashier. Any type of new transaction that is taken at the point-of-sale can also be taken
from within the customer screen with the New Action button.
Customer Account Detail Screen – New Action
See later in this chapter for details on entering each type of transaction.
Chapter 5. Point-of-Sale Tools
7
Transactions available from here include the following.
•
General Action – a notation on an account (could be anything).
•
Wish – a Wish List (like a wedding registry or list of “desired” items that others
can purchase from).
•
Credit – a Deposit, Gift Certificate, Coupon, Trade, Store Credit, etc.
•
Sale – Ring up sale.
•
Accounts. Receivable (AR) – Ring up sale with an unpaid balance and
scheduled payoff dates.
•
Layaway – Same as AR, except product physically remains in the store (a
“future” sale), so no risk exists for lost merchandise.
•
Consignment – a MEMO or Consignment ticket to consign items in your
inventory to this customer (will commit inventory to this customer and track it for
you).
•
Special Order – a “special” Purchase Order for products not in stock but
requested by this customer. It will automatically generate all vendor purchase
orders for you and notify you when they all come in (in order to invoice the
customer).
•
Work Order – a service job for this customer.
•
Quote – a proposal.
REQUIRED / DESIRED fields.
On the customer screen you may notice some fields colored in red. These fields will be
available for cashiers at the point-of-sale and are called required or desired fields.
Required Fields – These customer fields show up in dark red on the customer screen
and require data entry by the cashier before a transaction can be completed. Be careful
doing this because you don’t want to force a customer to not be able to complete a sale if
a customer refuses to give you certain information.
Desired Fields – These customer fields show up in light red on the customer screen and
are not required to complete a sale, but they are displayed on the list of fields at the pointof-sale for the cashier to enter. You are telling the cashier to please gather this data from
the customer if convenient. Make the fields “desired” allows the cashier to use their own
judgment about whether they should skip the entry of certain data in the event the
customer refuses to provide the information and/or there is a long line of other customers
waiting to check out.
Requiring or Desiring Specific Customer Fields at the Point-of-Sale
To mark a field “required” or “desired”, we need to enter the screen customization mode.
NOTE: Only the Systems Manager should be doing this. Consult your Systems Manager
manual for more detail.
1. From the Customer Account Detail screen, click File.
8
ENTERPRISE POS User Manual
2. Click Customize Form. The customizing utility comes up with the customer
screen editor ready for your changes.
Customizing Utility Screen Editor – Customer Account Detail
To edit a field, click
on the screen
NAME or label.
For example, to edit
the attributes of
Home Phone, click
the word “Home
Phone” where the
arrow is pointing not
the actual white box.
NOTE: Displayed is a “current view” of the customer screen fields, but it’s also a
view of customer fields throughout the system. You can edit fields here and have
the changes take effect on all screens with customer data (sales screens, etc.)
3. Click on a field name to edit (Home Phone, for example). This field’s attributes
come up.
Modify Screen Control Caption and Field Attributes
Select whether you want this field
Required or Desired at the pointof-sale.
NOTE: If Normal is selected, it
does not appear at the point-ofsale and must be entered from the
Customer Account Detail screen
later.
4. Select either Normal, Desired, or Required.
5. Click OK to save.
6. Click EXIT.
The exit button will return you back to the Customer Account Detail screen where you can
immediately apply your changes to notice any field you changed appear in red or back to
black if you changed it back to a Normal field.
This is also the screen where you change field names (Field Name / Label), add/remove
a default value (Default Field Value), enable/disable the field (Status of this field), or
enter any dropdown box values (Field Details). You should leave all the yellow fields to
the IT or Systems Manager. Changing anything here could reference invalid database
field attributes causing your system to not load or save screen data properly.
At the point-of-sale by the customer name, these required/desired fields are displayed
behind an ellipse box (“…”) that shows all these fields for the cashier to gather from the
customer.
Chapter 5. Point-of-Sale Tools
9
Store Required / Desired Customer Fields
An example popup list box of all
required / desired customer
fields at the point-of-sale.
All are at least desired, but we
see one field that is set to
required by the exclamation
mark. This tells the cashier it
must be entered.
For more detailed information on entering data at the point-of-sale, see the following
chapter (Chapter 6). Using the quick sale functions of the system are far more efficient
than the entry of sales data via the Customer Detail screen.
Entering a New Sales Proposal (QUOTES)
Sometimes referred to as a Proposal, the quote is exactly like an invoice record in
appearance except with the payment information replaced by a box for more notations.
Also note that you do not have to have product in stock to build a quote. Often, quotes are
treated like special orders when the purchase order system is not used. Occasionally
companies will keep the Vendor / Order side of the business to their financial package and
only use the POS functions of the system. For these setups, quotes are much more often
used.
Perform Searches for Customer and Item(s)
1. At the EnterprisePOS Desktop Customers area, use the search function and
perform a search to locate the customer for whom you want to create a new
quote/proposal.
2. Either right-click, and select New Quote, or Double-click on the customer to
open the Customer Account Detail screen to click New Action, then New
Quote.
New Quote “Sales Proposal”
Customer information is
automatically carried into
the top of the QUOTE
Notice the ellipse button
to the right of the
customer name “…”, this
shows the list of
customer required /
desired fields.
Quote totals and any
notations at the bottom.
A Microsoft Word
document (or whatever)
can be launched from
here for more detail.
10
ENTERPRISE POS User Manual
3. Click the Expires field to select an expiration date for the proposal/quote. This is
important for tracking the quotes for you in the EPOS Today screen (will tell you
when quotes are getting old or becoming expired for you to follow up with the
customer).
4. Click the Quick Scan box to select the field (field should turn pink to show it’s
selected).
5. Find Products : Begin scanning in products (if a scanner is used) or type in their
stock numbers. If you are unsure and need to search for product, you can
double-click in the table, click F9, or click the Products button on the left for an
inventory list.
Inventory Search
Select the product category and
sub-category (if available) to see
all items in the list.
Double-click on each item in the
list you want to add to the ticket.
6. When you return back to the ticket, if you want to change the sales rep, click on
the down arrow at the end of the Rep field to select the sales representative
associated with the proposal.
7. Enter any Payment Terms if this will be an accounts receivable once converted
later. Note that if the customer is already setup with a charge account, his/her
Account Type (NET30, NET60, etc.) will appear here automatically.
8. If you have a document with more detailed information, you can point to its
location on your hard drive or network using the field at the very bottom of the
screen.
New Quote “Sales Proposal” EXAMPLE
Chapter 5. Point-of-Sale Tools
11
9. If all data on the screen is correct, click the Save/Print button or press F2 to save
and print the proposal.
NOTE: If you do not have a printer connected to your computer or do not want to print
the quote, the system saves the quote without printing it when you press F2 or click
the Save/Print button. You’ll get a box to send the quote directly to the printer, the
screen, or not print at all.
Printing a Quote using Microsoft Word or Excel
NOTE: Your report can be in Word, Excel, or a Crystal Report. If it is Word or Excel, you
will notice Microsoft Word or Excel open up and all fields will be placed in the appropriate
spot on the field including any pictures you may have. You can then enter more detail
while Word or Excel remains open (the template is copied into a temp folder for
modification, so remember to save the report elsewhere if you wish to keep it after making
changes).
To setup any type of report, you would do this under the EnterprisePOS Desktop
Reporting menu.
Generally this isn’t used for cashiers since it requires further knowledge of Word or Excel,
but is an excellent tool for Managers or Supervisors wanting to include more detail in their
invoice or quote report. For example, pages within the quotation could include excerpts
from a product appraisal, for example.
A Microsoft Word Quote Example created from EnterprisePOS
Notice the TEMP
filename shown at the
top of Microsoft Word.
NOTE: If Adobe
Acrobat is installed on
your machine, you can
also create a PDF
version and quickly
email it to a customer.
If we had product
pictures for these
items, they would be
inserted here.
10. Notice that when you return to the Customer Account Detail screen after saving
and printing, the new quote appears in the Account Actions tab of the screen.
Recording any other transactions (Work Orders, Special Orders, etc.) are identical as the
above new quotation entry in this section. See the following chapter for details on other
transactions entry. These will be covered from the point-of-sale perspective.
12
ENTERPRISE POS User Manual
Recording New Credit from Customer Account Detail
Credits may be in the form of an employee discount, sales discount, coupon, promotional
discount, gift certificate, trade, etc. to be used toward a future sale. The system provides
information regarding each of these selections including how they apply to taxes.
1. From the Customer Account Detail screen, press the New Action button.
2. Click New Credit.
Enter New Credit Number
3. Leave the word AUTO in the text field and press OK to have the system
automatically assign a credit number.
Customer Credit Record
IMPORTANT
NOTE: The notes
that appear at the
bottom provide
important tax
information
regarding each
credit type selection.
Be sure to read the
notes carefully.
NOTE: The Customer Credit Record screen appears and allows you to select the
type of credit to be issued. Notice that IMPORTANT NOTES displays important
information you should know about each of the selections particularly whether to give
the discount before or after taxes.
Enter Data
4. Click on the down arrow at the end of the Credit Type field to select the type of
credit to be given to the customer, such as Coupon or Gift Certificate. This will
adjust the field to correspond to that type of credit.
5. Enter the amount of the credit in the Total Discount field. In our example, a $25
coupon or a $50 gift certificate.
6. Enter any notes or additional information in the Discount For text field.
Chapter 5. Point-of-Sale Tools
13
7. When complete, click the Save button or press F2 to save the credit.
Record Saved
8. Click OK on the Record Saved popup window.
9. Notice that when you return to the Customer Account Detail the credit you just
entered is credited to the customer and shows up on the screen under the detail
tab.
Recording General Customer Actions
The term “Action” can be defined simply as any customer activity. This customer activity
can be anything from financial transactions (a sale, a layaway, etc.) to general notations
on a specific customer account (action to record a customer stopping by, a wish list entry,
etc.).
There are dedicated buttons on the Customer Detail screen for all financial transactions
performed on a customer account that create these financial actions. For example, the
New Sale button that generates INVOICE or INVOICE-AR actions, the New Layaway
button that generates LAYAWAY actions, and the New W/O that generates W/O actions
for work orders.
There is a single dedicated button for the entry of new general actions not used in any
financial functions. This button would also be used for any custom action types as well.
These can be entered using the Action/Wish button.
1. From the Customer Account Detail screen, click New Action.
2. Click New General Action.
14
ENTERPRISE POS User Manual
Customer Account Action Record
You can enter your OWN Action
Types. This can be ANYTHING
you want to track on a customer
account. Customize this field (like
all other fields) using the
Customizing Utility.
3. Notice that the Customer Account Action screen appears for you to select an
Action Type and enter details. The Action Type is configurable in the
Customization Utility as well (just like all other fields).
4. Click on the down arrow at the end of the Rep field to select the store
representative responsible for the action (if applicable).
5. Enter a any description or details regarding the action in the Details/Action
Description text field.
6. If you are tracking a monetary value with this action, then enter the amount of the
action in the $ Amount field.
NOTE: Keep in mind that this action record created from this screen will not be
used in any financial functions outside of the customer record. These “actions”
are only for your own information or database tracking and reporting purposes.
7. Click the Save button or press F2. The action is then stored under this
customer’s account.
8. Notice that the recorded action now appears in the Account Actions portion of the
Customer Account Detail screen.
Entering Work Orders for a Customer
Work Orders can be entered from several different areas depending on the type of work
order. A work order is simply defined as an internal request for service.
Usually, a work order is used to schedule the work of an internal service shop, not for
items being sent off for repair. However, you’re not limited to how you want to use your
work order entry process.
The benefits of using work orders come from the automation derived from the Work Order
Station module (sold separately). This module shows a queue of work for specific
technicians / shop workers immediately after the work is entered by cashiers. It is an
excellent way to track the progress of work since each work order must go through phases
of a life cycle before completion.
•
New Request – when the work is first entered
•
Assigned – after the work is assigned to a technician / shop worker
Chapter 5. Point-of-Sale Tools
15
•
Work-In-Progress – the technician / shop worker begins work on the item
•
ON HOLD – the technician / shop worker is waiting on parts, transportation, etc.
•
Completed (Awaiting Approval) – the technician / shop worker has finished the
job and is awaiting approval from a supervisor
•
CLOSED – the work is done, converted to an INVOICE, and is awaiting the
customer to pick it up and make payment
A cashier taking in a work order marks it as a New Request by default. With the
appropriate security rights, cashiers can also assign work to technicians / shop workers as
well. However, they are not allowed to enter a new work order as Work-In-Progress. Only
the individual doing the actual work (who it was assigned to) is allowed to move the work
order into this phase because it requires an entry of what work is being done.
You can enter a new work order specifically from a product record, the repairs tab, the
EPOS Desktop menu, or the Customer Account Detail screen. This section covers mostly
the later. For more details relating to work orders and the Work Order Station module addon, see the Work Order Station user manual.
The following steps walk you through work order entry at the Customer Account Detail
screen.
1. From the Customer Account Detail screen, click New Action.
2. Click New WO (Work Order).
New Work Order
3. Enter a description of the work to be done in the Job Description/Work to do
text field. Remember, if you’re a cashier (or anyone not doing the actual work),
make absolutely sure you’re as descriptive as possible to make it easier on the
technician / shop workers. They will later have to go by your written detail when
it’s time to work on the item.
4. Click on the down arrow at the end of the Requested Completion Date field and
select a date. This is the date you told the customer to expect it completed.
16
ENTERPRISE POS User Manual
5. Click on the down arrow at the end of the Sales Rep/Technician field and select
the person responsible for entering the work order.
6. Click Save button or press F7 to save the work order.
Save
7. Click Yes on the Save confirmation popup window to save the work order as a
New Request.
8. Click OK on the save verification screen.
Print Work Order
9. Click Yes to print the work order for the customer. Or, click No for an in-store
work order print out.
Chapter 5. Point-of-Sale Tools
17
Customer Area Reports
The EnterprisePOS application provides reports specific to the area you are in. Just as the
Vendors and Inventory areas had their own reports, so does the Customers area. When
you are in this area of the system, the list of reports appears for that area.
There are hundreds of available reports that can be customized for customers and sales
reporting. See Chapter 9 – Report Engine for details on selecting and adding customer
and sales reports (or any other reports) to the system.
Customer Reports
The following are a few examples of common default custom reports included in this area.
Actions2 – generates a general report of customer actions
All Daily Sheets – generates a report of all daily cash sheets with summary data
Layaway Balance – generates a report of layaways and balance owed for each
Layaways UNPAID – generates a report showing all unpaid layaways
Sales – generates a sales report of sales for specific date(s)
Wish – generates a report of all customer “wish” lists
Etc.
18
ENTERPRISE POS User Manual
Chapter 6. The QUICK SALE / Express Check-Out
In the previous chapter, generation of customer transactions were only covered from the
Manager or Supervisor’s perspective by using the Customer area of the EnterprisePOS
Desktop. However, the system more efficiently records daily financial transactions from the
sales screen performed by cashiers with predefined minimal keystrokes or mouse clicks.
There are two versions of this “environment”.
•
The QUICK SALE Screen – accessed from the EnterprisePOS Desktop Quick
Sale menu
•
The Express Check-Out – accessed immediately after login by a cashier
Both screens are designed with a number of short cuts to assist the cashier in ringing up
sales as quickly as possible. The only differences in the two screens are how they’re
accessed and what occurs after the sale is complete. This is the focus of Chapter 6.
What you will find in this chapter…
The Speedy Sales Process – Some Forethought
2
Accessing the QUICK SALE Screen
2
Accessing the Express Check-Out Screen
3
About the Screen Itself
Custom and Options Menu Bar
Invoice Screen Fields
5
6
6
Entering a New Express Sale (Using Quick Scan)
Ringing Up a Standard Sale
Non-Standard Sales
9
9
11
Using the Quick Entry Method for Systems without Bar-Code Scanners
Enter Payment Type and Amount
12
13
Applying In-Store Credit Toward a Sale (AFTER TAX)
13
Applying In-Store Credit Toward a Sale (BEFORE TAX)
15
Issuing New Credit to a Customer from the Point-Of-Sale
16
Entering a New Layaway (from Quick Sale)
18
Performing an Express Return or Refund for a Customer
The Customer Has Their Receipt
The Customer Does NOT Have Their Receipt
Searching Existing Customer Accounts at the Point-of-Sale
20
20
20
21
Entering an Express Sales Proposal (QUOTE)
21
Voiding a Sale
22
Entering an Express Accounts Receivable
Pre-Define a Customer Charge Account – Management’s Role
How to Use Customer Charge Accounts at the Point-Of-Sale – The Cashier’s Role
23
23
24
Other ‘Express’ Transactions
Express Work Order Entry
Express Action
Express WISH LIST Entry
Cashing Out from the Invoice Screen – The Z Report
25
25
26
28
30
Chapter 6.The QUICK SALE / Express Check-Out
1
The Speedy Sales Process – Some Forethought
Both the Quick Sale and the Express Check-Out screens are designed for one thing, to
move product as fast as possible. The system includes several short cuts and system
settings specifically for this purpose. However, be careful not to sacrifice your focus on
total customer satisfaction in order to improve the turn around time of individual sales. You
want to make sure you address all customer needs and concerns at the point-of-sale to
ensure repeat business. Repeat business ensures the future stability and growth of an
organization.
The law of diminishing returns applies here. If your sales process does not provide enough
time to focus on a customer’s needs or concerns, then customer satisfaction will suffer. On
the other side of the spectrum, if too much time is given to individual customers your
business will also suffer from a long check-out process and lack of attention given to
waiting customers. The goal is to reach the medium that provides the fastest possible
check-out time while keeping customers satisfied. This will depend on your type of
business and clientele.
GOAL : Fast checkout with satisfied
customers!
Customer Satisfaction
Sales Speed
To streamline your checkout process, focus on disabling fields you don’t need from the
sales screen and limiting your customer required / desired field list. These are just some
of the things that could speed up the check out process. Too much information gathered
during check-out could effect your repeat business by making it too cumbersome to do
business with you. Any concerns in your check-out process during system testing should
be addressed prior to going live with the system. You certainly don’t want your business to
suffer while you go through the system learning or adjustment stage. Proper planning and
customization based on how you intend to use the system is extremely important early on.
Accessing the QUICK SALE Screen
The Quick Sale screen can be accessed directly from the EnterprisePOS Desktop main
screen (for supervisors, managers, or senior-level cashiers). Simply click QUICK SALE
from the main EnterprisePOS Desktop menu.
Enterprise POS Desktop – Top Menu
QUICK SALE!
Click here.
2
ENTERPRISE POS User Manual
New Invoice “Quick Sale”
Customer
information is
always blank initially
for a Quick Sale
because we did not
have a customer
record opened. We
have to either click
New Customer or
select an existing
customer from the
F8:Customers
button.
Always select the
customer FIRST.
NOTE: The field with the focus (selected for input) is always shown in light purple. By
default, after the customer is selected, the Quick Scan field is selected for you to
begin scanning in products to appear in the SOLD ITEMS table.
Accessing the Express Check-Out Screen
The Express Check-Out Screen is the exact same sales/check out screen as Quick Sale,
except it is accessed directly from the login prompt (usually ONLY used by cashiers).
Using this screen provides the maximum check-out process speed as well as a fast signin process. This is ideal for non-supervisory employees that are only given the task of
ringing up various customer transactions and nothing more.
Giving someone Express Check-Out access must be done under their own user account
in the Administration Utility (under the Administration menu of the EnterprisePOS
Desktop). There is a starting screen selection under each employee account that allows
the System Administrator to pick what screen the user sees after login. The Express
Check-Out starting screen selection will assign the user exclusively to this screen.
Contact your System Administrator or consult the user manual of this utility for more detail.
Remember, this screen is limited to only general cashier functions. Assigning someone to
this screen at login makes it impossible for this user to do any inventory maintenance,
administrative functions, setting changes, or vendor account maintenance unless signing
in as someone else. You must be sure the user will never need to access any of these
other areas before assigning this starting screen to their account.
Logging in to an Express Check-Out session (if setup) would involve the following.
1. From Windows, double click on the EnterprisePOS Desktop icon on your
Windows desktop or access the program through the START button. If you kept
the defaults during installation, these icons would be located in the EPOS folder
under Program Files.
Chapter 6.The QUICK SALE / Express Check-Out
3
EPOS in Start Menu > Programs and EnterprisePOS icon
2. Double-Click the EnterprisePOS icon. The standard login screen appears.
EnterprisePOS Login
3. Enter your assigned user ID in the User Name field and password in the
Password field. Click OK. If the user has their Starting Screen setting to Express
Check-Out as mentioned previously, you’ll see the familiar sales screen appear
instead of the EnterprisePOS Desktop (load time will be MUCH faster).
New Invoice – EXPRESS CHECK OUT
Goes right to the sales
screen after login ready
for customer selection
for new transaction
entry. This is the only
screen the cashier
really ever deals with.
NOTE: Two TEMP records are created in the database at this point. One is for a temp
invoice number, and the other is for a temp customer ID. This is in order to reserve the
newly assigned invoice number and customer ID for this sale-in-progress ticket.
Reserving these two numbers prevents other cashiers on the same network from
assigning them to their transactions.
4
ENTERPRISE POS User Manual
About the Screen Itself
Invoice Screen
YOUR LOGO: You can
enter your own logo
here by renaming it to
DEFAULT.JPG (or GIF,
BMP, etc.), and copying
the file into the
\Program Files\EPOS\
folder. The system will
then automatically pick it
up for display on all
screens and some
reports.
The Invoice screen contains buttons on the left hand side of the screen that perform
specific tasks. Each button is assigned a function key that can be used for speed typing
(cashiers often prefer typing instead of clicking with the mouse). The buttons are also very
clearly defined with sharp icons to denote what their function is at a glance and provide
ease for touch-screen usage. The function key is to the left of the button name.
F4:Ticket (only in Quick Sale) – Toggles between a sale, a quote, a layaway, etc.
F8:Customers – Search for a customer to select for this ticket
F9:Products – Search for product to select (to sell) for this ticket
F2:Save/Print – Saves the ticket and prints it (or does a re-print if already saved)
F7:Credit – Enter a new credit for this customer (Deposit, Gift Cert., Coupon, etc.)
F5:Repairs – Enter new repairs for this customer or view this customer’s existing
repairs
F10:Cash Out – Cashes out the register at the end of the day or shift
Time Clock – Signs a customer in or out of the system (See the Appendix on the
Time Clock utility)
F12:VOID – Deletes this transaction
F3:Exit (not shown) – Exits this screen
These function keys (F4, F3, F8, F9, etc.) can be programmed into a programmable
keyboard with additional strokes to even limit further steps.
These buttons above appear under the System menu bar, there is also a Custom menu
bar (where a System Administrator can add buttons for their cashiers), and an Options
menu for additional programs.
Chapter 6.The QUICK SALE / Express Check-Out
5
Custom and Options Menu Bar
Clicking the Options button on the button control panel to the left of the screen will bring
up the Options Menu Bar.
Options
F6:Swipe License – If you’ve selected a NEW customer, you can click this
button or hit F6 to swipe the customer’s driver’s license. This will gather all the
information off their driver’s license for you (instead of having to type everything
in)
Special Order – Click here to enter a new Special Order (a customer
Purchase Order). It works the same as a Purchase Order except it entirely
assigned to a customer. See the previous chapter on Purchase Orders in the
Vendors area
Work Order – Enters a new Work Order or launches the technician station
New Action – Enters a new general notation customer account action
New Wish List – Enters a new customer Wish List (like a wedding registry)
Clicking the Custom button on the button control panel to the left of the screen will bring
up the Custom Menu Bar. These are designated programs that may or may not be of
EnterprisePOS.
In this example, the customer has a button that launches their own program to
do appraisals (may be MS Word) and another button to launch Microsoft
Access.
If you have access, you can right-click in this bar to add more program icons.
Invoice Screen Fields
The fields found on the Invoice screen and a brief explanation of each are included in this
section. However, remember that these fields may be customized very differently in your
system. As with all screens, you can Customize Form or Customize Table (items sold
table) under the File menu of the screen if your user account has rights to do so.
Fields
Sale – current date of sale (depends on customizations – you may want to called it
Date instead)
Quick Scan / Quick Entry – field that finds store product based on an item number –
usually the store’s inventory number (depends on customizations)
Quick Scan – The Quick Scan field will do a product search for the value you entered
after you hit the Enter key. When the system finds a match in the database, it will add
it to the invoice. If you are using a standard bar code scanner that automatically does
6
ENTERPRISE POS User Manual
an Enter for you after displaying the scanned code string, then Quick Sale would have
to be used.
Quick Entry – The Quick Entry field is the same field as the Quick Scan, however It is
designed for only fast manual entry – usually used in the food service industry. This
field will do a database search after each character typed. As soon as a match is
found (regardless whether or not the whole value has been typed yet), it enters the
product in the ticket without the user hitting the Enter key. It is rarely ever used with
bar code scanners for this reason. However, a bar code reader that would allow you
to turn off the Enter character would work, but it would be slower that using the Quick
Scan because of the background database search that’s done after each character.
For example, if a product’s inventory number was coded BGEX1, immediately after
the cashier has typed the 1 character it would be entered in the ticket. However, if it
found no other products in the database with an X or 1 in the name, then the product
would be automatically entered in the ticket after the E was typed. As soon as a single
match is found the item is entered in the ticket. For this reason, it is the best option for
fast manual entry. It cuts down on the number of keystrokes before a match is found.
Also keep in mind that you are not required to use product inventory number as the
search field for the Quick Scan or Quick Entry. You can use your vendor’s product
number, a style number, etc. Contact your System Administrator for more detail since
this would require a customization of this field.
FOB – Freight On Board - used for recording any additional shipping notes (may not
be visible or called something else depending on your system customizations)
Payment Terms – field for recording terms of a sale, such as due on receipt, Net 30,
etc. (also depends on system customizations)
Invoice # – shows the system assigned invoice or ticket number
Rep – field for selecting the sales person
Rep 2 – a button used to add an additional sales person responsible for this sale –
would create a split sale that would split sales commission (if applicable) among the
two sales people
Sold Items (table)
The following are common columns found on the sales screen for products being sold.
Qty – the quantity sold of the item
Stock # – the store inventory number of the item sold
Item Name / Desc -- the database product name of the item and/or brief description
Dis% – the discount percentage given to the item’s unit price by the cashier
Price – the unit price of the item
Dis$ – the amount OFF of the line item total
Total – the line item total price (unit price multiplied by quantity)
Number – used as a reference number for the item (for example, it’s a Repair
Number if selling a repaired item, a Credit Number if applying a credit before tax, etc.)
– this field is automatically generated by the system
Product Category – product category for the item being sold – automatically entered
by the system
Chapter 6.The QUICK SALE / Express Check-Out
7
Type – product type (0=Non-Quantity / Service Item, 1=One-of-a-Kind, 2=KIT or
Custom item, 3=Standard Vendor item, 4=Weighted Part, 5=Invoice Comment)
Item Notes (Product details, Serial #s, etc) – details about the item such as model
number and/or serial number – this data is usually displayed on the invoice too (under
the item) depending on the ticket report used
Line Cost – associated cost for the item (cashier must have rights to see the costs)
Tax Level – tax level for the item (0=Normal / Taxable item, 1=Conditionally Taxable,
2=Nontaxable)
Vendor # – number for the vendor from whom the merchandise is purchased –
automatically entered by the system
Sys # - A system number for better invoice item control – used only by the system (a
yellow-colored column)
Customer Box:
Customer ID – customer identification number (if setup to do so under System
Settings, the system will automatically generate a number initially)
NOTE: You can change this ID number to whatever you want : phone number,
social security number, driver’s license, etc. After you enter the new number and
skip to the next field or hit Enter, the system will do a search for the item and grab
the customer if found. Therefore, this field can be used to search the database for
a repeat customer.
Name – name of the customer (can be customized to be the entire name, a last name
or first name, a company name, or whatever)
Bill To Address – the left address box is usually used as a primary or billing address
for the customer
Ship To Address – the right address box is usually used as a secondary or shipping
address for the customer if different from the other address
Tender: Customer Payment Details Table
One thing to keep in mind about this table when entering payments is only the areas of
concern relating to the payment type are available for entry – the remaining columns are
grayed out. When adding a payment record, most of the record’s columns listed below are
used by the system only. There usually are only a few columns you need to enter for each
payment type and most are not even required. Usually only the payment type and
payment amount are required.
Tender Type – method or type of payment such as cash, check, credit card, etc.
Amount – amount of payment
Number – check or credit card number (optional)
Bank Name – name of bank on check or debit card (optional)
Exp Date – expiration date on credit card (optional)
Inv # – invoice number (used by the system ONLY – you can’t change it)
Date – date of sale (used by the system, however you can change it if you need to
back-date a payment)
8
ENTERPRISE POS User Manual
Layaway – checkbox to select if this purchase is for a layaway (used by the system
ONLY)
Account – account information (used by the system ONLY)
Cust ID – customer identification number (used by the system ONLY)
Pay Desc – further description of payment (this allows you to type further detail about
the payment if necessary – just a notation field)
Entering a New Express Sale (Using Quick Scan)
All new sales are generated from the Invoice screen. However, the Express Check-Out
version of this screen contains additional short-cuts designed for quicker sale processing.
This section covers the fast processing of a sale when the Quick Scan field is used. The
Quick Scan field is located at the middle top portion of the screen and is always
highlighted first when a new sale is started. If it says Quick Entry, then move on to the next
section.
If you, as the cashier, are unsure about any particular field, you can always place the
mouse pointer over the field (without clicking a button) and brief help text will appear.
Ringing Up a Standard Sale
The following will walk you through a standard sale transaction.
1. From the Quick Sale screen, if you are not sure if the customer is new or not,
click F8:Customers to search, otherwise click the New Customer button to
generate a new Customer ID and skip to step 3.
2. Customer Search : Search to find customer, then double-click the record in the
table to select him or her.
Customer Search
Can click on a column to search
and type value at the top and hit
Enter.
Double-Click to select them.
You can click on the customer to
see a list of all recent
transactions in the table below.
3. Required / Desired Field Entry : Click the ellipse button next to the customer
name to enter any required or desired customer fields. Go down the list entering
any customer data that is desired or required by your organization.
Chapter 6.The QUICK SALE / Express Check-Out
9
Invoice – Required / Desired Fields
Click here or hit Enter
twice from the customer
name to enter the
customer required /
desired fields.
Store Desired Customer Fields List
4. Hit the Enter key to highlight the address information. Enter all address 1 and 2
information (if available), and continue to hit the Enter key until the Quick Scan
field is highlighted.
5. Adding Products to Invoice : Begin scanning in your products (if you have a
scanner) or manually type the stock numbers in this box. If you don’t the stock
numbers, you can search for product by double-clicking in the Sold Items table
or clicking F9:Products. Continue to add as many products as necessary.
New Invoice – After Entering Items
The Quantity column
(by default) is 1. To
change this default,
select the quick scan
options ellipse button.
These products have
pictures or attachments
available (because the
color changed). You
can click the DOC/PIC
column button to
display this products
picture or attachment.
TOTALS are automatic
at the bottom awaiting
payment
NOTE: If you made a mistake and want the product REMOVED from this ticket, just
click in the Quantity (Qty) column and change it to zero and hit the Enter key. The
item is then removed from the ticket.
NOTE: The options ellipse button next to the Quick Scan box is also where you
change the field you are scanning or entering data from. Instead of using the stock #,
you can select the vendor’s product number, a style number, a serial number, etc.
10
ENTERPRISE POS User Manual
6. Rep field : If your sales rep ID (same as login ID) is not selected in the selected
field, select it from the dropdown box and hit Enter.
7. F5:Payment Terms : If this is a accounts receivable, you place the payment
terms here (NET30, NET60, etc.) by clicking F5, then typing them in. The ellipse
button to the right will disperse the payments for you based on what you enter.
Hit Enter on this field to skip to payments table.
8. Enter Payment : When the TENDER table is highlighted in the first column
(Tender Type), type the first letter of how the customer is paying or click the
down arrow to select from a list of different payment tender types.
TENDER : Customer Payment Details Table
NOTE: You can keep pressing the C key until the correct payment type is
selected instead of using the mouse to click the down arrow.
9. Once a payment type is selected (CASH, CHECK, CHARGE, etc.), then the
related columns to the right will be highlighted showing you the columns related
to your payment type. Enter this data accordingly.
NOTE: When a credit card is selected, and you have Internet authorization setup
(in the HWCONFIG.INI file), it will launch a screen for you to swipe the
customer’s card. It will then authorize the payment and return back data into this
tender record. Keep in mind, however, not all providers offer Internet
authorization services. Internet authorization is required for EnterprisePOS for
authorizing credit cards. Otherwise, you must manually type the customer’s
information and use a terminal instead.
10. Press F2:Save/Print to complete the sale and print the ticket. You’ll get a pop-up
message asking you where to send the receipt (screen, printer, or not print at all).
Print A Copy of the Ticket?
NOTE: Your system may be setup to print directly to the printer (in System
Settings) which would never show this box. Contact your System Administrator if
you want this box to print if it’s not, or vise versa.
Non-Standard Sales
For the purposes of this manual, a non-standard sale refers to any sale that involves
manual changes to the SOLD ITEMS table. This includes product price discounting,
changing or adding product descriptive detail, adjusting quantity values in the table,
changing a unit price, and so on. There are just a few instructions to keep in mind when
changing product data during a sale. You do these product item modifications after adding
product to the ticket (as in step 5 in the previous section).
Chapter 6.The QUICK SALE / Express Check-Out
11
1. If you need to change the quantity of the item being sold, you can do so on this first
table column (Qty). After hitting Enter to move to the next column, the totals are
recalculated.
2. Changing the Stock # field will cause a product search for the item you typed in.
Some cashiers feel more comfortable manually typing in these products directly into
the table. This works fine.
3. Add additional comments to the product name column if necessary. Any additional
data you enter in a product name cell will also print on the invoice.
4. Enter any unit price percentage discount in the Dis% column. For example, for a 20%
discount, enter a value of .2, then hit Enter. You’ll see the unit price for the item adjust
along with all invoice totals.
NOTE: There is a security right that limits the amount a cashier can discount a
product. If the system tells you that you are not authorized to discount over a certain
amount, this security right may need to get adjusted.
5. You can change the unit price in the Price column if you have proper security rights to
do so, then hit Enter. You’ll see all the invoice totals adjust on the screen.
6. Enter any total line-item discount in the Dis$ column using the minus sign, then the
amount in whole dollars. For example, let’s assume you’re selling 5 of an item for
$100. The “total” column for this line item would have the value of $500. If you’re
giving a customer $50 off their purchase, you’d simply enter the –50 value in this Dis$
column, then hit Enter. You’ll see the invoice totals adjust to reflect the discount.
NOTE: In the ellipse option button next to Quick Scan, you have default discount
fields to allow you to add an automatic default for each item you add to the ticket. You
can also discount an entire invoice by hitting Enter in the discount box on the Options
screen.
7. Click the Item Note column button to enter any additional information about an
individual product line item. Just another good spot for entering a comment about the
item that can be easily added to an invoice report.
8. Tax Level (0=Normal, 1=Conditional, 2=Non-Taxable) column can be adjusted if
necessary, but it is generally hidden and is automatically entered by the system. If you
are showing this column, however, this is a quick way to make something non-taxable
on the fly.
After making your modifications to the ITEMS SOLD table, you can continue to step 6 in
the previous section and proceed as normal to enter other fields or payments.
Using the Quick Entry Method for Systems without Bar-Code
Scanners
As mentioned previously, this entry mode can be turned on under Systems Settings by
your System Administrator and will do a search after each character typed. This entry
mode is designed for any industry without bar-coding and where little product or customer
data is collected at the point-of-sale. The restaurant or fast food industry is a good
example of where this mode would be applicable.
First of all, the process is the same as previously (although more fields on the screen
would generally be disabled in common practice) except when you get to the Quick Scan
field.
12
ENTERPRISE POS User Manual
1. Begin typing the inventory number of the first item being sold. As soon as you
type enough characters for the system to find the item, the system will
immediately add the item to the ticket and clear the space for the next item
number. Repeat this for each item being sold. When finished, hit Enter.
2. If you don’t have a pre-defined default customer, then you can enter a default
customer under System Settings (such as CASH SALE), so you will not have to
enter any customer data at all. All of these transactions would be under the
“CASH SALE” customer account. This gives you the maximum data-entry speed
potential for ringing up a transaction.
Enter Payment Type and Amount
3. Type the first letter of the Tender Type (payment), for example, a “C” for
CHECK. You may need to hit “C” more than once since there are several
payment types that start with “C”. Hit Enter when the payment type is found.
4. Enter the amount of payment in the Amount field, then hit Enter.
5. Enter other fields as necessary (depending on how the customer is paying) such
as check number, credit card number, expiration date, etc.
New Invoice – EXAMPLE Tender: Customer Payment Details
NOTE: The amount paid should be the same as Grand Total, and the Unpaid
Balance should read $0.00. Unless, of course, a predefined charge-account customer
is selected and the ON ACCOUNT tender type is used. However, this is generally not
used in Quick Entry mode (businesses using this mode generally would never use
accounts receivables since everything is usually entered under a CASH SALE).
6. Hit the F2 key to save and complete the sale after the customer payment(s) is
entered. The receipt is then printed or displayed to the screen.
Applying In-Store Credit Toward a Sale (AFTER TAX)
A customer who has been given an in-store credit for a returned item may use that credit
toward the purchase of others items. When the cashier selects the TENDER table to enter
payment, a popup window appears informing the cashier that the customer has a credit
available and asks if the credit should be used on this ticket. In most instances, the cashier
would remind the customer of the credit and allow them to decide whether to apply it to the
current purchase or not.
This section covers the application of these credits after tax. All after tax credits are treated
as payments. These credits include the following.
•
STORE CREDIT types - from returned merchandise
•
DEPOSIT types - money deposited by the customer to be used on a future sale
•
GIFT CERT types - gift certificates purchased by the customer
Before-Tax credits, on the other hand, must be applied differently. These are entered as
invoice adjustments and appear in the ITEMS SOLD table as a negative value, for
example, a TRADE type. See the next section for details on these types of credit.
Chapter 6.The QUICK SALE / Express Check-Out
13
1. On a sale, finish entering all information on the invoice screen (items sold,
invoice fields, customer data, etc.). When you enter the TENDER table, a pop-up
box will notify you about the customer having credit available.
Credit Found For This Customer
2. Click Yes in the popup window to apply the credit toward the purchase of the
items in this sale.
Search Box showing customer credit
NOTE: The Search Box popup window appears with a list of available credit for the
customer.
3. Double click on the available credit item to select it. A pop-up message box
appears to verify that you’ve selected the correct credit, click OK.
Applying An AFTER-TAX Credit (Payment)
4. Another box appears wanting to know exactly how much of the credit to apply.
Enter the amount the customer wants to apply to the ticket and click OK.
Enter Credit $$ Amount to Use
NOTE: To apply the entire amount, just leave the box blank and click OK.
5. A notification box appears telling you the credit was applied (to the table as a
payment) successfully. Click OK to return back to the invoice. Notice the invoice
totals are adjusted to reflect the application of the credit.
Credit Added
14
ENTERPRISE POS User Manual
Applying In-Store Credit Toward a Sale (BEFORE TAX)
Credits that are applied before tax are treated as negative line items to deduct the value of
the ticket before tax is calculated. Often, these pre-tax credits are used to give customers
tax breaks since it reduces the invoice sub total, thereby reducing the amount of tax
calculated. The following are some examples of pre-tax credits.
•
TRADE Types – swapping one product or service for another (gives the customer
a tax break)
•
DEPOSIT Types – same as the after-tax deposit except it is recorded as a
negative line item on the ticket (be careful using this – could be considered a form
of tax evasion in some states)
•
DISCOUNTS (Employee discounts, promotional discounts, etc.) – this is no
different than manually entering the discount in the table for a specific line item
(column 6) except this is applied to the entire ticket, not just a single line item
•
COUPON Type – used as a pre-tax adjustment because coupons are usually
handed out before tax (coupons are rarely “sold”, so no tax is included in their
amount)
•
PRICE ADJUSTMENT Type – if you need to adjust an invoice sub-total for
whatever reason and reflect it as an invoice line item, you can do that here
•
OTHER Type – could be anything else!
NOTE: Contact your CPA if you’re not sure you’re doing the pre-tax and post-tax credits
properly.
The application of a pre-tax credit is very similar to the application of a post-tax credit in the
previous section. The following steps will walk you through this process.
1. On a sale, finish entering all information on the invoice screen (items sold,
invoice fields, customer data, etc.). When you make it down to the TENDER
table, a pop-up box will notify you about the customer having credit available.
Credit Found For This Customer
2. Click Yes. You’ll notice the PRE-TAX credit selection screen appears.
Pre-Tax Adjustments to ‘Sub Total’
These are only for pre-tax
credits that are treated as
negative inventory line
items, or items deducted
BEFORE tax is calculated.
We see this customer has
a $100 trade credit in his
account.
Chapter 6.The QUICK SALE / Express Check-Out
15
3. Double-click the credit to apply it.
4. Click Yes to apply the selected credit (or No if you made a mistake and clicked
on the wrong one).
5. Enter the total amount you want to apply (of this credit) to the ticket in the blank
below of the pop-up amount box, then click OK.
Enter Credit $$ Amount to Use
NOTE: To apply the entire amount, just leave it blank and click OK.
6. You’ll see the credit applied as a negative line item on the ticket and the invoice
totals adjusted.
After PRE-TAX Credit is Applied (SOLD ITEMS Table)
We see our PRE-TAX
“trade” credit is applied here
We see our POST-TAX
“Gift Cert” credit is applied
here
Issuing New Credit to a Customer from the Point-Of-Sale
At the point-of-sale sales screen, you can issue any form of credit.
1. Click the F7:Credit button. The credit menu appears.
Select any of the following credits to Issue
16
ENTERPRISE POS User Manual
Enter New Credit Number
2. Leave the AUTO in the blank and click the OK button to allow the system to
automatically assign the credit number for the new credit record. The new credit
screen will then appear with the newly assigned credit number.
NOTE: If you are using a manual credit slip booklet, this pop-up box allows you
to enter the credit slip number here. Keep in mind that you are not allowed to
enter a number that is already being used in the system.
Customer Credit Record
All credit types
Total credit amount
issued
Shows details about
each credit type
selected
3. Enter the total credit amount issued to this customer (top currency field on the
right).
4. If necessary, there is a Customer Paid With field to enter how they purchased
the credit (only for Gift Certificates, Deposits, etc. where the customer is putting
money down to receive the credit). You can also enter the Customer Pay
Amount field to reflect the amount they put down (may need to give them
change if they pay for the credit in CASH, for example).
5. If necessary, you can enter quantity information in the Qty Issued boxes (usually
for promotional discounts or coupons to keep track of credits issued).
NOTE: Quantity values are never used for individual customers. They are only
for generic credits for promotional purposes - available to anyone. For example,
you could select a COUPON credit type and enter 100 in the Qty Issued box.
Then, you could enter a coupon amount, say $10, in the top currency box on the
right. Saving this credit would allow this $10 credit to be used exactly 100 times
before it expires. The Qty Used field tallies exactly how many of the credits have
been used over time. When quantity used equals the quantity issued, the credit
becomes invalid. These are great for grand openings, limited-time specials, etc.
6. Click F2 or the Save button to save the credit. Click F6 or the Print button to print
the credit slip.
7. Click F3 or the Exit button to return back to the invoice screen.
Chapter 6.The QUICK SALE / Express Check-Out
17
Entering a New Layaway (from Quick Sale)
Layaway sales (often called future sales) are entered into the system by either selecting a
New Layaway from a customer’s account or by clicking the F4:Ticket button to switch the
ticket from a default sale to a Layaway .
Ticket Switch to Layaway
The F4:Ticket button can be used to
switch a Quick Sale ticket to an invoice,
layaway, consignment memo, or a quote.
You are allowed to switch among these
different tickets at will in a Quick Sale.
You’ll notice some additional fields appear when a layaway is selected (along with the
word LAYAWAY at the top of the screen).
Keep in mind that layaways are NOT sales or accounts receivables. Layaways are
actually sales in-progress. By doing a layaway, you are holding product and taking a
customer’s payment deposits until the total of the invoice is paid off. It is a sale that is
stretched over a long period of time before its completion. Because layaways are not
completed sales until the total is paid, you also do not pay tax on this amount. However,
an Accounts Receivable IS a sale. These are completed sales in which a customer charge
account is used to pay off the amount. The following comparison should help you
understand the differences.
•
SALE – A completed sale transaction that is paid in full – covered in the previous
sections
•
LAYAWAY – A sale-in-progress to be completed on some designated date in the
future where product remains in the store – covered in this section
•
ACCOUNTS RECEIVABLE – A completed sale transaction that is not paid in full
(usage of a customer charge account as tender) and product leaves the store
(includes the most risk of product loss) – covered in the next section
•
QUOTE – A proposal for a sale – covered later in this chapter
See the following Chapter 7 on Cashing Out at Days End for more detail on how these
various transactions work financially.
The following steps cover the process of ringing up a new layaway. The process is very
similar to ringing up a standard sale.
1. Enter all invoice information as described previously. However, do NOT enter
any payments as of yet.
2. When the ticket is switched to a layaway with F4. Notice the value at the bottom
right that gives you an estimate of the deposit amount to tell the customer. This is
a percentage value under System Settings and entered by your System
Administrator. For example, if your percent down is 20%, then 20% of the grand
total will be calculated here for the customer’s initial deposit amount.
18
ENTERPRISE POS User Manual
New Invoice LAYAWAY
The Pay By date
tells you when the
last payment is due
The amount down –
tells you how much
to require as an initial
deposit
NOTE: The amount down shown is only an estimate to save you time from having to
manually calculate this figure. The exact amount is not required. The customer can
put more or less down.
3. Check the Pay By date and make sure this is correct. This is another predefined
system setting by the System Administrator. If the calculation is not correct (you
need a shorter or longer layaway period, then adjust this date by clicking on the
down-arrow with the mouse. It will pop up a calendar for you to select the new
due date. Remember, if you forget to double check this date, the over-due
reports for management could falsely report this customer in their future
collections list.
Pay By Date Calendar for a LAYAWAY
Click the down-arrow to get
a calendar!
4. Enter any remaining information on the screen needed (including payments)
exactly as you would a normal sale.
NOTE: You’ll notice a new field called Layaway # to the right of the invoice
number at the top of the screen. This is automatically assigned by the system
unless you enter something for this field manually. If you are using special
manual layaway receipt booklets requiring customer signatures and disclaimers,
you can enter the manual layaway receipt number here.
5. Click on the Save/Print button or press F2 to save the layaway.
Submit Future Sale Verification
Chapter 6.The QUICK SALE / Express Check-Out
19
NOTE: The Submit Future Sale Verification popup window appears and asks if you
want to save and submit this sale as a layaway showing you the total customer
balance and deadline (Pay By) date.
6. If the amounts and dates are correct, click Yes to continue. Otherwise, click No
to return to the layaway screen and make adjustments as needed.
Performing an Express Return or Refund for a Customer
The following steps will briefly cover how to process an express return or refund from the
Quick Sale screen.
The following process focuses on two different customer scenarios – whether or not the
customer has their receipt!
The Customer Has Their Receipt
When the customer has their receipt, it makes life a little easier from the cashier’s
perspective since there’s no need to search for the invoice record.
1. From a refreshed sales screen, press the F11:Returns button.
2. A pop-up box asking for the invoice number appears. Enter the invoice number
value from the customer’s receipt.
Invoice Number
NOTE: You will not get this box if you are within an already completed sale. Instead,
the system assumes you want to return product on the current invoice and will skip
this step.
3. Enter the invoice number in the blank text field and click OK. You’ll see the
invoice appear you selected.
NOTE: If you do not know the invoice number, click Cancel and press F8 to do a
customer search and open the customer’s account.
4. Click the item(s) the customer wants to return and it totals the return amount at
the bottom and items being returned are selected in red.
5. Select whether this will be a return for store credit or a refund of money at the
bottom check box (where payments were).
6. Finally, click F2 to complete the return / refund and print a new ticket with the
adjustments if needed.
The Customer Does NOT Have Their Receipt
When the customer does not have their receipt, the return process involves a little more
effort because a search must be performed to find their ticket. Most retail establishments
avoid accepting any returns without a receipt, but of course there are always exceptions.
20
ENTERPRISE POS User Manual
After the customer is selected and the ticket is found and opened, the process is
exactly the same as previously. When the customer ticket is found and opened,
follow the previous steps.
Searching Existing Customer Accounts at the Point-of-Sale
The sales screen (both Express Check-Out and Quick Sale) have customer account
searching screens by pressing the F8:Customers button. This feature is frequently used
for either repeat customers or processing returns. All cashiers should get in the habit of
using this screen FIRST before a customer is rung up as new to avoid duplicate customer
accounts in the system.
The following is a walk through on the usage of the customer account search screen.
1. Hit the F8 key or click F8:Customers to pull up a customer look-up / search box.
Customer Search Box
Customer search – type
name, then Enter
The ellipse button here
next to the name runs a
predefined database
adhoc query (setup by
the System
Administrator) to simplify
a cashier’s search.
Clicking / selecting the
customer records
displays the actions
below.
2. First find the customer with the search fields provided (See Chapter 2 for more
detail on search engines).
3. Either single click on the customer record to select it, or hit the Tab key twice and
the arrow keys to move to the record with the keyboard.
4. While the customer is highlighted, hit the F9 key to display their purchase history
in a new table below.
5. When you find the sale in their history, double click on the record to pull up the
ticket. Or, you can use just the keyboard by hitting Tab until the table is selected,
then arrow-key down to the record and press F10 to pull up the ticket.
Entering an Express Sales Proposal (QUOTE)
The process of doing a sales proposal (quote) from one of the invoice screens (the Quick
Sale or Express Check-Out) is exactly the same as entering a quote from the Customer
Detail Record. There are only 2 differences.
1. Press the F4 key or click F4:Ticket to select a QUOTE like you did a LAYAWAY
previously until the ticket says “QUOTE” at the top.
2. Now you must select the customer with F8:Customer or by clicking the New
Customer button to enter new customer data.
Chapter 6.The QUICK SALE / Express Check-Out
21
At this point, the process of filling out the screen’s information, saving, then printing
are exactly the same as explained in Chapter 5. When finished filling out the
information on the screen and assigning product, hit the F2 key to Save and Print
the proposal form.
Voiding a Sale
Once again, the process of voiding a sale directly from the invoice screen is no different
from within the Customer Detail Record screen. However, the voiding of sales process
can be kicked off in several different areas outside of the invoice screen, not just the
Customer Detail Record.
Basically, any screen that allows you to delete records from a table can enter the void
process by clicking on an invoice record before the delete key is pressed (F12) or by rightclicking on the sale record and selecting VOID or DELETE (depending on which screen
you are in).
If you already have an invoice opened, F12:VOID will also do the trick to remove the ticket
you have opened and automatically exiting the screen.
First of all, the system will not allow you to void any work-in-progress new sale since you
can simply click F3 to cancel the sale and refresh the screen. A completed sale must be
opened before a void will work directly from the Invoice screen.
Can’t VOID an Unfinished Ticket
The following steps will walk you through the entire void process of the invoice screen (in
either Express Check-Out or Quick Sale) beginning from a refreshed new-sale screen.
Void Customer Invoice Verification
1. Click Yes and the VOID screen is displayed for this ticket.
Void Sale Screen
If you don’t have
rights to do a VOID.
You’ll need approval
here.
2. If your System Settings or security level requires supervisor approval, you’ll need
to have a supervisor enter their ID and password on the right to process the
VOID.
22
ENTERPRISE POS User Manual
3. Press the F2 key to process the void. The system will refresh to a new Quick
Sale screen after the void has been processed successfully. If you voided from
the EnterprisePOS Desktop or the Customer Account Detail screen, the record
will just be removed from the table.
Entering an Express Accounts Receivable
An accounts receivable sale is nothing more than a regular sale whose tender is diverted
to a pre-defined customer charge account. There is no way to create a new customer
charge account at the point-of-sale. This requires special customer fields that must be
entered under the Personal section of the customer’s detail record screen (along with
usually an in-depth customer background check and possibly the contact of trade
references on the part of management) before a charge account is opened for use. This is
not something that is generally done by cashiers.
Pre-Define a Customer Charge Account – Management’s Role
For a customer to purchase on account, you should first setup a customer with a charge
account. You can do this from the point-of-sale (if the user has the appropriate security
right assigned to their group – RIGHT #48), but it is not recommended. Generally, an
approval process must take place before a customer is issued a store charge account.
If the user does have the required security right assigned to their group (RIGHT #48), then
the following steps would apply from the Desktop.
1. Sign on to the EnterprisePOS Desktop.
2. From the Customers area, search for the customer you want to establish a store
charge account for, or create a new customer with the vertical New button to the
right of the customer table.
3. From the Customer Detail Record screen, click the Personal tab.
Customer Account Detail Record – Personal Tab
Charge account
information on
Personal tab
4. Click the Charge Account box. You’ll notice that, by default, the Enforce $$
Limits is enabled and checked. Without this value being checked, the cashier
has the ability to increase their account limit indefinitely. Use caution if you
decide to not use the enforcement of charge account dollar limits.
Chapter 6.The QUICK SALE / Express Check-Out
23
5. Enter the Account Type value. This value is the length of time extended to the
customer before payment in full is due. For example, NET30 for a month, NET45
for 45 days, etc.
6. Enter the Credit Limit field. This is the absolute maximum value the customer
can use to pay for merchandise in your store. The only exception is when the
Enforce $$ Limits is not checked which would allow the cashier to extend
additional charge credit dollars at the point-of-sale if necessary.
7. No other fields are required for a charge account. If there are any other preferred
fields you need to enter on either tab, do it now.
8. Click the Save button. A pop-up box is displayed saying the customer was saved
successfully.
How to Use Customer Charge Accounts at the Point-Of-Sale – The
Cashier’s Role
Even though a customer charge account is similar to regular store credit, their application
and how it is processed financially is very different.
When a charge account customer is checking out merchandise, there is no pop-up
notification to inform the cashier that the customer has available charge account dollars.
However, this DOES happen for store credit.
Special emphasis is taken to make absolutely sure a customer is reminded of their store
credit because these are funds already collected from the customer. A charge account, on
the other hand, is nothing more than a promise to pay - no funds were ever collected to
date. When funds ARE eventually collected, it goes against their charge account balance
and frees up additional charge space much like a store-issued credit card.
The reason cashier pop-up notifications are not provided with charge accounts is largely
due to the risk associated with allowing customers to pay on account. Payments on
account are usually a convenience provided for the customer, but it is definitely not a store
desired way to gather payment for purchases. When a customer walks out of your store
with merchandise, there are no guarantees that compensation will ever be collected. On
top of the risk issue, it is usually financially inconvenient for the store to be required to track
funds outstanding. This often has a substantial cost included with it as well due to the time
value of money and the employee effort involved in playing the collections department.
Unlike these charge accounts, layaways and regular sales keep product in the store until
the ticket is paid in full. For this reason, the EPOS system limits the cashier’s role for
charge accounts. Cashiers are only able to process a charge account once established by
management but not until. The following steps cover this process of charge account usage
at the point-of-sale.
1. Follow all steps (at the beginning of this chapter) for ringing up a regular sale.
Make sure you select the correct customer (with a pre-defined charge account
like explained in the last section).
2. When the TENDER Table is highlighted in the Tender Type column, either type
“O” or click the down arrow to select ON ACCOUNT from the list then hit the
Enter key.
NOTE: If you selected a customer who is not setup with a charge account, the
system will tell you immediately and not allow the transaction to complete.
3. Enter the Amount to pay using the charge account. Keep in mind the customer is
perfectly able to pay a portion on their charge account and a portion with actual funds.
24
ENTERPRISE POS User Manual
Simply move down (with the arrow key) to a blank row in the table and select another
payment / tender type if necessary.
rd
4. Although not required, you have a space in the 3 column for a PO Number. Usually,
companies who accept charge accounts require some form of purchase order number
from the customer’s system.
5. Press the F2 key or click the Save / Print button with the mouse to complete the
accounts receivable sale.
Other ‘Express’ Transactions
The following are functions less frequently processed from the invoice screen directly (the
Express Check-Out or Quick Sale). However, they are no less important. These are
mostly non-sales-related functions, but cashiers may occasionally need to perform some
of these tasks depending on their assigned responsibilities.
Express Work Order Entry
A cashier is able to enter a work order from Quick Sale under the Options Menu Bar from
a refreshed sales screen, do the following steps to enter a new work order for a customer.
1. First, you need to find the customer. Hit F8 or F8:Customers to find the customer and
select them.
2. Click Options on the left control panel bar to show the available buttons in this area.
Options Menu Bar
3. Click the Work Order button.
4. Click Yes on the verification box for a new Work Order entry.
Chapter 6.The QUICK SALE / Express Check-Out
25
NOTE: The screen opens with the status New Request – UNASSIGNED.
5. Enter all information on the screen as covered in Chapter 5 (see the section on
entering a Work Order from the Customer Account Detail screen for more detail).
6. Press the F2 key or click the Save button to complete and save (and/or print) the
work order.
7. Press the F3 key or click the Exit button to return back to the invoice screen.
Express Action
From the same Options Menu Bar, you can quickly record a new non-financial
transaction action by clicking the New Action button once a customer is selected.
These Actions can be customized to be whatever you want to track under a customer
account, but some examples of how these types of records are used would be as follows.
•
A wireless communications company that may want to track the number of cell
phone activations
•
A store that may want to record when people come by to only browse and not buy
•
A store that may want to track donations to an organization with a display in their
showroom, for example, the March of Dimes
•
A company may want to record product sales presentations for customers.
Recording these sales visits or presentations as actions would be a place to enter
this date-stamped data for each customer that could be used for reporting to
show how many sales presentations resulted in actual sales.
These are some of the non-financial transaction examples based on how the system is
used in other organizations. How you plan on using this feature (if at all), of course,
depends on the nature of your business.
NOTE: The System Administrator is allowed to add new Action Types of non-financial
nature like this to the system using the Customization Utility under the EnterprisePOS
Desktop Administration menu.
1. After entering the new customer on the Quick Sale screen, click the Options Menu
Bar.
26
ENTERPRISE POS User Manual
Options Menu Bar
2. Click the New Action button.
3. The new action screen appears with the customer information included.
New Customer Account Action Screen
NOTE: The two currency fields at the bottom right are not used in any financial
functions
4. Enter a detailed Description in the center notation box of the Action.
5. Select an Action Type from the dropdown list box.
6. If a dollar amount is associated with this action at all, enter this value in the top
currency field on the right.
7. If this action is associated with a document giving more information, you can type
the path and filename location of the document in the bottom blank space (above
the Control Panel). Click the button to the right of the space to search for the
document file.
NOTE: If you attach a document or any file associated to this action, when a user
double-clicks on this action record, it will launch this attachment automatically.
This is a great way to have Word Documents or Excel Spreadsheets (for
example) stored as actions and launchable right from the Desktop when clicked
on.
8. When finished, press the F2 key or click the Save button to save the new action
to the customer’s account.
9. Press F3 or click the Exit button to return back to the Invoice screen.
Chapter 6.The QUICK SALE / Express Check-Out
27
Express WISH LIST Entry
From the same Options Menu Bar on the Quick Sale screen, you can quickly record a
new customer WISH LIST by clicking the New Wish List button once a customer is
selected.
A “Wish List” is nothing more than a list of products for the customer that others can
purchase from. It is the same thing as a wedding registry. As other customers purchase
from another customer’s wish list, the items are scratched off the list.
Options Menu Bar
1. From the Quick Sale screen, click the Options menu bar on the left.
2. Click the New Wish List button.
If the customer already has a Wish List, you get the following.
If the customer does NOT already have a Wish List, or No is clicked on the box
above, a new list is created. If this is an existing Wish List you are adding to and Yes
is clicked, then skip to step 4.
3. Enter a brief description of the Wish List in the box (for example, “Wedding Registry”),
then click OK. The blank wish list for this customer opens up.
28
ENTERPRISE POS User Manual
Customer WISH LIST
4. To add items to the list, click the ADD button. The standard products search screen
comes up.
Customer WISH LIST – Adding Product
Searching for
product, then
double-clicking
adds quantity to
the wish list in
the background.
5. Begin searching for product and double-clicking to add product to the background (a
box pops up asking you for the quantity of items to add to the list)
NOTE: Adding product to a wish list does NOT commit product quantity. It is nothing
more than a list of items the customer would like for others to purchase for them. It
does NOT reserve quantity. If a customer purchases from the list, but the store is out
of stock, they cannot buy the item… Only special order it.
6. After you finish adding products to this wish list, click the X at the top to exit out of the
screen.
Chapter 6.The QUICK SALE / Express Check-Out
29
NOTE: You can open back up this wish list at any time and purchase from it with the
Purchase button.
Cashing Out from the Invoice Screen – The Z Report
The cashiers themselves or shift supervisors must cash out the registers at the end of the
day or shift. This must be performed in order to close batch transactions and post totals to
financial tables for reporting and/or transferring to external accounting packages.
Cashing out is also important to determine beginning and ending daily cash balances to
track/correct over and short cash drawer problems as well as for accurate daily bank
deposits. Not to mention, this is the only way to catch employee theft.
If the cashing out of the register(s) is not done, there is no financial cash sheet (or Z
Report) record that is placed in the system for that day or shift. Depending on how your
system’s transaction posting is setup (per-shift or per-day) will determine if your totals will
wrap over to the next day if cashing out is not done. Also, depending on how your
system’s transaction locations are setup in the store (consolidation of all registers on 1
cash sheet or a separate cash sheet for each register) will determine if you must cash out
at each register or only one register for the entire store.
A rule of thumb to use is you should cash out at each PC that is setup with a cash drawer.
If you entire store shares a single cash drawer, then only 1 PC should cash out at the end
of the day or shift – the one with the cash drawer that is physically holding the money.
Then, keep the cash-out process to only this PC each day.
These are all issues that will be covered in detail in the following chapter.
To cash out at the end of the day from the Quick Sale screen simply click the F10:CASH
OUT button on the left.
30
ENTERPRISE POS User Manual
Chapter 7. Cashing Out at End of Day / Shift
The process of cashing out at the end of a day or shift is important for closing batch
transactions and posting sales totals to financial tables for reporting and/or transferring to
external accounting packages. It is also important for determination of beginning and
ending daily cash balances to track/correct over and short cash drawer problems as well
as for accurate daily bank deposits.
We recommend physically printing a cash sheet / Z report after each shift or day’s end to
produce a daily paper trail of daily transactions. If your business is ever audited for any
reason, you’ll be glad you did. Auditors rarely tolerate electronic forms because they can
usually be doctored.
This chapter covers all the details of one of the most important functions in the system, the
Cash Out screen.
What you will find in this chapter…
The CASH OUT Screen Layout
Daily Totals Tab
Goods Sold Today Tab
Activity for Today Tab
Balance Sheet Tab
Screen Buttons and Settings
Today’s Drawer Totals
2
3
8
8
10
10
11
Counting Tender
The Cash Drawer Count Screen
12
12
Saving / Printing the Z Report
14
Chapter 7. Cashing Out at End of Day / Shift
1
The CASH OUT Screen Layout
The EPOS cash screen shows all financial activity for the day or shift (depending on how
your system is configured by your Systems Administrator). The term Cashing Out refers to
closing all financial transactions for a designated business unit of time. It is also
sometimes called Z’ing out (since a “Z Report” is the industry term for a financial summary
statement for the period closed). It marks the end of a financial transaction period or
“batch” of records.
Even if you’ve sold nothing on a given day, it’s still good to cash out at least once daily. At
some point you’ll need to compare the funds collected in the cash drawer to what the
system says you should have. Even if no sales occurred for the day, you should still cash
out the register to record the zero day in the system. If you don’t, your financial report for
that day or shift will be missing in the database. It can always easily be reprinted, but for
monthly summary reports this day will show omitted. Anyone reading your financial reports
(accountants, managers, auditors, etc.) will notice this shift of missing data.
Whether you cash out by day or by shift depends on the needs of your organization. When
your system is setup to cash out by day, the system expects you to cash out when you
close the business each day – best for single-shift organizations. Financial transactions
are closed on the day cashing out occurred only. Any transaction outside of the present
day is not included in the close.
On the other hand, cashing out by shift will close every transaction since the last time you
closed. The system expects you to cash out at the end of each employee shift change.
This generally works best for organizations open for long hours (day and night shifts), or
any company planning to make more than one trip to the bank per day.
From an accounting and systems standpoint, cashing out by day is far less complex.
When your batch of financial records for a single close spans over portions of two
separate dates, you can end up with some confusing reports. If you’re using an interface
to an external financial package, it makes matters even more complex. We recommend
cashing out by day if at all possible.
Cash Out Screen
Cash Out screen
tabs – Daily
Totals selected
NOTE: The screen is designed using the familiar tabular style.
2
ENTERPRISE POS User Manual
Screen Areas
•
Today’s Drawer Totals – the top frame of the screen holds several counted
values from the cash drawer – if any values are over or short of what the system
shows should have been collected, the color changes (gold=over / red=short)
•
Daily Totals Tab – this tab holds all general cash sheet data
•
Goods Sold Today Tab – this shows a list of items sold (or put on layaway)
today
•
Activity for Today Tab – this shows a list of all customer actions or business
activity that occurred today (such as sale receipts, layaway receipts, returns,
refunds, voids, work orders, quotes, etc.)
•
Balance Sheet – an actual balance sheet for the day or shift - the transactions on
this sheet / table is exactly what is exported to your external accounting
application
•
Count Drawer Button – brings up the screen to count cash, checks, charge
slips, etc. in the register drawer – the values entered on this screen end up in the
Today’s Drawer Totals box mentioned previously
•
Save / Print Button – saves this cash sheet and prints the Z report (daily)
•
Exit Button – exits this screen
•
Settings – the bottom frame of the screen holds settings that determine how the
cash sheet is calculated (by day, by shift, or per store, per register, etc.)
Daily Totals Tab
Most (if not all) of your daily usage of the Cash Out screen will occur on the initial screen
tab called Daily Totals.
Cash Out Screen – Daily Totals
Lists all “tender” or
payment types
collected
A list of sales tickets
for the day – you can
double-click one to
open it
This value is what
goes in the bank!
Your total “actual”
sales for this day
The Daily Totals tab shows all funds collected at a glance. If you understand the layout of
the tab, you can quickly see everything from store credit used to exactly what goes in the
bank.
Daily Totals Fields
Starting from left to right / top to bottom, the fields on this tab and their function are
described in detail below.
•
Change Given – This field only shows the total amount of change given back to
customers for the day.
Chapter 7. Cashing Out at End of Day / Shift
3
NOTE: This field is usually ignored since it has no substantial value to the cashing
out process. It is simply an FYI (for your information) only field. The “CASH” value
in the top portion of the table already accounts for this value.
•
Non-Cash REFUNDS – When you see a value here, a cashier has given a
refund of tender back to the customer in something other than cash (in check,
charge, etc.). If this occurs, there will be a corresponding negative tender value in
the first TOTAL Deposits column reducing the register drawer bank deposit total
amount.
•
Tender Type Column – The far left column in the Daily Totals table shows a list
of all tender types collected on this day or shift.
•
TOTAL Deposits Column – The next column (or the first currency column) is for
bank deposits only. This column shows the totals for each tender taken for all
sales that occurred on this day or shift. Each row in this column is totals for a
different tender type. For example, the second row in the last screen shot shows
a value of $946.12 for the CHARGE-AE (American Express card) tender type.
This amount could be a payment sum from one sale or ten. This amount is the
sum of all American Express card payments taken for this day or shift.
NOTE: The first light pink field below this column next to TOTALS: is the sum of
all values in this column. This is the total bank deposit amount (all tender types)
for the day or shift. Whether or not a portion of this total is wired directly to your
bank (as with credit or debit cards) or physically deposited by a store employee
(as with checks and cash), this value is the total funds taken in for the day.
However, remember this is NOT profit, or even actual sales revenue. This fact is
covered later in this section.
•
Layaway Payments Column – This column only shows payments taken on
layaways.
NOTE: The second light pink field under this table column is the sum of all values
in the Layaway Payments column. This value is subtracted out of the total bank
deposits for the day (the pink field to the left) because layaway payments can
NOT be included in the total “actual” sales for the day until the ticket is paid out in
full and becomes a sale. The following screen shot illustrates this point.
Cash Out - $300 Layaway Deposit Example
The cash for the day
hasn’t been counted
yet, so it is showing
short (red)
The layaway deposit
is removed from total
sales
NOTE: In this example, the customer put $300 down on a layaway. There was
already a $436 cash sale for the day that brought the total bank deposits for the
4
ENTERPRISE POS User Manual
day to $736 in cash. However, the $300 was subtracted because it is not part of
the sales for the day.
•
Certificates, Credits, and Deposits Column – This column shows any
monetary credits issued for the day or shift (gift certificates, coupons, deposits
rd
toward a future sale, etc.). Like Layaway Deposits, the total for this column (3
pink box below the table from the left) is also removed from total sales. This is
because when someone purchases a gift certificate from your store, for example,
you’re actually holding their money until they use it at a later date. No actual “sale”
is made until the credit is USED. The following screen shot builds on our previous
example by including a $100 gift certificate issued in the same day.
Cash Out - $100 Gift Certificate Issue Example
Now we have CASH
and CHECK tender in
the drawer we haven’t
counted yet, so it
shows short (red)
Notice our “actual”
sales have NOT
changed from the
last example
NOTE: In this example, someone has purchased a gift certificate of $100
(although it’s technically NOT a purchase of anything – your store is simply
holding the money towards a future sale). The customer paid for the gift certificate
with a check, so we see a $100 check in the deposit column. Now we see that
total bank deposits are now up to $836 that includes the $100 check, a $436 cash
sale, and a $300 layaway deposit. Removing the portion of the deposits that are
NOT part of sales ($300 + $100 = $400), we get the total actual sales for the day
of $436.
•
Accounts Receivables – This field holds all charge account payments.
Payments ON ACCOUNT are not actual funds, they are simply promises to pay.
They are a form of unsecured store credit. Nothing goes in the bank when
payments on account are made (nothing in deposit column), however, they are
considered part of the “actual” sales for the day or shift. Therefore, when a
payment on account is made, you’ll see this value included in the total “actual”
sales for the day. To illustrate this point, will use the same example day and
include a charge account purchase of $545.
Chapter 7. Cashing Out at End of Day / Shift
5
Cash Out - $545 Accounts Receivable Purchase Example
Total amount paid
“on account” is here
NOTE: In this example, a charge account customer walks in the store and
purchases an item with their account that totals $545 with tax. Notice the Daily
Totals table did not change (since no “real” tender was exchanged). The total
$545 amount for the sale is placed in the Accounts Receivables (AR) box and
also included in our total “actual” sales for the day. The actual sales for the day
now include both the $436 cash sale and the $545 AR sale that brings the total
sales for the day to $981.
NOTE: Keep in mind the customer charge account must be setup prior to the
point of sale (usually by a store manager or home office credit department).
6
•
Gift Certs & Credits Used – This is a field that holds all monetary credits that are
used in sales for the day or shift. In our previous $100 gift certificate example, the
$100 amount would appear in this field once the certificate is used and would
finally be included in the total “actual” sales value. If they used the certificate
towards a $1000 purchase on credit card, $900 would show up in the deposit
column under the credit card tender type, and the remaining $100 would be in this
column.
•
Paid Out Layaways – This is a field that holds the total amount of a layaway
when it is paid out in full and becomes an actual sale for that day. It is very similar
to the Gift Certs & Credits Used, however when a layaway is paid out in full the
entire amount of the ticket is included here – not just a portion. Because of this, it
can literally change previous daily cash sheets. A layaway becomes a sale (in
FULL) on the day it is paid out, so all previous daily cash sheets with deposit
values on them will be changed. This is the difference between pulling from
history or recalculating a previous daily. Sometimes daily sheets in the past look
differently than the same day or shift that is pulled from history. This is because
deposit values over the life of the layaway are literally removed from previous
daily sheets and included in this day as a sale. Often, people have trouble with
this concept because it seems like the system is changing the past. In actuality, it
is. To understand how this works you must think of a layaway as a future sale.
Deposits a customer makes on a layaway today will not appear on this daily sheet
when it finally becomes a sale in the future. However, using the “history” setting at
the bottom of the screen will allow the user to pull up previous days as they were
literally back in time (before the layaway was paid out). In the following screen
shot example, we’re assuming our layaway customer came back in later on the
same day and paid out the ticket.
ENTERPRISE POS User Manual
Cash Out – Previous Example Layaway Paid Out
The layaway is NOW a
sale!
His last payment (on
Mastercard) goes in
the bank!
NOTE: In this example, the customer who originally made the $300 deposit on a
layaway ticket total for $1,193.55 decided to come back in later that day and pay it
off on his Mastercard. You can see how the cash sheet was effected by the
TOTAL amount of the layaway ticket (that has now become a sale) is included in
the Paid Out Layaways box and is now included in the total “actual” sales for this
day bringing to $2,174.55 for the day. We can also see the new Mastercard
tender type included in the bank deposit column. Both his initial $300 cash
deposit and the $893.55 credit card payment he made later are in the cash
drawer for the day and go to the bank. However, it wasn’t until his credit card
payment was made that the TOTAL layaway ticket amount became a sale
included in actual sales.
•
Total Actual Sales – Enough has been said already about this pink currency box
located at the far right bottom corner of the Daily Totals tab. This is the “real”
sales for the day or shift.
•
View Box – The box on the far right of the Daily Totals tab shows all tickets (by
invoice numbers) for the day. You can click the option buttons to the left to show
what type of tickets (sales, layaways, credit slips, or voids). There is also a field
showing the total at the bottom of the box.
NOTE: The box actually counts payments for each ticket. For example, in the
previous screen shot the Layaway Tickets box was selecting showing ticket
#5939 (the layaway paid out in our example). Since there are two payments on
this ticket (one for $300 and one for $893.55), it shows the ticket number twice.
This is a quick way to tell how many payments in the Daily Totals table go with
which tickets.
NOTE: You can also double click on any invoice number in the box and pull up
that complete sales or layaway ticket. This is also a quick way to research a
possible problem on a daily.
Chapter 7. Cashing Out at End of Day / Shift
7
Goods Sold Today Tab
A supplementary feature to the Cash Out screen is the Goods Sold Today tab. Although
nothing on this tab is necessary for closing at day’s or shift’s end, it provides the user with
some additional detail about the individual items sold for the day or shift along with a cost /
profit breakdown of the total actual sales for the day.
Cash Out Screen – Goods Sold Today Tab
Double click an
item to pull up the
ticket!
The Total Actual
Sales from the
previous tab
NOTE: This screen shot shows the items sold in our previous example day. The first
item listed was the $436 cash sale ($400 sale + tax) at the beginning of the day, then
the layaway item, and finally the $545 accounts receivable.
NOTE: You can also double click on any item in the table to pull up the actual ticket.
Tab Fields
The bottom portion of the screen shows the cost / profit breakdown for the day or shift
mentioned earlier.
•
Total Actual Sales – This is the same field as the total actual sales from the
previous screen. It is copied here to show the source of the cost / profit
breakdown.
•
Sales Tax Collected – This is the total sales tax collected on all items sold for the
day. It is subtracted from total actual sales.
•
Adj. Actual Sales – This value is the Total Actual Sales after sales tax is
subtracted.
•
Today’s COGS – This value is the cost of goods sold (COGS) for the day or shift.
In our example, the costs for all three items sold this day totaled $892.44. This
value is subtracted from the Adj. Actual Sales to determine profit.
•
Total Actual Profit – This value represents the “bottom line” or final result. This is
really the value of most concern for management. Profit for the 3 items sold in our
example above totaled $1,102.56. This value is earnings before any expenses
(interests, income and employee taxes, salaries, overhead, amortization, etc.).
Activity for Today Tab
rd
The 3 tab on the Cash Out screen is also a supplemental area not required for cashing
out at day’s or shift’s end. Instead of showing you items sold, it shows all general “activity”.
This activity includes all sales, layaways, returns, refunds, quotes, work orders, voids, etc.
Any customer action that occurred today gets recorded here. Think of it as a work log for
the day.
8
ENTERPRISE POS User Manual
Cash Out Screen – Activity for Today Tab
Click buttons to
pull only specific
actions for the
day or shift
NOTE: Staying with our example, we can see the sales tickets displayed in the table
for the day. The first “INVOICE” record is for the $436 cash sale, the next is the
layaway (notice it shows “INVOICE” here because it is now a sale – before it was paid
out it was showing “LAYAWAY”), and finally we see the “INVOICE-AR” record which
is the accounts receivable sale. Only one record for each ticket or action is shown
here.
NOTE: Once again, you can double click on any record in the table to pull up that
ticket or action.
Tab Fields
The only fields on this tab are a series of option buttons at the top and a check box at the
bottom.
•
Sales – Click this button to show only sales tickets in the table below (with the
action type of “INVOICE” or “INVOICE-AR”).
•
Layaways – Click this button to show only layaway tickets in the table below (with
the action type of “LAYAWAY”).
•
Voids – Click this button to show only voided tickets in the table below (with the
action type of “VOID”).
•
Returns – Click this button to show only returns for store credit in the table below
(with the action type of “RETURN”).
•
Refunds – Click this button to show only refunds of tender in the table below
(with the action type of “REFUND”).
•
Credits – Click this button to show only credits issued for the day or shift (type will
depend on the credit, Gift Cert, Coupon, Trade, etc.).
•
W/O’s – Click this button to show only work orders in the table below (with the
action type of “W/O”).
•
All – Click this button to show everything.
•
Open Plain Action – This check box is usually found below any table listing
customer actions. If checked, it will not pull up the actual ticket when double
clicked. Instead, a general action screen will appear that allows employees to
input notations regarding the ticket that the customer will never see. Simply
uncheck the box again, and double clicking a record will begin opening up the
tickets themselves again.
Chapter 7. Cashing Out at End of Day / Shift
9
Balance Sheet Tab
The balance sheet tab is really only of interests for stores intending on using an external
accounting package, such as Quickbooks. The balance sheet lists all transactions for the
day in a batch which gets exported into an accounting file on the computer’s hard drive or
network (depending on how your Systems Administrator has it setup).
Cash Out – Balance Sheet Tab
The tab includes a balance sheet with all transactions in the form of debits and credits.
The debit side must equal the credit side before you can complete the cashing out process
IF the interface is turned on. The only time they wouldn’t equal is when the interface is not
setup properly.
See your Systems Administrator or Systems Manual for details on setting up the
Accounting interface.
Screen Buttons and Settings
The Cash Out screen has the following buttons and functions.
Cash Out Screen – Lower portion of screen
Buttons
The buttons are in order from left to right for cashing out.
•
Cash Drawer Button – This button brings up a screen to allow the user to count
all tender collected for the day or shift.
•
Save / Print – This button saves the cash sheet and prints the Z Report.
•
Exit – This button exits the screen.
Settings
The lower portion of the screen is a box specifically for settings that determine the
functionality of the screen and how the daily cash sheet is processed. These settings are
changed from the Systems Settings screen (under Administration) by the Systems
Administrator. If your Cash Out screen is not setup correctly, see your Systems
Administrator or consult the Systems Manual.
•
10
Calculate Each Daily – This option would cause each day selected (using the
date field to the left) to be recalculated. If something changed that reflected a
previous days daily sheet (a return, a paid out layaway, etc.), the old daily would
ENTERPRISE POS User Manual
change to reflect the new changes using this method (only available in per day
transaction posting).
•
Pull from History – This option would reflect previous days selected exactly as
they were when the cash out was performed. The day is not recalculated to
reflect any returns, refunds, layaway pay-outs, etc. that may have occurred
AFTER cashing out. Each daily would reflect the numbers as they were on that
day or shift.
•
Trans. Posting – This setting tells the system how to post the transactions –
either per day or per shift. As mentioned earlier in this chapter, per day covers all
transactions within a given 24hr span, while per shift covers all transaction from
the last close or cash out.
•
Trans. Location – This setting tells the system how to build the cash sheet. The
total sales values on the Cash Out screen can show all transactions collected by
user, register, department, or store. Usually, the setting is either by register
(several computer network) or by store (single computer network). However, a
manager may want to switch the value over to “by store” to check how the store is
doing for the day. The “by store” will show a cash sheet for all transactions within
the store from all registers.\
Today’s Drawer Totals
The top portion of the screen includes all tender values counted from the register drawer.
Cash Out Screen – Today’s Drawer Totals
Which tender is visible depends on what is collected during the day or shift. For example,
if no checks are collected, the “CHECKS” space would be invisible. Click the See More
button for a further breakdown tender collected (pennies, nickels, dimes, quarters, etc.) for
the day or shift.
The values are also color coded based on whether you’re over, short, or right on the
money for the day or shift.
•
White = correct
•
Gold = over
•
Red = short
Chapter 7. Cashing Out at End of Day / Shift
11
Counting Tender
When cashing out (closing all transactions) for the day or shift, the first thing you must do
is count all tender in your cash drawer. You do this by clicking the Count Drawer button
that is selected upon entering the Cash Out screen (or simply hit the Enter key). The
following walks you through the counting of the register drawer.
1. From the EPOS Desktop, click Financial Tools, then Cash Out. If you are using the
option to control the cash drawer, the drawer automatically pops open.
2. When the Cash Out screen is loaded, hit Enter. A pop-up box appears telling you to
remove the cash collected this day or shift from the cash drawer.
Remove Cash Collected Today
3. Begin removing ONLY the cash amount collected this day or shift from the cash
drawer and place it aside (don’t touch credit slips or checks yet) – this is the bank
deposit value of cash for the day that must be removed before balancing your register.
When finished, click OK or hit Enter.
The Cash Drawer Count Screen
You’ll now see the Cash Drawer Count screen appear for you to count every form of
tender currently in your cash drawer.
Cash Drawer Count Screen
Beginning and
Ending cash
drawer balance
must equal after
you’ve entered all
cash tender
All forms of cash
tender should be
entered in this row
NOTE: Every form of physical tender your store accepts (no charge account
payments) should be represented on this screen.
4. Begin counting all cash tender from cents to dollars and entering each value in the
Cash Drawer Count screen fields provided. Count pennies in drawer, enter them in
the Pennies fields, then hit Tab. Count nickels in drawer, enter them in the Nickels
field, then hit Tab. Continue in this fashion until all cash/coins are entered and the
CHECKS box finally becomes highlighted.
12
ENTERPRISE POS User Manual
NOTE: We’ve removed the cash deposits for the day already, so after we finish
entering all coins and cash values from the drawer, the total should equal the
beginning drawer balance. If they equal, the cashier has successfully balanced the
cash drawer (for cash tender).
5. Now total up all checks collected (if any) and enter them in the CHECKS field, then hit
Tab.
6. Now total up your credit slips (or print a summary report on your credit machine).
Enter these values in the next few CHARGE fields hitting Tab after each. Just skip
any tender type that was not collected today.
7. You can enter any comments in the bottom notes box provided for any reason if
needed. For example, you may want to enter an explanation for being over or short on
a specific tender. Hit Tab when finished.
Cash Drawer Count Screen Example
NOTE: Notice in our example screen shot the cashier noted that he/she was over
$0.28 because a customer said to “keep the change” on a sale. The cashier noted this
fact under the comments section. This field keeps the blame for an unbalanced
drawer from slipping into the next shift.
8. Click OK or hit Enter to return to the Cash Out screen.
When you return to the Cash Out screen, you’ll notice the fields in the Today’s Drawer
Totals box at the top of the screen change to reflect the values you’ve just entered. If any
values are over or short, they will be marked in either gold or red.
Cash Out Screen – Cash is over $0.28
Since CASH is a few
cents over the
beginning day or
shift’s balance it is
displayed in gold
Chapter 7. Cashing Out at End of Day / Shift
13
Saving / Printing the Z Report
The last thing we must do in the process of cashing out at day’s or shift’s end is to print the
Z Report, or cash sheet. Exactly what format your cash sheet is in depends on the
application report you’ve selected to print in the Report Engine Maintenance screen. See
Chapter 9 – Report Engine for details on assigning application reports or contact your
Systems Administrator.
After we’re sure the Cash Out screen as shown is correct, we click the Save / Print button
or press the F2 key. You’ll see a print verification box pop up with three options.
Cash Sheet (Z Report) Print Verification
•
Yes – sends the cash sheet / z report directly to the printer without viewing it first
•
No – sends the cash sheet / z report to the screen, then you can decide if you
want to print a hard copy or not
•
Cancel – stops the print operation completely
You don’t have to print the actual cash sheet to close transactions for the day or shift and
complete the cashing out process. However, it’s a good practice to keep a paper trail in
the event of an audit. We recommend printing at least one cash sheet per day per location
to file away with all sales receipts for the day or shift attached.
14
ENTERPRISE POS User Manual
Chapter 8. Other Financial and Marketing Tools
Up to this point in the EnterprisePOS Desktop user manual we’ve discussed all aspects of
data collection methods and controls. This chapter now focuses on exactly how to use the
data to make important decisions to steer the company in the right direction to achieve
your goals.
This chapter, for the most part, focuses on the role of making managerial decisions. This
chapter will be useful to you only if you’ve been given the role of daily financial decision
making over and above the duties of normal cashier or basic supervisory duties.
Otherwise, there is no need for you to continue your study of this chapter.
Keep in mind that some form of historical data is required before most the tools discussed
in this chapter can really be of help to you (as a manager). The more data in which to base
your decisions, the better your decisions will be. It may take months or even years of store
operation before real benefits of some of these tools are utilized.
These tools can be found under the Financial Tools menu of the EnterprisePOS
Desktop.
What you will find in this chapter…
Accessing / Using Financial And Marketing Tools
2
Sales Analysis
Layout of the Sales Analysis Screen
Payments / In-Flow Analysis
Invoices / Sales Analysis
Goods Sold Analysis
3
3
5
6
9
Account Actions / Credits
Analyzing Customer Account Actions
Analyzing Customer / Store Credit History
12
15
16
Marketing Analysis / Trends
Screen Layout
Forecasting Using Historical Full-Month Data
System Forecast for the Day Based on History
Trending
Interpreting Your Data / Making Decisions
18
18
20
22
23
26
Chapter 8. Other Financial and Marketing Tools
1
Accessing / Using Financial And Marketing Tools
All financial and marketing tools are located under the Tools menu of the EnterprisePOS
Desktop.
Some of the menu items under this dropdown menu are separate applications that can
also be accessed outside of the EnterprisePOS Desktop as well.
Accessing the system’s financial and marketing tools requires you to first log into the
EnterprisePOS Desktop.
1. From the EnterprisePOS Desktop, click the Tools menu.
EnterprisePOS Desktop
2. Now click on the appropriate selection from the dropdown menu to load that specific
financial or marketing tool.
The Tools menu includes the following available modules.
•
CASH OUT – Used for cashing out registers on a per-day or per-shift basis
(covered in the previous chapter – Chapter 7)
•
Customer Tools – Displays a list of all customer Actions, Credits, or Notations to
all accounts and allows the searching through these elements among all
accounts
•
Financial Tools – a sub-menu for the following…
•
Automated Billing (Publication System) an independent / stand-alone
application that is used for monthly customer account billing (covered in its
own manual)
•
Sales Analysis – screen specifically for analysis of past sales (includes
payment analysis, goods sold analysis, etc.)
•
Assess Finance Charges – a function that will apply finance charges to ALL
customer outstanding accounts in the system
•
Work Order System / Tech Station – an independent / stand-alone application
that is used for entry and processing of work orders and scheduled service work
(covered in its own manual)
•
Market Analysis / Trends – screen specifically for trending and analysis of past
daily data (group analysis of all daily sheets – CASH OUT screen)
•
General Ledger System – an independent and very basic stand-alone
accounting package (covered in its own manual)
The remaining menu items under the Tools menu are not the focus of this chapter. These
are basic stand-alone tools that are useful in day-to-day business but are not specifically
used for marketing or financial decision making.
2
ENTERPRISE POS User Manual
Sales Analysis
The sales analysis screen is used for any research, planning, or decision making
specifically from past sales records. It is also a useful screen to fix problems with sales
tickets without having to VOID and redo them.
Each time a sale is successfully processed (or completed), there is limited editing that you
can do when you reopen it. Once the sale is “closed” (or paid out), the cashier is not
allowed to reopen the sale and change the numbers. Your changes are limited to dates or
customer data since the inventory was already adjusted. The sale, therefore, has become
“history”.
The sales analysis screen, however, gives Managers the ability to go back and change
history. A sale becomes historical data to be accessed or analyzed from three different
aspects via the Sales Analysis screen. Each “aspect”, as it is referred, is split among three
different areas of the invoice. These areas are as follows.
•
Payments / In-Flow Analysis – this area includes customer payments
•
Invoices / Sales Analysis – this area includes all invoice summary data or totals
•
Goods Sold Analysis – this area includes items sold
These areas are tables in the database and each include records that make up a single
sale transaction. In the sales analysis screen, each “area” as it is defined above is
segmented into tabs on the screen.
To further understand these areas of a ticket that are stored when a transaction is
“processed” or committed to the database, we can examine a standard sales ticket.
A Standard Invoice Ticket
“Products” here get
recorded in the
Goods Sold
Analysis area
All “generic” invoice
data, customer data,
and totals get sent to
the Invoices / Sales
Analysis area
“Payments” here get
recorded in the
Payments / In-Flow
Analysis table
NOTE: Every “sale” record (as shown above) at the point-of-sale gets moved into
Sales Analysis once completed. The above picture example of a standard sale
shows exactly where the parts of the invoice will go. The next section gives more
detail about these individual invoice areas.
Layout of the Sales Analysis Screen
As mentioned, the layout of the Sales Analysis screen consists of the three tabs that
make up the three very distinct areas of each invoice.
Chapter 8. Other Financial and Marketing Tools
3
Sales Analysis Screen
Area Search
Engine
Tabs to the right
define the “area”
you are in
Sale Invoices
(each record is a
sale, layaway,
accounts
receivable, etc.)
in this middle
“area”
Functions Specific
to this area
You’ll notice the three separate invoice areas referred to earlier in the screen snapshot
example above. Each area is divided among three tabs at the right of the screen. In each
tab area includes a search engine for the records below. This search engine works the
exact same as described in previous chapters with the field to search in the dropdown box
on the left and the search value on the right. See chapter 4 for detail on using the system’s
search engine.
The bottom portion of each tab contains various analysis fields, buttons, and controls. The
bottom portion of the screen (under the tabs) is the Control Panel with a variety of useful
buttons.
You can use the search engine to capture a nearly unlimited table full of information based
on this historical sales data, then send the data to the printer using the Print button. On
any record displayed in the table, you can double click to display the actual ticket in its
entirety.
Control Panel Buttons
The Control Panel includes the following.
4
•
(F9) Calc – button to calculate the numbers / totals of the currency values
displayed in the selected table
•
(F8) Load Data – button to load another database’s data into only this screen –
useful for doing an analysis on old archived data or data from another store
location
•
(F2) Move to SOLD – button to move the currently displayed historical data into a
SOLD database for archiving purposes
•
(F5) Print – button to send the records in the table to the screen or printer in a
nicely formatted report
•
(F12) Void – button to void a sale
•
(F3) Exit – exits the screen
ENTERPRISE POS User Manual
Payments / In-Flow Analysis
The first tab on the Sales Analysis screen is devoted to only customer payment records.
In other words, each payment on each invoice would become a history record in the table
of this tab.
A good way to illustrate how payment records become available to this screen as history
immediately after completion of a sale is in the following example. The screen shot below
is from a sale in which the customer wanted to pay $100 in cash, $250 in check, and put
the rest on his Master Card (for whatever reason). Each of the three individual payment
rows entered at the point-of-sale (shown below) became individual history records at the
sale’s completion.
Invoice Screen – TENDER Table
Once the cashier finishes this sale, this invoice record is considered history and can be
analyzed (with other invoices) on the Sales Analysis screen. These three payment
records in particular can be viewed from the Sales Analysis screen Payments / In-Flow
Analysis tab.
Sales Analysis – Payments / In-Flow Analysis
For example, we did
a search on the
Invoice Date of
2/3/04, then hit Enter
to give us all
payment records in
the table below
You can then click
the CALC button to
tally up the totals for
all these payments
below
NOTE: Notice the most common tender types are totaled below when the Calc button
is pressed. Also notice the sales (both regular and accounts receivables) are totaled
on the bottom left (completed sales), but the layaways are totaled on the right. This is
because layaways are sales-in-progress or future sales. They should never be
included in your completed sales group.
Tips for Usage of This Tab
Any type of customer payment analysis can be performed on this tab of the Sales
Analysis screen. Here are some examples of how this tab can be used.
Chapter 8. Other Financial and Marketing Tools
5
•
Suggestion #1 : You can search on specific credit cards for the month and click
the Calc button for totals. This will provide you with a good check against your
bank statement to prove the credit card company didn’t make a mistake!
Payments Search Example
NOTE: This example would give you all American Express payments for the
month of June 2001 after hitting Enter. The Calc button would give you totals.
•
Suggestion #2 : You can search on individual layaway numbers or all layaways
and see who is late on their payments!
Payments Search Example
NOTE: This example would give you ALL payments for layaway #19791. The
payment records would be displayed in order of date, and you could easily see if
they’re late on their payment. The same goes for any or all accounts receivables.
•
Suggestion #3 : You may want to find your big cash spenders for marketing
purposes by searching on only those non-credit-card customers.
Payment Search Example
NOTE: This example would pull everyone in your database who has paid with
anything other than the “CHARGE” tender type in amounts greater than $500.
Invoices / Sales Analysis
The middle tab is for summary information only. Basically all areas of an invoice record
outside of the individual payments and items sold are included here. Each record in this
table represents an individual invoice record.
Sales Analysis – Invoices / Sales Analysis Tab
6
ENTERPRISE POS User Manual
NOTE: This tab includes 4 sub-tabs that provide further detail once the Calc button is
clicked.
NOTE: Click Unpaid Accounts to show a quick list of all invoices with an unpaid
balance (includes both layaways and accounts receivables).
Sub-Tabs
•
Profit / Cost – provides revenue / cost / profit calculations for sales only (no
layaways) when the Calc button is clicked
Profit / Cost Sub-Tab
NOTE: This tab will display the total change given from the registers, total sales
before tax (revenue), the cost of goods sold, then the total calculated profit. You
can do a further cost analysis by clicking the Run Cost Analysis button.
•
Tax & Shipping – provides tax (all rates collected) and shipping totals for all
sales only (no layaways) when the Calc button is clicked
Tax & Shipping Sub-Tab
NOTE: This tab will display totals for all the different tax rates collected along with
your total freight collected on the right. This is great for figuring monthly sales tax!
•
Accounts Receivables – provides totals, over due ticket counts, and analysis of
all accounts receivables when the Calc button is clicked
Accounts Receivable Sub-Tab
NOTE: The left of this sub-tab shows a count of all accounts receivables having a
an unpaid balance older than 30, 60, or 90 days. For more details on these
individual tickets, you can click the vertical SHOW button.
NOTE: The Sales Performance value : This tab also shows sales revenue and
cost of good sold (for only accounts receivables) with a calculated total profit
value. The totals of all unpaid balances are summed up as well and subtracted
from the profit totals for a Sales Performance value on the right. This value is a
very important analysis tool and shows the actual sales profit to-date. When this
value is positive, your store’s receivables are considered in good performance.
This means if none of the outstanding balances were ever collected, your store
would still come out ahead (with this profit amount). If this value is negative, it
means the opposite in that your store would suffer a loss of this amount.
•
Lay-Aways – provides totals and future profit analysis values for all layaway
tickets (no sales or accounts receivables) when the Calc button is clicked
Chapter 8. Other Financial and Marketing Tools
7
Lay-Aways Sub-Tab
NOTE: This tab also includes sales revenue, cost of goods sold, tax, and
shipping totals for all layaway records in the above table. Based on the revenue
and cost of goods sold, the future profit is also calculated. A total of all unpaid
balances is also totaled in the yellow currency field next to future profit. And as
with the previous sub-tab, there is also a performance field to the far right.
NOTE: The Layaway Performance value : like the sales performance value, this
is simply the ‘true’ profit (profit minus the total unpaid balances so far). Keep in
mind the layaway performance value isn’t nearly as crucial of a management
analysis tool since product is usually kept in-store until the balance of the layaway
is paid out. There is no risk factor in layaways like there is in accounts receivables
(where the sale is finalized and product is taken with the customer).
Tips for Usage of This Tab
There are seemingly unlimited ways to utilize this tab. The following are just a few
suggestions.
•
Suggestion #1 : Use this tab to pay your monthly taxes!
Invoice Search Example
Layaway? is
false because
we’re interested
in SALES only!
NOTE: This search would give you all sales in the month of June 2001 after
hitting the Enter key. Then click the Calc button to accumulate the totals in the
table. You’ll notice the Tax & Shipping sub-tab will then have all your tax rate
totals for you to pay your sales tax.
•
Suggestion #2 : Use this tab to determine your sales performance for the month
(if your company sells on customer charge accounts)!
You can use the same search example above for the month of June 2001. Simply
check your Accounts Receivable sub-tab and determine whether or not your
company is currently in the red and in trouble (when sales performance added to
the profit value on the first sub-tab is negative) or doing just fine (positive
performance and/or positive performance + profit from first tab).
•
Suggestion #3 : Use this tab to determine where to focus your marketing efforts!
You can do a multitude of searches on large invoice totals, then right click on a
column to sort. You can sort by City, for example, and focus your marketing
efforts in the areas with the most sales.
•
Suggestion #4 : Use this tab to find the layaways that are over due!
Invoices Search Example
8
ENTERPRISE POS User Manual
NOTE: This search example will pull only layaways with a deadline date greater
than 6/01/01. If the today’s date is 6/15/01, for example, you’ll see a list of all
layaways that are due to be paid in full. You can then print the list and send out
letters of reminders.
Goods Sold Analysis
The bottom right tab area of the Sales Analysis screen is designated only for individual
item sales history or “product sold”. Any line item that appears on an actual invoice
(whether it’s a regular sale, accounts receivable, or layaway) will appear as a record in this
table of this tab area once the ticket is saved. This data allows you to do analysis and
reporting on only the sold goods.
Sales Analysis – Goods Sold Analysis
NOTE: The bottom of this tab has similar total fields as the other tabs (revenue, cost,
and a calculated profit field). There are, however, two additional special fields to show
totals for quantities sold and total free gifts. Free gifts are simply items sold at a zero
price.
Goods Sold Analysis – Moving Product Details
After the Calc button/command is executed you’ll notice all the values in the table are
totaled in the bottom fields under the Moving Product Details section.
•
$ Total Sold or Held – this is the sum of all line item totals (unit price multiplied
by quantity) – also called product revenue
•
Cost of Goods – this is the sum of all line item costs
•
Product Profit – revenue subtracted by the cost of goods
•
Total Qty – the sum of all quantity values in the table (total of all items sold)
•
Total FREE Gifts – items sold with zero price
Chapter 8. Other Financial and Marketing Tools
9
FREE Gifts – How They Work
Free gifts, as they’re called, is a term referring to products sold with a zero price. Zeroing
out an item’s price value, then ringing up a normal sale is the absolute best way to keep
both your inventory and financial records straight and accurate. For example, companies
will often do this to keep a record of the number of items they donate. The system keeps
the cost value in the database and records the value as a loss or negative profit.
It is too easy for a user (with the appropriate security rights) to simply drop the quantity
value in a product record, then remove a product from inventory for donation, but this
practice should be strictly avoided. Doing this removes any possible history trail of your
action and will seriously effect your bottom line over time.
To illustrate this point we can examine our above example screen shot. We see the
calculated profit value for all items in the table are $6,952.61 with 11 items designated as
free gifts. If all donated items are recorded by zeroing out the unit price, then this profit
value is accurate assuming product theft, loss, or spoilage is not an issue (see the next
section).
Now, let’s assume this company was not keeping track of the free gifts in this way. If the
cost of each item given away is $100, your donation expense is actually $1,100.00 (the 11
items multiplied by $100 cost). This will increase your actual cost value and drop your
actual profit down to $5,852.61. However, management will not know this is their real profit
value and may continue to operate under the assumption their profit is at $6,952.61. This
could mean disaster for an organization over time.
It’s also good to track this value for the purposes of an annual tax write off. All donations
are tax deductible.
Finding Theft, Loss, or Spoilage
Unfortunately, there is no simple way to flush out inventory that is missing or unusable
without doing a comparison of the product quantities you have in the system verses what
is physically counted in the store.
If this is a problem in your store, one recommendation we can offer is to keep your
minimum reorder quantities 1 or 2 items higher than you normally would to account for
this. If you set your minimum quantities too low (let’s say, 1 for example), and an item is
lost or stolen, your store may be out of stock without the system notifying you to reorder.
The lost or stolen item may cause your store to be physically out of stock, but not logically
out of stock.
The downfall of this strategy is your higher inventory costs and higher annual inventory
taxes. The more often you do physical inventory counts, the better.
Tips for Usage of This Tab
There are several ways to utilize your goods sold list for managerial reporting purposes.
The following are just a few suggestions.
•
Suggestion #1 : As mentioned previously, you can use this tab to determine
your total cost for donated items for the month, quarter, year, etc.
Goods Sold Search Example
10
ENTERPRISE POS User Manual
NOTE: The above duel search would give you all donations in the table below
(price is zero and item type (Product Type) is less than 5 meaning it is anything
other than a line-item comment).
•
Suggestion #2 : You can search to find the total amount sold for a specific
product category for the month, quarter, year, etc.
Goods Sold Search Example
NOTE: The above duel search will give you all goods sold in the Product
Category of “services” for the month of March 2001. Notice the asterisks around
the word services in the search box. The asterisks tell the search engine to
include any Product Category in the search with the word services in the name.
•
Suggestion #3 : A similar search could provide all goods sold from a particular
vendor as well by selecting the vendor name or number to search on.
Chapter 8. Other Financial and Marketing Tools
11
Account Actions / Credits
Account actions, as they’re called, can be any one of two things, either a financial
transaction that increases a customer’s asset level to the store (for example, a sale), or a
general non-financial notation to a customer’s account. The only thing it cannot be is a
credit (or negative adjustment to the store’s assets) of any kind.
Think of each customer account as a separate company asset. Every time a cashier
processes a sale transaction, the customer transfers payments into that customer’s
account for the store that increases the overall assets for the store. However, if the
customer returns the product and is refunded this money, the credit is issued or assets are
reduced (the negative adjustment to the account).
From an accounting standpoint, the addition of any financial Action (sale, layaway,
accounts receivable, etc.) to a customer’s account would be called a debit due to the
increase of a store’s assets (the customer account itself) and a decrease of the store’s
liabilities (the reduction of a corresponding inventory expense). On the other side, the
addition of any customer Credit (gift certificate, store credit from a return, coupon, trade
credit, etc.) would be also called a credit from an accounting standpoint due to the
increase in store liability that usually comes with a corresponding decrease in some other
action (asset).
Debits and credits are the left and right sides of an accounting worksheet that are required
to equal, however, actions and credits do not have to equal. Do not get accounting debits
and credits confused with customer actions and credits. You can debit (increase) or credit
(decrease) any customer Action (or store asset) as well as debit (decrease) or credit
(increase) any customer Credit (or store liability). Consult an accounting professional to
better understand how this works.
A wide range of both customer credit and actions analysis can be performed from the
Account Actions & Credits screen to give management general information needed for
making important decisions. The reason we call it general information is to reflect that any
type of customer action can be analyzed from this screen keeping it generalized among all
different types of actions. For example, you could do the same analysis on work orders or
quotes (non-financial actions) as you would on layaways and sales (financial actions –
actual assets) without having to jump among different screens. It makes it very convenient
for reporting on things like specific employee activity verses productivity, work order
completion rates, quotes outstanding for specific time periods and/or sales reps, total
returns or refunds in a given time period or by specific employees or groups, and so on.
The general nature of this screen gives you a large range of capabilities.
You are able to customize your own account action types with the Customization Utility
included in the EnterprisePOS system, however, there are certain action types that are
specifically reserved to the system and can not be changed or removed. The following lists
these system-specific action types.
12
ENTERPRISE POS User Manual
Reserved Action Types
Financial?
Yes
INVOICE
INVOICE-AR
Yes
LAYAWAY
Yes
QUOTE
No
W/O
No
VOID
Yes
RETURN
Yes
REFUND
Yes
ACTION
WISH
No
No
Reserved Credit Types
Financial?
Yes
Gift Cert
Trade
Yes
Discount
Yes
Coupon
Yes
Store Credit
Yes
Adjustment
Yes
Deposit
Yes
Description
A regular sale (invoice paid in FULL at
point-of-sale)
An accounts receivable sale (invoice NOT
paid in full at point-of-sale – a designated
future date is issued for full payment)
A future sale (goods are KEPT in the store
until payment is received in full on a
designated future date that completes the
sale)
A proposal for a sale with a designated
future expiration date
A work order (or a request for work from an
internal services shop – becomes a
financial action when converted to a sale)
A financial action that has been deleted or
reversed
An invoice with product returned for
STORE CREDIT
An invoice with product returned for a
refund of money BACK to the customer
a general notation to a customer’s account
a general notation to a customer’s account
that is placed on a Wish List (a list of
customer desired or requested products
not yet carried by the store)
Description
A gift certificate (credit applied after tax is
calculated as an invoice payment)
A credit for an exchange of customer
product or services (applied before tax is
calculated as an invoice line item
adjustment)
A credit for a reduction in an invoice subtotal before tax (could be employee
discounts, promotional discounts, etc.)
Same as a discount – however, usually
uses a quantity value to keep track of the
number of these coupon discounts
currently in circulation
A credit created from a RETURN of goods
or services (applied after tax as an invoice
payment)
A “general” credit that is usually applied
before tax but can also be applied as an
after-tax payment – see your accountant!
A credit that is created when a customer
gives a store funds to be applied towards a
future purchase (and is, of course, applied
after tax as a payment)
Chapter 8. Other Financial and Marketing Tools
13
NOTE: You will better understand the workings of a customer account if you keep in
mind the financial customer actions are always assets and the customer credits are
always liabilities to the company.
You can access the Account Actions & Credits screen from the EPOS Desktop main
menu under Financial Tools. You’ll see a list of all your action types on the left portion of
the screen (both system and customized types). You can click on any of the action types
to see a quick list of all records in the database for this type of action. You can then do a
search on any or all the actions by using the search engine at the top portion of the
screen. To change from actions to credits, simply click the Customer Credit option to the
right of the search engine. After you’ve performed your search, you can click the
Calculate button to total the values at the bottom. You can also print your results by using
the Print Report button at the bottom of the screen.
Actions & Credits Screen – Work Orders Search Example
Click your Action
Type first to narrow
the list! Click ALL
to search on all
actions!
Now, do your search
based on your
desired action type
selected!
Click the Calculate
button to total the
values from your
search here!
NOTE: You’ll notice 2 customized action types on the right of the example screen
above, TEST and DONATION. This store obviously needed to track a customer
action for Tests and Donations. Non-profit organizations may have a need to track
their customer donations with a DONATION action type. Another example of a
customized action type would be a cell phone or PCS company that may want to track
cell phone activations by using a customized action type called ACTIVATIONS. All
customized actions are always non-financial (not used in any system-specific financial
calculations), however, you can easily create your own reports with financial
calculations of your own.
14
ENTERPRISE POS User Manual
Actions & Credits Screen - Credits
NOTE: Clicking the Customer Credit option button will switch the screen to focus on
only customer credit types and refreshes the search engine for credit fields only. You
can now begin your analyzing of credits.
Screen Control Panel
The following are the screen buttons and their functions.
•
Calculate – (or F8) totals all the values in the currency fields below the table
•
Print Report – (or F6) prints the data in the table using the report template
selected in the dropdown box
•
Delete – (or F12) removes an action or credit from the database
•
•
- button used to print a credit slip from a selected record
Exit – (or F3) exits this screen
Analyzing Customer Account Actions
Since we’ve discussed the details of the Actions & Credits screen’s layout and function,
getting the actual data you need for decision making is our next focus. How you use this
screen to formulate the data you need depends on your type of business and exactly what
you’re looking for.
The following are some suggestions based on how this screen is commonly used by other
customers.
•
Suggestion #1 : Analyzing Work Orders
1. Make sure Customer Account Actions is selected on the top right portion of
the screen.
2. Select work order actions only by clicking W/O in the action type list on the
left of the screen. You’ll see a list of all work orders in the database appear in
the table.
Chapter 8. Other Financial and Marketing Tools
15
3. Use the search engine to further dissect the group of work orders into exactly
the data you need.
Work Order Actions – Search Engine Example
NOTE: Entering the above search example while W/O is selected, then
hitting Enter, will give you a list of all CLOSED work orders for the month of
march. You can also search on any other work order status for any specific
employee, group, department, etc. CLOSED is often used since this
represents a conversion to an actual store asset.
4. Now click the Calculate button or hit F8. Notice the values in the table are
totaled.
5. Use the Print Report button to get a hard copy of the data.
•
Suggestion #2 : Analyzing Invoices
Use similar steps above after clicking on the INVOICE action type to display
different information for paid-out sales. While this action type is selected you can
perform searches for different date ranges (for total sales) or different employee
reps to determine sales performance.
•
Suggestion #3 : Analyzing Quotes
You may want to use similar steps for the QUOTE action type to list all proposals
over a month or so that have not been accepted by customers (to use to follow
up), or possibly to delete the quotes that are no longer valid.
Analyzing Customer / Store Credit History
There exists credit departments in larger organizations devoted only to processing
requests for customer credit, monitoring outstanding credit, producing monthly reports on
customer credit, etc. The task of processing and monitoring customer credit is usually
relative to the size of the organization. However, some form of credit monitoring should be
performed at least on a monthly basis regardless of the organization’s size if various forms
of credit are accepted for use. Too much issuance of credit will overwhelm a small
company in a mountain of liability. This can seriously effect the bottom line of the
organization if credit monitoring is not carefully performed.
The following are some suggestions based on how this screen is commonly used.
•
Suggestion #1 : Analyzing Gift Certificates
1. Make sure Customer Credit is selected at the top right portion of the screen.
2. Select Gift Cert in the credit type list on the left of the screen. You’ll see a list
of all gift certificate credits in the database appear in the table.
3. Use the search engine to further dissect the group of gift certificates into
exactly the data you need.
4. Click the Calculate button (or hit F8) to total up the values in your search.
16
ENTERPRISE POS User Manual
Customer Credit Search
NOTE: The above search will produce a list of all gift certificates issued in the
Hardware depart that will expire on 7/1/01 or later. This means that until
7/1/01, the Hardware department must be able to account for this total gift
certificate value in the table because they could be asked to redeem any or
all of these certificates at any time.
•
Suggestion #2 : Analyzing Credit History for a Customer
The same rules and functionality apply.
Chapter 8. Other Financial and Marketing Tools
17
Marketing Analysis / Trends
The Marketing Analysis / Trends screen is an excellent tool for comparisons between
upcoming periods (months, quarters, etc.) and past years sales activity. The more years of
data you have to pull from for specific months or quarters, the more prepared you’ll be for
upcoming dips or surges in demand. Forecasting future sales fluctuation is the focus of
this screen.
Screen Layout
The “look” of the screen is much like a pocket organizer for ease of viewing.
The default screen view is FULL MONTH which compares each day of the current month
to the same month of past years.
Market Analysis / Trends – FULL MONTH Analysis
Field used for
comparison
among different
months
Each day’s value is
compared to
previous years
Select the month
to compare with
previous years
here
Shows the BEST
(yellow) and
WORST (orange)
days for all years
NOTE: If you change the comparison month, sometimes you still have to select a day
on the calendar below for the comparison to work. The day itself it not used here, but
if an actual day is not selected on the calendar you’ll get a blank table on the right.
Screen Components
•
Comparison Field – The comparison field is the value that is used throughout
the screen’s analysis against previous years. These field values are saved each
day a Cash-Out is performed (or Z Report ran). The dropdown box can be clicked
to choose a different comparison field. As soon as a new field is selected for
comparison, the entire screen adjusts to reflect the change.
1. Total_Deposits – compares only cash deposits taken on future sales
2. Total_Layaways – compares only current layaways
3. Total_Certs – compares only gift certificates issued
4. Paid_Out_Layaways – compares only paid out layaways (now sales)
5. Gift_Cert_Used – compares only the gift certificates or credits used in a sale
6. Total_Actual_Sales – compares daily “actual” sales (deposits and credits
taken out)
18
ENTERPRISE POS User Manual
7. Tax_Collected – compares only the daily sales tax collected
8. Adj_Actual_Sales – compares only the “actual” sales without sales tax
included (sum of all sub-totals)
9. Todays_COGS – compares only the daily cost of all goods sold (COGS)
•
The Calendar – The calendar on the left of the screen shows the month and day
being analyzed. The day, however, is not used on this tab, but a day must be
selected to perform this analysis.
•
BEST Day / WORST Day – From the previous years analyzed, the system will
provide you with the worst and best days. You can use this to determine
approximate where within the month these days usually occur to prepare for
increased or decreased demand.
•
Month at a Glance – The table on the right shows each day as table rows and
each year you’ve been in business as columns for an easy comparison of past
year’s activity.
Screen Buttons
There are only two main buttons on this screen. Both are located at the bottom right.
•
Report – button for printing a report of the current data analysis (on the screen)
•
Exit – button for exiting this screen and returning to the EPOS Desktop
Screen Tabs
There are three tabs located to the right portion of the screen.
•
FULL MONTH – shows sales data for each day of the selected month and
compares it with the same month in previous years
•
SPECIFIC DAY – shows sales data for only the specific day selected on the
calendar and provides a calculated forecast for the day based on history
•
TRENDS – shows any trends by comparing whole weeks, individual days of the
weeks, quarters, holidays, etc. and shows two separate graphs
Market Analysis / Trends – SPECIFIC DAY Analysis
A calculated forecast of
the day based on history
– the more historical data
available, the more
accurate it is
Chapter 8. Other Financial and Marketing Tools
19
Market Analysis / Trends Screen - TRENDING
Comparison of
various week and
day totals among
years
Graphs for week
and days for past 6
years of business
Weekly and Daily Graphs – Last 6 Years Examined
Forecasting Using Historical Full-Month Data
A forecast is nothing more than an estimate, or educated guess. The more historical data
you have, the greater the accuracy of the guess. Forecasting is more of an art than a
science, but at least the features of EPOS makes it easier to make these guesses each
year you’re in business.
The trick of forecasting using the first screen’s tab, full-month view, is two-fold. First, you
must make a judgment that the current month is behaving in a similar fashion as previous
years. If so, you assume the following month (in which you’re making your forecast) will
operate similarly to a historical trend as well. You must also take into consideration any
other current variables that could effect your forecast, such as an election going on,
disastrous weather conditions in the area, or a stock market crash. Any change in your
environment that did not occur in the same month of previous years could affect your
forecast. It is always a good idea to print and file away these forecasts with a short
description of current economic conditions.
To make a forecast for the upcoming month of October, we would go through the following
steps.
20
ENTERPRISE POS User Manual
1. From the EPOS Desktop, click Financial Tools, then Market Analysis / Trends.
2. From the Market Analysis / Trends screen, click the month dropdown box above the
calendar to select the month of October (click on Oct).
Select Future Month of October
NOTE: Everything will probably be blank at first because you must click on a day next.
Also notice the default comparison field is Total_Actual_Sales which is fine for this
example. Simply drop down this box to select a different comparison field.
nd
3. Click on any day on the calendar, let’s say the 2 . Notice all the values on the right
appear including the best and worst days.
4. Given the historical data on the screen from the past few years, it’s possible to make a
fairly clear forecast for this upcoming October.
Market Analysis / Trends – Forecast for October 2001
Can easily see a
trend for peak sales
in mid-month (yellow)
Can easily see a
trend for lagging
sales in the later
portion of the month
(orange)
5. To print a hard copy of the information, click the Report button.
What Does This Tell Us?
From looking at the past three years in the above example, we can derive a wealth of
information. First of all, we can tell that our peak sales in October have always been in the
range from 10/12 – 10/16. We know to have additional staff on hand during these days to
th
help out. We can also expect to have sagging demand after the 20 , so additional help
does not need to be scheduled.
Chapter 8. Other Financial and Marketing Tools
21
We can also build an advertising plan based on this trend. We may want to offer some
kind of “Halloween Special” for October that may spread the demand a little evenly
throughout the month. Or, if demand has been notoriously slow each year around
Halloween, we may want to consider closing during this time. It may cost more to stay in
operation during slow periods than to simply close altogether.
System Forecast for the Day Based on History
The second tab (SPECIFIC DAY) shows all the totals for the selected calendar day and
provides you with a forecast based on sales data for previous years. EPOS determines
this forecast from a number of system calculations and averages. The more historical data
you have, the more accurate the estimate will be. At least 1 year of previous data is
required.
For the system to run a forecast, click the Click to Make a Forecast! button after a
specific calendar day is selected. Based on your historical sales data, the forecast
returned will be one of the following.
•
Expect high-volume sales, low profits – This is the worst possible system
forecast. This means you’ll need to increase your staff and work harder for little
profit. This is usually the forecast when the same day in previous years have sold
mostly low priced, low profit items in large volume.
•
Expect high-volume sales, moderate profits – This is a little better forecast
than the previous in that the hard work and busy schedule will be worth
somewhat decent profits.
•
Expect high-volume sales, high profits – This is a good forecast that says to
staff up and prepare for a very busy and profitable day!
•
Expect moderate sales, low profits – The forecast here expects a somewhat
busy store, but low profits – not a good forecast at all.
•
Expect moderate sales, moderate profits – This is the equivalent to an
average day – some walk-in traffic and some profitable sales, but nothing to get
excited over.
•
Expect moderate sales, high profits – This is a pretty good forecast because it
says your store will not be that busy, but your day should bring you higher priced
more profitable sales.
•
Expect low-volume sales, low profits – This is a bad forecast. You should
consider closing on this day! It says your store will have next to no traffic.
•
Expect low-volume sales, moderate profits – This forecast is not entirely bad.
It says store traffic is poor in comparison to other days, but expect to make some
money anyway.
•
Expect low-volume sales, high profits – This is actually a good forecast. It says
traffic will be slow, but the sale of some high priced high profit items will be sold.
It’s a good forecast because it requires a small sales force to achieve high profits!
•
Inconclusive – The system will display this if there is not at least 1 full year of
historical data to run the analysis against.
After the system provides its forecast, it will then display its recommendations for the day
in the box below (for example, staff up, stock up on Misc. Gifts, expect poor sales today,
etc.). The system may recommend a number of different things for you to prepare for
based on historical data. You should definitely heed the system’s warnings, however, keep
22
ENTERPRISE POS User Manual
in mind this is only a forecast – nothing is guaranteed. The more years of data the system
can pull from, the more accurate this forecast usually is.
Market Analysis / Trends – Specific Day’s Forecast
December 20th
proves to be an
annually good day
according to the
forecast!
NOTE: Immediately after the button is pressed, a forecast for the day should appear.
Trending
The trending tab identifies any demand variances by anything other than a specific day or
month. The following are a list of items you can make year-by-year comparisons with to
identify product demand trends.
•
Week 1 Total – this compares the summary of all days (Monday through
Sunday) for only the first week of the selected month (year-by-year comparison)
•
Week 2 Total – this compares the summary of all days (Monday through
Sunday) for only the second week of the selected month (year-by-year
comparison)
•
Week 3 Total – this compares the summary of all days (Monday through
Sunday) for only the third week of the selected month (year-by-year comparison)
•
Week 4+ Total – this compares the summary of all days (Monday through
Sunday) for only the forth week of the selected month (year-by-year comparison)
NOTE: On months with over 4 weeks of days, the remaining days are group with
this week 4 value.
•
Sun Total – this compares the summary of ALL Sundays for the selected month
(year-by-year comparison)
•
Mon Total – this compares the summary of ALL Mondays for the selected month
(year-by-year comparison)
•
Tue Total – this compares the summary of ALL Tuesdays for the selected month
(year-by-year comparison)
•
Wed Total – this compares the summary of ALL Wednesdays for the selected
month (year-by-year comparison)
•
Thur Total – this compares the summary of ALL Thursdays for the selected
month (year-by-year comparison)
Chapter 8. Other Financial and Marketing Tools
23
•
Fri Total – this compares the summary of ALL Fridays for the selected month
(year-by-year comparison)
•
Sat Total – this compares the summary of ALL Saturdays for the selected month
(year-by-year comparison)
•
Q1 Total – this compares the first quarter of the selected year to previous years
•
Q2 Total – this compares the second quarter of the selected year to previous
years
•
Q3 Total – this compares the third quarter of the selected year to previous years
•
Q4 Total – this compares the forth quarter of the selected year to previous years
•
Holiday – this compares a designated day or date range in the selected year to
previous years of the same day or date range
When to Use These Trend Values?
You may be interested in observing any demand fluctuations that occur during various
times throughout the year. This is the best section of the system to identify these
fluctuations. Below are some examples of some questions this tab can answer for you.
Weekday Analysis
•
Is my business slower in the beginning of the week, say Monday or Tuesday?
•
It seems my business drags on Wednesday. Is this only in certain months, or
always?
•
The store used to be opened on Saturday for years before I took over. Should I
open back up on Saturdays? Would it be profitable for us?
•
What are our best days each week? What are our worst days? We need to be
able to make accurate staffing arrangements.
Full Week Analysis
•
Is my business slower in the beginning of the month?
•
We need to close a few days for inventory, in which week of which month would
we lose the LEAST amount of business if we closed? And, is this week
consistently slow on this month each year? Is this a week we can close every
year to do inventory?
•
We’re noticing a strange trend of returns happening in the later portion of each
month. Is this really the case?
Quarter Analysis
•
In which quarter of each year can we expect the best (and worst) sales?
•
Was my store effected by the economic downturn that just happened at the
beginning of this year and last quarter of last year?
•
What happened in the second quarter of last year? We need to research why
poor sales occurred on only this quarter in the last 4 years.
Holidays or User-Assigned Dates and Ranges
•
24
I’m thinking of closing on Memorial Day from now on. What has the sales looked
like these last several years on this day? Should we, or should we not, close each
Memorial Day from now on?
ENTERPRISE POS User Manual
•
The day after Thanksgiving is said to be one of the largest retail shopping days of
the year. Can we put this to the test by looking at this day for the past several
years that we’ve been in business?
•
We want to know how we do during specific date ranges each year such as
Spring Break week or the summer school holidays. Can we do this?
Each of these questions CAN be answered using the trending tab. After selecting a day on
the left-side calendar, calculations begin for the trends tab. You can then scroll down to
view totals for this month (totals for individual weekdays and weeks as compared to the
same month in other years) or year (totals for each quarter or designated holidays).
Market Analysis / Trends – Analysis of Sales Quarters
The pop-up graph for
year quarters – we can
see at a glance the 4th
quarter in 2000
(green) was our best,
but the 4th quarter in
1999 (blue) was a
close second!
Here we see sales
totals for each quarter
for the last few years –
notice the 4th quarter in
2000 was our best at
$271,579.38!
To see a graph of this
data click here
Enter a Special Day or Date Range to Analyze
You’ll notice the last row in the Trends table on the right is called Holiday. This is for you
to enter any specific day or date range you want to analyze. This is a tool you’d need to
answer the last section of questions above such as whether or not to close on a specific
day or to identify any trends during a specific date range each year. Follow the example
steps below to create a date range to analyze.
Let’s say you own a beach-side business in Florida and wanted to compare annual sales
demand during the few weeks before Easter. Since most colleges have their spring breaks
during this time, this could provide valuable information for the store to determine exactly
how much of a spike in demand (if any) occurs during this time.
1. First, from the Marketing Analysis / Trends screen, click on the =TRENDS= tab.
2. Select Mar from the dropdown month box on the left (above the calendar) since
March is the month prior to Easter (in April). Make sure a day on the calendar is
selected, if not, click on any day in March – if data is available you’ll see the trends
table on the right start filling up with numbers.
3. Click the Configure Holiday Value button.
Chapter 8. Other Financial and Marketing Tools
25
Pop-up Holiday Date Range Entry Box
4. In the pop-up box, overtype the Holiday: word with the value 04/01-04/14 because
we want the first 2 weeks in April prior to Easter Sunday. Then, click OK.
5. You’ll notice the trends table completely recalculates and displays all the information
in the table including numbers for “Spring Break” each year for the past 6 years.
Can we make any conclusions from this data? Based on our March to April 2-week
comparison, it’s fairly obvious that a trend exists.
Example : Top of Trends Table
We can see the first 2
weeks in March totaled
$3,897.85 in 2001 and
$26,802.62 in 2000
NOTE: Remember these are week totals for March (the month selected)!
Example : Bottom of Trends Table
We see our 2-week
April date range is
$35,209.47 in 2001
and $47,591.36 in
2000
NOTE: Scrolling all the way to the last row in the table reveals the sales numbers from
our date range in question.
So is there a trend is this example? We suggest looking at prior years as well and possibly
other months to compare besides March, but the data here strongly suggests a trend
exists. In the year 2001, the first two weeks of April totaled over 9 TIMES the sales in the
first two weeks of March. We know this isn’t a fluke because the first two weeks in April in
the year 2000 totaled nearly double the sales in the first two weeks of March the same
year. As you can see, the evidence strongly suggests a trend for a demand spike
(increase) during this time. This could tell management to begin staffing more people to
handle the demand during this time. Adding additional staff during peak demand times
could even further boost sales and profits.
Interpreting Your Data / Making Decisions
How you interpret the system’s findings will depend mostly on the goals and the outlook of
the organization. The system only provides the numbers for management to easily spot
demand trends, what you do with the information is your business.
26
ENTERPRISE POS User Manual
Obviously, in the previous examples we can easily account for most of the demand
fluctuations such as increased sales due to Christmas time, Spring Break, etc. However, it
isn’t always this obvious. Sometimes what appears to be a trend could be coincidence, so
be careful! This system provides you with the tools to identify these trends much easier
than the rigorous task of using pen and paper, but this is by no means an end-all solution.
A good final decision will always depend mostly on the intuition and experience level of the
manager.
Chapter 8. Other Financial and Marketing Tools
27
Chapter 9. Report Engine / Reporting Menu
This chapter focuses on the entire aspect of reporting. The EnterprisePOS system comes
standard with many sample reports in Crystal, Microsoft Word, and Microsoft Excel format,
however, some reports may need to be slightly customized to fit the needs of individual
organizations. The focus of this chapter is how to use the EnterprisePOS Desktop
Reporting menu and the built-in Report Designer utilities to build reports best suited for
your organization.
What you will find in this chapter…
Reporting Menu – The EnterprisePOS Desktop
Setup Reports – Main Maintenance Menu
Custom-Direct Reports
Export Reports
Application (Screen-Specific) Reports
2
3
3
4
6
Report Maintenance
EnterprisePOS Desktop Report Maintenance
Application (Screen Specific) Reports Maintenance
7
7
10
Creating Report Templates from Scratch
EnterprisePOS Report Designer (Crystal)
EnterprisePOS Labels
The Labels Screen
Product Labels
Address Labels
Recommendations
12
12
21
21
22
26
26
Printing a Report
The Print Screen
27
27
Chapter10. The File / Edit / View Menus
1
Reporting Menu – The EnterprisePOS Desktop
All reporting functionality throughout the EnterprisePOS system is controlled completely
from the EnterprisePOS Desktop Reporting menu.
EnterprisePOS Desktop Reporting Menu
This menu includes the following.
Setup Reports – Where reports are assigned to specific system areas and edited (after
adding a report to a system area, you can double-click it to edit it as seen later in this
chapter).
Crystal Report Designer – The EnterprisePOS Report Designer (in the market-leading
Crystal Reports format). You can design your own Crystal reports from scratch using this
report designer utility. Note that the majority of the reports in EnterprisePOS are in Crystal
format (nearly 200).
BarTender Label Designer – If you have Seagull Scientific software’s BarTender
package (for creating and printing bar code labels), the system will launch the application
here.
Word Report Designer – The Microsoft Word Report Designer. This designer utility
launches Microsoft Word with a floating list of EnterprisePOS database fields for you to
build your own reports in Word (requires Microsoft Office software).
Excel Report Designer (MOR) – The Microsoft Excel Report Designer. This designer
utility is a tool that allows you to build operating reports (bulk data) or single-record reports
in Microsoft Excel (requires Microsoft Office software).
Print Excel Report – Launches the Excel Report printer utility to extract data from
EnterprisePOS into an Excel report (requires the template to be setup first using the Excel
Designer tool).
Product Labels – Bar Code label utility (screen to allow large label processing)
Address Labels – Same label utility except geared for customer addresses
Auto-Reporting – Launches the CRGEN application designed for automated reporting
2
ENTERPRISE POS User Manual
Setup Reports – Main Maintenance Menu
From the EnterprisePOS Desktop Reporting menu, clicking Setup Reports will open the
configuration screen where all report setup is performed. It is this screen where you add
reports to specific screens and control the operation of all system reporting functions.
Setup Reports Screen
There are two tabs on this screen.
EnterprisePOS Desktop Reports – Reports listed here show up on the main
EnterprisePOS Desktop screen on the right-side “reports” box.
Application (Screen-Specific) Reports – Reports listed here show up within specific
screens (after opening up records from the main screen)
When you click on a report in the list, certain attributes are highlighted on the right. These
are properties of the report and define how the report works and/or processes the data
you send to it.
Report Types (Crystal Reports Only)
From the EnterprisePOS Desktop Reports tab (left-side), there are two types of reports
as shown on the top right portion of the screen.
•
Custom-Direct Reports – a report that is NOT system-dependent and is
generally customized with database query information built into the report. It also
has database connection information built into the report that connects it directly
to your database (Access, SQL Server, or Oracle reports).
•
Export Reports – a report that is system-specific (or table dependent) to the area
it is currently selected, and it requires the data to be exported to it. Generally, you
would use the search engine or a query in from the EnterprisePOS Desktop
before double-clicking the report since the data selected in the table is
automatically exported for these reports.
Custom-Direct Reports
Custom reports, as they’re called in EnterprisePOS, are reports that are not systemspecific and are generally customized for detailed reporting purposes or designed for a
Chapter10. The File / Edit / View Menus
3
specific database. These reports can be executed anywhere and are independent of any
host. As long as the custom report can attach itself to the database from where it is being
executed, it will run properly. You can even setup the CRGEN.EXE program (Crystal
Report generator utility) as an icon on your Windows Desktop to run one of these reports.
It is completely independent of its host.
Custom reports are usually much more complex and detailed than export reports. Custom
reports are printing on the entire database where export reports are only printing on a
much smaller exported subset of the data.
Sample Custom Report
NOTE: This custom report is a compilation of several different database tables to
produce a report needed for this specific organization.
Custom reports usually have initial pop-up screens (Crystal parameter fields) when
executed requesting input from the user to manipulate the data before the report is
displayed or printed. The report uses this data from the user to query the database for
report processing. The search engine in EnterprisePOS is not used for these reports.
Export Reports
Unlike custom reports, export reports can NOT be executed outside of the EnterprisePOS
system. These reports are system-specific and require its data to be selected from the
table within the system first, then exported to the report when the report is double-clicked.
These reports use the search functions of EnterprisePOS to find the data records you
need (in the current table) before double-clicking on the report for a print-out. The data in
the table (from your search) will automatically dump into the report when you run it.
For example, if we wanted to print all inventory in the BRACELETS category. We can
enter the Inventory area of the EnterprisePOS Desktop, click on the Stock tab and
perform the search by clicking on the Product Category column and selecting the category
from the dropdown box and hitting the Enter key. We see all of our data displayed in the
table below.
Now, we want a detailed report of this data. For the purposes of this example, we’ll use the
Inventory Cost report.
4
ENTERPRISE POS User Manual
EnterprisePOS Desktop – Printing an Inventory EXPORT Report
Step 1 : Hitting Enter
after our search here,
displays all our
records from the
database below.
Step 2 : Now,
double-click on the
report of choice. If it
is an export report
type, the data will be
extracted to a temp
database for the
report to print from.
Double-clicking on an export report in the list on the right under Inventory Reports will
export all records just populated in the table below.
Building Exported Data…
Send the
report to the
printer and
printer setup
icons
Notice these
are all the
records in the
table from your
search!
You’ll notice the report is displayed in a print preview window initially. Click the little printer
icon at the top of the print screen to send the report to the printer.
Print Preview Screen – An Inventory Cost Report Example
Search box to
find a specific
page or area to
print
Envelope icon is
the export button
that can export
this report to
Word, Excel,
PDF, etc. or
even email the
report right from
here!
Note that the custom reports also have the same print-preview screen. However, they
generally print much faster because data doesn’t have to be exported first. Outside of the
speed downfall, one benefit of using these reports is they are easily portable to all
database types. In other words, you can build all your reports in Access, then upgrade
your database to SQL Server and all your reports will still work the same (because it is
exported).
Custom-Direct reports that were built in Access would ALL have to be rebuilt if an upgrade
to SQL Server was done.
Chapter10. The File / Edit / View Menus
5
Application (Screen-Specific) Reports
Application reports do not appear in any list on the EnterprisePOS Desktop, they are
reports assigned to specific screens and serve specific purposes. Examples of these types
of reports would be the store’s selected sales receipt, proposal or quote form, work order
form, purchase order form, etc. These are reports whose function or location cannot be
changed. They are designed for a specific program application and that’s all. You cannot,
for example, take a quote report and add it to the invoice area. It would cause an error
when printed. Quote reports must always be in the quote area, customer reports must
always be in the customer area, product reports must always be in the products area, and
so on.
Application (Screen-Specific) Reports
You can add more than one report into a given area (left side). This will cause a small
menu selection of reports to appear when the Print button is clicked within that specific
screen. The attributes are displayed on the right-hand side when a report is clicked on like
the previous EnterprisePOS Desktop Reports tab.
The report areas on the left include the following.
6
•
Invoice Ticket - this is your store’s sales receipt
•
Layaway Ticket – this is your store’s formal layaway agreement form that can
print (if set) immediately after a layaway is rung up and the invoice ticket is printed
•
Daily Cash Sheet Z Report – this is your store’s cash sheet or Z Report used to
close out registers at the end of the day
•
Employee Sales Commission Report – the employee commissions report
•
Product Sales Screen Detail Report – the report that prints from the Products
sales screen
•
Customer Screen Detail Report – the detailed report that prints from the
customer screen
•
Product Cost Screen Detail Report – the report that prints from the Products
cost detail screen
•
PO Report – this is your store’s purchase order form
•
Work Order Detail Report – this is your store’s work order form
ENTERPRISE POS User Manual
•
Quote Ticket / Proposal – this is your store’s quote or proposal form
•
Time Sheet – this the employee time sheet report(s) that are printed from the
Time Clock utility
•
Repairs Claim Ticket – this report or reports are printed from the Print button on
the Repairs screen
•
Credit Slip – this report defines the credit slip ticket when a new credit is issued
Report Maintenance
The Report Setup screen’s buttons (in the Control Panel at the bottom) of the
EnterprisePOS Desktop Reports tab function as follows.
•
Save Report – button used to save your changes after editing or adding a
custom or system report
•
NEW Report – button used to add a new custom or system report to the system
•
Print – button to print the list of reports displayed on the screen
•
Remove Rep. – deletes the currently selected custom or system report
•
Exit / Cancel – exits this screen and cancels any report changes you’re in the
middle of without saving
On the Application Reports tab (right) side, there are only two buttons that make up the
Control Panel that do the following.
•
Save Settings – saves the complete screen (all application reports shown on the
screen)
•
Exit / Cancel – exits this screen and cancels any changes you’ve made to the list
of application report filenames displayed
EnterprisePOS Desktop Report Maintenance
The left (and default) tab upon entering the Report Setup screen is specifically for custom
/ export report maintenance.
Editing an Existing Report
To change an attribute of an existing report, simply click on the report in the table to the
left. You’ll see the various selected attributes populate on the screen (under Report
Details on the right) for that specific report selected. You can then change any of the
selected report’s attributes and click the Save Report button when finished.
Chapter10. The File / Edit / View Menus
7
Report Setup – Custom-Direct Report Selected
A report with the
name of Action2
was clicked on
All Actions2’s
report attributes
are displayed here
The report attributes and their functions are as follows. Each are listed on the screen from
top to bottom by section.
•
Custom-Direct Report / Export Report – this option selects whether the report
is custom or export (as described in the previous section of this chapter)
NOTE: Export reports always begin with the filename of tmp to distinguish
themselves easier. Be careful when changing this option! If a report is a customdirect report, and you change it to a system report, it will not run – and vise versa.
Make sure you know which report is which before hand.
•
Report Name – this is the database name to identify the report in the system (the
name that is displayed on the screen for the user)
NOTE: Notice this value is grayed out when editing a report. The report name is a
key database field in EnterprisePOS, so to change a report name you’d have to
delete and re-add the report.
•
Report Filename – this is ONLY the file name of the report, NOT the file path
NOTE: The actual report folder path is entered under the System Settings menu.
•
Report Description – this is only a couple words to a few phrases that describe
this report (to help different users understand the function of each report)
•
Report for Which Table on Main Screen – this 8 option section selects exactly
which EnterprisePOS Desktop “area” this report will appear under (defines the
system area to assign the report to)
NOTE: Keep in mind that if you select the wrong area a report is designed for,
you’ll probably get a blank report or error each time it’s executed.
•
This Report is Tab Specific? – selecting this option forces the report to only
appear in the specific system area (or EPOS Desktop tab) selected in the option
box above
NOTE: The blank to the right of this selection defines the screen data control
name for the specific table the report is assigned to. You shouldn’t have to enter
this value. The system will automatically assign this value if you selected the area
above prior to checking this option.
After all your changes have been made, just click the Save Report button.
8
ENTERPRISE POS User Manual
Report Saved
Your changes should be reflected the next time you (or anyone else) signs into the
system.
Adding a Report to the System
Adding a report to the system that already exists is almost identical to editing an existing
report. The attributes are the same, however you must decide on a specific report name
that can be easily identified by all your users. The report name can be more than one word
but should be limited to 15-20 characters in length. This report name is not the filename
(the physical file name on the computer’s hard drive or network).
1. Click New Report. A verification box pops-up to clear all the report attribute fields
to prepare for the new report.
New Report Verification
2. Click Yes. The cursor appears on the report name (the key).
New Report Attributes – Cleared and Ready for Entry
Don’t forget to make
sure this is correct
before going much
further!! See step #4
below!
3. Select whether this report uses exported data (Export Report) or it is directly
connects to the core database (Custom-Direct Report).
4. Type a UNIQUE report name. You are not allowed to enter a name used by
another report nor should you use anything but regular alphabet characters. This
is the name that will appear throughout the system.
5. Type the report’s filename in the next blank or click the ellipse button (…) to
search the network.
NOTE: Do NOT risk entering the wrong filename since this value must be exact for
the report to run. Click on the … button to search for the file.
Chapter10. The File / Edit / View Menus
9
Button is Clicked to Search for File
Nearly 200 standard Crystal
reports are available for adding
to the system.
NOTE: There should be a previously saved report created in Crystal Reports or the
EnterprisePOS Report Designer prior to adding the report to the system.
1. The next box is the Report Description. You can type whatever you want in this field
to help you remember what this report is or does (optional).
2. The next section titled Report for which table on MAIN Screen is for only the
placement of the report. Click the system area (tab) where you want the report to
appear. Screens associated with this “area” will display this report throughout the
system.
3. The last attribute is a check box titled This report is tab-specific? All system export
reports are tab-specific since they must be associated with a specific database table
on a specific tab, however you can uncheck this option for custom reports if you want
your report to show up on every area and tab on the Desktop.
NOTE: The only type of report that may be good to have on every tab and screen is
possibly an employee time or sales report. You want to avoid having too many reports
in this limited space area.
4. Click the Save Report button to finish adding the new report to the EnterprisePOS
Desktop.
Application (Screen Specific) Reports Maintenance
As mentioned previously, Application (Screen-Specific) reports must be assigned to
specific application screens. Application reports serve a specific purpose only. The
application reports tab (right) side of the Report Setup screen shows all application
reports throughout the system.
Changing an Application Report
You may want to use a different style or layout of a specific screen report or simply add
some additional reports to that specific screen area that may better serve different needs
or different printers.
By default, all screens have at least 1 specific application report assigned to them. You
can use this tab area to modify these default reports to add logos, change wording on the
reports, etc. You may want to try out some other reports by adding them to the specific
areas as well. There are usually several variations to the same type of report in the
system.
If you are not satisfied with any of the bundled report styles, you should use either the
Report Designer (Crystal), the Word Report Designer, or the Excel Report Designer to
create your own from scratch or use another template as a starting point. See the next
10
ENTERPRISE POS User Manual
section for how to create your own report templates from scratch or off of an existing
template.
The following steps walk you through changing or adding to an application report area.
1. Upon entering the Report Setup screen, click on the Application (Screen-Specific)
Reports tab.
2. Find the application report area you want to modify and click to select it.
Application Report Area “INVOICE Ticket” selected
A list of reports for
this area is
displayed here, …
button adds, X
button deletes.
3. In the box to the right, select any report you want removed from this area and click the
X button. Likewise, any report you want added to this area click the ellipse (…) button.
4. Click the Save Settings button. The save verification box appears making sure you
are really ready to save all changes.
Save Verification Box
5. Click Yes. You will now need to exit this screen, log out, then log back into the system
for the changes to take effect.
Chapter10. The File / Edit / View Menus
11
Creating Report Templates from Scratch
There will often be situations when you’ll need to modify a default report template or setup
a new type of report. You may want to add your logo to the reports, change a footer
statement, incorporate an “old reliable” Excel spreadsheet to be used as a report in the
POS, or have already put in plenty of time in manual Word and Excel files that you don’t
want to have to redo. These are reasons EnterprisePOS is equipped with three reporttype designers to facilitate reporting your daily, monthly, or annual transaction data.
EnterprisePOS Report Designer (Crystal)
If you already have Business Object’s software Crystal Reports, you can use it to modify
your reports otherwise you can use the EnterprisePOS Report Designer that comes
bundled with the system and uses Crystal Reports technology. The most popular method
of reporting in EnterprisePOS is Crystal, so this module may be very helpful and frequently
used when adjusting reports to fit your business.
Modifying an Existing Crystal Report Template
Follow the steps below from the EnterprisePOS Desktop to modify an existing Crystal
Report template. There are two ways to go about editing a report in the system.
Either…
1. Click the Reporting menu.
2. Click Setup Reports to see all reports already setup in the system.
3. Find the report you want to edit in the list, then double-click and click YES to
open up the report template to be edited.
Setup Reports – Double-Click to Edit
Or…
1. Go to the report you want to edit in the EnterprisePOS Desktop (in this example,
we click Inventory because we want to modify the “Cost by Category” report in
the Stock tab area)
2. Right-click on the report to edit (normally you’d double-click to run it here)
3. Select Edit Report Template.
12
ENTERPRISE POS User Manual
Edit Report Template
Either one of these methods will open up this same report in design mode.
4. The Report Designer will open the report for you to make your modifications. At
this point, you can click-and-drag fields around, double-click label/text objects
to edit wording, right-click on fields to edit properties (fonts, sizes, colors, etc.),
right-click the insert picture to insert a logo, etc., etc.
EnterprisePOS Report Designer
Report Header – Fields here
print once per report (first page).
Double-click here
to show database
fields list
Page Header – Fields here print
once per page (at the top)
Right-click then
verify here to
refresh database
Group Header / Footers –
Summary sections (fields to
group on that have their own
header and footers)
Right-click then Set
Location here to
adjust database
connection
Details – Fields here print once
per database record (the “meat”
of the report)
Page Footer – Fields here print
once per page (at the bottom,
good for page numbering)
These are important
functions to “fix”
database/report
connection issues.
Report Footer– Fields here
print once per report (last page)
5. To add fields : double-click on Database Fields on the left to view the list of
available database tables. Double-click on a table to view the list of fields and
click-and-drag the field from the list to the report.
EnterprisePOS Report Designer – Database Fields
Click on a field from the list on
the left, then drag it to the
design area and drop it where
you want it to display.
6. To remove fields : click on a field in the design area you want to remove, then
click the Delete key or right-click, then Delete.
Chapter10. The File / Edit / View Menus
13
7. To change field properties : right-click on any field you wish to change the
properties of, then select Format. The Format Editor screen will pop up for you to
edit the field properties with.
Change Field Properties
Format Editor
The Format Editor screen allows you to
suppress (hide) the field, keep objects
together from spanning over multiple
pages, allow it to grow (expand) when
data is lengthy, rotate text, add a border
around the object, change fonts, colors,
format the data print style or paragraph,
or even add a hyperlink to a website
when the user clicks on the object.
The blue X-2 buttons to the right of each
property allows you to enter a condition
(formula) statement to tell the system to
only apply the property evaluate when the
property setting under specific conditions.
8. When you are finished adjusting the properties of the field item, click OK to return
to design mode.
9. Adding other features to report : There are a wealth of other nice features you
can add to your report such as cross-tab tables, charts/graphs, automatic
summaries and totals, etc. Do this with the Insert menu by right-clicking in any
blank space within the report design area (where you want to insert the object).
The Right-Click, Insert Menu
The Insert menu is where you can add :
-
14
ENTERPRISE POS User Manual
Your Logo (Picture)
Lines and Boxes
Charts and Graphs
Summaries and Totals
Website links
Cross-Tab Summary Tables
Special Fields (page number,
auto-date, auto-time, etc.)
10. Finally, when you are finished, click File, then Save.
11. Click File, then Exit to leave the Report Designer and return back to the
EnterprisePOS Desktop.
NOTE: Your report changes should take effect immediately, but if you experience
erratic response from the newly changed report, you may need to exit out of the
system and log back in.
NOTE: There are many areas that are not touched on (writing formula code,
database connection setup, etc.) in this chapter. These are more advanced Crystal
Reports features and functions and are beyond the scope of this chapter for basic
report setup. There are plenty of good books on Crystal Reports from beginner to
advanced level. We recommend taking these courses if you plan on doing more
advanced report design and possibly purchasing the full-blown Crystal Reports
package. The full-blown Crystal Reports software by Business Objects offers a wide
range of additional functionality and power to further enhance your reporting
capabilities.
Creating a Crystal Report Template from Scratch
Follow the steps below from the EnterprisePOS Desktop to create a Crystal Report
template from scratch.
1. Click the Reporting menu.
Reporting Menu – Crystal Report Designer
2. Click Crystal Report Designer. The Report Designer opens up with a blank
screen.
EnterprisePOS Report Designer – Create New Report
3. Click File, then Create New Report. The Crystal design area opens up.
Chapter10. The File / Edit / View Menus
15
EnterprisePOS Report Designer – New Report
4. Right-click on Database Fields, then select Add Database to Report. This is
where we link to our database.
Crystal Data Explorer
This may require involvement
by your IT person or Systems
Administrator.
You connect to your
database via several different
methods depending on the
type of database you have. In
this example, we’re using an
Access MDB file, so we
double-click on Database
Files to locate the MDB file
and select the tables we want
by double-clicking on them.
5. Locate and connect to your EnterprisePOS database successfully to view the list
of tables. Double-click each table you want to add to your report.
6. When you’re finished, click Close. This will bring up the Crystal Visual Linking
Expert to link the database tables you have added to the report.
16
ENTERPRISE POS User Manual
Visual Linking Expert
To keep it simple, we
only added 1 table.
If we had added more,
the system would link
them for you allowing
you to edit these links
here.
It is very important you
link these tables
properly to ensure
proper report operation
7. Click OK. You should now be able to see the table you just added with a list of
database fields under Database Fields on the left.
Enterprise Report Designer – New Report Ready with Data
8. Proceed with clicking and dragging fields on the report. You can set the
properties of these fields, add logos, charts, etc. as well at this point. Reference
the previous section for more information.
EnterprisePOS Report Designer – New Report w/ Fields
Clicking and dragging
fields into the Details
section automatically gives
you a column heading in
the Page Header section
right above it that you can
double-click to modify.
To resize a field, click it,
then drag to enlarge it.
9. Once we’ve finished adding fields, possibly a title in the Report Header, possibly
a pager number “special field” (auto-number) in the Page Footer, or whatever
else we want (all under the right-click Insert menu), we can now print-preview it.
Click File, then Print Preview to see how our report is taking shape.
Chapter10. The File / Edit / View Menus
17
Report Print Preview
10. Since this is a Custom-Direct report because we are directly connecting to our
core database, we need to build in a little functionality for the user instead of
printing a report on ALL products as in this example. Click the X to close the print
preview and return to Design mode.
11. Right-click on Parameter Fields on the left, then click New. These are fields
that prompt the user for input at runtime.
New Parameter Field
Create Parameter Field
If you wanted to, you
could put a dropdown
box of available values
here to give the user a
list to select from.
12. Enter a Name for this parameter field, then enter the Prompting Text (what you
want displayed to the user), and leave the Value Type as string. Then click OK.
You should now see your new parameter field in the list on the left.
13. Now we want to use what product category (in this example) that the user enters
in this box to only show those values in the report. We do this with a Record
18
ENTERPRISE POS User Manual
Selection Formula. Right-click in a blank area, then select Report, then Edit
Selection Formula, then Records.
Editing the report’s Record Selection Formula
This is the same
thing as setting up
a query that
processes the data
BEFORE the rest
of the report is
executed.
14. The Crystal Formula Editor opens up in which you can double-click your new
Parameter Field in the list of objects and make it equal to the database field
“Products.Product_Category” which is the Product_Category field in the Products
table.
Record Selection Formula Editor
Double-clicked your
parameter field to
make it equal to the
product category field.
The “formula” is in the
space below.
15. Click the Save button on the far left of the toolbar to exit back to the design area.
16. Now we can print preview our report again to see how it works with the new user
query on the product category. The category the user enters is what is displayed.
Print Preview – Now prompts for Product Category
The user enters the product
category they want to
display here. Then clicks
OK.
Chapter10. The File / Edit / View Menus
19
17. after making any further additional final adjustments to the report, click File, then
Save. You will be prompted for a filename to save your new report as. This will
be needed later when you add your new report to the system under “Setup
Reports”. Also, make sure you save your new report within the \POSDATA\
reports folder.
Now, you can proceed to the previous section on adding your new report to the
system.
20
ENTERPRISE POS User Manual
EnterprisePOS Labels
There are two kinds of labels in the EPOS system, product labels and address labels. The
only reason these two forms of labels are separate is due to the automated nature of
Product labels.
Product labels are designated only for inventory. When new inventory is entered into the
system, a label is added to a product label group to be printed at a later date. This group of
labels can be defined by date (when product was received from a vendor), product type
(all items for a certain product category, for example), user type (all product entered by a
specific employee), etc. However you want to define the label group is your business.
They are only there to facilitate label printing by separating certain collections of labels for
whatever reason.
Address labels have no automation at all. You must manually designate the records
(customers, vendors, employees, or whatever) you want to create address labels from.
This is usually done from the label screen itself.
The Labels Screen
The screen that maintains both product and address labels is under the Report Engine
menu on the EPOS Desktop. Clicking either the Product Labels or Address Labels will
bring up this screen.
The Labels Screen
Some controls for adding labels are at the top of the screen including a dropdown box to
select different label groups. The middle of the screen has a table that shows all labels for
the selected group while the bottom of the screen contains buttons that do a number of
different functions (see below).
•
(F8) Add Blank Labels (Top) – a button to insert blank label records to the top
portion of the table (useful tool when printing labels on a partially used sheet of
labels – For example, when using laser labels you may not want to print an entire
sheet every time, so you can always skip down the sheet to the labels you
haven’t used yet by adding blanks)
•
(F9) Add Blank Labels (Bottom) – same thing as the previous button, but it will
add blanks to the bottom
NOTE: These two buttons should never be used for label printers. These two
buttons are designed to help users pursue cheaper alternatives to labels
Chapter10. The File / Edit / View Menus
21
such as use existing laser or deskjet / inkjet printers. However, we highly
recommend a dedicated label printer if constant label printing will be a
possibility. Using laser or other printers not designated specifically for printing
labels may cause difficulty in scanning bar codes or problems with print
misalignment.
•
(F6) Run Report & Exit – this button will run the report selected in the above
combo box based on the items / labels currently in the table, then exit the screen
•
(F12) Remove Label(s) – this button will remove all selected records
•
(F3) Exit w/out Report – this button exits this screen without running any label
report
Product Labels
As mentioned, product labels are automated to a certain degree. Whenever new product
is added, a label group entry is generated for each quantity value. What this actually
means is the new product gets marked for label printing – 1 label for each quantity item.
This is accomplished through what is called a label group code. When receiving a
purchase order from a vendor and moving new stock to store inventory, this process is
done behind the scenes for you. However, adding a new product directly to inventory
manually or changing any existing product’s quantity value will demonstrate how this
automation works.
In the following example, we’re going to add a new product manually and examine the
number of labels that are sent to our default label group for later printing. Remember, you
must have the appropriate security rights to perform this example. Also, do not forget to
remove this example product after you’re finished (unless you’re in practice mode).
1. From the EPOS Desktop, click on the Inventory Control tab.
2. Click on the Stock (right) sub-tab under Inventory Control (although usually selected
by default).
3. Click the down-arrow button on the right of the table of inventory to move to the last
record in the table (because we need a blank row to enter a new product in).
Move-to-Last-Record Button
Click the down
arrow button
4. The table should be clear of all records except for the last product record in the
database that is now displayed as the first record in the table.
5. Drop down the Product Categories list on a blank row under the last record and select
a category to have a new inventory number automatically generated.
New Stock Entry Example #1
22
ENTERPRISE POS User Manual
6. Select any of your Product Categories from the list. For our example company, we’ve
selected the 10000-Misc. Gifts category. A pop-up box asking us if this is a standard
product appears after the new inventory number in this category is assigned.
New Stock Entry Example #2
NOTE: A standard product uses quantity (which would also need labels), a nonstandard product does not use quantity (for example, a service that would not use
labels).
7. Since we want to utilize quantity and labels for this example, click Yes.
8. The system then places the cursor on Product Name. Enter anything here (for
example, “Test Product” – or anything you’ll remember to delete later). Then hit Enter.
9. The cursor is then skipped to quantity. For our example, enter a quantity of 4 here,
then hit the Enter key.
10. The next few columns are cost and price along with several other fields you can either
choose to enter or leave blank. Continue to hit Enter to skip through these columns
until you see a column called Unprinted Labels or something equivalent (depending
on your customizations). You’ll notice a label code in the column. The code should
include the default label group letter followed by the quantity of product being added
(for example, if you already had a quantity of 1 of an existing product already and you
changed it to 4, the quantity number in the label code would say 3 because you’re
adding 3 new items - the system assumes you’re only needing 3 new labels to print).
Chapter10. The File / Edit / View Menus
23
New Stock Entry Example #3
NOTE: The “L” value is the label group and the 4 is the quantity of labels being added.
11. Now click the Product Labels selection under Report Engine. If you already have a
sheet of labels selected (a work-in-progress of unprinted labels), you’ll get a message
asking if you want to clear out all old labels. Clicking Yes or No to clear them is up to
you.
Old Labels Exist
12. On the labels screen we can now pull up our group “L” and add the additional labels to
our worksheet (the table). Click the Label Code Group dropdown box and select the
L Group.
Label Code Groups
13. Once L Group is selected, any labels currently assigned to this label group should
automatically populate the table. This is basically the “L” group worksheet of unprinted
labels. As you add more and more labels to this group, they become reserved to
ONLY this group until you are ready to print.
14. Click the Add NEW Group Inventory to Table button below the label group
dropdown box. A box should pop-up finding new labels in this group.
Our 4 New Labels Were Found
24
ENTERPRISE POS User Manual
15. Click OK. We see 4 label records appear in the table. We’ve just added 4 labels to
print (reserved under the “L” group) from the 4 items of product quantity we added into
inventory earlier.
Our 4 New Product Labels are now Entered!
NOTE: We don’t have to print now. We can exit the screen, add more product to the
“L” group, then come back and add them to the table later.
16. If you need to, use the two bottom buttons on the left to add labels to the top or bottom
of the table to force the labels to print exactly where they need to go on your
designated labels sheet (if applicable).
17. Select the labels report in the designated bottom central dropdown box and click the
Run Report & Exit button. The labels will then print to a screen for you to send to a
printer.
Print Preview of Product Labels
Click printer icon to
send it to the printer
As you are adding product, you can change a label group code to a different letter, such
as “S”. Grouping different products under different label groups make it simple for
employees to reserve specifically formatted label sheets for specific types of product.
Chapter10. The File / Edit / View Menus
25
Address Labels
Address labels are very similar to product labels. In fact, the screen remains exactly the
same and label group codes are still used to separate different label collections. The
automation of product labels is the most distinctive difference. This means the system will
never queue up new labels into any group for you to simply click a button and add (like
product labels). You are required to add these forms of labels manually from within the
labels screen itself.
However, one way you can get around this with customers is to use of the customer status
field. An example would be to use a default customer status field such as “NEW” for all
“new” customers. Then you could search on these values once a month to group all “new”
customers into a specific label group for address printing. You may want to print Thank
You cards, send follow-up sales materials next month, etc. Using the status field allows
you to do this and never miss a new customer for labels.
Recommendations
If you plan on printing labels daily (in excess of 50 or so) and price is not a major concern,
we definitely recommend going with a label printer. Even though laser label packages look
really nice from the picture on the box, we’ve seen customers struggle daily with even the
best quality laser labels.
Frequent complaints of laser or inkjet labels are poorly aligned print due to the slight paper
shifting as its feeding through the paper, print is not sharp enough for the scanner to read
the bar code, labels peeling off sometimes and jamming the printer, and so on.
The downfall of trying to cut corners and cost by going with a box of printer labels for a
regular printer is the high support costs down the road. Generally, a distributor will not
consider a label paper jam as part of your software support contract. You may end up
spending future dollars on hardware/printer support instead of focusing the money towards
software maintenance agreements or future upgrades that will move your company
software into the future. We definitely recommend spending on a dedicated label printer if
at all possible to save money and support headaches in the future.
26
ENTERPRISE POS User Manual
Printing a Report
Printing a report occurs by usually double-clicking on a report name or clicking a Print
button on a certain screen. Unless setup differently by your System Administrator, nearly
all reports will first print to what is called a print screen first.
The Print Screen
A report’s print screen allows you to view the report before it is actually sent to the printer.
It is designed to allow you to study the report on the screen (and even extract it to other
applications) in order to save paper from printing a hard copy. The print screen’s report
output looks identical to how the report would actually print if sent to the printer.
Skips through a
report with more than
1 page
The Print Screen
Sends a hard copy to
printer
Number of
database records /
items in report
Resize the report
view
The actual report
output view – also
called the print
preview
The EXPORT
button
In order to print a real hard copy of the output displayed, simply click the print button (with
the picture of the printer). It will send the displayed output to your default printer.
Once the printer button is pressed, a pop-up verification box will appear asking you to
choose which pages to print, the number of copies to print, and showing the currently
selected default printer. If this is not correct, you’ll have to exit out of this screen and
change the default printer yourself.
Print Pop-Up box
Clicking OK from this screen will immediately force the printer to begin printing the report
output.
We will not go into much further detail of the print screen since the majority of its
functionality has been covered in previous chapters. However, the export button brings an
added powerful element to the equation that is very often over looked and has not been
covered as of yet in this manual.
Chapter10. The File / Edit / View Menus
27
The Export Button
The export button on the print screen is for extracting report output data to a Windowsbased application. It can do everything from creating spreadsheets or documents with
your report’s data to sending a quick email of the data. Exactly what is created depends
on where you want to extract the data.
Below is an example of a report with product labels being sent to Microsoft Word.
1. From the Print Preview screen, click the export button.
NOTE: You’ll see a pop-up Export box asking you both the format and the destination
of your new exported file. Remember, this will create a NEW file in the format of
whatever application you choose.
Print Preview Screen – Export Button Clicked
2. Drop down the box under Format by clicking the arrow on the right. You’ll see a long
list of available options to send the report output data to. Find the Word for Windows
document selection in the list and click it to select it (for this example).
Export Formats
NOTE: If you do not have Microsoft Word or Microsoft Office, you may not see this
export option in the list. If you don’t, choose Text or Rich Text Format.
3. Keep the destination field with Disk File in it. Now, click OK. The Choose Export File
box comes up.
28
ENTERPRISE POS User Manual
Choose Export File
NOTE: You can call it whatever you want, but remember where you place it. Since
this is an example, you want to be able to delete it later.
4. Verify the given file name or change it to something new and click the Save button. A
status box comes up while the conversion to the selected file format is in progress.
When it completes, it returns you back to the print preview screen.
5. Now, let’s verify it worked by closing the print preview screen and finding where you
saved the file on the computer or network (double click on My Computer or use your
Windows Explorer program to find the file).
6. Running the file (by double clicking on it) will usually launch the application to is
designed for. When the application loads, visually verify the new document was
created with the exported report data.
Final Result – Exported Labels to Microsoft Word
NOTE: You may have to play with the layout of the document or spreadsheet once
the data is exported. Unfortunately, data doesn’t always import into another
application exactly the way you like it. Don’t be surprised if it looks a little different after
being exported.
Depending on what you have installed on your PC will determine the various export
formats and destination you have to choose from. If you have a mail program installed on
Chapter10. The File / Edit / View Menus
29
your PC like Microsoft Exchange or Outlook, Lotus cc:Mail, etc., you should have a
destination option to email people directly from your print preview screen.
Export Destinations
NOTE: In this example, the user has two email options, Microsoft Mail and
Exchange Folder. Microsoft Exchange or Outlook users would select the Exchange
folder option that would convert the report to a message in your selected Outlook
profile and prompt for you to enter the send-to address.
Using the Export Button for Mailing Labels, Form Letters, or even a
Product Catalog!
Users wanting to do more with address labels in particular are somewhat limited by using
the Reporting Engine’s Address Labels features in EPOS. So much more label
manipulation can be performed within a separate application specifically designed for
document processing, such as Microsoft Word. Using a word processor to manipulate
your labels gives you a wide range of capabilities (including graphics on certain labels,
adjusting heights and widths on only specific labels, changing data on a label after its
creation, and so on) after the pages of labels have been created. Using only EPOS gives
you the ability to adjust the labels on the report writer or change data in the table of labels
as well, but only before the actual labels report is created. Usually the ability to manipulate
sheets of labels after-the-fact as well as the added flexibility and familiarity of using a
popular word processor instead of a report writer are strong factors for usage of this
method for label creation.
There are some reports already in the system designed for mail-merge integration with an
external software package. These reports show bare-bone data and are not designed for
legible viewing – only integration into an external package for manipulation. These reports
are identified by an “MM” in the later portion of their filename. These reports can be
executed, then exported into an Access database table for creation of mailing labels, form
letters, product catalogs, etc. once mail merged into a word processor application.
For the purposes of the following example, we’ll use the customer data mail merge report,
tmpcustoMM2.rpt, and Microsoft Word.
First, you must use the report writer to add the tmpcustoMM2.rpt file to the System
Reports box of the vertical report menu under the Point-of-Sale EPOS Desktop tab. See
the earlier portions of this chapter on how to do this (using the Report Engine Maintenance
screen). Finally, you must have a version of Microsoft Word installed on your computer.
After you’ve verified these two preliminary requirements, continue with the following walkthrough for mail-merge document creation and usage.
1. From the EPOS Desktop, click the Point-Of-Sale tab. Notice the reports in the vertical
report menu on the right change to reflect the reports specific to this area.
30
ENTERPRISE POS User Manual
2. Perform a search to find a specific group of customers. Let’s say you want a report of
all customers who purchased something since March to send out Thank-You letters.
EPOS Desktop – Search Example for Mail Merge
The customer mail
merge report!
NOTE: You can use the Last Sale Date field to search for customers who have
purchased within given time frames. The above example pulls everyone who has
purchased in the store from 3/01/01 to present. If you wanted to pull only the people
who purchased in March, then use 3/01 instead. Remember this field name may be
different depending on your customizations.
3. After hitting the Enter key to perform the search, double click on the customer mail
merge report on the right of the screen entitled CustomerMM (in this example,
however, you can call it whatever you want in the Report Engine Maintenance
screen). The data from the table is displayed in a print preview window.
EPOS Customer Mail Merge Report
The Export
Button
NOTE: The data is not in the most easy-to-read format because it is only for merging
into another package. Most of the fields will be cut-off to save line space. This is not
an error – it is supposed to look this way.
4. Now click the Export button. Notice the export pop-up box appears.
The Export Button
Chapter10. The File / Edit / View Menus
31
5. Now select an export format that Microsoft Word can read as a data source. If you
have Microsoft Access installed on your system, we recommend using this selection.
Leave the Destination as Disk file. Click OK to begin.
6. The next screen prompts you to find the mdb file location to export to. The system will
want to create a new table for this data in an mdb Access file. You can select the
IODB.mdb file in your database folder if desired. This file is specifically for this
purpose. Once this (or another mdb file) is selected, click OK.
7. The following screen asks you for the table name to export to. This table name needs
to always match the table name in your Microsoft Word mail merge document, so it is
usually always easier to keep this default table name of CREXPORT and just
manually delete the table in Access when you’ve completed your mail merge. Click
OK to continue.
Enter Table Name to Export To
8. The export process begins and notifies you once complete. Now the data in this new
table (CREXPORT) can be used to mail merge into a Microsoft Word document
(labels, form letters, etc.)
At this point, you would need to enter Microsoft Word, start a new document, and select
the Mail Merge option under the Tools menu (unless you already have a mail merge
document created). The following process of creating the mail merge document from
scratch involves an understanding of the version of Word you are using. Different versions
of Microsoft Word have different capabilities, but the procedure is the same. You would
build your mail merge document from the CREXPORT table created from the previous
steps in the IODB.mdb file (or where ever you placed it). Building the mail merge
document would involve placing the merged database fields from CREXPORT where ever
you need them in the document. After you’ve finished creating the mail merge document,
you’d simply run it to see or print the results. Consult a manual on Microsoft Word for more
details on the process from this point on.
If you already have a previous Word mail merge document setup that points to the
CREXPORT table, you’d simply load up the document and run it to see the results. You’d
only need to create a new mail merge document the first time.
32
ENTERPRISE POS User Manual
Chapter 10. The File / Edit / View Menus
The last chapter in this manual is for specialized and less often used tasks, however, it is
no less important. This chapter’s focus is directed to the three far-left menus of the EPOS
Desktop titled File, Edit, and View. These three menus handle important functions such
as database refreshing, new default printer selection, importing / exporting transactions,
cut/copy/pasting fields, and changing among different Desktop views to make working in
the EPOS Desktop easier on you.
What you will find in this chapter…
The EnterprisePOS Desktop File Menu
New / Change Form View – Creating NEW Screens
Printer / Page Setup
Import / Export Business Profile
Import / Export Transactions
Change Desktop Control Bar
Exit
34
34
38
39
41
43
44
The Edit Menu
Undo, Cut, Copy, and Paste
Delete Selected Record
Open Selected Record
Copy Customer Actions (Customer Area only)
45
45
45
45
45
The View Menu
Current User (Who’s Logged In)
Status Bar
Viewing Reporting Engine / Stock Shortage
47
47
47
48
Chapter10. The File / Edit / View Menus
33
The EnterprisePOS Desktop File Menu
The file menu on the EPOS Desktop screen is specifically for the following basic tasks.
•
Form (screen) design from scratch (using the Forms Generator)
•
Default printer / page setup
•
Importing / exporting files, settings, or data
•
Changing the Desktop control bar on the left (the “custom” area)
•
Exiting the system
The EnterprisePOS Desktop File Menu
New / Change Form View – Creating NEW Screens
The New / Change Form View menu option launches the EnterprisePOS Form Designer
module. This is a separate module that will allow you to build your own application screens
from scratch. The following steps go through the new screen building process.
1. Click New / Change Form View. The EnterprisePOS Forms Generator loads up.
EnterprisePOS Forms Generator
A “clean slate” for your
new screen is displayed
initially. Nothing is
loaded
NOTE: As a basic
house keeping rule,
don’t place fields too
close to the top of the
screen. This is why the
dotted line is there. Keep
new fields below this
line.
2. Our new screen is ready for us to add fields, so click Settings, then Set
Database Table for this form to add an application area to the report. This is
how the system knows what area you are building this form for. For the purposes
of this example, we’ll build a new screen for the Vendor Product Line area.
Select this one from the menu.
34
ENTERPRISE POS User Manual
EnterprisePOS Forms Generator – Vendor Product Line Screen Example
3. Immediately after screen area selection, we get a list of database fields (in a
floating box) over our new screen. We can now double-click any of these fields to
add them to the new screen.
EnterprisePOS Forms Generator – Floating Database Fields Box
Double-click the
field you want,
then click and drag
it where you want
it to go on the
screen.
4. Continue to double-click to add all the fields you want to the screen. Initially, the
field appears above the dotted line. At this point you click and drag it where it
needs to go. Note that string fields will ask if you want to add the field as a
combo box. Click NO. this will allow the Customizing Utility to populate the fields
as dropdown boxes (if necessary) instead of you entering values here.
5. To RESIZE a field, click on the field with the mouse while holding down the
SHIFT key. The mouse pointer will change to a double-arrow and will be placed
at the end of the field where you can drag it. Release the mouse button when
you’ve achieved the field size you need. Most fields will need to be resized in
order the hold the amount of data it requires.
EnterprisePOS Forms Generator – New Vendor Product Line Screen
After quickly doubleclicking a series of
fields, placing them
where we want
them, and resizing a
few of them, the new
screen is already
taking shape!
Chapter10. The File / Edit / View Menus
35
NOTE: If you make a mistake and want to change a field, you simply right-click
on the field to remove it or view its properties.
Properties of a field
Much like in Word or
other applications,
you can set this
field’s fonts, field size,
font size, shape,
color, etc. under the
Item Properties
NOTE: There are buttons on the toolbar to help you align the fields on the screen
defined below. Use these fields to help you align fields better. Before clicking any
of these fields, you must first click and drag a selection box over a group of fields
in order to highlight the fields you want aligned, then click one of the buttons
shown below.
Toolbar from left to right (* = denotes the buttons used to align fields) :
New – New form
Open – Open existing form
Save – Save this form
Refresh – Refresh & test this form
Print – Screen print this form
* Align Left – Aligns all selected fields to the left
* Align Right – Aligns all selected fields to the right
* Align Center – Centers all selected fields on the screen (vertically)
* Align Top – Aligns all selected fields to the top
* Align Horizontal – Centers all selected fields on the screen (horizontally)
6. Now since we have our screen, we can pretty it up a bit by selecting a
background or a color under the Edit menu. Click Edit.
EnterprisePOS Forms Generator Edit Menu
Set Title Text – Gives this screen a title
Change Background Color – Selects a background
color other than the default (white)
Background Image – Selects a background image
(like a company logo)
7. Click Change Background Color.
36
ENTERPRISE POS User Manual
New Screen Background Color Selection
8. Click a color that satisfies you or define a custom color.
9. Click OK
Our new Vendor Product Line Screen
10. We could continue to tweak the screen by changing field fonts, colors, sizes,
rd
adding pictures, a screen title, etc., but we’ll stop here. Click the Save button (3
button from the left on the toolbar).
EnterprisePOS SAVE Form Template
11. Enter a new template name and click OK.
Testing our New Form
If a custom form is created for a specific area of the system, it should allow you to use it
automatically when that area of the system is accessed. In our example, we built our form
for the Vendor Product Line area.
1. From the EnterprisePOS Desktop, click Vendors.
Chapter10. The File / Edit / View Menus
37
2. Select the Vendor Product Line tab, and double-click on any record in the table.
Since we now have a custom form for this area, we see a popup box with our
new form in the list.
EnterprisePOS FORM Selection
3. Select our custom form (the only form in this example) from the list and click OK.
Our new custom screen then loads up with the selected records data.
Vendor Product Line Detail – Our Custom Form
Here are the fields we
added to the screen.
The control panel bar to
the left is the standard bar
that allows moving to and
from other records in the
Product Line table, saving
the item, adding/removing
quantity, undoing changes,
viewing history, or exiting
the system.
The scroll bars on the
screen can be used to see
additional fields (if
applicable).
Printer / Page Setup
This function is only for making changes to your default Windows printer or for switching
the default to a different Windows printer. Your default Windows printer should be the
printer connected to your computer or network that the majority of your system and
custom reports print to. For example, you would not set your default printer to be a receipt
printer for invoicing if you use another printer for summary reports. A receipt printer is a
specialized printer only designed for the invoice (application) report, so this would not be
your default. Unless, of course, you print nothing else on the machine.
Application reports often have their own special printers since they’re designed for specific
purposes (printing receipts, labels, contracts, etc.). The system’s Report Engine will
automatically print to special printers setup for specific reports. If you are using a special
printer for invoicing, for example, you’ll never need to change your printer before printing
an invoice. You can have several different printers setup on a computer for different
38
ENTERPRISE POS User Manual
reports that will be automatically selected when printed. For more information on
Application reports and how they work, see Chapter 9 - Report Engine.
For those reports without special printers, however, the default printer is where the hard
copy is sent when printed.
Printer / Page Setup
Properties
button shows a
list of settings
specific to the
printer selected
Drop down a list
of installed
printers to select
a different one
Import / Export Business Profile
A business profile is a collection of screen, field, table, or report customizations that are
usually specific to a certain type of business. The type of business itself represents the
business profile. Once a system has been fully customized by an expert in that line of
business, the customizations can be saved under a new business profile for later use. This
will benefit future customers in the same line of business since most of the screen and
field setup work will already be completed for them.
Occasionally, however, there is a needed to export a specific profile of your
customizations to a floppy disk (or other medium) for other machines. This is only when
databases are distributed since customizations will otherwise be shared among all
computers using the same database on the network. If you have more than one location
using separate database files, you may need to select one location to completely
customize first to use as a model for other locations. Once you’re sure about the
customizations of your model location, you can use this function to export your changes
for other locations. Keep in mind there is no need to do this among computers sharing the
same database on the same network.
Another use of this function is for companies who contract out their system
customizations. This is a common practice to save EPOS system setup time, however, it
will usually cost a company much more up front. There’s no need to purchase the
Customizing Utility if you plan on using a consultant, but don’t consider this option to save
money. Chances are you’ll end up spending many times the price of the utility in
consulting fees. You should, however, consider this option if time is of the essence (hiring
an expert verses learning the utility yourself could drastically cut down setup time).
If contracting out your system customization work is what your Systems Administrator
plans on doing, the consulting company would send you a floppy disk (or other medium)
with the customizations upon completion. You would simply use this function to import the
customizations into your database. You’ll then need to switch to the new business profile
for all the new changes to take effect (the next time anyone logs in). Once again, if you
have other locations running different databases, you’ll need to do this for each location.
Chapter10. The File / Edit / View Menus
39
The following is a walk through of how to accomplish this. These steps assume you
already have a customizations profile you want to IMPORT.
1. From the EPOS Desktop, click File.
2. From the File menu, click Import / Export Business Profile. The Import / Export
business profile screen appears with the cursor blinking on the top blank for SOURCE
file selection. If you have your customizations on a floppy disk or CD-ROM, insert the
disk now.
Import / Export Business Profile
If you are importing
your profile from a
floppy disk (set to
drive A), this will say
A:\expProf.mdb
Make sure
IMPORT is
selected!
NOTE: A business profile extracted from the Customization Utility would always have
the filename of expProf.mdb. The source file you’re looking for (on your computer’s
hard drive, network, floppy disk, CD-ROM, etc.) will have this filename.
3. Click the Find Source File button and locate your source expProf.mdb file. Doubleclick on the file to select it in the source field.
4. You can’t change the DESTINATION DATABASE PATH since it will automatically
import into the database you’re currently logged into. However, if you want to import
this profile into a different database, you must change to that database location in
System Settings, log into it, then come back to this screen.
5. Make sure the IMPORT option is selected, then click BEGIN Import / Export. The
process may take up to a minute or two depending on how many screen
customizations the system must import. A notification box will appear upon its
successful completion.
Import Successful
NOTE: Clicking OK takes you back to the EPOS Desktop.
6. Now, if you want to switch to the profile you’ve just imported, you must manually
change to the new profile one of two ways. Either change to the new profile in the
Customizing Utility, or select the new profile under System Settings in the EPOS
40
ENTERPRISE POS User Manual
Desktop’s Administration menu. You should contact your Systems Administrator
before making changes to System Settings.
You can do the reverse of the process above by taking your currently selected profile and
EXPORTING to a file. At any time you can export your customizations to a floppy disk, for
example, then import them into another database file at another machine. The process is
exactly the same as above except the SOURCE and DESTINATION files are reversed.
This is rarely done, however, outside of the Customizing Utility. We recommend contacting
your Systems Administrator, an independent consultant, or your distributor before
attempting an export of a business profile.
Import / Export Transactions
A very useful application for companies with distributed databases is the Export Utility. The
Export Utility can be accessed from both the Administration Utility and by clicking Import /
Export Transactions under the EPOS Desktop File menu.
We recommend strict caution be taken before attempting to use this utility since it could
potentially overwrite important database records if not used properly. Generally the
importing or exporting of financial transactions is limited to only Supervisors or Store
Managers. Rarely will a cashier be given this task due to the very careful operation of the
utility that is required.
Generally this utility is used to extract daily or weekly transaction records to be sent to a
home office or other location running a separate database. This utility is also commonly
used by individuals wanting to work at home or on a trip (via a remote or laptop PC). All
you’d have to do is put in a date range for the transactions to export (1 day, 1 week, 1
month, etc.), and you can send the file on its way. Traveling users are able to setup their
laptop PC as a remote store location and use the utility to keep an updated snapshot of
the store at all times. Once the transactions are imported, the laptop PC or other location
will operate with all the same transactions as the original location.
Every database change is included – not only financial transactions. Everything from
entering sales to new purchase orders or vendors will be included in every import or
export. All new records are date stamped to accommodate for this utility.
Exporting
The following details the process of exporting transactions to send to another location.
1. From the EPOS Desktop, click File.
2. Click Import / Export Transactions. The Import / Export screen appears that allows
you to enter the SOURCE and DESTINATION locations to export transactions.
Import / Export Transactions
Chapter10. The File / Edit / View Menus
41
Date range of
ALL
transactions to
export
NOTE: Under DESTINATION is a blank database that is created from a “model”
export.mdb file located in the EPOS program directory. It will ONLY have the
transactions for the range you’ve selected. You can, however, uncheck the ‘OverWrite’ box and have the records transferred into an existing database if desired. It will
prompt you if it hits on a record that already exists before overwriting.
NOTE: You’re not limited to any specific export date range. You can export
transactions for a couple days, a week, a month, etc. However, keep in mind if you’re
emailing it, you’ll want to keep the size down. We tested about 100 transactions for a
day (including records for new vendors, new products, new customers, etc. - ALL this
data will transfer). The export mdb file was only a little over 600k which is still not bad
for emailing. The blank database was 508k. You can estimate about 1k per
transaction is added to the database.
3. Select Export, since we want to EXTRACT the day’s transactions. As a test, you can
use your practice database as the SOURCE (as shown above) and use 3/20/2001 –
3/20/2001 as the export range. The unchanged factory practice database has around
16 records that will export for this day (1 new test customer, 3 new customer actions,
1 new work order, 2 new invoices, 1 new quote, 1 new credit, a few new products in
inventory, etc.).
NOTE: the EXPORT.MDB file must be in your EPOS application folder since this is
the blank database template that the DESTINATION is created from.
4. Click the BEGIN button, and away it goes.
5. When it finishes, the user can take the file (in this example, c:\EDEFAULT.MDB) and
email it to the home office, copy it to a lap top PC, etc.
Importing
Importing transactions from a file you receive from another location or PC should be
performed with the absolute maximum amount of caution. The process of importing is
almost identical to the previous steps of exporting (simply reverse the SOURCE and
DESTINATION files in the previous steps), however, inserting foreign records into your
local database is far more risky than the reverse.
42
ENTERPRISE POS User Manual
The risk comes from database integrity rules that must be followed for every new record
written to your database due to what’s called record indexing. Record indexing is used to
link tables together for faster data lookup speed. If a new record is entered in the database
that does not follow these integrity rules, important data could be overwritten or data
corruption could occur.
All records in the EPOS database have fields called primary keys that uniquely identify
them within each table. Indexing is always done for primary key fields, and sometimes
further indexing is setup among non-key fields as well. It all depends on how the specific
database table in question is used in the system. Sometimes additional indexing on a
table is needed for complex table searches, and sometimes it’s not. This is all handled by
the system in the background and is no concern to you under normal circumstances.
However, to avoid possible database corruption you must always make sure the database
you’re importing from was using the exact same version and build of EPOS when the
export was originally performed. Older versions of EPOS have slightly different database
structures due to the improvements to the system over the years. Attempting to import a
database exported from an older version of EPOS could be disastrous.
Another issue of concern if you plan to frequently use the import/export utility is the risk of
overwriting non-duplicate records if the interface is not used correctly. Importing / exporting
among locations or machines requires a little planning. For example, if you plan on adding
new inventory items to your laptop machine at the same time as a clerk back at the store,
you’d better make sure you both planned ahead to avoid having duplicate inventory
numbers at the time of import. Allowing the system to auto-assign inventory numbers in
this example (while both the store clerk and you add to the same product category) would
cause the same inventory numbers to be assigned in each system. When it’s time for the
laptop machine to do its import into the store’s database, you’d get several pop-up boxes
asking you to overwrite the duplicate records. Proceeding would overwrite the work the
store clerk had done, not to mention the numerous problems that would occur if any of the
items had been sold prior to the laptop’s import. You could end up with items sold that are
completely different than their matching inventory counterparts. The same would occur by
letting the system auto-assign new customer keys, purchase order numbers, work order
numbers, and so on. Overwriting these records could have detrimental consequences due
to the other database records that are linked to them.
In summary, if your company is utilizing a distributed database model, to avoid import
problems make sure you do the following.
•
All systems are running the same EPOS version and build
•
Planning is done ahead of time to avoid duplicate keys among records (either split
key ranges among different locations, have different locations work separate
areas, or keep databases separate altogether)
If performed correctly, the import/export utility can save your company time and the high
costs of setting up a WAN (wide area network) to connect among locations.
Change Desktop Control Bar
This menu selection configures the left-most menu bar on the EnterprisePOS Desktop
screen (in the Custom) area. This does the same thing as selecting the Custom bar then
right-clicking in it to add new items (which causes a search of the network to assign a
program to an icon on the menu bar).
Chapter10. The File / Edit / View Menus
43
Right-Clicking Custom Menu Bar
Either use right-click, then Add
New Item to add programs to
this bar, or use File, then
Change Desktop Control bar.
They are one in the same.
Exit
This function exits the EnterprisePOS system and closes any open files or records you
may have.
44
ENTERPRISE POS User Manual
The Edit Menu
The edit menu is a collection of shortcuts for field and record maintenance.
EPOS Desktop – The Edit Menu
Keyboard
shortcuts are
displayed on the
right of the menu
Undo, Cut, Copy, and Paste
The first four selections on the EPOS Desktop Edit menu are strictly for text editing. These
commands all have keyboard shortcuts as well making it easier and quicker for the
functions to be executed. The keyboard shortcuts are shown to the right of the menu
selection.
These functions (both by clicking the menu item or using the keyboard shortcut equivalent)
work exactly the same as text editing commands in word processing applications.
•
UNDO – will cancel the last thing you typed – as if it never happened
•
CUT – will copy the selected piece of text into memory (Windows clipboard) for
later use, then it will delete the selected text
•
COPY – will only copy the selected piece of text into memory
•
PASTE – the text in memory will be placed where the cursor is currently located
Delete Selected Record
This function will remove the currently selected record from the database. This function’s
keyboard equivalent is the F12 function key.
Open Selected Record
This function will open the currently selected record. This functions keyboard shortcut
equivalent is F11, although it is the same as simply double-clicking on a selected record.
Copy Customer Actions (Customer Area only)
The Copy Actions function is useful when you need to move all customer actions from
one or more customer accounts to another. It is most often used after a cashier mistakenly
rings up a new customer that already existed in the system. When a Supervisor (or whom
ever) finds the duplicate customer account (or accounts), he/she can move the copy
record(s) into a single account. The duplicates can then be automatically removed.
Chapter10. The File / Edit / View Menus
45
Copy Customer Actions Screen
After clicking this selection, the Copy Customer Action screen appears allowing you to
enter up to 8 customer accounts to copy from. There is a blank for 1 customer account to
copy all actions into. The option box on the left is the switch to automatically remove
duplicate customer accounts after the copy is complete (if Yes is selected).
The following steps walk you through this process.
1. From the EnterprisePOS Desktop, click Edit.
2. From the Edit menu, click Copy Actions. The Copy Customer Actions screen
appears.
3. Enter ALL customer IDs you want to copy FROM (the accounts with the actions you
want copied OUT). There are a total of 8 fields on the screen for Customer IDs to
copy from. These spaces represent your duplicate records you’d like consolidated into
one account.
4. Now enter the single customer ID to copy these duplicate accounts INTO (the last
field on the right). This will be the customer account the duplicate records will be
consolidated into. The customer ID number you enter in this field will be this
customer’s new and only ID once the copy is complete.
5. If you want to delete these old customer accounts once everything has been copied
out of them, then select Yes to Delete old customer ‘FROM’ record(s) after copy?
6. Click the Begin Copy button to start the process. After completion you’ll get a pop-up
verification box telling you it was successful.
46
ENTERPRISE POS User Manual
The View Menu
Most of the functions of the view menu are for changing the “look” of the EnterprisePOS
Desktop. By “look” we are not referring to colors or shapes; the different selections of this
menu are mostly designed to control whether or not to make a specific system area visible
or not.
EnterprisePOS Desktop – The View Menu
Current User (Who’s Logged In)
The first selection under the view menu is really the only selection not directly related to
look of the EPOS Desktop. Instead, this function allows a user to view who is currently
signed on to the local machine. This function is useful when a machine sits inactive for
long periods of time. You may not always remember who is signed on. This function will
display a pop-up message with the current use logged in.
It can be important to know who’s logged into the system if your company pays
commission to employees. However, the invoice screen can be setup to always request
the user to enter the sales rep ID before allowing the sale to complete. This can be a
simple alternative to running this function. If you do pay commissions to employees, we
recommend not using the user ID as the default sales rep field for each sale. The cashier
may forget to check the sales rep field for their ID before completing the sale. You could
risk paying commissions to the wrong employees this way. See your Systems
Administrator about making this change to System Settings.
Current User (Who’s Logged In)
NOTE: In this example the System Administrator would become the sales rep if a sale
was rung up on this machine.
Status Bar
This function will hide (if unchecked) or display (if checked) the status bar on the bottom of
the EPOS Desktop screen. The only reason you may want to do this is to add a little extra
vertical viewing area to your Desktop.
Your Systems Administrator can setup your user profile to not display the Status Bar upon
log in if this is your preference.
Chapter10. The File / Edit / View Menus
47
Viewing Reporting Engine / Stock Shortage
As with the status bar, the Report Engine and Stock Shortage area (located on the right of
the EnterprisePOS Desktop) will be hidden (if unchecked) or displayed (if checked).
However, unlike the Status bar, hiding the Report Engine and Stock Shortage area will
provide a substantial extra Desktop viewing area. Given the amount of extra viewing area
obtain from hiding these two sections, this may be a desirable option for the user.
However, you cannot run Desktop reports or see stock shortage warnings with this area
hidden.
Your Systems Administrator can setup your user profile to not display the Report Engine
and Stock Shortage area upon log in if this is your preference. The screen shot below
demonstrates the amount of viewing area gained by hiding these sections.
EPOS Desktop – With Report Engine / Stock Shortage Area
Report Engine
Stock Shortage and
Internet update
Warning Area
The Status Bar
EPOS Desktop – Without Report Engine / Stock Shortage Area
You get more
viewing area without
the Report Engine /
Stock Shortage
areas
48
ENTERPRISE POS User Manual
Appendix A. The Employee Time Clock Utility
A separate application from the EPOS system designed for employee time control is the
Time Clock Utility. The Time Clock Utility is a simple, yet useful program that can be
launched from the EPOS Administration Utility or stand-alone. It acts exactly as a regular
time clock machine requiring employees to “punch in” at the start of their day or shift and
“punch out” before going home. You punch in or out simply by selecting your name from
the employee list (like finding your time card in a rack or box of cards), then double clicking
your name (like sliding your card into the machine). The system will keep accurate time
and reports if used correctly each time an employee reports to work.
If the application was purchased with your EPOS system, it will have an icon in the
Enterprise POS folder under Program Files. Just double-click on the icon to run it.
Enterprise POS Program Folder
NOTE: What utilities are in this folder depends on what was purchased and installed
initially.
Running the Utility
From the Enterprise POS folder, double-click on the Time Clock icon.
NOTE: How you get to the Enterprise POS folder depends on your version of Windows. In
most versions you’d click START, then Programs to find the folder.
Using the Utility – CLOCK IN
To use the utility for clocking in, follow the steps below.
1. Double-click on the Time Clock icon. The list of employees appears.
EPOS Employee Time Clock
Buttons to shorten the list
of employees by only
selecting the ones
clocked in or clocked out
Appendix A. The Employee Time Clock Utility
1
2. Find your name in the list, and double click it with the mouse.
NOTE: If the list of employees is too big to scroll through, you can select the
CLOCKED OUT button at the top of the screen to find your name since you are
presently clocked out.
3. At the pop-up sign on box, your User Name (ID) should be selected. Hit Enter to skip
to the Password box.
Clock IN / OUT Box
4. Type your password, then hit Enter. A box pops up telling you that you are NOW
clocked in and gives you the time and date.
Successful Clock IN
5. Hit Enter to return back to the main screen list of employees.
EPOS Employee Time Clock – After Clock IN
Red check
marks mean the
employee is
clocked IN!
NOTE: Your name should now have a red check mark by it.
6. Click the Exit button or press F3 to exit the program.
2
ENTERPRISE POS User Manual
You are now “on the clock” and shouldn’t have to use the program again until it’s time for
you to clock OUT.
Using the Utility – CLOCK OUT
Clocking out step-by-step exactly the same as clocking IN. Follow the steps above exactly
to enter the system, double click on your name, type your password, and exit the system.
The only difference will be the pop-up verification box will tell you that you’re now clocked
OUT instead of IN.
Clock Out Verification
Using the Utility – Supervisors ONLY
To access the supervisor section of the utility for reporting on employee times, click the
Selected Employee Time Log button or press F2. You’ll get the supervisor’s sign-on.
EPOS Employee Time Clock
Supervisors /
Managers ONLY
Supervisors / Managers Sign-on
NOTE: You must have security access to pass this point.
Appendix A. The Employee Time Clock Utility
3
If you are a Supervisor or Manager with access to this area, type your password to enter
the Employee Time / Payroll screen. Keep in mind you may actually be a Supervisor or
Manager without access to this area – it is a specific security right you must have assigned
to your account to access this area. If you don’t have access to this area, and you’re
supposed to, contact your Systems Administrator or consult the Systems Manual.
Employee Time Log / Activity
Special
employee time
reports box
Search
buttons
Supervisor Screen Usage
Once you’ve entered the screen, select the employee you want to analyze in the
Employee drop down box at the top of the screen. By default the screen selects the last
two weeks from today’s date to analyze employee hours. If this is not correct, select the
FROM and TO dates in the date ranges boxes provided. This will define the pay period for
the employee.
If the employee ID and pay period date range is correct, click Calculate.
The employee’s rate (non-salary workers only) is shown in the Rate box (from the user’s
account in the Administration Utility) and multiplied by the number of calculated hours
worked in the selected date range under the Total Hours Worked field. The calculated
total due the employee is shown in the Total Due (Before Deductions) box.
The Security Log / Audit Trail table shows each time the employee has CLOCKED IN or
OUT for the selected date range. Supervisors can scroll through this information to
research problems if necessary. If they need to make a change to the records due to an
erroneous time calculation (for example, the employee forgot to clock out one day), they
can do so with the Insert and X vertical buttons to the right of the table (see below).
Screen Buttons
Below are the different buttons on this screen.
4
•
Calculate – The calculate button totals all hours worked and shows all clock IN’s
and OUT’s for the selected employee and date range.
•
Clock INS / OUTS – This option button shows all clock in and out records for the
designated employee in the table below (default).
•
ALL – This option button will show all security log entries (sign-ons, sign outs,
voids, database changes, deletions, etc.) – not just when the employee clocked in
ENTERPRISE POS User Manual
or out. This is usually only used to research employee fraud. Generally, if the
employee is showing CLOCKED IN, but no EPOS system usage at all is shown
for the employee, there is a possibility of fraud. For example, a cashier could have
their friend clock in for them with their password when the manager is out of town.
However, the manager would find it odd that no sales or activity were performed
under that cashier’s account all day. It looks a little suspicious and may indicate
that management should research the issue further.
•
INSERT – This vertical button located to the right of the employee activity table
will allow the Supervisor to insert time clock records to correct problems. Simply
click the button and answer a few basic questions to quickly insert either a
CLOCK IN or CLOCK OUT record for the employee at any time and date. Maybe
the employee forgot to clock out for lunch? The Supervisor could quickly add a
CLOCK OUT, then another CLOCK IN record to fix this.
•
X – This vertical button located to the right of the employee activity table and
below the INSERT button will delete an activity record from the table completely.
•
Print Report – This button at the bottom of the screen prints the selected report
in the report list on the right of the screen.
NOTE: The reports must be assigned in the Report Engine Maintenance screen.
See Chapter 9 – Report Engine for more detail on adding reports to EPOS.
•
Clear Log – This button will remove every activity log record displayed in the
table (for this customer and date range). This is a quick way to remove an entire
day, week, etc. of information on an employee account.
•
Exit – This button exits the screen.
Appendix A. The Employee Time Clock Utility
5
A
Accessing / Using Financial And Marketing Tools, 2
Accounts Receivables, 23
Accounts Receivables
How to Use Customer Charge Accounts at the Point-Of-Sale
– Cashier’s Role, 24
Pre-Define a Customer Charge Account – Management’s
Role, 23
Action / Wish Entry at Point-of-Sale, 26
Action Type, 15, 26, 27, 13
Action/Wish button, 14
Activities, 17
Adding Products, 7, 3
Address Labels, 21, 26, 30
After Tax Credit Addition to a Ticket, 13
Analyzing Customer / Store Credit History, 16
Analyzing Customer Account Actions, 15
Analyzing Goods Sold, 3, 9
Analyzing Sales, 3, 6
Analyzing Ticket Payments, 3, 5
Application Reports, 6, 7, 10, 11
Applying In-Store Credit Toward a Sale (AFTER TAX), 13
Applying In-Store Credit Toward a Sale (BEFORE TAX), 15
Approving an Order Requisition, 11
Assigning an Item on an Order to a specific Customer (different
special orders within the same order), 9
Auto-Inventory Numbering, 9
B
Back Order, 7, 3, 8, 17, 18
Before Tax Credit Addition to a Ticket, 15
Business Profile Export / Import, 39, 40
C
Cash Out Screen, 2
Cash Out Screen
Activity for Today Tab, 3, 8, 9
Balance Sheet Tab, 10
Daily Totals Tab, 3
Goods Sold Today Tab, 3, 8
Screen Buttons and Settings, 10
Cashing Out at Day’s End, 12
Cashing Out at End of Day / Shift, 1
Changing Printers, 38, 39
Codes, 7
Consumer Trends, 18, 25
Control Panel B, 4
Converting a Purchase Requisition to a Purchase Order, 11
Copy, 45
Copy Customer Actions, 45, 46
Counting Tender, 12
Credit Entry for a Customer at the Point-of-Sale, 16
Current User (Who’s Logged In), 47
Custom Assemblies, 7
Custom Report Maintenance, 7
Custom Reports, 16, 3
Customer Account Actions, 15
Customer ID, 5, 6, 9, 8, 46
Customer Payment Details, 8, 11, 13
Cut, 45
D
Data Input, 14
Default Customer Action Types, 11
Delete Orders, 13
Deleting Selected Records, 45
Detail Tab, 5
Displaying
Received Items, 16
Vendor Information, 7
Distribute Costs, 10
E
Edit Menu, 45
Employee Time Clock Utility, 1
Employee Time Log, 3, 4
Entering
New Order, 3
New Vendor Number, 2
Entering a New Layaway, 18
Entering a New Sales Proposal / Quote, 10
Entering an Express Accounts Receivable, 23
Entering an Express Sales Proposal (QUOTE), 21
Entering Purchase Order Origin Information, 6
EPOS Desktop Reporting Engine and Stock Shortage Indicator
View, 48
EPOS Desktop Status Bar View, 47
EPOS Labels, 21
Exiting, 4, 13, 16, 17, 26, 27, 3, 10, 4, 15, 19, 7, 22, 25, 44, 2, 5
Express Action / Wish Entry, 26
Express Quotes / Proposals, 21
Express Returns / Refunds, 20
Express Work Order Entry, 25
F
Fields, 8, 5, 10, 6, 3, 8, 9
File Menu, 34
Financial Tools, 2
Finding Out Who’s Logged In, 47
Fixing Duplicate Customers, 45, 46
Forecasting
Interpreting Your Data / Making Decisions, 26
Forecasting Sales, 20
G
Goods Sold Analysis, 3, 9
I
Import / Export Business Profile, 39, 40
Import / Export Transactions, 41
Appendix A. The Employee Time Clock Utility
1
In-Stock Tab, 2
Inventory
Assign Number, 5
Control tab, 13, 1, 2, 22, 23, 22
Invoices / Sales Analysis, 3, 6
Issuing New Credit to a Customer, 16
L
Labels, 21
Layaway Entry at Point-of-Sale, 18
Leaving the System, 4, 13, 16, 17, 26, 27, 3, 10, 4, 15, 19, 7, 22,
25, 44, 2, 5
Less Common ‘Express’ POS Transactions, 25
Logging In, 3
Login Buttons, 5
M
Marketing Analysis / Trends, 18, 25
Marketing Tools, 2
Moving Customer Transactions from One Account to Another,
45, 46
Moving Daily Transactions from / to a Lap Top or Different
Location, 41
N
NEW button, 2
New Sale Entry
Enter Payment Type and Amount, 13
Express Sale For Cashiers, 9, 12
New Sales Proposal / Quote, 10
O
One-of-a-Kind Products, 7
Opening Selected Record, 45
Order
Costs, 4, 10
Entering New, 3
Order Life-Cycle, 2
Order Statuses, 2
Other Cost, 10
Other Cost field, 10
P
Password, 3, 4, 2
Paste, 45
Payments / In-Flow Analysis, 3, 5
Performing a Vendor Search, 9
Performing an Express Return or Refund for a Customer, 20
Placing Orders from the Stock Shortage Box, 14
Point-Of-Sale tab, 3, 7, 23, 30
Precautions to Rapid Sales, 2
Print Preview, 10, 25, 28
Print Screen, 27
Print/Fax (F6), 4, 12, 17
Printer / Page Setup, 38, 39
Printing, 27
2
ENTERPRISE POS User Manual
Printing the Z Report, 1
Product Categories, 9, 4, 22, 23
Product Category, 10, 5, 9, 3, 20, 22, 23, 7, 11
Product Labels, 21, 22, 24, 25
Product Line Information, 6
Product Types, 7, 6
Product/Order Search, 2
Products Ordered With This Shipment, 7, 8, 10
Purchase Order
Origin Information, 6
Purchase Order Origin Information, 6
Purchase Orders, 4, 5, 6, 7, 8, 10, 11, 15, 8
Purchase Requisitions, 2
Q
QUICK SALE, 2
Quick Scan, 6, 7, 9
Quotes, 16
R
Receive button, 15, 18
Receiving Orders, 15
Report Changes, 7
Report Engine, 10, 23, 18, 14, 1, 2, 3, 7, 10, 11, 21, 24, 30, 31,
38, 48, 5
Report Engine – The EPOS Desktop, 2
Report Maintenance, 7
Return, 7, 20
Returns / Refunds with Customer Receipt, 20
Returns / Refunds without Customer Receipt, 20
Reviewing Vendor Information, 7
Ringing Up a Non-Standard Sale, 11
Ringing Up a Standard Sale, 9
S
Sales Analysis, 2, 3, 4, 5, 6, 9
Sales Analysis Screen, 2, 3, 4, 5, 6, 9
Sales Screen Fields, 6
Saving / Printing the Z Report, 14
Saving Product Detail, 7
Screen for Rapid Check-Out, 2
Search
Product/Order, 2
Search for In-Stock Inventory Items, 2
Searching Existing Customer Accounts, 21
See Inventory Number
Assign, 5
See Orders
Open, 3
See Tab
Orders, 2, 7, 8, 1, 7
See Tax Levels
Nontaxable Product, 8, 9
Variably Taxable Product, 8
Service Products, 7
Shipment
Products Ordered With, 7, 8, 10
Shipping Cost, 10
Sold Items, 7
Special Orders for Customers, 9
START Button, 7, 2, 3, 1
Status, 17, 18, 47, 48
Status Bar, 47
Stock Shortage Indicator, 18, 14, 48
Store Information, 6
Submit an order, 13
Submit button, 13
System Report Maintenance, 7
System Reports, 3, 4, 30
T
Tab
Detail, 5
Orders, 2, 7, 8, 1, 7
Vendors/Orders, 1
Tax Cost, 10
Tax Cost field, 10
Tax Levels, 7, 8
Nontaxable Product, 8, 9
Variably Taxable Product, 8
Tech Support, 8
Technical Support, 8
The ‘Special’ Order, 9
The CASH OUT Screen Layout, 2
The QUICK SALE Screen, 2
The Security Lock Key, 5
The Speedy Sales Process, 2
Time Clock, 1
Time Log, 3, 4
Total Added Cost, 10
Total Added Costs, 10
Total Order $ field, 10
Transaction Import / Export, 41
Trending, 23
U
Undo, 45
Use and Documentation of Control Conventions, 7
User Name, 3, 4, 2
Using Enterprise POS Documentation, 8
V
Vendor
Account Activity, 4
Contact Information, 3
Information, 7, 6
Number, 3, 8
Products, 4
Search, 9
Search Criteria, 8
Vendors/Orders Tab, 1
View Menu, 47
Viewing Customer Credit History / Balances, 16
VOID, 22
Voiding a Sale, 22
W
Work Order Entry at Point-of-Sale, 25
Work Order Station, 15, 16
Appendix A. The Employee Time Clock Utility
3