1
Meijer.com
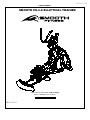
USER’S MANUAL
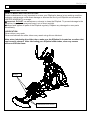
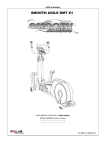
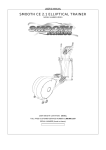
SMOOTH CE-3.0 ELLIPTICAL TRAINER
USER WEIGHT LIMITATION: 350lbs(160kgs).
SERIAL NUMBER (found on frame):
REV 12/27/11
Meijer.com
2
SMOOTH CE3.0 ELLIPTICAL TRAINER
PREASSEMBLY
For future service or related questions:
Please staple your receipt and/or write in the name and phone number of the retail store where you purchased your Smooth
Fitness Elliptical Trainer.
Name: ______________________________ Phone Number: ___________________ Receipt: ______________________
Open the boxes:
You are now ready to open the boxes of your new equipment. Make sure to inventory all of the parts that are included in the boxes.
Check the Parts List for a full count of the number of parts included for this product to be assembled properly. If you are missing
any parts or have any assembly questions call your local dealer or contact us directly at 888-800-1167.
Gather your tools:
Before starting the assembly of your unit, make sure that you have gathered all the necessary tools you may require to assemble
the unit properly. Having all of the necessary equipment at hand will save time and make the assembly quick and hassle-free.
Clear your work area:
Make sure that you have cleared away a large enough space to properly assemble the unit. Make sure the space is free from
anything that may cause injury during assembly. After the unit is fully assembled, make sure there is a comfortable amount of free
area around the unit for unobstructed operation.
Invite a friend:
Some of the assembly steps may require heavy lifting. It is recommended that you obtain the assistance of another person when
assembling this product.
User Weight Limitation:
Please note that there is a weight limitation for this product. If you weigh more than 350lbs. it is not recommended that you use this
product. Serious injury may occur if the user’s weight exceeds the limit shown here. This product is not intended to support users
whose weight exceeds this limit.
PACKAGING
Environmentally friendly, recyclable materials:
— Outer packaging of the cardboard
— Form parts of foamed, CPC-free polystyrene(PS)
— Foils and bag of polyethylene (PE)
— Tension bands of polypropylene (PP)
DISPOSAL
Please undertake environmentally friendly disposal.
Meijer.com
www.smoothfitness.com
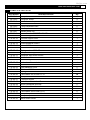
COMPLETE PARTS LIST
Part Number
CE-30i-1
CE-30i-2
CE-30i-3
CE-30i-4
CE-30i-5
CE-30i-6
CE-30i-7
CE-30i-8
CE-30i-9
CE-30i-10
CE-30i-11
CE-30i-12
CE-30i-13
CE-30i-14
CE-30i-15
CE-30i-16
CE-30i-17
CE-30i-18
CE-30i-19
CE-30i-20
CE-30i-21
CE-30i-22
CE-30i-23
CE-30i-24
CE-30i-25
CE-30i-26
CE-30i-27
CE-30i-28
CE-30i-29
CE-30i-30
CE-30i-31
CE-30i-32
CE-30i-33
CE-30i-34
CE-30i-35
Name&specification
computer
computer screw
handlebar end cap
handlebar tube
Fixed handlebar foam
handle pulse
handle pulse line
curved washer OD20*ID8.5*1.5T
Inner hexagon M8*20 Screw
console support tube
fixed handlebar cover-R
fixed handlebar cover-L
screw M4*20
Flat washer OD20*ID8.5*1.5T
Spring washer M8*2.0T
computer wire upper section
computer wire lower section
action handlebar cover –rear
R12 bearing
action handlebar tube-L
screw M5*16
front stabilizer cover
Flat head M6*16 screw
Spring washer M6*1.5T
Flat washer OD16*ID6.5*1.5T
transport wheel axle
Transport wheel
action handlebar tube –R
action handlebar end cap
action handlebar foam
action handlebar cover –front
Flat washer OD22*ID8.5*2.0T
computer post cover end hook
computer post cover
water bottle holder
Qty
1
4
2
1
2
2
2
2
30
1
1
1
17
22
28
1
1
2
12
1
34
2
10
10
10
1
1
1
2
2
2
2
1
1
1
3
Meijer.com
4
SMOOTH CE3.0 ELLIPTICAL TRAINER
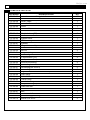
COMPLETE PARTS LIST
Part Number
CE-30i-36
CE-30i-37
CE-30i-38
CE-30i-39
CE-30i-40
CE-30i-41
CE-30i-42
CE-30i-43
CE-30i-44
CE-30i-45
CE-30i-46
CE-30i-47
CE-30i-48
CE-30i-49
CE-30i-50
CE-30i-51
CE-30i-52
CE-30i-53
CE-30i-54
CE-30i-55
CE-30i-56
CE-30i-57
CE-30i-58
CE-30i-59
CE-30i-60
CE-30i-61
CE-30i-62
CE-30i-63
CE-30i-64
CE-30i-65
CE-30i-66
CE-30i-67
CE-30i-68
CE-30i-69
CE-30i-70
Name&specification
main frame cover fixing plate
screw M4*20
cover –Right
main frame cover front cover
motor
motor cable
M10*1.5*10T nut
C style button (∮12)
Flat washer OD20*ID10.5*2.0T
flywheel axes
6001 bearing
flywheel
Magnetic assembly
screw M5*30
M5 nut
magnet spring
connecting bar axle
C style button (∮17)
M10 (Subtense 17) nut
2203-R5ZZbearing
connecting bar tube
connecting bar cover-R
connecting bar cover -L
Right and left rear stabilizer end cap
main frame
M6*1.0*6T nut
Crank Pulley
powder bushing
C style button (∮19)
crank axle set
screw M6*18
belt
crank arm -left
pedal axes gap bushing
screw 5/16-18*25
Qty
10
3
1
1
1
1
13
2
14
1
2
1
1
1
2
1
2
4
2
2
1
2
2
6
1
8
1
1
2
1
4
1
1
2
2
Meijer.com
www.smoothfitness.com
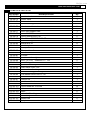
COMPLETE PARTS LIST
Part Number
CE-30i-71
CE-30i-72
CE-30i-73
CE-30i-74
CE-30i-75
CE-30i-76
CE-30i-77
CE-30i-78
CE-30i-79
CE-30i-80
CE-30i-81
CE-30i-82
CE-30i-83
CE-30i-84
CE-30i-85
CE-30i-86
CE-30i-87
CE-30i-88
CE-30i-89
CE-30i-90
CE-30i-91
CE-30i-92
CE-30i-93
CE-30i-94
CE-30i-95
CE-30i-96
CE-30i-97
CE-30i-99
CE-30i-100
CE-30i-101
CE-30i-102
CE-30i-103
CE-30i-105
CE-30i-106
CE-30i-107
CE-30i-108
Name&specification
pedal axle sleeve
power cable
sensor wire
roller track support cover –middle
aluminum roller track
roller track cover –rear
roller track support tube
screw M10*68
Spring washer M10*2.0T
Arc washer OD20*ID10.5*2.0T
crank arm -right
screw M10*25
pedal –right
Transport handle foam
Transport handle
M8*1.25*8T nut
J screw
pedal arm tube –right
M10*1.5*6.35T(subtense 17) nut
pedal fixing plate
pedal axle bushing
main frame cover –left
tension wheel bushing
tension wheel gap bushing
Flat washer OD25*ID19.5*1.5T
tension wheel bracket
washer flat
pedal arm tube-L
pedal –L
Round head M5*10 screw
roller cover
roller
roller shaft bushing
connecting bar –L
protect line
adaptor
Qty
2
1
1
1
2
1
1
2
2
2
1
8
1
1
1
1
1
1
2
2
2
1
1
1
1
1
1
1
1
10
2
2
2
1
2
1
5
Meijer.com
6
SMOOTH CE3.0 ELLIPTICAL TRAINER
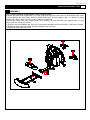
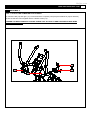
PARTS DIAGRAM
MOST OF THE PARTS SHOWN HERE HAVE BEEN PRE-ASSEMBLED.
4
107
8
15
7
9
1
2
20
13
18
12
9
13
10
15
14
13 31
11
16
33
34
58
21 22
17
57
13
28
89
54
44
99
82
100
13
18
22 21
44
42
32
9
15
13 31
14 15 9
101
58
102
21
89
80
76 21
42 82
79
21 74
54
83 44
44
42
105
85
101
102
78
77
105
9 15 8
57
13
88
14
15
9
Meijer.com
www.smoothfitness.com
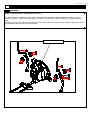
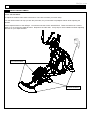
PARTS DIAGRAM
A MAJORITY OF THE PARTS SHOWN HERE HAVE BEEN PREASSEMBLED AT THE FACTORY.
7
Meijer.com
8
SMOOTH CE3.0 ELLIPTICAL TRAINER
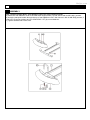
ASSEMBLY
STEP 1: Attach the Rear Roller Track Support Tube Cover and Transport Handle
(A) Attach the rear stabilizer cover to the roller track support tube (77) and secure with 4x M5*16(21) screws.
(B) Insert the transport handle through the top of rear stabilizer cover, then secure it with 2x M8*20(9) screws, 2
x M8*2.0T(15) spring washers and 2 x OD20*ID8.5*1.5T (8) curved washers.
(C) Tighten all bolts and screws now.
Meijer.com
www.smoothfitness.com
9
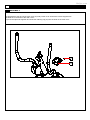
ASSEMBLY
STEP 1: Attach the Roller Track Support Tube to the Main Frame
(A) Attach the roller track support tube (77) to the main frame (60) and secure with 2 x M10*68(78) bolts, insert
the bolts through the frame then attach 2x OD20*ID10.5*2.0T curved washers (80), 2 x M10*2.0T spring
washers (79), and 2 x M10*1.5*10T nut (42). Tighten the bolts now.
(B) Place the middle roller track support tube cover –middle (74) over the roller track support tube (77) and
secure it with 2 x M5*16(21) screws.
(C) Place the left front stabilizer bar cover (21) over the front stabilizer and secure it with 2 x M5*16(21) screws.
(D) Repeat the above process for the right front stabilizer bar cover(22)
(E) Tighten all bolts and screws now
21 22
22 21
21 74
60
42
79
80
78
77
Meijer.com
10
SMOOTH CE3.0 ELLIPTICAL TRAINER
ASSEMBLY
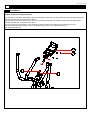
STEP 2: Attach the Action Handlebars and Covers
(A) Slide the right handlebar on to the action handlebar axle. Secure the action handlebar to the axle with 1 x
M8*2.0T bolt (9), 1 x M8*2.0T spring washer (15) and 1 x OD22*ID8.5*2.0T flat washer (32). Tighten all bolts
now
(B) Place the front and rear action handle bar covers around the pivot joint and secure with 1 x M8*20(13) screw
(C) Repeat the above process for the left side
Action Handlebar axle
20
13
18
13 31
28
13
18
32
9
15
13 31
Meijer.com
www.smoothfitness.com
11
ASSEMBLY
STEP 3: Attach the Left and Right Pedal Arms, Connecting Tubes and Covers
(A) Rotate the crank arm of the elliptical so the pedal arm (88) can be attached to the crank arm. (see diagram 4a
and 4b)
(B) Secure the right pedal arm to the crank arm with 1 x OD20*ID10.5*2.0T flat washer (44) and M10*1.5*6.35T
Nut (89) Tighten all bolts now.
(C) Attach the connecting tube (56) to the right action handlebar (28) (see diagram 4c).Secure the arm with 2 x
M8*20 bolt (9), 2 x M8*2.0T spring washer (15) and 2 x OD20*ID8.5*1.5T flat washer (14) (see diagram 4c)
(D) Put the left and right connecting tube covers (58 & 57) over the connecting tube / action handlebar joint ( see
diagram 4d) Secure the covers together with 5 x M4*20 screws (13)
(E) Position the pedal arm roller on to the aluminum roller track (see diagram 4e). remove the M8*20 bolt (9),
OD20*ID8.5*1.5T flat washer (14) and M5*10 screw (101), Install the retaining loop from under the roller track
support tube (77) and line line up the holes on the retaining loop and the roller bolt holes (previously removed).
Then reinsert the M8*20 bolt (9), OD20*ID8.5*1.5T flat washer (14) and M5*10 screw (101), to secure both the
retaining loop and the roller. Fully tighten all bolts now.
(F) Repeat the above processes for the left side.
4a
58
89
54
44
99
4a
57
13
106
60
14 15 9
102
58
28
89
102
54
44
88
14
77
105
Crank arm
bracket
57
13
15
9
4b
56
89
44
101
102
88
105
4e
14
4d
4c
103
58
101
77
57
14
15
9
9
105
13
Meijer.com
12
SMOOTH CE3.0 ELLIPTICAL TRAINER
ASSEMBLY
STEP 4: Attach the Left and Right Pedals
(A) Place the right pedal on the pedal plate (located on the pedal arm). Insert the 4 x M10*25(82) bolts trough the
pre drilled holes in the pedal and the pedal plate. Then secure the bolts with 4 x OD20*ID10.5*2.0T Flat washers
(44) and 4 x M10*1.5*10T Nuts (42)
(B) Tighten all nuts and bolts now
(C) Repeat the above processes for the left side
82
83 82
100
44
42
99
Meijer.com
www.smoothfitness.com
13
ASSEMBLY
STEP 5: Attach the Console Support Tube
Caution: Pinch point. Do not pinch the wires between the frame.
(A) Connect the Computer Wire – Upper (16) to the Computer Wire –
Lower (17) (be certain that the connectors are properly connected)
(B) Push the extra computer wire in to the console support tube. Line up the 4 bolt holes on the console post
with the 4 bolt holes on the main frame. (be certain the console support is facing the correct direction.)
(C) Secure the console support tube to the main frame with 4x M8*20 (9), M8*2.0T spring washers (15) and
OD20*ID8.5*1.5T flat washers (14)
(D) tighten all bolts now
9
10
15
14
16
17
Meijer.com
14
SMOOTH CE3.0 ELLIPTICAL TRAINER
ASSEMBLY
STEP 6: Attach the tube Cover
(A) Separate the split end of the post cover (34) and put the cover around the console support tube
(B) Slide the cover down to the main cover.
(C) Push the split ends together and insert the retaining clip (33) into the slots on the tube cover.
33
34
Meijer.com
www.smoothfitness.com
15
ASSEMBLY
STEP 7: Assemble Console Back Cover
Caution: Do not Pinch the wires between the frame
(A) Feed the Hand pulse wires (7) through the hole in the computer post (10) until they extend through the top of the
computer post. Do not pull on the wire as they may disconnect from the hand pulse sensors.
(B) Line up the bolt holes on the handle bars (7) with the holes on the computer post (10)
(C) Secure the handle bar to the computer post with 4 x M8*20 bolts (9), 4 x M8*2.0T spring washers (15) and 4 x
OD20*ID8.5*1.5T curved washers (8)
(D) Tighten all bolts now
10
4
7
8
15
9
Meijer.com
16
SMOOTH CE3.0 ELLIPTICAL TRAINER
ASSEMBLY
STEP 9: Attach the Computer Monitor
(A) Connect the Computer wire Upper (16) to the computer monitor wire (A). Be certain the wires are facing the proper
direction and that the connectors lock in place.
(B) Connect the two heart rate wires (7) with the two heart rate wire (B). Be certain the wires are facing the proper
direction and that the connectors lock in place.
(C) Line up the four screw holes on the computer monitor(1) with the four holes on the computer post (10)
(D) Secure the computer monitor (1) to the computer post (10) with 4 x Computer screws (2)
(E) Tighten all bolts now
1
2
B
A
16
7
Meijer.com
www.smoothfitness.com
ASSEMBLY
STEP 7: ATTACH THE COMPUTER POST COVERS
(A) Place the left (12) and right (11) covers around the computer post (see picture below for proper direction)
(B) Secure the two covers together with 3 x M4*20 screws (13).
ASSEMBLY IS NOW COMPLETE. DOUB:E CHECK THAT ALL BOLTS AND FASTENERS HAVE BEEN
PROPERLY TIGHTENED.
13
11
12
10
17
Meijer.com
18
SMOOTH CE3.0 ELLIPTICAL TRAINER
LEVEL ADJUSTMENT
LEVEL ADJUSTMENT:
To adjust the levelers follow these instructions: There are 6 levelers (3 on each side)
You will need someone to help you with this procedure, as you will need to tip elliptical trainer while adjusting the
levelers
Tilt the elliptical trainer to the left/right. You will then see the LEVEL ADJUSTERS. These will need to be screwed
either in or out to level the elliptical trainer. Repeat for the other side. It may help to use a bubble level when adjusting
the level on your elliptical trainer.
Leveler location
Leveler location
Meijer.com
www.smoothfitness.com
TRANSPORT INSTRUCTION
TRANSPORT INSTRUCTIONS:
To transport your elliptical trainer simply lift the back end and roll it away to the desired location.
Wheel
location
Transport
handle
19
Meijer.com
20
SMOOTH CE3.0 ELLIPTICAL TRAINER
COMPUTER OPERATION
Meijer.com
www.smoothfitness.com
21
COMPUTER OPERATION
DISPLAY FUNCTIONS
TIME
SPEED
RPM
DISTANCE
CALORIES
PULSE
HEART
SYMBOL
WATTS
Recovery
Count up - The time will count up from 00:00 to maximum 99:59 with each
increment is 1 minute.
Count down - If training with preset Time, Time will count down from the preset to
00:00. Each preset increment is 1 minute between 01:00 to 99:00.
Displays current training speed. Maximum speed is 99.9 KM/H or ML/H.
Displays the Rotation Per Minute. Display range 0~15~999
Accumulates total distance from 00:00 up to 99.99 KM or ML. The user may preset
target distance data by pressing the UP/DOWN button. Each increment is 0.1KM or
ML.
Accumulates calories consumption during training from 0 to maximum 9999
calories. (This data is a rough guide for comparison of different exercise sessions
which is not intended for medical treatment.)
User may set up target pulse from 0 - 30 to 230 and computer will beep when actual
heart rate is over the target value during workout.
When monitor receives the heart rate signal, the symbol will begin blinking.
Display current workout watts. Display ranges 0~999.
After exercising press the recovery button and hold the heart rate hand grips until
the display reads F1, F2, F3, F4, F5, or F6. This function will test how rapidily your
body recovers to a normal resting heart rate. F1 is the lowest rated result (worst)
and F6 is the highest (best) Press the recovery button again to return to the main
screen.
Temperature The room temperature will be displayed when in sleep mode
Calendar
The date will be displayed when in sleep mode
Clock
The time will be displayed when in sleep mode
Sleep mode When the machine is not used for 4 minutes the computer will enter sleep mode
Meijer.com
22
SMOOTH CE3.0 ELLIPTICAL TRAINER
COMPUTER OPERATION
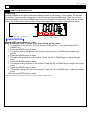
POWER ON
Connect adaptor to the Semi-Recumbent Bike to power on See page 11 for location. Do not use
the unit for, 2 seconds after plugging in, until the unit has finished calibration. Once the unit has
finished calibration the time and date can now be set. Press the mode button then use the up and
down keys to adjust the date and time. Press the mode button to confirm each entered value.
Date and time setting screen
Home screen
【USER PROFILE】
Setting USER information (U1 – U4):
Note: Press total reset to return to the User Profile set up screen.
1. U1 will blink on the screen. You can choose USER profile 1 – 4 by pressing the UP or
DOWN keys.
2. Press the MODE button to enter
3. The gender setting will blink on the screen. Press the UP or DOWN keys to adjust the
gender.
4. Press the MODE button to enter
5. The age setting will blink on the screen. Press the UP or DOWN keys to adjust the age
value.
6. Press the MODE button to enter
7. The height setting will blink on the screen. Press the UP or DOWN keys to adjust the height
value
8. Press the MODE button to enter
9. The weight setting will blink on the screen. Press the UP or DOWN keys to adjust the weight
value
10. Press the MODE button to enter
Press start to begin the workout in manual or choose from the preset programs
Meijer.com
www.smoothfitness.com
23
COMPUTER OPERATION
Quick Start
Press the start button at any time to begin work out in manual mode with our entering any user
information or workout parameters.
MANUAL PROGRAM
NOTE: the computer will default to the goal that end first and will end when that value
reaches 0
1. After entering the USER information press UP or DOWN to choose the type of program.
2. Press MODE button to confirm.
3. After selecting MANUAL mode, press UP and DOWN buttons to increase and decrease the
starting resistance level (from 1 to 16)
4. Press MODE button to confirm.
5. Adjust the time by pressing the UP or DOWN buttons
6. Press MODE button to confirm.
7. Adjust the distance by pressing the UP or DOWN buttons
8. Press MODE button to confirm.
9. Adjust the calories by pressing the UP or DOWN buttons
10. Press MODE button to confirm.
11. Press start to begin the workout
12. Level is adjustable during workout.
PRESET PROGRAM
1. After entering the USER information press UP or DOWN to choose the type of program.
2. Press mode to confirm the program type.
3. After entering the Preset Program, press UP and DOWN to select program profile from P1 P12
4. Press MODE button to enter the program profile.
5. Press UP and DOWN to adjust profile level.
6. Press mode to confirm.
7. Press MODE button to confirm.
8. Adjust the time by pressing the UP or DOWN buttons
9. Press MODE button to confirm.
10. Adjust the distance by pressing the UP or DOWN buttons
11. Press MODE button to confirm.
12. Adjust the calories by pressing the UP or DOWN buttons
13. Press MODE button to confirm.
14. Press start to begin the workout
15. Level is adjustable during workout.
16. Press start to begin
17. Level is adjustable during workout.
Meijer.com
24
SMOOTH CE3.0 ELLIPTICAL TRAINER
COMPUTER OPERATION
USER PROGRAM
1. After entering the USER information press UP or DOWN to choose the type of program.
2. Press mode to confirm the program type.
3. After choosing the user program press up or down to adjust the level of intensity of the first
segment
4. Press MODE to confirm and move to the next segment
5. Press up or down to adjust the level of intensity of the next segment
6. Press MODE to confirm and move to the next segment
7. Continue this process until all segments have been adjusted
8. There are 20 segments to each program. To create a shorter program, adjust the desired
amount of segments then press and hold the MODE button for 3 seconds. The program will
be entered.
9. Press start to begin the workout
HEARTRATE CONTROL PROGRAM
1. After entering the USER information press UP or DOWN to choose the type of program.
2. Press mode to confirm the program type.
3. After choosing the HRC program press up or down to select between 55%, 75%, 90%,
TARGET.
4. Press MODE to confirm
5. Adjust the time by pressing the UP or DOWN buttons
6. Press MODE button to confirm.
7. Adjust the distance by pressing the UP or DOWN buttons
8. Press MODE button to confirm.
9. Adjust the calories by pressing the UP or DOWN buttons
10. Press MODE button to confirm.
11. If target Heart rate is selected use the UP or DOWN buttons to adjust the target heart rate
12. Press the MODE button to confirm
13. Press start to begin the workout
14. Level is adjustable during workout.
15. Press start to begin
WATT PPROGRAM
1. After entering the USER information press UP or down to choose the type of program.
2. Press mode to confirm the program type.
3. After choosing the WATTS program, 120, the preset watts setting will blink on the screen
4. Press UP or DOWN to adjust the watts value. (wattage range 10-350)
5. Press MODE to confirm
6. Press START to begin
Meijer.com
www.smoothfitness.com
25
COMPUTER OPERATION
USING THE CHEST BELT HEART RATE MONITOR:
For proper operation, the chest belt should be worn with the monitor strapped across the front of
your body just above the chest line as shown in the drawing on the right. The monitor needs a little
body heat and moisture in order to work properly. To ensure correct operation you may want to wet
the two rubber pickups under the belt prior to exercising.
Meijer.com
26
SMOOTH CE3.0 ELLIPTICAL TRAINER
IMPORTANT STEPS
Warning:
Before using this product, please consult your personal physician for a complete physical
examination. Frequent and strenuous exercise should be approved by your doctor first. If any
discomfort should result from your use of this product, stop exercising and consult your doctor.
Proper usage of this product is essential. Please read your manual carefully before exercising.
Please keep all children away from the equipment during use and when equipment is unattended.
Always wear appropriate clothing, including athletic shoes, when exercising. Do not wear loose
clothing that could become caught during exercising.
Make sure that all bolts and nuts are tightened when equipment is in use. Periodic maintenance is
required on all exercise equipment to keep it in good condition.
Before beginning:
How you begin your exercise program depends on your physical condition. If you have been
inactive for several years, or are severely overweight, you must start slowly and increase your time
gradually, a few minutes per week.
Initially you may be able to exercise only for a few minutes in your target zone. However, your
aerobic fitness will improve over the next six to eight weeks. Don’t be discouraged if it takes longer.
It’s important to work at your own pace. Ultimately, you’ll be able to exercise continuously for 30
minutes. And the better your aerobic fitness, the harder you will have to work to stay in your target
zone. But remember these essentials:
•
Contact your physician before starting a workout or training program. Have your doctor
review your training and diet programs to advise you of a workout routine you should adopt.
•
Begin your training program slowly with realistic goals that have been set by you and your
doctor.
•
Supplement your program with some type of aerobic exercise such as walking, jogging,
swimming, dancing and/or bicycling. Monitor your pulse frequently. If you do not have an
electronic heart rate monitor, have your physician show you the proper way to manually
check your pulse by using your wrist or neck. Establish your target heart rate based on your
age and condition.
•
Drink plenty of fluids during the course of your routine. You must replace the water content
lost from excessive exercising to avoid dehydration. Avoid drinking large amounts of cold
liquids. Fluids should be at room temperature when consumed.
Meijer.com
www.smoothfitness.com
27
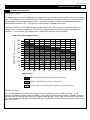
TARGET HEART RATE
Finding your pulse:
To make sure your heart is beating in its target zone, you’ll need to know how to monitor your heart
rate. The easiest way is to feel the pulse in the carotid artery on either side of your neck, between
the windpipe and the large neck muscles. Count the number of beats in ten seconds, and then
multiply that number by six. This gives you the number of beats per minute.
How fast should your heart beat during aerobic exercise? Fast enough to reach and stay in its
“target zone,” a range of beats per minute that is largely determined by your age and physical
condition. To determine your target zone, consult the chart we have provided.
FIND YOUR TARGET HEART RATE
HEART RATE in beats per minute
200
180
160
140
120
100
80
20
25
30
35
40
45
50
55
60
65
70
AGE IN YEARS
ADVANCED: Sports, athletic conditioning or interval training
FITNESS: Optimal training, aerobic or cardiovascular
HEALTH: Beginner, low intensity with long duration produces fat burning
Aerobic exercise:
Is any sustained activity that sends oxygen to your muscles via your heart and lungs. It will
improve the fitness of your lungs and heart: your body’s most important muscle. Aerobic fitness is
promoted by any activity that uses your large muscle groups - arms, legs or buttocks, for example.
Your heart beats quickly and you breathe deeply. An aerobic exercise should be part of your entire
exercise routine.
Meijer.com
28
SMOOTH CE3.0 ELLIPTICAL TRAINER
MUSCLE CHART
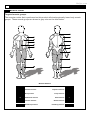
Targeted muscle groups:
The exercise routine that is performed on this product will develop primarily lower body muscle
groups. These muscle groups are shown in gray color on the chart below.
MUSCLE GROUPS
A
Shoulder muscles
B
Pectoral muscles
C
Bicep muscle
D
Abdominal muscles
E
Forearm muscles
F
Quadricep muscles
Calf muscles
G
Trapezius muscles
H
Tricep muscles
I
Back muscles
J
Gluteal muscles
K
Hamstring muscles
L
Meijer.com
www.smoothfitness.com
29
STRETCHING ROUTINE
Warm up and cool down:
A successful exercise program consists of a warm-up, aerobic exercise, and a cool-down. Do the entire program at least two and
preferably three times a week, resting for a day between workouts. After several months, you can increase your workouts to four or
five times per week.
Warming up is an important part of your workout, and should begin every session. It prepares your body for more strenuous
exercise by heating up and stretching out your muscles, increasing your circulation and pulse rate, and delivering more oxygen to
your muscles. At the end of your workout, repeat these exercises to reduce sore muscle problems. We suggest the warm-up and
cool-down exercises on the following pages:
Toe Touch:
Slowly bend forward from
your waist, letting your back
and shoulders relax as you
stretch toward your toes.
Reach down as far as you
can and hold for 15 counts.
Shoulder Lift:
Lift your right shoulder up
toward your ear for one
count. Then lift your left
shoulder up for one count as
you lower your right
shoulder.
Inner Thigh Stretch:
Sit with the soles of your feet
together with your knees
pointing outward. Pull your
feet as close into your groin
as possible. Gently push
your knees towards the floor.
Hold for 15 counts.
Hamstring Stretch:
Sit with your right leg
extended. Rest the sole of
your left foot against your
right inner thigh. Stretch
toward your toe as far as
possible. Hold for 15 counts.
Relax and then repeat with
left leg extended.
Side Stretch:
Open your arms to the side
and continue lifting them until
they are over your head.
Reach your right arm as far
upward toward the ceiling as
you can for one count. Feel
the stretch up your right side.
Repeat this action with your
left arm.
Calf-Achilles Stretch:
Lean against a wall with your
left leg in front of the right
and your arms forward. Keep
your right leg straight and the
left foot on the floor; then
bend the left leg and lean
forward by moving your hips
toward the wall. Hold, and
then repeat on the other side
for 15 counts.
Head Roll:
Rotate your head to the right
for one count, feeling the
stretch up the left side of your
neck. Next, rotate your head
back for one count, stretching
your chin to the ceiling and
letting your mouth open.
Rotate your head to the left
for one count, and finally,
drop your head to your chest
for one count.
Meijer.com
30
SMOOTH CE3.0 ELLIPTICAL TRAINER
IMPORTANT STEPS
HOW TO MAINTAIN YOUR ELLIPTICAL:
Proper maintenance is very important to ensure your Elliptical is always in top working condition.
Improper maintenance could cause damage or shorten the life of your Elliptical and exceed the
LIMITED WARRANTY coverage.
●Important: DO NOT use abrasives or solvents to clean the Elliptical. To prevent damage to the
computer, keep liquids away and keep it out of direct sunlight.
●Inspect and tighten all parts of the Elliptical regularly. Replace any damaged or worn parts
immediately.
LUBRICATION:
Clean rollers every week
Clean and lubricate the slider tubes every week using silicone lubricant.
Note: when lubricating the slider tubes, make sure the Elliptical is located on a surface that
can be easily cleaned. After lubricating your Elliptical slider tubes, clean any excess
silicone off of the frame.
Rollers
Aluminum roller tracks
Meijer.com
www.smoothfitness.com
31
GENERAL CLEANING
CLEANING:
Routine cleaning of your Elliptical will extend the product's life.
•
•
•
•
Warning: To prevent electrical shock, be sure the power to the Elliptical is OFF and the
power cord is unplugged from the wall electrical outlet before attempting any cleaning or
maintenance.
Important: DO NOT use abrasives or solvents to clean the Elliptical. To prevent damage to
the computer, keep liquids away and keep it out of direct sunlight.
After each workout: Wipe off the console and other Elliptical surfaces with a clean, water
dampened soft cloth to remove excess perspiration.
Weekly: Use of an Elliptical mat is recommended for ease of cleaning. Dirt from your shoes
contacts the pedals and eventually makes its way under the Elliptical. Vacuum underneath
Elliptical once a month.
Meijer.com
32
SMOOTH CE3.0 ELLIPTICAL TRAINER
TROUBLESHOOTING
Item
1
2
3
Breakdown
Troubleshooting
Computer will not 1. Plug the power adaptor in to the wall outlet
power up
2. Plug the power adaptor jack in to the unit.
3. Test the wall outlet for power.
4. Test the power adaptor for the correct voltage output.
5. Check the power adaptor and adaptor wire for damage.
6. Check for damaged computer cables then reconnect the lower, upper and console
cables found on page 5 and 10 of the assembly section.
No resistance level 1.When the resistance level is changed does the motor run?
change
Yes
2.Check for damaged computer cables then reconnect the lower, upper and console cables
found on page 5 and 10 of the assembly section.
3. Retest resistance
NO Hand pulse
1. Reposition hands on the pulse grip Do not hold one pulse grip with 2 hands.
figure display
2. Reconnect the pulse grip wire inside the pulse grip handle
3. Reactivate the computer
4
E-1
1. E-1 Indicates the computer was not able to calculate the body fat., Reposition hands on
the pulse grip. Do not hold one pulse grip with 2 hands.
5
E-4
6
E-2
1. E-4 indicates the user’s age, height, weight values have exceed of the maximum setting
range when entering the user information. Reenter values that do not exceed the
maximum values.
1. Check for damaged computer cables then reconnect the lower, upper and console
cables found on page 5 and 10 of the assembly section.
7
No speed reading
8
No display of
SPEED figure
9
Recovery function
does not readout
10
Noisy during
Movement
11
Noisy handlebars
2. Check the Motor and resistance cable for proper positioning.
1.Check the console together with the stage’s 9or12PIN connect cable, to see if the
console are bad contact or get loose with the stage’s 9or12PIN connect cable.
2. Check the Motor distance have exceed of the setting range or not.
1. Check for damaged computer cables then reconnect the lower, upper and console
cables found on page 5 and 10 of the assembly section.
2. Check the Speed SENSOR cable for damage and reconnect to the lower board.
Check the speed sensor and speed sensor magnet for proper positioning.
1 Verify the console is in the STOP mode and is not in a program.
2. Verify the pulse readout is functioning.
1.Check slider tubes for damage
2.Clean slider tubes with liquid silicone
3.Check pedal arm wheels for damage.
4.Clean pedal arm wheels with mild detergent and lubricate with liquid silicone
1.Disassemble lower handle bars and check for damage.
2.Lubricate with white lithium grease and reassemble.
Meijer.com
www.smoothfitness.com
33
LIMITED WARRANTY
LIMITED HOME USE WARRANTY – SMOOTH FITNESS Elliptical Warranty
Warranty Coverage: Smooth Fitness, Inc. ("Smooth Fitness") warrants to the original owner that each new product to be free from defects in workmanship and
material, under normal use and conditions.
Period of Coverage: The Warranty on this product runs from the date of original purchase using the following schedule:
Model Name
CE3.0 USA only
CE3.0 Canada
Frame
Lifetime
Lifetime
Resistance Assembly
Lifetime
Lifetime
Parts & Electronics
3 years
3 years
Labor
2 year
1 year
Labor: Smooth Fitness will reimburse for labor costs for Two (2) years*. Smooth Fitness reserves the right to either:
Hire and reimburse an independent service technician, who will come into the home for the repair,
OR
In the event that there is not an available certified Smooth Fitness service technician, Smooth will send the part directly to the consumer and will pay $75 US per
occurrence for the labor costs of such repair. If multiple repair attempts must be made for one reported problem, Smooth will only reimburse once per occurrence.
Smooth Fitness reserves the right to inspect damaged parts for misuse. Your Original Receipt is proof of purchase and should be kept with the product manual. You
may be required to show proof of purchase prior to warranty service being initiated.
Remedy Provided by Smooth Fitness: Smooth Fitness will provide a replacement part free of charge if a defect is found during the Warranty period. Smooth
Fitness may at its discretion, choose to provide any of following parts or repair options. In the event that a part is determined in need of replacement, upon receipt of
the part by Smooth Fitness, Smooth Fitness may send out the part by UPS ground or another such carrier directly to the customer’s home.
Any redemption may be by repair or replacement of the affected parts and/or product at the sole discretion of Smooth Fitness, by personnel approved by Smooth
Fitness.
Parts repaired or replaced pursuant to this Warranty shall be warranted for the unexpired portion of the Warranty applying to the original product. Any technical
advice furnished before or after delivery in regard to the use or application of Smooth Fitness products is furnished without charge and on the basis that it represents
Smooth Fitness' best judgment under the circumstances but that the advice is used at your sole risk.
Procedure for Obtaining Your Remedy Under This Warranty: To obtain service on a Smooth Fitness product, call Smooth Fitness. In the instance that service is
not available in an area, Smooth Fitness, at its discretion, can either 1) find a service technician in your area to perform warranty service, 2) have a local dealer
perform warranty service, or 3) send the warranty parts to you and reimburse as described above. To help the technician assist you, please have the following
information ready:
•
Model name or number from the cover of the manual;
•
Serial number located on the frame of the unit; and
•
The part description and the order number.
Limitations on Warranty: This Warranty does not cover any problems, damages or failures that are caused by accident, improper assembly, failure to observe
cautionary labels on the product, failure to operate the product correctly, power grid failures or spikes from your local electricity provider, abuse or freight damage.
Smooth Fitness does not warrant against any damage or defects that may result from repair or alterations made to the product by an unauthorized repair facility. In
order for this warranty to be valid, all Smooth Fitness and EVO Fitness exercise equipment must be stored and used in a fully finished and livable room within the
residence (not including an indoor swimming pool room and areas with excessive humidity).
This Warranty shall terminate if you sell or otherwise transfer this product. This Warranty does not apply to any product shipped or handled outside of the United
States or Canada. This Warranty does not apply if the product is used as a rental product or in commercial use. Consequential and incidental damages are not
recoverable under this Warranty. (Some states do not allow the exclusion or limitation of incidental or consequential damages, so the above limitation or exclusion
may not apply to you.)
THIS WARRANTY IS EXPRESSLY IN LIEU OF ALL OTHER EXPRESS WARRANTIES. ALL IMPLIED WARRANTIES,
INCLUDING WARRANTIES OF MERCHANTABILITY OR FITNESS FOR ANY PARTICULAR PURPOSE, ARE LIMITED IN DURATION TO TWO (2)
YEARS* FROM THE EFFECTIVE DATE OF THIS WARRANTY. SMOOTH FITNESS IS NOT
LIABLE FOR CONSEQUENTIAL OR INCIDENTAL DAMAGES RESULTING FROM ANY DEFECT IN PARTS NOR FOR
ANY BREACH OF EXPRESS OR IMPLIED WARRANTIES. SMOOTH FITNESS' SOLE LIABILITY UNDER THIS
WARRANTY IS LIMITED TO THE TERMS DESCRIBED IN THIS FORM. THIS WARRANTY GIVES YOU SPECIFIC LEGAL
RIGHTS, AND YOU MAY ALSO HAVE OTHER RIGHTS WHICH VARY FROM STATE TO STATE.
*Two year labor is valid only with the continental United States; Canadian labor warranties are valid for the period of 1 year from date of purchase.
FORM WS-1 (rev. 03/2008)
Meijer.com
SmooththFitness
780 5 Ave
King of Prussia, PA 19406
Toll Free Customer Service:
1.888.800.1167
Website:
www.smoothfitness.com