1
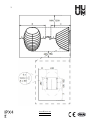
INSTALLATION AND OPERATION
MANUAL FOR HUUM DROP
ELECTRIC SAUNA
HEATER
2
Table of Contents
1. THINGS TO CHECK BEFORE INSTALLATION.................................................................... 2
2. INSTALLATION ................................................................................................................. 2
3. CONTROLLING THE HEATER......................................................................................................... 5
4. GUARD RAILS................................................................................................................................ 5
5. SAUNA ROOM .............................................................................................................................. 5
The HUUM DROP electric sauna heater delivery set contains:
- electric heater
- installation and operation manual for the electric heater.
NB! The electric heater requires a control panel and stones.
1. THINGS TO CHECK BEFORE INSTALLATION
-Does the output (kW) match the volume (m3) of the sauna room? See table 1.
- In case there are any uninsulated brick, tile or glass walls in the sauna room, an additional
volume of 15.3 m³ should be added to the sauna room for each such square meter of the wall.
-The suitable output of the heater will be determined based on Table 1.
-The producer’s warranty guarantee is invalid if the heater and sauna room have been
dimensioned incorrectly!
- Minimal safe distances between the sauna room’s ceiling and walls in view of installing the
electric heater are listed in Table 1.
2. INSTALLATION
2.1 Positioning the heater
- The heater must be positioned in such a way that there is a safe distance between flammable
materials and the external surfaces of the heater.
- In installing the heater, it must be prevented that people could have physical contact with
the heater or that other dangerous situations could emerge during the heating process.
Table 1
Output
Room
A
B
C
D
E
Min gap between
heater and ceiling
kW
m3
mm
mm
mm
mm
mm
mm
DROP 4
4.5
3–7
100
590
450
170
310
1,200
DROP 6
6
5–10
120
630
470
220
310
1,250
DROP 9
9
8–15
150
690
500
220
310
1,250
- The method of mounting the heater must guarantee that it remains securely on the wall.
The full weight of 65 kg should be considered upon installing the heater on the wall.
[email protected]
www.huum.eu
3
[email protected]
www.huum.eu
4
2.2 Connecting the heater to the power supply
- Only a certified electrician is allowed to connect the
heater to the power supply.
- A rubber insulated HO7RN-F cable or an equivalent
cable must be used as the connection cable.
The maximum current intensity in the cross-sectional area of
the cable and circuit breaker are listed in Table 2.
Table 2
Output
Heat elements
Circuit breaker
Power cable
kW
kW
A
mm2
DROP 4
4.5
1.5
3x10/1x16
5x1.5/3x2.5
DROP 6
6
2
3x10/1x35
5x1.5/3x6
DROP 9
9
1.5/2
3x16/1x50
5x2.5/3x10
ATTENTION! It is forbidden to use a non-heat-resistant cable with PVC isolation as the power
cable. The joint box must be waterproof and it must be located up to 50 cm from the floor.
- Open the cover of the heater’s electrical box.
- Attach the power cable on the terminal block according to the circuit diagram.
- Close the cover.
- Fix the cable on the output with a cable strap.
- Install the heater on the wall frame.
2.3 Fitting the stones
Upon stacking the stones, one should monitor that the heating elements are not bent and that
there is a sufficient air circulation around the heater elements.
- Stack the stones sparsely between the heating elements. When the stones have been
stacked too close to each other, the heating elements may overheat (= shorter useful life) and
slow the heating of the sauna.
- Stones with a diameter of 4–7 cm are suitable for the heater.
- The stones on the external surface of the heater must fully cover the heating elements. The
heating elements must not be visible.
- The external surface of the stone container must be stacked full as tightly as possible; the
surface of the heating elements must not be visible.
- Using ceramic stones in the DROP heater is allowed upon the user’s responsibility.
A TOO SPARSELY FILLED STONE CONTAINER CAUSES FIRE HAZARD!
Before switching the heater on, the insulation resistance might prove to be lower than the
standard.
The reason for that is the moisture seeped into the insulating layer during storage in the
warehouse and transportation. The moisture evaporates in 1–2 hours of heating the electric
heater.
[email protected]
www.huum.eu
5
3. CONTROLLING THE HEATER
All certified control panels may be used in controlling the heater.
The output of the heater must remain in the interval determined by the control panel’s
producer.
4. GUARD RAILS
- It is recommended to construct a guard rail around the heater. We recommend using
materials with low heat capacity and bad thermal conductivity for the guard rail.
- Upon using flammable materials, it is necessary to leave the specified minimal safety
clearances between the heater and flammable constructions.
INSTALLING THE HEATER CLOSER TO FLAMMABLE CONSTRUCTIONS THAN AT THE DISTANCE
OF THE MINIMAL REQUIRED PROTECTION BELT MAY CAUSE FIRE HAZARD.
5. SAUNA ROOM
5.1 Wall materials and insulating the sauna room
In a sauna with electric heating, all massive heat accumulating wall surfaces (brick, glass brick,
rendering etc.) must be insulated to use the electric heater with a regular output.
The following sauna wall and ceiling construction is considered to be sufficiently
insulated:
− a carefully installed insulation wool layer of 100 mm (min. 50 mm)
− the construction is damp proofed with taped aluminium paper or other reflective material
− there is a 10 mm air gap between the damp protection and boarding
− a light wooden board that is about 12–16 mm thick has been used for interior finishing
− there is an air gap of at least 5 mm on the edge of the ceiling panels at the upper part of
the wall panelling.
In order to use the heater with a regular output, it would be practical to bring the ceiling of the
sauna lower (regular 2,100–2,300, min. height of sauna room 1,900 mm) so that the volume of
the sauna room diminishes. The ceiling is insulated with an insulation layer at least 100 mm
thick and boarded according to the method described above.
Wood should be used to cover internal surfaces; an exception may be made for heat resistant
walls in the vicinity of the heater.
ATTENTION! Insulating the heat barrier has to be approved by the fire inspector. Insulating
flues in use is forbidden!
ATTENTION! Covering the walls or floor with light protective material, for example, mineral tiles
that are installed directly on the surface of the walls or ceiling might cause the dangerous
overheating of the wall or ceiling material.
5.2 Darkening of the sauna room walls
Due to heat, the wood material in the sauna room darkens in time. If you use wood protection
products, you may notice that the wall above the heater darkens before long. The darkening
process is also caused by the fine stone dust, breaking away from the heater stones and lifted
up by the airflow. If you follow the producer’s instructions upon installing the heater, the
[email protected]
www.huum.eu
6
flammable materials in the sauna room will not heat to a dangerous level. The highest
allowed temperature for the wall and ceiling surfaces is 140 ˚C.
5.3 Floor of the sauna room
The heater stones in use crumble due to temperature changes. The pieces and pebbles
breaking away from the heater stones are washed on the sauna’s floor with the steam-making
water. Hot stone parts may damage plastic flooring under and near the heater.
Heater stone particles and sprays from the steam-making water (e.g., with iron content) may
absorb into the light joints of a tile floor. In order to avoid aesthetic damage (caused by the
reasons mentioned above), ceramic tiles and dark joint filler should be used under and around
the heater.
5.4 Ventilation of the sauna
- In order to assure a sufficient oxygen supply and fresh air, the sauna’s ventilation must be as
efficient as possible. It is advisable to direct the fresh air into the sauna room from above the
heater stones. As an alternative, the fresh air may be directed in from under the heater.
- The air inlet must be equipped with an adjustable valve.
- The exhaust valve must be installed in the opposite wall from the heater at least 20 cm above
the inlet valve.
WARNING!
Only one heater may be installed in the sauna room.
•
•
•
•
•
•
•
•
•
•
•
•
•
•
•
•
•
Before turning on the electric heater, always check the sauna room and heater.
The heater may be used only when it has been correctly filled with stones.
Do not cover the heater—this causes fire hazard.
Do not touch a working heater, it causes burns.
Ventilating the sauna room incorrectly may dry the wood too much and cause a fire
hazard in the sauna.
Only tap water may be used for making steam.
Never make steam by using a water hose.
There must always be at least 5 cm of fireproof heat insulation under the boarding.
Sauna doors must always open outward.
Do not use the sauna for any other purpose than it is meant to be used.
Do not install more than one heater in the sauna room.
Undiluted sauna essences etc. may ignite when poured directly on the stones.
Do not leave small children in the sauna unattended.
Sudden cooling after staying in the steam room is not recommended for people with
poor health. Consult a doctor.
Enjoy the sauna as long as it is comfortable for you.
Keep this information in a secure place.
The product’s warranty guarantee does not extend to heating elements.
[email protected]
www.huum.eu