1
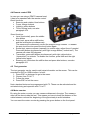
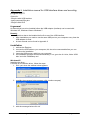
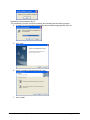
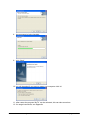
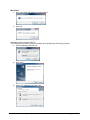
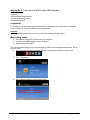
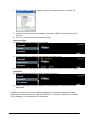
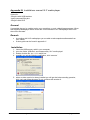
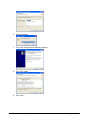
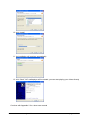
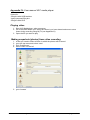
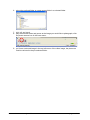
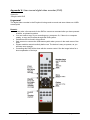
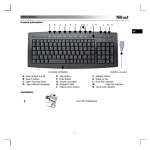
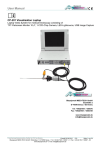
Content
page
1.
Content
1
2.
Introduction
2
2.1
2.2
2.3
2
2
3
3.
Safety
3.1
3.2
3.3
4.
Application area
The complete system
Working with the system
4
Setting up & connecting the system
Electricity
Temperature and moisture
4
4
4
Using the system
5
4.1
4.2
4.3
4.4
4.5
4.6
4.7
4.8
4.9
4.10
4.11
4.12
4.13
4.14
5
5
6
7
7
7
8
8
8
9
9
10
10
11
Before starting an inspection
Connecting the system
Controlpanel Easybox
Remote control ZRK
Text generator
Meter counter
USB interface
Laptop prepared Easybox (optional)
Easybox with digital video recorder (DVR) (optional)
Tool (accessories)
Steering unit (accessories)
Guides (accessories)
Transmitter with the 36, 45 and 48 mm camera (optional)
Truck, how to use
5.
Maintenance
13
6.
Service & Warranty
14
Appendix I: Installation manual for USB interface driver and recording
program MyTV
15
Appendix II: User manual MyTV with USB interface
20
Appendix III: Installations manual VLC media player
22
Appendix IV: User manual VLC media player
25
Appendix V: User manual digital video recorder (DVR)
27
Appendix VI: Troubleshooting, solving problems
31
98323408 manual easybox UK
rev L
page 1 of 31
2
Introduction
This manual is for:
•
•
•
Easybox
Easybox DVR-DP
Easybox prepared for laptop
(98320953)
(98325930)
(98324524)
2.1. Application area
Depending of your choice of camera head and the kind of cable every camera has
it’s own working area.
36 mm camera:
Suitable to inspect pipes of ∅ 50 to 200 mm.
90 degrees corners from pipes of 50 mm.
45 mm camera with combi cable 7.5 mm:
Suitable to inspect pipes of ∅ 75 to 200 mm. 90 degrees corners from pipes of
75 mm.
45 mm camera with combi cable 9 mm:
Suitable to inspect pipes of ∅ 75 to 300 mm. 90 degrees corners from pipes of
125 mm.
48 mm camera with combi cable 7.5 mm:
Suitable to inspect pipes of ∅ 75 to minimal 400 mm. 90 degrees corners from pipes
of 75 mm.
ZRK70 camera with combi cable 9 mm
Suitable to inspect pipes of ∅ 110 to 500 mm. 90 degrees corners from pipes of
125 mm.
Note: These specifications are depending on the kind of material, color and dirt of the
pipe.
2.2. The complete system
The camera system consist the following items:
•
•
•
Camera head
Reel with adjustable brake
Monitor box or Easybox
98323408 manual easybox UK
rev L
page 2 of 31
2.3 Working with the system
All parts of the system are made of high quality material and assembled with great
precision. For optimal usage of the system regular maintenance is necessary. You
will find instructions and tips in this manual about:
•
•
•
•
Safety
Usage
Maintenance
Service
98323408 manual easybox UK
rev L
page 3 of 31
3. Safety
3.1
Setting up & connecting the system
Mind the following aspects before setting up or starting up the system:
•
•
Place the Easybox on a dry and solid ground.
Place the reel in such way that it cannot fall into the well.
Be aware the system is switched off and not connected to the power grid before you
connect any connector. For further instructions how to connect read chapter 4
3.2
Electricity
The system operates on a 230V/50Hz current and on 12V DC. Be sure that the
system is set up in a dry environment. Prevent water or moisture getting in or on the
industrial box.
By using a wrong or instable electric current the system will be badly damaged and
warranty will void.
We recommend: do NOT use an generator.
Using an inverter (12V DC to 230V AC); The minimum power output must be 150W
continuous. The peak output must be 300W. The output must also be a pure sinus.
Your dealer could help you select a suitable inverter.
By using an underpowered inverter or an inverter with no pure sinus as output
you could harm your system. Warranty will void.
Use always a power point which is connected to ground.
3.3 Temperature and moisture
In case the system is not in use it has to be stored in a dry and ventilated room. The
temperature during use and storage has to stay between 0°C and 45°C.
Be aware of this during winter periods in case you keep your inspection system in
your company car or van.
98323408 manual easybox UK
rev L
page 4 of 31
4. Using the system
4.1
Before starting an inspection
Before starting an inspection be sure that the pipe has been totally cleaned.
Caution! Never use the camera for unblocking a pipe! If you feel resistance and can’t
push the camera any further, do not continue the inspection. Gently pull back the
camera and clean/ unblock the pipe first and then continue the inspection.
4.2 Connecting the system
•
•
•
•
•
•
•
•
Open the Easybox.
In case you are using a ZRK70 camera head, connect the 19p connector of
the reel to the remote control ZRK70
Connect the 7p connector of the reel or remote control ZRK70 to the Easybox
and eventually the 12V power cable
Connect the 230V connecter to a power point which is connected to ground.
Switch on the system with the red on/off button on the control panel. The LED
will become green.
Switch on, if necessary, the DVR. Use the the on/off button on the DVR front
also switch on the video signal, using the switch below the right part of the
DVR.
Switch on the LCD display, if necessary. Or start the laptop
Adjust the lightning with the yellow buttons on the front.
In case you’re working with the ZRK70 some actions will differ. See paragraph 4.6 for
further information.
98323408 manual easybox UK
rev L
page 5 of 31
4.3
Controlpanel Easybox
The controlpanel of the Easybox has the following funtions:
Fuse 6,3A
Power supply for
remote ZRK 70
Video in and
video out
connectors
Transmitter (optional)
for
Inspector 36/ 45 / 48
Light
adjustment,
for 36/45/48
Reset button to set
meter counter back to
‘0’
7p connector,
36/45/48
directly,
ZRK70 via
remote
98323408 manual easybox UK
On/off switch for the
Total system
rev L
page 6 of 31
4.4 Remote control ZRK
In case you are using a ZRK70 camera head,
it has to be operated with the remote control.
Basic functions
• Swerving and rotation; blue buttons
• Focus; orange buttons
• Lighting; yellow buttons
• Truck; turning knob, see also
paragraph 4.14
Smart functions
• Level (horizontal); press the middle
blue button
• Auto level; press either shift button
and the level button simultaneously.
The camera will continuously correct the image through rotation. To disable
the auto level function press the level button again.
• Socket test; swerve camera (manually) to socket edge, adjust focus if needed.
Press shift button simultaneously with right orange button (“socket test”). The
camera will rotate 360 degrees.
• Transmitter; press shift button simultaneously with right yellow button
(“transmitter”) to activate. To disable the function, press shift and the right
yellow button again.
• Steering unit; hold down the shift button and press blue buttons, see also
paragraph 4.11
4.5 Text generator
The text generator can be used to add extra information on the screen. This can be
recorded on DVR or USB interface. In brief:
1. Press ESC on keyboard to go to the menu.
2. Choose from F1 to F7
3. Follow the steps
4. Press ESC to exit the menu
Note: standard texts can be programmed with F3. These can be activated and deactivated during an inspection with F1 to F7.
4.6 Meter counter
By using the meter counter you can measure distances in the pipe. The measurement will be done inside the reel. This means you have to keep the distance of the
cable between reel and the beginning of the pipe steady to avoid mistakes.
You can reset the meter counter by pressing the green button on the front panel.
98323408 manual easybox UK
rev L
page 7 of 31
4.7 Usage of the USB interface
It is possible to record video and pictures on a computer by using the USB port. This
function can be found on the Easybox with USB interface, the laptop prepared
Easybox and the Easybox with digital video recorder.
Before you can start recording pictures and video, you have to take a number of
steps. Therefore you will need the provided cd-rom “USB Software” and follow the
guidelines which can be found in appendix I.
After you have executed all the steps you can start recording with the installed
software. A brief manual can be found in appendix II.
Remarks:
-
We recommend to take your time making all installations
By preference be seated at a table
4.8 Laptop prepared Easybox (optional)
When you´re using a laptop prepared Easybox you need to go through the steps as
mentioned in paragraph 4.7.
Besides, you also need to go through the following steps:
• Secure the laptop adapter on the therefore meant location, using the Velcro.
• Measure the height of the closed laptop
• Adjust the laptop support to the correct height using the winged nuts. This
should be done as such that the laptop will not be damaged while closing the
Easybox, but will stay in position during transportation.
4.9 Easybox with digital video recorder (DVR) (optional)
When you’ve opted for an Easybox with digital video recorder, in brief DVR, you can
record the camera’s image with help of the DVR on a USB-memorystick. Afterwards
the video can be transferred to a computer and easily show your analysation to your
customer.
The DVR is built into the Easybox and connected to its controlling system. How to
install and startup the Easybox is earlier mentioned in paragraph 4.2. A specific
manual for recording with the DVR can be found in appendix IV.
After recording one or more videos the USB-memorystick can be unplugged from the
DVR and connected to a computer. Be aware that you have executed the usage
steps exactly as they have been described in appendix IV, before removing the USBmemorystick from the DVR.
98323408 manual easybox UK
rev L
page 8 of 31
4.10 Tool (accessories)
The tool to ‘steer’ the ZRK70 camerahead
has to be mounted as follows. First, remove
the black plastic guide plate on the side
where the “endstop” sticker is positioned.
Replace this plate with the newly supplied
aluminium plate. Secondly, unscrew the two
central screws which are positioned left and
right from the camera glass. Then place and
fixate the mounting plate of the tool on the
camerafront by using the two new screws
from the tool set.
ATTENTION: make sure the aluminium
“endstop” plate is on top side and pointer
of the tool is on the opposite.
4.11 Steering unit (accessories)
Using the steering unit makes it possible to ‘steer’ the camera head into a side
branch. The functionality and controls of the camera head (ao. the ZRK70) remaines
unchanged. The steering unit is operated with the same remote control as the
ZRK70.
Attention, before mounting:
• Remove moist and dirt from the springpiece, camera head and fiber
connection
• Make sure you work with dry hands
• Prevent dirt and/or contaminated water from reaching the connectors
Mounting the Steering Unit
1. switch off the inspection system in case
this is actived
2. unscrew the camera head from the
spring piece, in case of the ZRK70, only
turn at the black part of the camera
head!
3. unscrew the spring piece from the push
fiber
4. put the rear of the steering unit onto the
push fiber end, beware, this can only be
achieved in one way, check for the pin.
Accordingly, screw the push fiber to the
steering unit
5. screw the camera head onto the
steering unit
6. activate the system
98323408 manual easybox UK
rev L
page 9 of 31
Operating the Steering Unit
1. push SHIFT + navigation arrows to bend
or rotate the steering unit
2. push SHIFT + top left button (‘light’) to
put the steering unit back into its default
position
Mounting the extra piece
1. same steps as with mounting the
steering unit
Maintance of O-rings (sealing ring)
In case you sense friction during screwing the different parts, you can apply
lubrication (Vaseline etc). This will also lengthen the life of the O-rings.
4.12 Guides (accessories)
There are several guides available to position the camera head in to the pipe.
Be aware: Do not turn the front ring of the camera (45mm camera). In case you
unscrew the guide a leakage can be caused and the warranty will void.
4.13 Transmitter with the 36, 45 and 48 mm camera (optional)
The camerahead of the 36 mm, 45 mm and the 48 mm systems can be equiped with
a 512 Hz transmitter (can also be done on a future date). The camerahead can be
localized above ground by using a receiver/detector.
Activation of the transmitter, is very straight forward by using the controlpanel switch.
During the activation the camera lighting is switched to its maximum. When the
transmitter is activated the lighting cannot be adjusted.
De-activation happens by pushing the switch again. When the transmitter is deactivated the lighting will show a small decline in intensity, but will regain its strenght
immediately.
98323408 manual easybox UK
rev L
page 10 of 31
4.14 Truck, how to use
Follow the steps below and strictly follow the sequence.
Preparing the system
1 Place each item of the system on a relative levelled surface and
connect the cable of the motorized reel to the truck.
2 Mount the pull protection. Be
aware, to give an extra length to the
flexible cable, approximately 5 cm.
And make sure the cable is not
twisted around its own length axis or
steel cable.
3 Connect the complete system without turning on any box
4 Plug in the two power cords (always use a power socket with ground!)
5 FIRST: Turn on the power for the control box
6 SECOND: Turn on the power for the easybox
98323408 manual easybox UK
rev L
page 11 of 31
Operating the system
When operating the system two aspect have to be taken into account.
1. The system has a delay function. This means that after
you´ve turned the knob it will take a few moments before
the truck actually starts driving.
2. Synchronization. When shifting direction (from forward to
backward (and vice versa) the truck and reel need to
communicate before starting with the next command.
Use the turning knob to drive the truck forward and backward. Be aware of the
system´s delay function so, gently turn the knob. Please, take special care when
shifting from driving forward to backward, and vice versa. Turn the knob in the neutral
position and wait a second before shifting to the other direction.
98323408 manual easybox UK
rev L
page 12 of 31
5. Maintenance
It’s of great importance to regularly clean and grease the system. If you do this at a
regular base it will increase the lifetime of the system.
After each inspection the system should be cleaned thoroughly, especially the
camera head and the connectors. Any sand or dirt on the camera head, connectors
or other moving parts should be removed after an inspection, do this with a clean
cloth or brush.
The reel or the box may never be cleaned with high pressure water cleaners.
We advise to deliver the system to your dealer for service every once a year. During
the service the system will be checked for operation, safety and any possible wear.
98323408 manual easybox UK
rev L
page 13 of 31
6. Service & Warranty
A certified engineer must do all service to the system. If any service is required you
should contact your dealer first. Your dealer will care for any service, modification or
repair on the system.
If any services, modifications or repairs are done by the end-user (without permission
of the dealer) or another third-party, warranty will void.
Warranty and warranty time is depending on the terms of your dealer.
Warranty also voids on:
•
•
•
•
•
Cable fracture.
Short circuit (e.a. power input > 230V – 50Hz).
Water damage.
Inaccurate use or abuse of the system.
In case you do not follow the instructions of this manual.
------------------------------------------------------------------------------------------------------------All the specifications, construction specifications, way of act and illustrations in this manual are not
strictly. We have the right to make an alternation to the manual without any announcement.
------------------------------------------------------------------------------------------------------------The Inspector® is a product of
Camtronics BV
Ekkersrijt 3209
5692 CG SON
Phone:
Fax:
E-mail:
Internet:
98323408 manual easybox UK
+31 499 494590
+31 499 494591
[email protected]
www.camtronics.nl
rev L
page 14 of 31
Appendix I: Installation manual for USB interface driver and recording
program MyTV
Suited for:
-Easybox with USB interface
-laptop prepared Easybox
-Easybox with DVR
In general
An extra driver has to be installed before the USB adapter (interface) can be used with
Windows XP, Windows Vista or Windows 7.
Remark:
• The driver has to be installed before first use of the USB interface
• After installation you need to use the same USB port on your computer every time the
USB adapter is used
• A short manual can be found in Appendix II
Installation
1. activate the Easybox
2. connect the USB cable to your computer, this has to be connected before you can
continue the installation
3. insert the USB memory stick into your computer
4. the installation process will start automatically, if not, go to the H:/ drive, folder ‘USB
disc’ and click ‘5600Setup.exe’
Windows XP
Installing the driver
First step is to install the driver, follow the steps:
1. click ‘yes’ when the window below appears
2. possibly the message below appears, click ‘continue anyway’
3. with the message below click ‘ok’
98323408 manual easybox UK
rev L
page 15 of 31
Installation of the program ‘My TV’
The installation process continues instantly with installing the recording program.
4. In case it is not selected automatically select desired language and click ‘ok’
5. click ‘next’
6. leave ‘complete’ selected and click ‘next’
7. click ‘install’
98323408 manual easybox UK
rev L
page 16 of 31
8. the programm is being installed
9. click ‘finish’
10. you will be asked if you want to restart your computer click ‘ok’
11. after restart the program ‘MyTV’ can be activated, this can take some time
12. for usage instructions, see Appendix
98323408 manual easybox UK
rev L
page 17 of 31
Windows 7
1. click ‘yes’ when the window below appears
2. click 'ok'
Installation of the program ‘My TV’
The installation process continues instantly with installing the recording program.
3. select language and click ‘ok’
4. click ‘next’
5. leave ‘full’ selected and click ‘next’
98323408 manual easybox UK
rev L
page 18 of 31
6. click 'install'
7. click 'finish'
8. restart your computer by clicking ‘ok’
9. after restart the program ‘MyTV’ can be activated, this can take some time
10. for usage instructions, see Appendix II
98323408 manual easybox UK
rev L
page 19 of 31
Appendix II: User manual MyTV with USB interface
Suited for:
-Easybox with USB interface
-Laptop prepared Easybox
-Easybox with DVR
In general
To be able to use the USB adapter (interface) in combination with Windows XP, Windows
Vista or Windows 7 an extra driver has to be installed.
Remark:
• Have you installed the drivers, if not follow the steps in Appendix I
Recording video
1. Activate the Inspector System and your computer
2. Connect the USB interface to your computer
3. Open the program MyTV
The most sensible thing to do is to set a folder in which the recordings will be saved, this is
how it’s done:
4. Go to the icons at the right of the top menu and click the spanner/wrench icon
5. Go to ‘Recording’
6. Go to ‘Movies Capture’ and click the third
98323408 manual easybox UK
rev L
page 20 of 31
7. Select a folder, for example a project folder of a specific inspection, and click ‘ok’
8. repeat this proces for ‘Picture Snapshot’, also select ‘JPEG’ as the file format for the
pictures.
9. click ‘ok’, you will return to the recording screen
video recording
10. start recording by clicking ‘record’ left below
11. a red dot and the recording time will appear in the lower menu
12. to stop recording click ‘stop record’, or simply click the red button in the video image
snapshots
13. create snapshots/photos by clicking ‘snapshot’ left below
14. in the top left corner the word ‘snapshot’ will briefly appear to indicate a photo has
been taken
Playing the movies can be done in Window Mediaplayer. It’s possible problems will arise,
especially with Windows versions older than Windows 7. Therefore, we advise you to install
VLC mediaplayer. See Appendix IV for instructions.
98323408 manual easybox UK
rev L
page 21 of 31
Appendix III: Installations manual VLC media player
Suited for:
-Easybox with USB interface
-laptop prepared Easybox
-Easybox with DVR
General
It’s possible that you’re unable to play your recordings, or only a black image appears. When
this happens Mediaplayer doesn’t have the correct firmware. VLC Mediaplayer does have
the correct firmware.
Remark
•
•
by working with VLC mediaplayer you are able to take snapshots afterwards from
your videos
a short guide can be found in appendix V
Installation
1.
2.
3.
4.
insert the USB memory stick in your computer
go to the folder ‘USB disc’ and subsequently ‘VLC media player’
double click the file ‘vlc-1.1.11-win32.exe’
possibly you get the following notification, click ‘execute’
5. when an older version is alreay installed you will get the below standing question,
click ‘yes’ and follow the steps. If not, continue with number 6.
98323408 manual easybox UK
rev L
page 22 of 31
6. select language
7. click ‘next’ with the below standing window
8. click ‘next’ again
9. click ‘next’
98323408 manual easybox UK
rev L
page 23 of 31
10. click ‘install’
11. the installation will continue automatically
12. click ‘finish’ VLC mediaplayer will be started, you can start playing your videos directly
Continue with Appendix V for a short user manual
98323408 manual easybox UK
rev L
page 24 of 31
Appendix IV: User manual VLC media player
Suited for:
-Easybox with USB interface
-laptop prepared Easybox
-Easybox with DVR
Playing video
1. Start VLC Mediaplayer, when necessary
2. Go to the folder where your videos are stored, you have determined were to store
these during recording using MyTV (see Appendix III)
3. Open the file you want to play
Making snapshots (photos) from video recording
1.
2.
3.
4.
at first you need to select a folder in which the photos will be stored
go to the top menu and select ‘extra’
click ‘Preferences’
select ‘Video’ on the left
5. go to ‘browse’
98323408 manual easybox UK
rev L
page 25 of 31
6. select the prefered folder or create a new folder in a selected folder
7. click ‘ok’ and ‘save’
8. play the selected video and pauze at the image you would like to photograph, click
the photo camera icon in the lower menu
9. you’ll see a reduced image in the top left corner of the video image, the photo can
now be retrieved in the pre selected folder.
98323408 manual easybox UK
rev L
page 26 of 31
Appendix V: User manual digital video recorder (DVR)
Suited for:
-Easybox with DVR
In general
The digital video recorder in the Easybox is being used to record and store videos on a USBmemorystick
Remark:
• It may take a few seconds for the DVR to execute a command after you have pressed
a button, so please be patient.
• You can make a copy of your recordings on a computer. Or, if there is no computer
nearby, a copy can be made through this DVR system.
• Guidelines can be found in this manual.
• Only connect or remove the USB-memorystick when you are in the main menu of the
DVR.
• Please read this manual carefully before use. The device is easy to operate, as you
will learn soon enough.
• Controlling this DVR will be done with the remote control. See the image below for a
short explanation of the keys.
98323408 manual easybox UK
rev L
page 27 of 31
Start up
1.
2.
3.
4.
5.
connect all cables to the Easybox
push ON (in the box lower right), the red light will turn green
activate display by pushing top button on the right of the display
connect an USB stick to the USB cable
activate the DVR by pushing the switch on the lower right of the DVR LCD display,
the start-up will take approx. 10 sec., you will see a blue screen with a logo in the
middle.
6. the MENU appears on screen, with live image from the camera already on the
background
Recording
1. navigate in the MENU to TV and push OK, you will see live signal from the camera
2. press RECORD once, this is only possible when the USB stick is connected to the
USB cable
3. a light on the DVR switches on, the DVR will automatically generate the folder Rec on
the USB stick
4. press PAUSE to interupt the recording, push PAUSE again to continue or press
STOP to quit recording, the light will be turned off
5. press MENU to return to main menu
Playback
1.
2.
3.
4.
5.
6.
press MENU
navigate to BROWSE and press OK
navigate to USB, press OK
select USB stick, press OK
navigate to My Recordings, press OK
select the desired video clip and press OK, if desired check the preview first
(generation of filename: yyyymmdd-tttt)
7. the video clip will stop automatically, or press STOP. Afterwards you will return to
Rec. If desired, you can start up another video clip
8. press MENU
Date, time etc.
1.
2.
3.
4.
5.
6.
press MENU
navigate to SETUP and press OK
navigate to SYSTEM, then to TIME and press OK, select ´manual´ and press OK
adjust the parameters by using the navigation ór number keys and press ENTER
when asked to confirm, select ´confirm´and press OK
press MENU
98323408 manual easybox UK
rev L
page 28 of 31
Removing files (via FILE COPY)
1.
2.
3.
4.
5.
6.
press MENU
navigate to FILE COPY and press OK
select source USB, press OK
select destination TRASHCAN, press OK
wait a few seconds
navigate to the desired source file, press SELECT to select file
(a check icon will appear)
7. press right arrow key
8. you will be asked to confirm the delete, navigate to YES and press OK
9. you will see the notification that deleting has been completed
select NO and press OK
10. press MENU
Removing files (via OPTION)
1.
2.
3.
4.
5.
6.
7.
press MENU
navigate to BROWSER and press OK
select source USB, press OK
select desired file and press OPTION on remote control
you can choose between back, rename or delete, select delete and press OK
you will be asked to confirm the delete, navigate to OK and press OK
press MENU
Renaming files (via OPTION)
1.
2.
3.
4.
5.
6.
press MENU
navigate to BROWSER and press OK
select source USB, press OK
select desired file and press OPTION
you can choose between back, rename or delete, select rename and press OK
by using the navigation keys and OK, you can insert a new name, when ready select
OK en press OK
7. press MENU
Playing files on computer, installing codecs
We advice to install VLC media player, see appendix III. If not possible, follow the steps
below.
1. put the USB memory stick in your computer
2. go to the folder ‘USB DVR recorder - MPEG codecs’
3. click the file ‘Matroska_Pack_Full_v1.1.2.exe’
4. select language ‘English’
5. click ‘no’ at question below
98323408 manual easybox UK
rev L
page 29 of 31
6. click ‘next’ (2x)
7. click ‘install’ the codecs will be installed
8. select ‘no’ at the notification below
9. click ‘close’ after finishing the installation
10. now you can play the recordings on your computer
98323408 manual easybox UK
rev L
page 30 of 31
Appendix VI: Troubleshooting, solving problems
Problem
System connected and
switched on in the wrong
order
Cause
Switch off complete system and switch it back on
Solution
Switch off transmitter
Unknown signs on
screen
Transmitter is activated
Switch off transmitter
No image
Lighting does not respond Transmitter is activated
to commands
Cable between USB-grabber and laptop may not be extended more than 3m
Change input with buttons ‘on/off’ (on the display’s upper right) or arrow button of ‘menu’
(on the display’s lower right)
Extension of USB-grabber
cable
Blue image with ‘no signal’ Display receives wrong
and/or ‘AV-2’
input
Noise/interference/no
image on laptop
Adjust settings via SETUP and VIDEO according to screenshot
Check if USB #1 is set, see screenshot and Selecting USB (App. IV)
Incorrect video setup
Check if time and date are correctly set , see screenshot and DATE, TIME etc.
Wrong setup of USB
recording device
Deviation in image
(noise, interference,
image aspect ratio)
Incorrect time setup
Not able to record
Can not find video clips,
which are just recorded,
at todays date
page 31 of 31
rev L
98323408 manual easybox UK