1
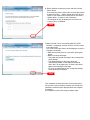
Driver for Windows Vista Installation Guide
Before setting up
- Prepare the following for setup:
1) Windows Vista or Windows Vista x64 Edition operating
system
2) Printer Driver Disk (this disk) or driver data downloaded
from Web site.
- When setting up, log on with an Administrator account.
- <Windows needs your permission to continue> may be
displayed in the <User Account Control> dialog box
during the setup process. If so, select <Continue>.
- If the FUJITSU DL3850+ printer driver has already been
set up, delete it and set up again.
- This guide includes procedures on installing printer drivers
on locally connected PC's.
For installation methods on network connection and shared
printers, refer to the Windows Vista user's manual or “help”.
- In the setup methods below, "Start" refers to the Windows
logo in the bottom left of the desktop.
Using Plug & Play
Require: Be sure to turn off the power to both the computer
and the printer.
a. Make sure that the printer is connected to the computer,
and then turn on the power to the printer.
b. Make sure that the printer is online, and then turn on the
power to the computer and start Windows Vista or Windows
Vista x64 edition.
c. If the printer is detected successfully, "Windows needs to
install driver software for your FUJITSU DL3850+" will be
displayed in the <Found New Hardware> dialog box.
d. Select <Locate and install driver software (recommended)>.
Click
e. When "Insert the disc that with your FUJITSU DL3850+" is
displayed, insert the printer driver disk in the CD-ROM.
** If the setup disk has already been inserted in the drive
before this window is displayed, the <Next> button will be
displayed, so click the <Next> button.
** To use the latest version of the printer driver downloaded
from our Website, select "-> I don't have the disc. Show me
other options." and then go to step “g”.
Click
f. When "Please select the best match for your hardware from
the list below." is displayed, select the driver in the
"D:\Drivers\DL3850+\English\Vista" folder for the <Location>
description, and then click the <Next> button.
Go to step “I”.
** In this example, the CD drive is drive D:.
If another letter is being used for the CD drive letter, change
the drive letter accordingly.
Select
Click
g. When the <Windows couldn't find driver software for your
device> window is displayed, click <Browse my computer for
diver software (advanced)>.
Click
h. When the "Browse for driver software on your computer"
window is displayed, enter "(name of the folder containing the
downloaded driver data) \Drivers\DL3850+\English\Vista" in
the <Search for driver software in this location:> field, and
then click the <Next> button.
Input
Click
i. "Windows can't verify the publisher of this driver software" will
be displayed in the <Windows Security> dialog box, but select
"-> Install this driver software anyway".
Click
j. The plug-and-play wizard will start copying the files.
k. When the <Found New Hardware - FUJITSU DL3850+> is
displayed, make sure that the message "The software for this
device has been successfully installed" is displayed, and
then select <Close>.
Click
This completes the setup procedure for the printer driver.
Setup method using Add Printer Wizard
(without using Plug & Play)
Set up the printer by running the Add Printer Wizard.
The procedure described here assumes that Windows Vista or
Windows Vista x64 Edition is already running.
a. Select "Start" -> "Control Panel" -> "Hardware and Sound"
-> "Printers".
b. Select <Add a printer> from the printer folder.
Click
c. Select <Add a local printer> when the <Add Printer> wizard
is displayed.
Click
d. Specify which port the printer will connect to, and then click
the <Next> button.
Click
e. Select <Have Disk> when the <Install the printer driver>
screen is displayed.
Click
f. Insert this disk in the CD drive (D:) and change the path from
"A:\" to "D:\Drivers\DL3850+\English\Vista".
** In this example, the CD drive is drive D:.
If another letter is being used for the CD drive letter,
change the drive letter accordingly.
** To use the latest version of the printer driver downloaded
from our web site, select the folder which stores the
downloaded data.
Input
g. Several model names will be displayed in a list box.
Select the model to be used, and then click the <Next>
button.
** If "Which version of the driver do you want to use?" is
displayed, select <Replace the current printer>.
Click
h. When the <Type a printer name> window is displayed,
enter the printer name (to change the printer name, enter
the new printer name), make settings for the default printer,
and then click the <Next> button.
Click
i. "Windows can't verify the publisher of this driver software"
will be displayed in the <Windows Security> dialog box,
but select "-> Install this driver software anyway".
Click
j. The wizard will start copying files.
k. Specify whether to share the printer, and then click the
<Next> button.
To not share the printer: Select <Do not share this printer>.
To share the printer : Select <Share this printer so that
others on your network can find and use it> and enter a
<Share name>, <Location> and <Comment>.
** This window will only be displayed if <User Account
Control (UAC)> is disabled.
Click
l. Make sure that "You've successfully added FUJITSU
DL3850+" is displayed, and then click the <Finish> button
to end the wizard.
The <Print a test page> button will be displayed, so print a
test page if necessary.
** Make sure that the printer is online when printing test
pages.
** Notes on printing test pages
- Test pages are printed according to the current printer
driver settings.
- The default settings for the printer driver are
"Automatically Select" for the paper feed method,
and "Letter" for the paper size, so insert Letter-sized
paper before printing the test page.
- To use a non-default paper size, change the settings
before printing the test page.
Click
This completes the setup procedure for the printer driver.
If the printer is set up using this method, the <Found New
Hardware> window may be displayed when the computer
is restarted.
If this happens, perform the setup procedure again.