1
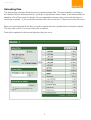
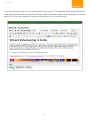
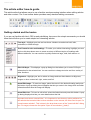
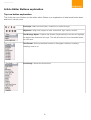
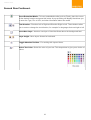
creotec.com
Simple Page Manager
The User Manual
1
creotec.com
Table of Contents
Welcome to Simple Page Manager............................................................................3
Navigating folders......................................................................................................4
Uploading files............................................................................................................5
Creating folders and files...........................................................................................6
Rename, move, delete and duplicate.........................................................................7
Editing text and HTML files........................................................................................8
The article editor how-to guide.................................................................................10
Getting started and the basics...............................................................................................10
Article Editor Buttons explanation ...........................................................................12
Top row button explanation...................................................................................................12
Second Row button explanation............................................................................................13
Third Row button explanation................................................................................................15
Queries ....................................................................................................................15
2
creotec.com
Welcome to Simple Page Manager
This simple page management (SPM) system will allow you to view and edit parts of your site - It will
not let you edit the template. The SPM is held on your website and the default path is usually your
domain name with “/ft2.php” at the end. An example is below:
http://www.yourdomain.co.uk/ft2.php
Once you are at the site you will be prompted to enter a user name and password – if you have
forgotten your user name or password please contact: [email protected].
Do not share your user name or password to anyone as they will be able to change aspects of you
site.
3
creotec.com
Navigating folders
To navigate through the folders hover over the folder you'd like to select and click on the directory
name to enter that directory and get a listing of the files in that directory.
The header at the top left of the page will always show your current directory. Each part of the
header will also link to the respective directory. You can use this to go back into previous directories.
4
creotec.com
Uploading files
The simple page manager allows the user to upload multiple files. This can be done by clicking on
the “Browse” button selecting what file you'd like to upload then select “Open” it will automatically be
added to a list of files ready for upload. You can repeat this process until you have all the files you
would like to upload – if you would like to delete a file click on the red “x” that is next to the file name.
When you have selected all the files you wish to upload click the 'upload' button to start the upload.
This may take a while if you have many files to upload.
Files will be uploaded to the current directory that you are in.
5
creotec.com
Creating folders and files
To create a new folder as a subdirectory in the current directory type the name you want in the input
field and click the 'Ok' button – this will create a new folder.
Change the radio button from 'folder' to 'file' if you wish to create an empty file instead of a new
folder. This is useful when you need to create new text or HTML documents for editing.
6
creotec.com
Rename, move, delete and duplicate
Files that can be modified have a diamond (◊) next to the file name. Clicking on the diamond will
open a new menu. It will default to renaming the file. To rename the file enter the new file name in
the field and click the 'Ok' button.
To move a file enter the folder name you want to move the file to in the field and click 'Ok'.
To delete a file click the confirmation button. Please note: If you do this the file will be permanently
deleted!
To duplicate a file enter a new file name (a new name will be suggested for you) and then click 'Ok'.
7
creotec.com
Editing text and HTML files
When a file can be edited a new menu item called 'edit' will appear when clicking a file's diamond –
this is usually an html file. Clicking on the 'Edit' button brings up a confirmation button – click the
“Yes, edit file” button and it will take you to a page where you can edit the contents of that file.
8
creotec.com
Once you are in the editor you can edit or add to your content. The standard 'Save' button will save a
copy of the file which will overwrite the old copy without leaving the edit window, allowing you to keep
editing. The 'Save Exit' button will save the file and return you to the file listing.
9
creotec.com
The article editor how-to guide
This article editor that allows users to use a familiar word-processing interface when editing articles
and other content. The 3-row toolbar below provides many standard editing commands:
Getting started and the basics
If you are not familiar with html, CSS or web publishing, here are a few simple commands you should
know that will allow you to create simple but interesting articles.
Font style - Highlight your text and use these 4 buttons to make text bold, italic,
underlined, or strike-through.
Text Format for size and headings - To make your articles interesting, highlight your text
and use this drop-down menu to create a variety of different styles of headings with
different attributes. You can use this to quickly make text large, bold, italic and so on.
Edit CSS Style - This displays a pop-up dialog box that allows you to enter CSS style
information for the selected text. You can use this to change text size and for a variety of
other functions.
Alignment - Highlight your text or select an image and use these buttons to Align text,
images or other content left, right, center, and full.
Insert/Edit Image - To insert an image, place the cursor in the desired location and press
this button. A pop-up dialog box will appear that lets you enter in the Image URL and other
information about how the image will display.
Insert/Edit Link - To insert or edit a link, select the linked text and press this button. A popup dialog displays that lets you enter details about the link.
Important note about external links! - It is important to note that any article published on
this website that contains links to other websites on the Internet, the links need to open "In
a new browser window". This is done in the drop-down menu of the "Insert/edit link" dialog
box. For target, choose the the option "Open in new window (_blank)".
10
creotec.com
To make a button or image Click-able to another article or website - To make a button or image
click-able to another article or website, you can use a combination of the last three explanations.
First insert the image or button into your article where you want it. Then click the image to highlight it.
Then click the "Insert/edit link" button in the toolbar and enter the URL of the link and update your
article. This will make the image or button click-able to the other article or website
Unlink - To remove a link, highlight the linked text and press this button.
Insert Embedded Media - To insert embedded media such as flash files, youTube videos etc. place
the cursor at the desired location and press this button. A pop-up box will appear prompting you to
enter the Type, File or URL, and the dimensions of the embedded media.
Are you a new user?
If you want to learn more about the basics of html, css and website publishing, you should visit
www.w3schools.com
How-to edit the html directly
There are two way that you can directly edit the html for your article if you know what you are doing!
Note; This function can also be used to quickly copy an article. You can view the html and copy it for
use in a second article that is very similar. This will save a lot of time if you have spent a large
amount of time formatting a particular article.
1. Edit HTML Source - If you click this button, a pop-up displays showing the HTML source code for
your article and allowing you to edit the HTML source code directly.
2. You can disable the editor completely by going to the User menu for the website and click "Your
details". In the drop-down menu for the editor, select "Editor - No editor" and click save. Now when you
edit an article, you will just see the html for the article. You can re-enable the editor again at any stage
by changing it back again.
11
creotec.com
Article Editor Buttons explanation
Top row button explanation
This is the top row of button on the article editor. Below is an explanation of what each button does
and how it can be used.
Font style - Make text bold, italic, underlined, or strike-through.
Alignment – Align text, images or other content left, right, center, and full.
Text & Image Styles - Caption and System Pagebreak styles can be set. Highlight
the desired text and select the style. This will allow this text to be formatted based
on CSS rules.
Text Format - Select predefined formats for Paragraph, Address, Heading1,
Heading2, and so on.
Font Family - Select the desired font.
12
creotec.com
Second Row button explanation
The second row include many important functions to help add content to your site such as inserting
images, formatting text and linking to external sites. Below is a small description on each function:
Text List formatting - Unordered List, Ordered list, Out-dent (move left) and Indent
(indent right).
Undo/redo - Undo (Ctrl+Z) and Re-do (Ctrl+Y) the formatting you just made to your
article.
Insert/Edit Link - To insert or edit a link, select the linked text and press this button. A
pop-up dialog displays that lets you enter details about the link.
Unlink - To remove a link, highlight the linked text and press this button.
Insert/edit anchor - Creates a named anchored which can be used as a target to jump
to when using a link.
Insert/Edit Image - To insert an image, place the cursor in the desired location and press
this button. A pop-up dialog displays that lets you enter in the Image URL and other
information about how the image will display.
Cleanup Messy Code - This button allows you to clean up HTML code, perhaps from
HTML text that you copied in from another source.
Edit HTML Source - A pop-up displays showing the HTML source code, allowing you to
edit the HTML source code.
Find - and Find/Replace.
Insert Date – Insert the date into your text by clicking on this icon
Time – Insert the time into your text by clicking on this icon
Emotions – Add emotions to your text. Click on the image and a range of different
expressions will be listed.
13
creotec.com
Second Row Continued..
Insert Embedded Media - To insert embedded media (such as Flash), place the cursor
at the desired location and press this button. A pop-up dialog will display that allows you
to enter the Type, File or URL, and other information about the media.
Text direction - Direction Left to Right and Direction Right to Left. These buttons allow
you to enter or change the text direction, for example for languages that read right to left.
Insert New Layer - Inserts a new layer of html that floats above the background html.
Layer height - Move layers forward or backward.
Toggle Absolute Position - For working with layered items.
Select Text Color - Select the color of your text. This drops down to give you a choice of
colors
14
creotec.com
Third Row button explanation
Insert Horizontal Ruler - Adds a horizontal ruler to your page.
Remove Formatting - Removes formatting from text copied from somewhere else.
Toggle Guidelines/Invisible elements - Toggles the invisible elements of your
article.
Subscript, Superscript - For adding scientific notation to your text.
Insert Custom Character - Choose from a selection of custom text characters.
Horizontal Rule - Applies horizontal rule
Tools for inserting and editing tables - Insert New Table, Table Row Properties,
Table Cell Properties, Insert Row Before, Insert Row After, Delete Row, Insert
Column Before, Insert Column After, Delete Column, Split Merged Table Cells,
Merge Table Cells.
Toggle Full Screen Mode - Toggles your article editing window to the full size of
your screen
Edit CSS Style - A pop-up dialog box displays that allows you to enter CSS style
information for the selected text
Queries
If you have any questions don't hesitate to ask, simply email [email protected] with any
problems you have and we'll be sure to help you out!
15