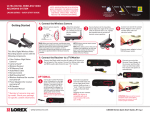
1
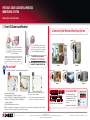
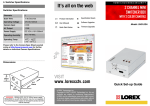
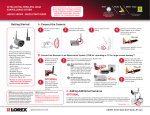
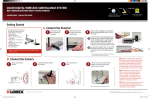
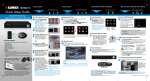
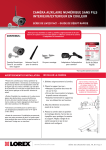
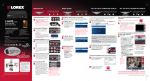
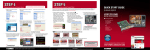
under 15 minutes
Hand Tools
PORTABLE COLOR LCD DIGITAL WIRELESS
MONITORING SYSTEM
Time
Camera Positioning: The Camera can be placed on
a flat surface, or wall mounted. The versatile stand
allows for several different mounting options.
Desk/Counter Mount
OPTIONAL
2
NOTE: AVOID INSTALLING IN
A LOCATION WHICH REQUIRES
THE WIRELESS SIGNAL TO PASS
THROUGH CEMENT, CONCRETE
AND METAL STRUCTURES. THIS
WILL REDUCE THE
TRANSMISSION RANGE.
Connect the Power Adaptor to the 9V
Input on the back of the camera.
Skill Level Hi Speed
Router
easy
Plug & Play
connections,
On screen set up
Intermediate
NOTE: See Page 2 for battery operation instructions.
Wall Mount
3
Wall Mounting: Mark the position of
the screw holes on the wall.
• Drill holes and insert 2 screws.
• Firmly attach the camera to the wall by
placing the stand over the installed
screws and pushing the base
Position the Base holes over the
downwards to secure.
screws. Slide the base downwards.
Receiver. Plug the power plug into a wall outlet or
surge protector.
NOTE: Leave the receiver to charge
for 4 hours prior to first time use so
the built-in rechargeable receiver
battery is fully charged. DO NOT
remove the power cable from the
receiver / from the cradle during
initial charging process. After initial
charge, charge as required.
Once the Receiver is fully charged the
LED light above the DC 9V input on the
receiver will turn from RED to GREEN.
www.lorexcctv.com
1
Connect one end (black connector
plug) of the RCA Audio/ Video
Cable to the Receiver or Receiver
Cradle.
2 Connect the other ends (Audio
- white plug, Video - Yellow plug)
of the RCA cable to your Monitor
or TV.
NOTE: The receiver monitor turns off
when it is connected to a Monitor or TV.
NOTE: Before you install a camera, carefully plan where and
Intermediate
easy
how it will be positioned,
and where
you will route theadvanced
cable that
connects the camera to the power adaptor. Before starting permanent
installation, verify its performance by observing the image on a
monitor when the camera is positioned where it will be permanently
installed.
Wireless cameras require a power source (either an electrical outlet
or battery power) to operate.
Set the alarm sensitivity on the camera.
Turn the wheel on the side of the camera
all the way down to decrease sound
sensitivity. This means that the alarm is
only triggered by loud noises. Turning
the wheel the other way will result in
the opposite. See the User’s Manual for
complete details on the alarm function.
B. Connect the Receiver (Determine if you will be using the Receiver Cradle, or connecting the cables directly to the receiver before installation)
View your Receiver images on any Monitor or TV
Place the Receiver Cradle
Plug the AC adaptor power output cable into the
RCA inputs (note that this requires the receiver
1 or Receiver in a location 2 9V POWER input of the Cradle or directly into the OPTIONAL with
to be connected to AC power, not battery power).
that offers clear reception
with your camera(s).
Hardware
Route
over 60 minutes
Skill Level
1
*Number of cameras and power adaptors may vary
by model. Check your package for specific content
information.
under 60 minutes
Skills - Easy
Hand Tools
* Installation time may vary based on
application and camera location
A. Installing the Camera
The Digital Wireless Surveillance System
comes with the following components:
1 x Wireless Receiver
1 x Receiver Cradle
1 x Wireless Camera(s)*
1 x Power Adaptor (for receiver)
1 x Power Adaptor (for camera)*
1 x RCA Audio/Video Cable
Instruction Manual
Quick Start Guide
Tools
Under 15 Minutes*
LW2002 Series - quick start guide
Getting Started
under 30 minutes
1
When adding cameras that were not included in the original box,
you will need to pair up the camera with the receiver. Please refer to
the Camera Pairing Section of the User Manual.
Auto-Mute Function : If you notice the speaker turning on and off,
this is the innovative Auto-Mute function. If no sound is detected by
the camera, the speaker will automatically shut off to prevent the
constant hiss of ambient noise (common in any environment); the
speaker will automatically turn on when any sound is detected.
This serves as an added security feature that can alert you of any
occurrence detected by the camera.
3 Turn on Monitor or TV, and switch to
the video channel that the receiver has
been connected to.
Tip 1: If your TV has a PIP feature, you
can have the camera images displayed in
the PIP window. Check your TV manual
for info on PIP feature (if available).
Tip 2: Connect to RCA input on a VCR,
2
DVD recorder or Surveillance DVR to
record video from the LW2002 system.
NOTE: The purpose of the AV output is for convenience only. When using with large
screen TV/Monitor, the picture might be grainy as the camera limits video resolution to
VGA (640x480 pixels). This is not a product defect. For best performance use with
TV/Monitor PIP (Picture in Picture) function. Check your TV/Monitor product manual to
see if this feature is available on your TV/Monitor. This allows you to view TV or other
video source and see video from the camera in a small window on the same screen.
LW2002 Series Quick Start Guide_R3 Page PORTABLE COLOR LCD DIGITAL WIRELESS
MONITORING SYSTEM
LW2002 Series - quick start guide
C. Power ON Camera and Receiver
4 Camera Digital Wireless Monitoring System
Camera 1
Press the “POWER” button located on the left side
of the receiver to turn on the receiver. You will see a
Green LED turn on above the LCD screen and Blue
LEDs around the navigation dial will flash twice.
Move the “ON/OFF” switch upwards
(located at the side of the camera) to
turn on the camera. The Green power
indicator LED will turn on.
The LW2002 series product is
expandable up to 4 cameras.
To order additional cameras, please visit
our website at www.lorexcctv.com
NOTE: Keep the receiver away from the camera to prevent
audio feedback (up to 10ft if volume is set to maximum).
Remember this when you are carrying around the receiver.
Did you know?
You can use ‘AA’ batteries* to make the camera truly wireless.
1
2
Receiver
Kitchen
Camera 2
Front Door
Camera 3
3
Nursery
Power camera using the batteries:
1. Remove the Battery Cover off the base of the Camera.
2. Insert 4 x AA Batteries (*not included) into the Battery compartment.
Make sure to correctly line up the Positive (+) and Negative (-)
terminals of the batteries.
3. Place the Battery compartment cover back on.
Camera 4
NOTE: Decide whether the camera will be permanently
wall mounted or placed on a tabletop:
• If you decide to permanently mount the camera to a wall,
make sure to select a location close to a power outlet.
Register Now!
to receive 3 monthS
warranty extension
Visit: www.lorexcctv.com/warranty
Garage
Backyard
It’s all on the Web
For detailed setup information,
please refer to your User’s Manual.
For additional information and
accessory purchases, please visit
our website
www.lorexcctv.com/support
NOTE: It is recommended to remove the batteries from the camera when not in use. If the Camera is plugged in with the AC Adaptor, the batteries
will not be used. The batteries are intended for short term, portable Camera use only.
www.lorexcctv.com
©2008 Lorex Technology Inc.
As our product is subject to continuous improvement, Lorex Technology & subsidiaries reserve the right to modify product design, specifications & prices
without notice and without incurring any obligation. E&OE
LW2002 Series Quick Start Guide_R3 Page