1
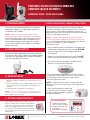
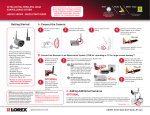
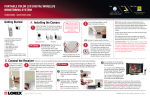
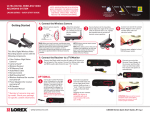
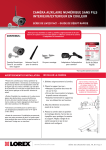
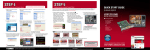
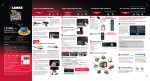
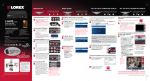
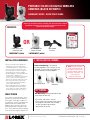
PORTABLE COLOR LCD DIGITAL WIRELESS
CAMERAS (BLACK OR WHITE)
LW2002AC1 Series - quick start guide
Contents:
Before you install the camera, carefully plan where and how it will be
positioned, and where you will route the cable that connects the
camera to the power adaptor.
OR
Digital Wireless Color
Camera with Stand
LW2002BAC1 (black)
Digital Wireless Color
Camera with Stand
Power Adaptor
for camera
Quick Start Guide
LW2002WAC1 (white)
Installation Warnings
1. INSTALLING THE CAMERA
• Aim the Cameras to best optimize the
viewing area: Select a location for the
camera that provides a clear view of the
area you want to monitor, which is free
from dust, and is not in line-of-sight to a
strong light source or direct sunlight.
• Avoid installing the cameras where there
are thick walls, obstructions, or
interference (i.e. transformers, microwave
ovens or other electrical equipment)
between the Cameras and the Receiver.
• Select a location for the camera that
has an ambient temperature between
14°F~113°F (-10°C~45°C)
• Before starting permanent installation,
have another person hold the camera
for you while you verify its performance
by observing the image on a monitor.
Camera Positioning: The Camera
can be placed on a flat surface, or wall
mounted. The versatile stand allows for
several different mounting options.
Night Vision
This camera includes IR LEDs, which
provide the camera with the ability to
view images in low light conditions. It
is important to use the provided power
adaptor (and not the Battery Pack
Adaptor) when using the camera for
prolonged periods in low light conditions, as the LEDs will drain the battery
more quickly than regular daytime use.
Desk/Counter Mount
NOTE: AVOID INSTALLING IN
A LOCATION WHICH REQUIRES
THE WIRELESS SIGNAL TO PASS
THROUGH CEMENT, CONCRETE
AND METAL STRUCTURES. THIS
WILL REDUCE THE
TRANSMISSION RANGE.
Wall Mount
OPTIONAL
Wall Mounting: Mark the position of the
screw holes on the wall.
• Drill holes and insert 2 screws.
• Firmly attach the camera to the wall by
placing the stand over the installed
screws and pushing the base
downwards to secure.
www.lorexcctv.com
Position the Base holes over the
screws. Slide the base downwards.
LW2002AC1 SERIES QSG_EN_R1 Page PORTABLE COLOR LCD DIGITAL WIRELESS
CAMERAS (BLACK OR WHITE)
LW2002AC1 Series - quick start guide
2. POWERING CAMERA
3. ADDING THE ACCESSORY CAMERA TO YOUR SYSTEM
The Camera can be powered either by using the provided Power Adaptor, or using batteries (requires 4 x
AA Batteries, not included).
NOTE: Wireless cameras require a power source
(either an electrical outlet or battery power) to operate.
If you plan to permanently mount the camera in a location, it is recommended to use the included Camera
Power adaptor to prevent interruptions to the video
transmission as batteries are intended as a temporary
power solution only.
a. USING POWER ADAPTOR
Connect the Power Adaptor to the Female Barrel Power
termination on the Camera. Make sure the power adaptor
is placed into a grounded outlet or surge bar to protect
the camera from power fluctuations.
The Pairing Function assigns each camera to a different
channel on the wireless receiver (connect up to 4 Cameras),
and is necessary for configuring additional cameras. By
default the camera that came with the LW2002W or LW2002B
system is assigned to channel no. 1.
NOTE: It is highly recommended to pair the Accessory
Camera to the Receiver before permanently mounting the
camera. For detailed information, please check the owners
manual for the LW2002 system available at
www.lorexcctv.com.
1. Press the MENU button on the Receiver. Navigate to the
PAIRING Menu option by pressing using the ▲▼◄►
keys to navigate. Press the OK button to open the
Pairing Menu.
2. Select a channel by pressing the UP and DOWN ▲▼
arrows. Press the OK Button on the receiver to accept.
3. Press the PAIR button located on the bottom of the
Receiver using a pen tip or paperclip.
b. USING BATTERIES*
1. Remove the Battery compartment cover off the base of the
Camera.
2. Insert 4 x AA Batteries (not included). Make sure to correctly
line up the Positive (+) and Negative (-) terminals of the
batteries.
3. Slide the Battery compartment cover back on.
NOTE: It is recommended to remove the batteries from the
camera when not in use. The batteries are intended for short
term, portable Camera use only.
4. A message will be displayed on the Receiver screen.
The Receiver will count down from 30~0 – you must press
the PAIR button on the Camera during this time to
successfully pair the Camera.
NOTE: If the button on the Camera is not pressed, the
Receiver will return to the view screen, and no pairing will
take place.
5. Press the PAIR button on the back of
the Camera.Once the camera has been
paired, it will be immediately viewable on
the Receiver Monitor.
C. SETTING ALARM SENSITIVITY
Set the alarm sensitivity on the camera. Turn the
wheel on the side of the camera all the way down
to decrease sound sensitivity. This means that the
alarm is only triggered by loud noises. Turning
the wheel the other way will result in the opposite.
See the User’s Manual for complete details on the
alarm function.
www.lorexcctv.com
It’s all on the Web
For detailed setup information,
please refer to your User’s Manual.
For additional information, please
visit our website
www.lorexcctv.com/support
LW2002AC1 SERIES QSG_EN_R1 Page