1
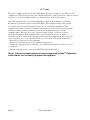
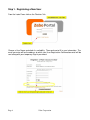
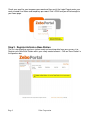
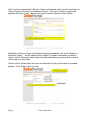
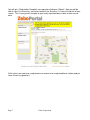
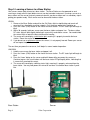
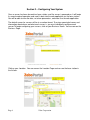
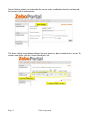
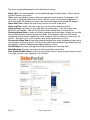
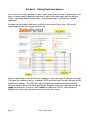
Zebo Corporation, Inc.
Owners Manual
Version 2.1 – 03/29/2012
Contents:
FCC Notice
Page 2
Section 1 – Commissioning Your System
Page 3
Section 2 – Configuring Your System
Page 9
Section 3 - Viewing Data from Sensors
Page 13
Page 1
Zebo Corporation
FCC Notice
This device complies with part 15 of the FCC Rules. Operation is subject to the following two
conditions: (1) This device may not cause harmful interference, and (2) this device must accept any
interference received, including interference that may cause undesired operation.
Note: This equipment has been tested and found to comply with the limits for a Class B
digital device, pursuant to part 15 of the FCC Rules. These limits are designed to provide
reasonable protection against harmful interference in a residential installation. This
equipment generates, uses and can radiate radio frequency energy and, if not installed and
used in accordance with the instructions, may cause harmful interference to radio
communications. However, there is no guarantee that interference will not occur in a
particular installation. If this equipment does cause harmful interference to radio or
television reception, which can be determined by turning the equipment off and on, the user
is encouraged to try to correct the interference by one or more of the following measures:
—Reorient or relocate the receiving antenna.
—Increase the separation between the equipment and receiver.
—Connect the equipment into an outlet on a circuit different from that to which the receiver
is connected.
—Consult the dealer or an experienced radio/TV technician for help.
Notice: Changes or modifications not expressly approved by ZeboTM Corporation
could void the user's authority to operate the equipment.
Page 2
Zebo Corporation
Section 1 – Commissioning Your System
Water
Internet
Temperature
Base Station
Electric Current
Humidity
Sensors
System Overview
The Zebo System allows for the remote monitoring and data collection of an unlimited number
of various sensors thru a simple web application that our customers can view through any
web enabled computer or smart phone. A series of wireless, battery powered sensors of
various types are placed throughout the location to be monitored along with a single base
station to which the sensors transmit. Consisting of an entirely wireless solution, installation
is simple and sensor placement is flexible. The base station sends the signals and
information it receives from the sensors to the web application over a cellular internet
connection. The customer may view the information, adjust settings, and create alarms with
the web application.
Basic System Setup:
1. Register as a new user on the Zebo Web Application. This is typically done after
ordering our product online during the checkout process or from the Sign In screen.
2. Register your base station, which is done by signing in to your account and clicking
on 'Register a New Base Station'. You'll need to create a Business and then a location
before actually registering the base station.
3. Assign/Learn your sensors to the new base station by pressing the “LRN” button
on the base station and then powering your sensor on. Do this for each sensor to be
added to the base station. See the “Learning Sensors” section for details on page 8.
4. Deploy the base station and sensors throughout the location making sure each
sensor is powered on. Keep track of where you put each sensor.
5. Configure and customize your sensors. Sign in to your account and update settings
for each sensor, assigning names and alarms according to your individual sensor
placement and monitoring needs.
Page 3
Zebo Corporation
Step 1. Registering a New User
From the Login Page, click on the 'Register' link.
Choose a User Name and check its availability. Then continue to fill in your information. The
email you enter will be the address to which your User Registration Confirmation email will be
sent along with your temporary Sign In password.
Page 4
Zebo Corporation
Check your email for your temporary password and then revisit the Login Page to enter your
newly created User Name and temporary password. Click LOGIN and you will be brought to
your home page.
Step 2. Register/Activate a Base Station
The first step to getting your base station ready and receiving data from your sensors is to
Register your New Base Station within your newly created account. Click on 'Base Station' in
the top menu bar.
Page 5
Zebo Corporation
You'll see links to create both a Business Name and Location, which you will want to do first.
Click on 'Create a Business' and complete the form. Then click 'Create a Location' and
complete that form as well. Now you are ready to actually Register a Base Station.
When both a Business Name and Location have been completed, click on the 'Register a
New Base Station'. You will need the Base Station ID, found on the bottom of the base
station, and the Reference Code, found in the documentation you received with your base
station when you received it.
Choose a Base Station Name that gives an indication of its physical location or intended
purpose. Click “Submit” when finished.
Page 6
Zebo Corporation
You will get a 'Registration Complete' message after clicking on 'Submit'. Now you will be
able to see a list of business you have created in the 'Business List' tab at the top left of your
screen. This is how you will navigate to your newly registered base station to view sensor
data.
At this point, you now have a registered user account and a registered base station ready to
have sensors assigned to it.
Page 7
Zebo Corporation
Step 3. Learning a Sensor to a Base Station
Your sensors come ready to learn to a base station. The Base Station must be powered on and
receiving a steady cellular signal before sensors can be learned or unlearned. Learning a sensor to a
base station sets the sensor up to only communicate with your base station and is a mandatory step in
getting your product ready. Each sensor must be learned to the base station.
LEARN
1. Power on the Base Station and wait for the Cell Status light to stop blinking and remain off
meaning it has attached to a cellular network. Only the green power light should be on.
2. Press the 'Learn (LRN)' button on the front of the base station. The RF status light will begin to
blink.
3. Within 30 seconds, hold your sensor near the base station and power it on. The base station
RF status light will blink rapidly indicating it successfully received the sensor. You need to hold
the sensor within a foot of the base station while learning.
4. The sensor will now display a solid status light, meaning it is properly learned to the base
station. Power the sensor off.
5. If you do not see a solid status light on the sensor, it is not properly learned. Power your sensor
off and repeat steps 2-4.
The next time you power the sensor on, it will begin its normal mode of operation.
UNLEARN
1. Hold the sensor near the base station and power it off.
2. Press the 'Learn (LRN)' button on the front of the base station. The RF status light will begin to
blink.
3. Press the 'Learn' button on the sensor and hold it down while you power the sensor on.
Continue to press the 'Learn' button until the base station RF light rapidly blinks, indicating that
it successfully received the sensor.
4. The sensor will now display a blinking status light, meaning it is properly unlearned from the
base station. You may now power the sensor off and learn it to another base station if you'd
like.
Base Station
Page 8
Sensor
Zebo Corporation
Section 2 – Configuring Your System
Once a sensor has been learned to a base station, and the sensor is powered on, it will begin
its normal mode of operation and send its data into the web application via the base station.
You will be able to view the data, set alarm parameters, and more thru the web application.
The default names for sensors will be in a number format. To assign meaningful names and
information about where and what each sensor is, you must individually configure each
sensor. To begin configuring your sensors, click on your Business Name. You are now on the
Business Page.
Click on your Location. You are now on the Location Page and can see the base station in
the list box.
Page 9
Zebo Corporation
Click on your Base Station. You are now on the base station screen. Notice the vertical
breadcrumb menu now showing along the left of your window. You are now on the base
station page and will see the list of learned sensors in the sensor area.
Note: The Base Station screen contains the Master Alarm Button. When ‘On’ you will receive
all alarms from this base station. When ‘Off’, all alarms will be turned off and you will not
receive any alarms from this base station. Alert Recipients added at the base station level will
receive alarms from any sensor learned to this base.
To begin configuration, click on the Sensor ID to view the Sensor Page (shown below).
Page 10
Zebo Corporation
Sensor Settings allows you to describe the sensor, enter a calibration formula, and override
the sensor's unit of measurement.
The Alarm setting screen below indicates that one alarm has been created for this sensor. To
create a new alarm, click the 'Create New Alarm' link.
Page 11
Zebo Corporation
The alarm screen below prompts for the following user input:
Alarm Type: This menu provides a list of predefined types of typical alarms. Chose the one
that best matches your needs.
Value: enter the trip point value at which you want your alarm to occur. For example, if the
alarm type is “Reading Higher than a Value,” and the sensor is measuring temperature, a
value entry of 90 will generate an alarm if the measured temperature exceeds 90 degrees.
Alarm Start Time: choose the hour of day you wish the alarm to be active
Alarm end Time: choose the hour of day you wish the alarm to be deactivated
Alarm on Days: if the alarm is only to be active on certain days, select those days here.
Default all are selected. Hold the Ctrl key down while clicking days to change them.
Recurring Alarm Delay: In order to minimize repeated alarm messages, choose a time value
here for delay between recurring alarm messages. For example, if you have a 20 minute
temperature sensor and it is beyond the value set above, you will receive an alarm every 20
minutes. Setting this to 1 hr will skip alerts only giving you one once an hour.
Consecutive Alarm Delay: How many readings beyond your value set above do you want to
receive before creating an alarm? Set this to two consecutive readings if you'd like to wait for
two readings to come in (beyond value above) before an alarm.
Text Message: A custom message that will be included in text message alerts.
Email Message: A custom message that will be included in email alerts.
Base Station Audible Alarm: If you wish for the base station's alarm to go off when an alarm
is created, you can have it sound for 1 to 5 minutes.
Page 12
Zebo Corporation
Section 3 - Viewing Data from Sensors
Once a sensor has been learned to a base station, each time the sensor is powered on, it will
begin its normal mode of operation and send its data into the web application via the base
station. You will be able to view the data, set alarm parameters, and more thru the web
application.
Navigate via the left bird crumb menu to find the sensor you'd like to view. Click on the
sensor and the main Sensor page will come up.
Here you will be able to view the Sensor's readings as they have come in (newest on the top).
The age of the reading as well as a reading's RSSI (received signal strength indicator) will be
visible for all readings. The RSSI will help you to determine good sensor placement and
diagnose sensors that are on the fringe of proper reception. Here you will be offered links to
graph the data for this sensor as well as export the data to a CSV file. Alert Recipients
added at the sensor level will receive alarms only from this sensor.
Page 13
Zebo Corporation