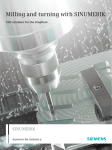
Transcript
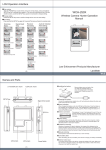
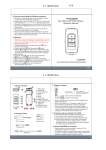
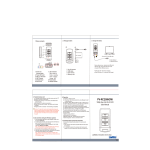
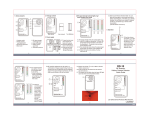
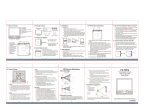
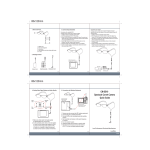
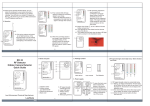
2. Package Content
1. Name and Parts
4. LED Indication
Red LED
The red LED will illumiate during the record.
Adapter
1. Lens
Flat Swivel Mount
Suction Cup Mount
4GB
Lock
1
MicroSD card
2. Power On/ Rec Button
Green LED
The green LED will illuminate when charging the battery.
The green LED will turn off when the battery is full and the
charging is complete.
3. Reset Button
9
2
10
3
11
4. Power Off Button
5. End Cap
6. 720P/1080P Switch
7. HDMI Port
8. Memory Card Slot
4
9. Power On/Off LED
10. Rec On/Off LED
5
11. Charging Stauts LED
6
7
8
HDMI&Mini USB Cable
Dual lock
Car charger
3. Charge Battery
5. Automatically Power off
1. Remove the end cap and connect the HDMI&USB cable into the HDMI port as shown on
illustration.
2. Screw the protective cap as shown on the illustration to the recorder.
3. Charging options:
a) Connect the other end of the cable to car charger
b) Connect the other end of the cable to PC
4. The green charging status LED will illuminate to tell you it’s charging.
When the green LED turns off ,the battery is full and charging is complete.
1. When the battery is low, the blue LED will blink for 30 seconds then the device
will power off automatically.
2. When the battery is fully or nearly discharged, the blue LED will blink 4 times and the
device will power off automatically. Under this situation, you will not be able to power on the
device again before it has enough charge.
Protective Cap
(1)
7. Operation
(2)
6. Date and time setting (for Windows computer)
1. Right-click on Windows desktop. Choose Notepad to create a
*.txt (text) file. Then double-click the text file.
2. Suppose current time is October 16, 2011 15:00. Enter date
and time information as 2011.10.16 15:00:00 Note that a
space must be present in between date and hour and time is
in 24-hour format.
3. Name the file as settime.txt and save it to the root directory
of the memory card.
4. Insert the memory card to the slot then power on the device.
The date and time setting is now completed.
5. Please note when the date and time information is successful
set to the deivce the settime.txt file should not be visible when
you connect the device to the computer again.
(3)
PV-RC400FHD
2. Suction Cup Mount
1. Insert the memory card into the card slot.
2. Select the preferred resolution for recording
a) 1080P:30fps
b) 720P :60fps
3. Press the On/Rec button
4. The device will turn on then start to record automatically.
5. Press Off button to stop the record.
6. The device will turn off automatically when the file is saved.
Blue LED
1. The blue LED will illuminate after the device is powered on.
2. The blue LED will blink when the battery is low.
Mount Application
a. 360 degree rotation on camera holder
1080P Bullet Camera Recorder
Quick Guide
8. Mount Applications
1. Flat Swivel Mount
a. Mount installation steps
b. Swivable mount base to adjust the camera
b. Helmet Camera Application
Law Enforcement Products Manufacturer
(4)
(5)
LawMate
V1.0


![wireless Mini Keyboard-[2.4GHz] User`s Manual Ver:2.1](http://vs1.manualzilla.com/store/data/005666864_1-44f56227f4d883897f7b8660e8efda97-150x150.png)