1
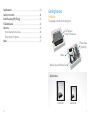
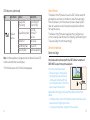
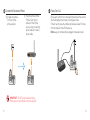
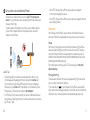
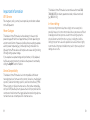
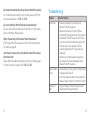
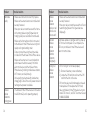
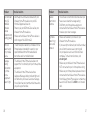
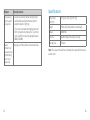
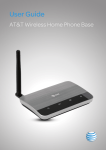
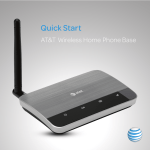
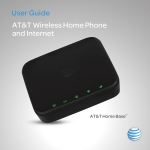
User Guide
AT&T Wireless Home Phone
Wireless Home Phone (“WHP”) device is a mobile device that may be used
with home phone equipment in different locations in the U.S. WHP device
requires a battery to be installed in the device at all times to operate. In
the event of a power outage, the battery can be used as a back-up battery.
However, a landline phone requiring separate electric power to operate
(e.g. cordless phones) connected to a WHP device will not place or receive
calls (including 911 calls) during a power outage. For emergency calls, you may
have to provide your location address to the 911 operator. Landline home
phone equipment is not included. Provides voice service only. Not compatible
with data or messaging services, home security systems, fax service, medical
alert systems, medical monitoring systems, credit card machines, IP/PBX
Phone systems, or dial-up Internet service. May not be compatible with your
DVR/Satellite systems, please check with your provider. DSL customers
should contact their provider before transferring a phone number to ensure
uninterrupted DSL Internet service. WHP device is sold for use on the AT&T
wireless network and cannot be activated on other carriers’ wireless networks.
If your WHP device is roaming, AT&T’s off-net usage restrictions apply. Service provided by AT&T Mobility. Portions © 2014 AT&T Intellectual
Property. All rights reserved. AT&T is a registered trademark of AT&T
Intellectual Property. All other marks contained herein are the property of
their respective owners.
Portions Copyright © 2014 ZTE CORPORATION. All rights reserved.
No part of this publication may be excerpted, reproduced, translated or
utilized in any form or by any means, electronic or mechanical, including
photocopying and microfilm, without the prior written permission of
ZTE Corporation.
The manual is published by ZTE Corporation. We reserve the right to make
modifications on print errors or update specifications without prior notice.
Version No.: V1.0 Edition Time: June 2014
Manual No.: 081704100294
Welcome to AT&T
Thank you for purchasing an AT&T Wireless Home Phone device
(Model: WF721). To get the most from your new device, check out our
videos and interactive tutorials at att.com/whphelp.
i
Contents
Getting Started.................................................................................................................1
In the Box.........................................................................................................................1
Getting to Know Your Device................................................................................ 2
How it Works..................................................................................................................5
Device Installation......................................................................................................5
Voicemail....................................................................................................................... 11
Transferring a Phone Number............................................................................ 12
Using Your Device......................................................................................................... 13
Making Calls................................................................................................................. 13
Three-Way Calling.................................................................................................... 13
Call Waiting................................................................................................................... 13
Call Forwarding........................................................................................................... 14
Helpful Tips.................................................................................................................. 15
Important Information.............................................................................................. 18
E911 Service................................................................................................................. 18
Power Outages........................................................................................................... 18
Device Compatibility.............................................................................................. 18
In-Home Wiring..........................................................................................................19
Frequently Asked Questions................................................................................20
Troubleshooting........................................................................................................... 23
ii
iii
Specifications................................................................................................................ 29
Safety Instructions.....................................................................................................30
Radio Frequency (RF) Energy............................................................................... 32
FCC Compliance.......................................................................................................... 33
Warranty........................................................................................................................... 34
How to Get Warranty Service............................................................................ 36
Other Warranty Programs................................................................................... 36
Notes....................................................................................................................................37
Getting Started
In the Box
The package contains the following items:
AT&T Wireless
Home Phone device
Phone Cable
(Optional)
Battery
Battery Cover and Power Cord
Also Included
Quick Start
iv
User Guide
1
Getting to Know Your Device
LED Indicators
The table below describes possible states for each of the LED
indicators.
Key
Icon Name
Power
Power
Voicemail
Voicemail
Wireless
Service
Battery Charge
Battery Cover
On/Off
Power Input
Antenna
Service Port*
Telephone Ports
*Reserved for AT&T technical support.
Service port is designed for diagnostic purposes only, not for
customer use. Never place a USB-based device into the Service port
of the device under any circumstance. Doing so may damage the
device and negate its warranty.
2
Battery
Charge
Status
Green Solid
Off
Condition
On
No power
New message
Green Blinking
waiting
No messages
Off
waiting
Green Solid
High
Green Blinking
Battery in use (High)
Yellow Solid
Medium
Battery in use
Yellow Blinking
(Medium)
Red Solid
Low
Red Steady Blinking Battery in use (Low)
Red Rapid Blinking No battery installed
Off
No charge
(Continued on next page)
3
How It Works
LED Indicators (continued)
Key
Icon Name
Status
Green Solid
(1 to 5 bars)
Wireless
Service
Green Blinking Bars
No Bars Lit
Red Blinking Bars
Red Solid Bars
Condition
Signal Strength
(Low to High)
AT&T 3G
MicroCellTM
Service*
No service
Check SIM
Software updating
Note: A software update is in progress when the Wireless Service LED
is solid red and all others are solid green.
* For MicroCell owners only. MicroCell sold separately.
4
The Wireless Home Phone device uses the AT&T cellular network to
provide phone service to your cordless or corded home phone(s).
Place it anywhere in your house where you have a wireless signal. It
does not require the use of a home phone wall jack like traditional
home phone service.
The Wireless Home Phone device provides many calling services,
such as voicemail, Caller Number ID, Call Waiting, Call Forwarding, and
Three-way Calling for your home phone(s).
Device Installation
Before You Begin
Your device works exclusively with the AT&T cellular network and
DOES NOT use your home phone wall jacks.
Your device should be located:
• Where you have a strong cellular
signal, typically near a window or
outside wall. Signal strength may
vary in different parts of your home.
• Near an electrical wall outlet.
Select which phone(s) you will use with the Wireless Home Phone
device:
• A cordless phone system with multiple handsets should be used to
place phones throughout your home.
• If using an existing phone, unplug it from the wall jack.
5
Install the Battery
Insert the battery.
ote: Battery must be installed at all times for your Wireless
N
Home Phone device to operate.
Install the battery cover.
Plug the power cord into an electrical wall outlet that is not
controlled by a wall switch.
Insert the small end of the power cord into the round Power Input
port on the back of your Wireless Home Phone device.
Slide the On/Off switch to the On position.
On/Off
Notes:
• The battery must be installed at all times for your Wireless Home
Phone device to operate properly, even when plugged into a
power source. It may take five (5) hours to fully charge (battery will
charge inside the device while connected to a power supply).
• Charge time may be impacted by environmental factors, and the
battery will stop charging when the ambient temperature is outside of
the temperature range allowed for charging (32 °F – 131 °F).
6
Turn on Your Device
Check the Wireless Signal
Raise the antenna to an upright position and check the signal
strength.
More green bars indicate a stronger signal. Your device can be
relocated in your home for best performance.
Signal
Strength
7
Connect the Device to a Phone
1) Unplug your phone
from your home
phone wall jack.
2) Plug your phone into the
“Phone 1” port on the
Wireless Home Phone
device, using your existing
phone cable or included
phone cable.
Place a Test Call
Place a test call from your connected home phone. Make sure to
dial the 10-digit phone number, including area code.
For best results, place the cordless phone base at least 12 inches
from the Wireless Home Phone device.
Note: Keep your cordless phone plugged into a power outlet.
IMPORTANT: DO NOT plug the Wireless Home
Phone device or your phones into your wall jacks.
8
9
Set up Voicemail and Additional Phones
Voicemail is included with your service. Dial “1” to set up and
access. If you choose to use an answering machine instead, set it
to fewer than 4 rings.
To place phones throughout your home, use a cordless phone
system with multiple handsets. Wall jacks are not used with
Wireless Home Phone.
• Y
our AT&T Wireless Home Phone device does not support
incoming or outgoing fax service.
• Your AT&T Wireless Home Phone device does not support rotary or
pulse-dialing phones.
Voicemail
Your Wireless Home Phone device comes with standard wireless
voicemail. Follow the steps below to set up and use your voicemail.
Setup
Useful Tips
• Transferring a phone number can take about four days, so you
should keep a phone plugged into your wall jack to receive calls
on your old service (including 911) until your transfer completes.
However, you can make calls immediately on your Wireless Home
Phone device. Check transfer status at att.com/port.
• The “Phone 2” port can be used to connect an additional phone or
stand-alone answering machine. It uses the same phone number as
the “Phone 1” port.
10
Dial 1 on any home phone connected to the Wireless Home Phone
device and wait four (4) seconds to connect to your AT&T wireless
voicemail. Simply follow the voice prompts to complete setup. To
enable remote voicemail retrieval and for added security be sure to
create a password during setup.
For more help on setting up your AT&T voicemail, go to att.com/
voicemailsetup.
Message Waiting
There are two indicators for a new message waiting: 1) the voicemail
icon; and 2) an intermittent dial tone.
The voicemail icon
on your Wireless Home Phone device blinks
when a voicemail message is waiting. You will also hear an intermittent
dial tone on any connected phone handset before placing a call.
11
Retrieving Messages
To retrieve voice messages, dial 1 on any home phone connected
to the Wireless Home Phone device and wait four (4) seconds to
connect to your AT&T wireless voicemail box. Simply follow the
voice prompts to listen to and manage your messages. (Alternately,
you may dial your 10-digit home phone number to access your
voicemail box.)
Remote Retrieval
To retrieve voicemail messages from a phone not connected to the
Wireless Home Phone device, dial the number associated with your
Wireless Home Phone service. When voicemail picks up, press *.
You will then be prompted to enter your password. Simply follow
the prompts to listen to and manage your voicemail messages.
Transferring a Phone Number
Transferring a landline phone number to your Wireless Home
Phone device can take about four days. Outgoing calls can be made
immediately using your Wireless Home Phone device, however
incoming calls (including 911) will continue through your old service
until the transfer is complete. Keep a phone connected to your
existing home wiring or prior service to continue to receive incoming
calls until the transfer is complete. To check the status of your
transfer, visit att.com/port.
12
Using Your Device
Making Calls
Using a phone connected to your Wireless Home Phone device, place
and receive calls as you normally would. The Wireless Home Phone
device supports both cordless and corded phone dialing methods.
Note: You will need to dial 10 digits even for local numbers.
Three-Way Calling
While on an existing call, press the Flash (or Phone/Talk) key on your
phone to put the first party on hold. When you hear a dial tone, dial
the second party’s number (wait up to four [4] seconds). When the
second party answers, press the Flash (or Phone/Talk) key again to
complete the three-way connection. If the second party does not
answer, press the Flash (or Phone/Talk) key to end the connection
and return to the first party.
Note: If your phone does not have a Flash (or Phone/Talk) key, use
the off-hook mechanism supported by your phone instead.
Call Waiting
You will hear two tones if someone calls while you are already on a call.
To hold the current call and accept the waiting call, press the Flash
(or Phone/Talk) key. You can press the Flash (or Phone/Talk) key
anytime to switch back and forth between calls.
To clear the current call and accept the waiting call, enter 1 and press
the Flash (or Phone/Talk) key.
To reject (User Busy) the waiting call, enter 0 and press the Flash (or
Phone/Talk) key.
13
Notes:
• Your Wireless Home Phone device comes with standard threeway calling and call waiting. Operation of these features will vary
depending on your home phone equipment.
• If your phone does not have a Flash (or Phone/Talk) key, then use
the off-hook mechanism supported by your phone.
Call Forwarding
To forward all calls, dial:
*21*
The 10-digit number to which you wish to forward your calls
# key
(Example: *21*1234567890# forwards your calls to the phone
number 123-456-7890)
Please wait at least three (3) seconds and until you hear a
confirmation tone for the forwarding to complete before hanging up.
To un-forward calls, dial #21#, please wait at least three (3) seconds
and until you hear a confirmation tone for the un-forwarding to
complete before hanging up.
Note: Applicable wireless minute plan rates apply to forwarded calls.
14
Helpful Tips
Home Answering Machines
If you choose to use your home answering machine instead of the
voicemail provided by your Wireless Home Phone device, you will
need to set your answering machine to pick up calls before network
voicemail, which is fewer than 4 rings. If you have a stand-alone
answering machine, you can connect it to the “Phone 2” port on the
back of your Wireless Home Phone device.
Adjusting Volume
Use your home phone’s volume adjustment if available. Alternately,
the volume of the Wireless Home Phone device can be adjusted if
necessary. While on a call, press ** or ## to enter Volume Setting
Mode. Press * to decrease volume. Press # to increase volume.
To exit Volume Setting Mode press any other key or wait five (5)
seconds.
15
Notes:
• Four volume levels are available (level 1 to level 4); the default
setting is the highest at level 4.
• Your home phone(s) may have a separate volume level setting
function that is independent of the Wireless Home Phone device.
Powering On/Off
The On/Off switch is used to turn your Wireless Home Phone device
on or off. When powered off, the Wireless Home Phone device will no
longer send or receive calls, but it will continue to charge the battery if
still connected to the wall outlet.
To turn the Wireless Home Phone device on, slide the On/Off switch to
the On position. To turn it off, slide the On/Off switch to the Off position.
AT&T 3G MicroCell
TTY Support
TTY (Text Telephony) and TDD (Telecommunications Device for the
Deaf) are supported by the Wireless Home Phone device. In order to
use the TTY network, you must have a TTY-compatible phone and
be in TTY mode. Note that most digital wireless devices are TTYcompatible.
Dial *983*889*n# to set the TTY mode.
• n = 0: TTY off mode. The standard voice speaking mode and
listening mode. This is the default setting.
• n = 1: TTY full mode. Transmit and receive the TTY characters.
• n = 2: VCO mode. Receive TTY characters but transmit by speaking
into the speaker.
• n = 3: HCO mode. Transmit TTY characters but receive by listening
to the receiver.
The Wireless Home Phone device can be used with the AT&T 3G
MicroCell when it’s within range of the MicroCell signal and the phone
number associated with the Wireless Home Phone device has been
added to the MicroCell’s approved user list. To update your approved
user list, visit att.com/3GMicroCell and click “Manage Settings.”
The Wireless Service indicator on your Wireless Home Phone device
will flash green when connected to the MicroCell.
16
17
Important Information
E911 Service
For emergency calls, you may have to provide your location address
to the 911 operator.
Power Outages
The Wireless Home Phone device has a battery in the event of a
power outage with talk time of approximately 3 hours depending on
environmental factors. However, a landline phone requiring separate
electric power to operate (e.g., cordless phones) connected to a
Wireless Home Phone device will not place or receive calls (including
911 calls) during a power outage.
If you experience a power outage and your battery is fully depleted,
it will be necessary to restart your device when power is restored by
sliding the On/Off switch off and on.
The Wireless Home Phone device cannot be used to make 500,
700, 900, 976, 0+ collect, operator assisted, or dial-around calls
(e.g. 1010-XXXX).
In-Home Wiring
Interconnecting to home telephone wiring is not necessary, but is
possible; however, it is not recommended unless you possess sufficient
knowledge of electrical systems. Use with home wiring requires the
physical disconnection from other services, including the landline
coming into your home. Use of a qualified licensed electrician is highly
recommended. Improper installation may result in phone equipment
damage or even a fire.
Device Compatibility
The Wireless Home Phone device is not compatible with data or
messaging services, home security systems, fax service, medical alert
systems, medical monitoring systems, credit card machines, IP/PBX
Phone systems, or dial-up Internet service. May not be compatible
with your DVR/Satellite systems, please check with your provider. DSL
customers should contact their provider before transferring a phone
number to ensure uninterrupted DSL Internet service.
18
19
Frequently Asked Questions
What kind of phone do I need to work with the Wireless Home
Phone device?
Most standard touch-tone phones may be used. Rotary phones are
not supported. Cordless phone systems provide the most flexibility
and allow you to easily place additional handsets throughout your
home. Cordless phone systems still need to be plugged into a power
outlet.
During a power outage, a standard corded phone which doesn’t
require electrical power is needed.
How do I install my Wireless Home Phone device?
Refer to pages 5-11 of this guide for the most common installation
methods. Other helpful information:
• Installation near a window or outside wall is strongly recommended
to ensure the strongest possible wireless signal in order to maximize
voice quality.
• If your voice quality is unacceptable, your device may not have
sufficient signal strength (green bars). You may need to relocate the
device to another area of your home with a stronger wireless signal.
Will my Wireless Home Phone device work in areas with no or low
wireless signal strength?
A strong wireless signal (three to five green bars) is recommended for
optimal performance. A moderate signal (one to two green bars) may
be sufficient. If you do not see three to five green bars, you may want
to choose an alternate location.
20
Does the Wireless Home Phone device support data or text
messaging?
No, only voice services are supported.
Why don’t I see the name of the caller on Caller ID?
The Wireless Home Phone device, similar to other wireless devices,
supports calling number identification.
However, contact names stored on your cordless home phone may
display for incoming calls.
Do I need broadband Internet service for the Wireless Home
Phone device to work?
No, the service is provided through the AT&T wireless network.
Can I move my Wireless Home Phone device and use it in another
location?
Yes, you can use your device anywhere in the U.S. where AT&T is
authorized to provide wireless services. All you need is an available
wireless signal and power outlet.
When I dial a seven-digit number using the Wireless Home Phone
device, I get a message that the number cannot be completed as
dialed. Does the Wireless Home Phone device support seven-digit
dialing?
The Wireless Home Phone device requires 10-digit dialing for
domestic calls in most areas.
21
Can I make international calls with my Wireless Home Phone device?
Yes. To add international calling to your account, please call 611 from
your connected phone, or 1-800-331-0500.
Can I use my Wireless Home Phone device internationally?
No. Use is limited to the United States, Puerto Rico, U.S. Virgin Islands,
Guam, and Northern Mariana Islands.
Troubleshooting
Problem
No dial tone
What is the warranty on the Wireless Home Phone device?
AT&T Wireless Home Phone device has a 12-month limited warranty.
For details, see page 34.
I can’t make or receive calls with my Wireless Home Phone device.
What should I do?
Please follow the troubleshooting steps found on the following pages.
If further assistance is required, call 1-800-331-0500.
Caller Number
ID only
Battery LED
is off
22
Possible Solution
• Make sure the battery is installed in your
Wireless Home Phone device.
• Make sure the device is turned on (Power
indicator light is green) and there is AC power to
the Wireless Home Phone device. Do not connect to an AC outlet controlled by a wall switch.
• Move the device to an area with sufficient
network signal (at least 1 to 2 green bars are
displayed).
• Make sure your home telephone equipment
has power and is connected properly to the
Wireless Home Phone device.
• Like all wireless services, only the calling number
is displayed with Caller ID.
• Your home phone equipment may support the
display of names stored in its contacts memory.
• Plug your Wireless Home Phone device into a
power outlet to charge the battery.
23
Problem
Poor voice
quality
Wireless
Service
indicator is
blinking green
24
Possible Solution
• Make sure all connections are firmly in place.
• Make sure the external antenna is installed and
securely fastened.
• Move your device to another area of the home
with a strong wireless signal (3 green bars or
more), typically near a window or outside wall.
• Make sure the home phone that is connected
to the Wireless Home Phone device is of good
quality and in good working order.
• Connect your phone using the phone cable
included with the Wireless Home Phone device.
• Make sure the antenna is in a vertical position
and increase the distance away from other
electronic devices and the Wireless Home
Phone device (including cordless base stations,
Wi-Fi routers, and cell phones).
• Voice quality may degrade with a low battery
charge (red). Connect to an AC power source to
recharge when power is available.
• The Wireless Home Phone device is connected
to a 3G MicroCell, and is operating properly.
Problem
Wireless
Service
indicator
displays a red
antenna and
no bars are lit
Solid red
Wireless
Service
indicator
(all other
indicators
solid green)
Blinking red
Wireless
Service
indicator
Possible Solution
• Make sure the external antenna is installed and
securely fastened.
• Move your device to another area with sufficient
network signal (at least 1 to 2 green bars are
displayed).
A software update is in progress and may take up
to 7 minutes to complete. Once complete, the
LEDs on your Wireless Home Phone device will
return to normal state.
• S
IM is missing or not installed properly.
1) Remove the battery cover and battery.
2) Locate the SIM card slot and insert the SIM
card into the slot until secure.
• SIM card may be invalid or damaged and needs
to be replaced. For a replacement SIM card,
take your Wireless Home Phone device to your
local AT&T store. Or, call AT&T Customer Care at
1-800-331-0500.
25
Problem
Can’t connect
to my 3G
MicroCell
(Wireless
Service
indicator is not
flashing green)
SIM card
doesn’t work
in my mobile
device
Message
Waiting
indicator on
my home
phone
equipment
doesn’t light
26
Possible Solution
• Add the phone number associated with your
Wireless Home Phone device to your 3G
MicroCell Approved User List.
• Power cycle your 3G MicroCell as well as your
Wireless Home Phone device.
• Make sure the Wireless Home Phone device is
within range of the 3G MicroCell.
• T
he SIM card provided with your Wireless Home
Phone device is intended for use only in your
specific Wireless Home Phone device and
cannot be used in a mobile handset.
• The Wireless Home Phone device does not
support this functionality with your home phone
equipment.
• The Wireless Home Phone device has a
dedicated Message Waiting indicator light and
will flash when you have a new voice message.
You will also hear an intermittent dial tone when
you pick up your handset.
Problem
I hear an
intermittent
dial tone
My phone
doesn’t ring
when a call
comes in
Possible Solution
• You will hear an intermittent dial tone when you
have a new voicemail message waiting.
• Dial 1 from your home phone equipment
connected to the Wireless Home Phone device
to review your voice messages.
• Make sure the battery is installed in your
Wireless Home Phone device.
• If you recently transferred your landline number,
you will continue to receive incoming calls
on your previous service until the transfer is
complete. To check transfer status, visit
att.com/port.
• Make sure your Wireless Home Phone device is
NOT connected to your in-home phone wiring.
• Make sure your home phone is powered on and
connected to the Wireless Home Phone device.
• Your Wireless Home Phone device number may
be set to Call Forward. Dial #21# to un-forward
calls.
27
Problem
My answering
machine won’t
pick up calls
I hear a
constant low
frequency tone
(not dial tone)
when I try to
place a call
28
Possible Solution
• S
et your answering machine settings to pick
up calls before network voicemail, which is
approximately four (4) rings.
• O
r, you can have network voicemail removed
from your account by calling AT&T Customer
Care. Dial 611 from your connected phone or
800-331-0500.
Hang up your home phone to restore dial tone.
Specifications
Dimensions
(W×D×H)
5.51" (W) × 4.33" (D) × 1.18" (H)
Weight
8.26 oz. (including antenna and battery)
Battery
Talk time
Standby time
1,900 mAh
Approximately 3 hours (2G and 3G)
25 hours
ote: The value of the talk time or standby time varies with the actual
N
environment.
29
Safety Instructions
• S
ome electronic devices are susceptible to electromagnetic
interference sent by devices that may not be adequately shielded.
For best performance, position the Wireless Home Phone device
as far from these types of devices (TV sets, radios and other
automated office equipment) as possible (at least 8 feet) so as to
avoid possible electromagnetic interference.
• Do not use the device in hospitals.
• Do not use the device on board aircraft.
• O
perating of the device may interfere with medical devices like hearing
aids and pacemakers. Consult a physician or the manufacturer of the
medical device before using.
• Be aware of usage limitations when using the device at places such
as oil warehouses or chemical factories, where there are explosive
gases or explosive products being processed. Even if your terminal
is in idle state, it still transmits radio frequency (RF) energy.
• Keep the antenna free from obstructions and position the antenna
straight up. This will ensure best call quality.
• Please put the device in a safe place. The device may cause injury if
used as a toy by children.
• Do not put other things on the terminal to avoid overheating.
• Please use original accessories or accessories that are approved by
vendor. Using any unapproved accessories may affect your device’s
performance, damage your terminal, or even cause danger to you
and violate related national regulations about telecom terminals.
30
• B
ecause the device can produce an electromagnetic field, do not
place it near magnetic items such as computer disks.
• Do not expose the device to direct sunlight or store it in hot areas.
High temperatures can shorten the life of electronic devices.
• Prevent liquids from leaking into the device.
• Do not attempt to disassemble the device by yourself. Non-expert
handling of the device may cause bodily injury or device damage.
• Do not install or remove the SIM card when the power is on.
31
Radio Frequency (RF) Energy
FCC Compliance
This device meets the government’s requirements for exposure to
radio waves.
This device is designed and manufactured not to exceed the
emission limits for exposure to radio frequency (RF) energy set by the
Federal Communications Commission of the U.S. Government:
The exposure standard for wireless mobile devices employs a unit
of measurement known as the Specific Absorption Rate, or SAR. The
SAR limit set by the FCC is 1.6 W/kg.*
While there may be differences between the SAR levels of various
devices and at various positions, they all meet the government
requirement.
The FCC has granted an Equipment Authorization for this device
with all reported SAR levels evaluated as in compliance with the
FCC RF exposure guidelines. SAR information on this device is
on file with the FCC and can be found under the Display Grant
section of http://www.fcc.gov/oet/ea/fccid/ after searching
FCC ID: SRQ-WF721.
*Tests for SAR are conducted using standard operating positions
accepted by the FCC with the device transmitting at its highest
certified power level in all tested frequency bands. Although the SAR
is determined at the highest certified power level, the actual SAR
level of the device while operating can be well below the maximum
value. This is because the device is designed to operate at multiple
power levels so as to use only the power required to reach the
network. In general, the closer you are to a wireless base station
antenna, the lower the power output.
32
This device complies with part 15 of the FCC Rules. Operation is
subject to the condition that this device does not cause harmful
interference.
Caution: Changes or modifications not expressly approved by
the manufacturer could void the user’s authority to operate the
equipment.
Note: This equipment has been tested and found to comply with the
limits for a Class B digital device, pursuant to part 15 of the FCC Rules.
These limits are designed to provide reasonable protection against
harmful interference in a residential installation. This equipment
generates, uses, and can radiate radio frequency energy and, if not
installed and used in accordance with the instructions, may cause
harmful interference to radio communications. However, there is no
guarantee that interference will not occur in a particular installation. If
this equipment does cause harmful interference to radio or television
reception, which can be determined by turning the equipment off
and on, the user is encouraged to try to correct the interference by
one or more of the following measures:
• Reorient or relocate the receiving antenna.
• Increase the separation between the equipment and receiver.
• Connect the equipment into an outlet on a circuit different from
that to which the receiver is connected.
• Consult the dealer or an experienced radio/TV technician for help.
33
Warranty
ZTE offers you a limited warranty that the enclosed subscriber unit
and its enclosed accessories will be free from defects in material and
workmanship for a period that expires one (1) year from the date of
sale of the Product to you, provided that you are the original enduser purchaser of the Product and provided that your purchase was
made from a supplier authorized by the Seller. Transfer or resale of a
Product will automatically terminate warranty coverage with respect
to that Product. This limited warranty is not transferable to any third
party, including but not limited to any subsequent purchaser or owner
of the Product. This limited warranty is applicable only to end users in
the United States.
This product or phone is under warranty for 12 months from the
date of purchase.
For warranty service information, please call ZTE service
number (877) 817-1759 (toll-free). The manufacturer’s website,
http://www.zteusa.com, is also available for assistance.
This warranty only applies if the product has been used in
accordance with the manufacturer’s instructions under normal
use and with reasonable care.
What this warranty does not cover:
a) Defects or damages resulting from the misuse of this product.
b) Defects or damages from abnormal use, abnormal conditions,
improper storage, exposure to moisture, dampness or
corrosive environments, unauthorized modifications,
unauthorized repair, neglect, rough handling, abuse, accident,
34
alteration, improper installation, incorrect voltage application,
food or liquid spoilage, acts of God.
c) Normal wear and tear.
d) If the Product has been opened, modified or repaired by
anyone other than a warranty service center or if it is repaired
using unauthorized spare parts.
e) If the serial number or mobile accessory date code has been
removed, erased, defaced, altered, or are illegible in any way
subject to sole judgment of ZTE.
LIMITED WARRANTY
TO THE EXTENT PERMITTED BY APPLICABLE LAW, THIS LIMITED
WARRANTY IS YOUR SOLE AND EXCLUSIVE REMEDY AGAINST
ZTE AND ZTE’S SOLE AND EXCLUSIVE LIABILITY IN RESPECT OF
DEFECTS IN PRODUCT. HOWEVER, THIS LIMITED WARRANTY SHALL
NOT EXCLUDE NOR LIMIT ANY OF YOUR LEGAL (STATUTORY)
RIGHTS UNDER THE APPLICABLE NATIONAL LAWS.
TO THE EXTENT PERMITTED BY APPLICABLE LAW ZTE DOES
NOT ASSUME ANY LIABILITY FOR LOSS OF OR DAMAGE TO OR
CORRUPTION OF DATA, FOR ANY LOSS OF PROFIT, LOSS OF USE
OF PRODUCTS OR FUNCTIONALITY, LOSS OF BUSINESS, LOSS
OF REVENUES OR LOSS OF ANTICIPATED PROFIT, INCREASED
COSTS OR EXPENSES OR FOR ANY INDIRECT, OR SPECIAL OR
CONSEQUENTIAL LOSS OR DAMAGE. TO THE EXTENT PERMITTED
BY APPLICABLE LAW, ZTE’S LIABILITY SHALL BE LIMITED TO THE
PURCHASE VALUE OF THE PRODUCT. THE ABOVE LIMITATIONS
SHALL NOT APPLY TO DEATH OR PERSONAL INJURY CAUSED BY
DEFECT OF PRODUCT IN MATERIAL, DESIGN, AND WORKMANSHIP.
35
How to Get Warranty Service
To obtain warranty service, please call (877) 817-1759. Please have the
following information available when you send the device in for repair:
• A valid Proof of Purchase
• Return address
• Daytime phone number or fax number
• Model #
• IMEI # (Look for the 15-digit IMEI # behind the battery of the device.)
• Complete description of the problem
• Transportation prepaid
Notes
Other Warranty Programs
You may have other warranty programs with your purchase, such as
warranty exchange. If so, please refer to equipment package or the
original point of sale.
36
37
38