1
Contents
Chapter 1
Introduction
1
1.1
1.2
1.3
The Nissan Story
Nissan Micra History
Aims & Objectives
1
1
1
Chapter 2
Preliminary Investigation
2
2.1
2.2
2.3
2.4
System Development Model
Feasibility Study
Software Solution
Hardware Solution
2
3
3
4
Chapter 3
Research
5
3.1
3.2
3.3
3.4
3.5
3.6
3.7
Alternative Methods
Menu Bar
Title Bar
Colour Scheme
Tables
CSS sheets
QTVR Panoramas
5
6
6
6
6
7
7
Chapter 4
System Analysis
8
4.1
4.2
Content Preparation
Content Flowchart
8
9
Chapter 5
System Design
10
5.1
5.2
Navigation Design
Story Board
10
13
Chapter 6
Implementation
14
6.1
6.2
6.3
Coding
Problems
Solutions
14
21
23
Chapter 7
System Testing
26
Chapter 8
User Manual
31
7.1
7.2
Chapter 9
Test Plan
Test Case
26
27
Evaluation
38
9.1
9.2
Aims & Objectives
Time Management
38
38
Chapter 10
Conclusion
40
Bibliography
41
Appendix A
Appendix B
42
48
0
Chapter 1
Introduction
1.1
The Nissan Story
In 1914 the first car was made at the Nissan production line in Japan.
In 1953 a joint venture with Austin of Great Britain allowed Nissan to expand their
range. In 1967 the Fairlady 200 was launched, a sports car which has an international
appeal. 1969 was the birth of the legendary Datsun 2402. Almost 1.5 million Z sports
cars where sold worldwide.
1.2
Nissan Micra History
Nissan Micra s are a top supermini choice as they are reliable, give good performance
and fuel economy. In 1993 the Nissan Micra became European Car of the year and
went on to win 12 major awards. The millionth Micra was produced in Sunderland, UK
in 1999.
This particular model has been chosen as I own a Nissan Micra and found the paper
based manual to be dull and boring.
By creating a web based interactive car manual it will allow the user to interact and
visually improve the learning experience, which is not possible with the original hard
copy paper version.
The intended audience the web site is aimed at is Nissan Micra owners.
1.3
Aims & Objectives
Ø To create an interactive web based car manual.
Ø Enable Nissan Micra owner s to ensure familiarity with controls and essential car
maintenance.
Ø To create a 360 degree panoramic tour inside a Nissan Micra.
Ø Using Active Server Pages scripting to access a database to give dynamically
updated web pages.
Ø Using ASP scripting to implement a facility to allow users to search for Nissan Car
Dealers.
Ø Meet the requirements for target audience.
1
Chapter 2
Preliminary Investigation
2.1
System Development Model
In order to accomplish a project successfully from start to finish it is important to have a
plan or procedure.
The work plans for a system development are called system
development file cycles.
Classical Waterfall
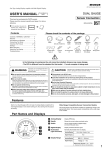
The lifecycle approach is used from the waterfall model of system development. Figure
2.1 shows the stages in the waterfall.
Feasibility
Analysis
Design
Implement
Test
Figure 2.1
System Development Lifecycle
Feasibility
Is the project technically, operationally, financially and legally feasible?
The feasibility study is used to determine if the project should progress. If the project is
to proceed then a project plan for the future stages of development will need to be
produced.
Analysis
Gather the requirements for the system. This stage includes a detailed study of the needs
for the new system.
2
Chapter 2
Design
This stage focuses on:
High level design the programs to be used.
Low level design - how the individual programs are going to work.
Interface design - what is the interface going to look like.
Data design - what information is needed.
Implementation
The designs are translated into code. The software and hardware are used to construct
the application.
Test
Individual parts of the system are tested then as a whole.
2.2
Feasibility Study
The foremost part of the project was to develop a feasibility study to ensure an
understanding of the aims and objectives with project supervisor. A Gantt chart (in
Appendix B) was produced to help with project time management and to allow
objectives to be broken down into manageable tasks with predicted start and finish
times for each work stage and the overall project.
2.3
Software Solution
After careful selection the following software applications were chosen for the project.
As the project was to be a web based application it was necessary to use a HTML
editor, the essential tool for visually designing and managing web sites and pages this is
why Macromedia Dreamweaver was chosen.
In order to allow the users to navigate around the site it is important to include a menu
bar containing links to the various pages. Macromedia Fireworks is the best tool to use
for visualising a web site and creating menu bars.
The best software application that can produce high quality web graphics and animation
is Macromedia Flash. Flash produces compressed file format called Shockwave that
can be downloaded quickly and played by most popular browsers.
3
Chapter 2
The advantage of using the Macromedia software is the compatibility with each other,
enabling the Fireworks menu bar and the Flash manual to be imported in Dreamweaver
allowing a web based delivery.
To store large amount of data requires a database, Microsoft Access was used for the
dealer search facility allowing easy retrieval of data using ASP scripting. The main
advantage of using a database is it can easily be updated.
To test and develop the ASP scripting before uploading to a server, Microsoft Personal
Web Server was used as it is provided with windows 98 operating system.
To view the web pages a web browser is needed, Microsoft Internet Explorer is the
most widely used and was required during the implementation and testing stages.
There where several software applications that could have been used to create 360
degrees panoramas by combining images together to create a QuickTime movie that can
be used for web pages. The application used for the project is The Panorama Factory
as this is a trial version downloaded from www.download.com.
Olympus Camedia Master is the image management application used to download
images from the Olympus digital camera.
Adobe PhotoShop is an image editing package used to produce high quality images for
the Web
2.4
Hardware Solution
To develop the project the main hardware needed is a PC with the appropriate software
packages installed.
Olympus digital camera obtained from the Electrical Engineering Department to take
images for the panoramic tour.
A tripod used to mount the digital camera on.
A scanner used to scan images from the Nissan Micra owner s manual.
The Nissan Micra Owner s Manual, the main source of information for the content of
the site.
4
Chapter 3
Research
3.1
Alternative Methods
There were many different ways considered to produce the project using various
software applications available.
Initially it was decided to create the project using 3ds max, which is a powerful
application used to create professional quality 3D models and film quality animations.
The idea was to create a 3D model of a Nissan Micra to allow a user to virtually explore
the vehicle.
Due to unfamiliarity with the software application this idea was not
utilised.
Macromedia Director was also considered as Director movies play either with a
Shockwave player or through a projector player. The Shockwave player allows movies
to be played in Web browsers and also outside browsers as stand-alone applications.
The projector player can only play movies independent of a Web browser.
The disadvantage with Director is it does not allow flexibility with the drawing tools
and the shaping of animation.
One of the objectives of the project was to include a dealer search facility, this could
only been achieved if produced as a web based application. The advantage of a web
based application is that it can be distributed on a CD-ROM, all features will work
except for the dealer locator, which can only run from a web server.
5
Chapter 3
3.2
Menu Bar
The most important part of a web site is the navigation, how potential users will
navigate around enabling them to find the content they require quickly.
The best place to locate a menu bar is either at the top of the page or along the left hand
side.
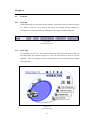
3.3
Title Bar
To attract the user into the material a combination of text and graphics related to the
subjects have been used to create a title bar for each of the pages. It also gives an
indication of where the user is at all times.
3.4
Colour Scheme
Colour is the quickest and most powerful way to create the tone of a web site, not only
does it add visual appeal but it is also important because of the message it sends to the
site user. Choosing the right colour combinations for the text and background improves
a reader s experience on the site.
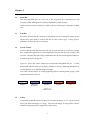
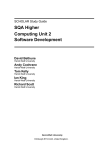
Figure 3.1 shows the colour scheme used consistently throughout the site. A white
background with the main text in purple, headings in orange, important information in
red and graphics are in different shades of purple.
The colour scheme chosen is visually appealing and eye-catching whilst giving a calm
and peaceful mood to the site.
Graphics
Main Text
& Graphics
Graphics
Graphics
Text
Figure 3.1
Colour Scheme
3.5
Tables
Using tables within Dreamweaver helps to construct the pages, as it is a good tool for
laying out data and images on a page. The main advantage of using tables is that it
reduces loading times and is supported by all browsers.
6
Chapter 3
3.6
Cascading Style Sheets (CSS Sheets)
The main advantage of using CSS sheets is they ensure consistency throughout the site
by controlling the appearance of the content, such as font style, size and colour.
3.7
QTVR (QuickTime Virtual Reality) Panoramas
QTVR panoramas can be created using images captured from the following types of
cameras:
·
35mm film cameras
·
Digital cameras
·
Video cameras
The most common method to create QTVR panoramas is to capture a series of images
around a single point of rotation then digitise them into a set of image files. Using
QTVR software the image files are stitched together and compressed before being
transformed into the final QTVR panorama.
The advantage of QTVR Panoramas is the user has the ability to the following features:
·
Vertical panning
·
Horizontal panning
·
Zooming into or out of the panorama
7
Chapter 4
System Analysis
4.1
Content Preparation
Before implementation of coding it was important to establish the content to be put on
the site to determine the site s structure. As the manual covers a wide range of topics it
would not be feasible to cover all topics within the web site. A questionnaire was
carried out on five potential users to help establish the content requirements. The
questionnaires can be found in Appendix A.
After reviewing the questionnaires the following topics where selected to be included in
the flash manual.
·
Instruments and Controls
Ø Instruments and Control Layout (Right-hand Drive models)
Ø Speedometer and odometer
Ø Tachometer (where fitted)
Ø Coolant Temperature Gauge
Ø Fuel Gauge
Ø Warning/Indicator Lights and Buzzer
Ø NATS (NISSAN Anti-theft system)
Ø Hazard Warning Flasher Switch
·
Pre-driving checks and adjustments
Ø Bonnet Release
Ø Supplemental Restraint System (Air Bag System)
Ø Air Bag Warning Light
·
Starting and Driving
Ø Running in Schedule
Ø Before Starting the Engine
Ø Care When Driving
Ø Starting the Engine (Petrol Engine Models)
Ø Driving with Manual Transmission
Ø Cold Weather Driving Precautions
·
Maintenance
Ø Maintenance
Ø General Maintenance
8
Chapter 4
4.2
Content Flowchart
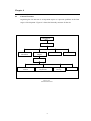
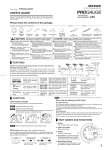
Organising the site structure is an important aspect as it prevents problems in the later
stages of development. Figure 4.2 shows the hierarchy structure for the site.
Introduction
Page
Home
Safety
Information
Interactive
Manual
Panoramic Tour
Dealer Locator
Flash Manual
Instruments and
Controls
Pre-driving checks and
adjustments
Figure 4.2
Content Flowchart
9
Starting and
Driving
Maintenance
Chapter 5
System Design
5.1
Navigation Design
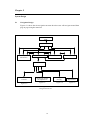
Figures 5.1 shows the site navigation structure how the users will navigate around from
page to page using the menu bar.
Introduction
Page
Home
Safety
Information
Interactive Manual
Panoramic Tour
Dealer Locator
Flash Manual
Instruments and
Controls
Pre-driving checks
and adjustments
Starting and
Driving
Maintenance
Figure 5.2
Figure 5.3
Figure 5.4
Figure 5.5
Figure 5.1
Navigation Structure
10
Chapter 5
Navigation Design
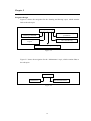
Figure 5.2 shows the navigation for the Instruments and Controls topic, which
contains links to the sub topics.
Instruments and Controls
Instruments and Controls
layout
Fuel
Gauge
Warning/Indicator Light and
Buzzer
Coolant temperature Gauge
Speedometer and Odometer
Hazard Warning Flasher
Switch
NATS (Nissan Anti-theft system) Security Indicator
Light
Figure 5.2
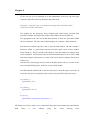
Figure 5.3 shows the navigation for the Pre-driving checks and adjustments topic,
which contains links to the sub topics.
Pre-driving checks and adjustments
Bonnet Release
Air Bag Warning Light
Supplemental Restraint System (Air Bag System)
Figure 5.3
11
Chapter 5
Navigation Design
Figure 5.4 shows the navigation for the Starting and Driving topic, which contains
links to the sub topics.
Starting and Driving
Cold Weather driving
precautions
Running in Schedule
Before Starting the
Engine
Care when driving
Precaution when starting the driving
Figure 5.4
Figure 5.5 shows the navigation for the Maintenance topic, which contains links to
the sub topics.
Maintenance
Maintenance
General Maintenance
Figure 5.5
12
Chapter 5
5.2
Story Board
13
Chapter 6
Implementation
6.1
Coding
Macromedia Flash was used to create the introduction animation to the web site.
Pictures were obtained from various web sites then imported into Flash to be used as
part of the animation. Once the animation had been completed, sequenced sound and
music was added. The animation was exported as a Shockwave (swf) file format and
then imported into Dreamweaver to allow for a web based delivery.
Using the help menu within Flash, a preloader was created which is a simple animation
that plays as the rest of a movie downloads.
The following is the Action script used for the preloader.
ifFrameLoaded ("Scene 1", 345) {
nextScene ();
play ();
}
Once the animation has finished it automatically opens the homepage using the
following action script.
getURL ("home.html");
The intro page also contains a button created in flash to enable the user to skip the
animation and go straight to the homepage.
following action script.
on (press) {
getURL ("home.html");
}
14
The link for the button contains the
Chapter 6
As the web site is to be uploaded on to the departmental web server, the intro page
contains a link to the university disclaimer page that reads:
Disclaimer - This link refers to an important message which should be read in
conjunction with this information.
The graphics for the homepage where designed and created using Fireworks then
exported as HTML and images, this produces the HTML code for the rollovers.
The appropriate tools were used within Dreamweaver to allow the Fireworks HTML
file to be imported. The lower part of the homepage also contains a flash animation.
The interactive manual page has a link to open the flash manual. The link contains a
behaviour, which is a prewritten JavaScript code that opens a new browser window
when clicked on. The user will have the ability to resize the window according to their
screen resolution. The shockwave file for the flash manual has been set to 100% width
and 100% height in Dreamweaver, so that it will resize itself according to the browser
window size.
The interactive manual page also has a link to the Macromedia web site, in order for the
user to download flash player, needed to view the flash manual.
The flash manual contains links to the four main topics, when the mouse is placed over
a topic the sub topics are displayed, this was done using the following action script:
on (rollOver) {
gotoAndPlay ("b1");
}
on (rollOut) {
gotoAndPlay ("b1-0");
}
on (press) {
gotoAndPlay ("instruments and controls", 1);
}
The images used for the topics were scanned from the paper based manual then imported into
flash
where
it
was
redrawn
using
15
the
vector
drawing
tools.
Chapter 6
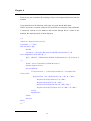
The following Action Script was obtained from the Flash Kit web site, used for the
puzzle. The Action Script is used for each of the labels, to enable the user to drag it into
the correct place. If the label is placed over the correct box it will fit into place
otherwise it will return to its original position. Figure 6.1 shows the interactive puzzle.
on (press) {
startDrag ("/a1");
}
on (release) {
stopDrag ();
}
on (release) {
if (getProperty("/a1", _droptarget) eq ("/b1")) {
setProperty ("/a1", _x, "217");
setProperty ("/a1", _y, "71");
} else {
setProperty ("/a1", _x, "135");
setProperty ("/a1", _y, "498");
}
}1
Figure 6.1
1
http://www.flashkit.com
16
Chapter 6
The images for the panoramic tour was taken using a digital camera, this was done by
holding the camera in the middle of the car and taking a total of fourteen pictures all the
way round. The images were then downloaded onto PC and using The Panorama
Factory , the images were stitched together to produce the output QuickTime movie.
Within Dreamweaver, the insert plugin option was used to import the QuickTime
movie. The following HTML code was generated to enable the browser to locate the
movie file and set the size properties.
<embed src="qtvr/car.mov" width="304" height="264"
pluginspage="http://www.apple.com/quicktime" controller="true" bgcolor="ffffff">
</embed>
When viewed in a browser the users has the ability to interact with the movie using the
mouse or keyboard. To view the movie the users will require the QuickTime plugin,
the page contains a link to the QuickTime web site where they can download the plugin
if required.
17
Chapter 6
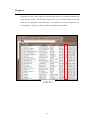
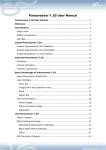
The Dealer Locator works simply by obtaining input from user, searches a database and
sends them the results. The first part of this task was to visit the Nissan web site and
search for the appropriate dealer addresses. The addresses were then entered into an
access database. Figure 6.2 shows a table of Nissan dealers in London.
Figure 6.2
Database Table
18
Chapter 6
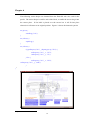
The next step was to produce the scripting to retrieve the required information from the
database.
Using Dreamweaver the following ASP script was typed into the html editor.
When a user enters a postcode in the text box and clicks on search, the script establishes
a connection with the Access Database and searches through the PC column in the
database, the matching results are then displayed.
<%
strSearch = Request.Form("search")
If strSearch <> "" Then
Dim strConnect, SQL
Dim RS
strConnect = "Provider=Microsoft.Jet.OLEDB.4.0;Data Source=" &
Server.MapPath("search.mdb") & ";"
SQL = "SELECT * FROM london WHERE INSTR(london.PC,'" & strSearch &
"')"
Set RS = Server.CreateObject("Adodb.Recordset")
RS.Open SQL,strConnect
Do Until RS.EOF
'If Len(strSearch) >= 1 AND LCase(strSearch) = LCase(RS("Post
Code")) Then
Response.Write "<B>" & RS("Dealer") & "</B>" & "<BR>"
Response.Write RS("Address1") & "<BR>"
Response.Write RS("City") & "<BR>"
Response.Write RS("PostCode") & "<BR><BR>"
Response.Write RS("Telephone No") & "<BR>" & "<BR>"
'End If
RS.MoveNext
LOOP
RS.Close
End If
%>
2
2
http://www.1AspStreet.com
19
Chapter 6
Using the information obtained from the research, tables were used within
Dreamweaver to construct all the pages allowing easy arrangement of the information
and graphics. The text on all the pages have been set into columns, as this is much
easier to read.
All pages contain the same menu bar with the Nissan logo in the top left corner with
links to the other pages, giving it a consistent look and feel when users navigate around
the site. The web pages also have a title bar giving an indication to the user the current
page they are on. CCS Stylesheet has also been used to apply formatting to all the text
on all the pages, giving it a consistent look by keeping the properties of the font the
same.
20
Chapter 6
6.2
Problems
6.2.1
Menu Bar
Adobe PhotoShop was originally used to produce a prototype menu bar shown in figure
6.3
When viewed in a web browser the image was blurred and the quality was
unsuitable for a web based delivery, although saved as high resolution JPEG file.
Figure 6.3
Prototype Menu bar
6.2.2
Home Page
The homepage in figure 6.4 was created in fireworks using the same colour scheme as
the initial menu bar (shown in figure 6.5), this was also shown to users to provide
feedback. The users response was too many pictures were used and the page needed
some animation.
Figure 6.4
Initial Homepage
21
Chapter 6
6.2.3
Panoramic Tour
When the QuickTime movie was viewed, the images had not aligned and stitched
properly because of the difficulty in keeping the camera steady whilst taking the
pictures.
6.2.4 Dealer Locator
The ASP scripting used was obtained from Beginning Active Server Pages 3 book, it
did not work as expected as the search would only work if the postcode entered
matched exactly what was in the database. This meant that the user would have to enter
the exact postcode of the dealer they wish to view the address of. After modification of
the script it still did not work as intended.
22
Chapter 6
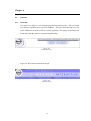
6.3
Solutions
6.3.1
Menu Bar
The menu bar in figure 6.5 was created using Macromedia Fireworks. The new design
was shown to potential users to provide feedback. The users found the links were too
small, difficult to read and overall not visually appealing. The quality of the image was
much better then the menu bar created using PhotoShop.
Figure 6.5
Initial Menu bar
Figure 6.6 shows the final menu bar design.
Figure 6.6
Final Menu bar
23
Chapter 6
6.3.2
Home Page
Using the same colour scheme as the final menu bar (figure 6.6), fewer pictures were
used and a Flash animation was added to create a new design for the homepage (shown
in figure 6.7).
Figure 6.7
24
Chapter 6
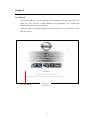
6.3.3
Panoramic Tour
To solve the problem of keeping the camera stable, it was attached to a tripod, and then
placed in the centre of the car. The tripod was adjusted to only move horizontally and
then pictures were taken keeping sure that each picture overlapped by at least 20%.
Figure 6.8 shows the output stitched image.
Figure 6.8
Stitched pictures
6.3.4
Dealer Locator
After research on the World Wide Web, an advanced ASP script was found at the
following URL: http://www.1AspStreet.com.
The new script still did not work as expected, as the search results would only be
displayed if the first two characters the users entered matched the postcode in the
database. Another problem was the script does not produce a message to indicate to the
user if no search results were found. After modification of the script, the problem was
still not resolved so it was decided to keep the ASP script.
6.3.5
Interactive Flash Manual
As most of the topics covered within the interactive manual were text based there was
limited amount of animation and user interaction. As the objective was to create an
interactive manual, an additional topic was added Driving with Manual Transmission .
The particular topic was chosen because it was possible to create an interactive
animation, which had not been used in the manual before.
A puzzle was also created to allow the user to test their knowledge on one of the topics
covered within the manual.
Further information regarding the puzzle can be found in chapter 6 section 6.1.
25
Chapter 7
System Testing
7.1
Test Plan
While the project was under development it was continuously tested.
Once the
implementation of the project was completed a test plan was produced on ways to test
the finished design.
To self test the site the following questions were asked:
·
Is the loading time for the site reasonable?
·
Is the page layout and use of colour, fonts, and images consistent throughout the
site?
·
Does the design appeal to the target audience?
·
Is there a balance between text and images used?
·
Are the colour combinations appropriate for the site's purpose?
·
Is the navigation located in the same place on every page of the site?
·
Is the content sufficient to meet user needs and expectations?
·
Is text content free from spelling and grammatical errors?
26
Chapter 7
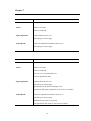
7.2
Test Case
No
1
File
index.html
Action
Mouse over skip intro button.
Click on skip intro button.
Expecting Result
Button changes colour to indicate mouse over.
Links to the homepage.
Actual Result
The colour changes as expected.
The button links to the homepage.
No
2
File
home.html
Action
Mouse over links.
Click on each link.
Expecting Result
Links indicate mouse over.
All links go to correct page.
Actual Result
Links are underlined to indicate mouse over.
All links go to correct page.
27
Chapter 7
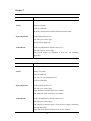
No
3
File
safety.html
Action
Mouse over links.
Click on each link.
Expecting Result
Links indicate mouse over.
All links go to correct page.
Actual Result
Links are underlined to indicate mouse over.
All links go to correct page.
No
4
File
qtvr.html
Action
Mouse over links.
Click on each link.
Use move to view panoramic tour.
Click on QuickTime link.
Expecting Result
Links indicate mouse over.
All links go to correct page.
QuickTime movie allows 360 degrees tour.
QuickTime link opens QuickTime web site in new window.
Actual Result
Links are underlined to indicate mouse over.
All links go to correct page.
Panoramic tour works as expected
The QuickTime link opens a new browser window.
28
Chapter 7
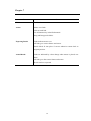
No
5
File
Dealer_Search.asp
Action
Mouse over links.
Click on each link.
Postcode entered into box then clicked on search button
Expecting Result
Links indicate mouse over.
All links go to correct page.
Search results displayed.
Actual Result
Links are underlined to indicate mouse over.
All links open up correct page.
The search results are displayed if there are any matching
postcodes.
No
6
File
Manual.html
Action
Mouse over links.
Click on each link.
Use move to view panoramic tour.
Click on Flash link.
Expecting Result
Links indicate mouse over.
All links go to correct page.
Open Interactive manual opens new window.
The flash link opens a new browser window.
Actual Result
Links are underlined to indicate mouse over.
All links go to correct page.
The Interactive manual opens a new browser window containing
the flash.html page.
Flash link opens Macromedia web site in new window.
29
Chapter 7
No
7
File
flash.html
Action
Mouse over links.
Click on each link.
Use all interactivity in the flash manual.
Drag and Drop puzzle labels.
Expecting Result
Links indicate mouse over.
All links go to correct frames and scenes.
Puzzle labels fit into place if correct otherwise returns back to
original position.
Actual Result
Links are indicated by colour change when mouse is placed over
them.
All links go to the correct frames and scenes.
Puzzle works as expected.
30
Chapter 8
User Manual
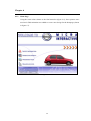
The first page the user will see when the site is launched, is the intro page (shown in
figure 8.1), this will play a flash animation for approximately 30 seconds then
automatically take them to the homepage.
If the user wishes to skip the animation at any time, they can do so by clicking on the
skip intro button.
Skip intro button
Figure 8.1
Intro page
31
Chapter 8
Figure 8.2 shows the homepage containing links to the four main pages.
Links
Figure 8.2
Homepage
32
Chapter 8
The safety information page (shown in figure 8.3) contains important information.
Using the menu bar the user can navigate to the other pages of the site.
Menu bar
Figure 8.3
Safety Information
33
Chapter 8
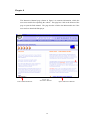
The Interactive Manual page (shown in figure 8.4) contains information, which the
users must read before operating the vehicle. This page has a link at the bottom of the
page to open the flash manual. The page also has a link to the Macromedia site if the
user needs to download flash player.
Link to Macromedia site
Figure 8.4
Interactive Manual
34
Opens Interactive Manual
Chapter 8
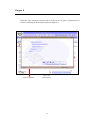
When the open interactive manual link is clicked on it will open a separate browser
window containing the flash manual (shown in figure 8.5).
Interactive Manual
Figure 8.5
Flash Manual
35
Chapter 8
Figure 8.6 shows the panoramic tour page, which contains the navigation controls for
the QuickTime movie. To take the tour the user simply clicks on the picture then uses
either the mouse or keyboard to navigate around.
Figure 8.6
Panoramic Tour
36
Link to QuickTime
web site
Chapter 8
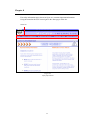
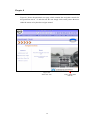
To search for a Nissan dealer the user simply enters a postcode into the input box then
clicks on search, if there are any matching results it will be displayed on the right side
of the page.
Search Box
Figure 8.7
Dealer Locator
37
Results Displayed
Chapter 9
Evaluation
By creating a web based interactive car manual it will allow the user to interact and
visually improve the learning experience, which is not possible with the original hard
copy paper version.
The intended audience the web site is aimed at is Nissan Micra owners.
9.1
Aims & Objectives
Ø To create an interactive web based car manual.
The Interactive Car Manual was created using Macromedia Flash using a combination
of sound, graphics and interactivity to meet the objective.
Ø Enable Nissan Micra owner s to ensure familiarity with controls and essential car
maintenance.
Ø Meet the requirements for target audience.
Conducting a user questionnaire enabled the needs of the target audience to be met as a
wide range of topics has been covered.
Ø To create a 360 degree panoramic tour inside a Nissan Micra.
Using the appropriate hardware and software resources the panoramic tour was created
successfully meeting the objective.
Ø Using Active Server Pages scripting to access a database to give dynamically
updated web pages.
Ø Using ASP scripting to implement a facility to allow users to search for Nissan Car
Dealers.
The dealer locator allows a user to search for Nissan dealers within two clicks. Using
ASP scripting a database of dealers is searched through and the results are displayed.
9.2
Time Management
The most important aspect in achieving a successful project is time management.
Appendix B shows the Gantt chart that was produced during the initial stages of the
project.
During the analysis and design stage it was important to carry out a
questionnaire to determine the structure for the site.
38
Chapter 9
As the introduction and homepage did not affect the overall structure, it was decided to
create these pages during this stage allowing more time to be spent on the other parts of
the site.
One of the most time consuming part of the project was the design of the menu bar and
homepage, as they had to be redesigned. The other time consuming part was creating
the flash manual. Redrawing the images in flash took longer then expected as they had
to be preciously drawn in detail.
It was initially decided to store addresses of all Nissan dealers in a database. As there
are hundreds of dealers across the UK it would no be feasible to cover all regions so it
was decided to limit the search facility to dealers in London.
Weekly checks were made against the Gantt chart, on the progress of work and the
quality of each task as it was produced.
Although the project was completed two weeks before the expected completion date
part of the flash manual had to be modified to include more interactivity which led to
the project being completed exactly as initially planned.
39
Chapter 10
Conclusion
During the second year of the course the module Multimedia Group Project was
studied, this enabled concepts of system specification, design, development and
integration. This also helped to understand the importance of human computer interface
design.
Using ASP scripting with databases, an online shopping web site was
produced. The skills and knowledge learnt was applied to this project.
The aim of the System Test & Evaluation module studied in the final year was to
develop an experimental topic, by managing time effectively and keeping an up to date
logbook of work undertaken. A technical report was also produced as part of the
assessment.
Using the skills and knowledge learnt over the past 3 years they have been applied to
the project to further enable problem solving skills, time management and how to
implement and manage a technology based project. These skills will be used in the near
future when joining a technology based industry.
Future Development
The future development for the project can cover all the topics within the interactive
manual with more animation and multiple choice quizzes to allow users to test their
knowledge on the information learnt.
As this is a prototype for the particular model of car, it can be easily adapted for any
make or model of vehicle. If the project was to be made commercial it is not necessary
to include all the features the web site currently offers, the most important part is the
actual flash manual, which can be kept as a web application or be made standalone.
The flash manual can be distributed with new cars on a CD-ROM.
40
Bibliography
Books:
Nissan Micra Owner s Manual
1998 NISSAN EUROPE N.V. AMSTERDAM, THE NETHERLANDS
Chris Ulman, David Buser, Jon Ducket, Brian Francis, John Kauffman, Juan T. Llibre,
David Sussman (2000). Beginning Active Server Pages 3.0. Wrox Press Ltd,
Birmingham (UK)
World Wide Web:
Nissan.co.uk
URL: http://www.nissan.co.uk
Nissan Global
URL: http://www.nissan-global.com/
ASP Street
URL: http://www.1AspStreet.com
The Wrox Web Development Site
URL: http://webdev.wrox.co.uk
Flash Kit
URL: http://www.flashkit.com
Good Web Sites
URL: http://www.leafdigital.com/class/lessons/graphicdesign2/2.html
Introduction to System Development Lifecycle
URL: http://www.doc.mmu.ac.uk/online/SAD/T02/sdlc.htm
QTVR Online Tutor
http://www.letmedoit.com/qtvr/qtvr_online/Mod2/m2.html
41
Appendix A
Questionnaires
42
Appendix B
Gantt Chart
43