1
Torrent VCG™
User Manual
rev. 12/23/02
PN: Docs-VCG-01
©2002 StarBak Communications, Inc. All Rights
Reserved.
Torrent VCG and Torrent are trademarks of StarBak Communications, Inc.
All other company, brand and product names may be registered
trademarks or trademarks of their respective companies and are
hereby recognized.
This publication and the information herein is furnished AS IS, subject to change without notice, and should not be construed as a commitment by StarBak Communications, Inc. Furthermore, StarBak
Communications, Inc., assumes no responsibility or liability for any
errors or inaccuracies, makes no warranty of any kind (express,
implied, or statutory) with respect to this publication, and expressly
disclaims any and all warranties of merchantability, fitness for particular purposes and non infringement of third-party right.
The StarBak Torrent VCG includes software developed by the
Apache Group for use in the Apache HTTP server project (http://
www.apache.org/).
StarBak Communications, Inc.
757 Brooksedge Plaza Dr.
Westerville, OH 43081
www.starbak.com
In the USA:
Phone
(866) STARBAK
(614) 865-9150
FAX
(614) 865-9149
Outside the USA:
Phone
(614) 865-9150
FAX
+1 (614) 865-9149
Important Safeguards
For your protection, please read all these instructions regarding your Torrent VCG
and retain for future reference.
1. Read Instructions
Read and understand all the safety and operating instructions before operating the
appliance.
2. Ventilation
The Torrent VCG’s vents (on the front panel) and the fan openings (on the front
panel) are provided for ventilation and reliable operation of the product and to protect it from overheating. These openings must not be blocked or covered. This
product should not be placed in a built-in installation unless proper ventilation is
provided.
3. Lithium Battery
The lithium battery on the system board provides power for the real-time clock and
CMOS RAM. The batter has an estimated life expectancy of 5 to 10 years. If your
system no longer keeps accurate time and date settings, it may be time to change the
battery. Contact StarBak for service information. There are no operator serviceable
parts inside.
5. Electrical Shock
To reduce the risk of electrical shock, do not disassemble this product. Take it to a
qualified service person when service or repair work is required. Opening or removing covers may expose you to dangerous voltage or other risks. Incorrect reassembly can cause electric shock when this product is subsequently used.
6. Operating the unit in an equipment rack
If you plan to install the Torrent VCG in an equipment rack, take the following precautions:
(a) Ensure there is sufficient airflow around the unit.
(b) Ensure electrical circuits are not overloaded; consider the nameplate ratings of all the connected equipment and ensure you have overcurrent protection.
(c) Ensure the equipment is properly grounded, particularly any equipment
connected to a power strip.
(d) Do not place any objects on top of the Torrent VCG.
7. Browsers
Both Netscape Navigator® and Microsoft Internet Explorer® have bugs that
can cause intermittent, unexplained failures. When using a Web browser to
interact with your Torrent VCG, you may occasionally experience a browser
failure. Released product versions of the browsers are usually more reliable
than beta versions, and later versions typically work the most reliably. A
browser program failure, although annoying, does not adversely affect your
Torrent VCG’s data. The Torrent VCG has been tested with both Netscape
Navigator and Microsoft Internet Explorer and the list of compatible browsers can be found in Appendix E: Client Requirements.
Regulations and Information
This equipment has been tested and found to comply with the limits for a
Class B digital device, pursuant to Part 15 or 18 of the FCC Rules. These
limits are designed to provide reasonable protection against harmful interference in a residential installation. This equipment generates, uses and can
radiate radio frequency energy and, if not installed and used in accordance
with the instructions, may cause harmful interference to radio communications.
In order to maintain compliance with FCC regulations, shielded cables must
be used with this equipment. Operation with non-approved equipment or
unshielded cables is likely to result in interference to radio and TV reception.
The user is cautioned that changes and modifications made to the equipment
without the approval of manufacturer can void the user’s authority to operate
this equipment.
This equipment is in compliance with Underwriters Laboratories (UL) and is
UL listed.
End User License Agreement
IMPORTANT: READ CAREFULLY: This [Origin Server] ("PRODUCT")
includes software product(s) and associated media, printed materials and "on-line"
or electronic documentation ("STARBAK SOFTWARE") licensed by StarBak Communications, Inc. ("STARBAK"), and software and associated media, printed materials and "on-line" or electronic documentation ("MICROSOFT SOFTWARE")
licensed by Microsoft Corporation ("MICROSOFT"). The components of the
PRODUCT may not be separated for individual use. By using the PRODUCT, you
agree to be bound by the terms of this EULA. If you do not agree to the terms of this
EULA, STARBAK and MICROSOFT are unwilling to license the STARBAK
SOFTWARE and the MICROSOFT SOFTWARE to you. In such event, do not use
the PRODUCT. Instead, promptly contact the manufacturer of the PRODUCT for
instructions on return of the unused PRODUCT for a refund. ANY USE OF THE
PRODUCT CONSTITUTES YOUR AGREEMENT WITH THE TERMS OF THIS
EULA (OR RATIFICATION OF ANY PREVIOUS CONSENT).
STARBAK SOFTWARE LICENSE AND MICROSOFT SOFTWARE
LICENSE
The installed STARBAK SOFTWARE and the MICROSOFT SOFTWARE are protected by patents, copyright laws and international copyright treaties, as well as other
intellectual property laws and treaties. The STARBAK SOFTWARE and the
MICROSOFT SOFTWARE are licensed, not sold.
1.Grant of License. This EULA grants you the following rights:
·You may use the STARBAK SOFTWARE and MICROSOFT SOFTWARE only as
they are installed in the PRODUCT.
2.Description of Other Rights and Limitations.
•
•
You may not use the PRODUCT to degrade, overload or stress any components
of any Windows Media Server.
You may not use the PRODUCT to impair or disable software programs or
applications that create, access or utilize [content, including the file storage format for authorizing, storing, editing, distributing, streaming, playing, referenc-
•
•
•
ing or otherwise manipulating such content ("Content"),] by exposing a
means or method by which such software programs or applications
access or utilize Content.
You may not use the PRODUCT as a means or method (including, but
not limited to, publicly defined interfaces or debugging information left
in a PRODUCT) by which other software programs, plug-ins, appliances or services can access or utilize content from Content by the
PRODUCT.
You may not use, integrate, combine or otherwise exercise your license
right in the STARBAK SOFTWARE and MICROSOFT SOFTWARE
or any component thereof in any manner that would render any STARBAK SOFTWARE or MICROSOFT SOFTWARE or any component
thereof "Open Source Software." Without limiting the generality of the
foregoing, but as an example of the limitation that STARBAK and
MICROSOFT intend to impose under the foregoing, you agree that you
will not combine any STARBAK SOFTWARE or MICROSOFT
SOFTWARE or any component thereof with, or integrate any programming interfaces, API’s or methods directly from the
STARBAK SOFTWARE or MICROSOFT SOFTWARE, to any software that has been integrated with, or contains modifications or components of, any software which is licensed or distributed under any Open
Source Software license. "Open Source Software" means any software
that is derived in any manner (in whole or in part) from any software
that is distributed under at least all the following conditions: (i) licensees of such software are authorized to access, modify and make derivative works of the source code for the software; (ii) licensees of source
code of such software are not obligated to maintain the confidentiality
of such source code; and (iii) at least some licensees of such software
are required, if they desire to distribute derivative works of such software, to license the source code for such derivative works to their sublicensees under the conditions of foregoing subsections (i), (ii) and (iii)
hereof. Open Source Software includes, without limitation, software
licensed or distributed under any of the following licenses or distribution models, or licenses or distribution models similar to any of the following: (i) GNU's General Public License (GPL) or Lesser/Library
GPL (LGPL); (ii) The Artistic License (e.g., PERL); (iii) the Mozilla
Public License; (iv) the Netscape Public License; (v) the Berkeley software design (BSD) license including Free BSD or BSD-style license;
(vi) the Sun Community Source License (SCSL); (vii) an Open Source
Foundation License (e.g., CDE and Motif UNIX user interfaces); and
(viii) the Apache Server license.
•
•
You may not reverse engineer, decompile or disassemble the STARBAK
SOFTWARE or MICROSOFT SOFTWARE, except and only to the extent that
such activity is expressly permitted by applicable law notwithstanding this limitation.
You may permanently transfer rights under this EULA only as part of a permanent sale or transfer of the PRODUCT, provided the recipient agrees to the
terms of this EULA.
3.Termination. Without prejudice to any other rights, STARBAK and
MICROSOFT may terminate this EULA if you fail to comply with the terms and
conditions of this EULA. In such event you must return the PRODUCT and all of its
component parts, including the STARBAK SOFTWARE and MICROSOFT SOFTWARE.
4.Copyright and Patent Protection. All title, patents and copyrights to the STARBAK SOFTWARE (including, but not limited to, the accompanying printed materials) are owned by STARBAK. You may not copy the printed materials
accompanying the PRODUCT. All rights to the STARBAK SOFTWARE and
accompanying printed materials that are not specifically granted under this EULA
are reserved by STARBAK. All title and copyrights in and to the MICROSOFT
SOFTWARE are owned by MICROSOFT or its suppliers. All rights to the
MICROSOFT SOFTWARE not specifically granted under this EULA are reserved
by MICROSOFT.
DISCLAIMER OF WARRANTIES
1.No Warranties. STARBAK disclaims all warranties and conditions, either
express or implied, including, but not limited to, implied warranties of merchantability, fitness for a particular purpose, title and non-infringement, with regard to the
STARBAK SOFTWARE. MICROSOFT disclaims all warranties and conditions,
either express or implied, including, but not limited to, implied warranties of merchantability, fitness for a particular purpose, title and non-infringement, with regard
to the MICROSOFT SOFTWARE.
2.No Liability for Consequential Damages. In no event shall STARBAK and its
suppliers have any liability for any direct, special, consequential or incidental dam-
ages (including, without limitation, damages for loss profits or business
interruption) arising from or in connection with the use or lack of use or performance of the STARBAK SOFTWARE even if STARBAK has been
advised of the possibility of such damages. In no event shall MICROSOFT
and its suppliers have any liability for any direct, special, consequential or
incidental damages (including, without limitation, damages for loss profits
or business interruption) arising from or in connection with the use or lack of
use or performance of the MICROSOFT SOFTWARE even if MICROSOFT
has been advised of the possibility of such damages. THESE EXCLUSIONS AND LIMITATIONS SHALL APPLY EVEN IF ANY REMEDY
FAILS ITS ESSENTIAL PURPOSE.
U.S. GOVERNMENT RESTRICTED RIGHTS
1.Export Restrictions. The STARBAK SOFTWARE and the
MICROSOFT SOFTWARE (the foregoing are collectively referred to as the
"Restricted Components") are of United States of America origin. You agree
to comply with all applicable national and international laws that apply to the
STARBAK SOFTWARE AND MICROSOFT SOFTWARE, including the
U.S. Export Administration Regulations, as well as end-user and destination
restrictions issued by the U.S. Government and its agencies and any other
governments.
2.U.S. Government Restricted Rights. The STARBAK SOFTWARE and
the MICROSOFT SOFTWARE are provided with RESTRICTED RIGHTS.
Use, duplication or disclosure by the U.S. Government is subject to restrictions as set forth in subparagraph (c)(1)(iii) of the Rights in Technical Data
and Computer Software clause at DFARS 252.227 ? 7013 or subparagraphs
(c) (1) and (2) of the Commercial Computer Software B Restricted Rights at
48 CFR 52.227 ? 19, as applicable.
GENERAL TERMS
1.Governing Law. Except as otherwise restricted by law, this EULA shall
be governed by, and interpreted in accordance with the laws of the State of
Ohio of the United States of America, without regard to the laws of the State
of Ohio governing conflicts of law. Furthermore, you understand and agree
that this EULA shall be treated as though it was executed in Cuyahoga
County of the State of Ohio and that any action or litigation relating to this
EULA shall be instituted and prosecuted in the courts of competent jurisdiction in the State of Ohio.
2.Entire Agreement. This EULA sets forth the entire understanding and license
between you and STARBAK and MICROSOFT and may be amended only in a writing signed by all parties. NO VENDOR, DISTRIBUTOR, DEALER, RETAILER,
SALES PERSON OR OTHER PERSON IS AUTHORIZED TO MODIFY THIS
EULA.
Contents
General Installation
1 Torrent VCG Overview 17
1.1 What is the Torrent VCG? 17
1.2 What Does the Torrent VCG Do? 17
1.3 Torrent VCG Users 18
2 Installation 21
Items required for installing the Torrent 21
2.1 Physical Installation 21
3 Initial Configuration 25
3.1 Establishing a Serial Console Interface 25
3.1.1 Serial Interface Settings 25
3.1.2 Logging in to the Torrent VCG Serial Console 26
3.2 Torrent VCG Network Configuration 27
3.2.1 Automatic Configuration 27
3.2.2 Manual Configuration 28
3.3 Upgrading Software 30
3.3.1 Using http to Update Your Torrent VCG Software 30
3.3.2 Using ftp to Update Your Torrent VCG Software 30
3.3.3 Using File Sharing to Upgrade Torrent VCG Software 31
3.4 Setting the Time Zone and System Time 32
3.4.1 Setting the System Time Using ntp 32
3.4.2 Setting the System Time Using rdate 32
3.4.3 Setting the System Time Manually 33
3.5 Changing the Console Password 34
3.6 NFS Mounted Storage 35
3.6.1 Creating a New NFS Mount 35
3.6.2 Changing Options for an NFS Mount 36
3.6.3 Removing an Existing NFS Mount 36
3.6.4 Attaching an NFS Mount 37
3.6.5 Detaching an NFS Mount 37
3.7 Entering a New Software Key 37
3.8 Exiting the Serial Console Interface 38
Web Interface
4 Interface Access 41
4.1 Accessing the Administration Interface 41
5 Address Book 43
5.1 Adding Address Book Entries 43
5.2 Editing Address Book Entries 43
5.3 Deleting Address Book Entries 44
5.4 Address Book Entry Field Descriptions 45
6 My Account 47
6.1 Change Email 47
6.2 Change Media Player 42
6.3 Change Line Settings 43
6.4 Change Password 48
7 Slide Management 51
7.1 Add a Slide Set 51
7.2 Upload Power Point Presentation 52
7.3 Edit Slide Set 53
7.4 Delete Slide Set 54
8 System Configuration 55
8.1 Call Rollover 55
8.2 Customizing the Interface 56
8.2.1 Changing the Logo 56
8.2.2 Changing the Support Email Address 56
8.3 Gatekeeper Registration 57
8.4 License Information 58
8.5 Managing Services 58
8.6 Multicast Range Configuration 59
8.7 SNMP Configuration 60
8.8 Streaming Configuration 60
8.9 Telnet Configuration 61
8.10 Time Synchronization 62
9 System Information 63
9.1 Usage Statistics 63
9.1.1 Streaming Bandwidth Summary 63
9.1.2 Active Stream List 63
9.1.3 Active Multicast List 64
9.2 General Information 64
9.3 Logs 64
9.3.1 Retrieving Logs from the Web Interface 64
9.3.2 Retrieving Logs Using FTP 64
9.4 Network Diagnostics 65
9.5 Storage Utilization 65
10 Users 67
10.1 Adding Users 67
10.2 Editing User Accounts 68
10.2.1 Editing User Information 68
10.2.2 Adding Lines to Users 68
10.2.3 Editing User Line Settings 69
10.2.4 Deleting User Lines 70
10.3 Deleting Users 70
10.4 Line Settings Entry Field Descriptions 70
11 File Management 73
11.1 Deleting Files 73
11.2 Editing Calls 73
11.3 File Information 74
11.4 Moving Files 74
11.5 Viewing Calls 74
11.6 Adding Directories 75
11.7 Exporting Calls 75
12 Call Center 77
13 Placing Calls 79
Appendices
A Viewing Streams 83
A.1 Accessing the Catalog Page 83
A.2 Joining Live Calls 84
A.3 Viewing Archived Conferences 84
B Firewall Reference 85
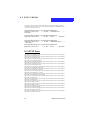
B.1 Torrent VCG Port Reference 85
B.2 QuickTime Streaming Ports 85
B.3 Windows Media Streaming Ports 86
C Telnet/FTP Features 87
C.1 Using Telnet 87
C.2 Using FTP 87
C.2.1 Using FTP to Export Videoconferences 87
C.2.2 Using FTP to Export Log Files 87
D Client Requirements 89
D.1 PC Requirements 89
D.1.1 Compatible Browsers 89
D.1.2 Compatible Media Players 89
D.2 Macintosh Requirements 89
D.2.1 Compatible Browsers 89
D.2.2 Compatible Media Players 89
General Installation
1
Torrent VCG Overview
This section introduces you the reader, and the network administrator to the
concept and capabilities of the Torrent VCG. This chapter provides you with
the understanding with which StarBak Communications addressed the challenges that were described to us by our customers.
1.1 What is the Torrent VCG?
The Torrent VCG is a videoconferencing to streaming media gateway appliance. It is reliable and simple to use. It utilizes a variant of the Linux operating system, but with only those components necessary for streaming
videoconference content over a data network.
1.2 What Does the Torrent VCG Do?
The Torrent VCG has been designed specifically to enable streaming and
recording of H.323 compliant videoconferences over intranets and the Internet.
If you are familiar with the business of videoconferencing and that of video
streaming over IP, you will be quick to understand what the Torrent VCG
does for the business or university that chooses to stream their videoconferences.
First, think of the physical server itself: A processor, hard disk, network
interface, serial console, and some memory. Basically, the Torrent VCG is a
simple webserver. Utilizing this hardware, we have used our in-house written RTP/RTSP (Real Time Protocol/Real Time Streaming Protocol) and
MMS (Microsoft Media Server) video servers from our Torrent OSA Origin
Streaming Appliance and applied it to the Torrent VCG. The video server
module uses RTP/RTSP (RTSP for short) transport over the network. The
RTP/RTSP and MMS modules can stream live and archived H.323 video-
Administration Manual
19
.....
1 . 3 TO R R E N T V C G U S E R S 1 . 3
TO R R E N T V C G U S E R S
conference streams to the Apple QuickTime media player, the Real One
Player, and the Windows Media Player.
The Torrent VCG acts as an endpoint in an H.323 conference call. It can
send and receive direct calls from another H.323 compliant endpoint, and
can also send and receive calls from an H.323 compliant Multi-Point Control
Unit (MCU). Once these calls have been made or received, the Torrent VCG
converts the video into RTSP streams and sends them over the network to
any desktop or laptop that has Apple QuickTime, Real One, or Windows
Media players. At the same time, the Torrent VCG allows the administrator
to archive these files using the Torrent VCG’s Videoconference Archive
Technology.
Above the server modules resides the administration interface for the entire
appliance. The server module and the Line Management System are controlled through this interface. It is used by the administrator to connect and
manage H.323 videoconference calls, to archive those calls for later viewing,
and for viewing the logs from specific periods of use. These features are
described in the following chapters.
1.3 Torrent VCG Users
The Torrent VCG creates three different levels of users. The administrator,
moderator, and viewer are all different levels of operation within the Torrent
VCG.
The administrator is the landlord of the Torrent VCG. The administrator
gains all the functions of the Torrent VCG such as log access, file exporting,
file deletion, placing calls, recording calls, etc. The main feature that separates the administrator from the moderator is that the administrator has the
ability to create moderator accounts to reside under his control. Through logging and bandwidth monitoring the administrator can track the use of the
Torrent VCG and care for its use.
The moderator has all the abilities of the administrator except the ability to
change the system settings, such as changing the license key, restarting the
H.323 module, creating other moderators, and more importantly they do not
have access to the security features of the Torrent VCG.
20
Administration Manual
.....
1 . 3 TO R R E N T V C G U S E R S
Viewers are the people who will watch the streams from the stream catalog.
They can watch live calls in progress or watch archived calls. They only
have access to these calls upon permission from the administrator or moderator.
The following chapters will outline and describe the use of the box for all of
the users of the Torrent VCG.
Administration Manual
21
.....
1 . 3 TO R R E N T V C G U S E R S 1 . 3
TO R R E N T V C G U S E R S
22
Administration Manual
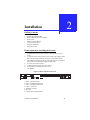
2
Installation
Packing Contents
•
•
•
•
•
•
•
•
Torrent VCG
RJ45 straight through cable
RJ45 to DB9 serial crossover adaptor
Power Cable
Manual (This Document)
License Key Document
Warranty Information
Registration Card
Items required for installing the Torrent:
1.
2.
3.
4.
5.
6.
7.
A Phillips head screwdriver (if you plan to rack mount the Torrent
VCG)
A computer which can be used as a serial console. This computer must
have a serial terminal emulation package or a serial dumb terminal.
The included serial adaptor cable to connect the computer or terminal to
the Torrent VCG and the RJ45 straight through cable.
A vacant 120 volt power outlet.
An RJ45 Ethernet connection to your network.
An Assistant for mounting the Torrent VCG.
This Manual
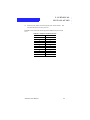
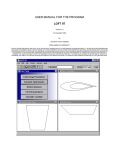
Figure 2.1: Rear Panel of Torrent VCG
A ETH2
G
G
C
ETH1
B
ETH0
E
F
G
D
10101
G
A. Eth2 -- Gig Ethernet Port
B. Eth0 -- 100 Mbps Ethernet Port
C. Eth1 -- 100 Mbps Ethernet Port
D. 10101 -- Serial Port
E. Auxiliary Card Port
F. Rear Fan
G. Possible Future Enhancements
Administration Manual
23
1
0
.....
2.1 PHYSICAL
INSTALLATION
2.1 Physical Installation
This section describes the process of placing your Torrent VCG into a computer rack, and how to connect the serial and network interfaces and the
power cord.
1.
2.
3.
Remove the packaging material surrounding the Torrent VCG.
Inspect the Torrent VCG for obvious exterior damage caused during
shipping.
Have an assistant hold the Torrent VCG in the rack where you want to
place it. The rear end of the Torrent VCG should be the first into the
rack. The front end with the StarBak logo should be at the front of the
rack.
NOTE: Check to make sure you can access the serial, RJ45 Ethernet, and
power connections on the rear panel.
4.
5.
6.
7.
8.
9.
Insert the mounting screws for your rack through the mounting ears of
the Torrent VCG and into your rack to secure the Torrent VCG.
Attach the RJ45 straight through cable into port D (listed above)
Connect the DB9 plug into the serial console computer.
Connect the RJ45 straight through cable to the RJ45 to DB9 adaptor.
Connect the RJ45 ethernet cable to one of ports A-C (listed above).
Plug the other end of the RJ45 ethernet cable into your supplied ethernet connection (router, hub, switch, etc.)
Connect the power cord from the Torrent VCG to power outlet.
NOTE: The Torrent VCG can only use one ethernet port at a time. The Torrent VCG comes from the factory configured to DHCP upon startup using
eth2. This is the Gigabit ethernet port for the Torrent VCG.
If you have purchased a Torrent VCG capable of using more than 100Mb/s
you should use the eth2 port on the back panel. When using a port other than
eth2 at first installation of the Torrent VCG, you will need to manually
change the configuration of the Torrent to DHCP from the intended port.
To DHCP or manually configure the Torrent VCG for your network, refer to
chapter 3.
10. Connect the power cord supplied to the back of the Torrent VCG.
11. Plug the power cable into an available power outlet.
12. Make sure the switch on the back of the Torrent VCG is in the on setting.
24
Administration Manual
.....
2.1 PHYSICAL
INSTALLATION
13. Press the power button on the front panel of the Torrent chassis. This
will cause the Torrent VCG to power on.
FINISH: You are now done with the physical installation of your Torrent
VCG.
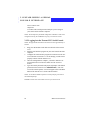
TABLE 1: Serial Port to RJ-45 Pin Outs
DB9
RJ-45
Shell
Unused
1
Unused
2
3
3
6
4
7
5
4
6
2
7
8
8
1
9
Unused
Unused
5
Administration Manual
25
.....
2.1 PHYSICAL
INSTALLATION
26
Administration Manual
3
Initial Configuration
The Torrent VCG uses a serial console to configure the Torrent VCG for
your network, to set the internal clock, to update your software, and to
change your serial console password. The Torrent VCG’s Serial Console is
also used for shutting down the system. Normal usage of the Torrent VCG
does not require a serial console connection. Normal use is obtained through
the web interface of the Torrent VCG.
3.1 Establishing a Serial Console Interface
You will need a serial console connection to the Torrent VCG when you first
install the unit. The rest of this section assumes that you have a serial interface program installed on the computer you are using for your serial console
interface. (i.e. Hyperterminal for Windows, Zterm for Macintosh, Minicom
for LINUX)
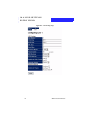
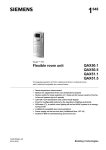
Figure 3.1: Torrent VCG Serial Console
3.1.1 Serial Interface Settings
The following list defines settings that you will need to be established within
your serial interface program.
•Bits per second: 9600
•Data bits: 8
•Parity: none
Administration Manual
27
.....
3.1 ESTABLISHING A SERIAL
CONSOLE INTERFACE
•Flow Control: none
•Stop bits:1
•Com Port: This will depend on which port you are using on
your serial console interface computer.
NOTE: The backspace key should be configured to send delete. If this is not
configured correctly, the combination of [Ctrl] + W will work as well.
3.1.2 Logging in to the Torrent VCG Serial Console
NOTE: The approximate boot time for the Torrent VCG is approximately 1.5
minutes.
1.
2.
3.
4.
5.
Plug your null modem serial cable into the back of the Torrent
VCG.
Start the serial interface program on your serial console interface
computer.
Configure the serial interface program for connection to the Torrent VCG. Refer to Section 3.1.1 for the settings you will need to
properly connect with the Torrent VCG.
Once the configuration is complete, you need to initiate a session with the Torrent VCG. Press Enter once the session is
started.
Type the console password at the password prompt. (The default
password for the Torrent VCG is administrator.) The “Torrent VCG Console Options” screen will appear. This is the Main
Menu of the Torrent VCG’s serial console interface.
NOTE: To invoke the default response for console prompts, press Enter at
the command prompts.
FINISH: You now have serial console access to your Torrent VCG.
28
Administration Manual
.....
3 . 2 TO R R E N T V C G N E T W O R K
CONFIGURATION
3.2 Torrent VCG Network Configuration
You may configure the Torrent VCG in either of two ways: automatic configuration or manual configuration. If your network has a DHCP server you
will be able to use the automatic configuration section (section 3.2.1). If your
network does not have a DHCP server you will need to use the manual configuration (section 3.2.2).
3.2.1 Automatic Configuration
The “Torrent VCG Console Options” Main Menu should be on the screen of
your serial console at this point. (Refer to Figure 3.1)
1.
Type: 1 then press Enter to open the Configure networking submenu. The next prompt to appear is: Hostname (default = localhost)
NOTE: You must make sure that your hostname corresponds with the
obtained IP Address entered in the DNS Server. If you do not have a DNS
Server, the IP Address of the Torrent VCG is a valid replacement.
2.
3.
4.
5.
Type the hostname you want for your Torrent VCG. Press Enter.
The next prompt to appear is: Use BOOTP/DHCP [y/n] (default
= yes)
Type: y then press Enter. This command configures the Torrent
VCG to automatically configure itself from the network. The
next screen to appear will be the Console Options Main Menu.
You will be prompted to choose between different DNS hostnames for your Torrent VCG. Please read the preceding note.
Copy the IP address that is found at the top left corner of the
Console Options Main Menu. You will need to use it in Chapter
4 step 2.
FINISH: Your Torrent VCG is now configured to your network. Proceed to
section 3.3
Administration Manual
29
.....
3 . 2 TO R R E N T V C G N E T W O R K
CONFIGURATION
3.2.2 Manual Configuration
Use this section if your network does not have a DHCP server. The Torrent
VCG Console Options Main Menu should be on the screen of your serial
console at this point. (Refer to Figure 3.1.)
Items required for initial configuration of the Torrent VCG (Consult your
network administrator for the following items):
•An available IP address to give to the Torrent VCG
•Netmask
•Broadcast address
•Gateway address (only required if your Torrent VCG will be
accessible from outside your local network)
•Primary nameserver address (optional)
•Secondary nameserver address (optional)
•Either an ntp server or an rdate server address (optional)
1.
Type: 1 then press Enter to open the Configure networking submenu. The next prompt to appear is: Hostname (default = localhost)
NOTE: You must make sure that your hostname corresponds with the
obtained IP Address entered in the DNS Server. If you do not have a DNS
Server, the IP Address of the Torrent VCG is a valid replacement.
2.
3.
4.
5.
6.
30
Type the hostname you want for your Torrent VCG. Press Enter.
The next prompt to appear is: Use BOOTP/DHCP [y/n] (default
= yes)
Type: n then press Enter. The next prompt to appear is: IP
address:
Type the IP address designated for your Torrent VCG. Press
Enter. The next prompt to appear is: Netmask (default =
255.255.255.0):
Type the netmask IP address for your Torrent VCG. Press
Enter. The next prompt to appear is: Broadcast address (default
= 192.168.1.255):
Type the broadcast IP address for your Torrent VCG. Press
Enter. The next prompt to appear is: Gateway address:
Administration Manual
.....
3 . 2 TO R R E N T V C G N E T W O R K
CONFIGURATION
7.
Type the gateway IP address for your Torrent VCG. Press
Enter. The next prompt to appear is: Primary nameserver:
8.
Type the IP address of the primary nameserver (DNS) for your
Torrent VCG. Press Enter. The next prompt to appear is: Secondary nameserver:
NOTE: The secondary nameserver address is not required but can be
included for redundancy.
9.
Type the IP address of the secondary nameserver for your Torrent VCG. Press Enter. The next screen to appear is the Torrent
VCG Console Options Main Menu.
10. Copy the IP address that is found at the top left corner of the
Console Options Main Menu. You will need to use it in Chapter
4, Step 2.
FINISH: Your Torrent VCG is now configured to your network. Proceed to
section 3.4.
Administration Manual
31
.....
3.3 UPGRADING SOFTWARE
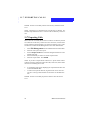
3.3 Upgrading Software
The serial console provides the Torrent Administrator with the opportunity
to upgrade the software to more current releases and versions. This is done
by acquiring a software image. The image must reside on either a http, ftp,
or SMB/CIFS server. Once the image is on the server the Torrent is then
given the location of the software image. After the Torrent is directed to the
software image it will connect to the host server, retrieve the software
update, load the update, then reboot once finished.
3.3.1 Using http to update Your Torrent VCG Software
1.
2.
3.
4.
5.
Connect to the Torrent VCG serial console using the methods
outlined in Section 3.1.
Enter the Serial Console password to activate the Serial Console
Menu.
Press 3 then Enter to select the Software Upgrade selection.
Press 1 then Enter to choose the http upgrade method.
Enter the URL of the system image you wish to download into
the Torrent VCG.
NOTE: The Torrent VCG takes several minutes to upgrade to the latest software version. If the Torrent VCG gets interrupted during the install, the old
image is re-loaded back onto the Torrent VCG. Please consult StarBak before
you begin the upgrade process.
3.3.2 Using ftp to update Your Torrent VCG Software
1.
2.
3.
4.
5.
32
Connect to the Torrent VCG serial console using the methods
outlined in Section 3.1.
Enter the Serial Console password to activate the Serial Console
Menu.
Press 3 then Enter to select the Software Upgrade selection.
Press 1 then Enter to choose the ftp upgrade method.
Enter the URL of the system image you wish to download into
the Torrent VCG.
Administration Manual
.....
3.3 UPGRADING SOFTWARE
NOTE: The Torrent VCG takes several minutes to upgrade to the latest software version. If the Torrent VCG gets interrupted during the install, the old
image is re-loaded back onto the Torrent VCG. Please consult StarBak before
you begin the upgrade process.
3.3.3 Using File Sharing to Upgrade Torrent VCG
Software
1.
2.
3.
4.
5.
Connect to the Torrent VCG serial console using the methods
outlined in Section 3.1.
Enter the Serial Console password to activate the Serial Console
Menu.
Press 3 then Enter to select the Software Upgrade selection.
Press 2 then Enter to choose the ftp/file sharing upgrade
method.
Follow the steps provided to point the Torrent VCG to the
intended folder from which you wish to share.
NOTE: You must download the Torrent VCG upgrade file to a shared file
directory or FTP directory before you begin the upgrade process.
Administration Manual
33
.....
3.4 SETTING THE TIME
ZONE AND SYSTEM TIME
3.4 Setting the Time Zone and System Time
This section will describe how to set the local time zone (section 3.3.1) for
your Torrent VCG, and how to set the internal system clock (section 3.3.2).
You can set the time manually or synchronize the time with a network time
server.
3.4.1 Setting the System Time Using ntp
If you are proceeding to this section from section 3.2 your serial console display should show the Torrent VCG Console Options Main Menu. (Refer to
Section 3.1)
1.
2.
3.
4.
5.
6.
7.
Type: 2 then press Enter. The next prompt to appear is: Timezone currently set to US/Eastern; Modify [y/n] (default = no):
If your Torrent VCG is located in the eastern United States time
zone press Enter and go to section 3.4.2. If not, go to step 3.
Type: y then press Enter. You will now see a list of 6 choices.
Type the number of your choice. Press Enter. You will now see a
new list of choices.
Type the number of your choice. Press Enter. You will now see
a list of three choices for how to set the time on your Torrent
VCG.
Type: 1 then press Enter. The next prompt to appear is: ntp
server address:
Type the address of your ntp server. The next screen to appear is
the Torrent VCG Console Options Main Menu.
FINISH: Your Torrent VCG's system clock is now set. Proceed to section
3.5.
3.4.2 Setting the System Time Using rdate
1.
2.
34
Type: 2 then press Enter. The next prompt to appear is: Timezone currently set to US/Eastern; Modify [y/n] (default = no):
If your Torrent VCG is located in the eastern United States time
zone press Enter and go to section 3.4.2. If not, go to step 3.
Administration Manual
.....
3.4 SETTING THE TIME
ZONE AND SYSTEM TIME
3.
4.
5.
6.
7.
Type: y then press Enter. You will now see a list of 6 choices.
Type the number of your choice. Press Enter. You will now see a
new list of choices.
Type the number of your choice. Press Enter. You will now see
a list of three choices for how to set the time on your Torrent
VCG.
Type: 2 then press Enter. The next prompt to appear is: rdate
server address:
Type the address of your rdate server. The next screen to appear
is the Torrent VCG Console Options Main Menu.
FINISH: Your Torrent VCG's system clock is now set. Proceed to section
3.5.
3.4.3 Setting the System Time Manually
1.
2.
3.
4.
5.
6.
7.
8.
Type: 2 then press Enter. The next prompt to appear is: Timezone currently set to US/Eastern; Modify [y/n] (default = no):
If your Torrent VCG is located in the eastern United States time
zone press Enter and go to section 3.4.2. If not, go to step 3.
Type: y then press Enter. You will now see a list of 6 choices.
Type the number of your choice. Press Enter. You will now see a
new list of choices.
Type the number of your choice. Press Enter. You will now see
a list of three choices for how to set the time on your Torrent
VCG.
Type: 3 then press Enter. The next prompt to appear is: Date
(mm/dd/yyyy) (default = mm/dd/yy):
Type the current date in the format (mm/dd/yyyy). The next
prompt to appear is: Time (hh:mm:ss) (default = hh:mm:ss):
Type the current time in the format (hh:mm:ss). The next screen
to appear is the Torrent VCG Console Options Main Menu.
FINISH: Your Torrent VCG's system clock is now set. Proceed to section
3.5.
Administration Manual
35
.....
3.5 CHANGING THE
CONSOLE PASSWORD
3.5 Changing the Console Password
StarBak recommends that you change the console password immediately
upon receiving your Torrent VCG. The serial console password and the web
interface password are kept separately.
1.
2.
3.
4.
5.
The Torrent VCG Console Options Main Menu should be on the
screen of your serial console at this point. (Refer to Section 3.1)
Type: 4 then press Enter. The next prompt to appear is: Current console password:
Type your serial console password then press Enter. The
default serial console password is administrator. The next
prompt to appear is: New console password:
Type the password you wish to use for console access. Press
Enter. The next prompt to appear is: Retype console password:
Retype the password for confirmation purposes. Press Enter.
The next screen to appear is the Torrent VCG Console Options
Main Menu.
WARNING: Please write this new password down in a safe place. Loss of
this password could result in loss of data from your box. You will need to
remember this password for future use.
FINISH: Your new password has been set. Proceed to section 3.6.
36
Administration Manual
.....
3 . 6 N F S M O U N T E D ST O R A G E
3.6 NFS Mounted Storage
The Torrent VCG provides the administrator with the ability to attach NFS
mounted storage. From the Remote Storage Options Menu, the administrator has the ability to create and delete an NFS Mount as well as manually
attach and detach storage.
1.
2.
The Torrent VCG Console Options Main Menu should be on the
screen of your serial console at this point. (Refer to Section 3.1)
Type 6 then press Enter. The next menu to appear is the
Remote Storage Options Menu. (Refer to Figure 3.2)
Figure 3.2: Remote Storage Options Menu
3.6.1 Creating a New NFS Mount
1.
2.
3.
Type 1 to select “Create a New NFS Mount” from the Remote
Storage Options Menu. Press Enter. (See Figure 3.2)
Provide a label that will uniquely identify the NFS mount profile. Press Enter.
Enter the hostname of the NFS Server you wish the Torrent
VCG to attach to.
EXAMPLE: nfsserver.yourdomain.com
4.
Provide the Remote Path for the NFS mount. Press Enter.
EXAMPLE: home/swanson/samsonite
Administration Manual
37
.....
3 . 6 N F S M O U N T E D ST O R A G E
5.
6.
Provide the name of the directory that you wish to designate as
your NFS mount. (This will be the directory that appears on the
Torrent VCG.) Press Enter.
Select whether the Torrent will attach to the NFS on bootup.
Select yes if you wish for the Torrent VCG to automatically
attach to the NFS mount every time you reboot the Torrent VCG.
By selecting yes, the NFS mount will not appear for the first
time until after the next reboot of the Torrent VCG. Select No if
you wish to manually attach the NFS mount. (See sections
3.6.4 and 3.6.5 on attaching and detaching an NFS mount.
FINISH: Your new NFS mount has been created.
3.6.2 Changing Options for an NFS Mount
1.
2.
3.
4.
5.
6.
7.
Type 2 to select Change Options for an NFS Mount” from the
Remote Storage Options Menu. Press Enter.
Enter the label of the NFS mount profile you wish to change.
Press Enter.
Enter the new label for the NFS mount profile. Press Enter.
Enter the new remote host for the NFS mount. Press Enter.
Enter the new remote path for the NFS mount. Press Enter.
Enter the new directory for the NFS mount. Press Enter.
Enter “y” or “n” to decide whether you want the NFS mount to
connect on bootup. Select yes if you wish for the Torrent VCG
to automatically attach to the NFS mount every time you reboot
the Torrent VCG. By selecting yes, the NFS mount will not
appear for the first time until after the next reboot of the Torrent
VCG. Select No if you wish to manually attach the NFS mount.
(See sections 3.6.4 and 3.6.5 on attaching and detaching an NFS
mount.
FINISH: Your NFS mount has been changed.
3.6.3 Removing an Existing NFS Mount
1.
38
Type 3 to select “Remove an Existing NFS Mount” from the
Remote Storage Options Menu. Press Enter.
Administration Manual
.....
3.7 ENTERING A NEW
SOFTWARE KEY
2.
Enter the label of the NFS mount profile you wish to remove.
Press Enter.
NOTE: You must make sure the NFS mount is detached before removal.
FINISH: You have deleted an NFS Mount.
3.6.4 Attaching an NFS Mount
1.
2.
Type 4 to select “Attach an NFS Mount” from the Remote Storage Options Menu. Press Enter.
Enter the label of the NFS mount you wish to manually attach.
Press Enter.
FINISH: You have attached your NFS mount.
3.6.5 Detaching and NFS Mount
1.
2.
Type 5 to select “Detach and NFS Mount” from the Remote
Storage Options Menu. Press Enter.
Enter the label of the NFS mount you wish to manually detach.
Press Enter.
FINISH: You have detached your NFS mount.
3.7 Entering a New Software Key
With the use of Software keys StarBak Communications provides the administrator the opportunity to add new lines to their Torrent VCG. The software
key needs to be in place before the Torrent VCG will function correctly. The
administrator can enter this code into the serial console or directly into the
web interface.
1.
2.
3.
The Torrent VCG Console Options Main Menu should be on the
screen of your serial console at this point. (Refer to Section 3.1)
Type 8 into the serial console. Press Enter.
Enter in the software key given to you from StarBak Communications. This is case sensitive so make sure you carefully enter
in the code key. Press Enter when done.
Administration Manual
39
.....
3.8 EXITING THE SERIAL
CONSOLE INTERFACE
FINISH: The Torrent VCG Serial Console will now display the Main Menu
without displaying the system is offline.
3.8 Exiting the Serial Console Interface
The Initial Configuration of your Torrent VCG is now finished. You may
log out of the serial console.
1.
2.
3.
The Torrent VCG Console Options Main Menu should be on the
screen of your serial console at this point. (Refer to Figure 3.1)
Type: q then press Enter.
This will end your console access, but the serial console interface will still be connected.
FINISH: You are now logged out of the Torrent VCG console and ready to
proceed to Section 2: Web Interface, starting with Chapter 4.
40
Administration Manual
Administrator Section:
Web Interface
4
Interface Access
This Chapter explains how to use your web browser to access the Torrent
VCG’s Web Interface. Please note that the passwords for the web interface
and the serial console are separate passwords.
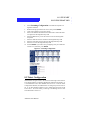
4.1 Accessing the Web Interface
1.
2.
Open a web browser on a computer that has access to the network where your Torrent resides.
Type the IP address (port number 8080) of your Torrent VCG in
the location box of the browser. Example: http://
71.132.99.22:8080
Or
2.
3.
Type the DNS name that you have assigned to your Torrent.
Example: http://TorrentYourDomain.com:8080
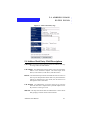
Torrent Login is the next screen to appear. (Refer to Figure 4.1)
Figure 4.1 Torrent VCG Login Page
Administration Manual
43
.....
4 . 1 A C C E S S I N G T H E WE B
INTERFACE
4.
5.
6.
7.
8.
Click the mouse cursor in the field labeled: Login
Type in your username, administrator is the default user.
Click the mouse cursor in the field labeled: Password
Type in the password for your username, administrator is the
default password for the administrator account
Click the Login button. The next screen to appear is: Torrent
VCG Administration Menu. (Refer to Figure 5.1)
FINISH: You are now logged into the Torrent VCG Administration Interface. You will perform the operations described in Chapters 5 - 12 from the
Administration Interface. Proceed to Chapter 5 to learn how to operate the
Torrent VCG’s Administration Options.
44
Administration Manual
5
Address Book
The address book allows the Users of the Torrent VCG to create call templates. These call templates can be called upon later from the Place Call
Page of the Web Interface. The address books can be used to specify the call
format, call addresses, slide sets, call descriptions, recording options, and
security
5.1 Adding Address Book Entries
1.
2.
3.
Select Address Book from the Web Interface Menu located on the left
side of the web interface.
Select Add from within the Address Book Submenu located on the left
side of the web interface.
Enter the address book entry information into the designated fields.
Press Add To Address Book.
NOTE: Complete descriptions of Address Book Entry Fields can be found
in section 5.4 of this chapter.
FINISH: You have successfully changed the email address of the current
user.
5.2 Edit Address Book
This option allows Torrent VCG Users to change the existing address book
entries.
1.
2.
3.
4.
5.
Select Address Book from the Web Interface Menu located on the left
side of the web interface.
Select Edit from within the Address Book Submenu located on the left
side of the web interface.
Edit the desired fields within the existing address book entry.
To change the existing entry, press Update Address Book.
To make these changes into a new address book entry, press Add As
New Address Book Entry.
Administration Manual
45
.....
5.3 DELETING ADDRESS
BOOK ENTRIES
FINISH: You have successfully chosen the default media player for your
account.
5.3 Deleting Address Book Entries
Once a User no longer needs to use a saved address book entry, the entry
may be deleted to save room on the Torrent VCG.
1.
2.
3.
Select Address Book from the Web Interface Menu located on the
left side of the web interface.
Select Delete from within the Address Book Submenu located on the
left side of the web interface.
Press the DELETE link of the desired address book entry from within
the address book table.
FINISH: You have successfully deleted an address book entry from the Torrent VCG.
46
Administration Manual
.....
5.4 ADDRESS BOOK
ENTRY FIELD
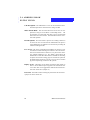
Figure 5.1: Address Book Entry Page
5.4 Address Book Entry Field Descriptions
Call Name: This field is used to uniquely describe the address book entry
for storage within the Address Book.
Call Address: The administrator uses this field to enter in the appropriate
address of the destination endpoint. This field accepts E.164
Aliases, H.323 Aliases, E-mail Aliases, and URL Aliases.
Bitrate: The bitrate field represents the maximum bitrate the Torrent VCG
will accept for this particular address book entry. If the destination
endpoint is configured for a lower bitrate, then the Torrent VCG
will negotiate down to that bitrate.
Call Format: The administrator can choose which type of call setup
within this field. This is helpful when a particular endpoint is usually used for a certain type of call.
Slide Set: This drop down menu allows the administrator to choose which
slide grouping to include with the videoconference.
Administration Manual
47
.....
5.4 ADDRESS BOOK
ENTRY FIELD
Call Description: The administrator or user can use this field to enter a
brief description of the conference that is being recorded.
MGC Stream Mode: This check box allows the Torrent VCG to compensate for using an Accord MGC in transcoding modes. The
Accord MGC can cause audio and video to not be synchronized
within the Torrent VCG streams. This mode allows for the correction of this problem.
Record Options: The “Record Now” option is for recording conferences
as soon as the VCG is connected. The “Manual Record” option is
so the administrator or moderator can start and stop recording the
conferences during the calls.
Live Access: The “None” option allows the moderator to connect to a videoconference without streaming the conference out to the internet.
This can be used to monitor conferences, or to just record a conference without streaming it live. The “Public” option allows the
administrator to make the videoconference available for streaming
to anyone who visits the catalog page. The “Password” option lets
the administrator decide who can have access to the live streams
by password protecting it before the call is placed.
Replay Access: The Replay Access field is used in the same manner as
the Live Access field except for it applies to the archived file once
it is created. This can be toggled later within the Saved Calls Section of the Torrent VCG (Chapter 11).
Password: This field is used for entering the password for the live and/or
replay access of the current call.
48
Administration Manual
6
My Account
The Torrent VCG features the ability for users to change their personal
options within their account. A user can choose to change their Email
address, their default Media Player, or change their password for the web
interface.
6.1 Change Email
1.
2.
3.
Select My Account from the Web Interface Menu located on the left
side of the web interface.
Select Change Email from within the My Account Submenu located
on the left side of the web interface.
Enter the new email address for the current user into the entry field provided. Press Next Step.
FINISH: You have successfully changed the email address of the current
user.
6.2 Change Media Player
This option allows the user to change the default player that is used when
placing a call from the call center. The user can select from the Windows
Media Player, Real One Player, or the QuickTime Player.
1.
2.
3.
Select My Account from the Web Interface Menu located on the left
side of the web interface.
Select Change Media Player from within the My Account Submenu
located on the left side of the web interface.
Select the default media player by checking the circle of the desired
player. Press Next Step.
FINISH: You have successfully chosen the default media player for your
account.
Administration Manual
49
.....
6.5 CHANGE LINE
SETTINGS
6.5 Change Line Settings
The My Account submenu allows the Administrator or User to change their
Incoming Call Line Settings.
1.
2.
3.
4.
Select My Account from the Web Interface Menu located on the left
side of the web interface.
Select Change Line Settings from within the My Account Submenu
located on the left side of the web interface.
Select the line with which you wish to make changes. Press Next
Step.
Make the changes to the designated entry fields. Press Save Settings.
FINISH: You have successfully changed the incoming call settings to one of
your lines on the Torrent VCG.
6.4 Change Password
STARBAK Communications recommends users change their password upon
first use for security reasons. Please store the new password in a safe place.
This is your only access to the Web Interface.
1.
2.
3.
4.
50
Select My Account from the Web Interface Menu located on the left
side of the web interface.
Select Change Password from within the My Account Submenu
located on the left side of the web interface.
Enter the Old Password in the entry field provided.
Enter and verify the new password in the next two entry fields. Press
Next Step.
Administration Manual
7
Slide Management
The Torrent VCG features the ability for Users to upload Power Point Presentations or .jpg files to use as slide sets during videoconferences on the
Torrent VCG.
7.1 Add a Slide Set
1.
2.
3.
Select Slide Management from the Web Interface Menu located on
the left side of the web interface.
Select Add from within the Slide Management Submenu located on the
left side of the web interface.
Press the Browse... button to open up a window and search for the
desired images for the slide set. This allows the User to search for
image files from within their personal computer.
NOTE: The Torrent VCG accepts .jpg, .bmp, .gif, .png files for slide sets
entries. You may also add a URL directly to the Slide URL List text box
within this page.
4.
5.
6.
7.
8.
9.
Select the desired image file from within your computer. Press Open.
Press the Upload File button. The new file will show up in the Slide
URL List text box.
Repeat steps 3 - 5 until the complete slide set is loaded into the Torrent
VCG.
Enter a Slide Set Name into the designated entry field.
Enter a number into the Auto-Cycle entry field to adjust the amount of
time between slide flips. If you wish to manually progress the slides,
enter 0 into the entry field.
Press the Save Slide Set button.
FINISH: You have successfully added a slide set to the Torrent VCG.
Administration Manual
51
.....
7.2 UPLOAD POWER
POINT PRESENTATION
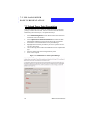
7.2 Upload Power Point Presentation
This option allows the user to change the default player that is used when
placing a call from the call center. The user can select from the Windows
Media Player, Real One Player, or the QuickTime Player.
1.
2.
3.
4.
5.
6.
7.
Select Slide Management from the Web Interface Menu located on
the left side of the web interface.
Select Upload Power Point Presentation from within the Slide
Management Submenu located on the left side of the web interface.
Press Browse on the StarBak Power Point Upload Manager.
Highlight the Power Point presentation you wish to upload to the Torrent VCG. Press Open.
Choose the image format within the StarBak Power Point Upload Manager.
Enter the slideset name into the designated entry field.
Press Convert/Upload.
Figure 7.1: STARBAK Power Point Upload Manager
52
Administration Manual
.....
7.3 EDIT SLIDE SET
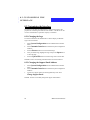
7.3 Edit Slide Set
1.
2.
3.
4.
5.
Select Slide Management from the Web Interface Menu located on
the left side of the web interface.
Select Edit from within the Slide Management Submenu located on the
left side of the web interface.
Select the slideset you wish to edit.
Using the instructions from Section 7.1, make changes to the existing
slide set.
Press Update Current Slideset.
Figure 7.2: Edit Slide Set
Administration Manual
53
.....
7.4 DELETE SLIDE SET
7.4 Delete Slide Set
1.
2.
3.
54
Select Slide Management from the Web Interface Menu located on
the left side of the web interface.
Select Delete from within the Slide Management Submenu located on
the left side of the web interface.
Select the slideset you wish to delete. Press Delete.
Administration Manual
8
System Configuration
8.1 Call Rollover
Call Rollover configuration allows you to accept incoming IP calls. When
turned on, incoming IP calls will roll from a busy line to the first available
line for the user selected.
If the user you select for call rollover has fewer lines than the number of
licensed lines for the Torrent VCG, the max number of incoming calls is the
number of lines for that user. Stated another way, the maximum number of
incoming IP calls is determined by the number of lines the selected user
owns.
NOTE: It is not recommended to use incoming call rollover for a Torrent
VCG that is registered to a gatekeeper or that has more than just one or two
users. To turn on the call rollover feature, use the following steps.
:1. Select System Configuration from the Administration Interface
Menu.
:2. Select Call Rollover from within the System Configuration submenu.
:3. Using the Enable IP Call Rollover drop down menu, select Yes.
:4. Using the Select User drop down menu, select the user you wish to
receive incoming calls. Press Submit.
FINISH: You have successfully adjusted the telnet access for the Torrent
OSA.
Administration Manual
55
.....
8.2 CUSTOMIZING THE
INTERFACE
8.2 Customizing the Interface
The Torrent VCG allows the administrator to change the logo that is displayed in the call catalog and within the web interface. This allows the Torrent to be customized for a particular company or institution.
8.2.1 Changing the Logo
The Torrent OSA allows the administrator to add a company or affiliated
logo to the web interface.
1.
2.
3.
4.
5.
Select System Configuration from the Administration Interface
Menu.
Select Customize Interface from within the System Configuration
submenu.
Press the Browse button to locate the desired logo.
Once you find the logo, highlight the logo and press the Open button
to select the logo.
Press the Upload File button to load the image to the Torrent OSA.
FINISH: You have successfully personalized the Torrent OSA Interface.
8.2.2 Changing the Support Email Address
1.
2.
3.
Select System Configuration from the Administration Interface
Menu.
Select Customize Interface from within the System Configuration
submenu.
Type the new support email into the designated entry field. Press
Change Support Email.
FINISH: You have successfully changed the support email address.
56
Administration Manual
.....
8.3 GATEKEEPER
REGISTRATION
8.3 Gatekeeper Registration
The Torrent VCG can register with a gatekeeper as an endpoint or as a service. Service registration allows H.323 zone administration of the Torrent
VCG.
NOTE: The number of aliases that can be registered by the Torrent VCG is
limited to 36 when NOT in service registration mode. Because of this,
STARBAK Communications recommends the use of service registration
whenever possible.
1.
2.
3.
4.
5.
Select System Configuration from the Administration Interface
Menu.
Select Gatekeeper Registration from within the System Configuration submenu.
Enter the IP address for the Gatekeeper with which you plan to register.
Enter the Gatekeeper Port into the designated entry field. The default
Port used is port 1719.
Enter the Gatekeeper Service Prefix into the designated entry field.
NOTE: Step 5 is optional, but not using service registration could prevent
the use of multiple lines within the Torrent VCG. You may automatically
discover a nearby gatekeeper by leaving the entry fields blank.
6.
7.
Use the drop down menu to enable the use of the gatekeeper.
Press Update Settings.
FINISH: You have successfully registered with a gatekeeper.
Figure 8.1: Gatekeeper Registration
Administration Manual
57
.....
8.4 LICENSE
INFORMATION
8.4 License Information
Within the web interface, the administrator can view the license settings of
the Torrent VCG. These settings display the current valid license key, along
with the MAC Address, number of lines authorized on the Torrent VCG, and
the total bandwidth authorized. This page also allows the administrator to
update the license key for upgrades or changes in the key over time. To enter
in your license key use the following steps.
1.
2.
3.
4.
Select System Configuration from the Administration Interface
Menu.
Select License Information from within the System Configuration submenu.
Enter the new license key in the entry field provided. Press Enter
License Key.
The next page will display the result of the new license key, whether the
key is valid, and the new settings to the Torrent VCG.
8.5 Managing Services
The administration interface allows the administrator to start and stop different services within the Torrent VCG so that it does not have to be completely
rebooted. The different services within the Torrent VCG are: Authorization,
the H.323 Module, Windows Media and RTSP streaming servers, the Telnet
Server, and the SNMP Server. The administrator can also reboot the Torrent
VCG from the Manage Services section of the web interface. WARNING:
Stopping or restarting any services while they are in use will result in that
service being interrupted for the end-user.
Figure 8.2: Managing Services
58
Administration Manual
.....
8.6 MULTICAST RANGE
CONFIGURATION
8.6 Multicast Range Configuration
The Multicast Range Configuration is used to determine which client
machines receive a multicast stream. If the IP Address of the client machine
falls within the multicast range, then that machine receives a multicast
stream. The Administrator can set 4 different multicast ranges within the
Torrent VCG. However, any combination of the four can be in use.
1.
2.
3.
4.
5.
Select System Configuration from the Administration Interface
Menu.
Select Mulicast Range Configuration from within the System
Configuration submenu.
Enter the IP Address for the start of the Multicast Range into the designated entry field.
Enter the IP Address for the end of the Multicast Range into the designated entry field.
Repeat for other multicast ranges. Press Finish.
FINISH: You have successfully changed the multicast settings of your Torrent VCG.
Administration Manual
59
.....
8.7 SNMP
CONFIGURATION
8.7 SNMP Configuration
SNMP stands for Simple Network Management Protocol and it is the standard protocol used to exchange network management information. This
information is used to monitor the status of the machines on a network. The
Torrent VCG can be enabled to communicate with an SNMP station so that
information can be attained for a network manager to monitor.
Select System Configuration from the Administration Interface
Menu.
2. Select SNMP Configuration from within the System Configuration submenu.
3. Enter a text description of where the Torrent VCG is located within the
designated entry field.
4. Enter a contact email for the administrator of the Torrent VCG.
5. Using the drop down menu, determine whether the SNMP controls are
enabled on boot.
6. Enter the Read Only Community String using the designated entry
field.
7. Enter the Read Only Netmask using the designated entry field.
8. Enter the Read/Write Community String using the designated entry
field.
9. Enter the Read/Write Netmask using the designated entry field.
10. Enter the Trap Destination Host name using the designated entry field.
11. Enter the Trap Community String using the designated entry field.
12. Enter the Trap Remote Port using the designated entry field.
1.
NOTE: Please refer to http://www.faqs.org/rfcs/rfc3300.html for further
explanation on the SNMP RFC.
8.8 Streaming Configuration
The Streaming Configuration allows the administrator to change the Multicast IP Address, and the ports used for streaming. Each line available within
the Torrent VCG has a slot that is assigned to it. All the slots can be configured individually to the Administrator’s preferences to ensure there are no
conflicting settings.
1.
60
Select System
Menu.
Configuration from the Administration Interface
Administration Manual
.....
8 . 9 TE L N E T
CONFIGURATION
Select Streaming Configuration from within the System Configuration submenu.
3. Read the message provided on the screen, then press Continue.
4. Click on the Call Slot # you wish to change.
5. Enter in the Multicast IP Address that will be used to stream the multicast signal into the designated entry field.
6. Enter the MMS Server port for the Torrent VCG into the designated
entry field.
7. Enter the Audio Port for the stream into the designated entry field.
8. Enter the Video Port for the stream into the designated entry field.
9. Enter the TTL into the designated entry field.
10. Press Continue if you wish to keep configuring more ports within the
Torrent VCG, otherwise, press Finish.
Figure 8.3: Streaming Configuration
2.
8.9 Telnet Configuration
Administrators can gain access to the Torrent VCG through a telnet session.
To do this the telnet access must be enabled from within the web interface. It
is recommended to leave telnet disabled when not in use. From the Telnet
Configuration Submenu, the administrator can change the port that uses telnet. It can also determine whether or not to enable telnet upon boot of the
Torrent VCG. To activate telnet, you must go to the Manage Services Submenu discussed in section 8.5.
Administration Manual
61
.....
8.10 TIME
SYNCHRONIZATION
:5. Select System Configuration from the Administration Interface
Menu.
:6. Select Telnet Access from within the System Configuration submenu.
:7. Enter the port number for the Torrent OSA to use during telnet sessions.
(The default telnet port is 23)
:8. USing the check box, select whether telnet will be enabled during the
boot of the Torrent VCG. Press Update Settings.
FINISH: You have successfully adjusted the telnet access for the Torrent
VCG.
8.10 Time Synchronization
The Time Synchronization section of the web interface displays the current
system time of the Torrent VCG. The Torrent VCG can be synchronized to a
time host within this section as well.
1.
2.
3.
4.
5.
6.
Select System Configuration from the Administration Interface
Menu.
Select Time Synchronization from within the System Configuration submenu.
Enter the Time Host that will be used to synchronize the system time of
the Torrent VCG into the provided entry field.
Check the box for the protocol type of the Time Host.
Check the box marked Persistent if you desire frequent time updates.
Press Next Step.
FINISH: The next page will confirm the changes made to the system time.
You have successfully changed the system time of the Torrent VCG.
62
Administration Manual
9
System Information
The Torrent VCG allows the administrator or moderator to change their
account information. This information includes their E-mail, password, and
the default media player used at call connection.
9.1 Usage Statistics
The Usage Statistics section allows the administrator to check the bandwidth
and streaming activity on the Torrent VCG. The administrator has the ability
to check the Streaming Server Connection Summary, the Streaming Bandwidth Summary, the Active Stream List, and the Active Multicast List.
These tables are just a summary of the statistics involved in each report.
9.1.1 Streaming Bandwidth Summary
The following statistics break down the connections to the Torrent VCG by
bandwidth and connections.
1.
2.
3.
Select System Information from the Administration Interface
Menu.
Select Usage Statistics from within the System Information submenu.
Select Streaming Bandwidth Summary from within the Usage
Statistics to see a report on the current streaming bandwidth summary.
9.1.2 Active Stream List
The following statistics break down the connections to the Torrent VCG by
displaying the current active streams.
1.
2.
3.
Select System Information from the Administration Interface
Menu.
Select Usage Statistics from within the System Information submenu.
Select Active Stream List from within the Usage Statistics submenu
to see a report on the current active streams list.
Administration Manual
63
.....
9.2 GENERAL
INFORMATION
9.1.3 Active Multicast List
The following statistics break down the connections to the Torrent VCG by
displaying the current active multicast streams.
1.
2.
3.
Select System Information from the Administration Interface
Menu.
Select Usage Statistics from within the System Information submenu.
Select Active Multicast List from within the Usage Statistics submenu
to see a report on the current active multicast list.
9.2 General Information
The General Information section of the Torrent VCG allows the administrator to check the current settings of the Torrent VCG, including the Product
Version, the Hostname, the System Time, the current Uptime, and the Network information.
9.3 Logs
The administrator can retrieve Logs from the Torrent VCG in two different
ways. The web interface allows the administrator to retrieve logs and have
them displayed on the screen for problem solving and status updates. Also,
the administrator can download W3C compliant logs from the FTP server of
the Torrent VCG for use in web tracking software.
9.3.1 Retrieving Logs from the Web Interface
1.
2.
3.
4.
5.
64
Select System Information from the Administration Interface
Menu.
Select Logs from within the System Information submenu.
Check the box of the Log Type you wish to retrieve. Press Next
Step.
Enter the time at which you wish the logs to begin into the designated entry fields, OR select a time offset in the lower fields.
Press Next Step.
Enter the time at which you wish the logs to end into the designated entry fields, OR select a time offset in the lower fields.
Press Next Step.
Administration Manual
.....
9.4 NETWORK
DIAGNOSTICS
6.
A text file will appear on the web interface of the Torrent VCG.
To save the file to your hard drive, press Save File.
9.3.2 Retrieving Logs Using FTP
1.
2.
3.
4.
Negotiate a connection to the Torrent VCG using FTP.
Log into the Torrent VCG using the username “logs” and the password
“logs”.
Retrieve the desired log files from the Torrent VCG.
End the FTP connection to the Torrent VCG.
9.4 Network Diagnostics
The Torrent VCG allows the administrator to check the network diagnostics
of an intended videoconference participant.
1.
2.
3.
4.
5.
Select System Information from the Web Interface Menu.
Select Network Diagnostics from within the System Information submenu.
Using the provided table, check the circles that pertain to the diagnostic
check you wish to perform.
Enter the IP Address of the system in question into the entry field.
Press Execute Query. Below the table the results will appear displaying the intended information.
9.5 Storage Utilization
The administrator can determine the amount of storage space currently available on the Torrent VCG by using the Storage Utilization section of the Web
Interface. The Storage Utilization section displays the amount of storage
available within the archive section of the hard drive, and also displays the
amount of storage available within the logs section of the hard drive. The
administrator can also clear the logs files from the system from this section.
1.
2.
Select System Information from the Administration Interface
Menu.
Select Storage Utilization from within the System Information
submenu to display the Torrent VCG’s storage status. This will display
all active mounts and internal hardware storage status.
Administration Manual
65
.....
9 . 5 ST O R A G E
UTILIZATION
66
Administration Manual
Users
10
The Torrent VCG allows administrators to set up accounts for other users.
This allows the administrator to provide access to the box without providing
all administrator functions. These users are able to set up and place videoconference calls, set access for those calls, and provide chat and slide presentations during the videoconferences. The users are also responsible for
maintaining their own content within the Torrent VCG.
10.1 Adding Users
Select Users from the Administration Interface Menu.
Select Add from within the User submenu.
Enter the new User Name into the designated entry field.
Enter and verify the password for the new user into the designated entry
fields.
5. Enter the email address of the new user into the designated entry field.
6. Enter the maximum number of simultaneous calls the new user will
have access to on the Torrent VCG into the designated field.
7. Enter the number of lines the new user may possess.
8. Enter the amount of Storage Space you wish to provide the new user
with into the designated entry field.
9. Check the box for the default media player of the new user.Press Next
Step.
10. Enter in the E164 alias and any other aliases that are required for the
user into the designated fields.
1.
2.
3.
4.
NOTE: The E164 alias is a unique identifier for each line of the User on the
Torrent VCG.
11. Set the Maximum Bitrate for this line by using the designated drop
down menu.
12. Set the Picture Update time for this particular line by using the designated entry field.
13. Using the drop down menus, toggle the Multicast fields to the desired
settings.
14. Check the boxes of the videoconference codecs you wish to authorize.
Administration Manual
67
.....
10.2 EDITING USER
ACCOUNTS
15. Using the drop down menu, toggle the Automatic Answer field to
the desired setting.
NOTE: The Automatic Answer field determines whether or not the VCG
accepts incoming calls to this User’s particular line.
16. Check the boxes of the media players you wish to allow during conferences from this line.
17. Press Finish.
NOTE: For a description of the line setting entry fields see section 10.4.
FINISH: You have successfully added a new User to the Torrent VCG.
10.2 Editing User Accounts
10.2.1 Editing User Information
1.
2.
3.
4.
5.
Select Users from the Administration Interface Menu.
Select Edit from within the User submenu.
Select Edit User Information from the Edit Submenu.
Select the user you wish to edit. Press Edit User.
Enter the desired changes into the appropriate entry fields.
NOTE: The Administrator can change the status of Users in this section.
They can disable a User here if they do not wish to delete the User’s entire
settings.
6.
Press Update User Settings. A confirmation page will appear listing
the new settings to the User.
FINISH: You have successfully updated a User’s settings.
10.2.2 Adding Lines to Users
1.
2.
3.
4.
5.
68
Select Users from the Administration Interface Menu.
Select Edit from within the User submenu.
Select Add Line from the Edit Submenu.
Select the User you wish to add a line to. Press Next Step.
Enter in the E164 alias and any other aliases that are required for the
user into the designated fields.
Administration Manual
.....
10.2 EDITING USER
ACCOUNTS
NOTE: The E164 alias is a unique identifier for each line of the User on the
Torrent VCG.
Set the Maximum Bitrate for this line by using the designated drop
down menu.
7. Set the Picture Update time for this particular line by using the designated entry field.
8. Using the drop down menus, toggle the Multicast fields to the desired
settings.
9. Check the boxes of the videoconference codecs you wish to authorize.
10. Using the drop down menu, toggle the Automatic Answer field to
the desired setting.
6.
NOTE: The Automatic Answer field determines whether or not the VCG
accepts incoming calls to this User’s particular line.
11. Check the boxes of the media players you wish to allow during conferences from this line.
12. Press Create Line.
NOTE: For a description of the line setting entry fields see section 10.4.
FINISH: You have successfully added a line to an existing User on the Torrent VCG.
10.2.3 Editing User Line Settings
1.
2.
3.
4.
5.
6.
Select Users from the Administration Interface Menu.
Select Edit from within the User submenu.
Select Edit Line Settings from the Edit Submenu.
Select the User whose lines you wish to edit. Press Next Step.
Select the Line you wish to edit. Press Edit Line Settings.
Enter the desired changes into the appropriate fields. Press Finish.
NOTE: For a description of the line setting entry fields see section 10.4.
FINISH: You have successfully edited a User’s line settings on the Torrent
VCG.
Administration Manual
69
.....
10.3 DELETING USERS
10.2.4 Deleting User Lines
1.
2.
3.
4.
5.
6.
Select Users from the Administration Interface Menu.
Select Edit from within the User submenu.
Select Delete Line from the Edit Submenu.
Select the User whose line you wish to delete. Press Next Step.
Select the line you wish to delete from the User. Press Delete Line.
A confirmation page appears with the User’s line settings you are about
to delete. Press Confirm Line Deletion.
FINISH: You have successfully deleted a User’s line from the Torrent VCG.
10.3 Deleting Users
1.
2.
3.
4.
5.
Select Users from the Administration Interface Menu.
Select Delete from within the User submenu.
Select the User you wish to delete.
Check the Remove all files box if you wish to delete all of the User’s
files.
A confirmation page will appear that shows you the User you are about
to delete. Press Next Step.
FINISH: You have successfully deleted a User from the Torrent VCG.
10.4 Line Settings Entry Field Descriptions
E.164 Alias: The administrator uses this field to determine the E.164 Alias
for this individual line of the Torrent VCG. This must be a numeric
value.
H.323 Alias: The administrator uses this field to determine the H.323
Alias for this individual line of the Torrent VCG. This must be in
alpha-numeric format.
EXAMPLE: “Torrent VCG Line 1”
URL Alias: The administrator uses this field to determine the URL Alias
for this individual line of the Torrent VCG. This must be in URL
format.
70
Administration Manual
.....
10.4 LINE SETTINGS
ENTRY FIELD
EXAMPLE: “h323://line1.h114.starbak.net”.
Email Alias: The administrator uses this field to determine the Email
Alias for this individual line of the Torrent VCG. This must be in
Email format.
EXAMPLE: “[email protected]”
Max. Bitrate: This drop down menu determines the maximum allowed
bitrate for this individual line. This does not affect the other lines
on the box. If the administrator is changing the line configuration
of Line 1 within the Torrent VCG and the Maximum Bitrate Menu
is pulled down so that 768Kb/s is chosen, then Line 1 is unable to
connect to video streams with a Bitrate higher than 768Kb/s.
MMS Multicast: This drop-down menu allows the User to enable or disable MMS multicasting within their network.
RTSP Multicast: This drop-down menu allows the User to enable or disable RTSP multicasting within their network.
Auth. Vid Codec: Using this option, the administrator enables this line of
the Torrent VCG to connect to endpoints using the selected video
codecs.
Auto Answer: This drop down menu allows the administrator to not be
present when incoming calls are being placed to the Torrent VCG.
This also allows the administrator to keep the Torrent VCG from
automatically answering endpoints. This helps prevent unwanted
traffic from the Torrent VCG.
Auth. Players: This field allows the administrator to limit the available
player outputs of the live and archive streams. The administrator can access
to streams with a particular player by checking the designated box for that
player.
Administration Manual
71
.....
10.4 LINE SETTINGS
ENTRY FIELD
Figure10.1: Line Settings Page
72
Administration Manual
File Management
11
The Torrent VCG allows the Administrator and Users to do their file management from the web interface. The Administrator and Users can delete
files, edit calls, read file information about calls, move files and directories,
create directories, export calls, and view calls. This chapter explains how to
manage your files from within the web interface.
Figure 11.1: File Management Page
11.1 Deleting Files
The Torrent VCG allows the owner of videoconference archives to delete
their files from the Torrent VCG once they do not need them any longer.
1.
2.
3.
4.
Select File Management from the Administration Interface Menu.
Select the file or the directory you wish to delete.
Press the Delete button on the file management menu bar at the bottom
of the page.
A confirmation page appears to finalize your selection. Press Finish.
Administration Manual
73
.....
11 . 2 E D I T I N G C A L L S
FINISH: You have successfully deleted a file from the Torrent VCG.
11.2 Editing Calls
Once a call is archived, the User and Administrator can edit the call information from the File Management page. This provides the User the ability to
add call descriptions to their archives, change filenames, and change the
replay access of the archived calls.
1.
2.
3.
4.
Select File Management from the Administration Interface Menu.
Select the file or the directory you wish to edit.
Press the Edit Call button on the file management menu bar at the bottom of the page.
Enter the new information into the designated entry fields. Press Finish.
FINISH: You have successfully edited a call within the Torrent VCG.
11.3 File Information
After a videoconference has been archived, the owner of the video may view
the file information from within the File Management section of the Web
Interface.
1.
2.
3.
4.
Select File Management from the Administration Interface Menu.
Select the file or the directory whose information you wish to view.
Press the File Info button on the file management menu bar at the bottom of the page.
A call information page appears providing the User with details about
the specific call. When finished, press Return to File Management.
FINISH: You have successfully viewed the information of a call within the
Torrent VCG.
11.4 Moving Files
Once a file has been archived, the Administrator or User owning the file may
move the file to a new location using the File Management section of the
Web Interface.
74
Administration Manual
.....
11 . 5 V I E W I N G C A L L S
1.
2.
3.
4.
Select File Management from the Administration Interface Menu.
Select the file or the directory you wish to move.
Press the Move button on the file management menu bar at the bottom
of the page.
Select the directory in which you wish to move the selected file. Press
Finish.
FINISH: You have successfully moved a file within the Torrent VCG.
11.5 Viewing Calls
The Torrent VCG enables the owners of archived videoconferences to view
their streams from the File Management section. This allows the owner of
the file to view the content before allowing public access to the general
viewers.
1.
2.
3.
4.
Select File Management from the Administration Interface Menu.
Select the archived videoconference you wish to view.
Press the View Call button on the file management menu bar at the
bottom of the page.
A new browser page will open with the Torrent VCG Call Viewer playing the selected archived conference.
FINISH: You have successfully viewed a call within the Torrent VCG.
11.6 Adding Directories
When a new user is created, the Torrent VCG creates a new directory for that
user within the root directory of the Torrent VCG. However, new directories
may be needed for file management. The Torrent VCG allows you to create
new directories within the File Management section of the Web Interface.
1.
2.
3.
4.
Select File Management from the Administration Interface Menu.
Press the Add Directory button on the file management menu bar at
the bottom of the page.
Enter the name of the new directory in the designated entry field. Press
Finish.
A confirmation page will appear showing the path of the new directory.
Press Return to File Management.
Administration Manual
75
.....
11 . 7 E X P O R T I N G C A L L S
FINISH: You have successfully created a new directory within the Torrent
VCG
NOTE: The directory is created in the user’s root directory by default. Perform the steps outlined in section 11.4 to move the new directory a new location.
11.7 Exporting Calls
When a new user is created, the Torrent VCG creates a new directory for that
user within the root directory of the Torrent VCG. However, new directories
may be needed for file management. The Torrent VCG allows you to create
new directories within the File Management section of the Web Interface.
1.
2.
3.
4.
5.
Select File Management from the Administration Interface Menu.
Select the video you wish to export.
Press the Export Call button on the file management menu bar at the
bottom of the page.
Enter the filename you wish to use for the exported video.
Select the export format. Press Finish.
NOTE: If you select “Export Whole Conference” a .zip file will be created
with this conference name that contains the video, and/or chat, and/or slides
that were viewed during the live call.
6.
7.
A confirmation page appears displaying the export filename and a link
to the downloadable video.
To retrieve the exported video file, log into the FTP server of the Torrent VCG. The log in and username are the same as for the Web Interface.
FINISH: You have successfully exported a conference from the Torrent
VCG.
76
Administration Manual
Call Center
12
The Torrent VCG Call Center is used to view information regarding calls in
progress. The Call Center contains a switchboard (A), a call information
table (B), an H.323 bandwidth monitor (C), and a streaming bandwidth monitor (D). The owner of a specific call, can log into the call center within the
web interface and view all the necessary information from each call they are
currently connected to.
Figure 12.1: Torrent VCG Call Center
To view a the information of a conference, click on the specific conference
within the switchboard. The videoconference’s information will then be displayed within the tables B,C, and D. By pressing the gray buttons in tables C
Administration Manual
77
.....
and D, the owner of the conference can view the real-time bandwidth graph
displayed to the right of those tables.
The owner of the call can also control the recording of the conference from
the call center, as well as end the conference when it is complete.
78
Administration Manual
Placing Calls
13
The Torrent VCG can join videoconferences in two different ways. The first
way is to be invited into a call from another endpoint or MCU. The second
way is to place the call from the Torrent VCG. This chapter discusses placing calls from the Torrent VCG.
Figure 13.1: Place Call Page
1.
2.
Select Place Call from the Web Interface Menu located on the left side
of the web interface.
Choose which line you wish to use to join the videoconference. Press
Place Call.
Administration Manual
79
.....
3.
4.
5.
6.
7.
8.
9.
10.
11.
12.
13.
14.
15.
80
Enter the Call Name into the designated field. This is the name that
will be used within the call catalog to describe your conference.
Enter the Call Address into the designated field. The Torrent VCG
will accept IP addresses, E.164 Aliases, H.323 Aliases, E-Mail Aliases,
and URL Aliases.
Select the Call Format using the designated radio buttons.
If you are using a slide format, choose your slideset using the designated drop-down menu.
Enter a call description into the Call Description text field.
Using the Record Options field, you can determine if you want the
Torrent VCG to record the conference upon connection, or manually.
If you are using a Polycom MGC in continuous presence mode or
transcoding mode, check the MGC Stream Mode box.
Using the Live Access field, check whether you want the live access
for this particular conference to be Public, Password protected, or no
access.
Using the Replay Access field, check whether you want the replay
access of this conference to be Public, Password protected, or no
access.
If you are making the live access or public access password protected,
enter the password into the designated entry field.
Using the check box provided, determine whether or not to have the call
viewer pop up when you place your call.
Press Place Call.
A call initiation progress page will appear showing you the status of the
call setup. Once the call connection is completed, you will be taken to
the call center. A Call Viewer will be launched at this time if you
checked that option in the Place Call menu.
Administration Manual
Appendices
Viewing Streams
A
This section focuses on the viewers of the Torrent VCG live and archive
streams. The Torrent VCG is able to stream videoconferences in a combination of ways. Live videoconferences can be viewed video only, with video
and chat, or with video, chat, and slides all at once. This enables the viewer
to take an active role in the videoconference. The viewer may also access the
videoconferences through the ”Replay” option of the Torrent VCG.
A.1 Accessing the Catalog Page
The first step in watching live and archived videoconferences from the Torrent VCG is being able to access the catalog page within the Torrent VCG.
There are two types of catalog pages within the Torrent VCG. There is an
administrator catalog page (Which shows all active calls within the Torrent
VCG) and each user is given a catalog page (Which only shows the active
calls for each individual user).
1.
Enter the URL of the Torrent VCG into the address bar of a web
browser.
Example: http://11.11.11.11/administrator for the administrator catalog page
Example: http://11.11.11.11/user for the user catalog page
2.
3.
Press Enter.
The Torrent VCG Call Catalog page will appear. (See Figure A.1)
Figure A.1: Live Catalog
Administration Manual
83
.....
A.2 JOINING LIVE CALLS
A.2 Joining Live Calls
Once the Viewer has accessed the catalog page, the Viewer can select which
videoconference to join. The Administrator will have given each videoconference a suitable description for each conference so that the Viewers know
which call to join. The Administrator can block unwanted Viewers by adding
the password option to conferences as he/she sees fit.
1.
2.
3.
Access the Torrent VCG Catalog Page.
Select the conference you wish to join.
Press Join Call.
NOTE: At this point a password or chat name may be asked for before
entrance into the conference is accepted. Consult your Administrator or user
if you do not know the password. Once you have connected to the call you
should start to see the stream in a Quicktime, Real One, or Windows Media
plug-in. If you do not have the designated plug-in, your browser will prompt
you to download the plug-in. To download the plug-in you must be logged
into your PC as administrator or your user must have administrative permissions.
A.3 Viewing Archived Conferences
The Torrent VCG has the ability to record H.323 videoconferences for later
viewing. This can be accessed within the Torrent VCG catalog page section.
1.
2.
3.
4.
Access the Torrent VCG Catalog Page.
Click “Replay” from the top right corner of the browser window.
Select the videoconference you wish to view by highlighting the
appropriate circle.
Press View Stream.
NOTE: At this point a password or chat name may be asked for before
entrance into the conference is accepted. Consult your administrator or user
if you do not know the password. Once you have connected to the call you
should start to see the stream in a Quicktime, Real One, or Windows Media
plug-in. If you do not have the designated plug-in, your browser will prompt
you to download the plug-in.
84
Administration Manual
B
Firewall Reference
This section enables Systems administrators to determine which ports to
open on the firewall to enable streaming from the Torrent VCG.
B.1 Torrent VCG Port Reference
The following port reference is for using the Torrent VCG features in conjunction with a firewall.
•
Port 80 In/Out for TCP (Web Interface)
•
Ports 1719-1720In/Out for TCP (Gatekeeper registration)
•
Port 3215 In/Out for TCP (This is the Java/Interface port)
•
Port 7776 In/Out for TCP (For the interactive chat feature of the Torrent
VCG)
•
All ports over 1024 for UDP (This is required for the H.323 protocol on
all endpoints)
B.2 QuickTime and Real One Streaming Ports
The following port reference is for enabling Quicktime streaming from the
Torrent VCG.
•
Port 554 RTSP over TCP (This is where the player controls are sent)
•
Ports 6970-6999 inclusive for RTP over UDP (These are the video
transport ports)
Administration Manual
85
.....
B.3 WINDOWS MEDIA
ST RE A M I N G P O R T S
B.3 Windows Media Streaming Ports
The following port reference is for enabling Windows Media Streaming.
•
•
•
•
86
In/Out: TCP port 1755 (This is where the player controls are sent)
In/Out: UDP port 1755
In/Out: UDP ports 1024 -5000 as needed (These are the video transport
ports)
***You can adjust individual clients' players to only use certain ports
within this range to save for too many open ports on the firewall. For
example: Under "Tools" then "Options" within the Windows Media
Player the client can select the "Network" tab to limit the ports being
used to ports 1050-1051.***
Administration Manual
C
Telnet/FTP Features
As mentioned in earlier chapters of the manual, the Torrent VCG enables
administrators and moderators to telnet and FTP for several different reasons. Telnet can be used to remotely administer the Torrent VCG so that the
administrator does not have to be on site to make changes to the configuration of the unit. FTP enables administrators and moderators the opportunity
to download their archived videoconferences for storage, distribution, or reencoding. This chapter explains the uses of these two features and how they
are controlled.
C.1 Using Telnet
Telnet enables the administrator to control the Torrent VCG from a remote
location. All of the functionality of the serial console is available within the
telnet feature except for the Network Configuration of the Torrent VCG.
1.
2.
3.
4.
5.
To connect to the Torrent VCG you must enable telnet within the
Administration Interface. (Refer to section 8.9 of the manual to
enable telnet.)
Telnet to the IP Address or hostname of the Torrent VCG.
Once connected, press Enter to activate the serial console.
You will be prompted for a password. Enter the serial console
password. The default password is administrator.
The serial console is now active. (Refer to chapter 3 of the manual for help with the serial console.)
NOTE: The Network Configuration feature within the serial console is not
active with a telnet connection. To change the network configuration of the
Torrent VCG, you must be connected to the unit with a null modem serial
cable as described in chapter 3.
Administration Manual
87
.....
C.2 USING FTP
C.2 Using FTP
The Torrent VCG uses FTP to allow Administrators and Users to export their
archived videoconferences or log files off of the Torrent. This feature makes
it easy for the administrator/user to re-encode the video, distribute the videoconference, or simply back up the conference for later retrieval.
C.2.1 Using FTP to Export Videoconferences
1.
2.
3.
4.
Within the web interface, export a conference or video file.
(Refer to section 11.2 on exporting conferences.)
Connect to the Torrent VCG using and FTP client. Use either
the IP Address or the URL of the Torrent.
The Torrent will ask you for a user name and password. For the
administrator the user name and password are the same as the
log-in to the Administration Interface log-in. For Users, the user
name and password is the same as the Web Interface.
Using the FTP client, move the video or videoconference to the
destination directory.
C.2.2 Using FTP to Export Log Files
Removing Log Files from the Torrent VCG is an administrator only feature.
Moderators do not have the permissions to access the log files.
1.
2.
3.
88
Connect to the Torrent VCG using an FTP client. Use either the
IP Address or the URL of the Torrent.
The Torrent will ask you for a user name and password. The
user name is logs and the password is logs.
Locate the log file you wish to download and export the file to
the destination directory.
Administration Manual
Client Requirements
D
The Torrent VCG is designed to function with a wide range of client-side
specifications. However, due to differences in browsers and operating systems it is nearly impossible to be compliant with every system in the user
realm. The following chapter outlines the known compatible systems and
browsers for the Torrent VCG.
D.1 PC Requirements
D.1.1 Compatible Browsers
Microsoft Internet Explorer 5.5 and higher.
Mozilla 0.9 and higher.
Requires JVM
Netscape 4.7x & 6.1 and higher. Not version 6.0.
D.1.2 Compatible Media Players
Microsoft Windows Media Player 6.4 (Pre-installed Win98 --> XP)
Apple QuickTime Player 5.0 and higher.
Real Networks Real One Player.
D.2 Macintosh Requirements
D.2.1 Compatible Browsers
Microsoft Internet Explorer 5.1 and higher.
Mozilla 0.9 and higher.
Requires JVM
Netscape 4.7x & 6.1 and higher. Not version 6.0.
D.2.2 Compatible Media Players
Apple Quicktime 5.0 and higher.
Microsoft Windows Media Player does not work. The required codec is not
supported.
Administration Manual
89
.....
D.2 MACINTOSH
REQUIREMENTS
90
Administration Manual
E
Reading the Logs
The Torrent VCG is designed to function with a wide range of client-side
specifications. However, due to differences in browsers and operating systems it is nearly impossible to be compliant with every system in the user
realm. The following chapter outlines the known compatible systems and
browsers for the Torrent VCG.
E.1 H.323 Access Logs
The H.323 Access logs are basically the summaries of the interactions
between the Torrent VCG and other H.323 equipment.
E.1.1 Example of Call Setup
Dec 17 15:38:27 localhost H323[4721]: productID: Polycom ViaVideo
Dec 17 15:38:27 localhost H323[4721]: versionId: Release 3.0 26Feb2002 3.0.0.144ä¹^S^Hp {^D
Dec 17 15:38:27 localhost H323[4721]: Incoming call detected
Dec 17 15:38:27 localhost H323[4721]: Preparing xmlrpcCallNotification with alias =
Dec 17 15:38:27 localhost H323[4721]: Incoming IP Call detected with IP = 12.34.56.78
Dec 17 15:38:27 localhost H323[4721]: Received response from hub
Dec 17 15:38:27 localhost H323[4721]: Hub returned NULL in reply
Dec 17 15:38:56 localhost H323[4721]: Set up mms unix domain socket
Dec 17 15:38:56 localhost H323[4721]: Set up rtsp unicast sockets
Dec 17 15:38:56 localhost H323[4721]: Call_ID 3: Recording started
Dec 17 15:38:56 localhost H323[4721]: Filename: Default_2002.12.17_15:38:56.ce
Dec 17 15:38:56 localhost H323[4721]: Call_ID 3: Placing call to TA:68.22.149.223 (rate:
131072)
Dec 17 15:38:56 localhost H323[4721]: Call_ID 3: Call state dialtone
Dec 17 15:38:58 localhost H323[4721]: productID: Polycom ViaVideo
Dec 17 15:38:58 localhost H323[4721]: versionId: Release 3.0 26Feb2002
3.0.0.144^\¹^S^HÚ)Ú^Q
Dec 17 15:38:58 localhost H323[4721]: Call_ID 3: Call state connected
Dec 17 15:38:58 localhost H323[4721]: Call_ID 3: Negotiated Rate Assignment: 67072
Dec 17 15:38:58 localhost H323[4721]: Call_ID 3: Sending Capabilities: H263/H261
Dec 17 15:38:58 localhost H323[4721]: send_capabilities: ret 1
Dec 17 15:38:58 localhost H323[4721]: Call_ID 3: Call Rate: 131050
Dec 17 15:38:58 localhost H323[4721]: Call_ID 3: Remote capabilities received
Dec 17 15:38:58 localhost H323[4721]: Remote rate max h261/h263 3840/3840
Dec 17 15:38:58 localhost H323[4721]: Negotiated codec_type/max 34/67050
Dec 17 15:38:58 localhost H323[4721]: Call_ID 3: MSSlave
Dec 17 15:38:58 localhost H323[4721]: Call_ID 3: Call state connected
Dec 17 15:38:58 localhost H323[4721]: Call_ID 3: Local RTP port 4004
Dec 17 15:38:58 localhost H323[4721]: Call_ID 3: Event handler init - Type 1 MMS 1 RTSP 1
Dec 17 15:38:58 localhost H323[4721]: Audio: Standard
Dec 17 15:38:58 localhost H323[4721]: Call_ID 3: Building g711Ulaw64k channel
Administration Manual
89
.....
E.1 H.323 ACCESS LOGS
Dec 17 15:38:58 localhost H323[4721]: rate: 60
Dec 17 15:38:58 localhost H323[4721]: Call_ID 3: Channel audio_out Dialtone
Dec 17 15:38:58 localhost H323[4721]: Call_ID 3: Channel audio_out: State: 1 Mode 1
Dec 17 15:38:58 localhost H323[4721]: Call_ID 3: Opening video channel
Dec 17 15:38:58 localhost H323[4721]: Call_ID 3: Local RTP port 4006
Dec 17 15:38:58 localhost H323[4721]: Call_ID 3: Event handler init - Type 2 MMS 1 RTSP 1
Dec 17 15:38:58 localhost H323[4721]: Video streaming: RTSP/MMS
Dec 17 15:38:58 localhost H323[4721]: Recording: on
Dec 17 15:38:58 localhost H323[4721]: Call_ID 3: Channel video_out Dialtone
Dec 17 15:38:58 localhost H323[4721]: Call_ID 3: Channel video_out: State: 1 Mode 1
Dec 17 15:38:58 localhost H323[4721]: Call_ID 3: Call state connected
Dec 17 15:38:59 localhost H323[4721]: Remote RTCP ip/port 12.34.56.78 49155
Dec 17 15:38:59 localhost H323[4721]: g711Ulaw64k
Dec 17 15:38:59 localhost H323[4721]: Call_ID 3: Audio channel codec info sent
Dec 17 15:38:59 localhost H323[4721]: Call_ID 3: Channel audio_in Offering
Dec 17 15:38:59 localhost H323[4721]: Call_ID 3: Channel audio_in Connected
Dec 17 15:38:59 localhost H323[4721]: Remote RTCP ip/port 12.34.56.78 49157
Dec 17 15:38:59 localhost H323[4721]: h263VideoCapability
Dec 17 15:38:59 localhost H323[4721]: Call_ID 3: Call connected
Dec 17 15:38:59 localhost H323[4721]: remote ip: 12.34.56.78 bitrate: 131050
Dec 17 15:38:59 localhost H323[4721]: Call_ID 3: Video channel codec info sent
Dec 17 15:38:59 localhost H323[4721]: Call_ID 3: Channel video_in Offering
Dec 17 15:38:59 localhost H323[4721]: Call_ID 3: Channel video_in Connected
Dec 17 15:38:59 localhost H323[4721]: Remote RTCP ip/port 12.34.56.78 49155
Dec 17 15:38:59 localhost H323[4721]: Remote RTP ip/port12.34.56.78 49158
Dec 17 15:38:59 localhost H323[4721]: Call_ID 3: Channel audio_out Connected
Dec 17 15:38:59 localhost H323[4721]: Remote RTCP ip/port 12.34.56.78 49157
Dec 17 15:38:59 localhost H323[4721]: Remote RTP ip/port 12.34.56.78 49156
Dec 17 15:38:59 localhost H323[4721]: Call_ID 3: Channel video_out Connected
Dec 17 15:38:59 localhost H323[4721]: Call_ID 3: Channel 813f5d4: New Rate:670
Dec 17 15:38:59 localhost H323[4721]: Call_ID 3: New Rate: 131000
Dec 17 15:40:28 localhost H323[4721]: Old mms fd: 8 Dec 17 15:40:28 localhost H323[4721]:
New mms fd: 19
E.1.2 Example of Call Tear Down
Dec 17 15:41:10 localhost H323[4721]: Call_ID 3: Recording ended
Dec 17 15:41:10 localhost H323[4721]: Call_ID 3: Channel audio_out Disconnected
Dec 17 15:41:10 localhost H323[4721]: Call_ID 3: Channel audio_out Idle
Dec 17 15:41:10 localhost H323[4721]: Call_ID 3: Channel video_out Disconnected
Dec 17 15:41:10 localhost H323[4721]: Call_ID 3: Channel video_out Idle
Dec 17 15:41:10 localhost H323[4721]: Call_ID 3: Channel audio_in Disconnected
Dec 17 15:41:10 localhost H323[4721]: Call_ID 3: Channel audio_in Idle
Dec 17 15:41:10 localhost H323[4721]: Call_ID 3: Channel video_in Disconnected
Dec 17 15:41:10 localhost H323[4721]: Call_ID 3: Channel video_in Idle
Dec 17 15:41:10 localhost H323[4721]: Call_ID 3: Call state disconnected
Dec 17 15:41:10 localhost H323[4721]: Reason: unknown Dec 17 15:41:10 localhost H323[4721]:
Call_ID 3: Call state idle
Dec 17 15:41:10 localhost H323[4721]: Call_ID 3: Call ended
Dec 17 15:41:10 localhost H323[4721]: Duration: 131 seconds
Dec 17 15:41:10 localhost H323[4721]: Destroying MMS connnection
Dec 17 15:41:10 localhost H323[4721]: Unable to find internal bcast
Dec 17 15:41:10 localhost H323[4721]: Destroying MMS connnection
90
Administration Manual
.....
E.2 HUB LOGS
E.1.3 Example of H.323 Shutdown
Dec 18 12:08:19 localhost H323[4721]: H323 shutdown start
Dec 18 12:08:19 localhost H323[4721]: Closed all Calls
Dec 18 12:08:19 localhost H323[4721]: RTP module closed
Dec 18 12:08:19 localhost H323[4721]: RTCP module closed
Dec 18 12:08:19 localhost H323[4721]: Stack closed
Dec 18 12:08:19 localhost H323[4721]: ---------- H323 module exited ----------
E.1.4 Example of H.323 Start Up
Dec 18 12:10:52 skull H323[10865]: ********** H323 module starting **********
Dec 18 12:10:52 skull H323[10865]: status_init: status->max_connects(7500) != configfile>max_sessions(65536). Changing config
Dec 18 12:10:52 skull H323[10865]: Gatekeeper enabled (endpoint mode)
Dec 18 12:10:52 skull H323[10865]: LINE_COUNT = 10
Dec 18 12:10:52 skull H323[10865]: HUB_PORT = 3216
Dec 18 12:10:52 skull H323[10865]: LOCAL_IP = 12.34.56.78
Dec 18 12:10:52 skull H323[10865]: GATEKEEPER_IP = 12.34.56.78
Dec 18 12:10:52 skull H323[10865]: GATEKEEPER_PORT = 1719
Dec 18 12:10:52 skull H323[10894]: GK registration state: registered
E.2 Hub Logs
Hub logs summarize logging events that tru to change the state of the Torrent
VCG when the Torrent VCG is not configured to accept those changes.
E.3 Interface Logs
The Interface Logs are a summary of the interactions within the Torrent
VCG interface. The Interface logs capture any event that occurs within the
web interface of the Torrent VCG.
E.4 RTSP & HTTP Logs
The RTSP and HTTP Logs are divided up into daily summaries. Each RTSP
and HTTP event begins on a new line in the log interface of the Torrent
VCG. Here, they are in bold print and separated by a line. The following is
an example of one day with four RTSP events:
#Software: Starbak RTSP Server
#Date: 2002-12-23 00:00:00
#Remark: all time values are in local time.
#Fields: c-ip date time c-dns cs-uri-stem c-starttime x-duration c-rate c-status c-playerid c-playerversion c-playerlanguage cs(User-Agent) cs(Referer) c-hostexe c-hostexever c-os c-osversion ccpu filelength filesize avgbandwidth protocol transport audiocodec videocodec channelURL sc-
Administration Manual
91
.....
E.5 HTTP ERROR
bytes c-bytes s-pkts-sent c-pkts-received c-pkts-lost-client c-pkts-lost-net c-pkts-lost-cont-net cresendreqs c-pkts-recovered-ECC c-pkts-recovered-resent c-buffercount c-totalbuffertime c-quality s-ip s-dns s-totalclients s-cpu-util
68.22.149.145 2002-12-23 09:27:47 - rtsp://68.22.149.65/.sdp/administrator/
administrator_1.sdp 0 1 1 200 - - - - - - - - - - 0 0 - RTP - - - - 63164 63164 60 60 - - - - - - - - 68.22.149.65 - - 68.22.149.145 2002-12-23 09:28:53 - rtsp://68.22.149.65/.sdp/administrator/
administrator_1.sdp 0 3 1 200 - - - - - - - - - - 0 0 - RTP - - - - 0 0 0 0 - - - - - - - - - 68.22.149.65 -68.22.149.145 2002-12-23 09:31:23 - rtsp://68.22.149.65/.sdp/administrator/
administrator_1.sdp 0 6 1 200 - - - - - - - - - - 0 0 - RTP - - - - 158487 158487 181 181 - - - - - - - - 68.22.149.65 - - 68.22.149.145 2002-12-23 09:34:53 - rtsp://68.22.149.65/.sdp/administrator/
administrator_1.sdp 0 2 1 200 - - - - - - - - - - 0 0 - RTP - - - - 0 0 0 0 - - - - - - - - - 68.22.149.65 --
E.5 HTTP Error
[Mon Dec 23 09:27:42 2002] [error] [client 68.22.149.145] File does not exist: /opt/www/htdocs/
admin/call_viewer/Commands.class
[Mon Dec 23 09:27:42 2002] [error] [client 68.22.149.145] File does not exist: /opt/www/htdocs/
admin/call_viewer/Commands.class
[Mon Dec 23 09:27:42 2002] [error] [client 68.22.149.145] File does not exist: /opt/www/htdocs/
admin/call_viewer/Commands.properties
[Mon Dec 23 09:27:42 2002] [error] [client 68.22.149.145] File does not exist: /opt/www/htdocs/
admin/call_viewer/Commands_en.class
[Mon Dec 23 09:27:42 2002] [error] [client 68.22.149.145] File does not exist: /opt/www/htdocs/
admin/call_viewer/Commands_en.class
[Mon Dec 23 09:27:42 2002] [error] [client 68.22.149.145] File does not exist: /opt/www/htdocs/
admin/call_viewer/Commands_en.properties
[Mon Dec 23 09:27:42 2002] [error] [client 68.22.149.145] File does not exist: /opt/www/htdocs/
admin/call_viewer/Commands_en_US.class
[Mon Dec 23 09:27:42 2002] [error] [client 68.22.149.145] File does not exist: /opt/www/htdocs/
admin/call_viewer/Commands_en_US.class
[Mon Dec 23 09:27:42 2002] [error] [client 68.22.149.145] File does not exist: /opt/www/htdocs/
admin/call_viewer/Commands_en_US.properties
[Mon Dec 23 09:27:42 2002] [error] [client 68.22.149.145] File does not exist: /opt/www/htdocs/
admin/call_viewer/SIRC.class
[Mon Dec 23 09:27:42 2002] [error] [client 68.22.149.145] File does not exist: /opt/www/htdocs/
admin/call_viewer/SIRC.class
[Mon Dec 23 09:27:42 2002] [error] [client 68.22.149.145] File does not exist: /opt/www/htdocs/
admin/call_viewer/SIRC_en.class
[Mon Dec 23 09:27:42 2002] [error] [client 68.22.149.145] File does not exist: /opt/www/htdocs/
admin/call_viewer/SIRC_en.class
[Mon Dec 23 09:27:42 2002] [error] [client 68.22.149.145] File does not exist: /opt/www/htdocs/
admin/call_viewer/SIRC_en.properties
[Mon Dec 23 09:27:42 2002] [error] [client 68.22.149.145] File does not exist: /opt/www/htdocs/
admin/call_viewer/SIRC_en_US.class
[Mon Dec 23 09:27:42 2002] [error] [client 68.22.149.145] File does not exist: /opt/www/htdocs/
admin/call_viewer/SIRC_en_US.class
92
Administration Manual
.....
E.5 HTTP ERROR
[Mon Dec 23 09:27:42 2002] [error] [client 68.22.149.145] File does not exist: /opt/www/htdocs/
admin/call_viewer/SIRC_en_US.properties
Administration Manual
93
.....
E.5 HTTP ERROR
94
Administration Manual