1
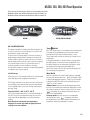
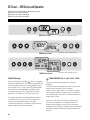
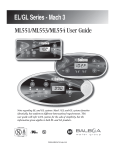
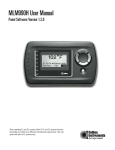
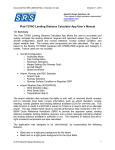
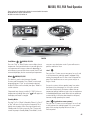
ML550, 551, 554 Panel Operation
Please refer to the following User Guides for more detailed information:
ML551/ML554 User Guide: P/N 40632-99
ML 550 User Guide: P/N 40569-99
Light
Mode
Warm
Light
Warm
Mode
Heat
Heat
Jets 1
Jets 1
Jets 2
Blower
Jets 2
Cool
Blower
Cool
ML551
ML554
Heat
Cool
Warm
Jets 1
Jets 2
Blower
Light
Mode
ML550
Cool/Warm
ML500, 551, 554
Press the “Cool” or “Warm” button once to display the set
temperature. Each time either button is pressed again, the
set temperature will increase or decrease depending on
which button is pressed. After three seconds, the LCD will
automatically display the last measured spa temperature.
Mode
ML500, 551, 554
This button is used to switch between Standard,
Economy, and Sleep modes. Press “Mode” to enter mode
programming, press “Cool” to cycle through to desired
mode (LCD flashes until confirmed), then press “Mode” to
confirm selection.
Sleep mode heats the spa to within 11°C (20°F) of the set
temperature only during filter cycles. “
” will appear on
the display until mode is changed.
Standby Mode
Pressing “Cool” or “Warm” followed by “Blower” or “Jets 2”
or “Aux” will turn off all spa functions temporarily. This is
helpful when changing a filter. Pressing any button exits
Standby mode. On some systems the “Jets 1” button will
control the pump in Standby Mode (“Drain Mode”). In this
case, press any other button to exit. System will revert to
previous mode after 1 hour.
Jets 1
Press the “Jets 1” button once to turn pump 1 on or off, and
to shift between low and high speeds if equipped. If left
running, the pump will turn off after a time-out period. The
pump 1 low speed time-out on some systems may be as
long as 4 hours.
On non-circ systems, the low speed of pump 1 runs when
the blower or any other pump is on. It may also activate
for at least 1 minute every 30 minutes to detect the spa
temperature (polling) and then to heat to the set temperature
if needed, depending upon mode. When the low speed turns
on automatically, it cannot be deactivated from the panel;
however, the high speed may be started.
Jets 2
(optional on some systems)
Press the “Jets 2” button once to turn pump 2 on or off, and
to shift between low and high speeds if it is a two-speed
pump. If left running, the pump will turn off after a
time-out period.
25
ML550, 551, 554 Panel Operation (cont.)
Blower
1-speed operation: on/off;
2-speed operation: med/hi/off; or
3-speed operation: lo/med/hi/off.
If left on, the blower will automatically turn off after a timeout period.
NOTE: If your system does not have a “Blower” button, and
is labeled as ”Jets 3” instead, please refer to the respective
User Guide listed above.
Light
Some systems are equipped with both a spa light and a fiber
optic light; however, only one can be accessed by this panel.
(Larger panels may be purchased so that both the spa light
and fiber optic light can be utilized.) Depending upon how
your spa is equipped and configured, the “Light” button will
operate in one of three ways:
1) Press the “Light” button to turn the spa light on and off,
and to shift between dim and bright settings if your light
is dimmable.
2) If a fiber-optic light with wheel is installed, press the
“Light” button once to start the light and wheel; press
it again to stop the wheel, and then again to turn the
light off.
3) If a fiber-optic light without a separate wheel stop is
installed, press the “Light” button to turn it on and off.
Both a spa light and a fiber optic light may be used
simultaneously on the EL8000 and EL5000 systems with a
different panel.
If any light is left on, it will automatically turn off after a
factory programmed time period.
Preset Filter Cycles
On all systems, the pump and the ozone generator will run
during filtration. At the start of each filter cycle, the blower
will run briefly on its highest speed to purge the air channels.
The lowest speed of any other pumps and the mister will
also run briefly. On some circ systems, pump 1 may also run
for the duration of the filter.
26
(Note: This panel cannot be used to program filter cycles
for systems that are programmed by time rather than by
duration. For these systems, a larger panel is needed and the
following description does not apply.)
The first filter cycle (“day”) begins 6 minutes after the spa is
powered up. The second filter cycle (“night”) begins 12 hours
later. Filter duration is programmable for 1-12 hours (“
”-“
”). The default filter duration can vary from system
to system. To program, press “Cool” or “Warm”, then “Jets 1”.
Press “Cool” or “Warm” to select the filter duration. Press
“Jets 1” to select the number of filter cycles. The display will
show “ ” (both “day” and “night” cycles); “ ” (day cycle
only); or “ ” (“night” cycle only). Press “Cool” or “Warm” to
adjust, then press “Jets 1” to exit the programming mode. For
continuous filtration, use “
” and “ ”.
Freeze Protection
If the temperature sensors within the heater detect a low
enough temperature, then the pump(s) and the blower
automatically activate to provide freeze protection.
The pump(s) and blower will run either continuously or
periodically depending on conditions.
In colder climates, an optional additional freeze sensor may
be added to protect against freeze conditions that may
not be sensed by the standard sensors. Auxiliary freeze
sensor protection acts similarly except with the temperature
thresholds determined by the switch. See your dealer
for details.
Locking Features
If this panel is used as the main panel, locking features will
not be available.
If this panel is used as a remote or additional panel, it will
lock when the main panel is locked. To unlock this panel,
unlock the main panel.
In the same way, the set temperature can be locked and
unlocked by a main panel. When the set temperature is
locked, it cannot be changed from either panel.
Clean-up Cycle (optional)
When a pump or blower is turned on by a button press, a
clean-up cycle begins 30 minutes after the pump or blower
is turned off or times out. The pump and the ozone generator
will run for one to four hours, depending on the system (on
some systems, you can change this setting.)
software version number (such as 2.1), followed by “
” and then your spa’s network ID number (consisting of both
letters and digits displayed in 5 steps).
If you need to see this series of numbers again, and “
” is
once again on the display, just press “Jets 1” again.
When done, press the “Light” button (more than once if
necessary) until you see the normal temperature display.
Circ Pump (optional)
If your system is equipped with a circ pump, it may be
configured to work in one of three different ways:
1) The circ pump operates continuously (24 hours) with the
exception of turning off for 30 minutes at a time when
the water temperature reaches 1.5°C (3°F) above the set
temperature (most likely to happen in very hot climates).
2) The circ pump stays on continuously, regardless of
water temperature.
3) The circ pump will come on when the system is checking
temperature (polling), during filter cycles, during freeze
conditions, or when another pump is on.
Ozone (optional)
On most systems, the ozone generator (if installed) runs
during filter cycles (except when pump 1 is operating at high
speed on a non-circ system) and during clean-up cycles. On
some systems, the ozone generator operates whenever the
pump runs.
If your system is configured with the optional ozone suppress
feature, the ozone generator will turn off for 1 hour any time
a function button (Jets 1, Jets 2, Blower, etc.) is pressed.
Displaying Info About Your Spa
There are several pieces of information about your spa that
can be called up from the panel, but are only needed in
special cases.
To access this information, press “Cool” or “Warm” then
“Jets 1”, then “Light”. (Each press must be within 3 seconds
of the previous press.) Then press “Cool” until you see “
” on the display. Press “Jets 1” to see the SSID (a series of
3 numbers, such as 100 133 10, which indicates the precise
revision of the software in your spa), followed by the Mach
User Preferences
There are several aspects of spa operation that you can
customize using the User Preferences submenu.
Press “Cool” or “Warm” then “Jets 1”, then “Light”. (Each press
must be within 3 seconds of the previous press.) At this
point, if “
” is not showing on the display, press “Cool”
until you see “
” on the display. Then press “Jets 1” to
enter the User Preferences submenu.
Once in the User Preferences submenu, press “Cool” or
“Warm” to cycle between these settings:
– Suppress Reminders
When set to “
”, reminders are never displayed on the
panel. When set to “
”, reminders are displayed on the
panel periodically.
– Temperature in Celsius
When set to “
”, temperatures are displayed on the panel
in degrees Celsius. When set to “
”, temperatures are
displayed in Fahrenheit.
– 24-hour Time Display
When set to “
”, time is displayed in 24-hour (military)
format (00:00 is midnight, 23:00 is one hour before midnight).
When set to “
”, time is displayed in 12-hour (am/pm)
format (12:00 is midnight, 11:00 pm is one hour before
midnight).
– Clean-up Cycle Duration (some systems only)
When set to “
”, Clean-up Cycles are disabled. When set
to “
” through “
”, the number indicates how many
hours each Clean-up Cycle will run.
27
ML550, 551, 554 Panel Operation (cont.)
– Dolphin II Address
When set to “
”, no addressing is used. Use this setting
for a Dolphin I, or for a Dolphin II which is set for no address
(which is the Dolphin II factory default). When set to
“
” through “
”, the number is the address (see your
Dolphin II manual for details).
Editing User Preferences
View the setting.
The left two characters (before the decimal point) tell
you what setting you’re viewing or editing, the right most
character (after the decimal point) tells you the value of that
setting (for example, “ ” for Yes or “ ” for No).
If the value is flashing, you’re editing it. If the value is not
flashing, you’re just viewing it.
Press “Jets 1” to switch editing of the value on (flashing) or
off (not flashing). Once you’re editing the value (it’s flashing),
use the “Cool” or “Warm” buttons to change the value to the
one you want.
After you change the value, you must press “Jets 1” again to
stop the flashing before the change will register, and before
you can view or edit another setting.
If you don’t interact with the menu for more than 30 seconds,
it may time out.
If you press “Light” to back out of the menu, or pause
long enough for it to time out, while a value was flashing,
the changes you were making to that setting are not
remembered. But changes you previously made to other
settings will be in effect.
Any User Preferences that you change will stay in effect
“forever” or until you change them again (unless the spa’s
“persistent memory” is reset by a service technician), and
will override the factory defaults for those settings.
28
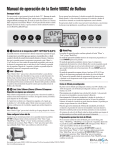
ML200, 240, 260, 400 Panel Operation
Please refer to the following User Guides for more detailed information:
ML400 User Guide: P/N 40570-99; ML260 User Guide: P/N 40633-99
ML240 User Guide: P/N 40634-99; ML200 User Guide: P/N 40571-99
Heat
Jets
Jets
Aux
Temp
Aux
Temp Light
Light
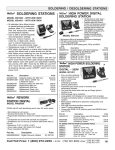
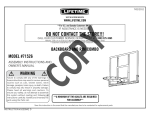
ML400
ML 400 INTRODUCTION
The pump responsible for heating and filtration (pump 1 low
on non-circ systems, or the circ pump on circ systems) will
be referred to simply as the pump.
Timeouts refer to a preset length of time that a function is
programmed to operate before shutting off automatically.
Certain conditions (filters or freeze) can cause a function to
operate longer, while faults can cause a function to operate
for a shorter length of time. The system keeps track of
timeouts regardless of other conditions occurring.
In multi-button sequences, if buttons are pressed too quickly
in sequence, they may not register
ML260, ML240, ML200
Temp
ML400
Press the “Temp” button once to display the set temperature.
To change the set temperature, press the pad a second
time before the LCD stops flashing. Each press of the
“Temp” button will continue to either raise or lower the set
temperature.
If the opposite direction is desired, release the pad and let
the display revert to the current water temperature. Press
the pad to display the set temperature, and again to make
the temperature change in the desired direction.
After three seconds, the LCD will automatically display the
last measured spa temperature.
Initial Start-up
Mode ML400
When your spa is first actuated, it will go into Priming mode
(after displaying some configuration information).
A button combination is used to switch between standard,
economy, and sleep modes. Press “Temp” followed by “Light”
to enter mode programming, press “Temp” to cycle through
to desired mode (LCD flashes until confirmed), then press
“Light” to confirm selection.
Standard mode maintains the desired temperature. Note
that the last measured spa temperature displayed is current
only when the pump has been running for at least 1 minute.
“
” will appear on the display momentarily when you
switch into Standard Mode.
Economy mode heats the spa to the set temperature
only during filter cycles. “
” will appear solid when
the temperature is not current and will alternate with the
temperature when the temperature is current.
The Priming mode will last for up to 4 minutes and then the
spa will begin to heat and maintain the water temperature
in the Standard mode. You can exit Priming mode early by
pressing “Temp”.
Temp Set (26.0°C - 40.0°C / 80°F - 104°F)
The last measured temperature is constantly displayed on
the LCD. Your spa’s set temperature range may vary from
range shown above depending on your manufacturer’s
settings.
Note that the last measured spa temperature
displayed is current only when the pump has been
running for at least 1 minute.
29
ML200, 240, 260, 400 Panel Operation (cont.)
Pressing “Jets” while in Economy mode puts the spa in
Standard-In-Economy mode, (“ ”) which operates
the same as Standard Mode, then reverts to Economy
Mode automatically after 1 hour. During this time, pressing
“Temp” followed by “Light” will revert the mode to
Economy immediately.
Sleep mode heats the spa to within 11°C (20°F) of the set
” will appear on
temperature only during filter cycles. “
the display until mode is changed.
Blower (optional on some systems) ML400
Standby Mode ML400
Circ Pump (optional) ML400
Pressing “Temp” followed by “Aux” or “Jets 2” or “Blower”
will turn off all spa functions temporarily. This is helpful
when changing a filter. Pressing any button exits Standby
mode. On some systems the “Jets” button will control the
pump in Standby Mode (“Drain Mode”). In this case, press
any other button to exit. System will revert to previous mode
after 1 hour.
If your system is equipped with a circ pump, it may be
configured to work in one of three different ways:
1) The circ pump operates continuously (24 hours) with
the exception of turning off for 30 minutes at a time when
the water temperature reaches 1.5 C (3°F) above the set
temperature (most likely to happen in very hot climates).
2) The circ pump stays on continuously, regardless of
water temperature.
3) The circ pump will come on when the system is checking
temperature (polling), during filter cycles, during freeze
conditions, or when another pump is on.
Jets ML400
Press the “Jets” button once to turn pump 1 on or off, and to
shift between low and high speeds if equipped. If left running, the pump will turn off after a time-out period. The pump
1 low speed time-out on some systems may be as long as 4
hours.
On non-circ systems, the low speed of pump 1 runs when
the blower or any other pump is on. It may also activate for
at least 1 minute every 30 minutes to detect the spa temperature (polling) and then to heat to the set temperature if
needed, depending upon mode. When the low speed turns
on automatically, it cannot be deactivated from the panel;
however, the high speed may be started.
Jets 2 (optional on some systems) ML400
If your system has a second pump but your panel does
not have a “Jets 2” button, use the “Aux” button to control
pump 2. Press the “Jets 2” button once to turn pump 2 on
or off, and to shift between low and high speeds if it is a
two-speed pump. If left running, the pump will turn off after
a time-out period.
30
If your system has a blower (and only one pump), but your
panel does not have a “Blower” button, use the “Aux” button
to control the blower.
1-speed operation: on/off;
2-speed operation: med/hi/off; or
3-speed operation: lo/med/hi/off.
If left on, the blower will automatically turn off after a timeout period.
Light ML400
Some systems are equipped with both a spa light and a fiber
optic light; however, only one can be accessed by this panel.
(Larger panels may be purchased so that both the spa light
and fiber optic light can be utilized.) Depending upon how
your spa is equipped and configured, the “Light” button will
operate in one of three ways:
1) Press the “Light” button to turn the spa light on and off,
and to shift between dim and bright settings if your light is
dimmable.
2) If a fiber-optic light with wheel is installed, press the
“Light” button once to start the light and wheel, press it
again to stop the wheel, and then again to turn the light off.
3) If a fiber-optic light without a separate wheel stop is
installed, press the “Light” button to turn it on and off.
Again, both a spa light and a fiber optic light may be used
simultaneously on the EL8000 and EL5000 systems with a
different panel.
If any light is left on, it will automatically turn off after a factory programmed time period.
Ozone (optional) ML400
Preset Filter Cycles ML400
On most systems, the ozone generator (if installed) runs
during filter cycles (except when pump 1 is operating at high
speed on a non-circ system) and during clean-up cycles. On
some systems, the ozone generator operates whenever the
pump runs.
If your system is configured with the optional ozone suppress feature, the ozone generator will turn off for 1 hour any
time a function button (Jets, Jets 2, Blower, etc.) is pressed.
On all systems, the pump and the ozone generator will run
during filtration. At the start of each filter cycle, the blower
will run briefly on its highest speed to purge the air channels.
The lowest speed of any other pumps and the mister will
also run briefly. On some circ systems, pump 1 may also run
for the duration of the filter.
Clean-up Cycle (optional ML400)
When a pump or blower is turned on by a button press, a
clean-up cycle begins 30 minutes after the pump or blower
is turned off or times out. The pump and the ozone generator will run for one to four hours, depending on the system.
(On some systems, you can change this setting; see User
Preferences section.)
Freeze Protection ML400
If the temperature sensors within the heater detect a low
enough temperature, then the pump(s) and the blower automatically activate to provide freeze protection. The pump(s)
and blower will run either continuously or periodically
depending on conditions.
In colder climates, an optional additional freeze sensor may
be added to protect against freeze conditions that may not
be sensed by the standard sensors. Auxiliary freeze sensor
protection acts similarly except with the temperature thresholds determined by the switch. See your dealer for details.
Locking Features ML400
If this panel is used as the main panel, locking features will
not be available. If this panel is used as a remote or additional panel, it will lock when the main panel is locked. To
unlock this panel, unlock the main panel.
In the same way, the set temperature can be locked and unlocked by a main panel. When the set temperature is locked,
it cannot be changed from either panel.
(Note: This panel cannot be used to program filter
cycles for systems that are programmed by time rather
than by duration. For these systems, a larger panel is
needed and the following description does not apply.)
The first filter cycle (“day”) begins 6 minutes after the spa is
powered up. The second filter cycle (“night”) begins 12 hours
later. Filter duration is programmable for 1-12 hours (“ ”-“
”). The default filter duration can vary from system to
system. To program, press “Temp” then “Jets”. Press “Temp”
to select the filter duration. Press “Jets” to select the number
of filter cycles. The display will show “ ” (both “day” and
“night” cycles); “ ” (day cycle only); or “ ” (“night” cycle
only). Press “Temp” to adjust, then press “Jets” to exit the
programming mode. For continuous filtration, use “
”
and “ ”.
Displaying Information About Your Spa ML400
There are several pieces of information about your spa that
can be called up from the panel, but are only needed in
special cases.
To access this information, press “Temp” then “Jets”, then
“Light”. (Each press must be within 3 seconds of the previous press.) Then press “Temp” until you see “
” on the
display. Press “Jets” to see the SSID (a series of 3 numbers,
such as 100 133 10, which indicates the precise revision of the
software in your spa), followed by the Mach software version number (such as 2.1), followed by “
” and then your
spa’s network ID number (consisting of both letters and digits
displayed in 5 steps).
If you need to see this series of numbers again, and “
” is
once again on the display, just press “Jets” again.
When done, press the “Light” button (more than once if
necessary) until you see the normal temperature display.
31
ML200, 240, 260, 400 Panel Operation (cont.)
User Preferences ML400
Editing User Preferences ML400
There are several aspects of spa operation that you can
customize using the User Preferences submenu.
Press “Temp” then “Jets”, then “Light”. (Each press must be
within 3 seconds of the previous press.) At this point, if “
” is not showing on the display, press “Temp” until you see
” on the display. Then press “Jets” to enter the User
“
Preferences submenu.
Once in the User Preferences submenu, press “Temp” to cycle
between these settings:
View the setting.
The left two characters (before the decimal point) tell
you what setting you’re viewing or editing, the right most
character (after the decimal point) tells you the value of that
setting (for example, “ ” for Yes or “ ” for No). If the value
is flashing, you’re editing it. If the value is not flashing, you’re
just viewing it.
– Suppress Reminders
”, reminders are never
When set to “
”,
displayed on the panel. When set to “
reminders are displayed on the panel
periodically.
– Temperature in Celsius
”, temperatures are displayed
When set to “
on the panel in degrees Celsius. When set to “
”, temperatures are displayed in Fahrenheit.
– 24-hour Time Display
”, time is displayed in 24-hour
When set to “
(military) format (00:00 is midnight, 23:00 is
one hour before midnight). When set to “
”, time is displayed in 12-hour (am/pm) format
(12:00 is midnight, 11:00 pm is one hour before
midnight).
– Clean-up Cycle Duration (some systems only)
”, Clean-up Cycles are disabled.
When set to “
” through “
”, the number
When set to “
indicates how many hours each Clean-up Cycle
will run.
– Dolphin II Address
”, no addressing is used. Use
When set to “
this setting for a Dolphin I, or for a Dolphin II
which is set for no address (which is the
”
Dolphin II factory default). When set to “
”, the number is the address (see
through “
your Dolphin II manual for details).
32
Press “Jets” to switch editing of the value on (flashing) or off
(not flashing).
Once you’re editing the value (it’s flashing), use the “Temp”
buttons to change the value to the one you want.
After you change the value, you must press “Jets” again to
stop the flashing before the change will register, and before
you can view or edit another setting.
If you don’t interact with the menu for more than 30 seconds,
it may time out.
If you press “Light” to back out of the menu, or pause long
enough for it to time out, while a value was flashing, the
changes you were making to that setting are not remembered. But changes you previously made to other settings will
be in effect.
Any User Preferences that you change will stay in effect
“forever” or until you change them again (unless the spa’s
“persistent memory” is reset by a service technician), and
will override the factory defaults for those settings.
GL Series Mach 3 -- Persistent Memory & Power Up
This document applies when using ML Series panels with any EL or GL Mach 3 series system.
POWER UP DISPLAY SEQUENCE, SOFTWARE ID
GL, ABOUT PERSISTENT MEMORY
Any time you change DIP Switches or Software Configuration Settings that
affect parameters the user can change (any filter settings, set temperature
default, Celsius vs Fahrenheit, 12-hour vs 24-hour time, reminders
suppression, etc), you must reset Persistent Memory for your DIP Switch or
Software Configuration Settings changes to take effect. You should also reset
Persistent Memory after loading a new file into a board (using the ESM,
purchased seperately).
To reset Persistent Memory:
s Power down.
s Set A12 ON (See illustration below).
s Power up.
s Wait until “ ” or “
” is displayed on your panel.
” appears see section below.
Note: If “
s Set A12 OFF. (This can be done safely with power on if you use a nonconductive tool such as a pencil to push the switch back to the OFF
position. Otherwise, power down before setting A12 OFF)
s Power up again (if you powered down in the previous step).
s For all other power ups, leave A12 OFF.
About Persistent Memory and Time of Day Retention:
This system uses memory that doesn’t require a battery to store a variety
of settings. What we refer to as Persistent Memory stores all the User
Preferences, as well as all the filter settings, the set temperature, and the
heat mode.
Persistent Memory is not used for Time of Day. Time of Day needs to be
“kept running” (not just stored) while the power is off, so a separate Real
Time Clock feature (on all models except the EL1000) keeps track of
Time of Day while the unit is off. Time of Day Retention, and Time of Day
Retention alone, is controlled by the J91 jumper. J91 must be set according
to main system panel used.
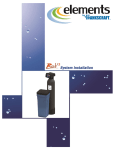
Switchbank A
J91
RTC
Enabled
(Not Jumpered)
Switchbank B
J91
RTC
Disabled
(Jumpered)
message on power up:
If “
” appears before (and instead of) “ ” or
”, you have not configured DIP Switches and/or
“
Software Configuration Settings in a valid manner. This must be corrected
before you can reset Persistent Memory.
The switch numbers, jumpers, or configuration settings displayed after
“
” are ones with which the system has found a configuration problem.
For example:
s “
” would mean that the combination of how you’ve set
A5 and how you’ve set B2 is not supported on this system.
s “
” would mean that there is a problem with jumper J99
s “
” would mean that the combination of how
you’ve set pump 3 for 1-speed and blower for 1-speed is not supported
on this system.
s “
” would mean that the combination of how you’ve
set DIP switches which have been assigned to pump 3 and blower is not
supported on this system.
Power Up Display Sequence
Upon power up, you should see the following on the display:
s Three numbers in a row, which are the SSID (the System Software
ID). The third display of these numbers is the Software Version, which
should match the version of your system. For example, if these three
, that is a Mach 3 EL8000 at version 26.
numbers are
s If there is a Configuration Error, the
message (see above) will
appear at this point (and none of the messages below will display).
Otherwise what comes next is:
s An indication of either the input voltage detected (EL1000/EL2000), or
the heater wattage range supported (EL8000/GL2000/GL8000).
s Heater wattage display: “ ” means the system supports a heater
” means the system supports a heater
from 1 kW to 3 kW. “
” means the system supports a 3 kW
from 3 kW to 6 kW. “
heater only. (These ranges may be modified slightly in the case of
special heaters, which the next bullet covers.)
s Input voltage display: A system showing “
” supports 3 kW
to 6 kW heaters. A system showing “ ” supports the very same
heaters, although at 120V those heaters will function at only 1/4 of
” or
their 240V rated wattage. (The system shows only either “
” as a general indication of input voltage; it does not show the
“
actual input voltage.)
s If your system is using a special type of heater, a display such as “ ”
may appear next. If your system is using the generic Balboa heater, no
heater type display will appear.
s “ ” or “
” will appear to signal the start of
Priming Mode.
At this point, the power up sequence is complete. Refer to the User Guide
for the ML Series panel on your system for information about how the spa
operates from this point on.
33
VL Series Panels -- For use with GS Systems
Warm
Blower
Light
Mode / Prog
Cool
Jets 1
Jets 2
Time
Warm
Blower
Light
Mode/Prog
Cool
Jets 1
Jets 2
Mode
Warm
VL702S
Blower
Heat
Jets 1
VL701S
Blower
Jets 2
Light
Mode
Cool
Warm
Heat
Jets 2
Light
Cool
VL600S
VL700S
Jets 1
34
DELUXE SYSTEMS
Time
Jets
Warm
Mode
Blower
Light
Jets Blower Light Heat
Cool
STANDARD SYSTEMS
VL801D
VL802D
VL Panel Line-up
“Phone Plug” RJ Type,
VL/GS Connector
VL406U
VL406T
Jets
Warm
Light
Cool
Heat
Jets
Temp
Blower
Light
“Phone Plug” RJ Type,
VL/GS Connector
Heat
Set
Heat
VL403
Jets
Light
Note:
VL404 and VL403 have red
LED’s on black background
Heat
Blower
Jets
Temp
Light
VL402
Blower
Heat
Jets
Heat
Blower
Jets
Temp
Light
Set
VL200 VL240
VL260
VL400
VL401
Light
DUPLEX SYSTEMS
VL404
Blower
Blower Jets
Blower Jets
Temp Light
Temp Light
35
GS Panel -- 500 Series and Operation
Please refer to the User Guides for additional information.
500 Z Series User Guide: P/N 40789
500 SZ Series User Guide: P/N 40790
500 DZ Series User Guide: P/N 40788
Temp
Te
mpp
J ts
Je
Blow
Bl
ower
er
500Z Series Panel
Warm
Cool
Mode
Warm
Cool
Mode/Prog
Time
Initial Start-up
Your spa will enter Priming Mode ( ) when it is energized.
During Priming Mode, press “Jets” button(s) repeatedly and
be sure all pumps are free of air. Priming Mode lasts less
than 5 minutes. Press “Temp” to exit. After Priming Mode,
the spa will run in Standard Mode (see Mode section).
Some panels may not have a “Temp” button. On these
panels the “Set”, “Warm”, or “Cool” buttons are used.
The pump responsible for heating and filtration (pump 1
low-speed on non-circ system, or the circ pump on circ
systems) will be referred to simply as the pump.
In multi-button sequences, if the buttons are pressed too
quickly in sequence, they may not register.
Blower
Light
Note: Button shapes and labels may vary.
Jets
500DZ Series Panel
36
Note: Button shapes and labels may vary.
Jets
500SZ Series Panel
Ligh
Li
g t
gh
Blower
Light
Note: Button shapes and labels may vary.
TEMP CONTROL (26°C - 40°C / 80°F - 104°F)
The last measured water temperature is constantly
displayed.
The water temperature displayed is current only when the
pump has been running for at least 2 minutes.
On panels with a single “Temp” or “Set” button, to display
the set temperature, press the button once. To change the
set temperature, press the button a second time before the
display stops flashing.
Each press of the button will continue to either raise or
lower the set temperature. If the opposite direction is
desired, allow the display to revert to the current water
temperature. Press the button to display the set temperature,
and again to make the temperature change in the desired
direction.
On panels with “Warm” and “Cool” buttons, to display the set
temperature, press “Warm” or “Cool” once. To change the set
temperature, press a temperature button again before the
display stops flashing. Each press of “Warm” or “Cool” will
adjust the set temperature.
After three seconds, the display will stop flashing and begin
to display the current spa temperature.
JETS
Jets 1 500Z, 500DZ, 500SZ Series
Press “Jets 1” to turn pump 1 on or off, and to shift between
low and high speeds (if equipped). The low-speed will turn
off after 4 hours. High-speed will turn off after 15 minutes.
Low-speed may run automatically at times, during which it
cannot be deactivated from the panel, but high-speed may
be operated.
Jets 2/Jets 3/Blower (If equipped)
Press the corresponding button once to turn the device on or
off. The device will turn off after 15 minutes. Pump 2 may be
two-speed on some systems.
Some systems use this one button to control two devices.
The first button press will activate one device. Press again
to have both devices active. Press again to turn off the first
device only. Press one more time to turn both devices off.
UÊ STANDARD Mode maintains set temperature. will be
displayed momentarily when you switch into Standard
Mode.
UÊ ECONOMY Mode heats the spa to the set temperature
only during filter cycles. will display when water temp
is not current, and will alternate with water temp when
the pump is running.
UÊ SLEEP Mode heats the spa to within 10°C/20°F of the
set temperature only during filter cycles. will display
when water temp is not current, and will alternate with
water temp when the pump is running.
Mode 500SZ
UÊ Mode is changed by pressing “Warm” or “Cool”, then
pressing “Mode”.
UÊ STANDARD Mode maintains set temperature.
will be displayed momentarily when you switch into
Standard Mode.
UÊ ECONOMY Mode heats the spa to the set temperature
will display when water
only during filter cycles.
temp is not current, and will alternate with water temp
when the pump is running.
UÊ SLEEP Mode heats the spa to within 10°C/20°F of the
set temperature only during filter cycles.
will display
when water temp is not current, and will alternate with
water temp when the pump is running.
Mode/Prog 500DZ
LIGHT
Press “Light” to operate the spa light. Turns off after 4 hours.
SETTING THE TIME OF DAY
When the spa is first powered up, the words SET TIME will
flash on the display. Press “Time”, then “Mode/Prog”, then
“Warm” or “Cool”. The time will begin changing in one-minute
increments. Press “Warm” or “Cool” to stop the time from
changing. Press “Time” to confirm.
MODE/PROG
Mode 500Z
UÊ Mode is changed by pressing “Warm” or “Cool”, then
pressing “Mode/Prog” button.
UÊ Standard Mode maintains set temperature and the
STANDARD icon will be displayed.
UÊ ECONOMY Mode heats the spa to the set temperature
only during filter cycles.
will display when water
temp is not current, and will alternate with water temp
when the pump is running. The ECONOMY icon will be
displayed.
UÊ SLEEP Mode heats the spa to within 10°C/20°F of the
set temperature only during filter cycles.
will display
when water temp is not current, and will alternate with
current water temp when the pump is running.
UÊ Depending on system configuration, mode changing may
not be available and will be locked in Standard Mode.
UÊ Mode is changed by pressing “Temp”, then “Light”.
37
GS Panel -- 500 Series and Operation (cont.)
FILTER CYCLES
Preset Filter Cycles 500Z
UÊ The first preset filter cycle begins 6 minutes after the
spa is energized. The second preset filter cycle begins 12
hours later. Filter duration is programmable for 2, 4, 6, or
8 hours or for continuous filtration (indicated by ). The
default filter time is 2 hours.
UÊ To program, press “Temp”, then “Jets 1”. Press “Temp” to
adjust. Press “Jets 1” to exit programming.
UÊ For non-circ systems, low-speed pump 1 and the ozone
generator (if installed) run during filtration.
UÊ For circulation systems, the circ pump and the ozone
generator (if installed) run 24 hours. In hot environments,
the circ pump may turn off for 30 minute periods,
except during filter cycles. At the beginning of each
filter cycle all other equipment will run briefly to purge
the plumbing.
Preset Filter Cycles 500SZ
UÊ The first preset filter cycle begins 6 minutes after the
spa is energized. The second preset filter cycle begins 12
hours later. Filter duration is programmable for 2, 4, 6, or
8 hours or for continuous filtration (indicated by
).
The default filter time is 2 hours for non-circ systems and
4 hours for circ systems.
UÊ To program, press “Warm” or “Cool”, then “Jets 1”.
Press “Warm” or “Cool” to adjust. Press “Jets 1” to
exit programming.
UÊ In hot environments, the circ pump may turn off for
30 minute periods, except during filter cycles. At the
beginning of each filter cycle all other equipment will run
briefly to purge the plumbing
Preset Filter Cycles 500DZ
UÊ The first preset filter cycle starts at 8:00 AM and ends
at 10:00 AM. The second preset filter cycle starts at 8:00
PM and ends at 10:00 PM.
UÊ For non-circ systems, low-speed pump 1 and the ozone
generator (if installed) run during filtration.
UÊ For circulation systems, the circ pump and the ozone
generator (if installed) run 24 hours. In hot environments,
the circ pump may turn off for 30 minute periods, except
during filter cycles. At the beginning of each filter
cycle, all other equipment will run briefly to purge the
plumbing.
Optional Filter Cycle Programming 500DZ
UÊ You are not required to change the filter cycles, but if you
wish to, press “Time”, “Mode/Prog”, “Mode/Prog” within
3 seconds. SET START FILTER 1 (AM) will appear. Press
“Warm” or “Cool” to reset the filter start time.
UÊ Press “Mode/Prog” to see SET STOP FILTER 1 and
adjust the time with “Warm” or “Cool” as done above.
Press “Mode/Prog” to see SET START FILTER 2 (PM)
and proceed as above. Press “Mode/Prog” to see
SET STOP FILTER 2 and proceed as above. Press “Mode/
Prog” to confirm.
LOCKING THE PANEL 500DZ
UÊ Press “Time”, “Blower”, and “Warm” within 3 seconds.
The Panel is now locked. To unlock the panel, press the
“Time”, “Blower”, and “Cool” within 2 seconds.
UÊ Note: On some systems, “Jets 1”, instead of “Blower”, is
used in Lock/Unlock sequences.
LOCKING THE TEMPERATURE 500DZ
UÊ Press “Warm”, “Time”, “Blower”, and “Warm” within
3 seconds. The “Warm” and “Cool” buttons are now
disabled. To unlock the temperature, press “Time”,
“Blower”, and “Cool” within 2 seconds.
UÊ Note: On some systems, “Jets 1”, instead of “Blower”, is
used in Lock/Unlock sequences.
OZONE
For non-circ systems (if installed) runs during filtration.
For circulation systems (if installed) runs 24 hours.
38
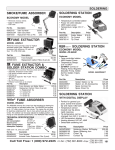
GS Persistent Memory with VL Panels
Power Up Display Sequence
Any time you change a DIP Switch, other than A1, you must reset Persistent
Memory for your new DIP Switch Settings changes to take effect. If you do
not reset Persistent Memory, your system may function improperly.
Upon power up, you should see the following on the display:
> Three numbers in a row, which are the SSID (the System Software
ID). The third display of these numbers is the Software Version,
which should match the version of your system. For example, if these
, that is a VS511SZ at version 38.
three numbers are
> Displayed next is: “ ” (indicating the system is configured for
a heater between 3 and 6 kW) or “ ” (indicating the system is
configured for a heater effectively* between 1 and 3 kW).
“ ” should appear for all VS models running at 240VAC.
“ ” should appear for all VS models running at 120VAC, as well
as all GS models. (*A heater which is rated at 4 kW at 240VAC will
function as a 1 kW heater at 120VAC.)
> “ ” will appear to signal the start of Priming Mode.
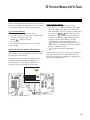
To reset Persistent Memory:
> Power down by disconnecting power source from spa.
> Put a jumper on across J43, covering both pins. (See illustration below)
> Power up by connecting power source to spa.
> Wait until “ ” is displayed on your panel.
> Power down again.
> Remove jumper from J43 (May also move to cover 1 pin only)
> Power up again.
About Persistent Memory and Time of Day Retention:
This system uses memory that doesn’t require a battery to store a variety of
settings. What we refer to as Persistent Memory stores the filter settings,
the set temperature, and the heat mode.
At this point, the power up sequence is complete. Refer to the Reference
Card for the GS System model of your spa for information about how
the spa operates from this point on, including how to adjust the Time of
Day if using a Serial Deluxe style panel.
Persistent Memory is not used for Time of Day. Only models with a
Serial Deluxe panel installed (GS5xxDZ) can display the time.
However, during power loss to the spa, the system will lose the
correct time, and reset to 12:00 PM when power is restored.
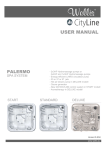
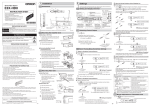
J43
J46
J20
NEUTRAL
WHITE
C
C
G
G
F1
K8
W3
J1 J1A
K5
W2
J10
J18
J2A
HOT
RED
K3
K2
TB1
J36
Balboa
1
U4
J2
J35
2 3
J12
J43
J37
F2
RED AC
HTR2
HTR1
J101
J13
E.GND
J32 J33 J34
J100
C
W7
K9
HOT
BLACK
K4
TORQUE
RANGE
FOR TB1:
27-30 IN. LBS.
G
J17/26
S1 TST
T1
F4 FUSE .3A 250V
J29
C
C
W1
SWITCHBANK
A
J47
FUSE 3A 250V
J16 J25 J63 J64
J15
J6
G
J11
FUSE 20A 250V
F7
J50
K1
G
WHT
T AC
J66 J65
J23
W4
J62
C
J61
G
K6
BLK AC
F5
E.GND
CLASS G FUSE 30A
J6
S1 TST
SWITCHBANK A
J60
J22
EXT.
RLY
AUX. F
J7
J8
SEN. A
SEN. B
BALBOA INSTRUMENTS, INC. 2-SPD
J44 VS500Z
EXT RLY
P/N 22972 REV D
VAC MADE IN U.S.A
COPYRIGHT 2005
J43 on GS Series Main Board Shown.
39
Changing a System Circuit Board
HOW TO REPLACE A SYSTEM CIRCUIT BOARD
Important!
Be sure to turn the power off before replacing any
component, especially a circuit board.
Important!
DO NOT REMOVE AND REPLACE THE CIRCUIT BOARD
UNLESS THE FAULT HAS POSITIVELY BEEN DETERMINED TO BE THE CIRCUIT BOARD.
HOW TO REMOVE A SYSTEM CIRCUIT BOARD
NOTE: Before you begin, labeling all wires to be removed
may help speed up reinstallation. The wiring diagram should
always be used to ensure proper wire placement.
UÊ Shut OFF line power to the spa at the main circuit
breaker panel. Do not attempt to service a spa without
shutting off the power. Serious injury or damage may
result.
UÊ Disconnect all wires and slip-on connectors as
necessary to remove the board.
UÊ Remove all the screws which mount the board to the
system enclosure.
UÊ Remove the board from the plastic stand-offs by gently
squeezing the locking flange on each stand-off with a
pair of pliers. The board should now be free and can be
removed from the system box.
GS500Z Board
40
UÊ Check all jumpers and dip switch positions on the new
board. Make sure they are in the same position as the
old board.
UÊ Make sure the new board snaps in place on the plastic
stand-offs. Use care to be sure the connectors on the
right side of the board clear the enclosure openings as
the board is installed.
Caution: Do Not Overtighten this screw.
UÊ Install all screws which mount the board to the system
enclosure.
UÊ Reconnect all wires and slip-on connectors.
UÊ Restore power to the spa at the main breaker.
UÊ Test to make sure all functions work correctly.
Important
DO NOT REMOVE AND REPLACE THE CIRCUIT BOARD
UNLESS YOU HAVE TESTED ALL OTHER COMPONENTS
AND PROVEN THAT THE CIRCUIT BOARD IS ACTUALLY
CAUSING THE PROBLEM.
Testing the Sensor Set
1.
UÊ If the opposite sensor is now reading higher,
the problem is with the sensor(s). Replace the
sensor set.
*If you wait more than 2 minutes after plugging the
sensors back in, heating may start (even outside a filter
in Economy or Sleep mode) due to a stray Cd/CLd/COLD
WATER condition usually detected when sensors are
being plugged in while the system is running.
Check sensor wires for cracks or damage that may
indicate the presence of a rodent.
2. Inspect the connections of both sensors on the circuit
board. The plugs must be clean.
3.
4.
If the sensors are not totally failing but are showing
excessive (1.0°C/2.0°F or more) difference between the
two sensors when not heating (a possible cause of Sn/
SnS/SENSOR SYNC, HL/HFL/HTR FLOW LOW, and LF/
LOW/FLOW/messages), do the following: Note which
sensor is reading consistently higher (A vs B or t vs H).
Unplug the two sensors from the circuit board and
exchange their positions (i.e., plug the one that was in
the “Sen. A” jack into the “Sen. B” jack and vice versa).
5. Press a panel button if any "stray" faults appeared during
the process. (Stray faults are normal when sensors
are unplugged then plugged back in while the system
is running.)
6.
Within a minute or so*, see if the same or other sensor
is now reading consistently higher:
UÊ If the same sensor (A vs B or t vs H) is reading
higher after the sensor interchange, the problem is
on the circuit board. Replace the circuit board.
7.
If there is a message indicating an open or faulty sensor:
UÊ Unplug the sensor set (but leave the original sensors
in the heater) and plug in the test sensor set. Put
both sensors into the same cup of warm water
(ideally above the set temperature, so the spa won't
try to heat during this test, as there is no heater
protection during this test) and verify that they read
the same temperature (within 0.5°C/ 1°F).
UÊ If the problem is solved, replace the sensor set.
If the problem is not solved, do not replace the
sensor set.
UÊ Plug in the original sensor set to verify that there is
not a connection problem.
UÊ If the problem continues after following the above
steps, then replace the circuit board.
41
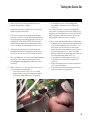
Removing the Heater Assembly from a Spa System
Note: Be careful when removing a heater assembly
from a spa plumbing system. Water may splash out
under pressure.
Water under pressure in the plumbing may splash out,
and onto the system’s electronic board. Do not remove the
system door until the water has been drained from the heater
assembly tube.
1.
Turn off the main power.
2. Close off the slice valves (or, ball valves) adjacent to the
heater assembly.
3.
Once the valves are closed, slowly crack the heater
assembly end tubes until water flows out. If the
connectors are on too tight, it may be necessary to
loosen the Phillips screws that hold the connectors
together. Once the water has been drained, continue.
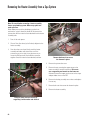
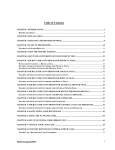
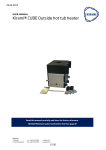
Remove both nuts that secure
the element in place.
4.
Remove the system door cover.
5. Remove the nuts securing the copper straps to the
heater assembly’s terminal connectors. Be sure to
use a supporting end wrench on the lower nut.
Otherwise, excessive torque may be occur on the straps
and put undue stress on the PCB.
Keep the lower nut from turning by
supporting it with another end-wrench
42
6.
Remove the heating assembly sensor wires and replace
if necessary.
7.
Remove both nuts that secure the element in place.
8.
Remove the heater assembly.
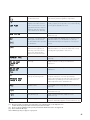
Panel Message Reference Guide
Message
Meaning / Frequency
Action Required
5FNQFSBUVSFOPUDVSSFOUJO
&DPOPNZPS4MFFQNPEF
*O&DPOPNZPS4MFFQNPEFUIFQVNQNBZCFPGGGPS
IPVSTPVUTJEFBmMUFSDZDMF*GZPVXJTIUPTFFUIF
DVSSFOUTQBUFNQFSBUVSFFJUIFSTXJUDIUP4UBOEBSE
NPEFPSUVSO+FUTPOGPSNJOVUFT1MFBTFTFF
i%JBHOPTJOH5PQTJEF$POUSPM1BOFMTw1BHF
$POmHVSBUJPOFSSPS4QB
DBOOPUTUBSUVQ
1MFBTFTFFi%JBHOPTJOH5PQTJEF$POUSPM1BOFMTw
1BHF
"TOFFEFE<>
*OTUBMMOFX.JOFSBMDBSUSJEHF
Reminder, Suppress in User Preferences. [2]
&WFSZEBZT<>
5FTUBOEBEKVTUQ)DIFNJDBMMFWFMTQFSNBOVGBDUVSFST
JOTUSVDUJPOTReminder, Suppress in User Preferences.
[2]
&WFSZEBZT<>
5FTUBOEBEKVTUTBOJUJ[FSDIFNJDBMMFWFMTQFS
NBOVGBDUVSFSTJOTUSVDUJPOTReminder, Suppress in User
Preferences. [2]
'JSNXBSFJOTUBMMQSPCMFN
$POUBDU#BMCPBJGNFTTBHFBQQFBSTPONPSFUIBOPOF
QPXFSVQ
&WFSZEBZT<>
$MFBOBOEDPOEJUJPODPWFSQFSNBOVGBDUVSFST
JOTUSVDUJPOTReminder, Suppress in User Preferences.
[2]
&WFSZEBZT<>
3FNPWFDMFBOBOESFJOTUBMMmMUFSQFSNBOVGBDUVSFST
JOTUSVDUJPOTReminder, Suppress in User Preferences.
[2]
4ZTUFNDPOmHVSFEJODPSSFDUMZ
.FOVQBOFMEJTQMBZTFSSPST
$POUBDU#BMCPB1MFBTFTFFi%JBHOPTJOH5PQTJEF
$POUSPM1BOFMTw1BHF
'JSNXBSFJOTUBMMQSPCMFN
$POUBDU#BMCPBJGNFTTBHFBQQFBSTPONPSFUIBOPOF
QPXFSVQ1MFBTFTFFi%JBHOPTJOH5PQTJEF$POUSPM
1BOFMTw1BHF
.-1BOFMT
*OBEFRVBUFXBUFSEFUFDUFE
JOIFBUFS
$IFDLXBUFSMFWFMJOTQB3FmMMJGOFDFTTBSZ*GUIF
XBUFSMFWFMJTPLBZNBLFTVSFUIFQVNQTIBWFCFFO
QSJNFE1SFTTBOZCVUUPOUPSFTFU
7-QBOFMT
1PTTJCMFJOBEFRVBUFXBUFS
QPPSnPXPSBJSCVCCMFTJOEFUFDUFEJOUIFIFBUFS4QBJTTIVU
EPXOGPSNJOVUFT
*GXBUFSMFWFMJTOPSNBMNBLFTVSFBMMQVNQTIBWFCFFO
QSJNFE1SFTTBOZCVUUPOUPSFTFU5IJTNFTTBHFXJMM
SFTFUXJUIJONJOVUFT
&WFSZEBZT<>
%SBJOBOESFmMMTQBQFSNBOVGBDUVSFSTJOTUSVDUJPOT
Reminder, Suppress in User Preferences. [2]
or
[1]
On some systems even when spa is shut down, some equipment may occasionally turn on to
continue monitoring temperature or if freeze protection is needed.
[2] Please see the User Manual of the specific panel that the Reminders need to be suppressed.
[3] This is a Reminder Message.
Note: All Messages may not appear on your panel.
43
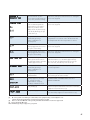
Panel Message Reference Guide (cont.)
5IFQVNQJTPOEVSJOH
4UBOECZ.PEFUPBTTJTU
JOESBJOJOHUIFTQB
1SFTTi+FUTwUPUVSOPGGUIFQVNQXIFOXBUFSIBT
ESBJOFEPSQPXFSPGGUIFTQB
*OBEFRVBUFXBUFSEFUFDUFEJO
IFBUFS%JTQMBZTPOUIJSEPDDVSSFODFPGiESwNFTTBHF
4QBJT
TIVUEPXO<>
'PMMPXBDUJPOSFRVJSFEGPS NFTTBHF
4QBXJMMOPUBVUPNBUJDBMMZSFTFU1SFTTBOZCVUUPOUP
SFTFUNBOVBMMZ
5IFTQBJTPQFSBUJOHJO
&DPOPNZ.PEF
i&DOwXJMMBQQFBSTPMJEPOUIFEJTQMBZXIFOUIF
UFNQFSBUVSFJTOPUDVSSFOUi&DOwXJMMBMUFSOBUFXJUI
UIFUFNQFSBUVSFXIFOUIFUFNQFSBUVSFJTDVSSFOU
"TOFFEFE
$POUJOVPVT'JMUSBUJPOJTPO
i*DFw1PUFOUJBMGSFF[F
DPOEJUJPOEFUFDUFE
/PBDUJPOSFRVJSFE5IFQVNQTBOEUIFCMPXFSXJMM
BVUPNBUJDBMMZBDUJWBUFSFHBSEMFTTPGTQBTUBUVT
4QBDPVMEOPUUSJQ('$*
$POUJOVFEPQFSBUJPONBZCFVOTBGF
*OBEFRVBUFXBUFSEFUFDUFE
JOIFBUFS%JTQMBZTPOUIJSE
PDDVSSFODFPGUIFBCPWF
NFTTBHF
4QBJTTIVUEPXO<>
'PMMPXBDUJPOSFRVJSFEGPSUIFBCPWFNFTTBHF
4QBXJMMOPUBVUPNBUJDBMMZSFTFU)JHIMJHIUBOE
QSFTTUPSFTFU
*OBEFRVBUFXBUFSEFUFDUFE
JOIFBUFS
$IFDLXBUFSMFWFMJOTQB3FmMMJGOFDFTTBSZ*GUIFXBUFS
MFWFMJTPLBZNBLFTVSFUIFQVNQTIBWFCFFOQSJNFE
1SFTTBOZCVUUPOUPSFTFU
"TVCTUBOUJBMEJGGFSFODF
CFUXFFOUIFUFNQFSBUVSF
TFOTPSTXBTEFUFDUFE5IJT
DPVMEJOEJDBUFBnPXQSPCMFN
$IFDLXBUFSMFWFMJOTQB3FmMMJGOFDFTTBSZ*GUIFXBUFS
MFWFMJTPLBZNBLFTVSFUIFQVNQTIBWFCFFOQSJNFE
1SFTTBOZCVUUPOUPSFTFU
i0WFSIFBUw5IFTQBIBTTIVU
EPXO<>0OFPGUIFTFOTPST
IBTEFUFDUFE¡'¡$BU
UIFIFBUFS
%0/05&/5&35)&8"5&33FNPWFUIFTQBDPWFS
BOEBMMPXXBUFSUPDPPM0ODFUIFIFBUFSIBTDPPMFE
SFTFUCZQVTIJOHBOZCVUUPO
"QVNQBQQFBSTUPIBWFCFFO
TUVDLPOUIFMBTUUJNFTQBXBT
QPXFSFEEPXO
108&3%08/41"*..&%*"5&-:%0/05
&/5&35)&8"5&3
i0WFSIFBUw5IFTQBIBTTIVU
EPXO<>0OTPNFTZTUFNTBO
BMBSNNBZTPVOE0OFPGUIF
TFOTPSTIBTEFUFDUFE¡'
BQQSPY¡$
BUUIFIFBUFS
%0/05&/5&35)&8"5&33FNPWFUIFTQB
DPWFSBOEBMMPXXBUFSUPDPPM0ODFUIFIFBUFSIBT
DPPMFESFTFUCZQVTIJOHBOZCVUUPO*GTQBEPFTOPU
SFTFUUFTUTFOTPST
Economy
[1]
On some systems even when spa is shut down, some equipment may occasionally turn on to
continue monitoring temperature or if freeze protection is needed.
[2] Please see the User Manual of the specific panel that the Reminders need to be suppressed.
[3] This is a Reminder Message.
Note: All Messages may not appear on your panel.
44
i*DFw1PUFOUJBMGSFF[F
DPOEJUJPOEFUFDUFE
/PBDUJPOSFRVJSFE5IFQVNQTBOEUIFCMPXFSXJMM
BVUPNBUJDBMMZBDUJWBUFSFHBSEMFTTPGTQBTUBUVT
1FSTJTUFOUMPXnPXQSPCMFNT
%JTQMBZTPOUIFmGUIPDDVSSFODF
PGUIFi)FBUFS'MPX-PXwNFTTBHFXJUIJOIPVST
)FBUFSJT
TIVUEPXOCVUPUIFSTQBGVODUJPOTDPOUJOVFUPSVOOPSNBMMZ
'PMMPXBDUJPOSFRVJSFEGPSi)'-wPSi)-wNFTTBHF
)FBUJOHDBQBDJUZPGUIFTQBXJMMOPUSFTFUBVUPNBUJDBMMZ
ZPVNBZQSFTTBOZCVUUPOUPSFTFU
&WFSZEBZT<>
*OTUBMMOFXmMUFSReminder, Suppress in User
Preferences. [2]
i0WFSIFBUw5IFTQBIBTTIVU
EPXO<>0OFPGUIFTFOTPST
IBTEFUFDUFEUIBUUIFTQBXBUFS
JT¡'¡$
%0/05&/5&35)&8"5&33FNPWFUIFTQBDPWFS
BOEBMMPXXBUFSUPDPPM"U¡'¡$UIFTQB
TIPVMEBVUPNBUJDBMMZSFTFU*GTQBEPFTOPUSFTFUUFTU
TFOTPST
i0WFSIFBUw5IFTQBIBTTIVU
EPXO0OTPNFTZTUFNTBO
BMBSNNBZTPVOE0OFPGUIF
TFOTPSTIBTEFUFDUFE¡'
BQQSPY¡$
BUUIFIFBUFS
%0/05&/5&35)&8"5&33FNPWFUIFTQBDPWFS
BOEBMMPXXBUFSUPDPPM0ODFUIFIFBUFSIBTDPPMFE
SFTFUCZQVTIJOHBOZCVUUPO5FTUTFOTPST
)BSEXBSFGBJMVSF
$POUBDU#BMCPBJGNFTTBHFBQQFBSTPONPSFUIBOPOF
QPXFSVQ
Q)JTIJHI
"EEQ)SFEVDFSBDDPSEJOHUPNBOVGBDUVSFST
JOTUSVDUJPOT
Q)JTMPX
"EEQ)JODSFBTFSBDDPSEJOHUPNBOVGBDUVSFST
JOTUSVDUJPOT
8IFOZPVSTQBJTmSTUBDUVBUFE
JUXJMMHPJOUP1SJNJOHNPEF
4FFUIF.*OTUBMMBUJPO*OTUSVDUJPO.BOVBMGPS
DPNQMFUFJOTUSVDUJPOTPO1PXFSVQBOE1VNQ
1SJNJOH5IF1SJNJOHNPEFXJMMMBTUGPSVQUPNJOVUFT
BOEUIFOUIFTQBXJMMCFHJOUPIFBUBOENBJOUBJOUIF
XBUFSUFNQFSBUVSFJOUIF4UBOEBSENPEF
)BSEXBSFGBJMVSF
$POUBDU#BMCPBJGNFTTBHFBQQFBSTPONPSFUIBOPOF
QPXFSVQ
"TOFFEFE<>
*OTUBMMOFX.JOFSBMDBSUSJEHFReminder, Suppress in
User Preferences. [2]
&WFSZEBZT<>
*OTUBMMOFXmMUFSReminder, Suppress in User
Preferences. [2]
&WFSZEBZT<>
3FNPWFDMFBOSFJOTUBMMmMUFSQFSNBOVGBDUVSFSTJOTUSVDUJPOTReminder, Suppress in User Preferences. [2]
[1]
On some systems even when spa is shut down, some equipment may occasionally turn on to
continue monitoring temperature or if freeze protection is needed.
[2] Please see the User Manual of the specific panel that the Reminders need to be suppressed.
[3] This is a Reminder Message.
Note: All Messages may not appear on your panel.
45
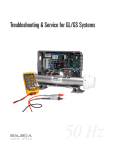
Panel Message Reference Guide (cont.)
[1]
&WFSZEBZT<>
$MFBODPOEJUJPODPWFSQFSNBOVGBDUVSFSTJOTUSVDUJPOTReminder, Suppress in User Preferences. [2]
&WFSZEBZT<>
%SBJOBOESFmMMTQBQFSNBOVGBDUVSFSTJOTUSVDUJPOT
Reminder, Suppress in User Preferences. [2]
&WFSZEBZT<>
5FTUBOEBEKVTUQ)DIFNJDBMMFWFMTQFSNBOVGJOTUSVDUJPOTReminder, Suppress in User Preferences. [2]
&WFSZEBZT<>
5FTUBOEBEKVTUTBOJUJ[FSDIFNJDBMMFWFMTQFS
NBOVGBDUVSFSTJOTUSVDUJPOTReminder, Suppress in User
Preferences. [2]
)BSEXBSFGBJMVSF
$POUBDU#BMCPB
&WFSZEBZT<>
5FTUSFTFU3$%QFSNBOVGBDUVSFSTJOTUSVDUJPOT<>
&WFSZEBZT<>
$MFBOBOEDPOEJUJPOXPPEQFSNBOVGBDUVSFST
JOTUSVDUJPOT<>
4QBJTTIVUEPXO<>5IFTFOTPSUIBUJTQMVHHFEJOUPUIF
4FOTPSi"wKBDLJTOPUXPSLJOH
*GUIFQSPCMFNQFSTJTUTDPOUBDU#BMCPB.BZBQQFBS
UFNQPSBSJMZJOBOPWFSIFBUDPOEJUJPO
4FFi5FTUJOHUIF
4FOTPS4FUw1BHF
4QBJTTIVUEPXO<>5IFTFOTPSUIBUJTQMVHHFEJOUPUIF
4FOTPSi#wKBDLJTOPUXPSLJOH
*GUIFQSPCMFNQFSTJTUTDPOUBDU#BMCPB.BZBQQFBS
UFNQPSBSJMZJOBOPWFSIFBUDPOEJUJPO
4FFi5FTUJOHUIF
4FOTPS4FUw1BHF
4BOJUJ[FSJTIJHI
3FNPWFTQBDPWFSBOEBMMPXTBOJUJ[FSUPEJTTJQBUF
4BOJUJ[FSJTMPX
"EETBOJUJ[FSBDDPSEJOHUPNBOVGBDUVSFSTJOTUSVDUJPOT
4UBOECZ.PEFIBTCFFO
BDUJWBUFECZQSFTTJOHB
CVUUPODPNCJOBUJPOPO
UIFVTFSQBOFM
1SFTTBOZCVUUPOFYDFQUi+FUTwUPMFBWF4UBOECZ
.PEFBOESFUVSOUPOPSNBMPQFSBUJPO
5IFTQBJTPQFSBUJOHJO
4UBOEBSEJO&DPOPNZ.PEF
0QFSBUFTUIFTBNFBT4UBOEBSENPEFUIFOSFWFSUTUP
&DPOPNZNPEFBGUFSIPVS1SFTTi.PEFwUPTXJUDI
EJSFDUMZUP&DPOPNZNPEF
4QBJTTIVUEPXO<>5IF
TFOTPSUIBUJTQMVHHFEJOUPUIF
4FOTPSi"wKBDLJTOPUXPSLJOH
5FTUTFOTPSBOESFQMBDFJGCBE1MFBTFTFF5FTUJOHUIF
4FOTPS4FU1BHF
On some systems even when spa is shut down, some equipment may occasionally turn on to
continue monitoring temperature or if freeze protection is needed.
[2] Please see the User Manual of the specific panel that the Reminders need to be suppressed.
[3] This is a Reminder Message.
Note: All Messages may not appear on your panel.
46
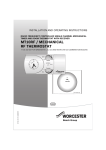
4QBJTTIVUEPXO<>5IF
TFOTPSUIBUJTQMVHHFEJOUPUIF
4FOTPSi#wKBDLJTOPUXPSLJOH
5FTUTFOTPSBOESFQMBDFJGCBE1MFBTFTFF5FTUJOHUIF
4FOTPS4FU1BHF
4FOTPSTBSFPVUPGCBMBODF
*GUIJTJTBMUFSOBUJOHXJUIUIF
UFNQFSBUVSFJUNBZKVTUCFB
UFNQPSBSZDPOEJUJPO*GUIF
EJTQMBZTIPXTPOMZUIJTNFTTBHF
QFSJPEJDBMMZCMJOLJOH
UIFTQB
JTTIVUEPXO<>
5FTUTFOTPSBOESFQMBDFJGCBE1MFBTFTFF5FTUJOHUIF
4FOTPS4FU1BHF
4MFFQ.PEFIBTCFFO
BDUJWBUFECZQSFTTJOHB
CVUUPODPNCJOBUJPOPO
UIFVTFSQBOFM
i4-1wXJMMBQQFBSTPMJEPOUIFEJTQMBZXIFOUIF
UFNQFSBUVSFJTOPUDVSSFOUi4-1wXJMMBMUFSOBUFXJUI
UIFUFNQFSBUVSFXIFOUIFUFNQFSBUVSFJTDVSSFOU
4QBJTTIVUEPXO5IFTFOTPS
UIBUJTQMVHHFEJOUPUIF4FOTPS
i"wKBDLJTOPUXPSLJOH
5FTUTFOTPSBOESFQMBDFJGCBE1MFBTFTFF5FTUJOHUIF
4FOTPS4FU1BHF
4QBJTTIVUEPXO5IFTFOTPS
UIBUJTQMVHHFEJOUPUIF4FOTPS
i#wKBDLJTOPUXPSLJOH
5FTUTFOTPSBOESFQMBDFJGCBE1MFBTFTFF5FTUJOHUIF
4FOTPS4FU1BHF
i0WFSIFBUw5IFTQBIBTTIVU
EPXO<>0OFPGUIFTFOTPST
IBTEFUFDUFEUIBUUIFTQBXBUFS
JT¡'BQQSPY¡$
%0/05&/5&35)&8"5&33FNPWFUIFTQBDPWFS
BOEBMMPXXBUFSUPDPPM"U¡'BQQSPYJNBUFMZ
¡$
UIFTQBTIPVMEBVUPNBUJDBMMZSFTFU*GTQB
EPFTOPUSFTFUTIVUPGGUIFQPXFSUPUIFTQB
4UBOECZ.PEFIBTCFFO
BDUJWBUFECZQSFTTJOHB
CVUUPODPNCJOBUJPOPO
UIFVTFSQBOFM
1SFTTBOZCVUUPOUPMFBWF4UBOECZ.PEFBOESFUVSO
UPOPSNBMPQFSBUJPO
5IFTQBJTPQFSBUJOHJO
4UBOEBSE.PEF
5FNQFSBUVSFEJTQMBZJTDVSSFOUBGUFSQVNQIBT
CFFOSVOOJOHGPSBUMFBTUNJOVUFT
"QVNQBQQFBSTUPCFTUVDL
PODBVTJOHUIFXBUFS
UFNQFSBUVSFUPDSFFQVQ
QPTTJCMZUPIB[BSEPVTMFWFMT
108&3%08/41"*..&%*"5&-:%0/05
&/5&35)&8"5&3
&WFSZEBZT<>
5FTUSFTFUQFSNBOVGBDUVSFSTJOTUSVDUJPOTReminder,
Suppress in User Preferences. [2]
&WFSZEBZT<>
$MFBOBOEDPOEJUJPOXPPEQFSNBOVGBDUVSFSTJOTUSVD
UJPOTReminder, Suppress in User Preferences. [2]
[1]
On some systems even when spa is shut down, some equipment may occasionally turn on to
continue monitoring temperature or if freeze protection is needed.
[2] Please see the User Manual of the specific panel that the Reminders need to be suppressed.
[3] This is a Reminder Message.
Note: All Messages may not appear on your panel.
47
©2008 Balboa Water Group. All rights reserved.
Tustin, Ca. 92780 (714) 384-0384
48
40921 Rev A October 31, 2008