1
AIR PURIFICATION
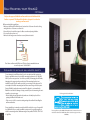
NOTE: GC to mount to wall (wall bracket included)
Ultra Quiet Air Purifier
Hello!
w w w.rabbitair.com
Rabbit Air*
201 West Garvey Ave., Suite 102-168
Monterey Park, CA, 91754-7418
Please fold and seal with tape before mailing. Do not staple.
fold here
*Please do not send products or other correspondence to this address.
----------------------------------------------------------------------------------------
Return
this card now for:
t1SPEVDU1SPUFDUJPO
By registering your product and purchase information, we can confirm the date of
purchase to secure your warranty. This confirmation serves as security in the event that
your original proof of purchase is lost, or in case your unit needs any servicing in the future.
t1SPPGPG0XOFSTIJQ
Your model number, serial number, and other information will be kept in our files. Please
complete and return this registration within 30 days from purchase in order to receive
our 5 Year Limited Warranty.
You can also register online at www.rabbitair.com
Owner’s
manual
Warranty
Models:
Registration Card
Copyright 2010 All Rights Reserved
SPA-700A
SPA-780A
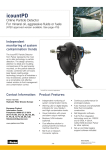
24/7 customer care
For Questions: Call 888.866.8862
Visit us at www.rabbitair.com
General Safety Information
About Your MinusA2 Air Purifier
Caution: When using electrical appliances, observe the following basic precautions
to reduce the risk of fire, electric shock and injury to persons:
Electrical Safety Instructions
t1MFBTFSFBEBMMUJQTBOEXBSOJOHTCFGPSFVTJOHUIF.JOVT""JS1VSJöFS
t6TFPOMZBTEJSFDUFECZUIF.JOVT""JS1VSJöFS0XOFST.BOVBM
t5IF.JOVT""JS1VSJöFSJTPOMZEFTJHOFEGPSVTFJOB7PVUMFU
t1MFBTFPCTFSWFFYUSFNFDBVUJPOXIFOVTJOHUIF.JOVT""JS1VSJöFSJOUIFQSPYJNJUZ
of children.
t5VSOPòZPVS.JOVT""JS1VSJöFSCFGPSFVOQMVHHJOHJUGSPNUIFQPXFSPVUMFU
t.JOVT""JS1VSJöFSTBSFGPSJOEPPSVTFPOMZ
t5IF.JOVT""JS1VSJöFSJTOPUJOUFOEFEGPSVTFJOCBUISPPNTMBVOESZBSFBTBOEPUIFS
damp indoor environments. Keep the MinusA2 Air Purifier away from water at all times.
t%POPUVTFUIF.JOVT""JS1VSJöFSOFBSöSFQMBDFTPSJOBSFBTXIFSFøBNNBCMFPS combustible products or vapors may be present.
t6OQMVHUIF.JOVT""JS1VSJöFSGSPNQPXFSPVUMFUXIFOOPUJOVTFBOECFGPSFTFSWJDJOH
or cleaning the unit.
t5PSFEVDFUIFSJTLPGFMFDUSJDTIPDLUIF.JOVT""JS1VSJöFSIBTBQPMBSJ[FEQMVHXIJDI
NFBOTJUXJMMöUJOUPBQPMBSJ[FEPVUMFUPOMZPOFXBZ*GUIFQMVHEPFTOPUöUJOUPUIF
PVUMFUSFWFSTFUIFQMVH*GJUTUJMMEPFTOPUöUDPOUBDURVBMJöFEQFSTPOOFMUPJOTUBMMUIF
proper outlet. Do not alter the plug in any way.
t5PBWPJEFMFDUSJDTIPDLEPOPUUPVDIUIF.JOVT""JS1VSJöFSPSJUTQPXFSQMVH
with wet hands.
t,FFQUIF.JOVT""JS1VSJöFSDPSEBXBZGSPNIFBUFETVSGBDFTBUBMMUJNFT
t*GDPSEPSQMVHBQQFBSTEBNBHFESFUVSOUIFVOJUJNNFEJBUFMZUPBOBVUIPSJ[FETFSWJDF
GBDJMJUZGPSFYBNJOBUJPOBOESFQBJS
t"OZBUUFNQUTUPSFQBJSUIF.JOVT""JS1VSJöFSXJUIPVUXSJUUFOQFSNJTTJPOGSPN3BCCJU
"JSXJMMWPJEUIFXBSSBOUZBOEDPVMEDBVTFTFSJPVTQFSTPOBMJOKVSZUPUIFVTFSBOEPS result in severe damage to the unit.
t%POPUQVMMDBSSZMJGUPSESBHUIF.JOVT""JS1VSJöFSCZQVMMJOHJUTQPXFSDPSE3FNPWF
the power plug from its outlet by grasping the plug itself and pulling gently.
t8IFOUIF.JOVT""JS1VSJöFSJTQMVHHFEJOUPUIFQPXFSPVUMFULFFQBMMöOHFSTCPEZ
parts, hair, jewelry and loose clothing away from the openings.
1
2
Operation Guidelines
t%POPUCMPDLUIFBJSJOUBLFBOEBJSPVUMFU
t%POPUVTFUIF.JOVT""JS1VSJöFSPOPSBSPVOEIPUTVSGBDFT
t%POPUVTFUIF.JOVT""JS1VSJöFSJOBSPPNXIFSFJUNBZDPNFJOUPDPOUBDUXJUITUFBN
t%POPUPQFSBUFUIF.JOVT""JS1VSJöFSPOJUTTJEF
Remote Control Tips
t%POPUJOTUBMMUIF.JOVT""JS1VSJöFSJOHSFBTZPSEBNQFOWJSPONFOUT
t%POPUVTFEFUFSHFOUPSTPBQUPDMFBOUIF.JOVT""JS1VSJöFS
t%POPUPQFSBUFUIF.JOVT""JS1VSJöFSXJUIPVUöMUFST
t%POPUXBTIBOESFVTFUIFöMUFSTFYDFQUGPSUIFXBTIBCMF1SFöMUFS
t*OWFSUFSMJHIUJOHFRVJQNFOUPSFMFDUSPOJDMJHIUöYUVSFTNBZJOUFSGFSFXJUI remote control signals.
t"WPJETUPSJOHUIFSFNPUFDPOUSPMJOEJSFDUTVOMJHIU)FBUNBZJOUFSGFSFXJUI remote control signals.
t8IFOUSBOTQPSUJOHUIF.JOVT""JS1VSJöFSBMXBZTIPMEUIFIBOEMFPOUIFCBDLPGUIFVOJU
Installation Guidelines
t.BJOUBJOBEJTUBODFPGGUPGTQBDFCFUXFFOUIF.JOVT""JS1VSJöFSBOEBOZ
FRVJQNFOUUIBUHFOFSBUFTFMFDUSPNBHOFUJDXBWFTTVDIBTUFMFWJTJPOTSBEJPTBOE
microwave ovens. Electromagnetic waves may interfere with the digital display
operation.
t"WPJEQVUUJOHUIF.JOVT""JS1VSJöFSJOBQMBDFXIFSFUIFBJSJOUBLFPSBJSPVUMFU
could become clogged with dirt.
t-FBWFBUMFBTUGUPGTQBDFCFUXFFOUIFDFJMJOHBOEUIF.JOVT""JS1VSJöFS
3
4
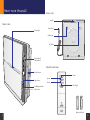
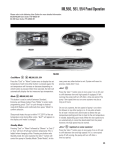
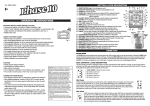
Meet your MinusA2
Back view
Handle
Front view
Mood Light
Power Cord
Unit Hanger
Air Outlet
Control Panel/
Display Panel
Remote control
Particle Sensor
Power
Speed
Light Sensor
Air Quality Indicator
Mode
Mood Light
Odor Sensor
Battery (AAA size)
5
6
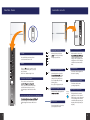
Control Panel
Indicator Lights
Turbo
High
Medium
Low
Silent
Replace
Filters
Pollen
Auto
Filter
Reset
MOOD
LIGHT
Ion
Ion
on/off
Sleep
Light Sensor
Air Quality
Indicator
Auto Mode Indicator
Fan Speed Indicator
Turbo
High
Medium
Low
Power
Turbo
High
Press and hold the power button for two
seconds to turn the unit on or off.
Medium
Indicates the fan speed of the air
. The lowest speed is Silent.
The highest speed is Turbo.
Auto
s
automatically depending on the
readings of the air quality sensors
and light sensor. The mood light is
solid blue when the unit is in Auto
Mode.
Low
Silent
Speed
When Auto Mode is selected, the
Silent
Replace
Filters
Pollen
MODE
Auto
Filter
Reset
There are
speeds. Operation speed
changes in the following order as you press
the speed button.
Silent > Low > Medium > High > Turbo
Pollen Mode Indicator
Pollen
MOOD
LIGHT
Ion
Ion
on/off
Mode and Filter Reset
This is a duel control button. When
Sleep
mode of operation between Auto Mode
and Pollen Mode. When pressed and
held, the Replace Filters Indicator will be
reset.
Replace
Filters
When Pollen Mode is selected, the
r changes
automatically depending on the
readings of the air quality sensors.
The mood light shifts color in the
following pattern:
blue > purple > light purple > pink .
When this indicator lights up, it is time
Mood Light and Negative Ion Generator
Air Quality
Indicator
Odor Sensor
7
Mood Light
The Mood Light has four colors: blue,
purple, light purple and pink.
Ion Indicator
This indicates that the Negative Ion
Generator is operating.
Sleep
Sleep Mode Indicator
This indicates that the unit is
operating in Sleep Mode.
Replace Filters Indicator
Light Sensor
turn the mood light on or off. When pressed and
held, the Negative Ion Generator will turn on or
off.
Ion
Air Quality Indicator
Air Quality
Indicator
This light indicates the current air
quality in the room. The colors will
shift from blue > purple > light purple
> red, depending on the amount of
contaminants. Blue represents good
air quality, while red represents poor
air quality.
8
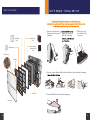
Let’s begin - Initial set up
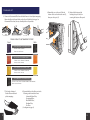
Meet the Filters
1. Remove the front panel by
lifting from the bottom and
pulling up.
BioGS HEPA
Filter
Medium Filter
grasping the handles on
both sides and pulling
3. Pull the tabs on the
front of the Pre-Filter
to remove it.
Customized
Filter
Charcoal Based
Activated Carbon
Filter
Pre-Filter tabs
Pre-Filter
4. Remove the white Medium Filter from the black frame to discard the plastic wrapping.
Filter case
5. Remove HEPA Filter and discard plastic wrapping.
Front panel
9
10
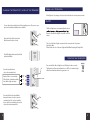
Finishing up!
3FNPWFUIF$VTUPNJ[FE'JMUFSGSPNUIFCMBDLGSBNFUPEJTDBSEQMBTUJDXSBQQJOH
Return the filter to its frame. Make sure the front of the filter is facing up. See
$VTUPNJ[FE'JMUFSDIBSUCFMPXUPJEFOUJGZUIFGSPOUPGZPVSöMUFS
9. Return filter case to the unit. Slide the
10. Reattach the front panel by
CPUUPNPGUIFDBTFCBDLJOUPUIFVOJU
latching the top hooks, then
UIFOQSFTTUIFUPQJO
securing the bottom of the panel.
Know your Customized Filter!
Front
Back
Toxin Absorber Customized Filter:
Front color: Purple
Back color: Black
Pet Allergy Customized Filter:
Front color: Purple & Orange
Back color: Orange
Germ defense Customized Filter:
Front color: Purple & Yellow
Back color: Yellow
Odor Remover Customized Filter:
Front color: Black (thicker fabric like material)
Back color: Black
7. Pull out the Activated
Carbon Filter and discard
plastic wrapping.
11
8. Return the filters to the filter case in the
following order from back to front:
Activated Carbon Filter,
$VTUPNJ[FE'JMUFS
#JP(4)&1"'JMUFS
Medium Filter,
Pre-Filter.
4FFEJBHSBNPOQBHF
12
Mode Selection(Pollen Mode or Auto Mode)
Operation Modes
1MVHUIFVOJUJOUPB7PVUMFU
Auto Mode
Pollen
1MVHUIFVOJUJOUPB7PVUMFU
"GUFSUVSOJOHPOUIFVOJUCSJFøZQSFTT
UIF.PEF'JMUFS3FTFUCVUUPOUPTFMFDU
your desired mode of operation, Pollen
or Auto.
Press the power button. The air purifier will start
up automatically in Auto Mode.
The Mood Light will be a solid blue.
5IFDPMPSPGUIF"JS2VBMJUZ*OEJDBUPSDIBOHFT
based on the amount of impurities in the air, and
the fan speed adjusts accordingly.
Air Quality
*OEJDBUPS
Sleep mode will activate if the room is dark and
the unit is in Auto Mode.
Filter Reset
Press the power button to activate the unit.
#SJFøZQSFTTUIF.PEF'JMUFS3FTFUCVUUPOUPTFMFDU1PMMFO.PEF
*O1PMMFO.PEFUIFDPMPSPGUIFNPPEMJHIUXJMMTIJGU#MVF1VSQMF-JHIU
Purple-Pink.
5IFDPMPSPGUIF"JS2VBMJUZ*OEJDBUPSDIBOHFTCBTFEPOUIFBNPVOUPG
impurities in the air, and the fan speed adjusts accordingly.
Sleep Mode will not activate when the unit is in Pollen Mode.
Manual Speed Selection
1MVHUIFVOJUJOUPB7PVUMFU
Low
Silent
Press the power button, the air purifier will start
up automatically in Auto Mode.
13
Choose between five speeds,
4JMFOU-PX.FEJVN)JHIBOE5VSCP
Pollen
Auto
1MVHUIFVOJUJOUPB7PVUMFU
The Mood Light will be a solid blue.
Ion
8IFOUVSOFEPòBOESFBDUJWBUFE
the unit will start up in the same
mode of operation it was last in.
Pollen Mode
Press the Speed button to change the
speed manually.
Auto
5IF3FQMBDF'JMUFST*OEJDBUPSXJMMCFDPNFJMMVNJOBUFE
XIFOJUJTUJNFUPDIBOHFZPVSöMUFST0ODFZPVIBWF
SFQMBDFEUIFöMUFSTQSFTTBOEIPMEUIF.PEF'JMUFS3FTFU
button for three seconds, or until the Replace Filters
*OEJDBUPSDMFBSTJUTFMG
Filter
Reset
Sleep Mode
When the unit is in Sleep Mode, the fan speed of the air purifier
BVUPNBUJDBMMZDIBOHFTUPTJMFOUNJOJNJ[JOHFOFSHZDPOTVNQUJPO
and noise.
Light Sensor
The light sensor detects the brightness of
UIFSPPN*GUIFSPPNJTEBSLUIF.JOVT"BVUPNBUJDBMMZ
switches to Sleep Mode after three minutes.
Pollen
Replace
Filters
To activate Sleep Mode, the unit must be in Auto Mode. All other
modes of operation override this function.
Auto
Turbo
High
Medium
Low
Silent
When the MinusA2 is in Sleep Mode, the Mood Light and Air
2VBMJUZ*OEJDBUPSBVUPNBUJDBMMZTXJUDIPòBOEUIF4MFFQ
.PEF*OEJDBUPSXJMMCFDPNFJMMVNJOBUFE
Sleep
14
Changing the Sensitivity Level of the Sensors
Mood Light Operation
Mood light not only changes colors, but it also indicates the current operation mode.
On/Off
You can adjust the sensitivity level of the air quality sensors. The sensors come
preset at a standard sensitivity level as a default.
Auto
The color of the Mood Light corresponds to the current mode of operation.
Auto Mode: Blue
Pollen Mode: the color of the mood light will shift: Blue-Purple-Light Purple-Pink.
Ion
Air Quality
Indicator
The Air Quality Indicator and Auto Mode
Indicator will blink.
Negative Ion Generator
High
Press the Speed button to
choose the sensitivity level.
Replace Filters : Low sensitivity
Pollen Mode : Standard sensitivity
Auto Mode : High sensitivity
The Mood Light turns on automatically when the air
button to turn the Mood Light on and off, or use the
remote.
Silent
Press and hold both the Speed and
Mode button for three seconds.
Ion
Medium
Press and hold the Mood Light & Ion on/off button for three seconds.
The Negative Ion Generator will switch on or off. The Ion indicator light
will become illuminated when the generator is on.
MOOD
LIGHT
Ion
on/off
Low
Replace
Filters
Replace
Filters
Pollen
Pollen
Auto
Auto
Filter
Press and hold the Speed and Mode
buttons for three seconds to save the
sensitivity level. If no action is taken for
ten seconds, the sensitivity level you last
selected is saved automatically.
Pollen
Auto
MOOD
LIGHT
Ion
15
16
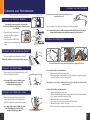
Cleaning the Unit Surface
Cleaning and Maintenance
Always unplug the unit before cleaning.
outlet
Cleaning the Particle Sensor
Clean particle sensor every three to six months.
Clean the air intake and outlet using a vacuum cleaner
or soft brush.
0QFOUIFQBSUJDMFTFOTPSDPWFSPO
the right side of the unit (when
GBDJOHUIFVOJU
6TFBEBNQDPUUPOTXBCUPDMFBO
and dry the lens, dust inlet and dust
outlet.
air inlet
The unit surface should be cleaned depending on the air
quality of the room.
6TFBDMFBOESZDMPUIUPXJQFUIFFYUFSOBMTVSGBDFTPGUIFBJSQVSJöFS
dust outlet
Use a damp cloth to remove stubborn stains and dirty buildup if necessary. Avoid
commercial cleaning products which may damage the unit's surface.
Cleaning the Pre-filter
dust inlet
Cleaning the Air Intake and Outlet
1. Clean the air intake and outlet with a soft brush.
Caution: Be careful not to drop the brush into the unit.
The Pre-Filter should be cleaned depending on the air quality of the room.
Cleaning the Front Panel
1. Remove the front panel from the unit and use a dry
DMPUIPSTPGUCSVTIUPEVTUJUPò
Use a damp cloth to remove stubborn stains
and dirty buildup if necessary. Avoid
commercial cleaning products.
Cleaning the Mood Light Lens
1. Remove the front panel from the unit and use
a dry cloth, soft brush, or cotton swab to dust
PòUIFNPPEMJHIUMFOTPOUIFCBDLPGUIFQBOFM
Use a damp cloth to remove stubborn stains
and dirty buildup if necessary. Avoid
commercial cleaning products.
17
t5PDMFBOUIF1SF'JMUFSWBDVVNNFUIPE
1. Remove front panel from the air purifier
3VOBWBDVVNDMFBOFSXJUIBOP[[MFPSCSVTIBUUBDINFOUPOMPXQPXFSTFUUJOH
along the Pre-Filter to remove visible particles.
If vacuuming does not seem to sufficiently clean your Pre-Filter, please follow the steps
below to wash it.
t5PDMFBOUIF1SF'JMUFSXBTIJOHNFUIPE
1. Remove the Pre-Filter from the unit.
2. Fill the sink with lukewarm water and gently wash the Pre-Filter under the water
for 2-3 minutes or until it is completely clean.
3. Rinse the Pre-Filter with clean tap water.
6TFBUPXFMUPSFNPWFBOZFYDFTTXBUFSGSPNUIF1SF'JMUFS
5. Allow the Pre-Filter to dry for 12-24 hours.
6. When the Pre-Filter is completely dry, place back into the air purifier.
18
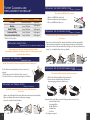
Filter Cleaning and
replacement schedule*
'JMUFST
Replacing the BioGS HEPA FilterEvery 12 Months
%JTDBSEUIFPME)&1"'JMUFSEPOPUSFVTF
Replacement
1SF'JMUFr
Medium
BioGSTM HEPA
$VTUPNJ[FE'JMUFr
$IBSDPBMCBTFE"DUJWBUFE$BSCPn
Cleaning
1FSNBOFOU8BTIBCMe
Every Month
Every 12 Months
/PU3FRVJSFE
Every 12 Months
/PU3FRVJSFE
Every 12 Months
/PU3FRVJSFE
Every 12 Months
/PU3FRVJSFE
#BTFEPOPQFSBUJPO
Replacing your Filters
See pages 9-12 for detailed instructions
Always unplug the unit before cleaning/replacing the filters.
Depending on the amount of pollutants in your indoor environment, the life
span of the filters will vary.
3FNPWFPME)&1"'JMUFSBOEEJTDBSE
2. Remove new filter from plastic wrapping.
1MBDFOFX)&1"'JMUFSJOöMUFSDBTF
Replacing the Customized Filter
Every 12 Months
%P/05EJTDBSEUIFöMUFSIPMEFS%JTDBSEUIFPME$VTUPNJ[FE'JMUFS
do not reuse.
3FNPWFUIFPME$VTUPNJ[FE'JMUFSGSPNUIFCMBDLGSBNFBOEEJTDBSEFYQJSFEöMUFS
5BLFUIFOFX$VTUPNJ[FE'JMUFSPVUPGUIFXSBQQJOHBOEQMBDFJOUIFCMBDLGSBNF
.BLFTVSFUIFGSPOUPGUIF$VTUPNJ[FE'JMUFSJTGBDJOHVQ4FF$VTUPNJ[FE'JMUFSDIBSU
QBHF
UPJEFOUJGZUIFGSPOUPGZPVSTQFDJöDöMUFS
Replacing the Pre-filter
permanent filter
%P/05EJTDBSEUIF1SF'JMUFS*UJTEFTJHOFEUPCFDMFBOFEBOESFVTFE
The Pre-Filter is a permanent filter and does not need to be
replaced.
1. Pull the tabs on the front of the Pre-Filter to remove it.
2. Put the Pre-Filter to one side while replacing the other filters.
Replacing the Medium Filter
Replacing the Activated Carbon Filter
Every 12 Months
%JTDBSEUIFPME"DUJWBUFE$BSCPO'JMUFSEPOPUSFVTF
1. Pull out the old Activated Carbon Filter and discard.
2. Remove the new Activated Carbon Filter from its
plastic wrapping, and place in the filter case.
Every 12 Months
%P/05EJTDBSEUIFöMUFSIPMEFS%JTDBSEUIFPME.FEJVN'JMUFS
do not reuse.
3FNPWFUIFPME.FEJVN'JMUFSGSPNUIFCMBDLGSBNFBOEEJTDBSEUIFFYQJSFEöMUFS
0QFOOFX.FEJVN'JMUFSBOEEJTDBSEUIFQMBTUJDXSBQQJOH
3. Secure the new filter in the black frame.
19
Return the filters to the filter case in the following order from back to front:
-Activated Carbon Filter,
$VTUPNJ[FE'JMUFS
#JP(4)&1"'JMUFS
-Medium Filter,
-Pre-Filter.
4FFEJBHSBNPOQBHF
20
Wall-Mounting your MinusA2
(Optional)
0OMZVTFUIFBQQSPWFE3BCCJU"JSXBMMNPVOULJUUPJOTUBMMUIF.JOVT""JS
Purifier on your wall. The MinusA2 Air Purifier is designed to be either free
TUBOEJOHPSXBMMNPVOUFE
Wall-mount installation guidelines:
t.BLFTVSFUIF.JOVT""JS1VSJöFSIBTBUMFBTUUXPGFFUPGDMFBSBODFGSPNUIFDFJMJOH
and eight inches of clearance on either side.
t#FDBSFGVMOPUUPESPQUIFGSPOUQBOFMPSöMUFSDBTFXIFOSFQMBDJOHUIFöMUFST
t%POPUQVMMPOUIFQPXFSDPSE
t.BLFTVSFUIFIBOHFSTDSFXTIBWFCFFOTFDVSFMZESJWFOJOUPTUVET
%POUIBWFBXBMMNPVOULJU 8BOUPOF 0SEFSPOMJOFBUXXXSBCCJUBJSDPN
or over the phone at 1.888.866.8862
Disclaimer for installing wall-mounted objects
Do not attempt to install this product if you do not understand the instructions.
$POUBDUBRVBMJöFEDPOUSBDUPSUPJOTUBMMUIFNPVOUJOHCSBDLFUBOEDBMMJGZPVIBWFBOZRVFTUJPOT:PVSJTLUIFQPTTJCJMJUZPGEBNBHJOHUIF"JS1VSJöFS
damaging other property and personal injury if the mounting bracket is not
installed properly. Check to make sure there are no missing or defective parts. Do
not attempt to install the mounting bracket if there are missing or defective parts.
Contact Rabbit Air and replacement parts will be shipped to you immediately.
Rabbit Air is not liable for damage or injury caused by incorrect mounting, incorrect
assembly or incorrect usage.
t"GUFSJOTUBMMJOHUIFXBMMNPVOUCSBDLFUNBLFTVSFJUJTöSNMZJOQMBDFCFGPSF
putting the MinusA2 Air Purifier on it.
t5BLFDBSFOPUUPESJMMPSTDSFXJOUPFYJTUJOHXJSJOHJOUIFXBMMXIJMFJOTUBMMJOHUIF
wall-mount bracket.
21
$PSSFDUJOTUBMMBUJPOJTFYUSFNFMZFTTFOUJBMBOEGBMMTPVUTJEFUIFTDPQFPGSFTQPOTJCJMJUZPG3BCCJU"JS1MFBTFDPOTVMUBRVBMJöFEDPOUSBDUPSBOEPSTQFDJBMJTUTVQQMJFSUP
JOTUBMMUIFNPVOUJOHCSBDLFU.BYJNVNXFJHIUPGBJSQVSJöFS41""41""
LHMCT
The Energy Star Label and disclaimer:
5IFFOFSHZFóDJFODZPGUIJT&/&3(:45"3RVBMJöFENPEFMJTNFBTVSFECBTFEPOB
SBUJPCFUXFFOUIFNPEFMT$"%3GPS%VTUBOEUIFFMFDUSJDBMFOFSHZJUDPOTVNFTPS
$"%38BUU
22
TROUBLESHOOTING GUIDE
Symptom
6OJUXJMMOPUUVSOPO
Suggestions
t5IFQPXFSQMVHNBZCFMPPTF1SFTTUIFQPXFSCVUUPOPOUIF
unit, or the power button on the remote.
t.BLFTVSFUIFGSPOUQBOFMJTTFDVSFMZBUUBDIFEUPUIFNBJOVOJU
The top hooks on the front panel must be latched on the hinges
of the main unit.
The remote control
does not work.
t#BUUFSZDPVMECFEFBEPSEFQMFUFE
t3FNPUFNJHIUOPUCFQPJOUFEEJSFDUMZBUUIFVOJU
t.BLFTVSFUIFCBUUFSZJTDPSSFDUMZJOTUBMMFE
5IFVOJUJTOPUFòFDUJWF
t'JMUFSTNBZCFIFBWJMZTPJMFEBOEEVFGPSDMFBOJOHPS
SFQMBDFNFOUTFFQBHF
t'JMUFSTNBZOPUIBWFCFFOSFNPWFEGSPNPSJHJOBMQBDLBHJOH
TFFQBHF
6OJUPQFSBUFTBUB
constant speed in Auto
Mode.
23
#FMPXXFWFQSPWJEFEZPVXJUIBUSPVCMFTIPPUJOHHVJEFGPSZPVS.JOVT"BJS
QVSJöFS:PVBSFXFMDPNFUPDBMMVTBOZUJNFXJUIRVFTUJPOTPSDPODFSOTBU
888.866.8862
-The Rabbit Air team
Symptom
Suggestions
The unit does not
respond to smoke or
pollution.
or
The sensors are too
TFOTJUJWFOPU
sensitive enough.
t$IFDLUPCFTVSF0EPSBOE1BSUJDMFTFOTPSTBSFDPNQMFUFMZ
clean.
t"EKVTUUIFTFOTPSTFOTJUJWJUZTFFQBHF
The Replace Filters
*OEJDBUPSSFNBJOT
illuminated, even after
*SFQMBDFEUIFöMUFS
t8JUIUIFQPXFSPOQSFTTBOEIPMEUIFöMUFSSFTFUCVUUPOGPS
three seconds, or until the “Replace Filters” indicator clears
JUTFMGTFFQBHF
The fan is noisy.
t.BLFTVSFUIFVOJUJTQMBDFEPOBMFWFMTVSGBDF
t'JMUFSTNBZOPUIBWFCFFOSFNPWFEGSPNUIFJSPSJHJOBM
QBDLBHJOHTFFQBHF
t.BLFTVSFOPGPSFJHOPCKFDUTIBWFGBMMFOJOUPUIFVOJU
t5IFTFOTPSTNJHIUCFCMPDLFEPSDMPHHFEDMFBOUIFTFOTPST
TFFQBHF
t"EKVTUUIFTFOTPSTFOTJUJWJUZTFFQBHF
t*GZPVSSPPNJTEBSLBOEUIFVOJUJTJO4MFFQ.PEFJUXJMMPOMZ
operate at the lowest fan speed.
24
*First Name_________________________________________________________________________
Limited Warranty
*Last Name_________________________________________________________________________
*Address___________________________________________________________________________
*City_______________________________________________________________________________
Rabbit Air warrants that your Air Purifier will be free from defects in material or workNBOTIJQGPSBQFSJPEPG'JWF
ZFBSTGSPNUIFEBUFPGQVSDIBTF5PBDUJWBUFUIF
warranty, please complete and return your warranty registration within 30 days of
QVSDIBTFPGZPVS"JS1VSJöFSUP3BCCJU"JS*OPSEFSUPFOTVSFVOJUQFSGPSNBODFUIF
filters should be replaced with original replacement filters as recommended in this
NBOVBMUIFh-JNJUFE8BSSBOUZh
0UIFSXJTFUIFTUBOEBSEXBSSBOUZUJNFJOZPVSDPVOUSZ
applies. Within the first 30 days of purchase, Rabbit Air will replace the defective unit at
no additional cost and reimburse any shipping charges. After 30 days, Rabbit Air's
obligation and liability under this Limited Warranty is limited to repairing or replacing
BUJUTTPMFEJTDSFUJPO
UIFEFGFDUJWFVOJU5IF-JNJUFE8BSSBOUZEPFTOPUDPWFSSFQMBDFNFOUöMUFST*OUIFFWFOUPGBNBMGVODUJPOPSGBJMVSFPGZPVS3BCCJU"JS1VSJöFSQMFBTF
DPOUBDU3BCCJU"JSUPPCUBJOBSFUVSOBVUIPSJ[BUJPOOVNCFSBOEUIFBEESFTTPGUIF
TFSWJDFDFOUFS5IFSFUVSOBVUIPSJ[BUJPOOVNCFSNVTUCFDMFBSMZXSJUUFOPOUIFPVUTJEF
PGUIFTIJQQJOHCPYPSUIFTIJQNFOUNBZCFSFGVTFE:PVS-JNJUFE8BSSBOUZSFNBJOTJO
FòFDUPOMZJGZPVS"JS1VSJöFS
*TPQFSBUFEJOBDDPSEBODFXJUIUIFJOTUSVDUJPOQSPWJEFE
*TDPOOFDUFEUPBQSPQFSQPXFSTVQQMZTFFWPMUBHFMBCFMPONBDIJOF
3. There is no evidence of tampering, mishandling, neglect, accidental damage,
NPEJöDBUJPOBOEPSSFQBJSEPOFUPUIF"JS1VSJöFSCZBOZPOFPUIFSUIBOBVUIPSJ[FE
service personnel.
4. Your warranty registration has been completed and returned to Rabbit Air.
4UBUF1SPWJODF@@@@@@@@@@@@@@@@@@@@@@@@@@@@@@@_______________________________________
;JQ1PTUBM$PEF@@@@@@@@@@@@@@@@@@@@@@@@@@@@@@@______________________________________
*Country___________________________________________________________________________
Email_____________________________________________________________________________
*Date of Purchase
@@@@@@@@
*Purchase Location___________________________________________________________________
*†Model number________________________________________________________________
*†Serial number_________________________________________________________________
Year of birth____________________________________________________________________
Martial status___________________________________________________________________
%PZPVPXOBIPVTFPSSFOU @@@@@@@@@@@@@@@@@@@@@@@@@@@@@@@@@@@@@@@@@@@@@@@@@@@@@@
Annual family income____________________________________________________________
Level of education_______________________________________________________________
8IFSFEJEZPVöSTUMFBSOBCPVU3BCCJU"JSQSPEVDUT
_________________________________________________________________________________
8IBUJTUIFQSJNBSZSFBTPOZPVQVSDIBTFEUIJTQSPEVDU
Limits and Exclusions
5IFSFBSFOPFYQSFTTXBSSBOUJFTFYDFQUBTMJTUFEBCPWF
5)&8"33"/5034)"--/05#&-*"#-&'03*/$*%&/5"-03$0/4&26&/5*"%"."(&43&46-5*/('30.5)&64&0'5)*4130%6$503"3*4*/(0650'"/:
#3&"$)0'5)*48"33"/5:"--&913&44"/%*.1-*&%8"33"/5*&4*/$-6%*/(
5)&8"33"/5*&40'.&3$)"/5"#*-*5:"/%'*5/&44'03"1"35*$6-"3
163104&"3&-*.*5&%505)&"11-*$"#-&8"33"/5:1&3*0%4&5'035)"#07&
4PNFTUBUFTEPOPUBMMPXUIFFYDMVTJPOPSMJNJUBUJPOPGJODJEFOUBMPSDPOTFRVFOUJBM
EBNBHFTPSMJNJUBUJPOPGJODJEFOUBMPSDPOTFRVFOUJBMEBNBHFTPSMJNJUBUJPOTPO
IPXMPOHBOJNQMJFEXBSSBOUZMBTUTTPUIFBCPWFFYDMVTJPOTPSMJNJUBUJPOTNBZOPU
apply to you. This warranty gives you specific legal rights and you may also have
PUIFSSJHIUTXIJDIWBSZGSPNTUBUFUPTUBUF*GBQSPCMFNXJUIUIFQSPEVDUEFWFMPQT
during the warranty period, we will repair or replace it without charge to you. A
shipping and processing fee may apply. To obtain service under warranty, please
contact Rabbit Air at 1-888-866-8862 or by e-mail at [email protected]
25
___________________________________________________________________________________
___________________________________________________________________________________
8IFSFEPZPVQMBOUPVTFUIJT3BCCJU"JSQSPEVDU ____Living room
____Bedroom
____Child's room
____Family room
____Kitchen
@@@@0óDF
@@@@)BMMXBZ
____Bathroom
@@@@)PNFPóDF
@@@@0UIFS
8IBUGBDUPSTNPTUJOøVFODFEZPVS
decision to purchase this Rabbit Air
QSPEVDU $IFDLVQUP
____Advertisement
@@@@0UIFS
@@@@1SJPSFYQFSJFODFXJUI3BCCJU"JS
____Product availability
____Quality
____Rabbit Air reputation
@@@@4J[F%JNFOTJPO
@@@@4UZMF"QQFBSBODF
____Value for the price
*GUIJTQSPEVDUXFSFBWBJMBCMFJOBEJòFSFOUDPMPST
"SFUIFSFPUIFSGFBUVSFTUIBUZPVXPVMEMJLFUPTFFPOUIJTQSPEVDU
XIJDIDPMPSXPVMEZPVQSFGFS @@@@@@@@@@@@@@@@@@@@@@@@@@@@@@@
______________________________________________________________________________________
______________________________________________________________________________________
†Please check the sticker on the back of the unit for the model and serial #
3FRVJSFE'JFME
26