1
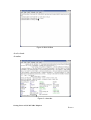
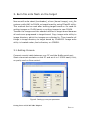
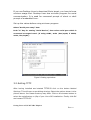
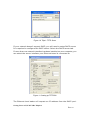
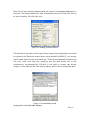
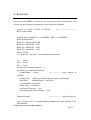
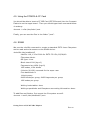
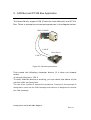
Porting Linux to XSCALE SBC Platform Contents 1. BUILDING DEVELOPMENT ENVIRONMENT ..............................5 1.1. GETTING START .........................................................................................6 1.2. 1.3. 1.4. DEVELOPMENT ENVIRONMENT..................................................................6 INSTALL TOOLS ..........................................................................................8 FILE LIST ON CDROM..............................................................................9 2. BUILDING LINUX CODE.....................................................................10 2.1. 2.2. 2.3. 3. BOOT LOADER .........................................................................................10 KERNEL ....................................................................................................12 FILE SYSTEM ............................................................................................14 BURN FILE ONTO FLASH ON THE TARGET..............................16 3.1. 3.2. 3.3. 4. SETTING CONSOLE ..................................................................................16 SETTING TFTP ........................................................................................17 BOOT LOADER ..........................................................................................20 BOOT LINUX ................................................................................................23 4.1. 4.2. 4.3. 4.4. 4.5. 4.6. USING THE ETHERNET ...................................................................................26 USING THE AUDIO .........................................................................................27 USING THE USB HOST ..................................................................................27 USING THE DISPLAY ......................................................................................27 USING THE PCMCIA & CF CARD .................................................................28 SRAM ..........................................................................................................28 5. CAN BUS AND PC104 BUS APPLICATION .................................................29 6. THE I8K MODULE SDK .................................................................................32 7. U-BOOT BOOT LOADER ...............................................................................34 8. NFS-MOUNTING THE ROOT FILE SYSTEM ............................................41 8.1. VERIFY THE HOST HAS NFS SUPPORT ............................................................42 8.2. 8.3. 8.4. 8.5. SETUP THE EXPORTS FILE .......................................................................42 CREATE ROOT FILE SYSTEM AND RESTART THE NFS SERVER ...........................43 CONFIGURE AND REBUILD THE KERNEL .........................................................43 LOAD THE KERNEL ON THE TARGET PLATFORM AND REBOOT ........................44 Porting Linux to XSCALE SBC Platform PAGE 2 9. 9.1. 9.2. HOW TO BUILD YOUR APPLICATION ........................................45 INSTALL CROSSCOMPILER .............................................................................45 EXAMPLE PROGRAM ......................................................................................45 APPENDIX A: CAN BUS API .........................................................................47 A.1 CAN MESSAGES ..............................................................................................47 A.2 OPEN() .............................................................................................................47 A.3 CLOSE() ...........................................................................................................48 A.4 READ() .............................................................................................................48 A.6 IOCTL() ............................................................................................................48 A.7 SELECT() ..........................................................................................................50 Porting Linux to XSCALE SBC Platform PAGE 3 Figures and Tables FIGURE 1. DEVELOPMENT ENVIRONMENT.......................................................................7 FIGURE 2. BUILD U-BOOT ............................................................................................. 11 FIGURE 3. U-BOOT.BIN................................................................................................... 11 FIGURE 4. CONFIGURING KERNEL UNDER CONSOLE ......................................................12 FIGURE 5. CONFIGURATION MENU UNDER CONSOLE......................................................13 FIGURE 6. MAKING KERNEL’S COMMAND......................................................................13 FIGURE 7. INSTALLING RPM .........................................................................................15 FIGURE 8. SETTING UP COM PORT PARAMETER ..............................................................16 FIGURE 9. SETTING UP MINICOM ...................................................................................17 FIGURE 10. TFTPD - TFTP SEVER..................................................................................18 FIGURE 11. SETTING UP TFTPD32................................................................................18 FIGURE 12. SETTING UP DHCP SERVER ........................................................................19 FIGURE 13. DOWNLOADING KERNEL .............................................................................19 FIGURE 14. BURNING U-BOOT ONTO FLASH ..................................................................20 FIGURE 15. U-BOOT COMMAND MODE ..........................................................................21 FIGURE 16. WRITING FILE TO FLASH .............................................................................21 FIGURE 17. ERASING FLASH..........................................................................................22 FIGURE 18. CAN WIRING CONNECTION ..........................................................................29 FIGURE 19. STRUCTURE OF LIBI8K.A .............................................................................32 FIGURE 20. POWER ON SCREEN SHOT ............................................................................34 FIGURE 21. U-BOOT ‘S HELP ..........................................................................................35 FIGURE 22. PRINTENV ...................................................................................................36 Porting Linux to XSCALE SBC Platform PAGE 4 1. Building Development Environment This document provides a step by step guide on how to put an embedded computer NuWa 470 into operation. Although some knowledge about LINUX and IP networking is advised, an introduction into IP Networking is also provided in this document. This document concentrates on the use of the software integrated into the NuWa 470 and less on the hardware. Throughout this manual, the evaluation board NuWa 470 is used. The NuWa 470 is a complete system on chip that enables the design engineer to implement complex hard- and software designs in their own products. It is designed as a microcontroller drop-in replacement and contains the microprocessor core, the Ethernet controller, all necessary memory components, the power management and the glue logic. The NuWa 470 implements a full embedded computer system with a preinstalled bootloader and a fully featured LINUX 2.4.20 on a very small standard 3.5” (27 x 84mm) platform. It can be used in a wide variety of applications that require remote control and monitoring via the ethernet are most suitable for the NuWa 470 since control and monitoring can be done through the use of a standard Web browser such as Internet Explorer, Netscape Mozilla or Konqueror. The NuWa 470 provides all required basic hard- and software environment, allow you developing individual applications for the NuWa 470. The main features of the NuWa 470 Board are: 3.5” Platform for NuWa 470 32bit RISC Microcontroller with 400MHz 64MB SDRAM, 32MB Flash and 1MB SRAM One CF Slot, One PCMCIA Slot and One SD/MMC Slot TFT or STN LCD and CRT Display interface Audio Interface ( Line in, Line out and MIC in ) 4 ports USB 2.0 slot 7 serial RS232 and one RS485 Port Dual 10/100Mbit ethernet interface High-speed CAN-Bus (up to 1Mbit/s) Porting Linux to XSCALE SBC Platform PAGE 5 Support 87K-IO slot Not only the hardware is supplied to you with features such as ethernet, serial port and programmable I/O pins, the software to use these interfaces is already implemented in the NUWa 470. The main important features included in the Embedded Linux distribution are: Embedded Linux 2.4.20 Bootloader uboot 1.1.1 A full TCP-IP stack with application interfaces for UDP and TCP sockets. DHCP client. FTP server. SSH/Telnet server Driver support for CAN Bus, USB and etc Journaling flash file driver JFFS2 for the internal flash disk drive 1.1. Getting Start Before you start, please check the NuWa package to ensure all components are present. The NuWa 470 contains: A NuWa 470 platform 5V DC power supply CD-ROM containing original sources with synertronixx modifications with PXA255 cross toolchain and documentation 1.2. Development Environment First of all, you should have a development environment appears as in the diagram below: Porting Linux to XSCALE SBC Platform PAGE 6 Figure 1. Development Environment As show in figure 1, there are three component in the development environment. PC1 is for downloading file such as bootloader and kernel image to target. PC2 is for developing linux program Target board is NUWA This manual is written on the assumption that you install "Red Hat Linux 9.0" by workstation type on your host PC. If you install other distributions on your PC, some problems related to library etc can be happened. So if you want to prevent getting into trouble and spare development time, install “Red Hat Linux 9.0” by workstation type on your PC. To develop embedded Linux kernel, device driver, application, etc., you have to construct cross-compile environment. Cross-compile environment is development environment that is embodied in host PC to develop linux for embedded system. To create embedded program, we would have to compile the program directly in target board or compile that in host PC for target board processor. But because of restricted resources (lack of memory or storage), compiling in target board is not easy. Porting Linux to XSCALE SBC Platform PAGE 7 So we construct cross-compile environment to compile embedded program sources in host PC instead of target board. To construct the environment, install tool chain for target board processor. Tool chain is collection of various utilities and libraries which are needed to compile embedded program sources. Normally, Tool chain offered by GNU is used for developing Linux. gcc compiler for GNU C, C++ GNU binary utilities (assembler, linker and various object file utilities) GNU C library 1.3. Install tools z Cross Compiler If you are not using DevRocket for your application, you will need to install Cross Compiler for NUWA first and to set up the compiler’s path. # cp /mnt/cdrom/cross_compiler.tar.gz ./ # tar zxf cross_compiler.tar.gz # PATH=$PATH:/usr/local/xscale/bin z JFlashMM JFlashMM is a generic JTAG flash memory programmer that uses configuration data files to describe the target development platform. JFlashMM is a Windows* console application that uses various cables to interface a parallel port to the JTAG TAP on a development system. The supported cable types are as follows: Insight* IJC-1 connector and IJC-2 cable. o Intel® JTAG cable o Click on the setup to install Jflash utility. Now you have to configure your hardware to use the Jflash utility. Installing the GIVEIO.SYS driver on Windows* NT and Windows* Porting Linux to XSCALE SBC Platform PAGE 8 2000 f) Copy the included GIVEIO.SYS file to your C:\WINNT\system32\drivers directory. g) Open the Control Panel and select Add/Remove Hardware Wizard. h) Follow the directions for adding a new device. i) Select “Select hardware from list” and then choose NEXT. j) Select “Ports” from the hardware list and then choose NEXT. k) Select “Have Disk” and browse to the giveio.inf file.0) l) Confirm and finish the installation by choosing NEXT and then FINISH. With this Installation of Jflash is complete. 1.4. File list on CDROM Now we explain each directory on CD ROM very simply. /app Application Software /compiler Cross compiler for target board /kernel Linux kernel for target board /rootfs Root file system for target board /rpm RPM for target board /u-boot Boot loader for target board /tools Tools software for PC /drivers/ts Touch screen driver for X Windows Porting Linux to XSCALE SBC Platform PAGE 9 2. Building Linux Code 2.1. Boot Loader In embedded system, differently in general PC, general firmware like CMOS does not exist. So to boot embedded system for the first time, we have to make bootloader which adjusted well to target board. Bootloader plays a very important part in embedded system. We explain the roles of bootloader simply below. Copy kernel to RAM from flash memory, and execute kernel. Initialize hardware. Bootloader have the function that writing data to flash memory. (Downloading kernel or Ram disk by serial port or other network hardware, data is stored in RAM. But RAM lost all data downloaded if you cut power supply, so to avoid this work you have to store to flash memory.) It provides interface to send commands to target board or to inform users state of target board. First of all, extract tarball now that uboot files are compressed with tarball. Uboot tarball source is located at /mnt/cdrom/uboot directory. # PATH=$PATH:/usr/local/xscale/bin # tar zxf uboot.tar.gz Porting Linux to XSCALE SBC Platform PAGE 10 Figure 2. Build U-Boot # cd u-boot # make Figure 3. u-boot.bin Porting Linux to XSCALE SBC Platform PAGE 11 If compiling uboot progresses well, u-boot binary file is created under /uboot directory. 2.2. Kernel If you are using the command-line tools, to create and populate your project directories, follow the steps included in the sections below. kernel sources are compressed by the name of “linux-2.4.20.tar.gz” under /mnt/cdrom/kernel directory. Extract this then move to “linux-2.4.20” directory created by extraction Figure 4. Configuring kernel under console To set the set points, do “make menuconfig” command. The results are reflected on zImage binary finally. In here, we will not set all values, instead we will load default-configuration-file which includes the set points adjusted to target board well. Under arch/arm/def-configs directory, there are default-configuration-files for NuWa 470 target board. # tar zxf linux.tar.gz # cd linux Porting Linux to XSCALE SBC Platform PAGE 12 # make menuconfig Figure 5. Configuration menu under console Setting for compiling kernel is over. Compile embedded kernel as following. Figure 6. Making kernel’s command Porting Linux to XSCALE SBC Platform PAGE 13 # make clean dep zImage modules modules_install If above steps are done without problems, kernel image is created in linux-2.4.20/arch/arm/boot directory by the name of zImage. “make modules” command compiles the parts selected for Module in kernel setting menu. Modules mean the part undertaking independent function under big program and before linking to the big program, modules can not do any work. According to, there is advantage that we can reduce the size of kernel by modularity. “make modules_install” command creates kernel, pcmcia directories under /lib/modules/linux-2.4.20 directory. build directory in there is not related to module, it’s just symbolic linked to /lib/modules/linux-2.4.20 directory for easy work. Finally, we need to build ulinux format for u-boot # ./fu Object File:ulinux 2.3. File system If you are using the command-line tools, to create and populate your project directories, follow the steps included in the sections below. Root filesystem of NuWa is composed by JFFS2(Compressed ROM file system). JFFS2 is designed small and simple. The size is restricted to 16MB, but it doesn’t act on a defect in embedded system. Porting Linux to XSCALE SBC Platform PAGE 14 Figure 7. Installing RPM compress file system as jffs2 format # tar zxf rfs.tar.gz #./mkfs.jffs2 -r /fs -o rootfs.jffs2 -e 0x40000 --pad=0x01000000 if you want to add RPM to your root file system, please type the following command. # rpm --root /root/montavista/devrocket/rootfs –Uvh –force –nodeps –ignorearch –no scripts /mnt/cdrom/ nfs-utils-0.3.1-1.rpm Object File: rootfs.jffs2 Porting Linux to XSCALE SBC Platform PAGE 15 3. Burn file onto flash on the target Now we will write uboot (bootloader), ulinux (kernel image), root_file system rootfs.jffs2 to FLASH on target board by using JFlash32 utility. This method can be used after booting target board so it’s used for writing images on FLASH newly or writing images to new FLASH. Transfer the images and the needed utilities to target board because all works are progressed in target board. Copy image write utility to image directory which the images are collected in. Then transfer all things in image directory to target board by JFLASH32. Image write utility is located under /tools directory on CDROM. 3.1. Setting Console Connect a serial cable between your PC and the NuWa serial port. Start a terminal emulator on the PC and set it to 115200 baud, 8 bit, no parity and no flow control. Figure 8. Setting up com port parameter Porting Linux to XSCALE SBC Platform PAGE 16 If you use Desktop Linux to download file to target, you have to know minicom usage first. Desktop Linux has minicom program for serial communication. It is used for command prompt of uboot or shell prompt of embedded linux. Set up the values before using minicom program. Select “Serial port setup” item. Push “A” key for setting “Serial Device”, then write serial port which is connected to target board. (If using COM1, write /dev/ttyS0, if COM2, write /dev/ttyS1.) Figure 9. Setting up minicom 3.2. Setting TFTP After having installed and started TFTPD32 click on the button labeled Settings. This will open a new dialog window. Select the options shown in the picture above. Your base directory may differ. Click on the browse button to select the subdirectory e:/ftp of your Linux OS installation. Finally click OK and restart TFTPD32. Porting Linux to XSCALE SBC Platform PAGE 17 Figure 10. Tftpd - TFTP Sever If your network doesn’t support DHCP, you will need to setup DHCP server. It is required to configure the DHCP server. Select the DHCP server tab. If more than one network interface has been installed on your computer, you can select the server interface your Ethernut board is connected to. Figure 11. Setting up TFTPD32 The Ethernet boot loader will request an IP address from the DHCP pool. Porting Linux to XSCALE SBC Platform PAGE 18 Enter the IP pool starting address and the number of available addresses in the pool. The sample above will offer IP addresses from 192.168.100.100 up to and including 192.168.100.109. Figure 12. Setting up DHCP Server The boot file is the name of the raw binary image of the application you want to upload to the Ethernut board. When using WinAVR (AVRGCC), you simply enter make install on the command line. This will automatically compile and link your code and copy the resulting hex file and binary file to the subdirectory bin/atmega128. ICCAVR is not able to create raw binary images. A tool named robi has been created, which will be explained later. Figure 13. Downloading kernel Porting Linux to XSCALE SBC Platform PAGE 19 There's no need to specify a WINS/DNS server address or default router unless your Ethernut application requires direct Internet access. In case it does, you probably know what to enter. Make sure that the network mask and the IP pool addresses fit your local network configuration. Finally press Save to let TFTPD32 store the values in the Windows registry and select the Tftp Server tab to return to the initial window. Now press the reset switch on your Ethernut board an watch the magic things happening. 3.3. boot loader Burn 'u-boot.bin' onto flash starting at 0x0000_0000. You may use the JFlash utility D:\jtag>xuboot Figure 14. Burning u-boot onto Flash Start your terminal emulator “TERA TERM”. Reset the Target Platform Porting Linux to XSCALE SBC Platform PAGE 20 Figure 15. U-boot Command mode At the prompt, type the following command to upload the kernel: #tftp 0xa0008000 ulinux After the kernel image transfer is complete, burn the uploaded file system image onto flash. Before burning, erase the orignal images on flash. #protect off 1:1-4 #erase 1:1-4 Then burn the image in RAM to flash. #cp.b a0008000 00040000 100000 #protect on 1:0-4 Figure 16. Writing file to Flash Porting Linux to XSCALE SBC Platform PAGE 21 Load the file system image 'lubbock_PXA262_QTE_16M.jffs2' to the target platform's RAM: #tftp 0xa0008000 lubbock_PXA260_QTE_16M.jffs2 Burn uploaded file system image onto flash. Before burning, erase the original images on flash. #protect off 1:5-82 #erase 1:5-82 #cp.b a0008000 140000 1000000 #protect on 1:5-82 Figure 17. Erasing Flash Porting Linux to XSCALE SBC Platform PAGE 22 4. Boot Linux On every board RESET or power up, do not press any key on keyboard. You should see the following message on your terminal emulator: U-Boot 1.1.1 (Dec 8 2004 - 17:38:28) <------------------------ Boot Loader Start U-Boot code: A3080000 -> A3099988 BSS: -> A309DF88 RAM Configuration: Bank #0: a0000000 64 MB Bank #1: a4000000 0 kB Bank #2: a8000000 0 kB Bank #3: ac000000 0 kB Flash: 32 MB *** Warning - bad CRC, using default environment In: serial Out: serial Err: serial Hit any key to stop autoboot: 0 ## Booting image at 00040000 ... Image Name: name <------------ move kernel to SDRAM Image Type: Data Size: ARM Linux Kernel Image (gzip compressed) 640849 Bytes = 625.8 kB Load Address: a0008000 Entry Point: a0008000 Verifying Checksum ... OK Uncompressing Kernel Image ... OK Starting kernel ... <--------------- Kernel Running Linux version 2.4.20 ([email protected]) (gcc version 3.3.1 (MontaVista Porting Linux to XSCALE SBC Platform PAGE 23 3.3.1-3.0.10.0300532 2003-12-24)) #366 Wed Jan 19 16:20:07 CST 2005 CPU: XScale-PXA255 [69052d06] revision 6 (ARMv5TE) CPU: D undefined 5 cache CPU: I cache: 32768 bytes, associativity 32, 32 byte lines, 32 sets CPU: D cache: 32768 bytes, associativity 32, 32 byte lines, 32 sets Machine: ICPDAS SBC Platform Ignoring unrecognised tag 0x00000000 Memory clock: 99.53MHz (*27) Run Mode clock: 398.13MHz (*4) Turbo Mode clock: 398.13MHz (*1.0, inactive) On node 0 totalpages: 16384 zone(0): 16384 pages. zone(1): 0 pages. zone(2): 0 pages. Kernel command line: root=/dev/mtdblock2 console=ttyS0,115200 Calibrating delay loop... 397.31 BogoMIPS Memory: 64MB = 64MB total Memory: 63312KB available (1200K code, 232K data, 44K init) XScale Cache/TLB Locking Copyright(c) 2001 MontaVista Software, Inc. Dentry cache hash table entries: 8192 (order: 4, 65536 bytes) Inode cache hash table entries: 4096 (order: 3, 32768 bytes) Mount-cache hash table entries: 1024 (order: 1, 8192 bytes) Buffer-cache hash table entries: 4096 (order: 2, 16384 bytes) Page-cache hash table entries: 16384 (order: 4, 65536 bytes) POSIX conformance testing by UNIFIX Linux NET4.0 for Linux 2.4 Based upon Swansea University Computer Society NET3.039 Initializing RT netlink socket Version ID = 0 LSP Revision 1 Starting kswapd Disabling the Out Of Memory Killer JFFS2 version 2.1. (C) 2001, 2002 Red Hat, Inc., designed by Axis Communications AB. Serial driver version 5.05c (2001-07-08) with MANY_PORTS enabled Porting Linux to XSCALE SBC Platform PAGE 24 ttyS00 at 0xf8100000 (irq = 15) is a XSCALE UART ttyS01 at 0xf8200000 (irq = 14) is a XSCALE UART ttyS02 at 0xf8700000 (irq = 13) is a XSCALE UART ttyS03 at 0xf4200000 (irq = 112) is a 16450 ttyS04 at 0xf4300000 (irq = 113) is a 16450 ttyS05 at 0xf4400000 (irq = 114) is a 16450 ttyS06 at 0xf4500000 (irq = 115) is a 16450 ttyS07 at 0xf4600000 (irq = 116) is a 16450 ttyS08 at 0xf4700000 (irq = 117) is a 16450 ttyS09 at 0xf4800000 (irq = 118) is a 16450 ttyS10 at 0xf4900000 (irq = 119) is a 16450 SA1100 Real Time Clock driver v1.02 SA1100/PXA Watchdog Timer: timer margin 60 sec eth0: DM9000 9000-a46 at 0xf1000300, 00:e0:60:00:00:a8, IRQ 108. eth1: DM9000 9000-a46 at 0xf1100300, 00:e0:60:00:00:58, IRQ 109. SCSI subsystem driver Revision: 1.00 ac97_codec: AC97 Audio codec, id: NSC72(National Semiconductor LM4548A) Probing ICPDAS SYSTEM Flash at physical address 0x00000000 (32-bit buswidth) cfi_cmdset_0001: Erase suspend on write enabled Using buffer write method RedBoot partition parsing not available cmdlinepart partition parsing not available Probing ICPDAS DATA Flash at physical address 0x04000000 (16-bit buswidth) cfi_cmdset_0001: Erase suspend on write enabled Using buffer write method Probing ICPDAS DATA SRAM at physical address 0x08000000 (32-bit buswidth) Using static partitions on ICPDAS SYSTEM Flash Creating 3 MTD partitions on "ICPDAS SYSTEM Flash": 0x00000000-0x00040000 : "U-BOOT" 0x00040000-0x00140000 : "KERNEL" 0x00140000-0x02000000 : "JIFF2 RFS" Registering ICPDAS DATA Flash as whole device Registering ICPDAS DATA SRAM as whole device Porting Linux to XSCALE SBC Platform PAGE 25 usb.c: registered new driver usbdevfs usb.c: registered new driver hub hc_isp116x.c: USB starting hc_isp116x.c: USB ISP116x at f4100000/0 IRQ 104 Rev. 10 ChipID: 6122 usb.c: new USB bus registered, assigned bus number 1 USB HC dev alloc 384 bytes Product: USB ISP116x Root Hub SerialNumber: 0 hub.c: USB hub found hub.c: 2 ports detected usbdcore: usbdcore 0.1 034 2002-06-12 20:00 (dbg="") NET4: Linux TCP/IP 1.0 for NET4.0 IP Protocols: ICMP, UDP, TCP, IGMP IP: routing cache hash table of 512 buckets, 4Kbytes TCP: Hash tables configured (established 4096 bind 8192) NET4: Unix domain sockets 1.0/SMP for Linux NET4.0. NetWinder Floating Point Emulator V0.95 (c) 1998-1999 Rebel.com VFS: Mounted root (jffs2 filesystem) readonly. <---------- Mount Root file system Freeing init memory: 44K INIT: version 2.78 booting INIT: Entering runlevel: 3 PXA Linux Preview Kit Kernel 2.4.20 on an armv5tel Linux login: root login[51]: root login <------------ type ‘root’ on `ttyS0' [root@Linux root]# <------------- Bash Running 4.1. Using the Ethernet As you are rebooting, watch the console for error messages. Use the ping Porting Linux to XSCALE SBC Platform PAGE 26 command to test your connectivity. Try to ping the gateway machine IP address first. This will test local connectivity on the LAN. If you cannot ping the gateway, you are not going to be able to connect to the Internet. If you can ping the gateway, try pinging a known host on the Internet. For example, ping www.yahoo.com will test both the ability to do a DNS lookup from your name server as well as your ability to connect to the Internet 4.2. Using the Audio Change to folder /home/sound Then you can play an mp3 file by specifying its name: #./mp3player moon.mp3 4.3. Using the USB Host In the bash shell, you should be able to plug a USB mouse into the USB slot on the taget board and receive input. To verify that the device is working, you can examine the input through the event interface device. First create the following character device (if it does not already exist): # mknod /dev/input/event0 c 13 64 A program, evtest, is provided to read from this device file. Run it with the following command: # evtest /dev/input/event0 As you use move the mouse (for instance), it should produce the following type of output: Event: time 946695141.507730, type 2 (Relative), code 0 (X), value –1 Event: time 946695141.507734, type 2 (Relative), code 1 (Y), value –1 ... 4.4. Using the Display Change to folder /home/fbv Then you can display a picture file by specifying its name: #./fbv 6.jpg Porting Linux to XSCALE SBC Platform PAGE 27 4.5. Using the PCMCIA & CF Card You should be able to insert a CF IDE Card (FAT32 format) into the Compact Flash slot on the taget board . Then you should type those command below # cardmgr #mount –t vfat /dev/hda1 /mnt Finally, you can see the files in the folder “/mnt”. 4.6. SRAM We use the mke2fs command to create a standard EXT2 Linux filesystem and to read and write access on the SRAM device . #mke2fs /dev/mtdblock5 mke2fs 1.19, 13-Jul-2000 for EXT2 FS 0.5b, 95/08/09 Filesystem label= OS type: Linux Block size=1024 (log=0) Fragment size=1024 (log=0) 128 inodes, 1024 blocks 0 blocks (0.00%) reserved for the super user First data block=1 1 block group 8192 blocks per group, 8192 fragments per group 128 inodes per group Writing inode tables: done Writing superblocks and filesystem accounting information: done To add files and folders, first mount the file system as ext2. #mount –t ext2 /dev/mtdblock5 /mnt Porting Linux to XSCALE SBC Platform PAGE 28 5. CAN Bus and PC104 Bus Application The Nuwa Family support CAN (Controller Area Network) and PC104 Bus. There is a sample environment appears as in the diagram below: PISO-CAN200 CAN-H Nuwa Series CAN-L Figure 18. Can wiring connection First create the following character device (if it does not already exist): # mknod /dev/can c 120 0 To verify that the device is working, you can check the status of the can bus with cat /proc/can. The can driver provide 2 sample file operations. Cansend is the example is designed to send out the CAN message and canmon is designed to receive the CAN message. Porting Linux to XSCALE SBC Platform PAGE 29 Figure 19. Cansend Figure 20. Canmon The NuWa-430 support pc104 bus. These sample can be to apply to the 8 bit ISA card, the 16 bit ISA card, the 8 bit PC-104 card, and the 16 bit PC-104 card. To reference the driver, you must have loadable module support enabled in your kernel. If you have kernel running, and do a "make install" as above, kernel should load the module on demand for you. To load the module manually, without kernel, type "insmod kito.o". (On most systems, "insmod kito" alone will do after you have done a "make install". Use the complete path if "insmod kito" alone comes up Porting Linux to XSCALE SBC Platform PAGE 30 with a "file not found" error.) To unload the module manually, type "rmmod kito". Here are a few things you may need to edit in "kito.h" for your specific installation: • • • "#define KITO_IRQ". Make sure this matches the IRQ Number on your card. Make sure it doesn't conflict with other cards. "#define KITO_IOADDR" Make sure this matches the value set via dip-switches on your card. Make sure it doesn't conflict with other cards. "#define KITO_MEMADDR" Use this to define where in memory you want the card to map in. 0x0000 is the most common default. The driver will softset the card to the value specified here when the driver is inserted via insmod or by kernel. Make sure this value doesn't conflict with a memory block used by another device. After you have compiled the driver and inserted it into the kernel as a module, you are ready to run the utility applications in this package and talk to your pc104.c from Linux. The library just is a sample application to show the number on 7-Seg LED, but you'll have to write the applications yourself. Porting Linux to XSCALE SBC Platform PAGE 31 6. The I8K Module SDK In this section, we will focus on examples for the description of and application of the functions found in the Libi8k.a. The Libi8k.a functions can be clarified into 3 groups which are listed in Fig. 19. Figure 21. structure of Libi8k.a Functions (1) and (2) in the Libi8k.a are the same as with the DCON.DLL Driver ( including Uart.dll and I7000.dll ) as used in the DCON modules ( I-7000/I-8000/I-87000 in serial communication ). You can refer to the DCON.DLL Driver manual which includes the functions on how to use DCON modules. The DCON.DLL Driver has already been wrapped into the Libi8k.a. Functions (3) of the Libi8k.a consist of the most important functions as they are specially designed for I-8000 modules in the LinCon-8000 slots. They are different from functions (1) and (2) because the communication of I-8000 Porting Linux to XSCALE SBC Platform PAGE 32 modules in the LinCon-8000 slots are parallel and not serial. Therefore ICPDAS rewrote I8000.c to Slot.c especially for I-8000 modules in the LinCon-8000 slots. Here we will introduce all the funcitions for slot.c and they can be divided into eight parts for ease of use. 1. System Information Functions; 1. System Information Functions 2. Digital Input/Output Functions 3. Watch Dog Timer Functions 4. EEPROM Read/Write Functions 5. Analog Input Functions 6. Analog Output Functions 7. 3-axis Encoder Functions 8. 2-axis Stepper/Servo Functions The functions in the Libi8k.a are specially designed for LinCon-8000. Users can easily find the functions they need for their applications from the descriptions in Lincon manualand in the demo programs developed by ICPDAS. Porting Linux to XSCALE SBC Platform PAGE 33 7. U-BOOT Boot Loader The user interface to U-Boot consists of a command line interrupter, much like a Linux shell prompt. When connected via a serial line you can interactively enter commands and see the results. After power on the initial u-boot prompt looks like this: Figure 22. Power on screen shot You can receive more information about what command u-boot support. In the following the commands typed ‘?’. You will see the command list. Porting Linux to XSCALE SBC Platform PAGE 34 Figure 23. U-boot ‘s help Much like a traditional Linux shell the U-Boot shell uses environment variables to tailor its operation. The U-Boot commands to manipulate environment variables have the same names as the BASH shell. For instance printenv and setenv behave the same as their BASH shell counterparts. In the following example you will dump the current environment variables using the "printenv" command and change the IP address of the TFTP server using the "setenv" command. u-boot # printenv Porting Linux to XSCALE SBC Platform PAGE 35 Figure 24. Printenv bootargs: Support kernel’s command line Bootcmd: Boot kernel from address 0x40000 bootdelay: Delay time at power on baudrate: the baudrate of serial port console ethaddr: Ethernet hw address ipaddr: Ethernet IP address sererip: TFTP Server’s ip address netmask: Subnet mask addres stdin: console input stdout: console output You can create short shell scripts by storing a sequence of U-Boot commands, separated by semicolons, in an environment variable. To execute the script use the "run" command followed by the variable name. This can be handy to automate repetitive tasks during development. Network Commands Having a network connection on your boot loader is very convenient during Porting Linux to XSCALE SBC Platform PAGE 36 development. If your project requires several networked boards they can all download and boot the same kernel image from a centralized server. When you update the kernel you only need to update the single copy on the server and not each board individually. U-Boot supports TFTP (Trivial FTP), a stripped down FTP that does not require user authentication, for downloading images into the board's RAM. The "tftp" command needs two pieces of information, the name of the file to download and where in memory to store the file as shown in the following example: u-boot # tftp 8000 u-boot.bin From server 10.0.0.1; our IP address is 10.0.0.11 Filename 'u-boot.bin'. Load address: 0x8000 Loading: ################### done Bytes transferred = 95032 (17338 hex) The size and location of the downloaded image are stored in the fileaddr and filesize environment variables for possible latter use by other shell commands and scripts. Flash Commands Some embedded projects only have access to a network while being programmed "in the factory". When deployed in the field the boards boot a kernel stored in the flash memory. The board can be updated in the field by reprogramming the flash memory with a new kernel. U-Boot offers several commands for programming, erasing and protecting the flash memory. To see what type of flash memory your board has enter the flinfo command: u-boot # flinfo Bank # 1: AMD Am29LV160DB 16KB,2x8KB,32KB,31x64KB Size: 2048 KB in 35 Sectors Porting Linux to XSCALE SBC Platform PAGE 37 Sector Start Addresses: S00 @ 0x01000000 ! S01 @ 0x01004000 ! S02 @ 0x01006000 ! S03 @ 0x01008000 ! S04 @ 0x01010000 ! S05 @ 0x01020000 ! S06 @ 0x01030000 S07 @ 0x01040000 ... S32 @ 0x011D0000 S33 @ 0x011E0000 S34 @ 0x011F0000 The output carries quite a lot of information. Immediately you see the flash manufacturer, part number and sector layout. This particular part begins with a 16KB sector at address 0x01000000, followed by two 8KB sectors, a 32KB sector and 31 64KB sectors for a total of 2 megabytes in 35 sectors. The exclamation points following sectors 0 through 5 indicate that those sectors are "protected". In this example sectors 0 through 4 contain the code for U-Boot itself, and sector 5 is used to store the environment variables. Any attempt to program these sectors without first unlocking them will fail. This offers some level of protection from "rm -rf /" type mistakes when programming the flash. Continuing the TFTP example, let's assume the file you uploaded is a new version of U-Boot. You need to first unlock flash sectors 0 through 4 before programming the flash. Type "protect off 1:0-4", which instructs U-Boot to allow write access to flash bank 1, sectors 0 through 4. u-boot # protect off 1:0-4 Un-Protect Flash Sectors 0-4 in Bank # 1 Next you must prepare the flash sectors for programming by erasing them. Enter "erase 1:0-4", which tells U-Boot to erase sectors 0 through 4 of flash bank 1. u-boot # erase off 1:0-4 Erase Flash Sectors 0-4 in Bank # 1 Erasing Sector 0 @ 0x01000000 ... done Porting Linux to XSCALE SBC Platform PAGE 38 Erasing Sector 1 @ 0x01004000 ... done Erasing Sector 2 @ 0x01006000 ... done Erasing Sector 3 @ 0x01008000 ... done Erasing Sector 4 @ 0x01010000 ... done [end courier] To program the flash memory you need to copy the image from RAM to the address of flash sector 0, 0x01000000, using the cp command. You will use the byte version of the command to copy the specified number of bytes. In this case you can use the fileaddr and filesize environment variables, which contains the RAM address and number of bytes loaded by the last TFTP command. Type cp.b ${fileaddr} 1000000 ${filesize} at the u-boot prompt. u-boot # cp.b ${fileaddr} 1000000 ${filesize} Copy to Flash... ................ done Finally restore the write protection on flash sectors 0 through 4 by typing protect on 1:0-4 at the U-Boot prompt. u-boot # protect on 1:0-4 Protect Flash Sectors 0-5 in Bank # 1 You have just updated the U-Boot code for you board. The next reboot will run the newly uploaded U-Boot code. Well done! The final flash related command is the saveenv command, which like the name implies saves your current environment variables to a reserved flash sector. This allows your environment variables to persist across power cycles and reboots. You might want do this after updating the server IP address or when adding a new script. Type saveenv to save your environment. u-boot # saveenv Saving Environment to Flash... Un-Protected 1 sectors Erasing Flash... Porting Linux to XSCALE SBC Platform PAGE 39 Erasing Sector 5 @ 0x01020000 ... done Erased 1 sectors Writing to Flash... ................ done Protected 1 sectors As you can see the saveenv command bundles together the un-protect, erase, copy and protect steps you covered in the previous example Porting Linux to XSCALE SBC Platform PAGE 40 8. NFS-mounting the Root File System Fundamental to Linux is the concept of a file system, i.e. an area where files are stored. Even when used in an embedded system, you will still need a file system. A file system can be stored on various media, for example a floppy or hard disk, RAM, Flash or ROM, and can also be accessed remotely across a network connection. Linux supports several different file system organisations. These have different characteristics, which make them suitable for different applications. For example one may be faster than another, but be less efficient in how it uses the available storage space. A file system is made available by mounting it. This makes the new file system visible as a directory in an existing file system. For most purposes crossing from one file system to another is invisible to user. File systems can be freely mixed, so for example an ext2 file system on a hard disk could be mounted into a JFFS2 file system in Flash. However, the first file system is special. This is called the root file system, and is where the root directory (/) resides. This is mounted by the kernel as it boots, so the first program which the system executes (init) must be read from the root file system. For development purposes, we find having the root file system as a remote file system, accessed across the network, the most convenient option. In this way we can make a directory, and all the files and directories contained in it, appear as the root file system on the target. To do this we use a protocol called NFS (Network File System), and we need to set up a server on the PC to allow the target access to these files. Porting Linux to XSCALE SBC Platform PAGE 41 8.1. Verify the host has NFS support To do this, query the portmapper with the command rpcinfo -p to find out what services it is providing. You should get something like this: This says that we have NFS versions 2 and 3, rpc.statd version 1, network lock manager (the service name for rpc.lockd) versions 1, 3, and 4. There are also different service listings depending on whether NFS is travelling over TCP or UDP. Linux systems use UDP by default unless TCP is explicitly requested; however other OSes such as Solaris default to TCP. If you do not at least see a line that says portmapper, a line that says nfs, and a line that says mountd then you will need to backtrack and try again to start up the daemons 8.2. Setup the exports file Edit the file /etc/exports. If this file already has conent, then NFS mount points have already been setup and may be in use. Leave them in place. Append the content of the reference /etc/exports file and then save. You can also manage/verify the mount point by running redhat-config-nfs in RedHat 9 Porting Linux to XSCALE SBC Platform PAGE 42 8.3. Create root file system and restart the nfs server The root file system You will also need to restart NFS, the portmap daemon and resync the exported filesystems. NOTE: if you change the link to the file system you may will need to resync. The easy rule is to restart the NFS service each time you change the link to a new filesystem. If you have added a new entry to the dhcpd.conf file then you need to restart DHCP too. 8.4. Configure and rebuild the kernel To change the configuration of the kernel you can use the make menuconfig command and follow the menus. Or, you can edit the config file directly. Whichever way you choose, the following configuration options must be set. You can use Make menuconfig to set the config options. Use this method Porting Linux to XSCALE SBC Platform PAGE 43 if you are unsure of editing the .config file directly Use the menus to set the configureation items: - General Setup - Default kernel command string, set to "console=ttyS0,115200 root=/dev/nfs ip=dhcp nfsroot=192.168.100.25:/tftpboot/source" (CONFIG_CMDLINE) - Networking Options - IP:kernel level autoconfiguration, set to Y (CONFIG_IP_PNP) - IP:DHCP Support, set to Y (CONFIG_IP_PNP_DHCP) - IP:BOOTP Support, set to Y (CONFIG_IP_PNP_BOOTP) - File Systems - Network File Systems - NFS file system support, set to Y (CONFIG_NFS_FS) - Root file system on NFS, set to Y (CONFIG_ROOT_NFS) Then make the kernel 8.5. Load the kernel on the target platform and Reboot The kernel zImage can be loaded on the target platform either by burning in to flash ( see the 3.3 ) and then reboot the Nuwa. Porting Linux to XSCALE SBC Platform PAGE 44 9. How to Build your application In this chapter, we will introduce how to install crosscompiler for Nuwa platform to your host PC and how to compile the sample application. 9.1. Install Crosscompiler Firstly extract tarball that cross_compiler.tar.gz files are compressed with tarball. cross_compiler.tar.gz tarball source is located at /mnt/cdrom/gcc directory and place cross_compliler in the directory /usr/local/xscale. Add the /usr/local/xscale/bin/ directory to the PATH environment variable in your linux. PATH=$PATH: /usr/local/xscale/bin/ 9.2. Example program For this example, use the simple “hello world” program saved as hello.c. #include <stdio.h> int main( int argc, char **argv) { Printf(“ hello world\n”); } Using the cross compiler tools build the executable. Use the following command: xscale_le-gcc –o hello hello.c Copy the executable to an NFS-mounted location on the target. For example: cp hello /tftpboot/source/home Porting Linux to XSCALE SBC Platform PAGE 45 on the target, change to the directory where your program is located. For example: cd home Run your program on the target. For example: ./hello Hello world Porting Linux to XSCALE SBC Platform PAGE 46 Appendix A: CAN BUS API A.1 CAN messages CAN messages are defined as a struct with the following content: typedef struct { CanId id; // identifier (11 or 29 bits) int type; // standard (0) or extended frame (1). // Use the predefined values ’STANDARD’and ’EXTENDED’. int rtr; // remote transmission request (1 when true) int len; // data length 0..8 unsigned char d[8]; // data bytes struct timeval timestamp; // timestamp in the format // timestamp. tv_sec (seconds) // timestamp. tv_usec (microseconds) // since Epoch (January 1. 1970). } canmsg; A.2 open() Open the device. The driver supports both blocking and non-blocking modes. For Blocking mode use: Ex: int can; can = open(”/dev/can”, O_RDWR); The non-blocking mode must be specified in the open file operation with the flag O_NONBLOCK in the last parameter: Ex: can = open(”/dev/can”, O_RDWR | O_NONBLOCK); After open() the SJA1000 is set to 1Mbit/s with single filter mode. The acceptance mask is set to 0xffffffff, which means that all messages will be accepted. WARNING: only one application is allowed to use the driver at a time. If the open operation is called by a second application an -EBUSY error code is returned. Porting Linux to XSCALE SBC Platform PAGE 47 A.3 close() Close the device. Ex: close(can); A.4 read() Read a message. Return 32 (size of the canmsg struct) when a message is available and -EAGAIN when there is no message. Ex: read(can, &msg, sizeof(msg)); A.5 write() Write a message. Return 32 (size of the canmsg struct) when the message is successfully stored in the driver’s transmit buffer and -EAGAIN when the buffer is full. Ex: write(can, &msg, sizeof(msg)); A.6 ioctl() This command provides the following operations: CAN_IOCSBAUD: set baud rate. Use the following constants to set it: B1000 (1Mbit/s), B500 (500kbit/s), B250 (250kbit/s), B125 (125kbit/s), B20 (20kbit/s). The standard bit timing register values are: {BTR0, BTR1}: baud rate {0x00, 0x14}: 1 Mbit/s {0x00, 0x1c}: 500 kbit/s {0x01, 0x1c}: 250 kbit/s {0x03, 0x1c}: 125 kbit/s {0x18, 0x1c}: 20 kbit/s Ex: unsigned long baud_rate = B1000; ioctl(can, CAN_IOCSBAUD, &baud_rate); CAN_IOCSAMASK: set acceptance mask. Use a 32-bit value to set it. Ex: long long amask=0xfffffffd; ioctl(can, CAN_IOCSAMASK, &amask); Porting Linux to XSCALE SBC Platform PAGE 48 CAN_IOCSACODE: set acceptance code. Use a 32-bit value to set it. Ex: long long acode=0xfffffffe; ioctl(can, CAN_IOCSACODE, &acode); CAN_IOCCRBUF: clear read buffer. CAN_IOCCWBUF: clear write buffer. CAN_IOCRREG: read a SJA1000 register. It can be any of the available registers. The most useful ones for applications are: ERROR_CODE_CAPTURE RX_ERROR_COUNTER TX_ERROR_COUNTER Ex: int outcome; unsigned long reg; reg = RX_ERROR_COUNTER; outcome = ioctl(can, CAN_IOCRREG, ®); printf("RX_ERROR_COUNTER = %dd\n", outcome); CAN_IOCRTTS: read the timestamp of the last transmitted message. The timestamp is returned in a timeval structure. CAN_IOCSACTIVE: set active mode CAN_IOCSPASSIVE: set passive mode CAN_IOCRAPS: get current active/passive status CAN_IOCSBTR: set bit timing registers directly. The parameters are passed through the following structure: typedef struct { unsigned char bt0; unsigned char bt1; } canconfig; Ex: canconfig bconfig; bconfig.bt0 = 0x0; bconfig.bt1 = 0x1c; ioctl(can, CAN_IOCSBTR, &bconfig); Porting Linux to XSCALE SBC Platform PAGE 49 A.7 select() Example for checking for received messages: ret = select(can+1, &readfds, NULL, NULL, &timeout); Porting Linux to XSCALE SBC Platform PAGE 50