1
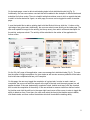
Clemson Bucket List User Manual Introduction Clemson Bucket List is a web application that provides an interactive experience for students to create and complete their very own “bucket list.” Students can create an account and log in to use this application. With an account, students will be able to browse a list of tasks that can be added to their personal bucket list. These tasks can then be checked off by marking “completed.” The student may also decide to further prove that they’ve completed a task by checking in via geolocation and/or uploading a picture of the completed task. This functionality will enhance the social aspect of the application, making it more rewarding for students to participate. Navigating the App On the Homepage of the application, a user can sign into an existing account, or register a new one (Fig. 1). The user has the option to toggle the menu (once logged in or registered) and navigate to a different page. In order to toggle the menu, the user must click or tap the “hamburger” menu (three stacked horizontal lines) in the upper corner of the application. When the menu is open, any given tab can be selected in order to navigate to a particular page of the application. To close the menu, the user simply taps the hamburger menu icon or clicks anywhere in the center of the screen. Figure 1a: Home Page (Login/Sign Up) Figure 1b: Home Page Mobile 1 On the tasks page, a user is able to add existing tasks to their individual bucket list (Fig. 2). Additionally, the user can create a new task that will be added to the stockpile of different tasks and submitted for further review. There is a helpful tooltip that advises users to click on a particular task to add it to his/her bucket list. Again, on each page, the menu can be toggled to switch to another page. A user that would like to add an existing task to his/her Bucket List may click the ‘+’ button on the right edge of any given task. Additionally, the user can submit a new activity on the tasks page. The user must upload an image for the activity (via the up arrow), then add in a title and description for the activity, and press submit. The activity will be submitted to the author of the application for further review. Figure 2a: Tasks Figure 2b: Tasks Mobile On the “My List” page of the application, users can manage their individual tasks (Fig. 3). The user has the option to toggle completion of a given tasks as well as view summary statistics of the tasks that he/she has completed and has yet to complete. On this page, the user may toggle the completion of a given task. In order to mark a task as completed, the user must select the square at the right of the task, and the empty square box will appear checked. If the user inadvertently completes a task, he/she must tap or click the checked box to undo the completion of the activity. If the user wishes to remove a task from his/her bucket list, he/she must click the edit icon in the upper right hand corner of the screen in order to toggle the ability to delete an item. From there, the user must select the item(s) that he/she wants to delete, click delete tasks, and then confirm the deletion which will terminate the deleting ability. 2 Figure 3a: My List Figure 3b: My List Mobile When the user is on the photos page of the application, he/she is able to view all photos that have been publicly shared by all users of the application (Fig. 4). If a given photo is selected, a caption for the photo will expand with more information about the photo, a caption, the owner of the photo, the date the photo was taken, etc. To expand the information about a particular photo, the user must click the photograph that he/she is interested in, and a caption for the photograph will expand. To close that menu, the user can either click the ‘x’ at the upper right hand corner of the caption, click on the same photo again, or click on another photo to show the caption for that one. To add a new photo, the user must click the ‘+’ in the upper right corner of the Photos tab, upload the image, fill in information about the image (title, caption) and then submit the image. Figure 4a: Photos Figure 4b: Photos Mobile 3 Finally, on the settings page of the application, users can toggle various settings (Fig. 5). The settings are to later include theme (dark/ light), media, privacy, etc. In order for the user to toggle a given setting, he/she must click on the grey/ green toggle button. Green means that the item is on and grey means that the item is off . Figure 5a: Settings Figure 5b: Settings Mobile 4