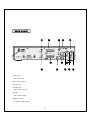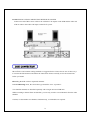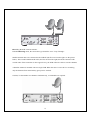
1
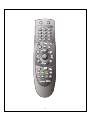
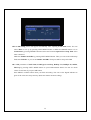
Operation Manual
relook 300S
World First LINUX O/S Twin Tuner PVR
Connecting People To Digital Home Entertainment
GENERAL INFORMATION
Thank you for purchasing relook 300S. relook 300S is the world's 1st 2 Tuner PVR based on
LINUX O/S. This product is fully compliant with the DVB standards and transmits digital
broadcasting service directly to your TV through the various satellites and record those programs
and enjoying trick play.
You can notice that every operation of relook 300S is based on a dynamic and user-friendly user
interface and menus. The relook 300S is easy to use and adaptable for future upgrade. The software
of relook 300S is to be upgraded continuously to improve the functionality. Also new utilities for
easy control of system setup and user manual are to be upgraded together.
SAFETY INFORMATION
Please read the following recommended safety cautions carefully for your safety.
■ Main Supply: 90-240V AC 50/60Hz 30W
■ Allow clear space around the relook 300S for sufficient ventilation.
■ Never place the relook 300S on soft furnishing or carpet.
■ Do not stack other electronic equipment on top of the relook 300S.
■ Use a soft/dry cloth and a mild solution to clean the exterior of the relook 300S.
■ Never allow liquids. The inside of the relook 300S shall not be exposed to dripping, spray or other
objects filled with liquids.
■ Do not use any attachments that are not recommended.
■ Do not allow the unit to be exposed hot, cold or humid conditions.
■ Service should be carried out only at a qualified service agent.
■ Do not connect or modify cables when the relook 300S is plugged in.
■ Do not remove the cover.
1
HOW TO USE THIS MANUAL
This manual provides complete instructions for installing and using relook 300S. The following
symbols will serve as follows.
Symbol
MENU
Explanation
Represents a button on the remote controller or on the front panel.
(Capital)
Main Menu
Represents a menu item.
(Bold Character)
No. Menu Name
Indicates the subsidiary selectable option in certain menu.
Ex) 1. move
Please do not open or change any part or option of this menu without full understanding or
skillful installer's guidance.
Press the MENU key on the RCU (Remote Control Unit) to make the main menu appeared.
In some menus, you are asked to put the PIN (Personal Identification Number) code as a
password.
Factory default password is '0000'. Press PIN code by numeric buttons on the RCU.
■ How to move the cursor
Use
or
(channel and volume up/ down)
buttons to move the cursor on the menu.
■ How to select an option
Some menus support examples or options with
indication. To scroll it, use
(volume up/ down)
buttons and select one by pressing OK button on the RCU.
■ How to use the virtual keyboard
In some menus, you are asked to put the alphabet by
the virtual keyboard.
2
Move the cursor by
or
buttons to each
alphabet character you want and press OK button on
the RCU to type it. Once it is finished, select the
Enter key on the virtual keyboard to save and exit.
3
Table of Contents
General Information -------------------------------------------------------------------------------------1
Before you Begin
-------------------------------------------------------------------------------------6
The contents of the box -----------------------------------------------------------------------------------7
Remote Control Unit --------------------------------------------------------------------------------------8
Front Panel -------------------------------------------------------------------------------------------------11
Rear Panel --------------------------------------------------------------------------------------------------12
INSTALLATION -----------------------------------------------------------------------------------------13
Equipment Connection -----------------------------------------------------------------------------------13
Dish Connection ---------------------------------------------------------------------------------------------15
Before setting -------------------------------------------------------------------------------------------------19
Get started for the first time ------------------------------------------------------------------------------19
USING HOT BUTTON ------------------------------------------------------------------------------------24
Tv or radio channel list -----------------------------------------------------------------------------------24
Edit in the channel list ------------------------------------------------------------------------------------25
Favorite channel list --------------------------------------------------------------------------------------27
Program guide ---------------------------------------------------------------------------------------------29
CMS / File -------------------------------------------------------------------------------------------------34
Channel info -----------------------------------------------------------------------------------------------35
RCL ---------------------------------------------------------------------------------------------------------35
Subtitle -----------------------------------------------------------------------------------------------------36
Audio setting ----------------------------------------------------------------------------------------------36
PVR OPERATION ---------------------------------------------------------------------------------------37
Recording --------------------------------------------------------------------------------------------------37
Recording file open ---------------------------------------------------------------------------------------38
Record plan ------------------------------------------------------------------------------------------------39
Play back ---------------------------------------------------------------------------------------------------39
Trick play in live signal ----------------------------------------------------------------------------------39
Book mark ------------------------------------------------------------------------------------------------------ 40
Play -------------------------------------------------------------------------------------------------------------- 40
Repeat ----------------------------------------------------------------------------------------------------------- 41
Stop -------------------------------------------------------------------------------------------------------------- 41
4
Pause ------------------------------------------------------------------------------------------------------------- 41
Instant play ------------------------------------------------------------------------------------------------------ 41
Quick Skip -------------------------------------------------------------------------------------------------------42
Fast forward or random position jump & playback ------------------------------------------------------- 42
Fast reverse or random position jump & playback -------------------------------------------------------- 42
OSD teletext------------------------------------------------------------------------------------------------------42
Slow motion or frame by frame ------------------------------------------------------------------------------43
USER’S OPTION----------------------------------------------------------------------------------------------44
User’s setting ---------------------------------------------------------------------------------------------------44
Lock control ----------------------------------------------------------------------------------------------------45
Langue ----------------------------------------------------------------------------------------------------------46
Local time ------------------------------------------------------------------------------------------------------47
USB Mode -------------------------------------------------------------------------------------------------------48
HDD management --------------------------------------------------------------------------------------------47
SYSTEM SET UP --------------------------------------------------------------------------------------------49
TV output ------------------------------------------------------------------------------------------------------49
LNB setting ----------------------------------------------------------------------------------------------------49
Channel search ------------------------------------------------------------------------------------------------52
DiSEqC 1.2 position ------------------------------------------------------------------------------------------53
USALS setting -------------------------------------------------------------------------------------------------54
Restore factory setting ----------------------------------------------------------------------------------------54
CI MODULE --------------------------------------------------------------------------------------------------55
ABOUT ---------------------------------------------------------------------------------------------------------56
SOFTWARE UPGRADE -------------------------------------------------------------------------------------57
Glossary of Terms ----------------------------------------------------------------------------------------------58
Trouble Shooting -----------------------------------------------------------------------------------------------59
Product Specifications -----------------------------------------------------------------------------------------60
5
BEFORE YOU BEGIN
Advanced Features
■Application and Expansion
LINUX O/S enables ultimate applications and expansions to fulfill the customer’s need
■Max. Two Channels Recording and One Prerecorded File Playback
Simultaneous Double Descrambling on Viaccess CAM
■Watching 1 Viaccess channel while recording another Viaccess channel with only 1 Viaccess
CAM
Playback of prerecorded programs without Viaccess CAM
■Simultaneous two Descrambling on 2 CI CAMs
Watching 1 scrambled ch. while recording another scrambled channel by using 2 CAMs
Playback of prerecorded programs without CAMs
■Playback without CAM
Playback a prerecorded scrambled program without CAM
■Almost Unlimited Channel Memory
10,000 channels
■Variable HDD Size is Applicable for production up to 250GB or above
■Enhanced Search Channel Option
Search by all satellite
Search by satellite/ network
Search by all TP scanning
■Unlimited Trick Play
Unlimited trick play on any of Real Time Live Programs/ Recording Program/ Playback of
Prerecorded Program
■Smart EPG
Automatically updates Program Info. EPG shows all Satellites’ Program Guide
Search programs by Genre on the EPG
■Enhanced Recording Plan by timer setting/ EPG
■Enhanced Playback to skip commercials/ edit prerecorded files by PC
■USB Connection to PC for PC editor/ enhanced program utility
6
**Notice)
Normally, a CI CAM works for one single channel descrambling at a time.
To descramble two different channels simultaneously, it requires two CAMs at same time.
(Proper CAM and smart card required for the channels you wish to watch, check the
channel encryption and availability)
Exceptionally, Viacess CAM works for dual descrambling simultaneously with only one
VIACESS CAM.
Notice that Double Descrambling is up to whether the CAM manufacture supports the
function or not.
THE CONTENTS OF THE BOX
Please make sure that the following items are included in the Package.
■ relook 300S main unit
■ Remote Control Unit
■ 2 Batteries (size AAA)
■ Operation Manual
7
REMOTE CONTROL UNIT
For Power On / Off
For Mute
To toggle between TV and Radio mode
To recall previous channel when you watch live programs only OR Switch back and forth
among a LIVE program and a RECORDING channel and a PLAYBACK of prerecorded
program FILE
To record selected program
To make Page Up / Down
To go to Electronic Program Guide
To manage prerecorded programs(Files). You can see prerecorded TV/Radio program list and
reserved recording plan by pressing this button
To see and manage Favorite channel list
To go to Main menu and go back to previous menu
To make channel Up / Down and move Up / Down in the menus
To exit from menu
To make volume Increased / Decreased and move Left/ Right
To make Bookmark on File progressing time bar(in Information banner)
To display program information banner\
To select options and call Channel List
To stop File playback / recording program
8
For Playback / Catch up for real time live program point
To pause the screen
For Instant Replay (Jump back to 15 sec. previous scene)
For Instant quick skip (Jump forward to 15 sec. after scene from current point)
For Fast reverse or Random play
For Fast forward or Random play or sort move
For Slow motion forward or Frame-by-Frame Play
For Section Repeat between the position by Bookmark in File playback and for teletext in
program watching mode
To select alternative audio option
To display subtitle
9
10
FRONT PANEL
■Slot for a smart card
■Displays channel number, error messages, current time and status and remote control commands
Menu
■EPG
■Power On/ Stand by
■Open the Lid for using slots
Slot for CAM
Push the button to eject CAM
■OK
■Volume Up
■Volume Down
■Channel Up
■Channel Down
11
REAR PANEL
①
③
④ ⑤
⑩
②
⑫
⑪
①TV Aerial
For a terrestrial
②TV antenna input
③VCR Scart
④Audio L/R
RCA Audio outputs
⑤Video
RCA Video output
⑥Digital Audio
5.1 channel audio output
12
⑦
⑬
⑥ ⑨ ⑧
⑦LNB IN
LNB cable from satellite dish antenna input
⑧Tuner1
⑨Tuner2
⑩RF cable connection to the TV or VCR
TV Scart
⑪USB
To read and load the A/V data
⑫Serial
RS232C
⑬IF OUT
Loop through to another Set Top Box
INSTALLATION
Most effective and common setting methods are suggested below. Please follow the instructions
carefully.
Connection to TV, VCR and Hi-Fi
■ CONNECTION TO THE TV with a SCART cable
Connect the TV to the PVR with a SCART cable. One end of SCART cable goes into the TV
SCART socket and the other end goes into to the SCART socket on the PVR.
13
■ CONNECTION TO THE VCR with a SCART cable
A. Connect the VCR with a SCART CABLE
After connecting the PVR to TV with a SCART cable, connect VCR to the PVR same way that
the TV and the PVR connected with SCART cable.
B. Connect the TV to the VCR with RCA cable
Connect one end of RCA (RED: Audio right, White: Audio left, and Yellow: Video) to PVR and
the other end of RCA to the TV.
14
■ ADDITIONAL AUDIO CONNECTION WITH HI-FI SYSTEM
Connect one end of RCA stereo cable to the 'AUDIO L/ R' outputs on the PVR and the other end
of RCA cable to the Audio L/R inputs on the Hi-Fi system.
DISH CONNECTION
Most effective and common setting methods are suggested below. Please choose one of these ways
to connect the dish-antennas and follow the instructions. Please carefully review the instructions
before you install.
■Installing the PVR with two separated antennas.
In the LNB Setting menu, the connection type should be set to “separated.”
Two Satellite antennas are installed separately with a single universal LNB each.
While recording a channel from one Satellite, you can only watch or record channels from the other
Satellite.
Caution) To descramble two channels simultaneously, 2 CI Modules are required.
15
■Installing the PVR with one antenna.
In the LNB Setting menu, the connection type should be set to” Loop Through”
Satellite Antenna has to be connected to the LNB IN (the first one from the right: see the picture
below). The second LNB IN and IF OUT (the first one from the right) should be connected with
coaxial cable. If the connection is done opposite way, the PVR will not be able to scan the channels.
A Satellite antenna is installed with one single LNB. When the tuner is reserved for a recording,
only the channels from same Polarity group can be watched.
Caution) To descramble two channels simultaneously, 2 CI Modules are required.
16
■Installing the PVR with twin LNB Antenna
In the LNB Setting menu, the connection type should be set to “separated”
A Satellite Antenna is installed with twin/dual universal LNB.
While one tuner is reserved for a recording all other channels can be watched or recorded.
Caution) To descramble two channels simultaneously, 2 CI Modules are required.
■Installing the PVR with two separated antennas with twin LNB.
In the LNB Setting menu, the connection type should be set to “separated”
Each twin or dual universal LNB is connected to two different Satellite Antennas separatelly.
While one channel is recorded, all channels from two Satellites can be watched or recorded.
Caution) To descramble two channels simultaneously, 2 Modules are required.
17
BEFORE SETTING
■Menu Information
Selectable lines are generally activated(highlighted). No-activated lines cannot be selected.
Most of menus show short information at the bottom of the screen.
■Basic Key Control
With the UP/DOWN button you can move upwards and downwards in the menus. In most of menus,
you can search channels with the button.
When you have reached the required subject menu, press the OK button to confirm your choice.
In case of changing TV channel you can only press UP/DOWN button.
In most of menus, you can select menu items with REFT/RIGHT button.
When you want to return to the previous menu with saving the change, press the MENU button.
When you want to exit from current menu, press the EXIT button.
GET STARTED FOR THE FIRST TIME
If it is the first time using relook 300S, you should set parameters for system configuration and scan
satellite.
Follow setup procedure for scanning the satellite. When you have finished the procedure, you can
start watching TV or listening to Radio.
18
The HDD Preparing time is decided to as HDD size.
If the power off unexpected, then preparing time for HDD also need.
■Turn on your TV and PVR.
■The Local Time setting menu will appear automatically. Please adjust your local time at first.
Press LEFT/RIGHT buttons to find your area on Time Zone and make Daylight-saving(summer
time) ON or OFF. Also, you can adjust local time manually by using LEFT/RIGHT and
UP/DOWN button on Date and Time menu.
19
■The LNB Setting menu will appear automatically after adjusting Local Time menu. You can
select Tuner to set up by pressing LEFT/RIGHT button or RED and GREEN button. Go to
Connection by pressing DOWN button and select one between Separated and Loop Thru as the
tuner connected.
Make the Number Of LNBs by pressing LEFT/RIGHT button. Then you can see the LNB setup
field some LNB No. as you set on Number Of LNBs. Then press OK to setup each LNB.
■Set LNB parameters of SAT Name, LNB Type, Local Freq, DiSEqC Ver, DiSEqC No, 22Khz,
TP Freq by pressing LEFT/ RIGHT button as your LNB and dish aimed. You can see whole
values of each item if you press OK button.
Press MENU or EXIT button when you finish all setting. You can see the Signal indicator as
green if all values are setup correctly. (Red color means incorrect setting.)
20
■You can setup Tuner 2 if Connection is Separated. To copy the values of LNB 1 to LNB 2, just
press BLUE button. Press YELLOW button to go to Channel Search menu.
You can scan the channels by Auto or Manual by LEFT/RIGHT button.
Auto : This is to scan all channels in the satellites you setup in LNB Setting menu. Set Satellite
Name, Network Search option and Search Method option by LEFT/RIGHT button and press
OK on Start Searching to start scanning.
Manual : This is to scan channels on specific TP. Set Satellite Name, Frequency, Symbol
Rate, Polarity values. You can press OK to check the values on Frequency and Symbol Rate
menu or press NUMERIC buttons to input digit values directly. Press OK on Manual Search to
21
start scanning. If you input new TP data on this menu, the new data will be saved on the
satellite.
22
You can do Advanced scanning option to scan channels with PID values.
■Now, you can watch TV or listen to the Radio.
USING HOT BUTTON
This section explains various function while watching TV or listening to Radio. Below menus can
be accessed by hot buttons on the remote controller.
■TV or Radio Channel List
While watching TV or listening to Radio, you can get the ‘TV or Radio Channel List’ by pressing
OK button on the remote controller. Press
or
(UP/DOWN button) to
change/select channel and Press OK to select channel.
There are 3 sorting options: First, ‘Mode’ Second, ‘Channel’ Third, ‘Sort’ to help finding out
required channel quickly.
23
1. Mode
Change to TV or Radio
2. Channel
Three options inside ‘All’ ‘Favorite’ ‘Satellite’
3. Sort
Sorting function A to Z, Z to A, FTA to CAS, CAS to FTA and Satellite.
24
■Edit in the Channel List
Move to option, press
and right side option you select be high lighting.
Back to channel list again press
and the high lighting disappear.
1.To Favorite
Move to Favorite, press
first and press OK button, then you can see default group like Movie,
Music, Sport, Drama and News. If you want to add the selected channel to favorite group, press OK
button.
You can find the added favorite channel in the Favorite list
You can make new favorite group and rename in the Favorite list too.
2.Hide
Select the channel you want to hide and press OK button and put password, then the channel be
hidden. If you want to see the hidden the channel again, Move to Main menu
and select Lock
control and make Hide Channel OFF.
Back to Channel list, You can see hidden channel with “H” beside channel name also the Hide
option change to Unhide in your option.
25
If you want to remove the “H” beside channel name, move to Unhide press OK button and put
password.
3.Lock
Select the channel you want to Lock and move to Lock and press OK button and put password A
lock image will show beside channel name. If you want to un-lock the channel
Press OK button and Put password again.
4.Rename
Change the selected channel name using virtual key board.
Move to Rename option and press OK button and you can see the virtual keyboard.
In the virtual keyboard you can change the letter to Capital or small with lock image key
(beside DEL key) If you want to exit from virtual keyboard after change the channel name, select
ENTER key.
If you want to exit from virtual keyboard without change the channel name, press OK button.
5.Delete
Select the channel you want to delete and move to Delete option and press OK button and put
password.
26
■Favorite Channel Lists
When watching TV or listening to Radio, you can get the favorite group channel by pressing the
FAV button on the remote controller. In the Favorite List, you can see the default favorite groups
like Sports, Drama, News, Movie and Music.
1. Make Fav. List
Move to Make Fav. List press
and OK button to bring virtual key board and make new
favorite group Using virtual keyboard.
To save and exit, select the enter key on the virtual keyboard.
2. Exclude
Move to Exclude press
and press OK button again, If you want to Remove selected
channel & fav group select OK and press OK button.
3. Rename
Move to Rename and press OK button to bring virtual keyboard and change selected channel
& fav group name, then press OK button for change name and exit from virtual keyboard.
4. Add Channels
Move to Add Channels and press OK button, then showing all channel list you have.
For add channels, press OK button you want to add, then you can see check sign beside
channel name.
27
If you want to add the selected channels, move to OK button
and press OK button.
5. Reorder Fav. List
Reorder selected channel & group
Select you want to moving file and Move to Reorder Fav. List and press OK button, then
showing a indicator beside channel name or fav group, then press Up/ Down button you want
to put position and press OK button again, then the channel or fav group moved.
To exit from Favorite Channel List without selection, press FAV button or EXIT button.
■Program Guide
Press the EPG button on the remote controller, you can get the TV electronic program guide(EPG).
Search channels by UP/DOWN buttons and go to (or come back to channel list) program
schedule by LEFT/RIGHT button.
You can see the extended EPG by pressing OK button on the program.
In the EPG menu, Press
to EPG Search and you can see subordinate menu for more detail.
28
1. MODE
Press
Change TV and Radio Channel list.
2. CHANNEL
Press
Select one from All, Favorite and SAT displays
EPG information
3. SEARCH
Press
Search programs by program specific information.
When the channel has a EPG data, The EPG displayed.
Category: Select genre of a programs to be searched.
(SF/ Fantasy/ Horror,,,)
Sub Cat: Select sub-category of programs to be
searched (Adult movie / Romance / Comedy….)
Program name: Select the name of a specific program to be
searched.
Rating: Select Maturity of programs to be searched.
29
4. ZOOM
Press
Select the time-grid of EPG display by 15 Min., 30 Min.,
1 Hour, or move to specific date maximum 7day.
Record reservation in the EPG
30
Under the EPG display, you can make recording reservation, Move to the displayed EPG and press
button you want to recording reservation and letter color change to red
If you select the recording reservation channel, you can see the contents of the channel.
31
If the recording reservation time is duplicated at the same time, you have to adjust the recording
time properly
*Recording reservation
When you power off under recording reservation, and the recording time coming, then It
automatically turns on before one minute of recording reservation time and check HDD.
After one minute lapse, Pop-up window appear whether you recording or not.
32
If you don’t touch RCU, It recognizes as there are no people and carry out recording.
After recording, It turns off automatically.
But if you use RCU during recording, then it recognize that there are a people and does not turn it
off automatically.
■CMS / FILE
Press CMS/FILE button to display recorded file.
33
The Record Plan show the recording status.
Yellow color of channel shows on the recording channel now.
White color channel shows recording reservation channel.
Grey color channel shows failure to recording.
(If the PVR power off at the recording reservation time, then the reserved channel’s color change to
grey.)
You can get more detail information about recording reservation channel
If the recording reservation files are bigger than HDD size, then the PVR ask you which files be
removed and you need to choose.
To exit from CMS / FILE press EXIT button.
■Channel Information
Press the INFO button on the remote controller; you can see general information of the channel.
Press INFO or MENU button to exit.
Press button first shows channel info press button second shows SAT and TP info
Press third shows teletext info if it has.
■RCL
In the live channel it shows previous channel.
34
Under Watching recorded file, RCL change to live channel, and the watching file will maintain it’s
status as you setting if you change to live channel.
■Subtitle
If the watching channel has a subtitle, show it and can select the subtitle language.
■Audio Setting
Press the AUDIO button on the remote controller; you can select the audio language and sound
mode.
The window shows the input audio signal and you can select the audio language among options.
And you can select sound mode among Stereo / Mono Left / Mono Right.
Press the UP/DOWN button to move to another item and press LEFT/RIGHT button to select
option.
Press AUDIO or MENU key to exit.
Under the recording or Trick play you can’t select audio option, you have to select audio option
before recording or Trick play.
35
PVR OPERATION
Maximum 2 channel recording and 1 channel playback.
■Recording
Press
button to record now you watching, On TV screen recording channel info display.
In the channel list, Recording file change it’s color to yellow
36
Press
button to stop recording .
The default recording time is two hour, and you can change the recording time maximum
23h 59min .
CMS-> Record plan->New-> Duration.
The recording notice will be shown in two minute before.
When you make a recording reservation and the power is off, the PVR automatically turn on the
power and make recording. When finish the recording, the PVR power also turn off automatically,
But during recording If you operate RCU, then the power not off automatically.
During recording, if you turn off the power with RCU, then ask again which prevent unexpected
RCU operation. If you want to stop the recording, the recorded file will not be saved.
■Recorded file open
button , you can see your recorded files and your HDD information.
Press
1. Video
Show recorded video files
2. Radio
Show recorded audio files.
3. Record Plan
Show recording file and reserved record list
37
■Record plan
button and move to Record plan and select options
Press
1. New
Select channel and other options.
2.
Edit
Edit setting options.
3. Delete
Delete the Record Plan.
■Play back
Press
button first In the CMS/File menu, Move to recorded file you want to watching and
press OK button to playback.
■Trick play in live signal.
You can watch about 30min live signal trick play. After change channel, the recorded file Removed
automatically.
If you change the channel, then start recording again the changed channel.
Under live signal, The PVR function compatible like a Pause, Jump back, Jump forward, rewind,
Fast forward, slow, frame by frame.
38
■Book mark
Press
button make a book mark on the time bar as you want.
If you want to move next book mark, press PLAY button jump to next book mark
button again.
To remove book mark on the time bar, press
■Play
Display time bar and press the button under the book mark to jump to the next book mark, then the
39
playback start at the marked position.
■Repeat
Press repeat button to repeat in the pointed book marks
If you don’t make book mark, The hole section be repeated.
White point show above time bar that indicate start and end point for repetition.
To exit repeat function, press repeat button again.
■Stop
Stop the watching file and back to live channel
■Pause
Pause the watching file and live signal. If you want to back normal play, press play button.
If you press the button under the recording, the recording continue and showing the procedure
on the time bar.
■Instant replay
In the time bar, it make jump back about 15sec behind from now you watching.
Press PLAY button back to normal play.
40
■Quick skip
In the time bar, it make jump forward about 15sec ahead from now you watching.
Press PLAY button back to normal play.
■Fast forward or random position jump & playback
Move the time bar forward x2,x4,x8,x16 steps and press keep the button then, the time bar move
fast as you desired position.
Press PLAY button back to normal speed.
In the default channel list, if you press the button the channel jump to 100 unit
If you Sort channel as CAS to FTA, the channel jump to CAS and FTA unit.
If you Sort channel as Satellite name, the channel jump to Satellite name unit.
■Fast reverse or random position jump & playback
Move the time bar backward x2, x4, x8, x16 steps and press keep the button the time bar move fast
to backward.
■OSD teletext.
If you watching channel have a teletext, then you can see the Information.
According to color displayed in the teletext, press the color on the RCU like blue, yellow, green and
red the subordinate menu will display
41
■Slow motion or Frame by Frame
Press the button 1~2sec and showing as you push the button show speed as x1/16, x1/8, x1/4, x1/2
steps.
Press the button less than 1sec it show still screen first, As you press the button, show frame by
frame.
Press PLAY button to back normal play
42
USER’S OPTIONS
■USER'S SETTING
1. Aspect Ratio
Select 4:3 PS (Pan & Scan) or 4:3 LB (Letter Box) for
Standard TV or 16:9 for wide screen TV.
2. Banner Time Out
Select the time-out for information banner display from 2 - 10sec.
3. Subtitle
Select subtitle display ON/ OFF. The selected Subtitle Language
on the Language menu will be displayed.
4. Switch Smart EPG/CAM Update
Watching channel or on the process of recording. searched all channel’s EPG save
Automatically In side receiver though power off, the EPG still remain.
When you need update the CAM, You have to change from Smart EPG to CAM Update.
43
■ Lock Control
1. Maturity Control
Select the age limit (OFF, 5, 8, 10, 13, 15 and 18) for programs which have parental control
information. If the contents have a parental guide information, it will be locked automatically
according to the option.
2. System Lock
Select System Lock (ON or OFF). If you select ON,
a password input box will be appeared when you
enter the Main Menu. The default password is 0000.
3. Channel Lock
Select Channel Lock (ON or OFF). Each channel can
be locked according to the option.
Refer to Channel List to lock specific channels
4. Hide Channels
Select Hide Channels (ON or OFF). The hidden
channels will not be displayed on the Channel List.
Refer to Channel List to hide specific channels.
44
■ Language
1. Menu Language
Select a language for Menus, dialog boxes, and help
messages.
2. Audio Language
Select an audio language for the program with
multilingual audio.
3. Subtitle Language
Select a subtitle language for the program with
multilingual subtitle.
45
■ Local Time
Select or change your Time Zone, Year, Month, Date, Hour, Minute and Daylight-saving.
■ USB Mode
1.PC editor
Use PC editor to edit searched channel list
2. File transfer
Up load the recorder file to PC
46
■ HDD Management
Select HDD Format or HDD Exchange. When you
select Format, the system will be restarted and
current HDD will be formatted.
▶ We strongly recommend you use the HDD for A/V or CE only. If you use the HDD for PC
We will not guarantee the HDD performance.
When you select Exchange, current HDD will save recorded file and setting options.
47
SYSTEM SETUP
■ TV Output
1. Channel
Select a UHF TV channel for the TV connected to RF
modulator output. The default channel is 38.
2. CH type
Select a proper TV broadcasting system.
Among PAL B/G, PAL I and PAL D/K
■ LNB SETTING
Tuner 1, Tuner 2
Select Tuner 1 or Tuner 2 first.
Make sure your tuner Connection is Separated or Loop Thru.
Loop through connection between tuner 1and tuner 2.
It is not able to set up tuner 2.
48
In case that the receiver is connected both tuner 1 and
tuner 2, select tuner 1 and set up first, then select tuner 2 and set up.
Hot Key
: Tuner 1
: Tuner 2
49
Copy LNB settings of Tuner 1 to Tuner 2
Once you complete LNB setting of tuner 1,
switch connection type to Loop Thru and switch
back to Separated.
You will see LNB setting of tuner 1 is copied to
tuner2.
Connection
In case the 2 tuners are connected, select separated.
If the Tuner is connected by Loop through, select Loop Thru.
Switch Type
Select your LNB switch type.
Number of LNBs
Select the number of LNBs you have installed.
LNB set up
Move the cursor to each LNB No. for which you want
to set up and press OK button on the RCU. In the
pop up menu, select LNB Type, Local Frequency,
DiSEqC port No., Satellite Name and TP Frequency.
(If you cannot find suitable Satellite Name or
Frequency, you can register new satellite names or
frequencies at the bottommost position of pull-down
list.)
Once your setup is completed, press EXIT button to
save and exit.
The Signal Indicator
It displays Signal Strength and Signal Quality that
you receive a signal.
Make sure that LNB Setting is correct by this indication.
50
Go to Search
Once LNB setting is completed, select Go to
Search to move to Channel Search menu.
■ Channel Search
You can select one of three Channel Search options
such as Auto and Manual Auto
Searches channels automatically using the
information the relook 300S has.
Satellite Name: Select each satellite name or All.
Network Search: Select Network Search ON/OFF
Search Method: Select ALL, FTA, or Scrambled.
All: It detects and searches both FTA and
Scrambled channels.
FTA: It detects and searches only the Free-To-Air
channels.
Scrambled: It detects and searches only the
Scrambled channels.
Manual
Select specific Satellite Name, Frequency, Symbol
Rate, and Polarity and press Manual Search button
51
Advanced
Video PID: Enter the desired number using numeric
buttons.
Audio PID: Enter the desired number using numeric
buttons.
PCR PID: Enter the desired number using numeric
Buttons.
Scan
Select Tuner 1 or Tuner 2 first.
Select LNB: Choose Single/ Dual/ Universal
Symbol Rate: Enter the Symbol Rate using numeric
buttons.
Select Start Searching to search.
■ DiSEqC1.2 Positioner
If you have a DiSEqC1.2 motorized system, then you can use the DiSEqC function.
Select the satellite name first, and change the DiSEqC th Enable and put other options.
Select the TP to catch the strong Signal Strength.
52
■ USALS Setting
USALS is very convenient motorized DiSEqC system that support DiSEqC 1.3 command and also
can get the satellite position automatically if you know your geographical location.
If you have USALS motorized system, then you can use the USALS as follows.
Select the tuner that is connected with USALS system.
Select Enable and Select the satellite name which will be used to identity a motor system.
Put your longitude and Latitude and press OK button start search satellite.
■ Restore Factory Setting
It removes Channel List, FAV List, LNB Settings and
restores original factory settings, but the file you saved still remain in HDD.
53
CI MODULE
■ CI Modules
This menu shows the status of CI Slots, CAMs, and
Smart Cards inserted.
This information varies depending on the CAMs and
Smart Cards inserted.
54
ABOUT
■ System Info
It displays Linux Version, Program Version, Boot Version, Channel List Version, the size of HDD
and first operate date of your PVR.
55
SOFT WARE UPGRADE
Make sure that Hardware Driver and Flash Tools are completely installed on your PC.
-Driver installation
For the first time, follow the instructions from 1 to 10.This procedure is required for initial use for
once.
1. Download the Flash tools on your PC
2. Connect PC and relook 300S by USB Cable
3. If relook is standby mode when it is connected by USB, skip the # 4, follow the # 5 to enter USB
mode.
3-1. If the power is on, follow the instruction # 4 to enter Standby mode first then #5 to enter
“USB” mode.
4. Press Power button more than 2seconds (to turn relook into Standby mode) to turn relook into
Stand-by mode.
5. Press and Hold Power button until you see “USB” on the front display of relook.
6. PC detects new hardware device (important)
7. Driver Installation Wizard Appears
8. Click on proper (recommended) driver search.(the top choice)
9. Click on designate the folder
10. Designate the folder at C:/Programfiles/Flash_tools/VESTAUSB
11. Folder starts transfer
12. Click on Finish when it is done.
Important) The order of this procedure is very important, please do follow the instruction step by
step.
When Driver is installed successfully, it is ready to download the latest image to relook(USB
download instructions)
56
-Latest image downloading
1. Relook and PC have to be connected by USB cable.
2. Relook has to be “USB “upgrade mode (‘USB” on the display of relook)
3. Run the Flash Tools
4. Click on USB? check the “USB connected” message at the bottom
5. Designate the image that you want to download to relook by pressing FILE
6. "DONE" on the front display. Press Power button on RCU. relook will be restarted!
Important) To enter “USB MODE” : Turn relook into standby mode(press the power button more
than two seconds) then press and hold power button again until you see “USB” on the display of
relook.
(For more detail, refer to http:// www.dgstation.co.kr)
57
GLOSSARY OF TERMS
CA
Conditional Access. A system to control
subscriber access to services/ programs.
RF
Radio frequency (known as HF in some
countries).
Common Interface
DVB standard hardware and software
architecture for Conditional Access systems.
SCART
A 21-pin connector used for connection of
the relook, VCR and TV. Also known as
Euro connector
DVB
The Digital Video Broadcast group was
created to establish
a technical framework for the introduction of
digital video broadcasting systems.
EPG
Electronic Program Guide. The programming
information provided
By the service provider that enables a viewer
to find the much
Information of programs.
LNB (Low-Noise Block Converter)
An electronic unit mounted on the satellite
dish. It receives the signals reflected by the
dish and coverts them to signals that can be
used by satellite receiver
Polarization
Polarization allows several programs to be fit
into the same frequency band. The signals
from a satellite are transmitted either with
linear (vertical or horizontal) polarization or
circular (right or left) polarization.
S/PDIF
Sony/Philips Digital Interface Format
digital audio output.
Symbol Rate
Speed of the digital transmission
TS
Transport stream.
CMS
Contents Management System
58
TROUBLE SHOOTING
Problem
No display appeared on front
Possible Causes
Power cord is not plugged in.
No Sound/ Picture
Wrong Audio/ Video output
connection between the
receiver and TV set.
Mute Audio
TV Power off
No Signal
Turn TV on
Check the cable connections,
LNB and other equipment
connected between the
LNB and the receiver, or
adjust the dish.
Wrong direction of the dish
Adjust correctly the
direction of the dish to the
satellite
Check the batteries or
replace with new batteries
Remote controller does not
Batteries are not inserted
correctly or low.
CA module is not working
CA module is not inserted.
CA module is not inserted
correctly.
No HDD space is available.
Recording is not working/
Recording is stopped
Forgot PIN Code
System Halt
What ToDo
Check that power cord is
Panel.
Check Audio/ Video output
connection between the
receiver and TV set.
Press Mute button to recover.
System Halt or Error
59
Check CA module is
inserted correctly.
Check HDD status.
Contact your local service
provider/ dealer.
Press & Hold OK and
Power key on the front
panel to return to stand by
mode.
PRODUCT SPECIFICATION
Part
CPU
Tuner (Twin) & Channel
LNB Control
MPEG Transport Stream &
A/V Decoding
Type
Type
Speed
Data/Instruction Cache
Input Connector
Loop through Connector
Frequency Range
Waveform
Symbol Rate
Loop through Out Impedance
Loop through Gain
Band selection
Switch
Polarization
Transport Stream
Profile & Level
Input TS Data Rate
Aspect Ratio
Video Resolution
Audio Decoding
Audio Mode
60
Specification
IBM's PowerPC405
225MIPS
8KB/16KB
2 x IEC169-2 female
2 x IEC169-2 male
950MHz to 2150MHz
QPSK
1 ~ 45MS/s
75 ohms nominal
0 dB Typical / 3dB Max
22 KHz tone
DiSEqC 1.0/1.2/USALS
13/18V (400mA Max/per
each)
ISO/IEC 13818-1
Specification
MPEG-2 MP@ML
90Mbit/S max.
4:3, 16:9 with pan vector
720 x 576(PAL), 720 x 480
(NTSC)
MPEG-1 Audio Layer 1,2
Stereo, Dual Channel,
Joint Stereo, Mono
Part
Memory
Conditional Access System
A/V & Data In/Out
Local Storage
Power Supply
Type
Sample Rate
Flash Memory
SDRAM
EEPROM
Type
CI
Number of Slot
TV SCART
VCR SCART
RCA
Data Interface
Type
Size
Input Voltage
Type
Power Consumption
Protection
Physical Specification
Environment
Size (W x H x D)
Weight
Operating Temperature
Storage Temperature
61
Specification
32, 44.1, and 48KHz
8MB
24MB
0KB
PCMCIA TYPE 2
DVB CI standard
2
1 x SCART
1 x SCART
Video x 1, Audio L/R X1
9 Pin D-Sub, RS232C,
Baud Rate 115200 Max
ATA - 3
User selectable
AC90-240V, 50Hz/60Hz
Linear PWM
50W max.(Under 7W max.
at stand-by mode)
- Separate Internal Fuse
and Chassis, - Grounding
The Input shall have
lightning or Electric Shock
Protection
320mm x 58mm x 240mm
About 4 .0kg
+ 5 C ~ + 45 c
- 40 C ~ + 60 c
Connecting People To Digital Home Entertainment
Issue:relook 300S
2004. Dgstation Co., Ltd. - Korea
If in doubt about this manual, Please send your comments to :
Rm.401,Bldg.A,Bundang Techno Park 150,
Yatap-dong, Bundang-gu, Sungnam-si,
Gyunggi-do, 463-760, Korea
V1.0
62