1
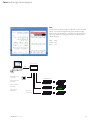
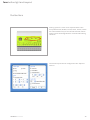
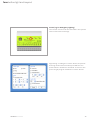
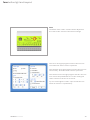
feno before light and beyond
feno before light and beyond
User Manual Multi 4 Control
Version 2.0
feno GmbH, Kolpingring 22,
82041 Oberhaching, Germany
P +49 89 613725 30, F +49 89 613725 50
[email protected], www.feno.com
©feno GmbH/Date: 01.02.2010
feno before light and beyond
This manual and the associated software (hereinafter
referred to as "documentation") are provided to users
for information purposes only. feno GmbH (hereinafter referred to as "feno") reserves the right to make
changes to the documentation or to withdraw the
documentation at any time.
This documentation may not be copied, transmitted,
reproduced, published or duplicated either in whole
or in part prior to written consent from feno. All
information in this documentation is the property of
feno. feno provides this documentation "in its
present form" and accepts no liability for it or any
express or implicit guarantees or suitability for any
particular purpose.
feno can under no circumstances be held liable for any
direct or indirect damage arising from the use of this
documentation, including but not restricted to loss
of profit, interruption of business, loss of goodwill or
data, even if feno is expressly notified of such loss or
damage. Use of the products specified in this
documentation and the documentation itself are
subject to the relevant licence agreement of the user.
The producer of this documentation is feno. All rights
reserved.
©feno GmbH/Date: 01.02.2010
feno before light and beyond
Contents
System Requirements
fc s.multi 4d Specifications
Installation
User Interface
Online/Offline Mode
Operation
Color Selection
Programming
Device Settings
Pushbuttons
Inputs
©feno GmbH/Date: 01.02.2010
5
6
7
9
10
11
13
17
19
20
25
feno before light and beyond
System Requirements
Operation system
Windows 2000, Windows XP, Net Framework 1.1
RAM
at least 64 MB RAM
Free space on the hard disk
approx. 10 MB
Screen resolution
1024 x 768 recommended
Interfaces
One free USB port for online mode
©feno GmbH/Date: 01.02.2010
5
feno before light and beyond
fc s.multi 4d Specifications
The software enables you to create your own light programs which you can either transfer to a
connected fc s.multi 4d lighting control unit or save as a file to a hard disk.
42 mm
Product
167 mm
This software enables you to:
· easily create and edit individual light moods
· combine several light moods into one light program
· save light programs in a file
· load saved light programs and edit or run them
· attach light moods to a light program
· delete light moods from anywhere within a light
program
· edit cross-fade effects between the individual
light moods in terms of speed and intensity
· set light moods in any of three different ways:
1) by selecting RGB color values using sliders or
by entering the values directly
2) by combining RGB and white (RGBW) using sliders
or by entering the values directly
3) by setting 4 channels individually (W) using sliders
· edit light moods anywhere within a light program
· insert light moods anywhere within a light program
· run light programs on a PC in preview mode
· set the basic brightness
· define hold times for each light mood
©feno GmbH/Date: 01.02.2010
6
feno before light and beyond
Installation
First install the Multi 4 Control software by running
the installation program.
Then connect the device via USB cable to the
computer. The computer will then automatically
search for new hardware.
The software will be installed in the specified
directory
Default:
C:\Program Files\feno\Multi 4 Control V2.0\
©feno GmbH/Date: 01.02.2010
7
feno before light and beyond
Select "Next" and then "Finish".
©feno GmbH/Date: 01.02.2010
8
feno before light and beyond
User Interface
Current mood
The mood is held for the
defined period of time.
The unit fades to the next
mood in the defined period
of time.
Preview field
Add new mood
Insert new
mood
Reset current mood
Sliders for setting colors as
percentage or for direct entry
Copy to clipboard
Paste from
clipboard
Delete current mood
©feno GmbH/Date: 01.02.2010
The storage space available
in the unit, maximum of 244
moods.
9
feno before light and beyond
Online/Offline Mode
Loading a Light Program from fc s.multi 4d
You can run the software either offline or with an
active connection to an fc s.multi 4d (online).
To establish an active connection your PC must be
linked to the fc s.multi 4d via a standard USB cable
and the fc s.multi 4d must be connected to a power
supply. If you have connected the fc s.multi 4d to your
PC the stored light program will automatically be
loaded into the Multi 4 Control software.
When a connection is made to the unit the
current firmware is automatically checked and,
if appropriate, replaced by a newer version (the
message "Firmware upgrade" will appear during the
initialisation). This can take up to one minute. Do not
switch off during this time and do not break the
connection to the PC as this would damage the unit.
Creating a New Light Program
If you have not connected the fc s.multi 4d to your PC,
select "offline" and select "OK". The Multi 4 Control
software will open, enabling you to create a new light
program offline.
©feno GmbH/Date: 01.02.2010
10
feno before light and beyond
Operation
Saving a Light program in fc s.multi 4d
When you have created your light program or loaded
an existing file you can save it in the fc s.multi 4d. To
do this the unit must be connected. Select "download"
to permanently save the light program on the
fc s.multi 4d. You can change or overwrite it at any
time.
Select "Exit" to close the Multi 4 Control software.
Make sure that your light program has been saved to a
file or to the unit before doing this.
©feno GmbH/Date: 01.02.2010
11
feno before light and beyond
Opening a Light Program
Select "Load sequence" and then select a file with the
suffix ".kseq".
Saving a Light Program
Select "Save sequence" to save your light program.
Your file will be saved with the suffix ".kseq".
©feno GmbH/Date: 01.02.2010
12
feno before light and beyond
Color Selection
How do I set a color?
The color values can be entered directly in the input
fields for the channels or adjusted as percentage
values with the sliders. The top left section shows the
RGB color mixture of the first three channels. The top
right section shows the RGBW color mixture of all four
channels.
©feno GmbH/Date: 01.02.2010
13
feno before light and beyond
RGB
The first three channels are combined to form an RGB
value. If you have assigned red, green and blue light
sources to your channels 1, 2 and 3 you can select the
color you want by moving the sliders or entering the
values directly.
Red: 255
Green: 127
Blue: 127
fc s.multi 4d
USB
1 2 3
External button
(optional)
25 ECGs max.
Motion detector
(optional)
25 ECGs max.
Potentiometer
(optional)
Light sensor
(optional)
©feno GmbH/Date: 01.02.2010
DSI/DALI
4 channels
25 ECGs max.
14
feno before light and beyond
RGBW
Four channels are combined to form a unit. A white
light source can be connected to the extra fourth
channel to intensify the light. All four channels can be
set by moving the sliders or entering the values
directly.
Red: 255
Green: 127
Blue: 127
White: 127
fc s.multi 4d
USB
1 2
3 4
25 ECGs max.
External button
(optional)
25 ECGs max.
Motion detector
(optional)
25 ECGs max.
Potentiometer
(optional)
Light sensor
(optional)
©feno GmbH/Date: 01.02.2010
DSI/DALI
4 channels
25 ECGs max.
15
feno before light and beyond
Individual Channels
Each of the 4 channels can individually be set to a
specific value by moving the sliders or entering the
value directly. This enables adjustment of the luminous intensity.
fc s.multi 4d
USB
1 2
3 4
25 ECGs max.
External button
(optional)
25 ECGs max.
Motion detector
(optional)
25 ECGs max.
Potentiometer
(optional)
Light sensor
(optional)
©feno GmbH/Date: 01.02.2010
DSI/DALI
4 channels
25 ECGs max.
16
feno before light and beyond
Programming
Cross-Fading and Hold Time
You can sequence individual moods and assign
cross-fade properties to them. You can also specify
different hold times for each mood. The settings are
in hh:mm:ss up to a maximum of 1:59:59.
Preview
As you create a light program you can view the result
by activating "Preview".
The preview for the sequence always begins with the
mood that is currently being edited and not at the
start of the sequence itself.
©feno GmbH/Date: 01.02.2010
17
feno before light and beyond
2
1
3
Programming a Sequence
Step 1: Select the color settings for the channels as
described in the previous chapter.
Step 2: You now have the option of holding the mood
for as long as you like and you can also decide whether
to cross-fade into the next mood. You can specify the
exact time the cross-fade lasts. The program then
automatically calculates the cross-fade step size to
achieve a smooth effect.
Step 3: When you have finished setting your mood
select "append" to add a new empty mood to the
current sequence. You can optionally remove all the
current color settings by selecting "reset" in order to
start again. This way you can add one mood to another
and view the result in the preview field.
Additional Functions
By selecting you can insert a new mood
anywhere in the sequence.
To delete the entire mood, select
.
Save all the color values of the mood by selecting
.
Transfer these values to another mood by selecting
.
.
©feno GmbH/Date: 01.02.2010
18
feno before light and beyond
Device Settings
The device settings can be opened by selecting
"setup".
Output: In the "output signal" section you have a
choice between "DSI", "DALI" and "PWM". The device
will then transmit the appropriate signal.
©feno GmbH/Date: 01.02.2010
19
feno before light and beyond
Pushbuttons
Setting up the fc s.multi 4d is simple thanks to the
four pushbuttons (Enable, Preset, Start, Pause). These
are connected directly to the relevant external switch
inputs, which are designated for conventional floating
contacts.
The switch inputs can be configured in the "Options"
section.
©feno GmbH/Date: 01.02.2010
20
feno before light and beyond
Enable (e.g. for External Enable switch)
The "Enable" button is activated by the "use external
enable switch" check box . As long as the "Enable"
button is held down, the unit will react to "start" and
send a previously set signal.
If the "use external enable switch" check box is
activated the "Enable" input in the unit is polled. This
enables you to activate or deactivate the output of the
unit.
©feno GmbH/Date: 01.02.2010
21
feno before light and beyond
Preset (e.g. for Emergency Lighting)
The "Preset" function can be controlled in the "preset"
section of the device settings.
By pressing + holding the "Preset" button, the preset
dimming values will be initiated, provided the "use
preset switch" checkbox is activated. To return to the
previous light program release the "Preset" button.
©feno GmbH/Date: 01.02.2010
22
feno before light and beyond
Start
The effect of the "Start" contact can be adjusted in
the "start mode" section of the device settings.
start once: The light program stored in the unit runs
once when the "Start" button is pressed.
start endless: The light program stored in the unit runs
continuously when the "Start" button is pressed.
start with timer at: The light program stored in the unit
runs once at the predefined time. In this setting the
"Start" button on the unit is not active.
Tip: You can bridge the "Start" input so that the unit
starts as soon as it is powered up.
©feno GmbH/Date: 01.02.2010
23
feno before light and beyond
Pause
Press and hold the "Pause" button to pause the
current light program.
If the unit is in time mode and the "Pause" button is
released again the program resumes at the point it
would have reached without the interruption.
Master Dimm
The basic brightness of the connected light sources
can be controlled in the "master dimm" section.
Internal dimming value 255 = 100 %
= max. luminous intensity
Use External Dimm
If the "use external dimm" check box is activated a
light sensor or potentiometer can be used to set the
basic brightness. If, for example, the internal dimming
value is 50 % and the potentiometer setting is 50 %
the light sources would be set to a basic brightness of
25 %.
©feno GmbH/Date: 01.02.2010
24
feno before light and beyond
Inputs
Conventional floating buttons and switches can be
connected to the inputs of the fc s.multi 4d, such as
pushbuttons, motion detectors, daylight sensors and
a central on/off switch so that for example a fixed light
scene (emergency lighting, light for cleaning) or a light
program can be started. The 1..10-V input enables
overriding dimming via daylight sensors or an external
100 kW potentiometer.
©feno GmbH/Date: 01.02.2010
25