1
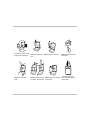
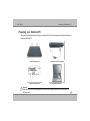
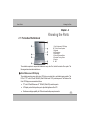
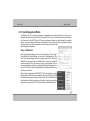
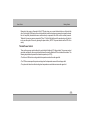
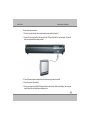
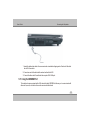
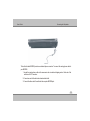
Notebook PC
User’s Guide
NB-PEARL
Notational Conventions
Throughout this manual, the following conventions are used to distinguish elements of text.
Note:
Tips and information for special situations.
Warning !
Important information that must be followed for safe operation.
Tip :
Tips and useful information for completing tasks.
Caution:
identifies important information that, if not followed,
may result in loss of data or damage to the computer.
Important !
Vital information that must be followed to prevent
damage to data, components, or persons.
Keyboard keys are shown in a bold typeset. For example:
Press Enter to complete.
When keys are joined by a plus sign (+), press the first key, and, while keeping the first key down, press the
remaining keys, finally release all the keys. When necessary, keys are also shown in graphics.
A title, command, setup item, or button that you can see on the screen is shown in boldface.
Overview
Chapter - 1
Introducing the Notebook PC
1-1
Chapter - 2
Knowing the Parts
2-1
Chapter - 3
Getting Started
3-1
Chapter - 4
Using the Notebook PC
4-1
Chapter -5
Connecting the Peripherals
5-1
Chapter - 6
Caring for your Notebook
6-1
TAKING CARE OF YOUR NOTEBOOK PC
To prevent possible overheating of the computer's
processor, make sure you don't block the openings
provided for ventilation.
DO NOT press or touch the display panel.
DO NOT place or drop objects on the computer
and DO NOT apply heavy pressure on it.
DO NOT subject the computer to magnetic
fields.
DO NOT place on uneven or unstable work
surfaces.
DO NOT use your notebook computer under
harsh conditions.
DO NOT expose to direct sunlight.
DO NOT use or store in extreme
temperatures.
Avoid sudden changes in temperature or humidity
by keeping it away fromA/C and heating vents.
DO NOT expose to dust and/or corrosive
chemicals.
DO NOT expose the computer to rain or
moisture.
DO NOT slam your notebook shut and never
pick up or hold your notebook by the display.
DO NOT place near fire or other sources of heat.
DO NOT spray water or any other cleaning fluids
directly on the display.
DO NOT tamper with the batteries. Keep them
away from children.
If you are traveling with your computer,
remember to carry it as hand luggage. Do not
check it in as baggage.
User's Guide
Introducing the Notebook PC
Chapter - 1
Introducing the Notebook PC
Transportation Precautions
To prepare the Notebook PC for transport, you should turn it OFF and disconnect
all external peripherals to prevent damage to the connectors. The hard disk drive's
head retracts when the power is turned OFF to prevent scratching of the hard disk
surface during transport. Therefore, you should not transport the Notebook PC
while the power is still ON. Close the display panel and check that it is latched
securely in the closed position to protect the keyboard and a display panel.
Cover Your Notebook PC
You can purchase an optional carrying case to protect it from dirt, water, shock, and scratches.
Note :
The surface glaze is easily dulled if not properly cared for. Be careful not to rub or scrap the Notebook PC surfaces when
transporting your Notebook PC.
Cover Your Batteries
If you intend to use battery power, be sure to fully charge your battery pack and any optional battery packs
before going on long trips. Remember that the power adapter charges the battery pack as long as it is plugged
into the computer and an AC power source. Be aware that it takes much longer to charge the battery pack when
the Notebook PC is in use.
1-1
User's Guide
Introducing the Notebook PC
Airplane Precautions
Contact your airline if you want to use the Notebook PC on the airplane. Most airlines will have restrictions for
using electronic devices. Most airlines will allow electronic use only between and not during takeoffs and
landings.
Caution :
There are three main types of airport security devices: X-ray machines (used on items placed on conveyor belts), magnetic
detectors (used on people walking through security checks), and magnetic wands (hand-held devices used on people or
individual items). You can send your Notebook PC and diskettes through airport X-ray machines. However, it is
recommended that you do not send your Notebook PC or diskettes through airport magnetic detectors or expose them to
magnetic wands.
1-2
User's Guide
Introducing the Notebook PC
Preparing your Notebook PC
These are only quick instructions for using your Notebook PC. Read the later pages for detailed information on
using your notebook PC.
1. Install the battery pack
3. Open the Display Panel
2. Connect the AC Power Adapter
4. Turn ON the Notebook PC
Important :
When opening, do not force the display panel down to the table or else the hinges may break! Never lift the notebook PC by
the display panel!
1-3
User's Guide
Knowing the Parts
Chapter - 2
Knowing the Parts
2.1 The Inside of the Notebook
9
10
1. Color Widescreen LCD Display
2&7. Built-in Stereo Speaker
3. Keyboard
4. LED Indicators
5. Easy Buttons
6. Power On/Resume Button
8. Touchpad Pointing Device
9. Camera
10. MIC
The notebook computer is compact with features on every side. First, look at the inside of the system. The
following sections describe inside features.
1
Color Widescreen LCD Display
The notebook computer comes with a color LCD that you can adjust for a comfortable viewing position. The
LCD is 14” TFT color LCD with 1280x800 (Wide XGA with ratio 16:10) resolution panels. The features of the
Color LCD Display are summarized as follows:
! TFT color LCD with Widescreen 14” 1280x800 (Wide XGA) resolution panels.
! LCD display control hot-keys allows you to adjust the brightness of the LCD.
! Simultaneous display capability for LCD and external desktop computer monitor.
Built-in Stereo Speakers
2-1
User's Guide
2&7
Knowing the Parts
Built-in Stereo Speaker
Integrated left and right mini stereo speakers for sound and audio output for your multimedia presentations or
listening pleasure.
3
Keyboard
Standard QWERTY-key layout and full-sized 87 keys keyboard with Windows system hot-keys, embedded
numeric keypad, 10 hot keys, inverted "T" cursor arrow keys, and separate page screen control keys.
Wide extra space below the keyboard panel for your wrist or palm to sit-on comfortably during typing.
4
LED Indicators
Keeps you informed of your notebook computer’s current power status and operating status. Description of the
status icons appears in the latter part of this section.
5
Easy Buttons
There are three easy buttons used for CPU throttling, accessing Internet and Wireless LAN functions instantly
and easily. Description of the easy buttons appears in the latter part of this section.
6
Power On/Resume Button
Switches the computer power on and off, or resumes whenever it is in Suspend mode.
8
Touchpad Pointing Device
Microsoft mouse compatible with two Touchpad click buttons. The two select buttons located at each side
support tapping selection and dragging functions. These buttons work like a standard computer mouse.
2-2
User's Guide
Knowing the Parts
Simply move your fingertip over the touchpad to control the position of the cursor. Use the selection buttons
below the touchpad to select menu items.
9
Camera (on selected Models)
The built-in Camera allows picture taking or video recording. Can be used with video conferencing and other
interactive applications
10
Microphone (Built-in)
The built-in mono microphone can be used for video conferencing, Voice narrations, or simple audio
recordings
NOTEBOOK STATUS ICONS
1. Power Indicator
2. Battery Charging LED
3. Drive Access
4. Wireless LAN Access
5. Caps Lock
6. Scroll Lock
7. Num Lock
2-3
User's Guide
Knowing the Parts
The Status LED Panel keeps you informed of the notebook’s current power and operating status. Each LED is
marked with an icon to designate the system status.
1
Power Indicator
Lets you know that power to the system is turned on. This LED is positioned so that you can see the power state
whether the LCD panel is opened or closed.
!
!
!
!
2
Lights green when the system is powered on.
Lights green blinking when the system is in Standby mode.
Lights yellow when the battery power is low.
Lights orange when the battery power is critical low.
Battery Charging LED
Lights to indicate battery in charging status.
! Lights orange to indicate that the battery is in charging.
! Lights orange blinking when the battery charging is in error.
! Lights green to indicate the battery is fully charged or no battery installed.
3
Drive Access
When LED in green blinking light indicates that the system is accessing the Hard Disk or Optical Disk Drive.
2-4
User's Guide
4
Knowing the Parts
Wireless LAN access/Bluetooth (If available)
When LED in green light indicates that the wireless LAN module/bluetooth (if available) is activated. When
LED lights off, it indicates that the function is disabled.
5
Caps Lock
When LED in green light indicates that the Caps Lock key on the keyboard is activated. When activated, all
alphabet keys typed in will be in uppercase or capital letters.
6
Scroll Lock
When LED in green indicates that the Scroll Lock key on the keyboard is activated. The Scroll Lock key has
different functions depending on the software you are using.
7
Num Lock
When LED in green light indicates that the Num Lock key on the keyboard is activated. When activated, the
embedded numeric keypad will be enabled.
1. Wireless LAN Button/bluetooth (if available)
2. Internet Button
3. CPU Throttling
2-5
User's Guide
Knowing the Parts
THE FUNCTION OF EASY BUTTONS
1
Wireless LAN Button
Push this button to activate or inactivate the Wireless LAN/Bluetooth (if available). When you activate the
wireless LAN function, it will search the wireless LAN signal automatically if you had installed the driver. And
Bluetooth enable. If you have installed the driver (if available)
2
Internet Button
This technology is designed specifically for providing a very convenient way in connecting Internet only by
pressing Internet button as shown in the graphics. Just Press this button to open the Internet Explorer directly.
3
CPU Throttling
Press this button to decrease the CPU performance speed in order to save power for extending battery life and
operation time.
2.2 The Front Side of the Notebook
1. Cover Switch
2-6
User's Guide
Knowing the Parts
Cover Switch
The cover (LCD panel) is locked when it is closed. Slide the button right aside to release the latch for opening
the cover of the computer.
2.3 The Rear Side of the Notebook
The system ports at the back of your notebook computer can connect various devices. Each port is described
as followings.
1. Kensington Lock Hole
2. VGA Port
1
Locking Device Keyhole
Lets you attach a Kensington security system or a compatible lock to physically secure your notebook
computer.
2-7
User's Guide
2
Knowing the Parts
VGA Port
Lets you attach an external monitor or projector for wider display. You can run the LCD display and the external
monitor simultaneously or switch it to monitor only using the display hot-key.
2.4 The Left Side of the Notebook
1. DC Power Port
2. LAN Port
3. USB 2.0 Ports
4. Air-Outlet Vent
5. Headphone Jack
6. Line-In Jack
7. Microphone Jack
8. 4 in 1 card slot
9. PCMCIA Card Slot
The left side of your notebook computer provides the features shown in the following figure.
1
DC Power Port
Lets you connect the AC power adapter in supplying continuous power to your notebook and recharging the
battery.
2
LAN Port
An internal 10Base-T/100Base-TX/1000Base-TX Ethernet LAN module connects your computer to other
computers/networks through a local area network (LAN).
2-8
User's Guide
3
Knowing the Parts
USB 2.0 Ports
The Universal Serial Bus (USB) port allows you to connect USB 2.0-compliant devices (for example, printers,
scanners and so on) to your notebook computer.
4
Air-Outlet Vent
Emits the heat out of your computer and keeps it within operating temperature.
5
Headphone Jack (with SPDIF out)
Lets you plug in a stereo headphone, powered speakers, or earphone set with 1/8 inch phono plug for personal
listening. (The SPDIF transmits digitized audio signal by optical fiber. The external audio amplifier can get the
best audio quality without loss.)
6
Line-In Jack
Lets you connect audio sources, such as external CD, players to this jack for recording on your computer or
playback through the Line-Out device.
7
Microphone Jack
Allows you to connect an external microphone for monophonic sound recording directly into your notebook
computer.
8
4 in 1 card slot
The card slot supports SD, MMC, MS (Memory Stick) and MS_Pro flash memory card format. You can use
either of the 4 types flash memory cards for extra storage media. Please pay attention to correct direction when
you insert the flash memory card.
2-9
User's Guide
9
Knowing the Parts
PCMCIA Card Slot
A newly developed PC Card interface, its connector has a potential transfer rate of up to 500 MB/sec (or 250
MB/sec in each direction).
2.5 The Right Side of the Notebook
The right side of the notebook computer offers the features shown in the following figure.
1. Optical Disk Drive
2. USB 2.0 Ports
3. Modem Port
Right Side Features
1
Optical Disk Drive
Allows you to load and start programs from a compact disc (CD) or a digital video disc (DVD) and play
conventional audio CDs. It also can make CD/DVD by using CD-R/RW or DVD-R/RW. (Burning DVD is only
possible with models equipped with a DVD burner)
2-10
User's Guide
2
Knowing the Parts
USB 2.0 Ports
The Universal Serial Bus (USB) port allows you to connect USB 2.0-compliant devices (for example, printers,
scanners and so on) to your notebook computer.
3
MODEM Port
A 56K internal fax/data MODEM is installed. It keeps you connected to the outside world through phone line.
2.6 The Underside of the Notebook
The bottom of the notebook computer offers the following features.
7
1. Battery Bay
2. Battery Release Latch
3. Hard Disk Compartment
4. Battery Lock Latch
5. Fan
6. Memory Compartment
7. Internal PCI-e slot
Bottom of the System
2-11
User's Guide
1
Knowing the Parts
Battery Bay
Equipped with a choice of Lithium-Ion (Li-Ion) battery pack.
2
Battery Release Latch
To release the battery, first locate the Battery Lock Latch at the left side with unlock status, then push the
Battery Release Latch to the right end to remove the battery pack.
3
Hard Disk Compartment
Open this cover of this compartment to replace with other Hard Disk Drive.
4
Battery Lock Latch
Push the latch to the lock side to lock and secure the battery, or push the latch to the unlock side for unpacking
the battery pack.
5
FAN
6
Memory Compartment
There are two SO-DIMM memory slots. One memory slot is empty for upgrade usage.
7
Internal PCI-express Slot (on selected models)
This PCI-express slot allows to install Intel® Turbo® Memory module
2-12
User's Guide
Knowing the Parts
2.7 Notebook Accessories
AC Adapter
The AC Adapter supplies external power to your notebook computer and charges the internal battery pack
simultaneously. The AC adapter has an auto-switching design that can connect to any 100VAC ~ 240VAC
power outlets. You just change the power cord if you are going to use your notebook in other countries with
different connector outlets.
When you connect the AC adapter, it charges the battery whether or not the notebook computer is powered on.
Battery Pack
Aside from the AC adapter, your computer can also be powered through the internal battery pack. The battery
pack uses rechargeable Lithium-Ion (Li-Ion) battery cells that provide long computing hours when fully
charged and power management enabled. You should always leave the battery inside your computer even
when using the AC adapter as it also acts as a back-up power supply in case power from the AC adapter is cut
off. It is also very important to have the battery pack always charged to prevent battery cell degradation.
2-13
User's Guide
Getting Started
Chapter - 3
Getting Started
3.1 Using the Battery Pack
The notebook is designed to operate with one of the following power sources:
! With AC power using the AC adapter connected to an electrical outlet.
! With a Lithium-Ion (Li-Ion) battery pack.
You should use the AC adapter whenever it is possible, relying on the battery pack only when AC power is
unavailable.
Before you use your notebook computer, install and recharge the battery pack first. The rechargeable Li-Ion
battery pack allows you to operate the notebook without an external power source. When you connect the AC
power adapter, the battery immediately starts to recharge.
For maximum battery performance, fully discharge the battery first before recharging it when you start to use it
first time. To do so, unplug the AC adapter, turn off power management features (through Setup and Windows),
and turn on the system. Once the battery is fully discharged, plug in the AC adapter and recharge the battery.
If you do not discharge the battery completely, it fails to accept a full recharge.
3-1
User's Guide
Getting Started
Installing the Battery Pack
This notebook provides the most convenient way to install the battery pack into your computer. With the
extended nose directed toward the compartment, insert and push the battery pack.
Removing the Battery Pack
To remove the battery pack, slide the lock latch to the end of left side to unlock the battery lock latch (1), and
slide the battery release latch to the end of right side to release the battery latch (2), then take out the battery
pack with your finger (3).
3-2
User's Guide
Getting Started
Replacing the Battery Pack
When your notebook estimates that the battery only has enough charge to continue for a few minutes, it will
alert you with a battery low warning beep. If you are consuming a lot of power by using the audio system, the
PCMCIA Card slots, the hard disk drives, and optical disk drive, your notebook might run out of charge much
sooner than you expect. You should always respond to the battery low indication by connecting to AC power or
turning off your notebook, or suspending your notebook to disk. If you do not do so, the notebook will
automatically suspend to disk and turn off. The contents of the memory will store in the hard disk drive. You will
be unable to restart the notebook until you have connected to the AC adapter or installed a charged battery. To
replace the battery pack, refer to the previous sections on "Installing the Battery Pack" and "Removing the
Battery Pack."
3.2 Connecting the AC Power Source
3-3
User's Guide
Getting Started
The AC adapter provides external power source to your computer and charges the internal battery pack at the
same time. The AC adapter also has an auto-switching design that can connect to any 100VAC ~ 240VAC
power outlets.
To connect the power adapter:
1. Plug the AC power cord into the power socket of the AC power adapter.
2. Plug the other end of the AC power cord to a live AC wall outlet.
3. Plug the connector of the AC adapter to the DC-IN port found at the left side of the computer.
3.3 Starting Your Computer
The Power/Resume button is found on the top of the base unit. Press the Power/Resume button to start your
computer and check that if the Power LED turns on.
3-4
User's Guide
Getting Started
3.4 Turning off Your Computer
If you are not going to use the computer for a while, it is best to turn off the power of the computer for longer use.
Before turning off the power, you need to close first all application programs and shutdown the operating
system.
After turning off the computer, make it a habit to leave the LVDS panel open for a while whenever used for an
extended period of time. This allows the inside parts of the computer to cool off. Closing the panel will force the
heat up against the LCD screen, which may degrade the LCD when done regularly. More importantly, never
close the LVDS panel for a long period of time when computer is on and power saving features are disabled.
3.5
Restarting or Rebooting
After making changes to your operating system, you may be prompted to
restart the system. Some installation processes will provide a dialog box to
allow restart. To restart the system manually, click Windows Start button
and select “Turn off computer” and then choose Restart.
3.6
Powering Off
In Windows Vista, power OFF the Notebook PC by clicking Windows Start
button and select “Turn Off” and then choose Turn Off (or Shut Down).
3-5
User's Guide
Getting Started
Important :
To protect the hard drive, wait at least 5 seconds after turning OFF your Notebook PC before turning it back ON.
3.7
Emergency Shutdown
In case your operating system cannot properly turn OFF or restart, there is an additional way to shutdown your
Notebook PC:
Hold the power button
over 4 seconds
TIP: Use a straightened paper clip to press the shutdown button.
Important :
Do not use emergency shutdown while data is being written; doing so can result in loss or destruction of your data.
3-6
User's Guide
Getting Started
3.8 Power Management Modes
The Notebook PC has a number of automatic or adjustable power saving features that you can use to
maximize battery life and lower Total Cost of Ownership (TCO). You can control some of these features through
the Power menu in the BIOS Setup. ACPI power management settings are made through the operating
system. The power management features are designed to save as much electricity as possible by putting
components into a low power consumption mode as often as possible but also
allow full operation on demand.
Sleep and Hibernate
Power management settings can be found in the Windows > Control Panel >
Power Options. In System Settings, you can define "Sleep/Hibernate" or "Shut
Down" for closing the display panel or pressing the power button. "Sleep" and
"Hibernate" saves power when your Notebook PC is not in use by turning OFF
certain components. When you resume your work, your last status (such as a
document scrolled down half way or email typed half way) will reappear as if you
never left. "Shut Down" will close all applications and ask if you want to save your
work if any are not saved.
Sleep is the same as Suspend-to-RAM (STR). This function stores your current
data and status in RAM while many components are turned OFF. Because RAM
is volatile, it requires power to keep (refresh) the data. Click the Start button and
the arrowhead next to the lock icon to see this option. Recover by pressing any
keyboard key except [Fn]. (NOTE: The power indicator will blink in this mode.)
3-7
User's Guide
Getting Started
Hibernate is the same as Suspend-to-Disk (STD) and stores your current data and status on the hard disk
drive. By doing this, RAM does not have to be periodically refreshed and power consumption is greatly reduced
but not completely eliminated because certain wake-up components like LAN needs to remain powered.
"Hibernate" saves more power compared to "Sleep". Click the Start button and the arrowhead next to the lock
icon to see this option. Recover by pressing the power button. (NOTE: The power indicator will be OFF in this
mode.)
Thermal Power Control
There are three power control methods for controlling the Notebook PC's thermal state. These power control
cannot be configured by the user and should be known in case the Notebook PC should enter these states. The
following temperatures represent the chassis temperature (not CPU).
• The fan turns ON for active cooling when the temperature reaches the safe upper limit.
• The CPU decreases speed for passive cooling when the temperature exceeds the safe upper limit.
• The system shut down for critical cooling when temperature exceeds the maximum safe upper limit.
3-8
User's Guide
Using the Notebook PC
Chapter - 4
Using the Notebook PC
4.1 Operating System
This Notebook PC may offer (depending on territory) its customers the choice of a pre-installed operating
system such as Windows Vista. The levels of hardware and software support may vary depending on the
installed operating system.
Support Software
This Notebook PC comes with a driver CD’s that provides, drivers and
applications to enable hardware features, extend functionality, help manage
your Notebook PC, or add functionality not provided by the native operating
system.
Ths driver CD contains all drivers, utilities and software for all supported
operating systems including those that have been pre-installed. The driver CD
does not include the operating system itself.
Note :
Some of the Notebook PC's components and features may not work until the device drivers and utilities are installed.
4-1
User's Guide
Using the Notebook PC
4.2 Understanding the Keyboard Functions
Your notebook computer is equipped with an 87 keys keyboard that provides all the functionality of a full-sized
101 or 102-key keyboard. Aside from the standard typewriter-layout keyboard of your computer, there are a
number of extra features and function controls on the built-in keyboard including Windows system hot keys.
1. Function Keys
2. Control Keys
3. Windows Start Menu Key
4. Control Keys
5. Windows Shortcut Key
6. Cursor Control Keys Keyboard
4-2
User's Guide
Using the Notebook PC
Key features and operations are described below:
Function Keys
Function keys are application-driven, like F1 through F12 can be found on the keyboard. These keys work
together with the Fn key to activate special functions. Some keys (printed in blue on keypad) are
preprogrammed with dual functions.
Control keys — Ctrl, Alt, Fn, and Shift are controls used in conjunction with other keys to change their
functions. To use control keys, press and hold the control key while pressing another key. For example, "Press
Ctrl-C" means to hold down the Ctrl key and type the letter C. Key combinations work especially to the
application you are running.
Windows keys— Use the following two keys to facilitate your work:
Start Menu key — Displays the Start menu.
Shortcut/Application key
Provides quick access to shortcut menus. This key acts like a right mouse button.
Cursor Control keys
Cursor control keys let you position the cursor on the screen where you want. In the screen, the cursor is a
blinking underline, block, or vertical bar depending on the application. The cursor indicates where the next text
typed is inserted.
Typewriter keys
Typewriter keys (also called alphanumeric keys) are used to enter text and characters. Keys with blue print on
them behave differently when combined with control keys.
4-3
User's Guide
Using the Notebook PC
4.3 Special Function Keys
Keypad
Function Description
+
To enable the Web Camera function.
+
Switches display between LCD, CRT, or LCD and CRT simultaneously.
+
To Mute or Unmute the built-in system speaker volume.
+
Decreases the brightness of LCD display.
+
Increases the brightness of LCD display.
+
Decreases the audio volume of the notebook.
+
Increases the audio volume of the notebook.
+
To Enable/Disable the touchpad function.
4-4
User's Guide
Using the Notebook PC
4.4 Using the Touchpad Pointing Device
Your computer comes with a built-in touchpad pointing device that is found on the center of the palm-rest
surface. The touchpad offers a number of options that let you customize how it functions. To access these
options, locate the Control Panel and double click on the Mouse icon. The options let you control the size and
color of the cursor, cursor speed, the accepted double-click speed, and selection button orientation.
The touchpad works a mouse pointing device replacement that is used under Windows-based operating
system. You can use the standard Microsoft driver that is compatible with the touchpad device and is normally
used under Windows-based operating system. However, if you want to utilize the added features of the
touchpad, you may want to try installing its own device driver that comes with added utilities for enhancing the
function of the device.
1. Left Selection Button
2. Right Selection Button
3. Touchpad
Touchpad Features
4-5
User's Guide
Using the Notebook PC
Here how to use the touchpad pointing device:
1. The rectangular surface acts like a miniature duplicate of your display screen. To move the mouse
cursor, place the finger lightly on the sensor pad and move in the desired direction. If you reach the end
of the pad, lift your finger and place it back down on the other side of the pad.
2. To select an item, click on the item by pressing the left button control or by simply tapping on the surface
once. A light, quick tap always works best. To execute an item, click the left button twice or do a quick
double tap on the surface.
3. To simulate holding the mouse button down (dragging an icon or selection), use the tap-and-drag
gesture. This feels much like a double-click, except that the finger remains on the pad after the second
tap: Tap, lift, tap, hold and move. The simulated button remains held as long as the finger remains on the
pad.
4. When you press both the Left and Right click button at the same time, the auto Scroll function will be
activated.
4.5 Working with the Built-in HDD
Your notebook computer is equipped with a built-in large capacity 2.5 inch hard disk drive where you store and
run your computer’s operating system and application software programs.
4.6 How to Access the Optical Drive
Your system ships with an optical disk drive installed on the right side of your computer. You would normally use
the drive for installing operating system and software application programs.
To insert and remove a disc on the drive:
4-6
User's Guide
Using the Notebook PC
1. Make sure the computer is turned on. Press the eject button found on the door cover of the combo
drive. The DVD/CD tray mechanism will pop-out slightly and slowly pull out the whole length of the tray.
2. Place the disc on top of the DVD/CD tray with the label side facing up. Gently press the compact disc
onto the center spindle to secure the disc.
3. To remove the disc, press on the center spindle and pull up the disc from the side until the disc snaps
out of the spindle lock.
4. To close the combo drive, simply push the CD tray inside. The combo drive LED will activate when the
disc is detected. Wait until the LED has turned off and then start to read the disc.
How to care the Optical Disks (CDs, DVDs, etc.)
When you handle CDs and DVDs, pay attention to the following guidelines:
! Always pick up the disk by its edges.
4-7
User's Guide
!
!
!
!
Using the Notebook PC
Avoid scratching or soiling either side of the disk.
Do not write with the hard ball-point pen or apply labels on either side of the disk.
Keep the disk away from direct sunlight or high temperatures.
Clean fingerprints or dust from the disk by wiping it with a soft cloth.
The above points also apply to other optical storage media.
The optical drive is a Class 1 Laser Product.
4.7 PCMCIA Card
Inserting PCMCIA Card
To insert a PCMCIA Card into the PCMCIA Card slot:
1. Locate the PCMCIA Card slot cover on the left side of the computer.
2. Insert the side of PCMCIA Card into the PCMCIA Card slot. The face label of the card should also be
facing up.
4-8
User's Guide
Using the Notebook PC
3. When the full length of the card is almost inside the slot, push firmly but slowly, to ensure full connection
with the computer. The PCMCIA Card will be automatically detected and once the needed driver is
installed, it will generate a beep sound to indicate that the card is detected.
Removing PCMCIA Card
4-9
User's Guide
Using the Notebook PC
To remove a PCMCIA Card from the PCMCIA Card slot, you should first disable the PCMCIA Card card setting
in the system as described followings:
1. Double click the PCMCIA Card icon on the right bottom side of the task bar.
2. Select the socket from the list that you want to remove, and click Stop button. The system then disables
the function of PCMCIA Card.
3. Then you can remove the inserted PCMCIA Card, push the PCMCIA Card to the bottom to release the
PCMCIA Card.
4. When the PCMCIA Card has moved out a space out of the slot, hold the edges of the card and slowly
slide it out.
4.8 Using Flash Memory Cards
WHAT IS FLASH MEMORY CARD?
Flash Memory is a memory storage media. It is used by most digital camera, moreover, it can replace the
traditional floppy disk. Flash memory card is built with different form factor and brand name. Their size is
smaller than PCMCIA card. This computer supports most of the flash memory card, including SD, MMC, MS
(Memory Stick), and MS_Pro card.
The 4 in 1 card slot is used by the following cards as SD, MS (Memory Stick ), MMC, and MS_Pro.
Inserting Flash Memory Card
To insert a flash memory card into the slot is similar to PCMCIA Card. You only need to pay more attention
whenever insert the flash memory card into the slot with the correct side.
4-10
User's Guide
Using the Notebook PC
Slot
Card type
Copper connector
4 in 1
SD (Secure Digital)
MMC (MultiMedia Card)
MS (Memory Stick)
MS_Pro
Bottom side
Bottom
Top side
Top side
For MMC and SD card, you should position the copper connector at the bottom side. For Memory Stick card,
you should position the copper connector at the topside. All of these cards should be located at the center of the
slots in inserting.
Only one correct side can be accepted for the 4 in 1 card slots. If you cannot insert the card into the 4 in 1 slot or
you had inserted the card but it is not recognized by the computer, please remove the card and turn the card
upside down and insert it again. To prevent the damage made both on card and the slot, never forced an entry
into the slot with incorrect side.
4-11
User's Guide
Using the Notebook PC
Removing Flash Memory Card
It is similar to PCMCIA Card for removing a flash memory card from the slot. You should first disable the card
setting in the system as described in the former section. To remove the flash memory card, you should only pull
out the card by finger, there is no release button for flash memory slot.
4-12
User's Guide
Connecting the Peripherals
Chapter - 5
Connecting the Peripherals
Connecting to Peripherals
This chapter describes how you attach peripheral devices to your notebook. You can attach a printer or mouse;
connect an external monitor and keyboard, or any other peripheral device. You will learn how to use these
peripheral devices with the step-by-step instructions depicted in this chapter.
5-1
User's Guide
Connecting the Peripherals
5.1 Using the USB Port
USB (Universal Serial Bus) is a hardware interface that enables you to connect multiple devices (such as
printers, mouse, keyboards, storage devices, joysticks, digital cameras, and video conference cameras, etc.)
to your notebook computer, and up to 127 devices can be attached. Besides, USB’s hot swap capability allows
everything to be plugged in and unplugged without turning the system off.
5.2 Using an External Monitor Port
Your computer has a 15-pin Monitor port for supporting any external CRT or LCD color monitor. You need a
display signal cable (usually provided with the monitor). One end of the cable must have a 15-pin connector for
the system.
5-2
User's Guide
Connecting the Peripherals
To connect an external monitor:
1. Turn off your computer and make sure the monitor power switch is turned off.
2. Connect the connector cable of the monitor to the VGA port at the back of your computer. Secure the
cable connection with the screws provided.
3. Connect the monitor power cable and plug it into a properly grounded wall outlet.
4. Turn on the power of the monitor.
5. Turn on your computer. Both the LCD panel and the monitor screen will show the display. Your computer
is set at default to run at simultaneous display mode.
5-3
User's Guide
Connecting the Peripherals
6. If you only want to show the display on the external monitor or projector and shut off the LCD display, you
can use the <Fn> + <F3> hot-key to switch display type between LCD and external monitor. Keep
pressing the hot-key until you get the display to external monitor only.
5.3 Using the External Audio System
At the left side of your computer, you will find the built-in audio ports. You can connect Microphone jacks,
earphone or powered speaker.
To connect to a audio jack:
1. Locate the audio port (Microphone, Headphone) that you want to use to the target device.
2. Plug the jack into the port on the left side of the system.
If you use external speakers and experience the sound distortion or feedback, please lower the volume.
Some factors is caused by too close locating the microphone and speakers from each other, moving away
the external audio option from the unit may also help.
5.4 Using the LAN Port
This notebook comes with an internal 10Base-T/100Base-TX/1000Base-TX LAN module that connects your
computer to other computers/networks through a local area network (LAN) and supports data transfer rates at
10Mbps and can be up to 1000Mbps. The 10Base-T standard also called Twisted Pair Ethernet is connected
with RJ-45 connectors. The 100Base-TX is based on the older Ethernet standard. Because it is 100 times
faster than Ethernet, it is often referred to as Fast Ethernet.
The built-in LAN module provides a standard RJ-45 connector. To connect the twisted-pair cable to your LAN
port:
5-4
User's Guide
Connecting the Peripherals
1. Locate the twisted-pair cable in the accessories box in notebook shipping carton. Each end of the cable
has a RJ-45 connector.
2. Connect one end of the cable into the network wall outlet or HUB.
3. Connect the other end of the cable into the computer RJ-45 LAN port.
5.5 Using the MODEM Port
This notebook comes equipped with a 56K internal fax/data MODEM that allows you to communicate with
others via fax, email, or to connect to an online service or bulletin board.
5-5
User's Guide
Connecting the Peripherals
The built-in fax/data MODEM provides on standard phone connector. To connect the analog phone cable to
your MODEM:
1. Locate the analog phone cable in the accessories box in notebook shipping carton. Each end of the
cable has a RJ-11 connector.
2. Connect one end of the cable into a standard wall outlet.
3. Connect the other end of the cable into the computer MODEM port.
5-6
User's Guide
Connecting the Peripherals
5.6 Using the Wireless LAN (On Selected Models)
Wireless LAN is the major breakthrough in computer communication technology. It lets user connect to the
LAN environment without using any wire to traditional RJ-45 jack. User can enjoy the wireless connection
within the range of Access Point (AP) of LAN.
Access Point (AP) is the wireless transmission and receiving device, it generally connects to the server of a
LAN environment or act as a LAN hub with wireless connection. Access point can be set in an office
environment, airport, major railway station, etc. that depends on the construction of each country. In most
case, you probably can use it at office, please consult with the network department of your company for more
details.
This computer integrates built-in Tri-mode 802.11 a/b/g wireless LAN module. with using Intel ® PRO/Wireless
network solution by Intel ® Centrino™ mobile technology. IEEE 802.11b standard supports 11 Mbps wireless
connection speed. However, IEEE 802.11g supports 54Mbps wireless connection speed, and is backward
compatible with the slower 802.11b. You can connect to the wireless LAN Access Point without inserting an
extra wireless LAN card into the PCMCIA Card slot. Wireless LAN module is similar to LAN module. You need
to install software driver before using it.
Ad-hoc mode
The Ad-hoc mode allows the Notebook PC to connect to another
wireless device. No access point (AP) is required in this wireless
environment. (All devices must install optional 802.11 wireless LAN
adapters.)
5-7
User's Guide
Connecting the Peripherals
Infrastructure mode
The Infrastructure mode allows the Notebook PC and other wireless devices to join a
wireless network created by an Access Point (AP) (sold separately) that provides a
central link for wireless clients to communicate with each other or with a wired
network.
(All devices must install optional 802.11 wireless LAN adapters.)
These are examples of the Notebook PC connected to a Wireless Network.
5.7 Bluetooth Wireless Connection (on selected models)
Notebook PCs with Bluetooth technology eliminates the need for cables for connecting Bluetooth enabled
devices. Examples of Bluetooth-enabled devices may be Notebook PCs, Desktop PCs, mobile phones, and
PDAs.
Note:
If your Notebook PC did not come with built-in Bluetooth, you need to connect a USB or Express Card Bluetooth module
in order to use Bluetooth.
Bluetooth-enabled mobile phones
You can wireless connect to your mobile phone. Depending on your mobile phone’s
capabilities, you can transfer phone book data, photos, sound files, etc. or use it as a
MODEM to connect to the Internet. You may also use it for SMS messaging.
Bluetooth-enabled computers or PDAs
You can wireless connect to another computer or PDA and exchange files, share
peripherals, or share Internet or network connections. You may also make use of
Bluetooth-enabled wireless keyboard or mouse.
5-8
User's Guide
Caring for your Notebook
Chapter - 6
Caring for your Notebook
6.1 Important Safety Instructions
!
Portable computers take the most beating from end users. This section gives you detailed information
about how to maintain a safe working environment while using the notebook computer. You can maintain
its condition and performance by following these guidelines. Please read it carefully to ensure maximum
safety.
!
Before cleaning the notebook computer, make sure it is disconnected from any external power supplies
(i.e. AC adapter, car adapter and so on).
!
When cleaning, do not use liquid or sprayed detergent for cleaning. Instead, use moisture sheet or a
cloth for cleaning.
!
!
!
!
The socket-outlet shall be installed near the notebook computer and shall be easily accessible.
!
Please keep the notebook computer from humidity.
Lay the notebook computer on a reliable surface when installing. A drop or fall may cause injury.
The openings on the enclosure are for air convection hence the notebook computer can be protected
from overheating. DO NOT COVER THE OPENINGS.
Be careful of using power supply. The notebook computer has specific power requirements.
6-1
User's Guide
!
!
!
!
Caring for your Notebook
Use only a power adapter approved for use with this notebook computer.
The power adapter may have a 2-prong plug. This is an important safety feature. A compatible outlet is
required. If it is not available, find a qualified electrician to install one.
While unplugging the power cord, disconnect it by the plug head, not by its wire.
Make sure the socket and any extension cords you may use can support the total current load of all the
connected devices.
!
Though your AC adapter is suitable for universal international voltage, it still requires a stable and
continual power supply. Make sure the voltage of the power source when connect the notebook computer
to the power outlet. If your are unsure of your local power specifications, consult your dealer or local
power company.
!
Place the power cord in such a way that people can not step on it. Do not place anything over the power
cord.
!
!
All cautions and warnings on the notebook computer should be noted.
!
!
Never pour any liquid into openings as this may cause fire or electrical shock.
!
If one of the following situations arises, have the notebook computer checked by service personnel:
If the notebook computer is not in use for a long time, disconnect it from mains to avoid possible damage
by transient over-voltage.
Never open the body of notebook computer. For safety reason, the notebook computer should only be
opened by qualified service personnel.
6-2
User's Guide
Caring for your Notebook
!
!
!
!
!
!
The power cord or plug is damaged.
Liquid has penetrated into the notebook computer.
The notebook computer has been exposed to moisture.
The notebook computer has not worked well or you can not get it work according to user’s manual.
The notebook computer has dropped and damaged.
The notebook computer has obvious sign of breakage.
!
Do not leave this notebook computer in an environment unconditioned. Storage temperature above
60ºC (140ºF) may damage the notebook computer.
!
!
An approved power cord has to be used for the notebook computer’s power supply.
To avoid any damage happened to the internal device, you should first disconnect the AC adapter and
remove the battery pack from the notebook when replacing any internal device.
6.2 Cleaning Your Computer
When it is necessary to clean the plastic case and keyboard, use a soft, lint-free cloth, slightly dampened with a
mild detergent solution or use the contents of any commercially available computer cleaning kit.
Never use alcohol, petroleum-based solvents, or harsh detergents to clean the notebook. Also never spray any
liquids directly on the computer case, keyboard, or screen. If the Liquid Crystal Display (LCD) screen has
become smeared or dusty, clean the screen by first applying a mild glass cleaner to a soft, clean, lint-free cloth,
and gently wipe the glass. Never apply liquids directly on the screen surface. Moreover, do not use paper
towels to clean the display screen. Paper can scratch the display screen matte.
6-3
User's Guide
Caring for your Notebook
6.3 Maintaining the LCD Quality
When it comes to screen problems, heat plays a big part. After a good working session, the typical routine is to
shut the machine and close the cover. But the display surface - no matter what type it is - and the components
inside the computer radiates heat; when you close the cover, you trap the heat against the screen. Leave the
computer's cover open for about ten minutes while the heat disperses. Make this a habit.
You should also enable the power management of your computer to turn off the LCD power and display when
the system is in inactivity for some time. Adding screen savers is also acceptable.
Follow the safety guidelines mentioned earlier and how to clean your computer.
6.4 Maintaining Your Hard Disk
Losing your data has the same consequences as a system break down. Users must make it a habit of doing
hard disk maintenance every week or so. Here is some maintenance you could do:
!
!
!
Always back up your data files from your hard disk.
Install the virus detecting program to monitor virus that could tamper your files.
Use SCANDISK once in a while to correct any errors found in the directory and File Allocation Table. This
will also free up space from any unused sectors.
!
Never move or raise the computer while the hard disk is being accessed, most especially don't jar the
hard disk as this may cause a hard disk crash.
!
Use hard disk maintenance programs like Disk Defragmenter of Windows. These reorganize your hard
disk by eliminating fragmentation and improving your hard disk access time.
!
Install a system password in your computer so others won't be able to use the hard disk.
6-4
User's Guide
Caring for your Notebook
6.5 Battery Care Guidelines
The battery pack furnished with the computer requires reasonable care and handling to ensure efficient
operation and maximum life. There is a risk of fire and chemical burn if the battery pack is handled improperly.
!
To ensure that the battery pack endures normal life cycle, always observe the following precautions when
handling the battery pack:
!
Handle batteries carefully. Do not try to disassemble, crush, puncture, open, drop, mutilate, short external
contacts, disposed of in water or fire, or expose it to temperatures higher than 60 deg C.
!
Recharge batteries only as described in this manual and only in ventilated areas. Never use an external
charger other than the one supplied with your computer.
!
!
!
Do not leave batteries in hot locations for more than a day or two.
!
Dispose dead battery properly to protect the environment. The batteries contain hazardous chemicals
and should not be thrown out with household or office trash.
!
You should always discharge your battery before recharging it on either of these two conditions: first, this
is the first time you start to use your battery; second, you had not charge the battery for more than 2
months.
Do not leave your battery in your computer for longer than 1 month without plugging in the power adapter.
Do not leave battery in storage for more than 2 months without recharging it to prevent over discharge.
Over discharge will hurt the battery
6-5
User's Guide
Caring for your Notebook
6.6 When You Travel
For safety and convenience when traveling, please follow these instructions:
!
!
!
!
!
!
!
Back up all needed files on your hard disk before traveling.
Recharge your battery overnight to ensure full battery power before you leave.
Don't forget to bring along the AC adapter and extra battery pack.
Try to bring backup software as well.
Check the voltage rating and the outlet type of your destination. If the power cord of the adapter is
different, then you need to purchase a suitable one. Consult your dealer.
Carry your computer in its carrying case or in a briefcase. Never check-in the computer as a luggage.
Remember to apply those power saving features and techniques to save battery power.
-The End6-6