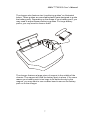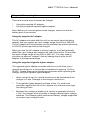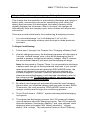
1
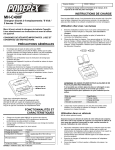
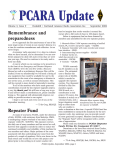
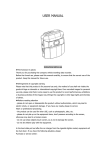
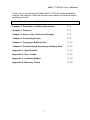
MH-C777PLUS User’s Manual
Thank you for purchasing the Maha MH-C777PLUS advanced battery
charger and analyzer. Read all directions and safety information before
operating this unit.
Table of Contents
Chapter 1: Precaution & Safety Information
P. 2
Chapter 2: Features
P. 3
Chapter 3: How to Use a Universal Charger
P. 5
Chapter 4: Connecting Power
P. 8
Chapter 5: Charging a Battery Pack
P. 10
Chapter 6: Conditioning & Analyzing a Battery Pack
P. 14
Appendix 1: Specification
P. 17
Appendix 2: Error Codes
P. 18
Appendix 3: Contacting Maha
P. 19
Appendix 4: Warranty Terms
P. 20
1
MH-C777PLUS User’s Manual
Chapter 1: Precaution & Safety Information
Please read and observe the following precaution and safety
information while operating the MH-C777PLUS charger.
?
Only charge, condition and analyze rechargeable Lithium Ion (LiIon), Nickel Metal Hydride (NiMH), and Nickel Cadmium (NiCD)
chemistry battery packs. Attempts to charge other types of battery
packs may result in explosions.
?
Due to the unit’s rapid charging current, it is not recommended to
charge battery packs with capacity lower than 400mAh in order to
avoid overheating and possible leakage.
?
When powering the unit with vehicular 13.8V DC power, ensure
that the unit is not plugged in when you start your vehicle.
?
This unit is designed for indoor use only. Do not expose the unit to
high humidity and high temperature.
?
When charging a battery pack that is attached the radio, make sure
that the radio is turned off.
?
Always use the supplied AC adapter or cigarette lighter adapter.
The cigarette lighter adapter includes a fuse. CAUTION: for
continued protection against the risk of fire, replace only with the
same type and rating of fuse.
?
The charger chassis features a magnet. Since the charger is not
shielded, keep it away from computer monitors, diskettes, and other
devices that may become affected by the magnetic field.
?
To reduce the risk of damage to the AC adapter, pull by the
connector rather than the cord when disconnecting.
?
Use of an attachment not recommended by or sold by Maha may
result in a risk of fire, electric shock or injury to persons.
2
MH-C777PLUS User’s Manual
Chapter 2: Features
?
Universal design to accommodate a wide variety of battery packs
for two-way radios, cellular phones, camcorders, and more.
?
Support Lithium Ion (Li-Ion), Nickel Metal Hydride (NiMH), and
Nickel Cadmium (NiCD) battery packs.
?
Supports a wide voltage range from 1.2V to 14.4V (1 to 12 cells) for
NiMH & NiCD, and from 3.6V to 14.4V (1 to 4 cells) for Lithium Ion
battery packs.
?
In addition to battery packs, the charger also supports 1 to 12 cells
of AA, AAA, C, and D rechargeable battery cells.
?
Intelligent microprocessor driven Negative Delta V, Zero Delta V,
and Delta Temperature detection.
?
Analyze and condition battery packs and digitally display capacity.
?
Digitally display voltage, time, and capacity throughout the charge
and discharge processes.
?
Include a light weight travel AC adapter (110/220V) and a car kit.
3
MH-C777PLUS User’s Manual
Charger Diagram
External Charging
Connector
(Not shown)
Positioning Guide
Temperature Sensor
Power
Input
Floating
Charging
Contacts
Battery
Selector
(Not Shown)
Positioning Guide
Discharge Button
Polarity Switch
LCD Screen
Note: If you are charging individual battery cells such as AA, AAA, C or
D batteries, you must obtain an optional “battery holder” and connect it
to the external charging connector. An optional “alligator clip-lead cable”
(P/N: MHS-CW4) can be used as a patch cable.
4
MH-C777PLUS User’s Manual
Chapter 3: How to Use a Universal Charger
One of the unique features on this charger is its ability to charge a wide
array of battery packs regardless of the battery shape. This is made
possible by a pair of “floating charging contacts,” pins that can be
moved from right to left, and from top to bottom.
The following instruction provides a general step-by-step procedure that
will help you to charge many battery packs. However, be sure to
exercise common sense since every battery pack is different from one
another and may require a slightly different approach.
1.
Before you start, it is important to identify which metal contacts on
the battery pack you will use. Generally, battery packs feature two
distinctive sets of contacts. The “discharging contacts” are the ones
used by your device to drain current off the battery pack. They are
generally located on the battery pack where it makes contact with
your equipment. This set of contacts is suitable for charging,
discharging, conditioning, and analyzing.
The other set of contacts, commonly known as the “drop-in
charging contacts”, are the ones designed to be used by drop-in
chargers. This set of contacts are generally found near the bottom
or at the back of your battery pack. Some of the battery packs may
feature a diode protection on the drop-in charging contacts that will
prevent proper discharging. Therefore, if you unable to charge or
discharge the battery pack using the drop-in charging contacts, you
should use the “discharging contacts” as discussed in the previous
paragraph.
2.
After you have selected the set of contacts to use, you must identify
which two metal contacts out of the set to use (positive and
negative respectively). Generally, there are more than two contacts
in a set of contacts. There are two ways to find the right pair.
Voltage Meter: If you have a voltage meter, you can use it to
measure a pair of the contacts available on your battery pack.
When your meter registers a positive voltage that is close to the
rated voltage of the battery pack, you have found the right
combination.
Trial & Error: Since the charger will not respond until you have
connected its charging pins to the right pair of contacts on your
battery pack, you can use a “trial and error” method. Continue to try
different pairs of contact until the charger emits a short beep and
the LCD screen displays “QUICK CHARGE.”
5
MH-C777PLUS User’s Manual
3.
After you have found the right pair of contacts, you must maneuver
the “floating charging contacts” on the charger to mate securely
with your battery pack. As explained earlier, the floating charging
contacts on the charger can be moved to the left or right, top or
bottom. The diagrams below illustrate various ways to move the
contacts:
From the bottom of the charger, you can move the floating charging
contacts in various directions.
6
MH-C777PLUS User’s Manual
The charger also features two “positioning guides” as illustrated
below. These guides are removable plastic parts designed to guide
the battery pack. Depending on the shape of your battery pack, you
may need to adjust these positioning guides. For large battery
packs, you may need to remove them.
The charger features a large piece of magnet in the middle of the
chassis. The magnet will hold the battery pack in place. If for some
reason your battery pack is too large to be held securely by the
magnet, you may want to use a rubber band to secure the battery
pack on to the charger.
7
MH-C777PLUS User’s Manual
Chapter 4: Connecting Power
There are several ways to power the charger:
?
?
Using the supplied AC adapter.
Using the supplied cigarette lighter adapter.
Note: Before you connect power to the charger, make sure that no
battery pack is connected.
Using the supplied AC adapter
The AC adapter included with this unit is a universal travel switching
adapter that can support an input voltage range from 80V to 240VAC.
The AC adapter will automatically convert standard household electricity
to 24V DC power required by the charger.
When you use the AC adapter in foreign regions, it will automatically
detect the input voltage and requires no user intervention. Ensure that
the input voltage range is from 80V to 240V AC. You may need to
purchase an optional “adapter” that will change the plug on the AC
adapter to the appropriate type.
Using the supplied cigarette lighter adapter
The cigarette lighter adapter included with this unit will allow you to
operate the charger in a vehicle that is capable of supplying 13.8V or
24VDC. Please observe the following precautions when operating the
charger using the cigarette lighter adapter:
?
When using the car kit, vehicle should never be started while the
charger is in use. Damage to the charger could occur.
?
The cigarette lighter adapter includes a fuse. For continued
protection against the risk of fire, replace only with the same type
and rating of fuse.
?
Because the voltage available on a vehicle is generally limited at
13.8V, the charger will not be able to charge certain higher voltage
batteries. The following table outlines the battery voltage supported
at various input voltage levels:
8
MH-C777PLUS User’s Manual
Input Voltage
(DC)
Supported Battery
Voltage for NiMH &
NiCD
Supported Battery
Voltage for Lithium
Ion
12V / 13.8V
(Standard output
for small
vehicles)
1.2V to 4.8V
3.6V, 7.2V
18V
1.2V to 7.2V
3.6V, 7.2V, 10.8V
24V
1.2V to 14.4V
3.6V, 7.2V, 10.8V,
14.4V
Note: If the input voltage is too low to support the voltage of the battery
pack are you attempting to charge, “Err2” will appear at the LCD screen
and the charger will sound a series of continuous long beeps.
9
MH-C777PLUS User’s Manual
Chapter 5: Charging a Battery Pack
Please read Chapter 3 “How to Use a Universal charger” prior to
charging a battery pack.
Note: the charger has a built-in safety timer that will terminate the
charging process automatically after 13 hours of charging regardless of
battery condition. As a result, the charger can support a maximum
battery capacity of 10400mAh. If your battery pack capacity is higher
than this value, you may need the charge the battery pack “twice” by
restarting the charger after the safety timer expires.
To Begin Charging:
1.
Connect the supplied AC adapter or cigarette lighter adapter to the
charger. When you successfully connect power, you will hear a
brief beep.
2.
Prior to installing the battery pack, be sure to use the “battery
selector” to choose the type of battery pack you are charging. Slide
the switch “Ni” if you are charging Nickel Metal Hydride (NiMH) or
Nickel Cadmium (NiCD) battery pack. Otherwise, slide the switch to
“Li” if you are charging Lithium Ion (Li-Ion) battery pack. It is
important that you make the selection before you install the battery
pack, as you will not be able to change it after you do so.
Battery Selector
10
MH-C777PLUS User’s Manual
The LCD screen will also indicate your selection, as shown below:
BATT
MODE
Ni
BATT
MODE
V
V
mAh
QUICK
mAh
CHARGE
QUICK
Sample readout
indicating “Ni”
battery mode.
3.
LI
CHARGE
Sample readout
indicating “Li”
battery mode.
Install the battery pack on to the charger (refer the Chapter 3 “How
to Use a Universal Charger” for instructions on installing the battery
pack on to the charger). Ensure that the battery contacts mate
securely with the metal pins on the charger. When you complete
this, you will hear a brief beep indicating successful contact. In
addition, the LCD screen will also display “QUICK CHARGE.”
Note 1: If you are charging a battery pack through its diodeprotected terminals, the charger may need 3 to 15 seconds to
properly register the battery pack.
Note 2: If you hear continuous short beeps and the LCD screen
displays “Err1”, there is a battery fault. Most likely, you have
connected the battery pack’s polarity incorrectly. To resolve this
issue, flip the “polarity switch” located in the front of the charger’s
control panel. If the beeps do not stop, there may be a problem with
your battery pack. Some of the causes are listed below:
?
?
A shorted battery pack
A dead cell in your battery pack
BATT
MODE
LI
V
Note 3: If you are charging a battery pack through its diodeprotected terminals, the charger may not respond with a “Err1”
code when the polarity is incorrect. Instead, the charger simply will
not respond as if there is no battery pack at all. To resolve this
11
MH-C777PLUS User’s Manual
issue, flip the polarity switch and the battery pack should be
detected.
4.
Place the magnetic temperature sensor on the battery pack.
Note: It is important that you place the temperature sensor directly
on the batteries if you are charging individual battery cells like AA,
AAA, C or D size batteries.
5.
By default, the charger will automatically enter the rapid charging
cycle. From this point forward, no further user intervention is
needed.
In the first 3 minutes of the charging process, the charger will apply
a “surface charge” to the battery pack. This is designed to help the
charger properly recognize the battery voltage. After the first 3
minutes, the charger will detect the voltage and begin the actual
charging. Note that the LCD capacity accumulation and timer will
reset after the surface charge has been applied.
6.
Throughout the charging process, the LCD screen will display
various statistics about the charging process. The LCD screen will
alternate between “charging capacity” and “time elapsed” while
displaying other information like “battery chemistry” and “charge
status”, and “voltage”.
Battery Mode
Battery Mode
Voltage
Voltage
Charging
Capacity
Charge Status
MIN
Time
Elapsed
Charge Status
Charging Capacity (mAh): This number represented the amount
of charge already applied to the battery pack. This number will
continue to increase until the charging is terminated. Generally
speaking, the charging is near completion when the charging
capacity approaches rated capacity of the battery pack. Please
note that the charging capacity is not the actual battery capacity. It
12
MH-C777PLUS User’s Manual
is normal for the charging capacity shown on the LCD screen
to exceed the rated capacity by up to 15%.
Note: In certain cases, the charging capacity may appear to be
normal (meaning close to the rated capacity) even though the
battery doesn’t last very long in your equipment. To determine
the actual capacity of the battery pack, you must use the
“analyze” function covered in Chapter 6.
Voltage (V): This number represents the battery pack voltage
during charging.
Note: When you charge battery packs with 3 or less battery
cells, the voltage reading might appear higher than usual. This
is due to the limited voltage sensor resolution at lower voltage
and does not indicate a problem during the charging process.
Time Elapsed (min): The charger features an internal clock that
displays the time (minute) elapsed during the charge. The time will
continue to increase until the charging is terminated.
Battery Mode: The LCD will show “NI” for Nickel Metal Hydride
and Nickel Cadmium battery packs, and “LI” for Lithium Ion battery
packs. This is based on your selection using the “battery selector.”
Charge Status: When rapid charging, the LCD screen will indicate
“QUICK CHARGE.” When the charging process terminates, the
symbol “FULL” will be displayed.
Err3 (High Temperature): This symbol indicates that the charger
has terminated charging due to high temperature. This is normal for
certain batteries that produce more heat than others. This usually
does not indicate a problem with the battery pack. Note: If you are
charging 1 to 2 battery cells, the probability for Err3 to occur is
higher.
7.
The charger is a microprocessor driven unit that will automatically
terminate rapid charging and enter a gentle slow trickle charging
when the battery pack becomes fully charged. When this happens,
the charger emits several long beeps and the LCD screen will
display “FULL” indicating full charge. At this time, you may either
13
MH-C777PLUS User’s Manual
remove the battery pack for immediate usage, or leave the battery
pack on the charger for trickle charging.
FULL
14
MH-C777PLUS User’s Manual
Chapter 6: Conditioning & Analyzing a Battery Pack
This charger has the capability to automatically discharge and charge a
battery pack, commonly known as the conditioning cycle. When the
battery pack becomes fully discharged, the battery capacity will be
digitally displayed on the screen. After 15 minutes, the charger will
automatically enter the charging cycle. None of these will require user
intervention.
There are several limitations to the conditioning & analyzing function:
?
?
You cannot discharge 1 or 2-cell batteries (1.2V or 2.4V).
You cannot discharge a battery pack through its diode-protected
terminals.
To Begin Conditioning:
1.
Follow step 1 through 3 on Chapter Five “Charging a Battery Pack.”
2.
Like the charging process, the discharging process will also apply a
3-minute “surface charge” prior to the actual discharging (this is
needed to properly recognize the battery voltage). After 3 minutes,
the accumulated capacity will reset and discharging will begin.
Note: As discussed in Chapter Three, it is not possible to discharge
a battery pack through its diode-protected terminals. If you use the
diode-protected terminals and press the DISCHARGE button, the
charger will appear to proceed to discharging by applying the
surface charge for 3 minutes. However, as soon as the charger
enters the actual discharging, it will stop and immediately revert to
the charging mode. To discharge properly, you must use nondiode protected battery terminals.
3.
By default, the charger will automatically enter the rapid charging
process after you install the battery pack and make contact. Within
30 seconds, you must press the “DISCHARGE” button on the
charger control panel to begin the conditioning process.
4.
The LCD will show a “DISCH.” symbol indicating that discharging
is progress.
5.
Throughout the discharging process, the LCD screen will display
various statistics about the charging process. The LCD screen will
alternate between “discharging capacity” and “time elapsed” while
displaying other information like “battery chemistry”, “charge
status”, and “voltage”. The information shown on the LCD during
15
MH-C777PLUS User’s Manual
the discharge is essentially identical to that of the charging process,
with the following exception:
Discharging Capacity: This number represents the amount of
energy already drained from the battery pack. This number, which
will continue to accumulate until the battery pack is fully drained,
represents the actual capacity of the battery pack. For a good
battery pack, this number should be relatively close to the rated
capacity. It is normal for this number to be higher or lower the rated
capacity.
Note: It is important to understand that actual battery capacity will
be affected by various factors. Among them, the most critical is the
charging rate. For example, a battery pack discharged at a higher
rate will yield a lower capacity than the same battery pack
discharged at a slower rate. The charging rate featured on this
charger is approximately 300mA. For certain battery packs, this
rate is considered high. Therefore, the capacity measured might be
lower than the rated capacity.
6.
After the discharging process is completed, the charger will sound
eight long beeps. The charger will pause for approximately 15
minutes. During this time, the final discharge capacity of the battery
pack will remain on the screen. After the 15 minute pause, the
charger will automatically enter the charge cycle and the LCD
screen will show “QUICK CHARGE.” Please refer to Chapter five
“Charging a Battery Pack” for more information on the charging
process.
BATT
MODE
NI
V
mAh
DISCH.
QUICK
16
MH-C777PLUS User’s Manual
Appendix 1: Specification
Detection:
Negative Delta V, Zero Delta V, and Max.
Temperature
Chemistry
Supported:
Lithium Ion, Nickel Metal Hydride, Nickel
Cadmium
Voltage
Supported:
1.2V to 14.4V (1 to 12 cells) for NiMH & NiCD
3.6V to 14.4V (1 to 4 cells) for Lithium Ion.
Rapid Charge
Current:
800mAh +/- 50mA for NiMH & NiCD
400mAh max for Lithium Ion
Trickle Charge
Current:
70mA
Discharge
Current:
300mA +/- 50mA
Safety Timer:
13 Hours
Included
Adapter:
Switching adapter 80V-240VAC Autoswitch to
24VDC 0.83A
Capacity
Accuracy:
+/- 5%
Voltage
Accuracy:
+/- 0.3V
17
MH-C777PLUS User’s Manual
Appendix 2: Error Codes
You may see the following error codes displayed on the LCD screen
during charger operation.
?
Err1: Battery Fault. This generally indicates a reverse polarity. This
issue may be resolved by flipping the polarity switch. This is
accompanied by continuous beeps.
?
Err2: Insufficient Input voltage. Make sure that the input voltage is
high enough to charge your battery pack if you are using DC power
sources other than the supplied AC adapter. Refer to the table
below for minimal input voltage levels:
Input Voltage
(DC)
Supported Battery
Voltage for NiMH &
NiCD
Supported Battery
Voltage for Lithium
Ion
12V / 13.8V
(Standard output
for small
vehicles)
1.2V to 4.8V
3.6V, 7.2V
18V
1.2V to 7.2V
3.6V, 7.2V, 10.8V
24V
1.2V to 14.4V
3.6V, 7.2V, 10.8V,
14.4V
?
Err3: High Temperature. This symbol indicates that the charger has
terminated the charging due to high temperature. This is normal for
certain batteries that produce more heat than others. This usually
does not indicate a problem with the battery pack. Note: If you are
charging 1 to 2 battery cells, the probability for Err3 to occur is
higher.
?
Err5: Battery pack detected during power on. This does not
indicate a problem, but merely informs the user that a battery pack
is connected when the charger powered up. It is recommended to
disconnect any battery pack prior to powering the charger.
18
MH-C777PLUS User’s Manual
Appendix 3: Contacting Maha
If you require additional technical assistance after thoroughly reading
this user’s manual, please do not hesitate to contact Maha:
Web: http://www.mahaenergy.com/support/
Maha’s technical support web site features extensive FAQ and other
information that is not included in this manual.
E-mail: [email protected]
Technical Support Hotline: (714) 990-4557
Support hours: 8:15AM to 5:00PM Pacific Time. Monday through Friday.
19
MH-C777PLUS User’s Manual
Appendix 4: Warranty Terms
Maha Energy Corp. warrants this product against defects in materials
and workmanship as follows:
For the first year from the date of purchase, Maha Energy Corp. will
repair or replace the unit, at our option, without charge for parts or labor.
After the indicated period of one year, the product owner is subject to
pay repair and parts fee.
This limited warranty is non-transferable, and consequently only valid
toward the original purchaser of this product. It does not cover damage
or failure caused by or attributable to natural disaster, abuse, misuse,
improper or abnormal usage, faulty installation, improper maintenance,
lightning, or other incidences of excessive voltage, or any repairs or
tampering by other than by Maha Energy Corp. or its Authorized Service
Center. This warranty will be voided if the serial number (if applicable),
model number identification, or brand has been wholly or partially
removed or erased. Repair or replacement under the terms of this
warranty does not extend the terms of this warranty.
Should this product be proven defective in workmanship or material, the
consumer's sole remedies shall be such repair or replacement as
provided by the terms of this warranty. Under no circumstances shall
Maha Energy Corp. be liable for any loss or damage, direct,
consequential, or incidental, arising out of the use of or inability to use
this product. Some states do not allow limitations on how long an
implied warranty lasts or the exclusions or limitations of incidental or
consequential damages, so the above limitations or exclusions may not
apply to the product owner. This warranty gives the product owner
specific legal rights. The product owner may also have other rights,
which vary from state to state.
To obtain warranty service, contact Maha Energy Corp. Service
Department at 714-990-4557. When returning a unit for warranty
service, the product owner must obtain a return merchandise
authorization number from a service representative. In addition, please
include a copy of the product owner’s sales receipt, a brief description of
the symptoms, name, address, and phone number. Then deliver or ship
the product, postage or shipping costs prepaid (insurance suggested),
to:
Maha Energy Corp. Service Department
545-C W. Lambert Rd.
Brea, CA 92821
20
MH-C777PLUS User’s Manual
All warranty repair or replacement will be returned to the customer using
UPS® Ground service or other carriers at our option. If a faster carrier
method is requested, the product owner must pay the cost difference
over the UPS® Ground service charge. Maha Energy Corp. is not liable
for products lost or damaged during shipment.
21