1
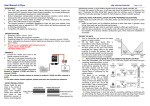
If the counted goods smaller than 2d, it demonstrates “no-Cou” and can’t
count. In this case please choose several goods together as ONE goods.
3. Percentage: Pressed the “MODE” till “Unit” shining, then press the button
twice, “PER” shining. Pressed the “TARE” button to confirm, “100%” shining.
Then put the goods on the pan and press “TARE” button, the goods is now
setted as 100%. Take off the goods and put another goods, screen can
show percentage. If the percentage is too small, less then 2d, it doesn’t work
and only demonstrates “no-PER”.
4. Low voltage warning : When the screen shows battery mark , it means the
(rechargeable) battery is lack of power (<5.2V ) . Over using will cause
rechargeable battery’s permonent damage and the weighing value will
not be accurate!!
5.
Change speed : Press TARE button for 3 seconds.
Nine. Charging
1. When you weigh goods daily, please take away the AC adapter and use
rechargeable battery only. Otherwise, even if the battery is full, the AC
adapter will still charge it.
2. When you see “low voltage warning” , put off the balance and charge it for
10~11hours ( better continuously ). Over charging is NOT recommend but
will not cause big problem as our charging current is small.
3. If you don’t see “low voltage warning” ,please charge it for shorter time.
4. If you don’t use or charge the battery for 6 months, the battery will be fail.
5. When replace old rechargeable battery, please adjust load cell’s 4 corners’
tolerance at the same time.
Ten . Pay attention to these points when using
1. warm up 10 minutes before using and calibration
2. The tare and objects to be weighed must not exceed the weighing limit.
3. If the weighing results are not correct, perform linear calibration twice .
4. When replace old rechargeable battery, please check load cell’s 4 corners’
tolerance at the same time.
Eleven . Product and accessories
Electronic balance, User’s manual, Remote display, AC adapter,
Since product is continuously developing, the information contained herein is
subject to change without notice.
Electronic Balance
Operating Manual
6.000g/0,1g
30.000gr/0,5g
One. Operating preparation
1. Set the balance stably on the horizontal table. Avoid vibrating, sunlight
illumination, air flow and strong electromagnetic wave .
Using environment: Temperature boundary 5°C
35°C
Temperature Fluctuation Range 5°C/h
Relative humidity 50% 85%
Two. Turn on
1. Connect with AC adapter or use battery. Press POWER button, screen
shows “8.8.8.8.8.8.”, “Max capacity”, ”S-CAL” “0.00”in turns.
Three. Perform calibration (after 10 minutes warming up)
1. Single point calibration
Press “CAL” button for 3 seconds screen shows “dA “ ( if shows others
like” d2,d3,d4,d5…d9, CAL L,” please press “CAL ” key again and again to
the “ * “ is changed from 0 to 5, “Zero0d” means balance=0.00g ~3000.09g ,
“Zero5d” means balance=0.05g ~ 3000.09g . When leave factory,it is setted
“Zero5d”
make it show dA )- then “3000g flicking” - then put 3000g weight sets on
the pan - then it will show “ –CAL- “ - then show 3000.00g - then
remove the weight- calibration for 3000g point is finished.
This balance use our latest program : when you perform dA 3000g single
point calibration, the effect = performed
500g,1000g,1200g,1500g,1700g,2000g,2200g,2500g,2700g,3000g linear
calibration. Because when you perform single point calibration, the balance
will automatically “REMEMBER” the linear calibration data performed last
time.
2.
“tArE9d”means when there are 0.09g goods on the pan,the program will eat
it and only show 0.00g. When leave the factory, it is setted “tArE9d”.
3.
2. Linear calibration
Press “CAL” button for 3 seconds it will show “CAL—L” ( if it shows others
like” d2,d4,d5…d9,d A ,” please press “CAL” button again and again to
make it show “CAL—L” ) -- then “500g” flickering - put a 500g standard
weight on the pan - screen show “- –CAL- “ - then show 500.00g remove the weight- calibration for 500g is finished.
then “1000g” flickering automatically - put a 1000g standard weight on the
pan-- screen show “- –CAL- “ - then show 1000.00g - then remove it
……finally “3000”g flickering automatically put 3000g standard
weights on the pan-- screen show “- –CAL- “ - then show 3000.00g then
remove it . That is all.
If screen show “no CAL” , means you didn’t put weight on the pan in time.
If sceen show “ E100 “ , that means your former calibration method is WRONG
and original correct calibration data is DISAPPEAR. In such case please
calibrate by above methods again.
Four. Weighing
1. The value is stable when the black spot on LCD is disappear.
2. The Max weighing ability is the largest value show on the screen +9d .
Overloading will show upper horizontal line “------”and damage load
cell.
Five.
Six.
Tare
Press the “TARE” button after the black spot on LCD is disappear.
Backlight
Press “BL” button.
Seven. Zero-Tracking Function and Auto Tare Function (only useful at 0
point or after tare)
1. When the power is off, one hand press and hold “CAL” button meanwhile
another hand turn on the power till “-Zero-” is displayed, then press and hold
“TARE” button till “Zero*d” is displayed, then press “TARE” button again,
Then press “CAL” button, “-tArE-” is displayed, then press “TARE” button,
“tArE*d” is displayed, then press “TARE” button again and again, “ * ” is
changed from 0 to 9. “tArE0d”means without Auto Tare Function,
Press “BL” button, your setting is remembered and balance is restarted, and
will display”0.00” mode.
This electronic balance remembers your latest settings when you turn on the
power, so it is convenient to use.
Eight. Other functions
1. Units shift: Press and hold “MODE” button till “Unit” shining. Press“TARE”
button to confirm, “Unit” shining again. Then press the “MODE” button to
select the unit that you like, at last press “TARE” button to confirm.
2.
Counting: Pressed the “MODE” till “Unit” shining , then press again,
“Count” shining. Press the “TARE” button to confirm, “pcs” shining. Press
“MODE” button, “pcs” can change from “10pcs”to “500pcs”. The larger the
Numeral is, the higher the counting precision is. Put the counting goods
correspondingly on the balance pan, and press the “TARE” button to confirm.
It demonstrates “------”. After a while, the counting is setted.