1
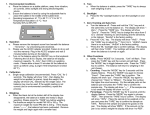
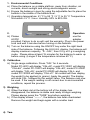
1. Environmental Conditions
a) Place the balance on a stable platform, away from vibration, air
currents, direct sunlight and strong electromagnetic waves.
b) Ensure the balance is level by using the adjustable feet to place the
bubble in the middle of the bubble level.
c) Operating temperature: 41 °F to 95 °F / 5 °C to 35 °C Temperature
fluctuation ≤ 5 °C / hour. Humidity 50% to 85% RH.
2.
Operation
use the
AC/DC
adapter
provided. Failure to do so will void the warranty. Plug in the power
cord and wait 5 minutes before turning on the balance.
b) Turn on the balance using the ON/OFF key under the right hand
side of the balance. Following the 8.8.8.8.8. display, the balance will
display maximum capacity, “S- -CAL”, then 0.0 g or 0 g in weighing
mode. Please allow at least 15 minutes for the balance to warm up
before using. (Longer if the temperature is below 60 °F).
a) Please
2) Calibration
a) Single range calibration. Press “CAL” for 4 seconds.
Model PC-6001 will display “CAL-d5”, model PC-10001 will display
“CAL-dA”, model PC-15001 will display “CAL-d9”, model PC-20001
will display “CAL-dA”, model PC-20000 will display CAL-L and
model PC-30000 will display “CAL-d1”. All models will then display
the weight to be applied (in grams). Apply the weight. The display
will show CAL, followed by the weight value. The balance may now
be used. If the weight reading is not correct due to environmental
conditions, repeat the process.
3) Weighing
a) When the black dot at the bottom left of the display has
disappeared, the balance is stable and ready to begin weighing.
Please always press the “TARE” key before weighing.
b) If the display shows “--------“, the balance has been overloaded.
Remove the weight and begin again with a smaller load.
4) Tare
a) When the balance is stable, press the “TARE” key to always start
weighing at zero.
5) Backlight
a) Press the “BL” backlight button to turn the backlight on and off.
6) Zero-Tracking and Auto-Tare
a) Turn the balance off. Press and hold the “CAL” key and at the
same time, turn the balance on. The display will show “-Zero-”.
Press the “TARE” key. The display will show “Zero*d”. Press the
“TARE” key to change the value from 0 to 5, “Zero0d” meaning no
zero-tracking and the sensitivity is the highest. “Zero5d” is the
factory setting.
b) Press the “CAL” key. The display will show “-tArE-“. Press the
“TARE” key to adjust the “*” from 0 to 9. “tArE0d” means there is no
auto-tare. “tArE9d” is the factory setting.
c) “Press the “BL” backlight key to confirm settings. The display will
then show “0.0”. Your settings will remain the same when the
balance is turned on again.
7) Other Functions
a) Units. Press “MODE” for 3 seconds. “Unit” will flash. Then press
the “TARE” key and the current unit will flash. Press the “MODE”
key to toggle between units. Press the “TARE” key to confirm. The
balance will return to weighing in the unit chosen.
b) Counting. Press the “MODE” key for 3 seconds until the display
flashes. Press the “MODE” key again to choose “Count”. Then
press the “TARE” key to confirm. The display will show “pcs”.
Press the “MODE” key again to choose from “10pcs” to “500pcs”.
The larger the number, the higher the count accuracy. Put the
sample parts on the balance pan and press the “TARE” key to
confirm the sample size. The display will show “----“. If the sample
size is too small the display will show “no-Cou”.
c) Percentage. Press the “MODE” key for 3 seconds until the display
flashes. Press the “MODE” key again to choose “PER”. Then
press the “TARE” key to confirm. The display will show “100%”.
Place the sample to be weighed on the pan and press the “TARE”
key to confirm the sample as 100%. Remove the sample and
place the goods on the pan. The display will show “###%”. If the
amount on the pan is too small a weight the display will show “noPER”.
d) Print. Press the “MODE” key until “Prt” is displayed. Press the
“TARE” key to confirm. Press the “MODE” key to change between
“hAnd”, “Auto” and “Contin”. Press the “TARE” key to accept.
i) “hAnd” – Print on demand
ii) “AUto” – Print when the balance is stable
iii) “Contin” – Print continuously
RS 232 port parameter
ASCII code transmission data format: Every 10BIT as a
Data frame.
1 start bit, 8 data bits, 1 stop bit, no parity
Baud rate: 9600 bps
Pin configuration: #2 – Transmit, #3 – Receive, #5 - Ground
e) Below Balance Weighing. When the unit is supplied with below
balance weighing, the screw thread of the hook inserts into the
bottom of the balance. Ensure that the screw is inserted all the way
before weighing.
f) Filtering (Speed of Weighing). Press the “TARE” key for 3
seconds. The display will show either “SPEED1” or “SPEED2, and
then return to weighing mode. The speed will remain at the last
speed displayed. To change the speed, repeat the above process.
The slower speed, “SPEED1” is more accurate. “SPEED2” is
faster.
g) Low Voltage Indicator. When the battery symbol is shown on the
display, recharge the battery by connecting the power cord to 120
Volt AC. If the battery will not charge after 8 hours continuous
charging, then replace the battery.
Safety Note! Electric shock. Please do not use this unit in conditions that may
cause the unit to short. This unit is powered by 120 VAC. Use extreme care.
There are no user serviceable parts inside the balance.
The wall socket must be equipped with a non-fused grounded conductor contact
for electrical safety.
Protect the unit against moisture.
Please disconnect the unit from the main power supply before cleaning. Do not
use any liquids or aerosol sprays to clean this unit. Use only a clean dampened
cloth.
Intelligent Weighing Technology, Inc.
www.intelligentwt.com
A Higher Level of Precision…
A Higher Level of Performance
Intell-Lab™ High Capacity Toploading Balance
PC Series
User Manual
© 2010 Intelligent Weighing Technology, Inc. All rights reserved worldwide.
The information contained herein is the property of Intelligent Weighing Technology, Inc. and is supplied without liability for errors or
omissions. No part may be reproduced or used except as authorized by contract or other written permission. The copyright and the
foregoing restriction on reproduction and use extend to all media in which the information may be embodies.