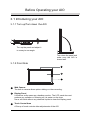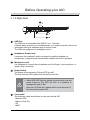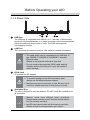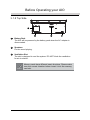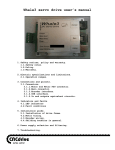
1
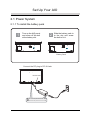
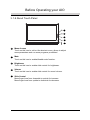
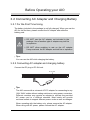
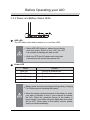
User's Manual
TABLE OF CONTENTS
Preface ....................................................................................... 3
1.1 Safety Precautions ........................................................ 3
Set Up your AIO ......................................................................... 7
2.1 Power System ............................................................... 7
2.1.1 To install the battery pack .................................... 7
Before Operating your AIO ........................................................ 8
3.1 Introducing your AIO ..................................................... 8
3.1.1 Turn up/Turn down the AIO ................................ 8
3.1.2 Front Side ............................................................ 8
3.1.3 Right Side ............................................................ 9
3.1.4 Rower Side ........................................................ 10
3.1.5 Top Side ............................................................ 11
3.1.6 About Touch Panel ............................................ 12
3.2 Connecting AC Adapter and Charging Battery ........... 13
3.2.1 For the First Time Using .................................... 13
3.2.2 Connecting AC adapter and charging battery ... 13
3.2.3 Power and Battery Status LEDs ........................ 14
3.2.4 Difference of stand-by and hibernate state ....... 15
Preface
1.1 Safety Precautions
The following safety precautions will increase the life of the AIO.
Follow all precautions and instructions.
Except as described in this manual, refer all servicing to qualified personnel.
Do not use damaged power cords, accessories, or other peripherals.
Do not use strong solvents such as thinners, benzene, or other chemicals on
or near the surface of your AIO.
The sign shows the behavior prohibited.
The sign shows the regulative behavior or the indication
Attention - The device and AC adapter
DO NOT use the AC adapter not included in the package. Use of
another type of adapter may risk fire or explosion.
Before you connect the AIO to a power source, ensure the voltage
rating of the AC adapter matches the available power source.
DO NOT attempt to service this product by yourself.
As opening or removing covers, you will be exposed to the
dangerous voltage or other risks.
When you fell the surface of the AC adapter is very hot or bad odor
give off from it. Please pull out the power plug immediately.
Continue to use the AC adapter may risk fire or electrical shock.
Please be sure not to pull out the power plug from the cord only.
You have to pull out the power plug from the plug part.
DO NOT place this AIO on an unstable card, stand, or table.
DO NOT place heavy object on this AIO. It may be broken to
cause some serious damage.
3
Preface
If an extension cord is used with this notebook, make sure that the
total ampere rating of the equipment plugged into the extension cord
does not exceed the extension cord amper rating.
Unplug this AIO from the wall outlet when you stop using this AIO.
SAFE TEMP: This AIO only be used in environments with ambient
o
o
temperatures between 10 C and 35 C.
DO NOT press or touch the display panel. DO NOT place together
with small items that may scratch or enter the AIO.
Avoid using the AIO during an electrical storm.
Disconnect all plugs and cables to avoid the possible damage.
DO NOT allow anything to rest on the power cord.
DO NOT locate this AIO where people will step on the cord.
Danger of explosion may occur if battery is incorrectly replaced.
Replace only with the same or equivalent type battery
recommended by the manufacturer.
DO NOT impact the battery.
If it exceed the specified charge time and the charge doesn’t
complete, please stop the battery charge. It may risk fire or
explosion if you continue to charge the battery.
DO NOT crush, disassemble, puncture, or incinerate the short
external contacts of the battery pack.
4
Preface
DO NOT dispose batteries in a fire. They may explode.
Check with local authorities for disposal instructions.
If the battery pack leaks and the fluid get in your eyes, do not rub them.
Instead, rinse your eyes with clean running water and immediately
seek medical attention. Otherwise, eye injury may be resulted.
If the battery pack leaks, gives off a bad odor, generates heat,
becomes discolored or deformed, or in any way appears abnormal
during use, recharging or storage, immediately remove it from the
AIO and stop using it.
Attention - Battery Pack
If liquid solution from the battery comes out and contacts with skin or
clothes, flush out with clean water.
DO NOT immerse the battery pack in water or allow it to get wet.
Its protective features can be damaged. Abnormal chemical reactions
may occur, possibly leading it to leak acid, overheat, emit smoke,
burst and/or ignite.
If you find a bad odor, overheating, battery balloon or swell up, discolor,
deformation, and/or other irregularities when using the battery, return
it to your supplier or vendor.
DO NOT connect the positive (+) and negative (-) terminals with a
metal object such as wire. Short-circuiting may occur leading the
battery pack to leak acid, overheat, emit smoke, burst and/or ignite.
Make new heading.
Keep the battery away from children.
5
Preface
General Warnings
Clean your computer with a soft cloth dampened with water.
DO NOT use liquid or aerosol cleaners, which may contain
flammable substances.
DO NOT move the machine while operating.
DO NOT move your AIO while the hard disk is in operating status.
It may be broken to cause some serious damage.
Please keep all accessories well.
Periodically backup your data in the hard disk.
6
Set Up Your AIO
2.1 Power System
2.1.1 To install the battery pack
1
Turn up the AIO panel
and screw off the bolt
at the battery slot.
2
Slide the battery pack in
to the slot and screw
the bolt to fix it.
Battery Pack
Connect the DC plug to DC-IN Jack
DC-IN Jack
3
Connect the AC power cord to the AC adapter
Connect the AC power cord to an AC outlet
7
Before Operating your AIO
3.1 Introducing your AIO
3.1.1 Turn up/Turn down the AIO
Turn up the panel and adjust it
to a easy to see angle.
Turn down the panel and
make sure the AIO is
closed well.
3.1.2 Front Side
1
2
3
1
Web Camera
The built-in camera allows picture taking or video recording.
2
Display Panel
It functions as the same as a desktop monitor. The LCD panel does not
produce any radiation or flickering so it is easier on the eyes.
Use a soft cloth without any chemical liquids to clean the display panel.
3
Touch Control Area
A Group of touch controls allow adjustments of the AIO
8
Before Operating your AIO
3.1.3 Right Side
1
4
5
3
2
1
USB Port
The USB port is compatible with USB 2.0 or 1.1 devices.
It allows many devices to run simultaneously on a single computer, with some
peripherals acting as additional plug-in sites or hubs.
The USB also supports hot-swapping function.
2
Headphone Output Jack
It connects the notebook’s audio out signal to amplified speakers or
headphones. Using this jack automatically disables the built-in speakers.
3
Microphone Jack
It is designed to connect the microphone used for Skype, voice narrations, or
simple voice recordings.
4
Power Switch
The button allows powering ON and OFF the AIO.
The blue indicator LED lights when the AIO turned ON.
When HDD LED light up, please do not directly push the
power button to turn OFF the AIO. It is possible to
damage the data or AIO.
Attention
5
After turn OFF the AIO, please wait 5 more seconds for
the second time power ON.
Card reader
The following cards listed below can be used on this AIO
- Memory Stick
- Memory Stick Pro
- SD
- MMC
9
Before Operating your AIO
3.1.4 Rower Side
4
1
2
2
1
5
3
USB Port
The USB port is compatible with USB 2.0 or 1.1 devices. It allows many
devices to run simultaneously on a single computer, with some peripherals
acting as additional plug-in sites or hubs. The USB also supports
hot-swapping function.
LAN Port
The connector is used to connect a LAN cable for network connection.
The cable which can be connected to the LAN port is
the 10BASE-T/100BASE-X/1000BASE-T standard
Ethernet cable.
Please do not use the cable other than that.
Attention
3
Do not connect the especially ISDN cable and the
modular cable to the LAN port. It may be broken to
cause damage.
DC-IN Jack
To connect the AC adapter.
To prevent damage to the AIO and battery pack,
always use the supplied power adapter.
Attention
4
May become warm to hot when in use. Be sure not to
cover the adapter and keep it away from your body.
Ventilation Slot
The slot is designed to cool the system. DO NOT block the ventilation for
air circulation.
Memory cards have different insert directions,
Please make sure the correct direction before insert it
into the memory card slot.
Notice
miniSD card cannot insert into the memory card slot.
Please verify the card type before you insert it.
10
Before Operating your AIO
3.1.5 Top Side
1
2
3
2
1
Battery Pack
The AIO will be powered by the battery pack when the AC adapter is
disconnected.
2
Speakers
For the sound playing.
3
Ventilation Slot
The slot is designed to cool the system. DO NOT block the ventilation
for air circulation.
Notice
Memory cards have different insert directions, Please make
sure the correct direction before insert it into the memory
card slot.
11
Before Operating your AIO
3.1.6 About Touch Panel
1
2
3
4
5
1
Menu Access
Touch on this icon to call out the shortcut menu, allows to adjust
some parameters and run some programs predefined
2
Mute
Touch on this icon to enable/disable mute function.
3
Brightness
Touch on this icon to enable slide control for brightness.
4
Volume
Touch on this icon to enable slide control for sound volume.
5
Slide Control
Move finger here from downside to upside for increase.
Move finger here from upside to downside for decrease.
12
Before Operating your AIO
3.2 Connecting AC Adapter and Charging Battery
3.2.1 For the First Time Using
The battery included in the package is not fully charged. When you use the
AIO for the first time, please connect the AC adapter after slide the
battery pack.
DO NOT use the AC adapter not included in the
package. Use of another type of adapter may risk fire
or explosion.
Attention
DO NOT allow anything to rest on the AC adapter.
It may overheat the AC adapter and risk fire or explosion.
Tips:
You can use the AIO while charging the battery.
3.2.2 Connecting AC adapter and charging battery
Connect the DC plug to DC-IN Jack.
DC-IN Jack
Tips:
The AIO comes with a universal AC-DC adapter for connecting to any
100V-240V outlets without setting switches or using power converters.
Different countries may require an adapter to connect the provided
AC power cord to a different standard. Most hotels will provide
universal outlets to support different power cords as well as voltages.
When operating with the battery only, please remove the AC adapter.
When using with AC power, please connect the AC adapter.
13
Before Operating your AIO
3.2.3 Power and Battery Status LEDs
2
1
1
HDD LED
The LED blinks when data is written to or read from HDD.
When HDD LED lights up, please do not directly
push the power switch to turn OFF the AIO.
It is possible to damage the data or AIO.
Attention
2
After turn OFF the AIO please wait more than
5 seconds for the second time power ON.
Power LED
Status
Content
Blue ON
The AIO is powered ON.
Blue Blinking
The AIO is in suspend mode.
Pink Blinking
Battery low power.
Red Blinking
Battery critical low power alarm.
Battery pack cannot be exchanged during battery charging.
For “Removing and Installing the battery”
Attention
When the charge remained amount of the battery is small,
your data is possible to lose if your continue to operate
the AIO. When the remained charge of the battery is
gone entirely, even while using the application the power
will be OFF. When alarm of the battery sounds, please
store your data immediately.
14
Before Operating your AIO
3.2.3 Difference of stand-by and hibernate state
Stand-by
Put the AIO on stand-by when it is idle. While on standby, the AIO switches
to a low-power state where devices, such as the monitor and hard disks
turned OFF and the AIO uses less power. When you want to use the AIO
again, it comes out of stand-by quickly, and your desktop is restored
exactly as you left it. Stand-by is particularly useful for conserving battery
power in portable computers. Because Stand-by does not save your
desktop state to disk, a power failure while on Stand-by can cause you to
lose unsaved information.
Hibernate
Put the AIO in hibernation. The hibernate feature saves everything in memory
on disk, turns OFF your monitor and hard disk, and then turns OFF the AIO.
When you restart the AIO, your desktop is restored exactly as you left it.
It takes longer to bring your AIO out of hibernation than out of stand-by.
15