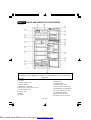
1
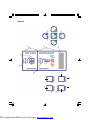
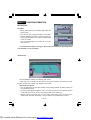
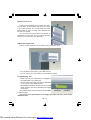
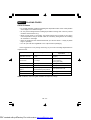
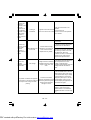
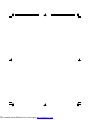
ELECTRONIC
NO FROST REFRIGERATOR
user manual
PDF created with pdfFactory Pro trial version www.pdffactory.com
PDF created with pdfFactory Pro trial version www.pdffactory.com
(2)
(2.2)
(1.1)
(2.1)
(1)
(3.1)
(4.1)
(3)
(4)
(24)
(25)
(34)
(20)
(32)
(36)
(21)
(40)
(26)
(22)
(9)
(11.2)
(9.1)
(8.1)
(7.2)
(11)
(7.1)
(7)
(7.3)
(8)
(11.1)
(10.1)
(8.2)
(10)
DISPLAY
DISPLAY Menus and Their Usage
[1] (Mode): Message Mod enables you to move between the MP3 Player and the Menu.
[2] (Timer/Alarm Off): It starts the counter to countdown according to the latest assigned
time in the Timer tab in the Menu. Also it is used for deactivating the audio warning to
be given at the end of the time.
[3] (FRZ.SET): It is used for changing the freezing temperature set value.
[4] (REF.SET): It is used for changing the cooler temperature set value.
Direction Buttons :
[8-11] Up – Down: In the menu they are used for moving up and down, in the MP3 Player
mode for turning up and turning down.
[9-10] Right – Left: W hile in the MP3 Player mode, they are used for playing the previous
/ next song.
[7] OK: It is used for accepting in the menu when necessary, while in the MP3 Player
mode for stopping the playing song or playing the paused song.
[20] (ULTRA FRZ Symbol): It lights as long as the Ultra Freeze mod is active.
[24] (ULTRA COOL Symbol):It lights as long as the Ultra Cool Mode is active.
[21] (Freezing Temperature Setting Indication)
[22] (Freezer Partition Temperature Indicator Bars): As the freezing partition temperature set value decreases, the number of the lighting temperature indicator bars increases (Cooler Environment = More Graphic Indicator Bars)
[25] (Cooler Temperature Setting Indication)
[26] (Cooler Partition Temperature Indicator Bars): As the cooler partition temperature
set value decreases the number of the lighting temperature indicator bars increase.
(Cooler Environment = More Graphic Indicator Bars)
[32] (Message Symbol): W hen there is an unheard voice mail it lights and stops, if all the
messages are heard it lights constantly, if there is no recorded voice mail it does not
light.
[34] (Child Lock Symbol): It lights as long as the child lock is active.
[36] (Economy Mode Symbol): It lights as long as the economy mode is active.
[40] (LCD Screen): All the data flow in this screen.
UK - 1 -
PDF created with pdfFactory Pro trial version www.pdffactory.com
Contents
DISPLAY Menus and Their Usage .................................................................................... 1
BEFORE USING YOUR FRIDGE .................................................................... 4
Information about No Frost Technology ........................................................................... 4
Safety Information ............................................................................................................... 5
Safety Warnings ................................................................................................................. 6
Installing and Operating your Fridge ................................................................................ 7
Before Running your Fridge .............................................................................................. 7
USAGE INFORMATION ................................................................................... 8
Accessories ........................................................................................................................ 8
Icemaker ........................................................................................................................................ 8
Quickfreezer ................................................................................................................................. 8
Chilledroom .................................................................................................................................... 9
Bottle Rack .................................................................................................................................... 9
Moving the Cover of the Crisper ................................................................................................ 10
Speaker and its cover ................................................................................................................ 12
USB Reader and Microfon ......................................................................................................... 12
For USB memory use; ............................................................................................................... 12
OPERATING YOUR FRIDGE ......................................................................... 13
Use of DISPLAY ................................................................................................................ 13
MODE Button ............................................................................................................................... 13
MESSAGE Mode ......................................................................................................................... 13
MP3 PLAYER Mode ..................................................................................................................... 14
Menu Functions ................................................................................................................ 15
1. Timer ........................................................................................................................................ 15
2. Ultra Freeze Mode .................................................................................................................. 15
3. Ultra Cool Mode ....................................................................................................................... 16
4. Holiday Mode .......................................................................................................................... 17
5. Economy Mode ....................................................................................................................... 18
6. Contrast Options; .................................................................................................................... 18
7. Time Options ........................................................................................................................... 19
8. Date Options ........................................................................................................................... 19
9. Choosing a language .............................................................................................................. 19
10. Reminder ............................................................................................................................... 19
11. Screensaver Mode ............................................................................................................... 21
12. Button Voice ......................................................................................................................... 21
Other Functions ................................................................................................................ 21
Child Lock Mode .......................................................................................................................... 21
Door Open Alarm Function ......................................................................................................... 21
UK - 2 -
PDF created with pdfFactory Pro trial version www.pdffactory.com
FRIDGE TEMPERATURE SETTINGS ............................................................ 22
Freezer Partition Temperature Settings .......................................................................... 22
Partition Temperature Settings ....................................................................................... 23
Warnings for Temperature Settings ................................................................................ 24
PLACING FOODS .......................................................................................... 25
Cooler Partition ................................................................................................................. 25
Freezer Partition ............................................................................................................... 26
CLEANING AND MAINTENANCE .................................................................. 30
Cleaning Door Glasses ................................................................................................... 31
Changing Leds ................................................................................................................. 31
SHIPMENT AND RE-POSITIONING .............................................................. 32
Shipment with a Package ................................................................................................ 32
Shipment without a Package .......................................................................................... 32
Position of the Adjustable Feet ....................................................................................... 33
BEFORE CALLING SERVICE ........................................................................ 34
PARTS AND PIECES OF YOUR FRIDGE ..................................................... 38
UK - 3 -
PDF created with pdfFactory Pro trial version www.pdffactory.com
PART- 1. BEFORE USING YOUR FRIDGE
Information about No Frost Technology
No-frost fridges differ from other static fridges in
their operating principle.
In normal fridges, the humidity entering the fridge
in the door openings and the humidity of the food
causes freezing in the freezer department. To defrost
the snow and ice in the freezer department, you should
turn off the fridge, take the food that needs to be kept in
a constant temperature off the fridge, and remove the
ice gathered in the freezer department periodically.
The situation is completely different in no-frost
fridges. Dry and cold air is blowed to the fridge and
freezer departments homogeneously from several
points via a blower fan. Cold air dispersed
homogeneously even between the shelves cools all
your food equally and uniformly, thus prevents humidity
and freezing.
Therefore your no-frost fridge allows you ease of
use, besides its huge volume and stylish appearance.
UK - 4 -
PDF created with pdfFactory Pro trial version www.pdffactory.com
Safety Information
• While carrying and positioning the fridge, do not give damage to the cooler gas circuit.
• If your old fridge has a lock, break or remove the lock before discarding it, because
children may get trapped inside it and may cause an accident.
• Old fridges and freezers contain isolation material and refrigerant with CFC. Therefore,
take care not to harm environment when you are discarding your old fridges.
IMPORTANT NOTES:
• If your appliance uses R600 as a refrigerant – you can learn this information from the
label on the cooler- you should be careful during shipment and montage to prevent
your appliance’s cooler elements from being damaged. Although R600a is a
environmental friendly and natural gas, as it is explosive, in case of a leakage to be
occurred due to a damage in the cooler elements move your fridge from open flame
or heat sources and ventilate the room where the appliance is located for a few
minutes.
• Please read the instruction manual carefully before installing and using your appliance. Our company is not responsible of the damage occurred due to misuse.
• Follow all instructions on your appliance and instruction manual, and keep this
manual in a safe place to resolve the problems that may occur in the future.
• This appliance is produced to be used at houses and it can only be used in house
and for the specified purposes. It is not suitable for commercial or common use.
Such use will cause the guarantee of the appliance to be cancelled and our company will not be responsible for the losses to be occurred.
• This appliance is produced to be used in houses and it is only suitable for cooling /
storing foods. It is not suitable for commercial or common use and/or for storing
substances except for food. Our company is not responsible for the losses to be
occurred in the contrary case.
UK - 5 -
PDF created with pdfFactory Pro trial version www.pdffactory.com
Safety Warnings
Warning: Do not use mechanical devices or other artificial methods to quicken to the
defrosting. Do not use electrical devices in the parts where food is stored. Keep the vent
holes of the appliances open. Do not damage your fridge’s refrigerant circuit.
• Do not use multiple receptacles or extension cord.
• Do not plug in damaged, torn or old plugs.
• Do not pull, bend or damage the cord.
• This appliance is designed for use by adults, do not allow children to play with the appliance or let them to hang over the door.
• Do not plug-in or out the plug from the receptacle with wet hands
to prevent electrocution!
• Do not place glass bottles or beverage cans in the freezer department.
• When taking ice made in the freezer department, do not touch it,
ice may cause iceburns and/or cuts.
• Do not touch frozen goods with wet hands! Do not eat ice-cream
and ice cubes immediately after you take them out of the freezer
department!
• Do not re-freeze the frozen goods after being melted. This may
cause health issues like food poisoning.
• Do not cover the body or top of fridge with lace etc. This effects
the performance of your fridge.
• Fix the accessories in the fridge during transportation to prevent damage to accessories.
• Due to its design, the door direction of your appliance cannot be changed.
• Do not use mechanical devices or other artificial methods to quicken to the defrosting.
• Do not use electrical devices on the food storage areas of your appliance.
• Keep the ventilation areas of your appliance open.
• Do not damage your fridge’s refrigerant circuit.
• Your fridge is not intended for use by physically, mentally or sensibly handicapped
people or by people with less experience and knowledge (including children). These
people may be allowed to use the appliance under the supervision of a responsible
person giving necessary instructions. You should supervise children to prevent them
playing with the appliance.
• Power cord should be replaced by an authorized technician when it is damaged.
UK - 6 -
PDF created with pdfFactory Pro trial version www.pdffactory.com
Installing and Operating your Fridge
• Before plugging in your fridge, please make sure that the voltage is compatible with
the voltage stated in the placket of the fridge.
• Operating voltage for your fridge is 220-240 V at 50Hz.
• Mains cord of your fridge has a grounded plug. This plug should be used with a
special grounded plug socket of at least 16 amperes. If you do not have such a plug
socket, have it done by a competent electrician.
• We do not take the responsibility of the damages that occur due
to ungrounded usage.
• Place your fridge in a place that it would not be exposed to direct
sunlight.
• Your appliance should be at least 50 cm away from stoves, ovens
and heater cores, and should be at least 5 cm away from
electrical ovens.
• It should never be used outdoors or left under the rain.
• When your fridge is placed next to a deep freezer, there should
be at least 2 cm between them to prevent humidity on the outer
surface.
• Do not place anything on your fridge, and install your fridge in a
suitable place so that at least 15 cm is available on the upper
side.
• If you will place your fridge next to your kitchen cabinets, leave a
space of 2 cm between them.
• Install the distance adjustment plastic (the part with black vanes
at the rear) by turning it 90° to prevent the condenser from touching the wall.
• The adjustable front legs should stabilized in an appropriate
height to allow your fridge operate in a stable and proper way.
Please look at page 33 for more detailed information…
• Before using your fridge, wipe all parts with warm water added with a tea spoonful of
sodium bicarbonate, and then rinse with clean water and dry. Place all parts after
cleaning.
Before Running your Fridge
• When it is operated for the first time or after transportation, keep
your fridge in the upright position for 3 hours and plug it on to
allow efficient operation. Otherwise, you may damage the
compressor.
• Your fridge may have a smell when it is operated for the first time; the smell will fade
away when your fridge starts to cool.
UK - 7 -
PDF created with pdfFactory Pro trial version www.pdffactory.com
PART- 2. USAGE INFORMATION
Accessories
Icemaker
• Fill the icebox part of the icemaker with water and
place it back.
• You can take your ice approximately 2 hours later.
• Without displacing the icebox, turn the icebox arm
to the right until all the ice cubes are discharged
to the ice bucket.
• You can serve taking the ice bucket out or you can
save ice there.
! The ice bucket is only for saving ice. Do not use it for making ice by putting water
in it. Otherwise, it can be broken.
Quickfreezer
Use Quickfreezer partition for freezing fresh foods.
In this way, you can enable the foods which you want to freeze to be frozen more rapidly and prevent their contact with already frozen foods.
After foods are frozen;
• You can place them to the other shelves in the freezing partition by taking them from
the quickfreezer shelf.
• To open the Quickfreezer partition cover, you can hold it and push forward by moving
on the rails and you can close it by pulling it back in the same way.
• Before closing the upper door of your fridge, make sure that the cover of the
quickfreezer is closed. Otherwise, it cannot perform its quickfreezing function.
UK - 8 -
PDF created with pdfFactory Pro trial version www.pdffactory.com
Chilledroom
Klape
Chilledroom enables your food to be kept in 0°C. You can keep the frozen foods that
you take out of the deepfreeze partition in order to defrost them or you can keep the meats
and cleaned fishes (in plastic bags or packets) etc. which you will use within 1-2 days
without need for freezing. (Water is frozen in 0°C but the foods including salt or sugar can
be frozen in colder environments.)
Chilledroom can optionally be used as a breakfast partition with the help of the klape
on the air channel. For this, you should only change the mode of this klape from Open to
Closed.
Bottle Rack
You can compress glass bottles, plastic bottles,
magnums etc. with the bottle rack in order to prevent
them from falling and rattling.
UK - 9 -
PDF created with pdfFactory Pro trial version www.pdffactory.com
Moving the Cover of the Crisper
First step: Taking the Crispers out
• Turn the front cover of the crisper in a way that its
back touches the crisper profile.
• Pull the crisper towards you.
• Hold the front part of it and take it out.
Second step: Taking crisper glass out together
with its front covers
• Hold the crisper glass 10 cm above from the
body stopping together with the crisper front
covers while the crisper front covers are fallen
down.
• Pull the crisper front cover towards you together
with the crisper glass.
• Do not separate the crisper front cover from the
crisper glass, otherwise the crisper glass can
be broken.
Note: In order to place the crispers back, follow the abovementioned process reversely.
UK - 10 -
PDF created with pdfFactory Pro trial version www.pdffactory.com
Important Warnings
The issues that need to be careful about while placing the crisper glass and cooler
partition shelves.
Cooler partition
Led cover
While mounting and demounting the
crisper glass and cooler partition
shelves; you should make sure that the
glass shelves are completely fitted in
the cooler led cover which is fixed at the
back of the cooler body and in the
suspension details in the sides.
Stoper detail
The issues that you need to be careful about while mounting door shelves:
CORRECT ASSEMBLY
Movable
shelf
accessories
asymmetric side surfaces
with
FAULTY ASSEMBLY
Movable shelves affixed to the cooler partition door can vary depending on design
features. During the assembly of the movable shelves with an asymmetric design, make
sure that the curved surfaces are mounted in a way that they are fitted to the outer part of
the door plastic. Otherwise, cooler partition door cannot be closed completely.
UK - 11 -
PDF created with pdfFactory Pro trial version www.pdffactory.com
Speaker and its cover
There are two speakers on the freezer door shelf.
You can listen your recordings and the music songs
in your USB memory. Do not use water and acid
based cleaners in the cleaning of the speaker and
the area it is located.
You can wipe the surface where the speaker is
located with a moist cloth. Do not cover the speaker
surface for the sound to come effectively.
USB Reader and Microfon
There is a USB reader and a microphone under the freezer door.
• You can listen to the songs in your USB memory.
• You can record your voice thanks to its microphone feature.
For USB memory use;
• Make sure that your USB memory is plugged to
the USB reader in the stated way.
• The use of the USB reader can change depending
on the format of your USB memory.
• The detailed information about the use of the USB
reader is given in the part of Operating Your Fridge
in the Part 3.
(The USB memory being used should be formatted
in FAT32 format).
USB READER
MICROFON
The picture in the presentation is the image seen when the door of the freezer
partition is open.
UK - 12 -
PDF created with pdfFactory Pro trial version www.pdffactory.com
PART- 3. OPERATING YOUR FRIDGE
W hen you plugged in your appliance, first all the symbols light and then as initial
value freezer partition temperature set value is displayed as -18°C, and the cooler partition temperature set value as +5°C.
Use of DISPLAY
MODE Button
You can move among Message Mode, MP3 Player and Menu which are the 3 main
screens using the Mode button.
When no action is performed, it turns back to the menu after 15 seconds.
When you plugged in your fridge
When you pushed on the Mode button for the first time
When you pushed on the Mode button for the second time
The Mode in the LCD Screen
Message
MP3 Player
Menu
MESSAGE Mode
For recording a Message;
• When the Message Mode is active, the icon of 8.2 (red circular) lights constantly.
• When you pushed this (8) button, the icon of 8.2 (red circular) starts to flash. This
means that the record has been started.
• Whatever you say in this period is recorded to the memory of the fridge.
• The record time is displayed at the bottom right corner of the LCD Screen.
• In order to stop the recording, just push the (8) button.
Note: The Microfon is under the upper door. As you get close to that area while recording,
the quality of the sound improves. (Record memory 70 (+/- 10) seconds.)
Moving among the Recorded Messages
If more than one message is recorded, the icons of 9.1 (previous) and 10.1 (next)
light. You can move among the messages using 9 and 10 buttons.
Listening to a Message
After selecting the desired message as explained above, you can listen to the record
pushing on the 7 (play) button.
Adjusting Volume
W hile listening to a message, the icons of 8.1 (turn up) and 11.2 (turn down) light
together with the 7.2 icon. You can turn the volume up pushing the 8 button and turn the
volume down pushing the 11 button.
UK - 13 -
PDF created with pdfFactory Pro trial version www.pdffactory.com
Deleting a Message
After selecting the desired message by the 9 and 10 buttons, push the 11 button while
11.1 (delete) icon lights. A question asking for your approval appears on the LCD Screen
of the Control Panel. At this point, if you push the 7 button while 7.3 (OK) icon lights, that
message is deleted.
In order to delete all the messages at the same time, you need to first hold the 11
button for a few seconds until you see the warning of “delete all” on the screen and then
just push the 7 button while 7.3 (OK) icon lights. You may need to wait for 5-10 seconds
depending on the lengths of the recorded messages.
What the Message Symbol (32) Means:
Situation
When there is an unheard voice message
When all the messages are heard
When there is no recorded voice message
Symbol
It flashes
It lights constantly
It does not light
MP3 PLAYER Mode
Activating the MP3 Player and Listening to Music;
• When you push the Mode button until you see “MP3” on the LCD Screen, you are in
the MP3 Player Mode.
• For your fridge to play music, you need to plug your USB memory including Music in
MP3 format to the socket under the upper door.
• If you already plugged a USB memory when you entered the mode; if a USB memory
is not plugged when it is plugged the control panel detects it automatically and
starts to play starting from the first song.
• While a song is being played the icon of 7.1 (play) flashes.
• The icons of 7.2 (stop), 8.1 (turn up), 11.2 (turn down), 9.1 (previous track), 10.1 (next
track) light.
• You can pause the music and play again pushing the 7 (OK) button.
Navigating among musics / Listening to the Same Song Again
• If you saved more than one MP3 in your USB memory, the icons of 9.1 (previous) and
10.1 (next) light. You can navigate among the songs using 9 and 10 buttons.
• While a son is being played, you can turn back to the beginning of the song being
played pushing the 9 button and turn back to the previous song pushing the 9 button
again at the beginning of the song within a second.
• Selected music starts to be played automatically.
Adjusting Volume
While listening to a music, the icons of 8.1 (turn up) and 11.2 (turn down) light together
with the 7.2 icon. You can turn the volume up pushing the 8 button and turn the volume
down pushing the 11 button.
Note: Your USB memory should be formatted in FAT32 file system.
UK - 14 -
PDF created with pdfFactory Pro trial version www.pdffactory.com
Menu Functions
1. Timer
2. Ultra Freeze Mode
3. Ultra Cool Mode
4. Economy Mode
5. Holiday Mode
6. Contrast Options;
7. Clock Settings
8. Date Setting
9. Choosing a language
10. Reminder
11. Screensaver Mode
12.Button Voice
1. Timer
• W hen you pushed the timer button on the control panel, the countdown starts
according to the latest time assigned in the timer tab in the menu. Also it is used for
deactivating the audio warning to be given at the end of the time.
• If you want to change the assigned time, enter the Menu pushing the Mode button
and then enter the Timer tab and push the OK button.
• The assigned time is displayed on the LCD Screen.
• Format is HH – MM – ss (H: Hour M: Minute s: Second)
• You can navigate among H, M, s with the 9 and 10 buttons; you can select the numbers
you desire with the 8 and 11 buttons.
• After your selection is completed, it starts to countdown as of the time you assigned
when you pushed the OK button.
• When counters comes to zero, your fridge warns you with an audio warning.
• In the meantime, the caption of 2.2 (Alarm Off) flashes. W hen you push the 2 (Timer)
button, alarm and sound is deactivated.
• If you want to hear the alarm after the same period without changing the time, you
just need to push the Timer (2) button. (the button 2 functions as a kind of shortcut.)
2. Ultra Freeze Mode
When to use ?
• For freezing a large amount of food (too large to be fitted in the Quickfreezer partition),
• To freeze fast food,
• To freeze food quickly,
• To store seasonal food for a long time
UK - 15 -
PDF created with pdfFactory Pro trial version www.pdffactory.com
How to use?
• In order to activate the Ultra Freeze Mode, first enter the Menu with the Mode button
and then enter the Ultra Freeze Mode pushing the down button and push the OK
button.
• W hen the Ultra Freeze Mode is active the symbol of 20 (Ultra Freeze Symbol) will
light. The expression near the Ultra Freeze will be turned into “On”.
• After 3 hours, you will see the warning that “Place your food” and you will hear a audio
waning at the same time. In this situation you can place your food.
• Until the door of the freezer is opened, this warning will be repeated in each 5 minutes
(for 1 hour).
• In order to deactivate the Mode, first enter the Menu with the Mode button and then
enter the Ultra Freeze Mode pushing the down button and push the OK button.
• 20 (Ultra Freeze Symbol) will disappear. The expression near the Ultra Freeze will
be turned into “Off”.
• The Freezer bars will be closed during the mod.
While the Ultra Freeze Mode is active;
• The Ultra Cool Mode can be activated. Both modes can be operated at the same
time.
• Cooler partition temperature value can be changed.
• Freezer partition temperature value can be changed. However, new temperature value
is activated when the Ultra Freeze Mode is over.
• The Economy Mode or Holiday Mode can also be activated. However, when these
modes are activated, the Ultra Freeze Mode is automatically cancelled and the fridge
starts to operate according to the mode selected.
Note: After 24 hours or when the freezer sensor temperature is -32°C, the mode is automatically terminated.
3. Ultra Cool Mode
When to use
• To cool fast food before eating,
• To cool and store and lots of food,
• To cool drinks quickly.
How to use?
• In order to activate the Ultra Cool Mode, first enter the Menu with the Mode button and
then enter the Ultra Cool Mode pushing the down button and push the OK button.
When the mode is activated the symbol of 24 (Ultra Cool Symbol) will light. During
the mode, cooler partition temperature indicator bars will be closed.
• In order to deactivate the Mode, first enter the Menu with the Mode button and then
enter the Ultra Cool Mode pushing the down button and push the OK button. 24
(Ultra Cool Symbol) will disappear. The expression near the Ultra Cool will be turned
into “Off”.
UK - 16 -
PDF created with pdfFactory Pro trial version www.pdffactory.com
While the Ultra Cool Mode is activated;
• The Ultra Freeze Mode can be activated. Both modes can be operated at the same
time.
• Freezer partition temperature value can be changed.
• Cooler partition temperature value can be changed. However, new temperature value
is activated when the Ultra Cool Mode is over.
• The Economy Mode or Holiday Mode can also be activated. However, when these
modes are activated, the Ultra Cool Mode is automatically cancelled and the fridge
starts to operate according to the mode selected.
Note: After 8 hours or when the cooler sensor temperature is 0°C, the mode is automatically
terminated.
The reason of limiting this time is to prevent the risk of freezing the food because of
the high cooling power of the “Ultra Cool” mode. If the drinks placed in the fridge department
are too hot, drinks may have not reached the desired coolness when the mode is
completed. You can re-activate the mode if this happens.
4. Holiday Mode
When to use?
If you are going to go on a holiday for a long time and if you want to empty the cooler
partition, you can use this mode. The cooler partition should be emptied as the temperature
in this partition will be inappropriate for storing food when this mode is selected. The
aim is to save energy. The cooler partition is fixed to 12°C in order to prevent smell and
moisture. Therefore, you should not leave the door of your Fridge open.
How to use?
• In order to activate the Holiday Mode, first enter the Menu with the Mode button and
then enter the Holiday Mode pushing the down button and push the OK button.
• W hen the mode is activated, the word H will appear in the areas displaying the
temperature set values of the Cooler and Freezer Partitions.
• In order to deactivate the Mode, first enter the Menu with the Mode button and then
enter the Holiday Mode pushing the down button and push the OK button.
• You will see the temperature set values before the Holiday Mode again, and your
fridge will start to operate according to these temperature set values.
• During the mode, freezer and cooler partition temperature indicator bars will be closed.
When the holiday mode is activated:
• The temperature set values of the Cooler and the Freezer partitions can be changed.
However, new temperature values are activated when the Holiday Mode is over.
• The Ultra Freeze Mode can be activated. However, when this mode is activated, the
Holiday Mode is automatically cancelled and the freezer partition starts to operate in
the Ultra Freeze Mode and the cooler partition starts to operate according to the
temperature set values before the Holiday Mode.
• The Ultra Cool Mode can be activated. However, when this mode is activated, the
Holiday Mode is automatically cancelled and the cooler partition starts to operate in
the Ultra Cool Mode and the freezer partition starts to operate according to the
temperature set values before the Holiday Mode.
UK - 17 -
PDF created with pdfFactory Pro trial version www.pdffactory.com
5. Economy Mode
When to use?
When you want to use your fridge under economical conditions, the freezer and the
cooler partitions operate economically according to the temperature set values defined
in the control panel.
How to use?
• In order to activate the Economy Mode, first enter the Menu with the Mode button and
then enter the Economy Mode pushing the down button and push the OK button.
• W hen the mode is activated, the word E will appear in the areas displaying the
temperature set values of the Cooler and Freezer Partitions.
• In order to deactivate the Mode, first enter the Menu with the Mode button and then
enter the Economy Mode pushing the down button and push the OK button.
• You will see the temperature set values before the Economy Mode again, and your
fridge will start to operate according to these temperature set values.
• During the mode, freezer and cooler partition temperataure indicator bars will be
closed.
When the economy mode is activated:
• The temperature set values of the Cooler and the Freezer partitions can be changed.
However, new temperature value is activated when the Economy Mode is over.
• The Ultra Freeze Mode can be activated. However, when this mode is activated, the
Economy Mode is automatically cancelled and the freezer partition starts to operate
in the Ultra Freeze Mode and the cooler partition starts to operate according to the
temperature set values before the Holiday Mode.
• The Ultra Cool Mode can be activated. However, when this mode is activated, the
Economy Mode is automatically cancelled and the cooler partition starts to operate
in the Ultra Cool Mode and the freezer partition starts to operate according to the
temperature set values before the Holiday Mode.
6. Contrast Options;
You can increase or decrease the contrast between lack and white on the LCD Screen,
and adjust the contrast according to your taste.
• In order to adjust, first enter the Menu with the Mode button and then enter the Contrast
Tab pushing the down button and push the OK button.
• Indicator bars like -……………………………………+ will appear
of contrast on the LCD Screen.
under the caption
• The icons 9.1 and 10.1 will light.
• You can increase the contrast pushing the 10 button and decrease pushing the 9
button. W hen you catch the display you desire, you can save the setting pushing the
7 (OK) button.
UK - 18 -
PDF created with pdfFactory Pro trial version www.pdffactory.com
7. Time Options
It is used to adjust the time displayed on the screen.
• In order to adjust, first enter the Menu with the Mode button and then enter the Time
Settings Tab pushing the down button and push the OK button.
• The current time setting is displayed on the LCD Screen.
• Format is HH – MM – ss (H: Hour M: Minute s: Second)
• You can navigate among H, M, s with the 9 and 10 buttons; you can select the numbers
you desire with the 8 and 11 buttons.
• After you completed the setting, the new time is activated when you push the OK
button.
• The day will automatically be assigned by the software of your appliance.
8. Date Options
It is used to adjust the date displayed on the screen.
• In order to adjust, first enter the Menu with the Mode button and then enter the Date
Settings Tab pushing the down button and push the OK button.
• The current time setting is displayed on the LCD Screen.
• Format is DD – MM –YYYY (D: Day M: Month Y:Year)
• You can navigate among D, M, Y with the 9 and 10 buttons; you can select the numbers
you desire with the 8 and 11 buttons (Months for M - months are written in words).
• After you completed the setting, the new date is activated when you push the OK
button.
9. Choosing a language
You can select the language of the Menu, whether Turkish or English, using this menu.
• In order to adjust, first enter the Menu with the Mode button and then enter the
Choosing a Language Tab pushing the down button and push the OK button.
• Push the 7 (OK) button selecting the language you desire navigating with the 8 (up)
and 11 (down) buttons.
• The language of the Menu will automatically changed into the language you selected.
10. Reminder
• In order to activate the Mode, first enter the Menu with the Mode button and then enter
the Reminder Tab pushing the down button and push the OK button.
• On the LCD screen, the list of the recorder reminder texts and a “new note” line will
be displayed.
To save a new reminder;
• Push the 7 (OK) button selecting the ‘new note’ you desire navigating with the 8 (up)
and 11 (down) buttons. The definitions below will appear on the LCD Screen.
UK - 19 -
PDF created with pdfFactory Pro trial version www.pdffactory.com
DATE / TIME / REPETITION / NOTE / DELETE / BACK
• Use the 8 (Up) and 11 (Down) buttons for navigating between DATE and DELETE.
You can enter to the settings of each or them pushing the 7 (OK) button.
• If you push the 7 (OK) button while DATE is selected, the date when the text is going
to be reminded first is set. For this, follow the instructions explained in the 8th part
regarding date setting in the menu (look at Date Settings Part)
• If you push the 7 (OK) button while TIME is selected, the time when the text is going
to be reminded first is set. For this, follow the instructions explained in the 7th part
regarding time setting in the menu. (look at Time Settings Part)
• If you push the 7 (OK) button While REPETITION is selected, the options below appear.
OFF - Only for once at the date and the time selected.
ANNUAL - Note is reminded at the anniversaries of the selected date and time.
MONTHLY - Note is reminded at the monthly anniversaries of the selected date and time.
WEEKLY - Note is reminded at the weekly anniversaries of the selected date and time.
DAILY - The note is reminded every day at the selected time as of the selected date.
• Push the 7 (OK) button selecting the repetition value you desire navigating with the 8
(up) and 11 (down) buttons.
• A virtual keyboard appears while NOTE is selected and enables you to write the note
you desire.
A, B, C, ..........Z
1, 2, 3, ...........9
• Space icon, Delete icon, Enter [
] (Approve) icon
• When you pushed the 7 (OK) button selecting the letter / number / symbol you desire
with the buttons 8, 9, 10, 11 (down, up, right, left), the letter / number / symbol you
selected is added to the text.
• For deleting the related icon and for spacing the related icon is used.
• When you complete the text select the Enter [
] icon and push the 7 (OK) button.
• MODE, TIMER, FRZ. SET, REF. SET are not activated while writing a note.
• After saving the note pushing the Enter and exiting, you can exit from the reminder
using the Back Tab or Mode button.
• When the selected time comes, the text you wrote on the LCD Screen appears and
an audio warning is given.
• In order to close the alarm and the text you need to push the 2 (Alarm Off) button.
Note: In order to delete the old note, you should select the note and select the delete tab
in it.
UK - 20 -
PDF created with pdfFactory Pro trial version www.pdffactory.com
11. Screensaver Mode
When to use?
When you do not change your settings and when you do not open the door of your
fridge for a while, you can use this function if you do not want the control panel lights be
on for vain.
How to use?
• IIn order to activate the Screensaver Mode, first enter the Menu with the Mode button
and then enter the Screensaver Mode pushing the down button and push the OK
button.
• IYou will see two lines on the screen: ON and OFF.
• IIf you select ON and push the 7 (OK) button, the mode is activated.
• IWhile the mode is active, if you do not press any button of the control panel for 5
seconds and if both doors are not opened, the lights of the control panel go out. Only
8.2 lights as a pilot lamp.
• IWhen you touch the control panel or open one of the doors, the lights of the control
panel are on.
• IIf you want, you can adjust again.
Note: While it is OFF, the lights of the control panel are on constantly.
12. Button Voice
When you push the button in the control panel of your fridge, a beep sound may come
or not depending on your choice.
How to use?
You can select either of them using the 7 (OK) button entering the Menu with the Mode
button and then entering the Button Voice Tab pushing the 11 (down) button.
Other Functions
Child Lock Mode
When to use?
When you want to prevent your children from changing your settings.
How to use?
• When you hold the FRZ. SET and REF. SET. Button for 5 seconds, it is activated.
• You can cancel it in the same way.
• If you activate the Child Lock as well while the Screensaver is activated, you first
need to cancel the child lock in order to be able to cancel the screensaver.
Note: In the event that electricity goes off or that you plug off your appliance while the
Child Lock is activated, the child lock remains activated when it is plugged again.
Door Open Alarm Function
• When one of the doors are left open for more than 2 minutes, an audio warning is
given.
• “Door is Open” warning appears on the LCD Screen.
UK - 21 -
PDF created with pdfFactory Pro trial version www.pdffactory.com
PART- 4. FRIDGE TEMPERATURE SETTINGS
Freezer Partition Temperature Settings
• Initial temperature value for Freezer Department Indicator is -18oC.
• Press FRZ. SET button once.
• When you first push this button, -18°C starts to flash in the setting indicator of the
freezer partition.
• Each time you push the FRZ. SET button, the set value decreases (-20°C, -22°C,
-24°C)
• If you do not touch any button while the temperature value that you desire is selected,
the value you selected will be accepted and your fridge will start to operate according
to this temperature value.
• W hen you push the FRZ. SET button until -24°C (maximum cold) appears on the
freezer partition setting indicator, and when you keep pushing, it will start from -16°C
again. -16°C, -18°C, -20°C…)
• The temperature value selected before Holiday Mode, Ultra Freeze Mode, Ultra Cool
Mode or Economy Mode is activated will remain the same when the mode is over or
cancelled. Your fridge will continue operating in this temperature value selected.
Note: If the temperature of the environment is higher than 38°C, the freezer partition
temperature cannot be adjusted to -22°C and -24°C. It can only be adjusted to the values
of -16°C, -18°C, -20°C.
Recommended Temperature Values for Freezer Partition
When should it be adjusted?
When small amount of food is stored
In normal usage
When lots of food is stored
Inner Temperature
-16°C
-18°C or -20°C
-22°C or -24°C
Note: The indicator bars on the right of the numbers showing the temperature value
light according to the temperature value (colder environment= more bars). W hen the
temperature value is changed, the indicator bar which starts to flash shows the
temperature value to which the fridge tries to reach, the indicator bar lighting shows the
current temperature. W hen reached the desired temperature value, the indicator bar which
flashes starts to light constantly.
UK - 22 -
PDF created with pdfFactory Pro trial version www.pdffactory.com
Partition Temperature Settings
• Initial temperature value for the Cooler Department Indicator is +5oC.
• Press the REF.SET button once.
• W hen you first push this button, +5°C starts to flash in the setting indicator of the
cooler partition.
• Each time you push the REF.SET button, the temperature decreases starting from
+5°C. (+4°C, +3°C, +2°C)
• If you do not touch any button while the temperature value that you desire is selected,
the value you selected will be accepted and your fridge will start to operate according to this temperature value.
• W hen you push the REF. SET button until +2°C (maximum cold) appears on the
cooler partition setting indicator, and when you keep pushing, it will start from +8°C
again. (+8°C, +7°C, +6°C,+5°C…)
• The temperature value selected before Holiday Mode, Ultra Freeze Mode, Ultra Cool
Mode or Economy Mode is activated will remain the same when the mode is over or
cancelled. The appliance continues to operate with this temperature value.
Recommended Temperature Values for Fridge Department
When should it be adjusted?
When lots of food is stored
In normal usage
When small amount of food is stored
Inner Temperature
+2°C
+4°C or +6°C
+8°C
Note: The indicator bars on the right of the numbers showing the temperature value
light according to the temperature value (colder environment= more bars). When the temperature value is changed, the indicator bar which starts to flash shows the set value to
which the fridge tries to reach, the indicator bar lighting shows the current temperature.
W hen reached the desired temperature value, the indicator bar which flashes starts to
light constantly.
UK - 23 -
PDF created with pdfFactory Pro trial version www.pdffactory.com
Warnings for Temperature Settings
• Your temperature adjustments will not be deleted when an energy breakdown occurs.
• It is not recommended that you operate your fridge in environments colder than 10°C
in terms of its efficiency.
• The indicator bars on the right of the numbers showing the temperature value light
according to the temperature value (colder environment = more bars).
• Do not pass to another adjustment before completing an adjustment.
Your fridge should be operated up to 24 hours according to the ambient temperature
without interruption after being plugged in to be completely cooled. Do not open
doors of your fridge frequently and do not place much food inside it in this period.
• A 5 minute delaying function is applied to prevent damage to the compressor of your
fridge, when you take the plug off and then plug it on again to operate it or when an
energy breakdown occurs. Your fridge will start to operate normally after 5 minutes.
• Your fridge is designed to operate in the ambient
temperature intervals stated in the standards,
according to the climate class stated in the
information label. It is not recommended that your
fridge is operated in the environments which are
out of the stated temperature intervals in terms of
cooling efficiency.
Climate Class
T
ST
N
SN
Ambient
16 to 43 °C
16 to 38 °C
16 to 32 °C
10 to 32 °C
Conformity Information
• Tropical Class is defined for the environment temperatures between 16°C and 43°C
in accordance with the TS EN ISO 15502 Standards.
• The appliance is designed in compliance with the EN15502, IEC60335-1 /
IEC60335-2-24, 2004/108/EC standards.
• The appliance complies with the “EEE” Regulation.
UK - 24 -
PDF created with pdfFactory Pro trial version www.pdffactory.com
PART- 5. PLACING FOODS
Cooler Partition
• For normal operating conditions, adjusting the temperature value of the cooler partition
of the fridge to 4°C will be enough.
• Do not put the storage boxes including liquid without closing their covers to prevent
moisture and therefore icing.
• Never put hot foods to your fridge. You should wait for the hot foods to get cold in
room temperature and you should make the necessary arrangements for enabling
air circulation in the fridge.
• Place the meats and the cleaned fishes that you will use within 1-2 days (in plastic
bags or packets).
• You can put fruits and vegetables in the crisper without packaging.
Some suggestions on the placing and storing of your food in the fridge department are
supplied below.
Food
Where to place in the fridge
department
Storing time
Vegetables and fruits
1 week
In the Crisper (without being
wrapped)
Meat and fish
2 to 3 days
Covered with plastic folio and bags
Or in a meat box
(on the glass shelf)
Fresh cheese
3 to 4 days
In the special door shelf
Butter and Margarine
1 week
In the special door shelf
Bottled product, Milk and Until the expiry date
Yoghurt
recommended by the producer
In the special door shelf
Eggs
In the egg shelf
1 month
Cooked food
All shelves
NOTE: Potatoes, onion and garlic shouldn’t be kept in the fridge.
UK - 25 -
PDF created with pdfFactory Pro trial version www.pdffactory.com
Freezer Partition
• For normal operating conditions, adjusting the temperature value of the freezer
partition of the fridge to -18°C will be enough.
• The freezer is used for storing deep frozen or frozen foods for a long time or for
producing ice.
• Do not put fresh and hot foods to the shelves of the freezer door in order to freeze
them. Only use it for storing frozen foods.
• Do not put fresh and hot foods close to frozen foods because the frozen foods can
melt.
• In order to freeze the food you cook at home (which needs to be frozen) more quickly,
use the quick freezer shelf, because the quick freezer partition has higher capacity
of freezing.
• While freezing a fresh food (exp. Meat, fish and minced meat), divide them into little
portions that you can use once.
• While freezing fresh foods; the maximum amount of food that can be frozen within 24
hours is shown on the label of the appliance (as kg).
• For an ideal appliance capacity that will enable you to reach the maximum freezing
capacity, adjust the freezer partition temperature to the coldest value 24 hours before
you place fresh foods in the freezer partition.
• You can freeze the foods using the quick freezer functions after 24 hours. After the
quick freezer function is over, the partitions can be adj usted to a desired
temperature value.
• After placing fresh foods in the freezer partition, waiting for 24 hours is generally
enough. After 24 hours, you do not need to adjust the freezer partition temperature
value to the coldest setting.
• Warning; While freezing a small amount of food, you do not need to adjust the freezer
partition temperature value to the coldest setting. This will help you to save energy.
• To store the frozen foods; you should carefully obey the instructions on the packages
of frozen foods, if there is no instruction on foods they should be stored maximum
for 3 months as of the date of purchasing.
• To store the frozen foods; you should carefully obey the instructions on the packages
of frozen foods, if there is no instruction on foods they should be stored maximum
for 3 months as of the date of purchasing.
• Frozen foods should be carried in appropriate storage boxes and be placed in the
freezer partition of the appliance as soon as possible.
• If there are moisture and abnormal swelling marks on the package of a frozen food,
it was probably stored in an inappropriate temperature and its content deteriorated.
• The expiry date of a frozen food depends on the room temperature, freezer partition
temperature setting, the frequency of opening the door of your fridge, the type of
food, the time passing while carrying it from shop to the house. Always follow
instructions on the package and do not exceed storing period.
• If you put the frozen foods taken out from the deep freeze partition of your fridge in the
partition under, they will help the fridge to cool. So you can save energy. If you put the
material in the deep freeze to an open area, energy loss occurs.
UK - 26 -
PDF created with pdfFactory Pro trial version www.pdffactory.com
Meat and fish
Preparing
Storing time
(months)
In room temperature
Defrost time
-hour-
Steak
Wrapping in a foil
6-10
1-2
Lamb meat
Wrapping in a foil
6-8
1-2
Veal roast
Wrapping in a foil
6-10
1-2
Veal cubes
In small pieces
6-10
1-2
Lamb cubes
In pieces
4-8
2-3
Minced meat
In packages without using spices
1-3
2-3
Giblets (pieces)
In pieces
1-3
1-2
Bologna
sausage/salami
Should be packaged even if it has
membrane
Until it is defrosted
Chicken and turkey Wrapping in a foil
7-8
10-12
Goose and Duck
Wrapping in a foil
4-8
10
Deer, Rabbit, Wild
Boar
In 2.5 kg portions and as fillets
9-12
10-12
2
Until it is thawed
completely
4-8
Until it is thawed
completely
2-4
Until it is thawed
completely
Freshwater fishes
(Salmon, Carp,
Crane, Siluroidea)
After cleaning the bowels and
scales of the fish, wash and dry it;
and if necessary, cut the tail and
Fatty fishes (Tunny, head.
Mackarel, bluefish,
anchovy)
Lean fish; bass,
turbot, flounder
Shellfish
Cleaned and in bags
4-6
Until it is thawed
completely
Caviar
In its package, aluminum or
plastic container
2-3
Until it is thawed
completely
Snail
In salty water, aluminum or plastic
container
3
Until it is thawed
completely
Note: frozen meat should be cooked as fresh meat after being thawed. If the meat is
not cooked after being thawed, it should never be frozen again.
UK - 27 -
PDF created with pdfFactory Pro trial version www.pdffactory.com
Preparing
Storing time
(months)
In room temperature
Defrost time
-hour-
Cauliflower
Take the leaves apart, cut
the heart into pieces, and
leave it in water with a little
lemon juice for a while
10 - 12
It can be used as frozen
String beans and
beans
Wash and cut to small
pieces
10 - 13
It can be used as frozen
Beans
Hull and wash
12
It can be used as frozen
Mushroom and
asparagus
Wash and cut to small
pieces
6-9
It can be used as frozen
Cabbage
Cleaned
6-8
2
Eggplant
Cut to pieces of 2cm after
washing
10 - 12
Separate them from one another
Corn
Clean and pack with its
stem or as sweetcorn
12
It can be used as frozen
Carrot
Clean and cut to slices
12
It can be used as frozen
Pepper
Cut the stem, cut into two
pieces and remove the core
8 - 10
It can be used as frozen
Spinach
Washed
6-9
2
Apple and pear
Peel and slice
8 - 10
(In Fridge) 5
Apricot and Peach
Cut into two pieces and
remove the stone
4-6
(In Fridge) 4
Strawberry and
Blackberry
Wash and hull
8 - 12
2
Cooked fruits
Adding 10 % of sugar in the
container
12
4
Plum, cherry,
sourberry
Wash and hull the stems
8 - 12
5-7
Vegetables and
Fruits
UK - 28 -
PDF created with pdfFactory Pro trial version www.pdffactory.com
Preparing
Packet (Homogenize)
Milk
Storing Conditions
2-3
Pure Milk – In its own packet
6-8
It can be left in its original
package for storing for a short
time. For long term storage It
should be stored in a plastic
In its own packet
Cheese-excluding
white cheese
In slices
Butter, margarine
In its package
6
Albumen
* Eggs
Storing time
(months)
10 - 12
30 gr of it is equal to a yolk.
Egg mixture
(Albumen – yolk)
Some salt or sugar is
added for preventing it
from becoming dense.
10
50 gr of it is equal to a yolk.
Yolk
Some salt or sugar is
added for preventing it
from becoming dense.
8 - 10
20 gr of it is equal to a yolk.
In closed container
Dairy Products
Pastry
* Should never be frozen with its shell. Albumen and yolk should be frozen individually or
completely mixed.
Storing time
(months)
Thawing time in room
temperature (hours)
Thawing time in owen (min.)
4-6
2-3
4-5 (220-225 °C)
Biscuits
3-6
1 - 1,5
5-8 (190-200 °C)
Pastry
1-3
2-3
5-10 (200-225 °C)
1 - 1,5
3-4
5-8 (190-200 °C)
Phyllo dough
2-3
1 - 1,5
5-8 (190-200 °C)
Pizza
2-3
2-4
15-20 (200 °C)
Bread
Pie
Some spices in cooked food (aniseed, basil, dill, vinegar, spice mix, ginger, garlic,
onion, mustard, thyme, marjoram, black pepper, bologna sausage etc.) may have a foul
taste when stored for a long time. Therefore, frozen food should be spiced just a little or
spice should be added after the food is thawed.
The storing time for the food depends on the oil used. Margarines, veal fat, olive oil
and butter are suitable, peanut oil and lard are not suitable.
Cooked food in liquid form should be frozen in plastic containers, other food should
be frozen wrapped in plastic foil or in plastic bags.
UK - 29 -
PDF created with pdfFactory Pro trial version www.pdffactory.com
PART- 6. CLEANING AND MAINTENANCE
• Make sure to unplug the fridge before starting to clean it.
• Do not wash your fridge by pouring water.
• You can wipe the inner and outer sides with a soft cloth
or a sponge using warm and soapy water.
• Remove the parts individually and clean with soapy water. Do not wash in washing machine.
• Never use flammable, explosive or corrosive material like
thinner, gas, acid for cleaning.
• The condenser (the back part with black wings) should
be cleaned using a vacuum cleaner or a dry brush at
least once a year. This will help your fridge to operate
more efficiently and will enable you to save energy.
Make sure that your fridge is unplugged while cleaning.
RESET Button
There is a RESET button on the upper right corner of the freezer door of your fridge.
Be careful for liquids while cleaning. Prevent any liquid from flowing through this are (wipe
with a moist cloth).
UK - 30 -
PDF created with pdfFactory Pro trial version www.pdffactory.com
Cleaning Door Glasses
Water based products which are not abrasive should be used in cleaning glasses.
Changing Leds
• A Led lighting system is used in the
freezer and the cooler partitions of the
fridge.
• Do not use water or acid based cleaners
in cleaning the leds.
• For changing leds, please call your
Technical Service.
UK - 31 -
PDF created with pdfFactory Pro trial version www.pdffactory.com
PART- 7. SHIPMENT AND RE-POSITIONING
Shipment with a Package
• Original package and foam may be kept for re-transportation (optionally).
• You should fasten your fridge with thick package, bands or strong cords and follow
the instructions for transportation on the package for re-transportation.
Shipment without a Package
• Remove movable parts (shelves, accessories, vegetable bins etc.) or fix them into
the fridge against shocks using bands during re-positioning and transportation.
• During transportation, the fridge should be carried
in a way that its back is through the floor with an
approximately 30° inclination; And it should be
carried at least by three people.
CAUTION:
1
1. To prevent downthrown support the fridge with
your free hand as shown in the picture.
2. Make sure that you do not shake the compressor
part during transportation.
3. Make sure that the fridge is parallel to the floor
during transportation. Carry it with at least 30°
inclination.
2
3
30
UK - 32 -
PDF created with pdfFactory Pro trial version www.pdffactory.com
Position of the Adjustable Feet
Thanks to adjustable feet, you can close the doors easily. The height of the appliance
can be adjusted turning the adjustable feet to right and left.
During the first assembly of your fridge:
• After demounting the base styropor of your fridge, repose it back slowly.
• First, adjust the ground clearance of the front part of the adjustable foot (right) as
3 – 3,5 cm. and place the fridge slowly to a flat and a rough surface.
• Then, open the other adjustable (left) foot and adjust it and ballast.
Note: This should be done before placing food in the fridge.
UK - 33 -
PDF created with pdfFactory Pro trial version www.pdffactory.com
PART- 8. BEFORE CALLING SERVICE
Check Warnings;
Your fridge warns you if the temperatures for fridge and freezer departments are in
improper levels or when a problem occurs in the appliance. Warning codes are displayed
in the Freezer and Fridge Department Indicators.
WARNING
TYPE
1. When “Call
Service"
appears
MEANING
Fault warnings
CAUSE
WHAT SHOULD BE DONE?
Contact the nearest service as
soon as possible.
It is seen when one or a few
Note: After the problem is
of the fridge parts fails.
solved, the warning “Call
Service” will disappear.
1. 1. If your frozen food are
thawed, consume them as soon
as possible because of the risk
of spoiling and do not re-freeze
them.
1. When
“Freezer is too
Displayed after long power
breakdowns or when the
hot” appears on Freezer department
the LCD screen is not cold enough fridge is operated for the first
time.
and 2nd beep
sound is heard.
2. 2. Temporarily increase the
temperature adjustment of the
freezer to the desired level or
activate fast freezing mode. No
beep sound will be heard and
the warning “Freezer is too hot”
will disappear.
When the problem is solved,
your fridge keeps operating in
the mod or temperature adjusted
latest.
1. When the
warning “Cooler
is too hot”
appears on the Cooler department
LCD Screen
is not cold enough
2. When a
beep sound is
heard
2. Temporarily increase the
temperature adjustment of the
freezer to the desired level or
The ideal temperature of the activate fast freezing mode.
cooler partition is +4°C.
There is a risk of spoiling of No beep sound will be heard and
the food in the fridge
the warning “Freezer is too hot”
department when this
will disappear.
warning is displayed.
When the problem is solved,
your fridge keeps operating in
the mod or temperature adjusted
latest.
UK - 34 -
PDF created with pdfFactory Pro trial version www.pdffactory.com
1. When the
warnings
“Freezer is too
hot” and
“Cooler is too
hot” appears
together on the
LCD Screen
2. When a
beep sound is
heard
Cooling is
insufficient
Apply the instructions in the
article 2
It appears when both articles
At the same time.
above occur at the same time
Call for a service if the problem
is not solved.
1.Check whether the fast cooling
is activated
1. When the
warning “Cooler
is too cold”
Fridge Department
appears
is too cold
2. When a
beep sound is
heard
When Low
Voltage
appears on the
Lcd Screen
Low voltage
It means that the fridge
department is cooling too
much and food in the
department may freeze.
Fridge switches to stand-by
condition when the voltage
supply is lower than 170
Volts.
2.Adjust the freezer department
temperature and decrease it.
No beep sound will be heard and
the warning “Cooler is too cold”
will disappear. When the
problem is solved, it continues to
operate in the mode and the
temperature adjusted latest.
This feature prevents damage to
the compressor due to low
voltage. Fridge will start
operating automatically when the
voltage reaches the desired
level.
Push the RESET button which is
located at the upper right corner
of the freezer door of your fridge
until the display on the screen
disappear (with a pen or similar
This kind of sensitive
If a problem not listed here appears
electronic appliances can be pointed object). After you see
or the buttons in the touch screen do
affected by electromagnetic that the display disappeared, set
not respond for a long time after
the button free again.
areas and the electrical
pushing
changes in mains.
Note: After the process of
RESET, make sure that the
RESET button is not fastened.
(RESET BUTTON: Look at Page
31)
UK - 35 -
PDF created with pdfFactory Pro trial version www.pdffactory.com
If your fridge is not operating ;
• Is there any electrical faults?
• Is the plug is placed properly in the receptacle?
• Is the fuse of the receptacle that the plug is plugged or the main fuse blown?
• Is there any fault in the socket? Examine this by plugging your fridge into a receptacle
which you are sure that is working.
If your fridge is operating too loudly;
Normal Noises
Cracking (Ice cracking) Noise:
• During automatic defrosting.
• When the appliance is cooled or warmed (due to expansion of appliance material).
• Heard when the thermostat switches the compressor on/off.
Compressor noise
• Normal motor noise. This noise means that the compressor operates normally
• Compressor may cause more noise for a short time when it is activated.
Bubbling noise and splash:
• This noise is caused by the flow of the refrigerant in the tubes of the system.
Water flow noise:
• Normal flow noise of water flowing to the evaporation container during defrosting.
This noise can be heard during defrosting.
Air Blow Noise:
• Normal fan noise. This noise can be heard in No-Frost fridge during normal operation of the system due to the circulation of air.
If the edges of fridge cabinet that the door joint contact are warm;
• Especially in summer (hot weather), the surfaces that the joint contact may get warmer
during the operation of the compressor, this is normal.
If humidity builds up inside the fridge;
• Are all food packed properly? Are the containers dried before placing them in the
fridge?
• Are the fridge doors opened frequently? Humidity of the room gets in the fridge when
the doors are opened. Humidity build up will be faster when you open the doors
more frequently, especially if the humidity of the room is high.
• Building up of water drops on the rear wall after automatic defrosting is normal. (in
Static Models)
UK - 36 -
PDF created with pdfFactory Pro trial version www.pdffactory.com
If the doors are not opened and closed properly;
• Do the food packages prevent closing of the door?
• Are the door compartments, shelves and drawers placed properly?
• Are door joints broken or torn?
• Is your fridge on a level surface?
If your fridge is not cooling enough;
After you see that the display disappeared, set the button free again.
IMPORTANT NOTES:
• Compressor protection function will be activated after sudden power breakdowns or
after unplugging the appliance, because the gas in the cooling system is not stabilized yet. Your fridge will start after 5 minutes, there is nothing to worry about.
• If you will not use your fridge for a long time (e.g. in summer holidays) unplug it.
Clean your fridge according to Part 4 and leave the door open to prevent humidity
and smell
• If the problem persists after you have followed all the instructions above, please
consult to the nearest VESTEL authorized service.
• The appliance you bought is designed for home type use and can be used only at
home and for the stated purposes. It is not suitable for commercial or common
use. If the consumer use the appliance in a way that does not comply with these
features, we emphasize that the producer and the dealer shall not be responsible
for any repair and failure within the guarantee period.
• The lifetime of your appliance stated and declared by the Department of the Industry
is 10 years (the period for retaining parts required for the proper functioning of the
appliance).
UK - 37 -
PDF created with pdfFactory Pro trial version www.pdffactory.com
PART- 9. PARTS AND PIECES OF YOUR FRIDGE
This presentation is prepared with the aim of informing you about the parts and the
accessories of your appliance. The parts may vary depending on the model of the
appliance.
1) Icemaker
11) Cooler Partition Glass Shelf
2) Ice plate
12) Bottle Rack
3) Freezer Partition Shelf
13) Movable Shelf
4) Freezer Partition
14) Cheese, Butter Shelf
5) Chilledroom - Breakfast
15) Cheese, Butter Shelf Cover
6) Cooler Led (Lighting) and its Cover
16) USB Reader and Microphone
7) Cooler Partition Shelf
17) Freezer Partition Door Shelf
8) Crisper Cover
18) Quickfreezer Partition
9) Crisper
19) Speaker and its cover
10) Skirting
20) Freezer Led and its Cover
UK - 38 -
PDF created with pdfFactory Pro trial version www.pdffactory.com
PDF created with pdfFactory Pro trial version www.pdffactory.com
PDF created with pdfFactory Pro trial version www.pdffactory.com
PDF created with pdfFactory Pro trial version www.pdffactory.com