1
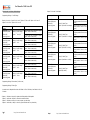
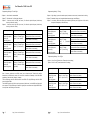
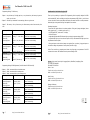
User Manual for COOL Series ESC
Thank you for purchasing our products! For the high power of this brushless system,
failure to use may result in injury yourself and damage of the whole device. So we highly
recommend you to read carefully and abide by the operating procedures of this manual before
the first flight. SunRise is not responsible for your misuse of this product or any damage including
incidental losses or indirect losses you may cause. Moreover, we have not any responsibility for
the modification of our products without authorization. We have the right to change the design,
features, functions and operating requirements of our products without any advanced notice!
IMPORTANT PRECAUTIONS:
● Read the manual correctly before your operating.
● Do not connect oppositely the polarity between the battery pack and the Electronic Speed
Controller(for short ESC). Wrong connecting of polarity will damage the ESC.
● The working range of ESC should not exceed the corresponding voltage and current.
● Do not disassemble any electronic components of ESC, or else it will cause permanent damage
or information losses.
● Do not allow any unqualified battery pack.
● Do not connect a degaussed motors.
● Do not use any substandard cable connector.
● Do not allow chemical agent and water onto the ESC.
● Do not take the battery away when the motor is rotating, or else it may cause high burst
current to damage the ESC.
● The ESC should be in a position which allows good airflow and heat dissipation.
● Always disconnect the battery from the ESC when not in use.
Features:
● Super fine and smooth touch of speed controlling, first-rate accurate linearity and quickrespond speed of throttle.
●With High Performance CPU of 24MHZ, Separate voltage regulator IC for MCU (Micro Controller
Unit), high capability of anti-interference to decrease the possibility out of control.
● Low-voltage cut-off protection of battery, blocked rotation protection and throttle signal lose
protection, etc. All these functions can prolong the service life of ESC effectively.
●Good and safe performance of power-on. The motor won’t be started no matter which position
the throttle stick is on when the battery is connected.
●Low torque "soft start," protecting gear box
●LED status indicator (LED keep shine under full throttle)
●Easy Installation, can change motor rotation direction by Prog-card
●Compatible for fixed wing airplane and helicopter; perfect governor mode for helicopter
●BEC circuit,SBEC output 6A
●With new generation MOSFET, lower internal resistance, stronger resistance to impulse current
● MOSFET in independent PCB, the thickness of copper plate reaches 800μm, the thickness of
high current ESC copper plate reaches 1200μm). Super low impedance and strongest resistance
to high current which could effectively reduce the temperature rise, improve the quality and make
the ESC work at optimal efficiency
●It can be compatible with a programming card (optional component), which has a simple and
visual surface so as to change the parameters conveniently at any time anywhere (reference to
the manual for programming card).
Page 1
http://www.sunrisemodel.com
Connection:
Use a good quality battery plug to connect cable, make sure right polarity.
Connect the 3 cables of ESC to motor. If the motor rotation direction is wrong, please exchange
connection for any 2 of the 3 cables, or use programming card to change the direction.
Plug the JR connector into the throttle control channel of the receiver. (HV ESC needs a separate
BEC or battery to supply power for the receiver).
Switch “on” the transmitter and move the stick of throttle to the lowest position. Only at the lowest
position, can the ESC work and will have buzzing sound to confirm working.
Connect the main power pack to ESC (pay attention to the polarity). There are different beep sounds
to recognize the cells of battery (2 beeps for 2 cells battery, 3 beeps for 3 cells battery, and so on ).
Please make sure that every battery is with full power, or the ESC may mistakenly recognize the
cells of battery.
Enter into Programming by transmitter:
Connect ESC to motor, switch on transmitter, move the stick of throttle to the highest position
(including throttle fine adjustment)
2. Connect ESC to the power, there will be a short tone.
3.Move the stick of throttle to the middle position, there will be another short tone.
4.Move the stick of throttle to the highest position, there will be repeated short tones, then move
again the stick of throttle to the middle position to make repeated tones, ESC enter into
programming mode. Successfully enter into the first setting (voltage option) .
5. You should only answer YES or NO for setting. If answer NO, none of any setting would be stored
but enter into the next setting. If answer YES, the setting would be stored and go to the next
setting.
6. The stick of throttle must be in the middle position to answer options. If answer NO, please move
the stick of throttle to lowest position and hold for 2 seconds. When ESC receives your answer, LED
will fast twinkle and send out Beep sound. If answer YES, please move the stick of throttle to
highest position and hold for 2 seconds. When ESC receives your answer, LED will fast twinkle and
send out Beep sound. When LED fast twinkle, please move the stick of throttle to middle position to
confirm ready for next option.
7. If you don’t want to answer all options, you could disconnect the power from ESC after you set
the parameters you need.
Page 2
http://www.sunrisemodel.com
User Manual for COOL Series ESC
Following with * are Factory Default Settings
Option 5:No brake: for helicopter
Acousto-optic Indicator
Programming Setting 1: Cut-off Voltage
*Option 1: Auto-Lipo Option 2: 4.0V cut-off Option 3: 5.0V cut-off
Option 5: 9.0V cut-off Option 6: 12 V cut-off
Acousto-optic
Indicator
Twinkle (Bi)
1 time-short pause
-Twinkle (Bi)
1 time-long pause
Twinkle (Bi)
1 time-short pause
-Twinkle (Bi)
2 times-long pause
Twinkle (Bi)
1 time-short pause
-Twinkle (Bi)
3 times-long pause
Twinkle (Bi)
1 time-short pause
-Twinkle (Bi)
4 times-long pause
Twinkle (Bi)
1 time-short pause
-Twinkle (Bi)
5 times-long pause
Twinkle (Bi)
1 time-short pause
-Twinkle (Bi)
6 times-long pause
Question
Setting 1(cut-off voltage)
Option 1 (Auto-Lipo)
Setting 1(cut-off voltage)
Option 2 (4.0V)
Setting 1(cut-off voltage)
Option 3 (5.0V)
Option 4: 6.0V cut-off
Answer
YES- move the stick of throttle to highest
position. Enter to next setting
NO- move the stick of throttle to lowest
position. Enter to next setting
YES- move the stick of throttle to highest
position. Enter to next setting
NO- move the stick of throttle to lowest
position. Enter to next setting
YES- move the stick of throttle to highest
position. Enter to next setting
NO- move the stick of throttle to lowest
position. Enter to next setting
Setting 1(cut-off voltage)
Option 4 (6.0V)
YES- move the stick of throttle to highest
position. Enter to next setting
NO- move the stick of throttle to lowest
position. Enter to next setting
Setting 1(cut-off voltage)
Option 5 (9.0V)
YES- move the stick of throttle to highest
position. Enter to next setting
NO- move the stick of throttle to lowest
position. Enter to next setting
Setting 1(cut-off voltage)
Option 6 (12.0V)
YES- move the stick of throttle to highest
position. Enter to next setting
NO- move the stick of throttle to lowest
position. Enter to next setting
Question
Twinkle (Bi)
3 times-short pause
-Twinkle (Bi)
1 time-long pause
Setting 3(Brake Type)
Option 1 (Soft brake、4s delayed)
Twinkle (Bi)
3 times-short pause
-Twinkle (Bi)
2 times-long pause
Setting 3(Brake Type)
Option 2 (Hard brake、4s delayed)
Twinkle (Bi)
3 times-short pause
-Twinkle (Bi)
3 times-long pause
Setting 3(Brake Type)
Option 3 (Soft brake、no delay)
Twinkle (Bi)
3 times-short pause
-Twinkle (Bi)
4 times-long pause
Setting 3(Brake Type)
Option 4 (Hard brake、no delay)
Twinkle (Bi)
3 times-short pause
-Twinkle (Bi)
5 times-long pause
Setting 3(Brake Type)
Option 45(No brake)
Programming Setting 2: Reservation (for future use)
Programming Setting 3: Brake Type
4 seconds can be delayed before brake. Soft Brake is 50% of full brake, Hard Brake is 100% of
full brake.
* Option
Option
Option
Option
Page 3
1:Soft brake、delayed: for airplane with fixed paddle or folded paddle
2:Hard brake、delayed: for direct drive needs hard brake
3:Soft brake, no delay: in the race, request very short delay
4:Hard brake, no delay: in the race, request fast brake with very short delay
http://www.sunrisemodel.com
Page 4
http://www.sunrisemodel.com
Answer
YES- move the stick of throttle
to highest position. Enter to next
setting
NO- move the stick of throttle to
lowest position. Enter to next
setting
YES- move the stick of throttle
to highest position. Enter to next
setting
NO- move the stick of throttle to
lowest position. Enter to next
setting
YES- move the stick of throttle
to highest position. Enter to next
setting
NO- move the stick of throttle to
lowest position. Enter to next
setting
YES- move the stick of throttle
to highest position. Enter to next
setting
NO- move the stick of throttle to
lowest position. Enter to next
setting
YES- move the stick of throttle
to highest position. Enter to next
setting
NO- move the stick of throttle to
lowest position. Enter to next
setting
User Manual for COOL Series ESC
Programming Setting 4: Throttle Type
Programming Setting 5: Timing
* Option 1:Auto throttle: recommended
Option 2:Fixed throttle: for fixed pitch helicopter
Option 3 : Governor mode, low RPM (see notes): for collective pitch helicopter (brake keep
shutting in Governor mode)
Option 4 : Governor mode, high RPM (see note): for collective pitch helicopter (brake keep
shutting in Governor mode)
Acousto-optic Indicator
Twinkle (Bi)
4 times-short pause
-Twinkle (Bi)
1 time-long pause
Twinkle (Bi)
4 times-short pause
-Twinkle (Bi)
2 times-long pause
Twinkle (Bi)
4 times-short pause
-Twinkle (Bi)
3 times-long pause
Twinkle (Bi)
4 times-short pause
-Twinkle (Bi)
4 times-long pause
Question
Answer
Setting 4(Throttle Type)
Option 1 (Auto throttle)
YES- move the stick of throttle to
highest position. Enter to next setting
NO- move the stick of throttle to lowest
position. Enter to next setting
Setting 4(Throttle Type)
Option 2 (Fixed throttle)
YES- move the stick of throttle to
highest position. Enter to next setting
NO- move the stick of throttle to lowest
position. Enter to next setting
Setting 4(Throttle Type)
Option 3 (Governor mode,
low RPM)
Setting 4(Throttle Type)
Option 4 (Governor mode,
high RPM)
YES- move the stick of throttle to
highest position. Enter to next setting
NO- move the stick of throttle to lowest
position. Enter to next setting
YES- move the stick of throttle to
highest position. Enter to next setting
NO- move the stick of throttle to lowest
position. Enter to next setting
Option 1:High timing, improve the rotation speed, consume more current, increase heat in working
* Option 2:Standard timing, reach at good balance between power and efficiency
Option 3 : Low timing, select this option when considering efficiency and flying time as first choice,
less power consumption, better efficiency
Acousto-optic Indicator
Twinkle (Bi)
5 times-short pause
-Twinkle (Bi)
1 time-long pause
Twinkle (Bi)
5 times-short pause
-Twinkle (Bi)
2 times-long pause
Twinkle (Bi)
5 times-short pause
-Twinkle (Bi)
3 times-long pause
Answer
Setting 5(Timing)
Option 1 (High timing)
YES- move the stick of throttle to
highest position. Enter to next setting
NO- move the stick of throttle to lowest
position. Enter to next setting
Setting 5(Timing)
Option
2
(Standard
timing)
YES- move the stick of throttle to
highest position. Enter to next setting
NO- move the stick of throttle to lowest
position. Enter to next setting
YES- move the stick of throttle to
highest position. Enter to next setting
NO- move the stick of throttle to lowest
position. Enter to next setting
Setting 5(Timing)
Option 3 (Low timing)
Programming Setting 6: Cut-off Type
* Option 1:Hard Cut-off (Motor shut off instantly at low voltage)
Option 2:Soft Cut-off (Throttle reduces at low voltage)
Acousto-optic Indicator
Note : Governor mode acts as an RPM control, not a throttle control. Throttle stick position
determines the RPM that the motor will run and the controller will attempt to hold that RPM
regardless of how the load (collective) changes.
The low RPM range has finer RPM control at lower RPMs. The high RPM range has finer RPM
control at higher RPMs.
The low RPM range is useful for low pole count motors (Hacker etc.) and low RPMs on higher pole
count motors. The high RPM range is useful for higher pole count motors and higher RPMs. Brake
is usually been used under governor mode.
Twinkle (Bi)
6 times-short pause
-Twinkle (Bi)
1 time-long pause
Twinkle (Bi)
6 times-short pause
-Twinkle (Bi)
2 times-long pause
Page 5
Page 6
http://www.sunrisemodel.com
Question
Question
Answer
Setting 6(Cut-off Type)
Option 1 (Hard Cut-off)
YES- move the stick of throttle to highest
position. Enter to next setting
NO- move the stick of throttle to lowest
position. Enter to next setting
Setting 6(Cut-off Type)
Option 2 (Soft Cut-off)
YES- move the stick of throttle to highest
position. Enter to next setting
NO- move the stick of throttle to lowest
position. Enter to next setting
http://www.sunrisemodel.com
User Manual for COOL Series ESC
Programming Setting 7: Soft Start-up
User Manual for COOL Series Prog-Card III
Option 1:Very soft start-up: for fragile gear box; or very slow and very soft start-up in governor
mode, very slow rotor
* Option 2:Soft start-up: recommend for most settings, soft start-up, slow rotor
Option 3 : Fast start-up: for very fast start-up, the fastest start-up under Governor mode, fast
rotor
Acousto-optic Indicator
Twinkle (Bi)
7 times-short pause
-Twinkle (Bi)
1 time-long pause
Twinkle (Bi)
7 times-short pause
-Twinkle (Bi)
2 times-long pause
Twinkle (Bi)
7 times-short pause
-Twinkle (Bi)
3 times-long pause
Question
Setting 7 ( Soft Startup)
Option 1 (Very soft startup)
Answer
YES- move the stick of throttle to highest
position. Enter to next setting
NO- move the stick of throttle to lowest
position. Enter to next setting
Setting 7 ( Soft Startup)
Option 2 (Soft start-up)
YES- move the stick of throttle to highest
position. Enter to next setting
NO- move the stick of throttle to lowest
position. Enter to next setting
Setting 7 ( Soft Startup)
Option 3 (Fast start-up)
YES- move the stick of throttle to highest
position. Enter to next setting
NO- move the stick of throttle to lowest
position. Enter to next setting
Programming Setting 8: PWM Adjustment (No this function for ESC below 40A)
* Option 1:12KHz,recommend for most brushless motor
Option 2:16KHz,recommend for low sensing motor
Option 3:24KHz,recommend for very low sensing motor
Acousto-optic Indicator
Question
Answer
Twinkle (Bi)
8 times-short pause
-Twinkle (Bi)
1 time-long pause
Twinkle (Bi)
8 times-short pause
-Twinkle (Bi)
2 times-long pause
Twinkle (Bi)
8 times-short pause
-Twinkle (Bi)
3 times-long pause
Page 7
Setting 8(PWM)
Option 1 (12KHz)
YES- move the
position. Finish
NO- move the
position. Finish
stick of throttle to highest
setting.
stick of throttle to lowest
setting.
Setting 8(PWM)
Option 2 (16KHz)
YES- move the
position. Finish
NO- move the
position. Finish
stick of throttle to highest
setting.
stick of throttle to lowest
setting.
Setting 8(PWM)
Option 3 (24KHz)
YES- move the
position. Finish
NO- move the
position. Finish
stick of throttle to highest
setting.
stick of throttle to lowest
setting.
http://www.sunrisemodel.com
Thank you for purchasing our products! This Programming Card is especially designed for COOL
series brushless ESC, which could help you easily set the parameters of ESC. With it, you don’t have
to move the stick of throttle up-and-down with hearing the sounds from ESC to set the parameters.
Small and light to bring makes the Prog-Card capable to use outdoors.
Operating instructions:
-Connect the ESC signal cables to the relevant positions of Prog-card (orange cable-signal, brown
cable- negative pole ( -), red cable- positive pole ( +)).
- HV (OPTO series ESC ) need extra 4-7V voltage.
- Connect ESC power
- Longitudinal and latitudinal LED indicators light up to show the present settings of ESC.
- Longitudinal LED light up to show the menu options of ESC, while latitudinal LED light up to show
the parameter of menu options.
- Short gentle press on the switch to change menu options (from up to down), long gentle press on
the switch to change the parameter of menu options (from left to right).
Notice: There would be no prompting sound when using Prog-card to set parameters if the ESC
connected to the motor. LED indicators show the present settings of ESC.
Address: Lijing center, Central city of Longgang District, ShenZhen, GuangDong, China.
TEL: 0086-755-89981092
FAX:0086-755-28437034
Sales 1: Jane
E-mail: [email protected]
MSN: [email protected]
Sales 2: daisy
E-mail: [email protected]
MSN: [email protected]
Manager: Jackhuang
E-mail:[email protected]
MSN: [email protected]
Page 8
http://www.sunrisemodel.com