1
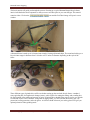
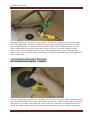
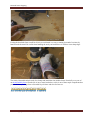
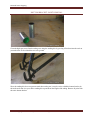
DIAMOND FRAME CHOPPING
CONTENTS
The head tube and bottom bracket ....................................................................................................................................... 4
Cutting the down tube ................................................................................................................................................................ 6
Working around frame collapse ........................................................................................................................................... 11
Cutting the top tube ...................................................................................................................................................................14
Removing sharp edges.............................................................................................................................................................. 17
Removing head tube cups ....................................................................................................................................................... 19
Head tube removal .....................................................................................................................................................................21
Rough grinding access tubing................................................................................................................................................ 25
Smooth grinding and paint removal ................................................................................................................................... 27
Removing the bottom bracket ............................................................................................................................................... 29
Cutting the seat stays ................................................................................................................................................................ 34
Cutting the seat tube..................................................................................................................................................................36
Bottom bracket cleanup ........................................................................................................................................................... 40
Bottom bracket paint removal .............................................................................................................................................. 44
Removing the rear dropouts .................................................................................................................................................. 46
Brazing material cleanup......................................................................................................................................................... 48
Removing the brake studs ...................................................................................................................................................... 51
Cleaning the brake studs ......................................................................................................................................................... 54
Tubing joint preparation ......................................................................................................................................................... 54
All content copyright AtomicZombie® Extreme Machines. All rights reserved.
1
Diamond frame chopping
This basic tutorial will guide you through the process of cutting up a typical diamond shaped bicycle frame
into its individual tubes and components so that you can re-use these parts in your own designs. This tutorial
contains videos. Click on the
window.
icon and the YouTube footage will open in a new
A diamond frame is made up of a front and rear triangle, forming a diamond shape. The round steel tubing on a
bicycle frame ranges in diameter from 3/4 inch to over 2 inches in diameter depending on the style of the
frame.
Three different types of grinder discs will be used when cutting up the steel tube bicycle frame: a standard
coarse grinding disc for rough metal cleanup (center); a thin zip disc for cutting the tubing; and a sanding disc
for final cleanup of the tubing and removal of paint. All grinder discs should be the proper size for your grinder
as indicated in your owner’s manual. Along with an angle grinder, you will need the usual safety gear: eye
protection, hearing protection, and work gloves. A full face shield in front of your safety glasses will give you
optimal protection when grinding metal.
All content copyright AtomicZombie® Extreme Machines. All rights reserved.
2
Diamond frame chopping
The cutting disc (also known as a “zip disc”) is a very thin grinder disc that can quickly cut through hollow
steel tubing of various diameters. Round tubing as well as square tubing can easily be cut by the zip disc,
although a hacksaw can also be used if you don’t mind the added effort. The zip disc used in this tutorial is a 5
inch diameter disc with a 3/64 inch thickness.
A sanding disc is also known as a “flap disc” because it is made up of many overlapping flaps of sandpaper,
and can remove metal as well as paint and stickers from bicycle tubing. A flap disc is usually used for final
cleanup or when you are grinding a weld flush to the surround material. Because a flap disc does not remove
metal as quickly as a rough grinder disc, it is much better for grinding an area where only a small amount of
material should be removed.
All content copyright AtomicZombie® Extreme Machines. All rights reserved.
3
Diamond frame chopping
THE HEAD TUBE AND BOTTOM BRACKET
Even if you are planning to build your own frame completely from scratch, you will still need to salvage the
head tube and bottom bracket from a steel tube bicycle frame. Some of our plans such as the Warrior Racing
Trike use only square tubing and require a pair of head tubes along with a bottom bracket. For this reason,
even a bent up or damaged steel bicycle frame can be a good source of reusable tubing and components, so
never pass up a free or good deal on an old bicycle. Also, aluminum frames are not used in any of our plans, so
ensure that you are acquiring a steel tube bicycle frame when looking for salvageable parts.
The head tube is another round steel tube that will have an outer diameter somewhere between 1.25 inches and
1.5 inches. The head tube carries a set of press fit bearing cups, which in turn carry the fork bearings and
supporting bearing hardware. Since there are varying diameters of head tubes, you should keep the bearing
cups and head tube together as a set to ensure that you have a matched set.
All content copyright AtomicZombie® Extreme Machines. All rights reserved.
4
Diamond frame chopping
The bottom bracket is a threaded round steel tube that must carry the crankset, as well as the weight of the
rider. The bottom bracket also forms a junction for many frame tubes, so it is by far the thickest wall tubing on
a bicycle frame. There are two common types of steel frame bottom brackets: a threaded type for a 3 piece
crankset and a non-threaded type for a single piece crankset. The threaded bottom bracket is by far the more
useful of the two, as there will be a large assortment of quality 3 piece cranksets available. Single piece
cranksets are normally found on very inexpensive bicycles and kids bikes. If you have a choice, always choose
a frame with a threaded bottom bracket.
The threaded bottom bracket has a set of threaded bearing cups that carry the crank axle bearings and
supporting crank hardware. The bearing cup on the left side of the frame is the easiest to remove. It has
standard threads, so removal is done by turning the cup in the counterclockwise rotation. The cup in the right
side of the bike is much more difficult to remove as it has only a small flat ridge to grip and is a reversed
thread. It is usually best to just leave the right side bearing cup installed on the frame as this will help protect
the shape of the bottom bracket when the extreme stresses of welding heat are applied. If for some reason you
do want to remove the right side cup, turn it out in the clockwise rotation using a large crescent wrench to grip
the flat ridges.
All content copyright AtomicZombie® Extreme Machines. All rights reserved.
5
Diamond frame chopping
CUTTING THE DOWN TUBE
Unless you need to include some of the steel frame tubing with the head tube or bottom bracket, cutting is
normally done as close to the surface as possible in order to minimize later cleanup. The down tube is the
lower tube in the front triangle that joins the head tube to the bottom bracket. This tube will be cut first.
The cut will be made as close to the bottom bracket shell as possible using the grinder disc or hacksaw.
All content copyright AtomicZombie® Extreme Machines. All rights reserved.
6
Diamond frame chopping
Throughout this tutorial, I will mention “frame collapse”, which can be a problem when using a thin cutting
disc in your angle grinder. Because the welding process puts a great deal of contraction stress on a welded
joint, a triangle formed by 3 welded steel tubes will want to collapse on itself when opening the first joint.
When a frame collapse occurs, the two tubes that were just cut create a vice as they attempt to collapse
together. This pressure on the grinder disc can cause a stall, making the grinder jump and pull from your
hands. Always be aware of frame collapse when cutting into any frame and hold the angle grinder tightly at all
times with two hands.
The type of angle grinder typically used in this hobby will be the 4/5 or 5 inch type, which is more than enough
to cut, grind, and sand the round or square tubing used in these projects. The term “angle grinder” describes the
angle of the disc in relation to the grinder body, which in this case is 90 degrees. Throughout the tutorials on
our site, the grinder is shown with the safety guard removed, but this was only done to allow clearer photos
All content copyright AtomicZombie® Extreme Machines. All rights reserved.
7
Diamond frame chopping
and videos. You should always use the recommended safety guard that came with your grinder, which will
help avoid high speed debris in the rare case of a disc breakage.
Your grinder will specify a diameter of discs that will fit, which will likely be either 4.5 inch or 5 inch
diameter discs. It is not advisable to run larger discs than recommended in the user’s manual as the motor may
become overworked and the safety guard will probably not fit correctly. Also, check the rotation speed (RPM)
of your grinder and ensure that the maximum recommend RPM on the discs you plan to use are within
specification.
The grinder disc is held on by a removable cap that threads on to the grinder shaft. Usually, one side of the cap
has a rubber gasket to cushion the disc, but your grinder may differ somewhat. To remove the cap, the grinder
may have a locking mechanism that holds the shaft from turning while you rotate the disc, or it may require
you to grip the disc with a small supplied wrench. Follow the included disc installation instructions and never
mix parts from different model grinders together.
All content copyright AtomicZombie® Extreme Machines. All rights reserved.
8
Diamond frame chopping
When cutting across a round bicycle tube, try to keep the disc or hacksaw blade perpendicular to the rubbing
and avoid changing the angle as you cut. If you keep the disc or saw blade running at the same angle through
the entire cut, there will be a lot less friction and heat generated. Set the part to be cut in a sturdy vice in such a
way that you can clearly see the work. If using a grinder disc, keep your face out of the line of fire and direct
all hot sparks into a safe area that does not contain materials that could ignite.
While holding the angle of the cutting disc stable, push into
the work and move the edge of the disc along the tube
slowly, as if sawing a small line. This helps open the cut
and will reduce friction where the sides of the tubing wall
are hitting the face of the cutting disc. Only a moderate
pressure is needed with a zip disc as it will easily slice into
the thing walled steel tubing.
All content copyright AtomicZombie® Extreme Machines. All rights reserved.
9
Diamond frame chopping
Always place the work in such a way that it is held securely and so that you can work the grinder in a
comfortable and safe position. It is best to have the bottom side of the disc cutting the metal since the grinder
will want to pull away from you rather than push towards you if the disc becomes stuck. Also, remember that
this is the first tube in the triangle, so there will be frame collapse. For this reason, the last quarter inch of the
tube will not be cut with the grinder but finished with a hacksaw instead.
The last small section of the cut on the other side of the down tube has been left so that it can be safely
completed with a hacksaw. The front triangle will certainly be under a lot of tension due to the contraction of
the welds, so it is not advisable to make the entire cut with a grinder disc. The frame collapse could easily stall
your grinder, making it run out of your hands. This danger is compounded by the use of a locking switch,
which should not be used when making tubing cuts.
All content copyright AtomicZombie® Extreme Machines. All rights reserved.
10
Diamond frame chopping
WORKING AROUND FRAME COLLAPSE
This is the small section of the down tube joint that has not been cut using the zip disc. The risk of a frame
collapse on the initial cut is too risky, so the last small section of cutting will be done using a hacksaw. Of
course, all of your cutting could be done completely with a hacksaw, but it will certainly take a lot longer.
Using a hacksaw is easy - just make long straight strokes while pushing the blade into the work. If you are
cutting the entire tube using a hacksaw, take your time and cut at about 1 stroke per minute, keeping the blade
running at the same angle throughout the entire cut. Of course, blade teeth need to face forward when installing
the blade on the saw.
All content copyright AtomicZombie® Extreme Machines. All rights reserved.
11
Diamond frame chopping
The hacksaw makes a much thinner cut than the zip disc. You can see this where the tubing has collapsed back
onto itself. The hacksaw will probably also become stuck in the joint, but it is only a matter of prying the frame
apart to release it. Note the tension on the frame as you open the cut area to release your blade. If you want to
see for yourself how much pressure there would have been on the zip disc, remove it from your grinder and
stick it in the hole, letting the tubes collapse on the disc surfaces. Usually, there is more than enough friction to
stall your grinder.
Your hacksaw blade is probably stuck around the frame tubing now that it has passed through the final section
of the down tube. To release the blade, grip the down tube and pry it away from the bottom bracket to open the
joint. Notice how the frame tubing easily moves about a quarter inch before becoming stiff. This is one of the
qualities of steel tubing that determine the stiffness of a steel frame bicycle. Steel tubing can flex somewhat
when necessary, yet form a very rigid shape at the same time.
All content copyright AtomicZombie® Extreme Machines. All rights reserved.
12
Diamond frame chopping
Using a hacksaw is certainly more labor intensive than a cutting disc, but you may be able to get the blade into
areas the disc cannot reach. The inside corner of a joint like the bottom bracket is one of those places a
hacksaw can reach easily.
With the first tube cut, the frame loses a lot of its rigidity to the point where you can flex the down tube almost
an inch from its original location with only the press of a thumb. A triangle is the strongest of all geometrical
shapes, and since a bicycle frame is made up of two of them, it is extremely rigid. Some of our single boom
projects like The Marauder Lowracer incorporates frame flex as part of the suspension system, making for a
smoother ride.
All content copyright AtomicZombie® Extreme Machines. All rights reserved.
13
Diamond frame chopping
A cutting disc is made to hit the work on its edge, so when a frame collapse occurs, the friction of the two
tubes pressing on the face of the disc becomes great enough to stall the grinder motor or pull the grinder out of
your hand. Always be aware of frame collapse when cutting the first tube in a frame, and keep a good grip on
the grinder, especially when completing the last part of a tubing cut.
CUTTING THE TOP TUBE
With one tube in the front triangle completely cut all the way through, the risk of a frame collapse is
eliminated, so you can make a complete cut thought the next tube. The top tube will be cut next, where it meets
the top of the seat tube. The action of the cutting disc will be the same here - a slow back and forth motion
while pushing the cut through the tube at 90 degrees.
All content copyright AtomicZombie® Extreme Machines. All rights reserved.
14
Diamond frame chopping
The grinder will be easiest to control when using the lower section of the disc for cutting as the force will try to
pull the grinder away from you rather than pushing it towards you. This position also makes it easy to control
the hot cutting sparks and keep your face out of the line of fire when cutting.
All content copyright AtomicZombie® Extreme Machines. All rights reserved.
15
Diamond frame chopping
Although a frame collapse is no longer an issue, there will still be some friction on the face of the disc when
the frame finally comes apart, causing the tubing to fall like a tree being cut down. If you start at the top of a
tube and let the other half fall away, then this is not an issue as the joint will open up rather than fold onto
itself.
On most bicycle frames, the top tube will be one of the larger diameter tubes, along with the down tube. The
seat tube will likely be the smallest diameter tube of the three front frame tubes. Be careful when handling a
newly cut tube as the edges on the inside and outside of the cut will have razor sharp edges. Handle a newly
cut tube with gloves until the sharp edges have been filed off.
All content copyright AtomicZombie® Extreme Machines. All rights reserved.
16
Diamond frame chopping
REMOVING SHARP EDGES
The front triangle has now been removed, leaving a complete rear triangle that includes the bottom bracket,
seat tube, seat stays, and chain stays. Depending on your project, you may need a complete rear triangle or just
the section of the front triangle, but we will be cutting this frame right down to the individual tubes to show
how it is done. An example of a complete rear triangle used on a trike can be seen on our StreetFox Tadpole
Trike, although in this case it is a suspension rear triangle.
All of the newly cut tubing will include a razor sharp outer edge and a few burrs on the inside of the tubing. A
hacksaw cut may not create as much of a razor edge as a grinder disc cut, but you should always take a file
around the tubing just to ensure that you don’t accidentally puck it up without gloves at some later time. Cut
tubing is about as sharp as the edge of a cut open pop can.
All content copyright AtomicZombie® Extreme Machines. All rights reserved.
17
Diamond frame chopping
A half round file is perfect to remove the razor edges from bicycle tubing. Use the flat side to file of the outer
edges and then round the file around the inside of the tube to remove any burrs.
It only takes a few seconds to work off the sharp tubing edge with the half round file. Square tubing should
also be filed after cutting as it will produce the same razor sharp edges.
All content copyright AtomicZombie® Extreme Machines. All rights reserved.
18
Diamond frame chopping
REMOVING HEAD TUBE CUPS
Much like the bottom bracket, the head tube is a key component in almost any bike or trike design as it creates
a very strong and light steering system. Even a four wheeled bike, like our StreetFighter QuadCycle, will make
use of a standard bicycle head tube, and in fact will use four of them. The head tube will be the first component
to free from this frame, and that will happen by cutting away the top tube and down tube at the head tube shell.
Before you can do any cutting near the head tube shell, the two bearing cups must be removed from the inside
of the head tube by banging them out. The bearing cups are press fit into the slightly tapered bottom bracket
shell and can easily be tapped out from the inside using a solid rod or a chisel and hammer. Always strike the
cups from the inside of the head tube, not from their outer rings. Since they are hardened steel, they could be
chipped if struck on the outer ring. I use an 8 or 10 inch length of 3/4 inch solid rod to tap out the bearing cups.
All content copyright AtomicZombie® Extreme Machines. All rights reserved.
19
Diamond frame chopping
Use a piece of solid rod or heavy round tubing to strike the top ridge of the bearing cups from inside the head
tube, forcing them out of the head tube shell. Work your way around the cups so that they are pushed out
evenly as you strike them from the inside of the head tube shell.
When you have released both head tube bearing cups, place them flat on your workbench and take note of the
two different sizes. The bearing cup that was removed from the underside of the head tube will usually be
slightly taller than the bearing cup from the top of the head tube. This is not always the case, but if there is a
larger cup, it is definitely from the bottom of the head tube and needs to be reinstalled that way.
All content copyright AtomicZombie® Extreme Machines. All rights reserved.
20
Diamond frame chopping
HEAD TUBE REMOVAL
The head tube will now be completely removed from the front section of the frame, by cutting the top tube and
down tube as close to the head tube shell as possible. Since there is no other frame tubing in the way and no
risk of a tubing collapse, cutting can be done without stopping using a zip disc. The closer you can get to the
head tube shell, the better as there will be less cleanup to do with the sanding disc later on.
Depending on the diameter of your disc, you may be able to cut straight through the frame tubing from one
side of the joint. Of course, the disc will become smaller as it wears out, so you will probably need to cut
around the joint in order to remove the frame tubing completely.
All content copyright AtomicZombie® Extreme Machines. All rights reserved.
21
Diamond frame chopping
Cutting around the welded area has the advantage of leaving less material left over for later cleanup. With a
smaller diameter cutting disc, you probably won’t be able to cut the inside of the joint on the first tube because
the other tube will prevent you from inserting the disc. A hacksaw can be used to cut the last small segment of
the tubing joint.
Another method of freeing the tube when there is only a small segment of metal left in the joint is to bend the
tube back and forth until it breaks free. Since this is only rough cutting, cleanup will be required anyhow, so
don’t worry about how nice the cuts are around the welded joint.
All content copyright AtomicZombie® Extreme Machines. All rights reserved.
22
Diamond frame chopping
With the top tube cut away from the head tube shell, the down tube can be cut using the same method. If your
grinder disc is new, it may have a large enough diameter to make it through the entire tube from one side. If
not, cut around the joint, being careful not to dig into the head tube shell.
If you can make it through the entire diameter of the tube from one side, keep the disc as close to the head tube
shell as possible and set the frame in a vice so that the tubing falls away from the grinder when the cut makes it
through the entire joint.
All content copyright AtomicZombie® Extreme Machines. All rights reserved.
23
Diamond frame chopping
Freeing the head tube from a small bit of left over weld metal is as easy as turning it around a few times by
hand to break the metal. Be careful when handling the newly cut head tube as it will have razor sharp edges.
The freshly liberated head tube ready for cleanup and installation into another frame. Practically every one of
our downloadable plans will make use of one or more head tubes, so this is one of those staple components that
you should always salvage from a discarded bicycle frame and store for later use.
All content copyright AtomicZombie® Extreme Machines. All rights reserved.
24
Diamond frame chopping
ROUGH GRINDING ACCESS TUBING
The newly removed head tube will need to have some cleanup done in order to remove the left over weld metal
and frame tubing. For this work, you will need two other types of grinder discs in addition to the zip disc: a
rough grinding disc and a sanding disc. The rough grinding disc is the heaviest of all discs and will probably
last much longer than the other two types of grinding discs. Rough grinding is done on the face of the disc,
unlike zip cutting, which is done on the edge of the disc. It is worth purchasing quality grinder discs, as cheap
department store discs may not be well balanced, causing the grinder to vibrate in your hand.
When using the rough grinding disc, press down on the grinder so that the face of the disc is pressing into the
work, using the outer face of the disc. Try to keep the grinder focused on the material to remove and avoid
digging into the head tube shell. Final cleanup will be done using a sanding disc, so leave a slight bit of
material around the joint.
All content copyright AtomicZombie® Extreme Machines. All rights reserved.
25
Diamond frame chopping
Work the tubing area evenly so that you can easily see how much metal is left to remove. When you have
about 1/16 inch of material left on the joint, it will be time to switch to the sanding disc.
With only a small amount of the original weld metal and tubing to remove, you can now switch to the sanding
disc. The sanding disc does not remove metal as quickly as the rough grinder disc, so there is less chance of
digging into the head tube shell.
All content copyright AtomicZombie® Extreme Machines. All rights reserved.
26
Diamond frame chopping
SMOOTH GRINDING AND PAINT REMOVAL
The sanding disc is basically a composite disc that contains many small flaps of sandpaper around the face,
which is why it is also known as a “flap disc”. Sanding discs are great for final weld cleanup, paint removal,
and frame sticker removal because they do not gouge out the material in the same way as a rough grinder disc.
You can certainly remove metal with a flap disc, but it can be done in a much more controlled manner.
When removing the left over metal from the joint area, the motion of the grinder is the same as when using the
rough grinding disc. Press the face of the disc into the work and work evenly around the tubing until it appears
flush with the head tube shell.
All content copyright AtomicZombie® Extreme Machines. All rights reserved.
27
Diamond frame chopping
Once you have the joint area ground flush to the head tube shell, run the sanding disc up and down the length
of the head tube while rotating it so that you remove all of the paint and stickers from around the entire
circumference. Burning paint and stickers give off toxic fumes, so they need to be remover prior to welding the
head tube.
The head tube is now ready for installation into your own project, clean and ready for welding. If you plan on
storing the head tube for later use, tie the bearing cups around the head tube using a zip tie or string so that you
know they are a matched pair. This will save time if you begin to collect a lot of bicycle component inventory.
All content copyright AtomicZombie® Extreme Machines. All rights reserved.
28
Diamond frame chopping
REMOVING THE BOTTOM BRACKET
The bottom bracket is the kingpin in a diamond bicycle frame as it joins four different tubes together, creating
the double diamond shape. The bottom bracket also carries the crank hardware, so it must endure an intense
amount of stress. For this reason, the bottom bracket is the thickest walled tube out of all the other bicycle
frame tubes. If you have been cutting your frame as per this tutorial, then three tubes must be removed in order
to salvage the bottom bracket; the seat tube, and a pair of chain stay tubes. Also, remove any cable guides that
may be installed on the underside of the bottom bracket as they will melt during the grinding process.
The cuts will be made along the bottom bracket shell in three places: the seat tube joint, and the two chain stay
joints. Since the bottom bracket will be salvaged and ground clean, cutting is done as close to the surface as
possible.
All content copyright AtomicZombie® Extreme Machines. All rights reserved.
29
Diamond frame chopping
The rear triangle will also be subject to frame collapse as all three sections are under tension due to the
welding process. The same precautions need to be considered as when cutting the front frame triangle.
If you start with the cutting of the chain stays, there is a simple method that can be used in order to stop the
frame from collapsing on the cutting disc. Place the frame in a vice so you can easily get the cutting disc into
one of the chain stay joints.
All content copyright AtomicZombie® Extreme Machines. All rights reserved.
30
Diamond frame chopping
The first chain stay can all the way through be cut without any problem because the other stay will still be
there to complete the hold triangle together.
Try to make the cut close to the bottom bracket shell and avoid cutting into the surface or any of the
surrounding bearing hardware that may still be installed.
All content copyright AtomicZombie® Extreme Machines. All rights reserved.
31
Diamond frame chopping
The first cut is made without a frame collapse since you have not yet broken the rear triangle.
If you wedge an object into the open chain stay joint, this will allow you to cut through the other side without
having a frame collapse. I keep an old flat head screwdriver around for this job.
All content copyright AtomicZombie® Extreme Machines. All rights reserved.
32
Diamond frame chopping
Cut completely through the other stay with the wedge in place so that the grinder disc does not become stuck
in the joint.
When you remove the wedge that was holding open the joint, the frame will instantly collapse onto the joint,
sometimes with a fair amount of pressure.
All content copyright AtomicZombie® Extreme Machines. All rights reserved.
33
Diamond frame chopping
CUTTING THE SEAT STAYS
With the two chain stays cut all the way through, you can now separate the rear triangle by cutting the two seat
stays, which probably form a single joint on the seat tube where they connect.
The goal is always to remove all components and tubes so that they are as long as possible for use in other
projects. Stay tubing is just like any other round steel tubing, and can be used in many projects.
Our HighRoller Short Wheelbase is an example of a frame that uses stays cut from a bicycle frame.
All content copyright AtomicZombie® Extreme Machines. All rights reserved.
34
Diamond frame chopping
Cut into the joint along the seat tube where the stay tubing is welded to the other tubing, keeping the cut as
close to the surface as possible to minimize waste and make later cleanup easier.
The rear triangle will separate as soon as the last cut is made, leaving the bottom bracket and seat tube together
as a single part.
All content copyright AtomicZombie® Extreme Machines. All rights reserved.
35
Diamond frame chopping
CUTTING THE SEAT TUBE
The seat tube is a special tube in a bicycle frame because it carries both the rear derailleur as well as the
adjustable seat post. For this reason, most bicycles have the same diameter seat post tubing.
Almost all of our bike and trike plans include an adjustable bottom bracket, which allows the cranks to be
moved along the frame to accommodate riders of just about any leg length. This adjustable bottom bracket is
an assembly that includes a bottom bracket, two clamping plates, and a section of the seat tube welded to the
bottom bracket. Some work can be saved by simply leaving a length of seat tube welded to the bottom bracket
when making this adjustable bottom bracket assembly.
All content copyright AtomicZombie® Extreme Machines. All rights reserved.
36
Diamond frame chopping
If you don’t intend to make a sliding bottom bracket or want to weld your own derailleur tube on later, then the
cut will be made right at the joint. For a sliding bottom bracket, leave about 8 inches of the seat tube installed
on the bottom bracket.
The bottom bracket is easy to remove from the seat tube once the other frame tubing has been cut. Place the
seat tube in a vice and then make the cut close to the bottom bracket shell, cutting all the way through the
tubing.
All content copyright AtomicZombie® Extreme Machines. All rights reserved.
37
Diamond frame chopping
Always try to use the front or bottom of the cutting disc, rather than the top as this will pull the grinder away
from you rather than forcing it towards your body.
If you want to get closer to the joint to minimize later cleanup, then rotate the part as you cut so that you can
aim the cutting disc right into the joint area.
All content copyright AtomicZombie® Extreme Machines. All rights reserved.
38
Diamond frame chopping
The bottom bracket has now been cut from the frame, but will require a lot of cleanup in order to remove the
leftover frame tubing and weld area from the four cut joints.
The frame has now been reduced to five separate parts, and soon it will become even more.
All content copyright AtomicZombie® Extreme Machines. All rights reserved.
39
Diamond frame chopping
The bottom bracket will require the most cleanup of any of the frame parts as it now has four separate tubing
stubs to be ground flush: the seat tube, the down tube, and the set of chain stays. The edges are razor sharp at
this point, so wear gloves when handling the part.
BOTTOM BRACKET CLEANUP
The junction where the seat tube meets the down tube will probably have enough excess material to warrant
another cut with the zip disc. Place the bottom bracket in the vice so you can make this cut.
All content copyright AtomicZombie® Extreme Machines. All rights reserved.
40
Diamond frame chopping
Cut across the tubing junction to remove as much of the access tubing as you can to minimize the amount of
effort needed with the rough grinding disc.
There will be a fair amount of friction developing as you cut through these tubing stubs, so keep a good grip on
the grinder and that the part is well secured in the vice.
All content copyright AtomicZombie® Extreme Machines. All rights reserved.
41
Diamond frame chopping
Cleanup will take less time now that the high spot has been removed from the junction between the seat tube
and the down tube.
The rough cleanup of the bottom bracket will take a fair amount of effort due to the number of tubing stubs to
remove. Secure the part in the vice and find a comfortable position to push down on the grinder.
All content copyright AtomicZombie® Extreme Machines. All rights reserved.
42
Diamond frame chopping
Work around the edge of the leftover tubing until the material is almost flush with the bottom bracket shell.
You can try holding the part by hand while you grind, but it will probably heat up too much even for
manipulation with work gloves.
Once you have the excess tubing material ground almost flush to the surface of the bottom bracket, it will be
time to switch back to the sanding disc for final cleanup.
All content copyright AtomicZombie® Extreme Machines. All rights reserved.
43
Diamond frame chopping
BOTTOM BRACKET PAINT REMOVAL
Clean the high spots away from the tubing area using the sanding disc by pressing it flat down into the work as
you make slow circles around the area to be ground.
Since the sanding disc does not generate much heat on the part, it may be easier to hold the bottom bracket by
the inside and rotate it as you run the sanding disc up and down the length of the tubing. Remove all paint from
the entire bottom bracket.
All content copyright AtomicZombie® Extreme Machines. All rights reserved.
44
Diamond frame chopping
The cleaned up bottom bracket is now ready for transplant into your own creations. The bottom bracket may be
the only bicycle tube that you would not attempt to fabricate due to the fine internal threads, so it is one of the
most important components to salvage from a frame. Every one of our human powered vehicles requires at
least one bottom bracket in order to allow the installation of a set of cranks.
The salvaged and cleaned up head tube and bottom bracket ready to be reborn in another human powered
vehicle. These two parts are the most important building blocks for just about any bike, trike, or quadcycle so
never toss out a frame without removing these key components. Even a badly damaged frame will probably
have a salvageable head tube and bottom bracket as these parts are extremely robust.
All content copyright AtomicZombie® Extreme Machines. All rights reserved.
45
Diamond frame chopping
REMOVING THE REAR DROPOUTS
The rear dropouts are important parts of a frame to salvage, especially for a project that requires a rear wheel to
be installed. Some of our bike plans will make use of salvaged dropouts while others will show you how to
make your own.
All content copyright AtomicZombie® Extreme Machines. All rights reserved.
46
Diamond frame chopping
If you don’t need the stay tubing along with the dropouts, cut them from the frame for later use right at the
joint where the round tubing joins the flat plate.
Place the stay tubing that you are cutting in the vice close to the dropout so that vibrations do not occur when
cutting. A bad vibration could cause your disc to jam as the friction increases.
All content copyright AtomicZombie® Extreme Machines. All rights reserved.
47
Diamond frame chopping
The dropouts will require some cleanup before welding in order to ensure that both are the exact same size and
do not contain any brazing metal in the joint.
BRAZING MATERIAL CLEANUP
Many times, the rear dropouts will be brazed (gas welded) to the frame using a bronze filler metal, and this
must all be removed before you can weld over the area. Brazing will look like gold plating in the area where
the stays used to meet the dropout material. If you try to arc weld over a brazed area, there will be a lot of
spatter and the weld will not take to the metal.
All content copyright AtomicZombie® Extreme Machines. All rights reserved.
48
Diamond frame chopping
To begin the cleanup of the dropouts, start with the rough grinder disc and work down the excess tubing until
you are almost flush with the face of the dropout material.
You will notice that the brazed area does not throw many sparks - this is because the bronze filler material
used in gas welding is non ferrous metal. After rough grinding the dropout, the brazing material will be clearly
visible as a gold patch.
All content copyright AtomicZombie® Extreme Machines. All rights reserved.
49
Diamond frame chopping
After rough grinding the welded area, the bronze brazing material is clearly visible. All of the gold colored
brazing must be removed before you can weld any new steel tubing to the dropout.
The sanding disc is used to take the rest of the brazing away and remove some of the paint around the area you
will most likely be wielding to when you reuse the dropouts.
All content copyright AtomicZombie® Extreme Machines. All rights reserved.
50
Diamond frame chopping
One of the completed dropouts after removing the excess tubing, brazing material and paint from the welding
area.
REMOVING THE BRAKE STUDS
Cantilever brake studs can also be transplanted from one frame to the other, even from the rear stays back to
the front forks. These small parts can be cut from the frame with minimal damage using a zip disc or hacksaw
blade.
All content copyright AtomicZombie® Extreme Machines. All rights reserved.
51
Diamond frame chopping
If you cut carefully around the welded area on the brake studs, then you can remove it from the frame with
minimal damage to the frame. The frame tubing will need a bit of welding and grinding to fill the ruts left
behind, but this can be done easily.
Try to minimize the cutting into the frame tubing and score the welded area so that the brake stud can be
snapped from the frame using a large wrench or vice grips.
All content copyright AtomicZombie® Extreme Machines. All rights reserved.
52
Diamond frame chopping
The brake stud has been removed from the rear stays with only a slight amount of damage to the frame tubing.
This rut can be filled with a light welding bead and then ground flush using the sanding disc.
All content copyright AtomicZombie® Extreme Machines. All rights reserved.
53
Diamond frame chopping
CLEANING THE BRAKE STUDS
There will be a right and left cantilever brake stud. They can be identified by the position of the spring loading
plate, as well as the shape of the fishmouth cut on the base.
After cutting away the welds around the brake studs, there will be a rut in the frame tubing. If you plan to reuse
this part of the frame, clean the area with a sanding disc, weld a cold bead over the area, and then use the
sanding disc one more time to clean up the area.
To clean up the brake studs for transplant to another frame or front forks, run the sanding disc around the outer
edge to remove the last bit of weld area and the paint so you can weld the joint once again.
Transplanting the brake studs to a pair of forks is actually an easy job, and this is shown in several of our plans
such as the Tomahawk Lowracer where a 26 inch fork has been shortened to accommodate a 20 inch front
wheel.
TUBING JOINT PREPARATION
If you intend to reuse any of the frame tubing, the area to be welded will need to have the paint removed at
least 2 inches around the joint area. You don’t have to remove all of the paint when recycling bicycle tubing,
but all stickers and any paint near the area to be welded will have to be removed.
All content copyright AtomicZombie® Extreme Machines. All rights reserved.
54
Diamond frame chopping
Stickers are easily removed with a sanding disc by turning the tubing slowly as you run the face of the disc
back and forth over the area. I find that a well worn sanding disc is better for initial sticker removal as it will
not get mucked up with the melting plastic as you grind. I take the stickers off with the worn out sanding disc
nd then finish the cleanup using a newer sanding disc.
Although burning paint will usually not interfere with your welding, it will certainly make you sick from the
terrible smell and toxic fumes. The paint should be taken off a few inches around the area to be welded so that
it will not begin to burn. If you still have some burning paint after welding, run a wire brush over the area and
the paint will come off easily.
All content copyright AtomicZombie® Extreme Machines. All rights reserved.
55
Diamond frame chopping
THE SEPARATED DIAMOND FRAME
The bicycle frame has now been separated into nine reusable components: the head tube, bottom bracket,
dropouts, brake studs, chain stays, seat stays, down tube, seat tube and top tube. Many of our bike, trike and
quadcycle plans make use of one or more of these components, and when you are experimenting with your
own designs, you can never have a large enough spare parts bin. It is rare that any bicycle frame would be so
damaged that it would not offer some salvageable material, so never pass up a good deal or free bike for parts.
Components such as the head tube, bottom bracket and brake studs are important building blocks when
creating any kind of human powered vehicle. If you have the time to cut up a few frames and clean up these
mission critical parts, then you will be able to quickly move your designs from the sketchpad or computer
drafting program right to the prototype stage in a hurry. Thanks for stopping by. We hope this basic tutorial has
“sparked” your interest in this great hobby!
All content copyright AtomicZombie® Extreme Machines. All rights reserved.
56
Diamond frame chopping
Free bike building tutorials:
Using a chain link tool
Basic fishmouth cutting
Arc welding
Cranks and pedals
Front derailleur
Cables
Coaster brakes
Free bike projects:
Kids electric trike
Choppers
Mountain bike tandem
Bicycle bearing basics
Lacing wheels
Frame chopping
Bike chains
Rear derailleur
Freewheel
Head tubes
Sidewinder stunt bike
Velomobile
World Record SkyCycle
Head tube bearings
Salvaging wheel parts
Bicycle autopsy
Rake and trail
Brakes
Gooseneck
Detachable tandem
Tall bikes
Spin Scooter
All content copyright AtomicZombie® Extreme Machines. All rights reserved.
Simple SWB recumbent
and more!
57